BODYTONE EVOT3 User manual

www.bodytone.eu · info@bodytone.eu · +34 968 20 53 83
CAUTION !
Read all precautions and
instructions in this manual
before using this equipment
USER’S MANUAL
EVOT3
Treadmill

Important Safety Instructions-------------------------------------------------------------------- 3
Before You Start-------------------------------------------------------------------------------------- 6
Main Parts List---------------------------------------------------------------------------------------- 7
Warning------------------------------------------------------------------------------------------------ 8
Using Method---------------------------------------------------------------------------------------- 9
Warm Up Exercises--------------------------------------------------------------------------------- 10
Power Requirements------------------------------------------------------------------------------ 11
Console Information------------------------------------------------------------------------------- 12
Moving Instructions------------------------------------------------------------------------------- 13
Parts List and Exploded View-------------------------------------------------------------------- 14
Console Panel Functions------------------------------------------------------------------------- 25
Electrical Connection----------------------------------------------------------------------------- 34
Belt Adjustment and Maintenance------------------------------------------------------------ 35
Maintenance Check List-------------------------------------------------------------------------- 37
Table of Contents
Read all precautions and instructions in this manual before using this
equipment.
! CAUTION

─ 3 ─
IMPORTANT SAFETY INSTRUCTIONS
When using an electrical appliance, basic precautions should always be followed,
including the following:
Read all instructions before using this Treadmill:
DANGER - To reduce the risk of electric shock:
1. Always unplug this appliance from the electrical outlet immediately after using
and before cleaning.
2. Do not reach for a plug that has fallen into water. Unplug immediately.
3. Do not use while bathing or in a shower.
4. Do not place or store the treadmill where it can fall or be pulled into a tub or
sink. Do not place in or drop into water or other liquid.
WARNING - Heart rate monitoring systems may be inaccurate. Over
exercising may result in serious injury or death. If you feel faint stop exercising
immediately.
WARNING - To reduce the risk of burns, fire, electric shock, or injury to
persons:
1. An appliance should never be left unattended when plugged in. Unplug from
outlet when not in use, and before putting on or taking off parts.
2. Do not operate under blanket or pillow. Excessive heating can occur and cause
fire, electric shock, or injury to users.
3. Close supervision is necessary when this treadmill is used by, on, or near
children, invalids, or disabled persons. Keep children away from extended back,
foot support (or other similar parts).
4. Use this treadmill only for its intended use as described in this manual. Do not
use attachments not recommended by the manufacturer.
5. Never operate this treadmill if it has a damaged cord or plug, if it is not working
properly, if it has been dropped or damaged, or dropped into water. Return the
Treadmill to a service center for examination and repair.
6. Do not carry this treadmill by supply cord or use cord as a handle.
7. Keep the cord away from heated surfaces.
8. Never operate the treadmill with the air openings blocked. Keep the air
openings free of lint, hair, and the like. Never operate on a soft surface such as
a bed or couch where the air openings may be blocked.
Important Safety Instructions

─ 4 ─
9. Never drop or insert any object into any opening.
10. Do not use outdoors.
11. Do not operate where aerosol (spray) products are being used or where
oxygen is being administered.
12. To disconnect, turn all controls to the off position, then remove plug from
outlet.
13. Connect this Treadmill to a properly grounded outlet only. See Grounding
Instructions.
14. The equipment is designed for commercial use.
15. The product should only be used on a level surface and is with 1x2 meters
space around the product.
SAVE THESE INSTRUCTIONS
GROUNDING INSTRUCTION
This product must be grounded. If it should malfunction or breakdown,
grounding provides a path of least resistance for electric current to reduce the
risk of electric shock. This product is equipped with a cord having an equipment-
grounding conductor and a grounding plug. The plug must be plugged into an
appropriate outlet that is properly installed and grounded in accordance with
all local codes and ordinances.
DANGER - Improper connection of the equipment-grounding conductor
can result in a risk of electric shock. Check with a qualified electrician or
serviceman if you are in doubt as to whether the product is properly grounded.
Do not modify the plug provided with the product - if it will not fit the outlet,
have a proper outlet installed by a qualified electrician.
This product is rated more than 16 amperes and is for use on a circuit having a
nominal rating of 230 volts and is factory-equipped with a specific electric cord
and plug to permit connection to a proper electric circuit. Make sure that the
product is connected to an outlet having the same configuration as the plug.
No adapter should be used with this product. If the product must be
reconnected for use on a different type of electric circuit, the reconnection
should be made by qualified service personnel.
Important Safety Instructions

─ 5 ─
CAUTION - Risk of Injury to Persons - To Avoid Injury, use extreme caution
when stepping onto or off of a moving belt. Read Instruction Manual Before
Using.
ATTENTION - Risque des blessures aux personnes - Pour éviter des
blessures, avec une extrême prudence en marchant sur ou hors d'une ceinture
mobile. Lisez le manuel d'instruction avant utilisation.
CAUTION - To Reduce The Risk Of Injury From Moving Parts - Unplug
Before Servicing.
ATTENTION - Pour réduire le risque de plessures des pièces mobiles -
Débranchez avant l'entretien.
WARNING - To Reduce the Risk of Electric Shock - Unplug Before Cleaning
or Servicing.
AVERTISSEMENT - Pour réduire le risque du choc électrique -
Uébranchez avant le nettoyage ou l'entretien.
Training Area and Free Area
906
2078
Training Area
Free Area
Specifications
Class: SB
Maximum User Weight: 150kg/ 330lbs
Product Total Surface: 2078*906 mm
Product Total Mass:
Noise around the treadmill using.
Noise emission under load is higher than
without load.
Important Safety Instructions

─ 6 ─
Remember to take the time to review owner's manuals before you start.
1. Before using this treadmill or starting any exercise program, consult your
physician and accompanied by specialized person. Adjust the speed not
over 8KMH.
2. Take the time to perform the stretching exercise provided to avoid injury.
3. If you have heart problems, and/ or the other diseases, do not use the
treadmill programs without receiving approval from your physician.
4. Stop exercising or call physician if you feel uncomfortable.
5. Do not leave children unsupervised and disabled person near or on the
treadmill. Should be accompanied by supervisors.
6. Running is oxygen exercise, recommended 30 minutes per time is
reasonable.
7. Wear comfortable, good-quality walking or running shoes and appropriate
clothing. Do not with fibre clothing to avoid electrical shock and damage
the treadmill.
8. Do note us the treadmill with bare feet, sandals, socks of stockings to
avoid any risk of injuries. Wear comfortable shoes or cotton socks.
9. Failure to follow these instructions will void the treadmill warranty.
10. If the supply cord is damaged, it must be replaced by the manufacturer or
its service agent or a similarly qualified person in order to avoid a hazard.
Before You Start

─ 7 ─
Main Parts List
Console
Console frame assy
Left upright
Frame cover
Right upright

─ 8 ─
Before using this treadmill or starting any exercise program, It is important to
review this manual and the following precautions.
1. Always unplug the treadmill after using to keep the life of treadmill and avoid any
risk of injuries.
2. In order to protecting your treadmill, spattering water on the machine must be
forbidden.
If the ground in user's house is not level, please adjust the adjust support
properly which is marked as A in the below figure to make the machine at a
leveled place. After adjusting tighten the hex nut by using the double-ended
spanner.
WARNING
Warning
Adjustment Machine
Power switch

Please read carefully and using follow the functions:
1. put the plug in the socket, turn on the switch.
2. grasp the handle firmly, stand on the treadmill.
3. Push red safety switch, tie the safety clip to your cloth, then start the treadmill
for exercise.
4. you can operate this device according as the manual set the lowest speed, first
then increase the speed gradually.
5. you should grasp the handle firmly by one hand, when you operating the
console.
6. Take care to use treadmill. Start from low speed handed to the uprights leaving
from treadmill after reducing speed and stopping all functions.
7. Haul the Safety clip linked with red wire on emergency.
8. Keep warm and relax your body after workout.
Exercise time and exercise frequency at a time:
Exercise time: 30minuates----Normal;
Exercise frequency: Warm your body by 10---20minutes under 8Kph,
then increase speed accordingly.
Safety Switch Introduction
When the treadmill is running, the user can press the stop switch directly if he
wants to stop it. Then the treadmill will stop slowly. If the user encounters
emergency when he using the treadmill he should haul the safety clip linked
with red wire, it will triger the safety switch to step.
Warning: When use above methed
to stop running, the running belt will
last running for several seconds before
completely stop.
─ 9 ─
Using Method
─ 10 ─
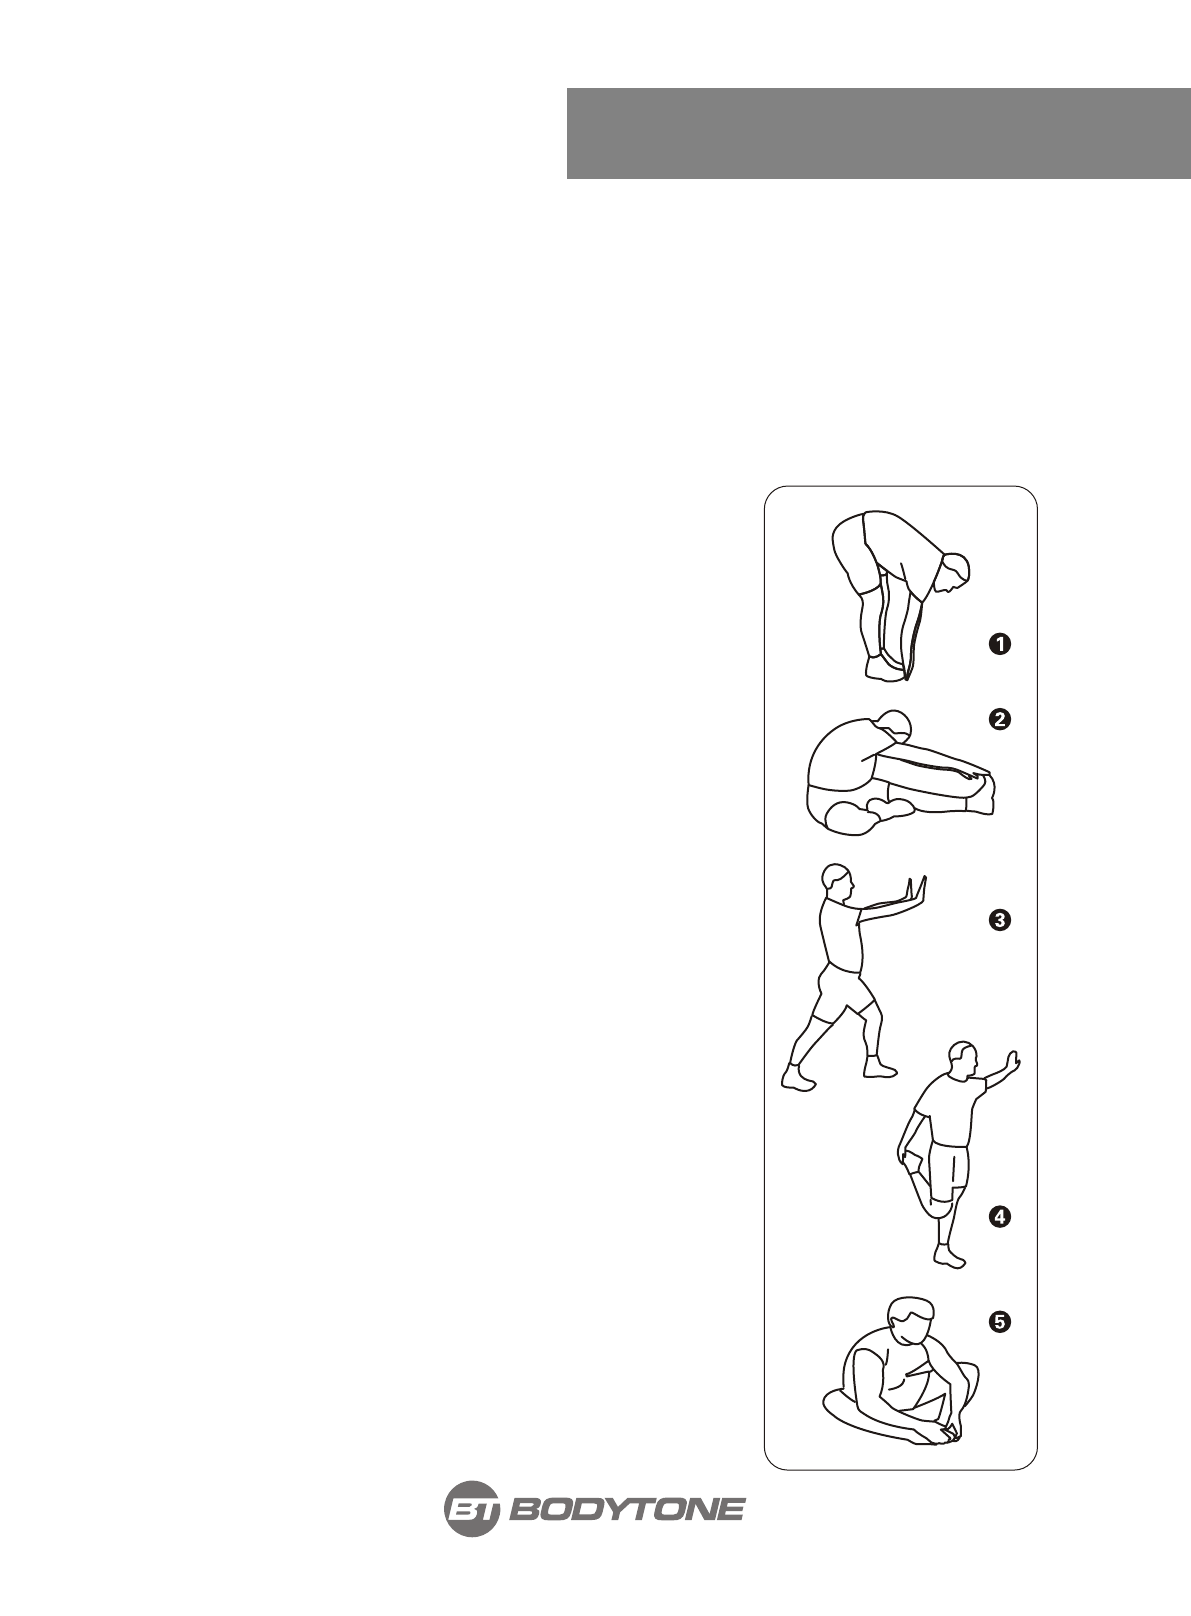
EXERCISE GUIDELINES
WARNING! Before beginning this or any exercise program, you should consult your
physician. This is especially important for individuals over the age of 35 or individuals
with pre-existing health problems.
Warming up prepares the body for the exercise by increasing circulation, supplying more
oxygen to the muscles and raising body temperature. Begin each workout with 5 to 10
minutes of stretching and light exercise to warm up. The photos on this page show
several forms of basic stretching you may perform before your workouts. In order to
achieve an adequate warm-up, perform each stretch three times.
TOE TOUCH STRETCH
Stand, bending your knees slightly and slowly bend forward
from your hips. Allow your back and shoulders to relax as you
reach down toward your toes as far as possible. Hold for 15
counts, then relax. This will stretch your hamstrings, back of
knees, and back.
HAMSTRING STRETCH
Sit with one leg extended. Bring the sole of the opposite foot
toward you and rest it against the inner thigh of your
extended leg. Reach toward your toes as far as possible. Hold
for 15 counts, then relax. This will stretch your hamstrings,
lower back, and groin.
CALF/ACHILLES STRETCH
With one leg in front of the other, reach forward and place
your hands against a wall. Keep your back leg straight and
your back foot flat on the floor. Bend your front leg, lean
forward and move your hips toward the wall. Hold for 15
counts, then relax. To cause further stretching of the Achilles
tendon, bend your back leg as well. This will stretch your
calves, Achilles tendons, and ankles.
QUADRICEPS STRETCH
With one hand against a wall for balance, reach back and
grasp one foot with your other hand. Bring your heel as close
to your buttocks as possible. Hold for 15 counts, then relax.
This will stretch your quadriceps and hip muscles.
INNER THIGH STRETCH
Sit with the soles of your feet together and your knees
outward. Pull your feet toward your groin area as far as
possible. Hold for 15 counts, then relax. This will stretch your
quadriceps and hip muscles.
Warm Up Exercises

IMPROPER CONNECTION OF THE EQUIPMENT GROUNDING CONNECTOR
CAN RESULT IN A RISK OF AN ELECTRIC SHOCK. CHECK WITH A QUALIFIED
ELECTRICIAN OR SERVICE MAN IF YOU ARE IN DOUBT AS TO WHETHER THE
PRODUCT IS PROPERLY GROUNDED. DO NOT MODIFY THE PLUG PROVIDED
WITH THE PRODUCT. IF PLUG WILL NOT FIT THE OUTLET, HAVE A PROPER
OUTLET INSTALLED BY A QUALIFIED ELECTRICIAN.
This treadmill can be seriously damaged by sudden voltage changes in your
home's electrical power. Voltage spikes, surges, and noise interference can
result from weather conditions or from other appliances being turned on or off.
This treadmill must be grounded to reduce the risk of electrical shock.
Grounding provides a path of least resistance for electric current should the
treadmill malfunction. Always plug the power cord into an appropriate outlet
that is properly installed and grounded in accordance with all local codes and
ordinances.
─ 11 ─
Power Requirements
─ 12 ─
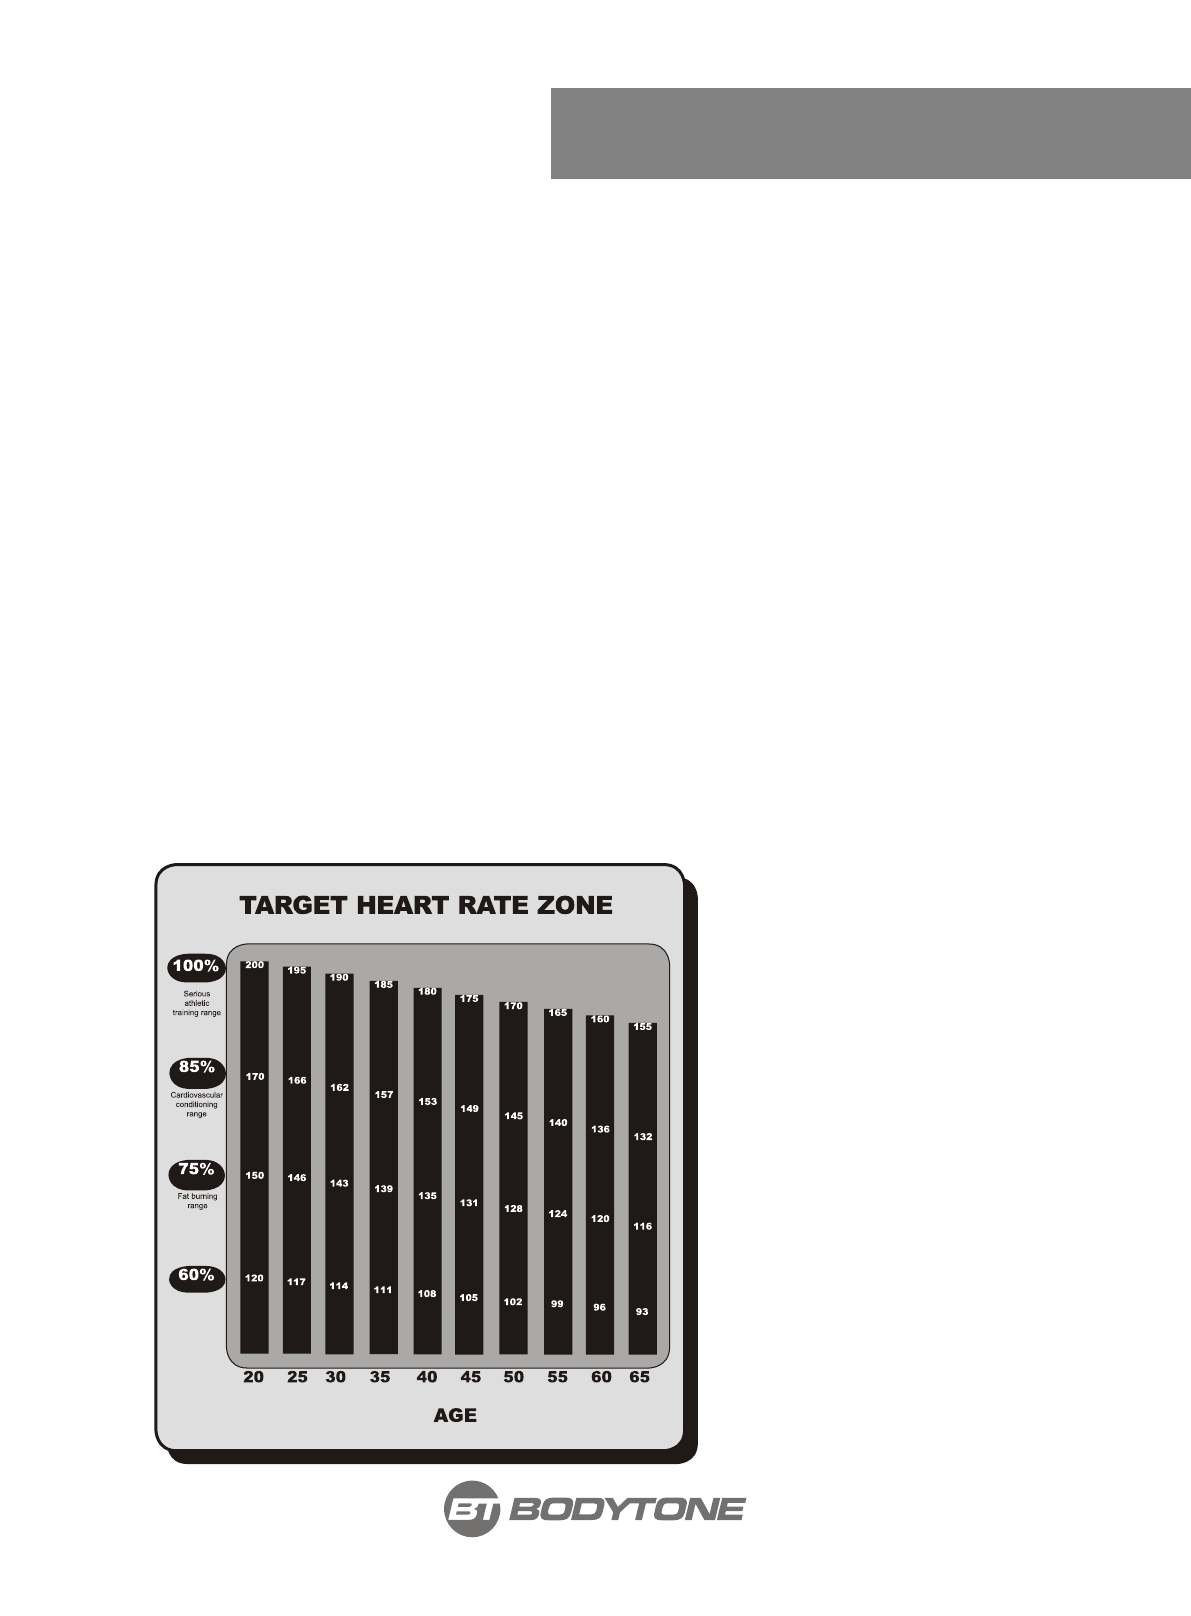
Before beginning your workout, check your normal resting heart rate. Place your
fingers lightly against your neck, or against your wrist over the main artery. After
finding your pulse, count the number of beats in 10 seconds. Multiply the number
of beats by six to determine your pulse rate per minute. We recommend taking your
heart rate at these times; at rest, after warming up, during your workout and two
minutes into your cool down, to accurately track your progress as it relates to better
fitness.
During your first several months of exercising, the AHA recommends aiming for the
lower part of the target heart rate zone-60%, then gradually pro-gressing up to 75%.
According to the AHA, exercising above 75% of your maximum heart rate may be
too strenuous unless you are in top physical condition. Exercising below 60% of
your maximum will result in minimal cardiovascular conditioning.
Check your pulse recovery rate – If your pulse is over 100 bpm five minutes after you
stop exercising, or if it's higher than normal the morning after exercising, your
exertion may have been too strenuous for your current fitness level. Rest and reduce
the intensity next time.
Fitness Safety The target
heart rate chart indicates
average rate zones for
different ages. A variety of
different factors (including
medication, emotional
state, temperature and
other conditions) can
affect the target heart rate
zone that is best for you.
Your physician or health
care professional can help
you determine the exercise
intensity that is approp-
riate for your age and
condition.
Console Information

─ 13 ─
Caution! To avoid the risk of injury, never attempt to move the treadmill while it is
operating. To reduce the possibility of injury while lifting, bend your legs and keep
your back straight. As you raise the treadmill, lift using your legs, not your back. In
order to raise or lower the treadmill safely, you must be able to lift 220 pounds
(100kg). It is suggested you always use the aid of a second person when moving the
treadmill.
Lift the treadmill back then move it to the desired location. Carefully put down it on
the position. Do not attempt to move the treadmill over an uneven or rough surface.
Note: The treadmill's angle can not exceed 30 degrees when lifted the treadmill back.
Moving Instructions

─ 14 ─
Installation
instructions
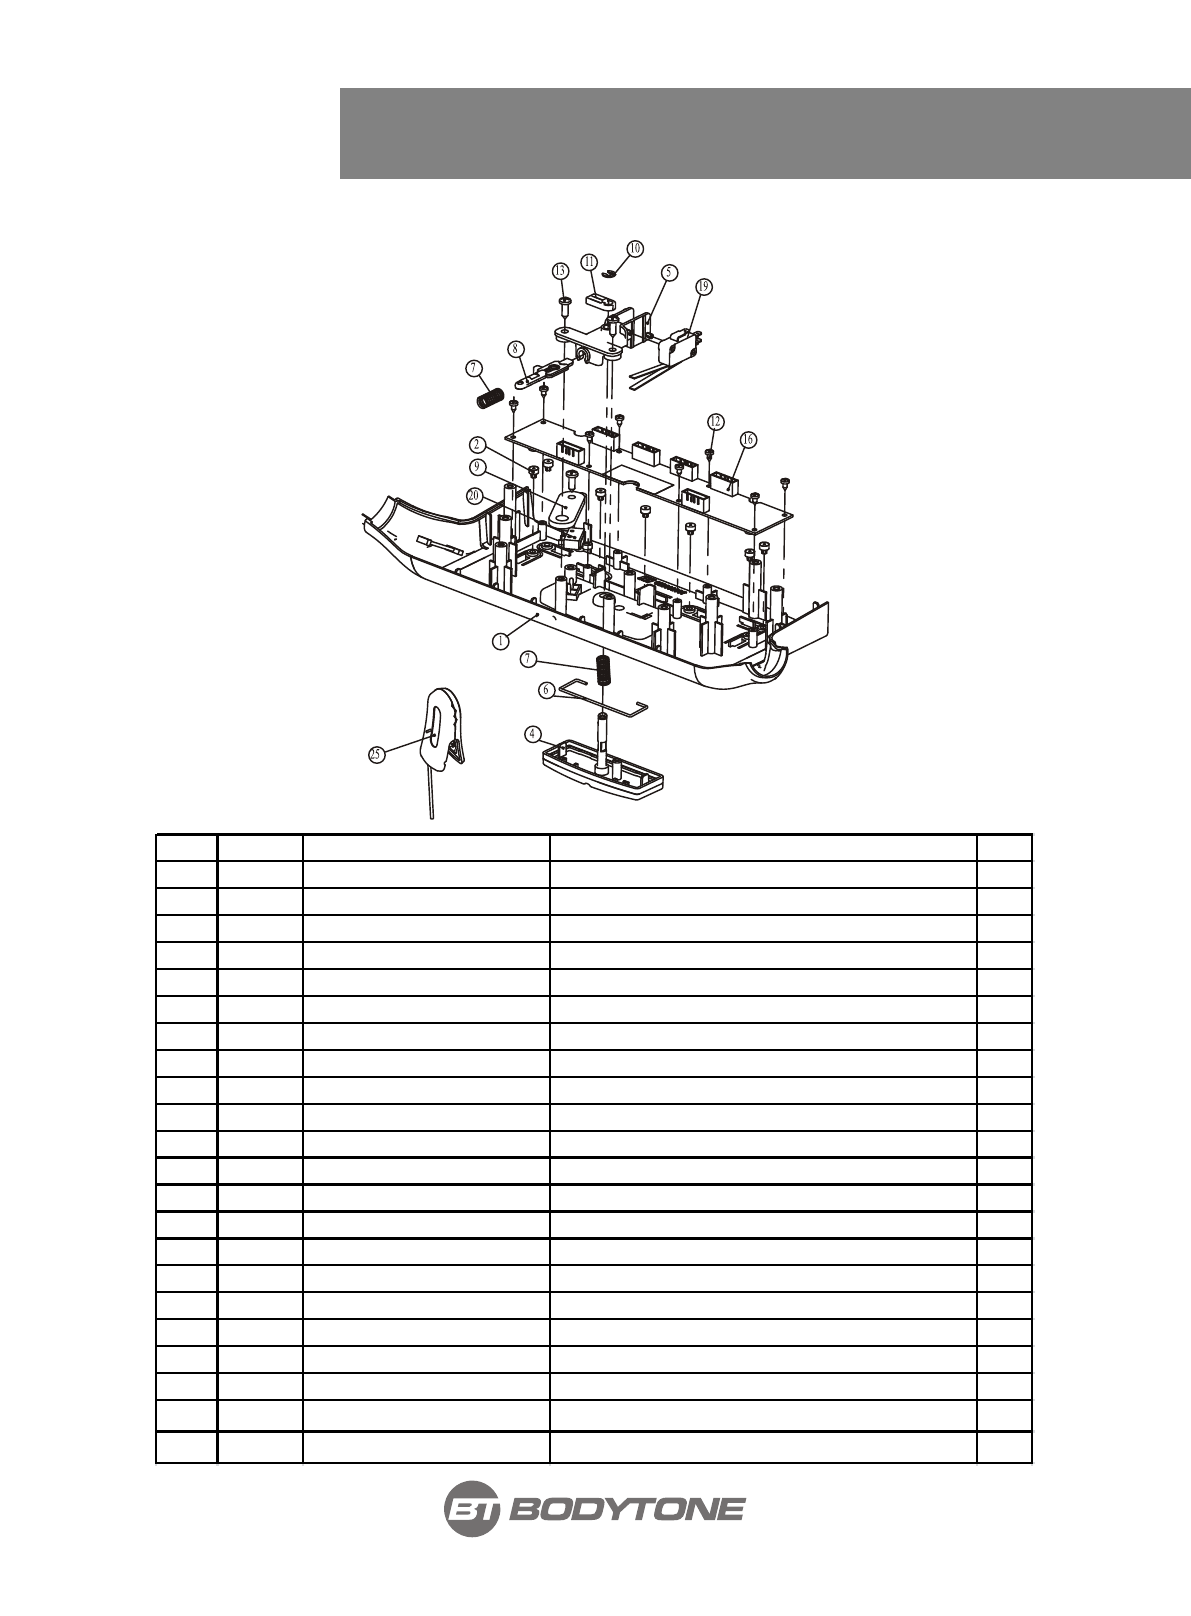
Exploded View and Parts List
Item No. Grade No. Part No. Description QTY
1 1 EVOT3-01ASSY Console Frame assembly 1
2 2 EVOT3DZBASSY Console 1
4 4 EVOT30400 Left upright 1
5 5 EVOT30500 Right upright 1
6 6 EVOT3-2205ASSY General assembly 1
7 7 AC2970C1100 The power cord fixed plate 1
8 8 A01-6 The power cord 1
9 9 RT7006400PBC After the electronic watch shield 1
10 10 EVOT32000 Chassis left shield 1
11 11 EVOT32100 Chassis shield right 1
13 12.1 PNLJCM8*20N19 Allen pan head screws and sawtooth lock washer assembly 22
14 12.2 GB818M5*15DS2 Phillip Screw M5*15 6
15 12.3 GB818M4*12DS20 Phillip Screw M4*12 2
16 12.7 CNLM8*15DHS20NL Inner hexagon countersunk head screwsM8*15 2
17 17 EVOT30300 Under the connection plate 1
18 2.13 L600JD-SMR-XHB-9 Electronic watch online segment 1
19 1.32 L800JD-SMY-SMA-9 Electronic watch line in the middle 1
20 6.1.46 L1900JDP-SMY-XHB-9 Console Wire Down 1
21 2.11 L300XHB-SMY-11 Central Line 1 1
22 1.3.15 L600XHB-SMA-11 Central Line 2 1
─ 15 ─
A zone up cover
assembly
Exploded View and Parts List
Item No. Grade No. Part No. Description QTY
1 1.3.1 GT3001007 Control on the shell 1
2 1.3.2 ECT74800 The key pad 7
3 1.3.3 EVOT3MM02 Control the mask 1
4 1.3.4 RT7005600 Stop switch and key components 1
5 1.3.5 RT7005900 Limit switch fixed plate 1
6 1.3.6 PT3002400 Reset switch spring bracket 1
7 1.3.7 PT3002500 Spring 1 2
8 1.3.8 GT3003600 Pull on the rope shaft 1
9 1.3.9 GT3003100 Switch panel 1
10 1.3.10 GB8964FH12 Open ring 1
11 1.3.11 RT7006000 Urgent stop switch panel 1
12 1.3.12 GB845ST2.9*6.5DS Phillip Screw ST2.9*6.5 8
13 1.3.13 GB845ST4.2*13DS Phillip Screw ST4.2*13 4
15 1.3.15 L600XHB-SMA-11 Central Line 2 1
16 1.3.16 B195-EVOT3 Control by the keypad 1
17 1.3.17 L350AMP175022-JD-1 Ground wire 1
18 1.3.18 L600ST0-XHB-4 Hold the line 1
19 1.3.19 F10 Emergency switch 1
20 1.3.20 F85 Emergency switch components 1
23 1.3.23 DQCH01-SBD The circular 3
24 1.3.24 DQCH02-SBD The circular 2
25 1.3.25 STDP4012 Safety clip combination 1

─ 16 ─
Big watch case assembly
Exploded View and Parts List
Item No. Grade No. Part No. Description QTY
1 1.1 GT3001008 Shell under control 1
2 1.2 EVOT30200 Header frame 1
3 1.3 EVOT3-02ASSY Control the shell assembly 1
4 1.4 GT3001004 Header back cover 1
5 1.5 GT3003001 The left arm 1
6 1.6 GT3003002 The left armrest garnish is 1 1
7 1.7 GT3003003 The left armrest garnish is 2 1
8 1.8 GT3004001 Right arm 1
9 1.9 GT3004002 Right armrest garnish is 1 1
10 1.10 GT3004003 Right armrest garnish is 2 1
12 1.12 ECT73800PBC Hand on heart 2
13 1.13 ECT73900PBC Hand heart under cover 2
14 1.14 ECT74600 Plastic quick nut 4
15 1.15 GT3001003 Big case 1
16 1.16 GT3001009 Header left to fill plate 1
17 1.17 GT3001010 Header right partner 1
19 1.19 EVOT32200 Large electronic watch case cover 1
20 1.20 GT3009010 Maintenance HouGaiBan 1
21 1.21 AC32705800 Quick nut 2
22 1.22 CNLM6*25DHS20NL Resistance to fall within the hexagon countersunk head screws 2
24 1.24 GB17880.3M5*13DS17 Small countersunk hex rivet nuts 2
25 1.25 GB845ST4.2*13DHS Phillip Screw ST4.2*13 54
26 1.26 GB818M4*10DS2 Phillip Screw M4*10 8
27 1.27 GB862.24DS12 Serrated lock washers Φ4 2
28 1.28 DP8650DQ02 2
29 1.29 GB6560M4*8DSG Phillip Screw M4*8 2
30 1.30 GB846ST2.9*19DS 4
31 1.31 GB845ST2.9*25DS Phillip Screw ST2.9*25 4
32 1.32 L800JD-SMY-SMA-9 Electronic watch line in the middle 1
33 1.33 DQXTJS01 Chest heartbeat receiver 1
34 1.34 AC32709906 Receiver cover 1

─ 17 ─
Big watch case assembly
Exploded View and Parts List

─ 18 ─
Console
components
Exploded View and Parts List
Item No. Grade No. Part No. Description QTY
1 2.1 EVOE20500 Electronic watch fixed frame 1
2 2.2 EVOE2DZB01 Electronic watch on shell 1
3 2.3 GB845ST4.2*16DHS Cross trough pan head self-drilling screwST4.2*16 10
4 2.4 EVOE2DZB02 Under the electronic watch shell 1
5 2.5 GB862.24DS12 External serrated lock washer 1
7 2.7 PR3003000 PCB shores 4
8 2.8 EVOT2DZB01ASSY PCB bracket assy 1
9 2.9 RU700DZB03PBC Magazine rack 1
10 2.10 GB818M4*10DHS2 The trough pan head screwsM4*10 4
11 2.11 L300XHB-SMY-11 Central Line 1 1
12 2.12 ECU7DZB06 Electronic atlas plug 1
13 2.13 L600JD-SMR-XHB-9 Electronic watch online segment 1
14 2.14 EVOT2MM01ES Electronic watch mask 1
15 2.15 BODYTONETZ180 Shield LOGO stickers crystal 2
16 2.16 DQCH02-SBD The circular 2
─ 19 ─
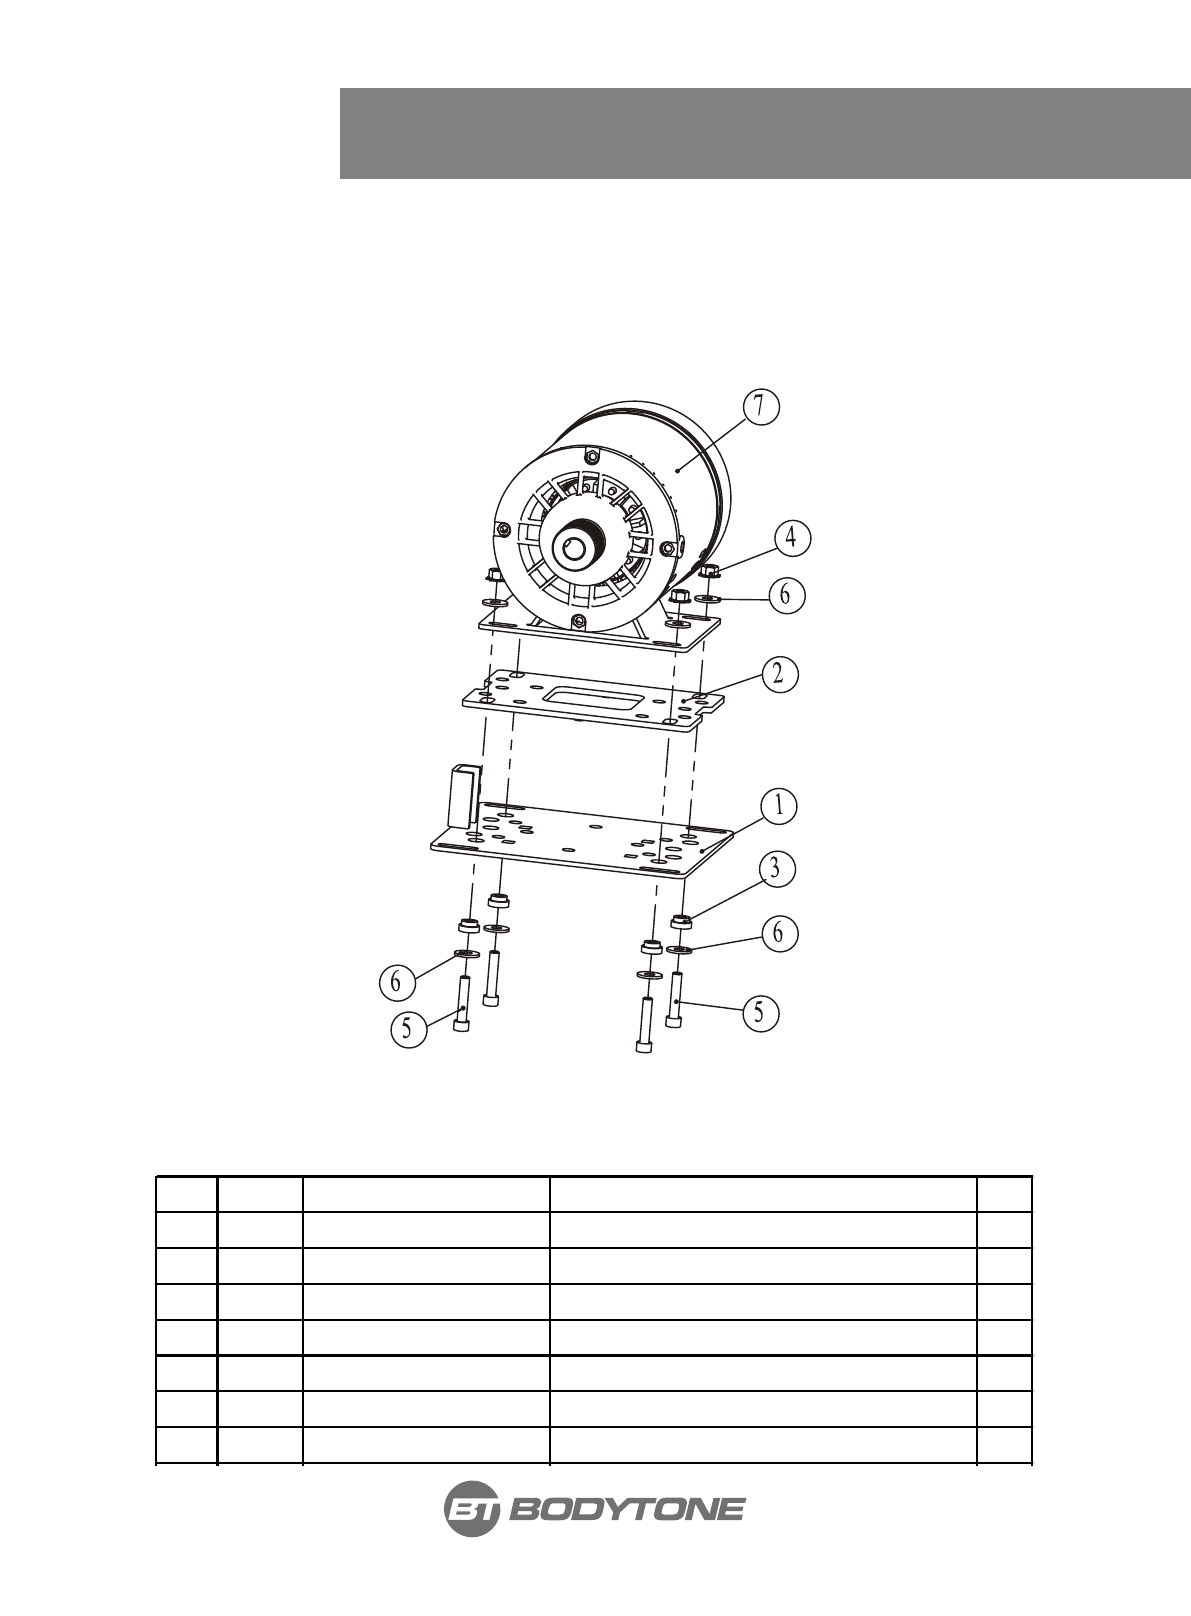
The motor assembly
Exploded View and Parts List
Item No. Grade No. Part No. Description QTY
1 6.1.36.1 AC29701300 Motor plate parts 1
2 6.1.36.2 AC29706700 The motor insulation pad 1
3 6.1.36.3 STDP3600 Motor never burning set 4
4 6.1.36.4 STDP6800 Hexagonal nut K 4
5 6.1.36.5 GB70M8*40*40DHS2 Hex cylinder head screw 4
6 6.1.36.6 DQ8DHS2A The gasket 8
7 6.1.36.7 D40-42 Motor 1

─ 20 ─
The mast assembly
Exploded View and Parts List
Item No. Grade No. Part No. Description QTY
1 6.2.2 AC2970H0700 The mast assembly 1
2 6.2.2 DC29002200 Roller 2
3 6.2.3 GB894.125FH12 Shaft with elastic ring 2
4 6.2.4 DQ8DS2B The gasket 2
5 6.2.5 GB70M8*15DS2 Hex cylinder head screw 2
PCB bracket assy
Item No. Grade No. Part No. Description QTY
1 2.8.1 EVOT25100 The LED circuit board frame 1
2 2.8.2 B106-B Electronic watch board 1
3 2.8.3 GB845ST2.9*9.5DS Phillip Screw ST2.9*9.5 23
4 2.8.4 ECT74800 The key pad 21
Other BODYTONE Treadmill manuals

Popular Treadmill manuals by other brands


Smooth Fitness
Smooth Fitness EVO 3i user manual

NordicTrack
NordicTrack NETL81810.0 user manual

Schwinn
Schwinn 830/Journey 8.0 Assembly manual / owner's manual

Keys Fitness
Keys Fitness HealthTrainer HT-740T owner's manual

Spirit
Spirit XT8 Service manual

NordicTrack
NordicTrack T 14.0 Treadmill Manuel de l'utilisateur