BOIFUN BABY 25 User manual
BABY 2S
2K Smart Video Monitor


FCC Statement
This equipment has been tested and found to comply with the limits for a Class B digital device.
pursuant to part 15 of the FCC rules. These limits are designed to provide reasonable protection
against harmful interference in a residential installation.
This equipment generates, uses and can radiate radio frequency energy and, if not installed and
used in accordance with the instructions, may cause harmful interference to radio communications.
However, there is no guarantee that interference will not occur in
a particular installation. If this equipment does cause harmful interference to radio or television
reception, which can be determined by turning the equipment o and on, the user is encouraged to
try to correct the interference by one or more of the following measures:
• Reorient or relocate the receiving antenna.
• Increase the separation between the equipment and receiver.
• Connect the equipment into an outlet on a circuit dierent from that to which the receiver is
connected.
• Consult the dealer or an experienced radio/TV technician for help.
Responsible for compliance could void the user's authority to operate this equipment.Example-use
only shielded interface cables when connecting to computer or peripheral devices)
Any Changes or modications not expressly approved by the party responsible for compliancecould
void the user's authority to operate the equipment.
This equipment complies with Part 15 of the FCC Rules. Operation is subject to the following two
conditions:
• This device may not cause harmful interference, and,
• This device must accept any interference received, including interference that may causeundesired
operation.
FCC Radiation Exposure Statement:
The equipment complies with FCC Radiation exposure limits set forth for uncontrolled
environmentThis equipment should be installed and operated with minimum distance 20cm between
theradiator and your body.
ECCID: 2AG7C-BABY1M(Monitor)
FCCID:2AG7C-BABY2T(Camera)


CONTENTS
English
Français
Deutsch
Italiano
Español
01~09
10~19
20~29
30~39
40~49

3
YEARS
WARRANTY
Send us Your Order Number via Email
3 YEARS WARRANTY?
HOW TO ACTIVATE

After-sale Support..........................................................................................2
Description ......................................................................................................... 3
APP Installation ................................................................................................4
Connect the Camera to the App..............................................................4
Connect the Camera to the Monitor......................................................5
General Setting ................................................................................................6
FAQ.........................................................................................................................8
English

2EN
After-sale Support
Dear friends
Thank you very much for supporting Boifun!
Receiving your message, we will provide a fast solution in 24 hours.
Please do not worry. Actually, many problems can be easily solved by setting. lf you have any
questions or ambiquities during usinq. Please feel free to contact us. We will try to nd a good
solution with our professional product engineers.
Warm Regards
Boifun Service Team
EN: Ocial website
3EN
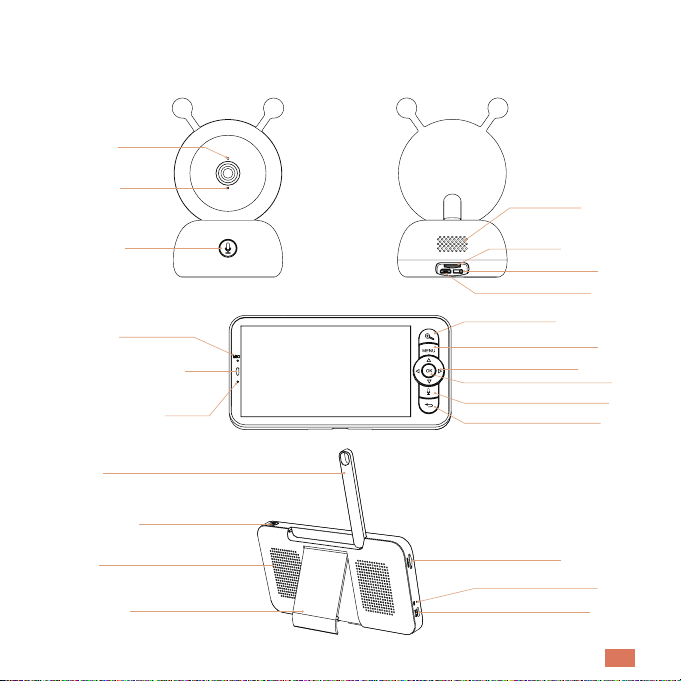
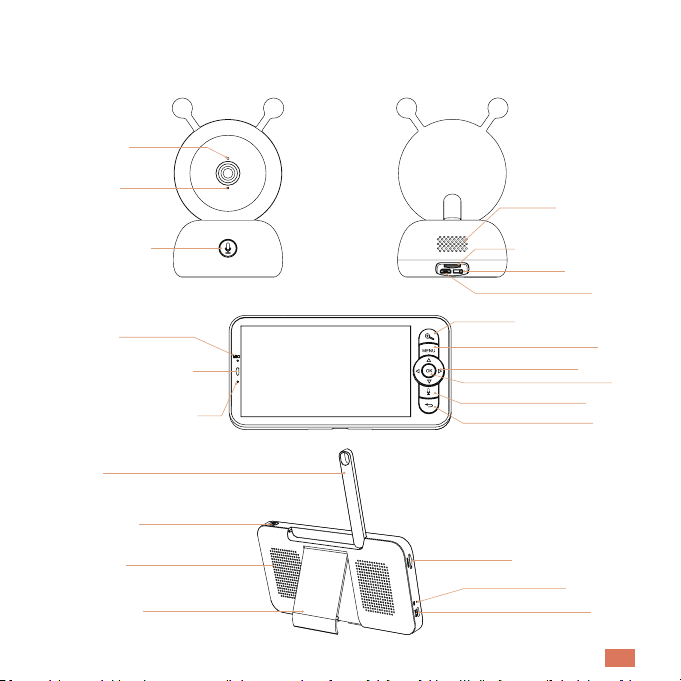
Description
Status light
Speaker
Microphone
SD card slot
Call button &
Pair button Reset
Microphone
Type C
Status light of charging
Zoom in/out
Status light of using
Menu
Direction
OK
Call
Back
Antenna
SD card slot
ON/0FF button
Reset
Speaker
Type C
Screen holder

4EN
APP Installation
Connect the Camera to the App
BoifunCam is available for both iOS and Android OS. Search the name "BoifunCam" in App Store or
Google Play or scan the OR-Code to download the App.
The camera can be connected both to the monitor and the App. Generally, it is connected to the
monitor by default.
Follow the steps below to connect the camera to the App:
1. Make sure the Wi-Fi network is a 2.4 GHz network, as the camera doesn't support 5 GHz Wi-Fi.
2. Download the BoifunCam App on your phone. Register a new account to log in or log in directlu.
3. Press the Reset button for ve seconds until you hear the "BOOGU" beep, which means the
camera has been reset, after 10-20 seconds, you will hear another beep and the red light of the
camera blinks slowly.
4. Follow the step instructions on your smart phone to add the cam, and scan the OR code with your
camera.
NOTE:
A very small number of mobile phone models may not be compatible with BoifunCam. We
apologize for any inconvenience this may cause. lf you encounter this situation, could you
optimize the software in time, and we have prepared a backup software "CloudEdge" for you,
which you can download and use from the Google Store or Apple Store. We would greatly
appreciate your understanding and kindness!
Download the APP

5EN
Connect the Camera to the Monitor
Power on the camera and the monitor, and then the camera will connect to the monitor
automaticallu.
Note: lf the connection to each other is not successful the rst time, press and hold the reset button
on the back of the camera and reconnect the monitor after the second beep of the camera. The
connection is distance limited, so make the distance between the camera and the monitor is no
more than 1000ft.
Disconnect the camera to the monitor:
1. Press Menu button on the display screen, and select > Camera.
2. Long press the OK button on the display screen to release the binding.
Reconnect the camera to the monitor:
1. Press the Menu botton on the display screen, and select > Camera.
2. Long press the camera pairing button until you hear the prompt tone.
3. Press the OK button on the display screen to start pairing.
on-one customer service guidance.

6EN
General Setting
• Set up volume:
1. Press Menu button on the display screen, and select
2. Press UP and DOWN direction buttons to adjust volume.
• Set up brightness:
1. Press the Menu button on the display screen, select
2. Press UP and DOWN direction buttons to adjiust brightness.
• Set up time:
1. Press the Menu button on the display screen, and select > Date and Time.
2. Press direction buttons to change date, time and time displaying mode.
• Set up language:
1. Press the Menu button on the display screen, and select > Language.
2. Select the language you need.
• Set up sleep mode:
You can set up sleep mode to increase standby time.
1. Press the Menu button on the display screen, and select > Sleep mode.
2. Select sleep mode as 1 minute, 5 minutes, 10 minutes, 30 min utes, 60 minutes or o.
• Setting camera status indicator:
1. Press the Menu button on the display screen, select
2. Press the left and right arrow keys to select on or o.
CONNECTING TWO CAMERAS TO THE DISPLAY:
Follow step above to connect the two cameras in turn. Two screens will appear on the monitor.
Press the ( )for camera selection, the icon in the upper left corner represents the currently
selected camera, then you can remotely control the selected camera under split-screen view.
Press the OK key to enter the selected camera in full-screen view.
Press the back key to return to the split-screen view.
7EN
• SD card:
1. Press the Menu button on the display screen, and select > SD card. Then you can view the total
capacity and remaining capacity of your SD card.
2. (Optional) You can format the SD card as you needed, but make sure that the important data is
backed up.
NOTE:
This product does not support hot-swapping.
Please insert the SD card before power on or unplug it after po wer o.
• Upgrade:
Make sure your camera is connected to a 2.4 GHz Wi-Fi.
You can upgrade your camera when the upgrade alarm appears. Or Press Menu button on the
display screen, and select > Device information to check whether there is a upgrade.
• Low battery alarm:
When the camera is low on battery, the low battery alarm will appear on the display screen. Please
charge the display as soon as possible.
Motion Tracking & Alarm Area
1. Motion Tracking: Open BoifunCam app, click your device, click the pinion icon in the upper right
corner, select Motion Tracking and open it.
2. Alarm Area: Open BoifunCam app, click your device, click the pinion icon in the upper right corner,
select Alarm Management>Motion Detection>Alarm Area.
Onvif Settings:
Open BoifunCam app, click your device, click the pinion icon in the upper right corner, select Onvif
Setting, you need to set password to enable this function.
If you need to learn more about the functions of the baby monitor (Add Device, Play Music, Feeding
Reminder, Humiture Detection, Safety Protection, etc.), please scan the OR code of the electronic
manual on this quide to view the details.

8EN
FAQ
Q: The monitor cannot be previewed properly?
A: Check whether the monitor has connected to the camera. lf not, pair the camera and the monitor
rstlu.
Q: Cannot nd the pairing button?
A: The pairing button is the call button of the camera. Long press the button for 3 seconds. and
follow the step instructions of the display. (To enter the pairing interface of the display, press the
Menu button on the display screen, and select > Camera.)
Q: What if the monitor screen is stuck and it doesn't work while pressing any buttons?
A: Press the reset button of your monitor with the pin, and then long press the power button of your
monitor to restart it.
Q: Why l can't get the notications with my cell phone App when I connect the camera to the
monitor?
A: Please conrm that the App has been running on the phone, and the relevant reminder function
has been opened; Message notication and authority con rmation in the mobile phone system has
been opened.
Q: How can l add devices or congure my network?
A: The camera can be connected to both the monitor and the application.
Generally, it connects to the monitor by default.
Q: The sound and cry detection function does not work.
A: The sound detection interval is 1 minute, after the sound triggers the alarm, the interval is 1 minute
again to avoid freauent alarms. The cry detection function can detect most babies crying. This
function uses a sound ltering algorithm, so some crying may not trigger the "cry detection"
function;
Please follow the steps below to connect the camera to the application.
1. Make sure the Wi-Fi network is a 2.4GHz network, as the camera does not support 5GHz Wi-Fi.
2. Download the appropriate application on your phone. Register a new account to sign in or sign in
indirectly.
3. Press the reset button to reboot the camera until the red status light ashes slowly (you must
9EN
connect the camera to the app within 2 minutes or you must reboot the camera again).
4. Follow the step-by-step instructions on your smartphone to add the screen and scan the OR code
with the camera.
If you encounter any other problems, please send your order number and problem to
hours.

Envoyez-nous votre numéro de commande par e-mail
LA GARANTIE 3 ANS?
COMMENT ACTIVER
3
ANS
GARANTIE

Assistance Après-vente...............................................................................12
La Description..................................................................................................13
Installation de L'application..................................................................... 14
Connectez la Caméra à L'application .................................................14
Connectez la Caméra au Moniteur....................................................... 15
Réglage Général.............................................................................................16
FAQ....................................................................................................................... 18
Français
12FR
Assistance Après-vente
Chers amis
Merci beaucoup de soutenir Boifun !
Si vous rencontrez des problèmes, veuillez envoyer votre numéro de commande et le problème à
heures.
S'il vous plaît ne vous inquiétez pas. En fait, de nombreux problèmes peuvent être facilement résolus
en réglant.
Si vous avez des questions ou des ambiguïtés lors de l'utilisation. N'hésitez pas à nous contacter.
Nous essaierons de trouver une bonne solution avec nos ingénieurs produits professionnels.
Meilleurs Voeux
Équipe de Service BOIFUN
FR: Site ociel
13 FR
La Description
Voyant d'état
Conférencier
Microphone
Fente pour carte SD
Bouton d'appel &
Bouton de jumelage Réinitialiser
Microphone
Type C
Voyant d'état de charge
Zoom avant/arrière
Voyant d'état d'utilisation
Menu
Direction
OK
Appeler
Retour
Antenne
Fente pour carte SD
bouton marche/arrêt
Réinitialiser
Conférencier
Type C
Support d'écran
14FR
Installation de L'application
Connectez la Caméra à L'application
BoifunCam est disponible pour les systèmes d'exploitation iOS et Android. Recherchez le nom
BoifunCam dans l'App Store ou Google Play ou scannez le code QR pour télécharger l'application.
La caméra peut être connectée à la fois au moniteur et à l'application. Généralement, elle est
connectée au moniteur par défaut.
Suivez les étapes ci-dessous pour connecter la caméra à l'application:
1. Assurez-vous que le réseau Wi-Fi est un réseau 2,4 GHz, car la caméra ne prend pas en charge le
Wi-Fi 5 GHz.
2. Téléchargez l'application BoifunCam sur votre téléphone. Enregistrez un nouveau compte pour
vous connecter ou connectez-vous directement.
3. Appuyez sur le bouton de réinitialisation pendant cinq secondes jusqu'à ce que vous entendiez
le "BOOGU" bip, ce qui signie que la caméra a été ré initialisée, après 10 à 20 secondes, vous
entendrez un autre bip et le voyant rouge de la caméra clignote lentement.
4. Suivez les instructions sur votre smartphone pour ajouter la caméra et scannez le code QR avec
votre appareil photo.
Remarque:
Un nombre très restreint de modèles de téléphone portable peut ne pas être compatible avec
BoifunCam. Nous sommes désolés pour tout inconvénient que cela pourrait causer. Si vous
rencontrez cette situation, pourriez-vous nous envoyer le modèle de votre téléphone par email ?
préparé un logiciel de sauvegarde "CloudEdge" pour vous, que vous pouvez télécharger et
utiliser depuis le Google Store ou l'Apple Store. Nous vous serions extrêmement reconnaissants
pour votre compréhension et votre bienveillance !
Télécharger l'application
Table of contents
Languages:


