Bojungle Genius B750500 User manual

1
B-Genius Reversible Stroller Light Grey–Dark Grey
(Manual – Handleiding – Mode d’emploi)
B750500 – B750510
English , Nederlands , Français
Made In China – Bo Jungle - Vox Populi BVBA – Brambroek 23b - -9500 GERAARDSBERGEN– BELGIUM
www.bojungle.eu – info@bojungle.eu – Tel: +32 54 240 331 – Fax: +32 9 270 01 80
IMPORTANT !
PLEASE READ CAREFULLY & KEEP FOR FUTURE REFERENCE
This product is designed to comply with Europe standard EN 1888:2012.
IMPORTANT !
VEUILLEZ LIRE ATTENTIVEMENT ET CONSERVER POUR RÉFÉRENCE ULTÉRIEURE
Ce produit est conçu pour être conforme à la norme européenne EN 1888: 2012.
BELANGRIJK !
LEES AANDACHTIG DOOR & BEWAAR VOOR TOEKOMSTIG GEBRUIK
Dit product is ontworpen om te voldoen aan de Europese norm EN 1888:2012.

2
WARNING – AVERTISSEMENT- WAARSCHUWING
• WARNING: Never leave your child unattended.
• WARNING: Ensure that all the locking devices are engaged before use.
• WARNING: To avoid injury ensure that your child is kept away when unfolding and folding
this product.
• WARNING: Do not let your child play with this product.
• WARNING: Check that the attachment devices of the reversible backrest and newborn nest are
correctly engaged before use.
• WARNING: Always use the restraint system.
• WARNING: Always use the crotch strap of the harness in combination with the waist and
shoulder belt.
• WARNING: This product is not suitable for running or skating.
• This pushchair is intended for children from birth up to a maximum user weight of 40 lbs.
• The maximum authorized load for the shopping basket is 9.9 lbs.
• This stroller is suitable for transporting only one child at a time.
• Do not use any accessories other than those approved or provided by BABYELLE.
• Do not use any spare parts other than those provided by BABYELLE.
• Hanging items or loads to the handlebar and/or on the back of the backrest and/or on the sides of
the stroller, might impair its stability.
• It is recommended to engage the parking brake when installing or removing the child.
• When folded, make sure the stroller is stored in a place where it does not risk to fall over a child.
• Before ascending or descending escalators or stairs, remove child from seat and fold the stroller.
• Keep the stroller away from open re, heaters and other sources of strong heat.
• It is recommended to maintain and clean moving parts periodically in order to check correct
functioning.
• Periodically make sure that locking mechanisms function properly and that they did not su-er any
damage, e.g following a shock.
• ITEM NO.: B/S S-352
• The Genius stroller has been approved in accordance with EN 1888: 2012.
• AVERTISSEMENT: ne laissez jamais votre enfant sans surveillance.
• AVERTISSEMENT: assurez-vous que tous les dispositifs de verrouillage sont engagés avant utilisation.
• AVERTISSEMENT: pour éviter les blessures, assurez-vous que votre enfant est tenu éloigné lorsque vous dépliez et pliez ce
produit.
• AVERTISSEMENT: ne laissez pas votre enfant jouer avec ce produit.
• AVERTISSEMENT: vérifiez que les dispositifs de fixation du dossier réversible et du siège bébé sont correctement engagés
avant utilisation.
• AVERTISSEMENT: utilisez toujours le système de retenue.
• AVERTISSEMENT: utilisez toujours la sangle d'entrejambe du harnais en combinaison avec la ceinture et les bretelles.
• AVERTISSEMENT : Ce produit ne convient pas pour la course ou le patinage.
• Cette poussette est destinée aux enfants dès la naissance jusqu'à un poids maximum de 15kg (40 lb).
• La charge maximale autorisée pour le panier de courses est de 4,5kg ( 9,9 lb).
• Cette poussette est conçue pour transporter un seul enfant à la fois.
• N'utilisez aucun accessoire autre que ceux approuvés ou fournis par BABYELLE.
• N'utilisez aucune pièce de rechange autre que celles fournies par BABYELLE.
• La suspension d'objets ou de charges sur la poignée et / ou à l'arrière du dossier et / ou sur les côtés de la poussette peut nuire
à sa stabilité.
• Il est recommandé de serrer le frein de stationnement lorsque vous installez ou retirez l'enfant de la poussette.
• Une fois pliée, assurez-vous que la poussette est rangée dans un endroit où elle ne risque pas de tomber sur un enfant.
• Avant de monter ou de descendre des escaliers mécaniques ou escaliers, retirez l’enfant du siège et pliez la poussette.
• Gardez la poussette à l'écart des flammes, des appareils de chauffage et des autres sources de forte chaleur.
• Il est recommandé d'entretenir et de nettoyer régulièrement les pièces mobiles afin de vérifier leur bon fonctionnement.
• Assurez-vous périodiquement que les mécanismes de verrouillage fonctionnent correctement et qu'ils ne sont pas
endommagés, par exemple à la suite d'un choc.
• ARTICLE N°: B / S S-352
• La poussette Genius a été approuvée conformément à la norme EN 1888: 2012.

3
• WAARSCHUWING: Laat uw kind nooit zonder toezicht achter.
• WAARSCHUWING: Zorg er vóór gebruik voor dat alle vergrendelingen zijn vergrendeld.
• WAARSCHUWING: Zorg er om letsel te voorkomen voor dat uw kind uit de buurt blijft tijdens het uitvouwen en opvouwen van
dit product.
• WAARSCHUWING: Laat uw kind niet spelen met dit product.
• WAARSCHUWING: Controleer vóór gebruik of de bevestigingsonderdelen van de omkeerbare rugleuning, het zitkussen en het
harnas goed zijn vastgezet.
• WAARSCHUWING: Gebruik altijd de veiligheidsgordels.
• WAARSCHUWING: Gebruik de kruisgordel van het harnas altijd in combinatie met de heup- en schoudergordel.
• WAARSCHUWING: Dit product is niet geschikt voor hardlopen of skaten.
• Deze kinderwagen is bedoeld voor kinderen vanaf de geboorte tot ze een gewicht van maximaal 18 kg hebben.
• De maximaal toegestane belasting van de boodschappenmand is 4,5 kg.
• Deze kinderwagen is uitsluitend geschikt voor het vervoeren van één kind.
• Gebruik uitsluitend accessoires die zijn goedgekeurd of worden geleverd door BABYELLE.
• Gebruik uitsluitend reserve-onderdelen die worden geleverd door BABYELLE.
• Het ophangen van voorwerpen of lasten aan het stuur en/of de achterkant van de rugleuning en/of de zijkanten van de
kinderwagen kan de stabiliteit van de kinderwagen negatief beïnvloeden.
• Het wordt aanbevolen om de kinderwagen op de rem te zetten wanneer u uw kind in de kinderwagen plaatst of uit de
kinderwagen haalt.
• Zorg ervoor dat de opgevouwen kinderwagen wordt opgeborgen op een plek waar deze geen gevaar vormt voor het kind.
• Haal uw kind uit het stoeltje en vouw de kinderwagen op voordat u roltrappen of trappen gebruikt.
• Houd de kinderwagen uit de buurt van open vuur, verwarmingstoestellen en andere sterke warmtebronnen.
• Het wordt aanbevolen om de bewegende onderdelen regelmatig te onderhouden en te reinigen om te controleren of ze
correct functioneren.
• Controleer regelmatig of de vergrendelingsmechanismen naar behoren functioneren en of ze geen schade hebben opgelopen,
bijv. na een schok.
• ARTIKELNR.: B/S S-352
• De Genius-kinderwagen is goedgekeurd in overeenstemming met EN 1888: 2012.
WARNING – AVERTISSEMENT- WAARSCHUWING
12° ou moins plus que 12°
12° of minder meer dan 12°
THE STROLLER IS DESIGNED FOR USE ON FLAT OR GENTLY SLOPING SURFACES, AND MAY BE
UNSTABLE ON HIGHER SLOPING AND UNEVEN SURFACES AND USERS SHOULD BE AWARE OF
THE POSSIBILITY OF THE STROLLER ROLLING AWAY OR TIPPING OVER.
• WITH YOUR HAND THROUGH THE WRIST TETHER STRAP LOOP, PUSH THE STROLLER HOLDING
BOTH HANDLES.
• THE STROLLER CAN BE STEERED IN THE DESIRED DIRECTION - ALLOWING THE FRONT WHEELS TO
SWIVEL WILL MAKE THIS EASIER.
• THE FRONT WHEELS MAY WOBBLE OR OSCILLATE WHEN WALKING FAST. LOCKING THE FRONT SWIVEL
WHEELS WILL STOP THIS.
• THE STROLLER CAN BE TAKEN UP KERBS BY EITHER PRESSING DOWN ON THE HANDLES AND RAISING
THE FRONT WHEELS AND MOUNTING THE KERB OR TURNING THE STROLLER AROUND AND PULLING
THE STROLLER UP THE KERB.
• CAUTION IS REQUIRED WHEN PUSHING THE STROLLER ACROSS STEEP SLOPES OR UNEVEN SURFACES
THIS MAY CAUSE STROLLER TO BECOME UNSTABLE AND FALL OVER. ALWAYS HOLD THE HANDLES

4
FIRMLY.
• DO NOT RUN WITH THE STROLLER.
• WHENEVER YOU STOP, ALWAYS APPLY THE BRAKES BEFORE YOU LEAVE THE STROLLER.
• DO NOT HANG BAGS OR GOODS FROM THE HANDLE AS THIS COULD CAUSE THE STROLLER TO TIP OVER.
USE THE STORAGE BASKET.
• THE UPRIGHT POSITIONS ARE NOT SUITABLE FOR A CHILD UNDER 6 MONTHS OLD.
• THE LOWEST RECLINE POSITION SHOULD BE USED TO TRANSPORT BABIES. THE BACKREST CAN BE
ADJUSTED TO A MORE UPRIGHT POSITION AS THE CHILD GROWS OLDER AND IS ABLE TO SUPPORT
ITS HEAD WITHOUT ASSISTANCE.
LA POUSSETTE EST CONÇUE POUR ÊTRE UTILISÉE SUR DES SURFACES PLANES OU LÉGÈREMENT INCLINÉES ET PEUT ÊTRE
INSTABLE SUR DES SURFACES PLUS INCLINÉES ET IRRÉGULIÈRES. LES UTILISATEURS DOIVENT ÊTRE CONSCIENTS DE LA
POSSIBILITÉ DE LA POUSSETTE DE DÉVALER LA PENTE OU DE SE RENVERSER.
• AVEC LA MAIN À TRAVERS LA BOUCLE DE LA SANGLE DE FIXATION DU POIGNET, FAITES AVANCER LA POUSSETTE TENANT LES
DEUX POIGNÉES.
• LA POUSSETTE PEUT ÊTRE DIRECTEMENT ORIENTÉE DANS LA DIRECTION DÉSIRÉE. LE PIVOT DES ROUES AVANT PERMETTRA DE
FACILITER LA DIRECTION.
• LES ROUES AVANT PEUVENT TREMBLER OU OSCILLER EN MARCHE RAPIDE. VERROUILLER LES ROUES AVANT PIVOTANTES
METTRA FIN AUX TREMBLEMENTS.
• LA POUSSETTE PEUT MONTER SUR LES TROTTOIRS EN APPUYANT SUR LES POIGNÉES, EN RELEVANT LES ROUES AVANT ET EN
MONTANT SUR LE TROTTOIR OU EN TOURNANT LA POUSSETTE ET EN LA TIRANT SUR LE TROTTOIR.
• IL FAUT PROCÉDER AVEC PRUDENCE LORS DU POUSSAGE DE LA POUSSETTE SUR LES PENTES OU LES SURFACES IRRÉGULIÈRES,
CELA POURRAIT PROVOQUER UNE INSTABILITÉ ET UNE CHUTE DE LA POUSSETTE. TOUJOURS TENIR LES POIGNÉES FERMEMENT.
• NE COUREZ PAS AVEC LA POUSSETTE.
• LORSQUE VOUS VOUS ARRÊTEZ, APPLIQUEZ TOUJOURS LES FREINS AVANT DE LAISSER LA POUSSETTE.
• N'ACCROCHEZ PAS DE SACS OU DE MARCHANDISES SUR LA POIGNÉE, CAR CELA POURRAIT CAUSER UN RENVERSEMENT DE LA
POUSSETTE. UTILISEZ LE PANIER DE RANGEMENT.
• LES POSITIONS DEBOUT NE SONT PAS ADAPTÉES POUR UN ENFANT DE MOINS DE 6 MOIS.
• LA POSITION D'INCLINAISON LA PLUS BASSE DEVRAIT ÊTRE UTILISÉE POUR TRANSPORTER DES BÉBÉS. LE DOSSIER PEUT ÊTRE
AJUSTÉ À UNE POSITION PLUS DROITE AU FUR ET A MESURE QUE L'ENFANT GRANDIT ET DEVIENT CAPABLE DE PORTER SA TÊTE
PAR LUI MÊME.
DE KINDERWAGEN IS ONTWORPEN VOOR GEBRUIK OP VLAKKE EN LICHT GLOOIENDE ONDERGRONDEN EN KAN ONSTABIEL ZIJN
OP STEILERE EN ONEFFEN ONDERGRONDEN EN GEBRUIKERS MOETEN ZICH BEWUST ZIJN VAN DE MOGELIJKHEID VAN HET
WEGROLLEN OF KANTELEN VAN DE KINDERWAGEN.
• HAAL UW HAND DOOR DE POLSLUS EN DUW DE KINDERWAGEN TERWIJL U BEIDE HANDGREPEN VASTHOUDT.
• DE KINDERWAGEN KAN IN DE GEWENSTE RICHTING WORDEN GESTUURD - DIT IS EENVOUDIGER WANNEER DE VOORWIELEN
KUNNEN DRAAIEN.
• DE VOORWIELEN KUNNEN WIEBELEN OF TRILLEN WANNEER U SNEL LOOPT. HET VERGRENDELEN VAN DE ZWENKWIELEN AAN
DE VOORKANT STOPT DIT.
• DE KINDERWAGEN KAN OP STOEPRANDEN WORDEN GETILD DOOR DE HANDGREPEN OMLAAG TE DUWEN EN DE
VOORWIELEN OP TE TILLEN OM DE STOEPRAND OP TE GAAN OF DOOR DE KINDERWAGEN OM TE DRAAIEN EN DE
KINDERWAGEN DE STOEPRAND OP TE TREKKEN.
• WEES VOORZICHTIG BIJ HET DUWEN VAN DE KINDERWAGEN OVER STEILE HELLINGEN OF ONEFFEN ONDERGRONDEN. DIT KAN
ERTOE LEIDEN DAT DE KINDERWAGEN ONSTABIEL WORDT EN OMVALT. HOUD DE HANDGREPEN ALTIJD STEVIG VAST.
• REN NIET MET DE KINDERWAGEN.
• GEBRUIK TELKENS WANNEER U STOPT DE REM VOORDAT U DE KINDERWAGEN ACHTERLAAT.
• HANG GEEN TASSEN OF VOORWERPEN AAN DE HANDGREPEN, OMDAT DIT ERTOE KAN LEIDEN DAT DE KINDERWAGEN
KANTELT. GEBRUIK DE OPBERGMAND.
• DE RECHTOPSTAANDE POSITIES ZIJN NIET GESCHIKT VOOR KINDEREN JONGER DAN 6 MAANDEN.
• DE LAAGSTE LIGGENDE POSITIE MOET WORDEN GEBRUIKT OM BABY'S TE VERVOEREN. DE RUGLEUNING KAN IN EEN MEER
RECHTOPSTAANDE POSITIE WORDEN GEZET NAARMATE HET KIND OUDER WORDT EN ZELF IN STAAT IS OM ZONDER HULP ZIJN
OF HAAR HOOFD TE ONDERSTEUNEN.

5
MANUAL HANDLING TECHNIQUES - TECHNIQUES DE MANIPULATION MANUELLES - HANDMATIGE HANTERINGSTECHNIEKEN
The SMART lifting technique
This technique can be used to pick up small light loads from low levels.
Size up the Load
• Assess the load (size, shape and weight).
• Assess whether the load needs to be moved;
• Where is it going to be placed” Check that there are no obstructions;
• Assess whether mechanical or human assistance is required.
Move the Load as close to the body as possible
• A load is heavier to lift or carry if it is not close to the body.
• The whole hand should be used to ensure a rm grip.
Always bend your knees
• Maintain balance.
• Keep feet apart and in a comfortable position.
• Minimise lower back bending.
• Bend knees preferable at as large an angle as possible but not at a right angle - use a semi squat in
preference to a full squat.
Raise the load with your legs
• Achieve the lift smoothly and without jerkiness.
• Maintain the normal curvature of the spine to allow the force of the load to be distributed evenly
from the spine to the pelvis.
Turn your feet in the direction that you want to move the load.
• Avoid unnecessary bending, twisting and reaching.
• Change direction by turning your feet and not your back.
• To set the load down, squat down, keep your head up and let
• Let your legs do the work.
Remember to ‘THINK TALL’ chest lifted, shoulders relaxed, chintucked in and head level.
La technique de levage INTELLIGENTE
Cette technique peut être utilisée pour ramasser de petites charges légères depuis des positions basses.
Dimensionnez la charge
• Évaluez la charge (taille, forme et poids).
• Évaluez si la charge doit être déplacée;
• Où va-t-elle être placée? Vérifiez qu'il n'y a pas d'obstruction;
• Évaluez si une assistance mécanique ou humaine est nécessaire.
Déplacer la charge aussi près que possible du corps
• Une charge est plus lourde à lever ou à porter si elle n’est pas proche du corps.
• La main entière doit être utilisée pour assurer une prise ferme.
Pliez toujours les genoux
• Maintenir l'équilibre.
• Gardez les pieds écartés et dans une position confortable.
• Minimiser la flexion du bas du dos.
• Pliez les genoux de préférence avec un angle aussi grand que possible, mais pas à angle droit - utilisez un semi-squat plutôt
qu'un squat complet.
Soulever la charge avec vos jambes
• Réalisez le levage en douceur et sans saccades.
• Maintenez la courbure normale de la colonne vertébrale pour permettre à la masse de la charge d'être répartie uniformément
de la colonne vertébrale au bassin.
Tournez vos pieds dans la direction dans laquelle vous souhaitez déplacer la charge.
• Évitez de vous pencher, de vous tordre et d'étendre inutilement les bras.
• Changer de direction en tournant les pieds et non le dos.
• Pour poser la charge, accroupissez-vous, gardez la tête haute et posez
• Laissez vos jambes faire le travail.
Rappelez-vous de «PENSER GRAND» poitrine bombée, épaules relâchées, menton rentré et tête droite.
De SLIMME optiltechniek
Deze techniek kan worden gebruikt om kleine, lichte lasten vanaf lage niveaus op te pakken.
Schat de belasting in
• Beoordeel de last (grootte, vorm en gewicht).

6
• Beoordeel of de last moet worden verplaatst;
• Waar wordt de last geplaatst? Controleer of er geen obstakels zijn;
• Beoordeel of er mechanische of menselijke hulp benodigd is.
Verplaats de last zo dicht mogelijk bij het lichaam
• Een last is zwaarder om op te tillen of te dragen als deze zich niet dicht bij het lichaam bevindt.
• De gehele hand moet worden gebruikt om een stevige grip te garanderen.
Buig altijd uw knieën
• Houd uw evenwicht.
• Houd uw voeten uit elkaar en in een comfortabele positie.
• Buig uw onderrug zo min mogelijk.
• Buig de knieën bij voorkeur onder een zo groot mogelijke hoek, maar niet onder een rechte hoek - gebruik bij voorkeur een
semi-hurkhouding in plaats van een volledige hurkhouding.
Til de last op met uw benen
• Til de last soepel en zonder haperingen op.
• Handhaaf de normale kromming van de wervelkolom, zodat de lastkracht gelijkmatig wordt verdeeld van de wervelkolom tot
het bekken.
Draai uw voeten in de richting waarin u de last wilt verplaatsen.
• Voorkom onnodig buigen, draaien en reiken.
• Verander uw richting door uw voeten, en niet uw rug, te draaien.
• Als u de last wilt neerzetten, hurk dan, houd uw hoofd omhoog
• Laat uw benen het werk doen.
Onthoud om ‘GROOT TE DENKEN’ de borst omhoog, de schouders ontspannen, de kin ingetrokken en het hoofd recht.
AVERTISSEMENT
OPGELET
This CAUTION Symbol is shown at certain steps in this Instruction Manual to highlight the danger of being injured by moving
parts.
Ce symbole AVERTISSEMENT est indiqué à certaines étapes dans ce manuel d'instructions pour mettre l'accent sur les risques de
blessures par des pièces mobiles.
LET OP
Dit OPGELET -symbool wordt bij bepaalde stappen in deze handleiding getoond om het risico op verwonding door bewegende
onderdelen te benadrukken.

7
PARTS LIST – LISTE DES PIÈCES – ONDERDELENLIJST
1
Canopy
Canopy
Kap
2
Bumper Car
Barre pare-chocs
Veiligheidsbeugel
3
Safety Buckle
Boucle de sécurité
Veiligheidsgesp
4
Footrest
Repose-pieds
Voetensteun
5
Stop Pin
Goujon d’arrêt
Stoppin
6
Front Wheel
Roue avant
Voorwiel
7
Fold Handle
Poignée pour pliage
Handgreep voor vouwen
8
Handle
Poignée
Handgreep
9
Seat
Siège
Stoeltje
10
Reversing Parts
Pièces réversibles
Omkeeronderdelen
11
Adjust Button
Bouton de réglage
Instelknop
12
Rear Wheel
Roue arrière
Achterwiel
13
Basket
Panier
Mand
14
Adjustment Buckle
Boucle de réglage
Verstelgesp
15
Lock Block
Bloc de verrouillage
Vergrendelingsblok
16
Lock Pedal
Pédale de verrouillage
Vergrendelingspedaal
17
Brake Pedal
Pédale de frein
Rempedaal
18
Frame x 1
Cadre x1
Frame x1
19
Bumper Bar x 1
Barre pare-chocs x1
Veiligheidsbeugel x1
20
Front Wheel x 2
Roue avant x2
Voorwiel x2
21
Rear Wheel (L) x 1
Roue arrière (Gauche) x1
Achterwiel(L) x1
22
Rear Wheel (R)x 1
Roue arrière (Droite) x1
Achterwiel(R) x1
23
Carry Bag x 1
Sac de transport x1
Draagtas x1

8
TO OPEN STROLLER - 1. POUR OUVRIR LA POUSSETTE - 1. DE KINDERWAGEN UITVOUWEN
(1) Open storage latch, refer to Fig. A
(2) Lift handle of stroller up, refer to Fig B&C
(3) Hold the Gray Lock Pedal, then Lift handle of stroller up untill heard “Click”, refer to Fig D,
CHECK that the stroller is completely latched open every time you open the stroller and before
continuing with the rest of the assembly steps.
(1) Ouvrez le loquet de rangement, voir Illustration A
(2) Soulever la poignée de la poussette, voir Illustrations B et C.
(3) Tenez la pédale de verrouillage grise, puis soulevez la poignée de la poussette jusqu’à entendre un clic, consultez
l'illustration D, VÉRIFIEZ que la poussette est complètement verrouillée en position ouverte à chaque fois que vous
ouvrez la poussette et avant de poursuivre les étapes de montage. Pédale de verrouillage
(1) Open de opbergvergrendeling, zie Fig. A
(2) Til de handgreep van de kinderwagen omhoog, zie Fig. B&C.
(3) Houd het grijze vergrendelingspedaal ingedrukt en til de handgreep van de kinderwagen omhoog totdat u een
klikgeluid hoort, zie Fig. D. CONTROLEER elke keer dat u de kinderwagen uitvouwt en voordat u verder gaat met de
resterende montagestappen of de kinderwagen volledig is ontgrendeld. Vergrendelingspedaal
FRONT WHEEL – ROUE AVANT – VOORWIEL
Attach front wheels to stroller as Fig. A, CHECK that wheel is securely attached by pulling on wheel assembly.
For easy transport or storage, remove front wheel by pushing button as Fig. B.
Fixez les roues avant à la poussette comme illustré sur l'illustration A, VÉRIFIEZ que la roue est solidement fixée en tirant sur la
roue.Pour faciliter le transport ou le stockage, retirez la roue avant en appuyant sur le bouton, comme indiqué sur l'illustration B
Bevestig de voorwielen aan de kinderwagen, zoals in Fig. A. CONTROLEER of de wielen stevig zijn vastgezet door aan de wielen
te trekken.
U kunt de voorwielen voor eenvoudig transport of opslag verwijderen door op de knop te drukken, zoals in Fig. B.

9
REAR WHEEL – ROUE ARRIERE – ACHTERWIEL
Attach Rear wheels(L&R) to stroller as Fig. A,CHECK that wheel is securely attached by pulling on wheel assembly.
For easy transport or storage, remove Rear wheel by pushing button as Fig. B.
Fixez les roues arrière (L & R) à la poussette comme sur l'illustation A, VÉRIFIEZ que la roue est bien fixée en tirant sur
l’assemblage des roues. Pour faciliter le transport ou le rangement, retirez la roue arrière en appuyant sur le bouton comme
indiqué sur l'illustration B.
Bevestig de achterwielen (L&R) aan de kinderwagen, zoals in Fig. A. CONTROLEER of de wielen stevig zijn vastgezet door aan de
wielen te trekken. U kunt de achterwielen voor eenvoudig transport of opslag verwijderen door op de knop te drukken, zoals in
Fig. B.
TO USE BUMPER BAR - UTILISER LA BARRE PARE-CHOCS - DE VEILIGHEIDSBEUGEL GEBRUIKEN
Opening /closing the Bumper Bar: Press down the bumper to instal until it click into place, Fig A.
Press the buttons on two sides of the arm together to take it off; Fig. B
WARNING: WHEN A CHILD IS IN THE STROLLER, KEEP THE ARM BAR ATTACHED TO THE FRAME AT ALL TIMES.
Ouverture / fermeture de la barre pare choc : appuyez sur le pare-choc pour l'installer jusqu'à ce qu'il s'enclenche, Illustration A.
Appuyez simultanément sur les boutons des deux côtés du bras pour l’enlever; Illustration B
AVERTISSEMENT: QUAND UN ENFANT EST DANS LA POUSSETTE, GARDEZ LA BARRE DE BRAS ATTACHÉE AU CADRE A TOUT
MOMENT.
De veiligheidsbeugel openen/sluiten: Druk de beugel omlaag totdat deze op zijn plaatst klikt om de beugel te installeren, zie Fig.
A. Druk tegelijkertijd op de knoppen aan beide zijden van de beugel om de beugel te verwijderen; Fig. B
WAARSCHUWING: WANNEER EEN KIND IN DE KINDERWAGEN ZIT, ZORG ER DAN VOOR DAT DE VEILIGHEIDSBEUGEL ALTIJD AAN
HET FRAME IS BEVESTIGD.
USING THE BRAKES - UTILISATION LES FREINS – REMMEN GEBRUIKEN
Parking and loosen the braker: Push the braker levers down to park; Fig. A push the brake levers up to loosen, Fig. B
WARNING: ALWAYS APPLY THE BRAKES WHEN THE STROLLER IS STATIONARY.
Stationner et desserrer le frein: Poussez les leviers du frein pour vous garer; Illustration A poussez les leviers de frein pour
desserrer, Illustration B

10
AVERTISSEMENT : TOUJOURS ACTIONNER LES FREINS LORSQUE LA POUSSETTE EST A L’ARRÊT.
De kinderwagen op de rem zetten en van de rem halen: Druk de remhendels omlaag om op de rem te zetten; Fig. A
Druk de remhendels omhoog om van de rem te halen; Fig. B
WAARSCHUWING: ZET DE KINDERWAGEN ALTIJD OP DE REM ALS DEZE STILSTAAT.
SWIVEL WHEEL - ROUE PIVOTANTE – ZWENKWIEL
Front swivel wheel locks for use on uneven surfaces such as grass, stones or gravel. Push up the button to lock the Front wheels;
push down the button to relase to Swivel Wheels
Les verrous des roues pivotantes avant servent lors de l'utilisation sur des surfaces irrégulières telles que sur l'herbe, les cailloux
ou le gravier.Poussez le bouton pour verrouiller les roues avant ; enfoncez le bouton pour revenir aux roues pivotantes
U kunt de zwenkwielen aan de voorkant vergrendelen voor gebruik op oneffen ondergronden, zoals gras, stenen of grind.
Druk de knop omhoog om de voorwielen te vergrendelen; Druk de knop omlaag om de voorwielen te ontgrendelen.
FOOTREST – REPOSE PIED – VOETENSTEUN
Hold the footrest front and raising it to up position, Fig. A Pull Buttons 1 on both sides of the footrest and hold while lowering
the footrest to the lower position. Fig B
WARNING: THE FOOTREST FEATURE IS PROVIDED FOR YOUR CHILDS COMFORT. THE FOOTREST IS NOT DESIGNED TO SUPPORT
EXTRA WEIGHT. DO NOT ALLOW CHILDREN TO STAND OR SIT ON THE FOOTREST.
Tenez le repose-pieds par l'avant et soulevez-le, Illustration A Tirez sur les boutons 1 des deux côtés du repose-pieds et
maintenez-les enfoncés tout en abaissant le repose-pieds en position basse. Illustration B
AVERTISSEMENT : LE REPOSE-PIEDS EST FOURNI POUR LE CONFORT DE VOTRE ENFANT. LE REPOSE PIED N'EST PAS CONÇU POUR
SUPPORTER PLUS DE POIDS. NE PAS PERMETTRE AUX ENFANTS DE SE TENIR OU DE S'ASSOIR SUR LE REPOSE-PIED.
Houd de voorkant van de voetensteun vast en til op tot de juiste stand is bereikt, Fig. A Trek de knoppen 1 aan beide zijden van
de voetensteun naar buiten en houd vast terwijl u de voetensteun laat zakken naar de lagere stand. Fig. B
WAARSCHUWING: DE VOETENSTEUN WORDT MEEGELEVERD VOOR HET COMFORT VAN UW KIND. DE VOETENSTEUN IS NIET
ONTWORPEN OM EXTRA GEWICHT TE DRAGEN. LAAT KINDEREN NIET OP DE VOETENSTEUN STAAN OF ZITTEN.

11
ADJUSTING THE BACKREST - RÉGLAGE DU DOSSIER - DE RUGLEUNING INSTELLEN
Adjustment of the reclined/upright position: Pull the webbing with both sides upward to make the backrest up(Fig A).
Pull down the buckle to put the backrest down (Fig B).
WARNINGS:
• THE UPRIGHT POSITIONS ARE NOT SUITABLE FOR USE WITH CHILDREN LESS THAN 6 MONTHS OLD.
• THE LOWEST RECLINE POSITION SHOULD BE USED TO TRANSPORT BABIES. THE BACKREST CAN BE ADJUSTED TO MORE
UPRIGHT POSITION AS THE CHILD GROWS OLDER AND IS ABLE TO SUPPORT ITS HEAD WITHOUT ASSISTANCE. NOTE: IF THE
CHILD IS SITTING IN THE SEAT, SUPPORT THE BACKREST AS IT RECLINES. IF YOU HAVE DIFFICULTY ADJUSTING THE BACKREST
YOU MAY NEED TO REMOVE THE CHILD FROM THE SEAT TO ALLOW YOU TO RAISE OR LOWER THE BACKREST WITH EASE.
Réglage de la position inclinée / droite : Tirez la sangle avec les deux côtés vers le haut pour relever le dossier (Illustration A).
Abaissez la boucle pour abaisser le dossier (Illustration B).
MISES EN GARDE :
• LES POSITIONS DROITES NE PEUVENT PAS ÊTRE UTILISÉES AVEC DES ENFANTS DE MOINS DE 6 MOIS.
• LA POSITION D'INCLINAISON LA PLUS BASSE DOIT ÊTRE UTILISÉ POUR TRANSPORTER DES BÉBÉS. LE DOSSIER PEUT ÊTRE
AJUSTÉ À UNE POSITION PLUS DROITE AU FUR ET A MESURE QUE L'ENFANT GRANDIT ET DEVIENT CAPABLE DE PORTER SA TÊTE
PAR LUI MÊME. REMARQUE: SI L’ENFANT S'ASSOIT DANS LE SIÈGE, SOUTENEZ LE DOSSIER AU FUR ET A MESURE QU'IL S'INCLINE.
SI VOUS AVEZ DU MAL A RÉGLER LE DOSSIER, IL VOUS FAUDRA PEUT-ETRE RETIRER L'ENFANT DU SIÈGE AFIN DE LE LEVER OU DE
L'ABAISSER PLUS FACILEMENT.
Instellen van de liggende/rechtopstaande positie: Trek de uiteinden van de band aan beide zijden omhoog om de rugleuning
omhoog te zetten (Fig. A). Trek de gesp omlaag om de rugleuning omlaag te zetten (Fig. B).
WAARSCHUWINGEN:
• DE RECHTOPSTAANDE POSITIES ZIJN NIET GESCHIKT VOOR GEBRUIK MET KINDEREN JONGER DAN 6 MAANDEN.
• DE LAAGSTE LIGGENDE POSITIE MOET WORDEN GEBRUIKT OM BABY'S TE VERVOEREN. DE RUGLEUNING KAN IN EEN MEER
RECHTOPSTAANDE POSITIE WORDEN GEZET NAARMATE HET KIND OUDER WORDT EN ZELF IN STAAT IS OM ZONDER HULP ZIJN
OF HAAR HOOFD TE ONDERSTEUNEN. OPMERKING: ALS HET KIND IN HET STOELTJE ZIT, STEUN DE RUGLEUNING DAN TERWIJL
DEZE ZAKT. ALS U MOEITE HEBT DE STAND VAN DE RUGLEUNING AAN TE PASSEN, MOET U HET KIND MOGELIJK UIT HET
STOELTJE HALEN OM DE RUGLEUNING EENVOUDIG OMHOOG OF OMLAAG TE ZETTEN.
12
SECURING YOUR CHILD TO HARNESS - ATTACHER VOTRE ENFANT AU HARNAIS - UW KIND VASTZETTEN IN HET HARNAS
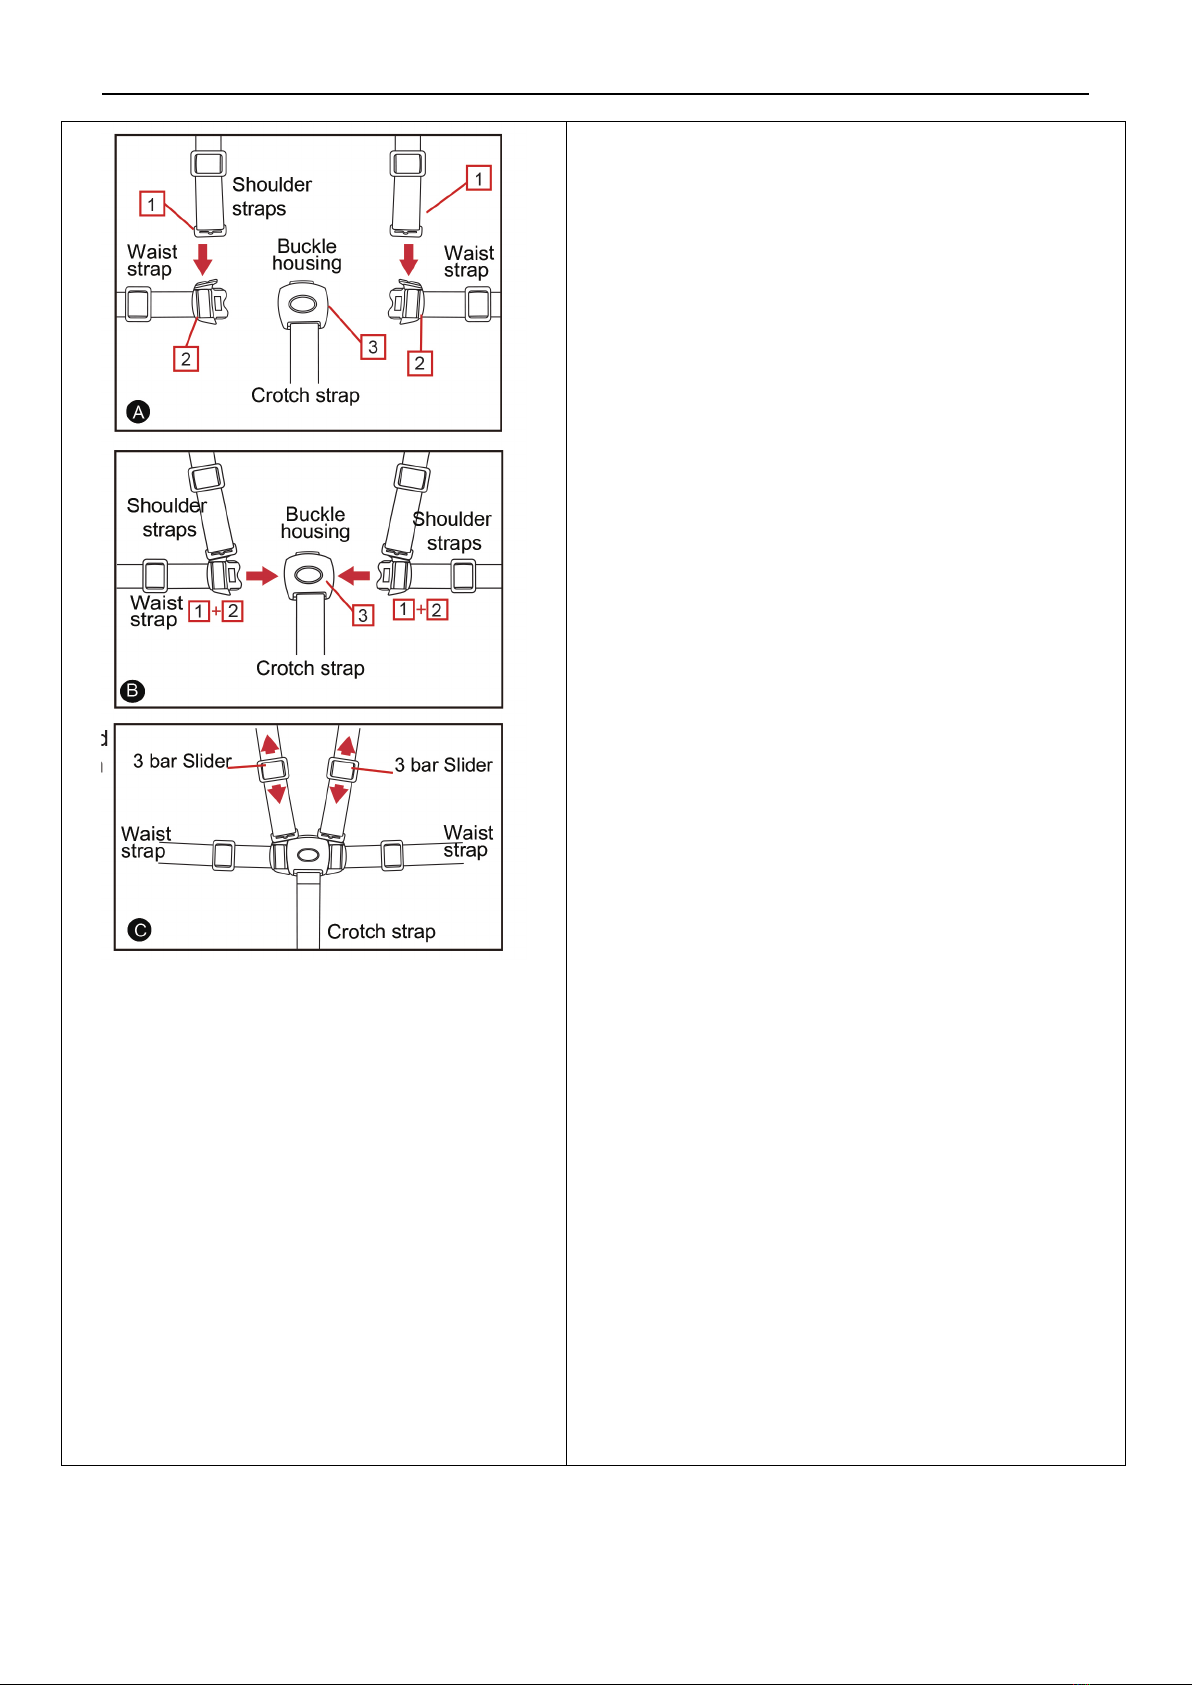
WARNING: USE THE HARNESS AT ALL TIMES.
When not in use disconnect shoulder straps from the waist
strap and buckle to prevent strangulation.
A five point harness is provided to restrain your child.
Buckle tongues separate for added safety. To reconnect
buckle tongues and to secure the child in the harness
please follow the steps below carefully.
-Position the shoulder strap tongue (1) on the top of
the waist buckle tongue (2) on both sides (Fig A).
-Push both buckle tongues (1+2) into the buckle
housing (3) until the buckle tongues lock into
position (Fig B).
-Tighten or loosen shoulder and crotch straps by
sliding up an down the 3 bar sliders (Fig C).
AVERTISSEMENT : UTILISEZ LE HARNAIS A TOUT MOMENT.
Lorsqu'il n'est pas utilisé, débranchez les sangles d'épaule
de la ceinture et de la boucle pour éviter les étranglements.
Un harnais à cinq points est fourni pour retenir votre
enfant. Les languettes de la boucle se séparent pour plus de
sécurité. Pour reconnecter les languettes de boucle et
attacher l'enfant dans le harnais, veuillez suivre
attentivement les étapes ci-dessous
-Placez la languette de la bandoulière (1) sur le haut
de la languette de la boucle de la taille (2) des deux
côtés (Illustration A).
-Poussez les deux languettes de la boucle (1 + 2)
dans l’encastrement de la boucle (3) jusqu'à ce
qu'elles se bloquent (Illustration B).
-Serrez ou desserrez les bretelles des épaules et de
l’entrejambe en glissant vers le haut les curseurs à
barre 3 (Illustration C).
WAARSCHUWING: GEBRUIK TE ALLEN TIJDE HET
HARNAS.Als het niet wordt gebruikt, maak de
schoudergordels dan los van de heupgordels en gesp om
wurging te voorkomen.
Er wordt een vijfpuntsgordel meegeleverd om uw kind vast
te zetten. Afzonderlijke gordeltongen voor extra veiligheid.
Volg de onderstaande stappen zorgvuldig om de
gordeltongen opnieuw te bevestigen en het kind vast te
zetten in het harnas.
-Positioneer de schoudergordeltong (1) aan beide
zijden boven de heupgordeltong (2) (Fig. A).
-Druk beide gordeltongen (1+2) in het gordelslot (3)
totdat de gordeltongen op hun plaats vergrendelen
(Fig. B).
-Zet de schouder- en kruisgordel strakker of losser
door de schuifsluiting omhoog of omlaag te
schuiven (Fig. C).
13
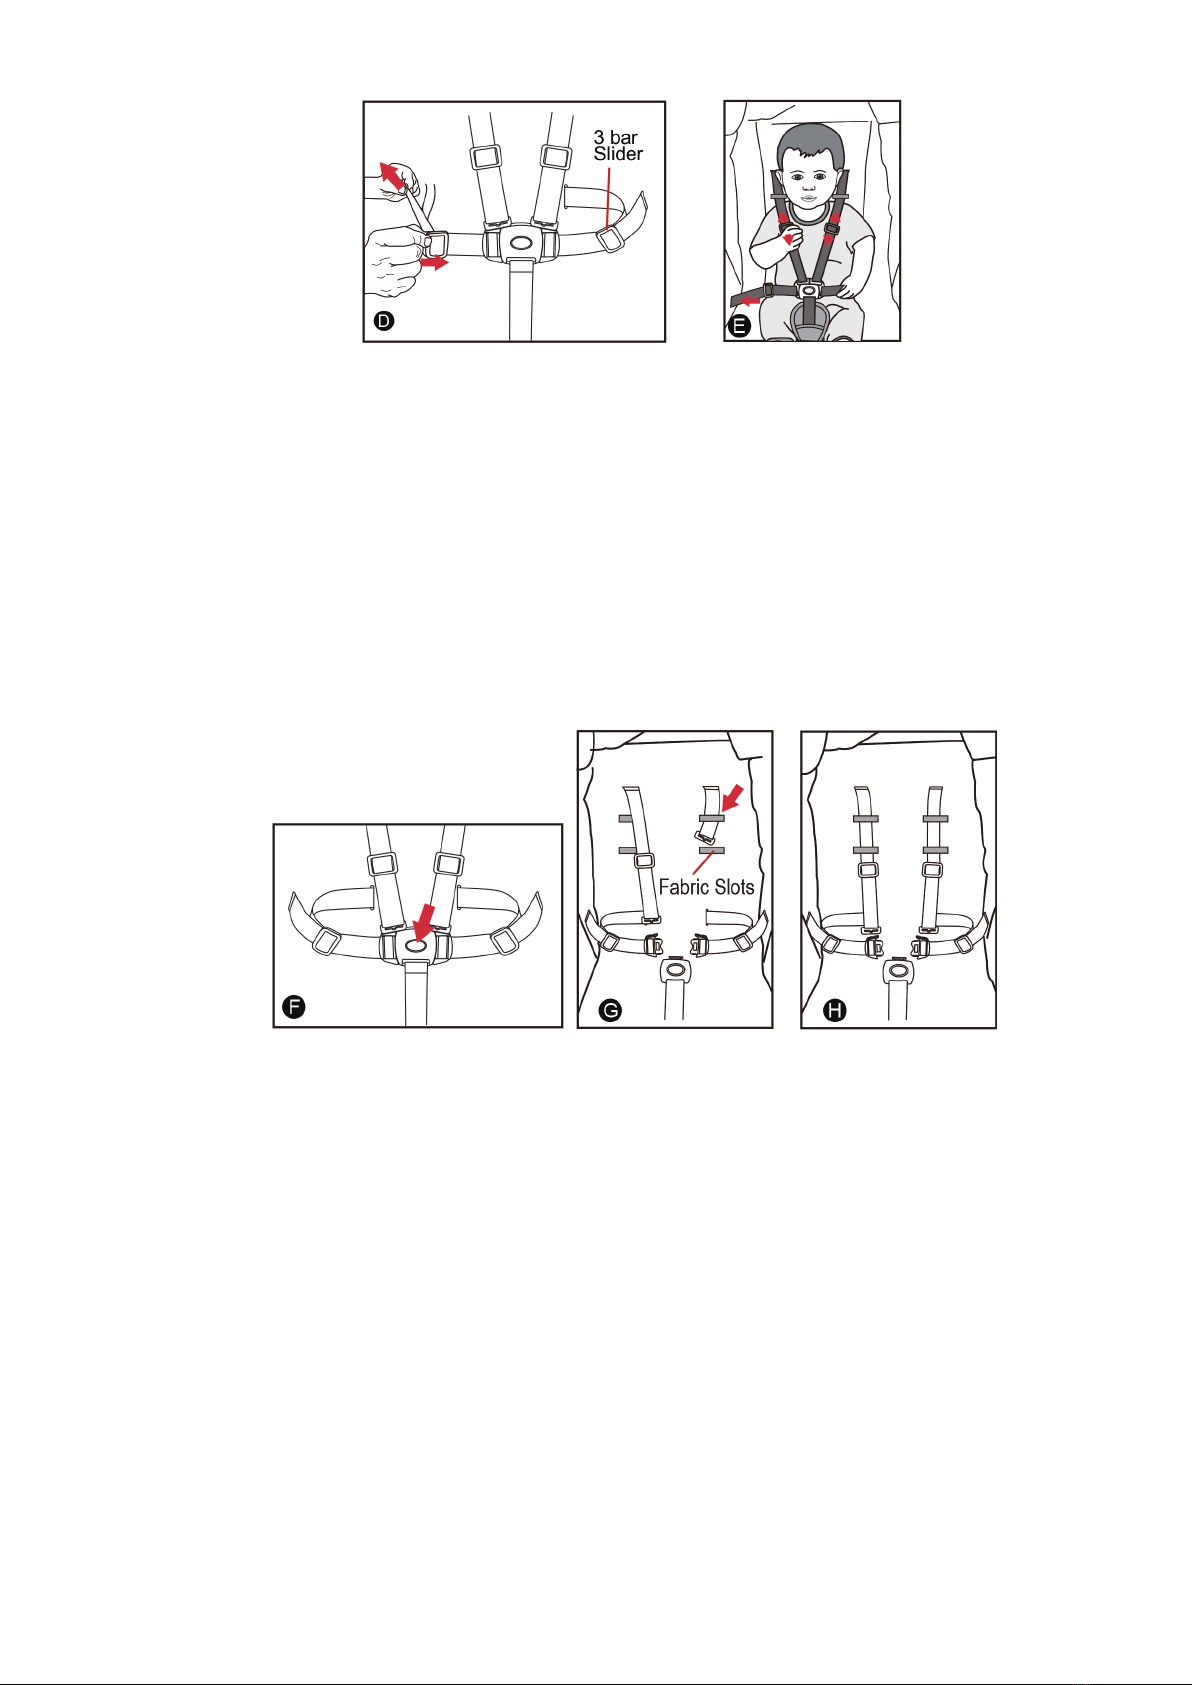
-Tighten or loosen the waist straps, hold and lift the 4 bar slider and then pull the harness strap, to adjust to the
desired fit. The waist strap needs to fit firmly around the child (Fig D).
-Tighten or loosen the shoulder straps, slide the 3 bar slider up or down to adjust to the desired fit. Always adjust
the harness strap when changing the seating position of the child (Fig E).
-Serrez ou desserrez les sangles de taille, tenez et soulevez le curseur à barre 3, puis tirez sur la sangle du harnais pour
l'ajuster. La ceinture doit être bien ajustée autour de l’enfant (Illustration D).
-Serrez ou desserrez les bretelles, faites glisser le curseur à barre 3 vers le haut ou le bas pour ajuster à la taille
souhaitée. Réglez toujours la sangle du harnais lorsque vous changez la position de l’enfant (Illustration E).
-Zet de heupgordel strakker of losser, houd de schuifsluiting vast, til deze op en trek vervolgens aan de gordel om de
gordel naar wens te verstellen. De heupgordel moet stevig rond het kind zitten (Fig. D).
-Zet de schoudergordel strakker of losser, schuif de schuifsluiting omhoog of omlaag om de gordel naar wens te
verstellen. Verstel de gordel altijd wanneer u de zitpositie van het kind wijzigt (Fig. E).
CAUTION: DO NOT SLIDE 3 BAR SLIDER OVER THE SEWN TAB ON SHOULDER HARNESS.
-To release the buckle. Squeeze the top botton and Buckle housing with enough pressure so the buckle tongues can
release from the buckle housing (Fig. F).
-The stroller seat has 3 sets of harness slots at different heights to accommodate the child. To change the shoulder
harness height, push the shoulder harness tongue out of the current harness slot and through the back of the seat (Fig
G). Depending on the model
-To reposition harness, pull the shoulder harness buckle tongue through the desired slot (Fig H).
MISE EN GARDE : NE PAS DÉPLACER LE CURSEUR À BARRE 3 SUR LE HARNAIS D'ÉPAULES.
-Pour relâcher la boucle. Appuyez le bouton supérieur et le logement de la boucle avec suffisamment de force pour que
les languettes de la boucle puissent se dégager du logement de la boucle (Illustration F).
-Le siège de la poussette dispose de 3 fentes pour harnais à différentes hauteurs pour accueillir l'enfant. Pour changer la
hauteur du harnais, poussez la languette du harnais vers l’extérieur de la fente du harnais et à travers l’arrière du siège
(Illustration G). En fonction du modèle.
-Pour repositionner le harnais, tirez la languette de la boucle du harnais à travers la fente souhaitée (Illustration H).
LET OP: SCHUIF DE SCHUIFSLUITING NIET TOT BOVEN HET GENAAIDE LIPJE OP DE SCHOUDERGORDEL.
-De gesp openen. Knijp met voldoende kracht in de bovenste knop en het gordelslot, zodat de gordeltongen niet langer
vergrendeld zijn in het gordelslot (Fig. F).
14
-Het kinderwagenstoeltje heeft 3 groepen harnassleuven op verschillende hoogten voor uw kind. U kunt de hoogte van
de schoudergordel wijzigen door de schoudergordeltong uit de huidige harnassleuf en door de achterkant van het
stoeltje te drukken (Fig. G). Afhankelijk van het model
-U kunt het harnas herpositioneren door de schoudergordeltong door de gewenste sleuf te trekken (Fig. H).
TO FOLD THE STROLLER - POUR PLIER LA POUSSETTE - DE KINDERWAGEN OPVOUWEN
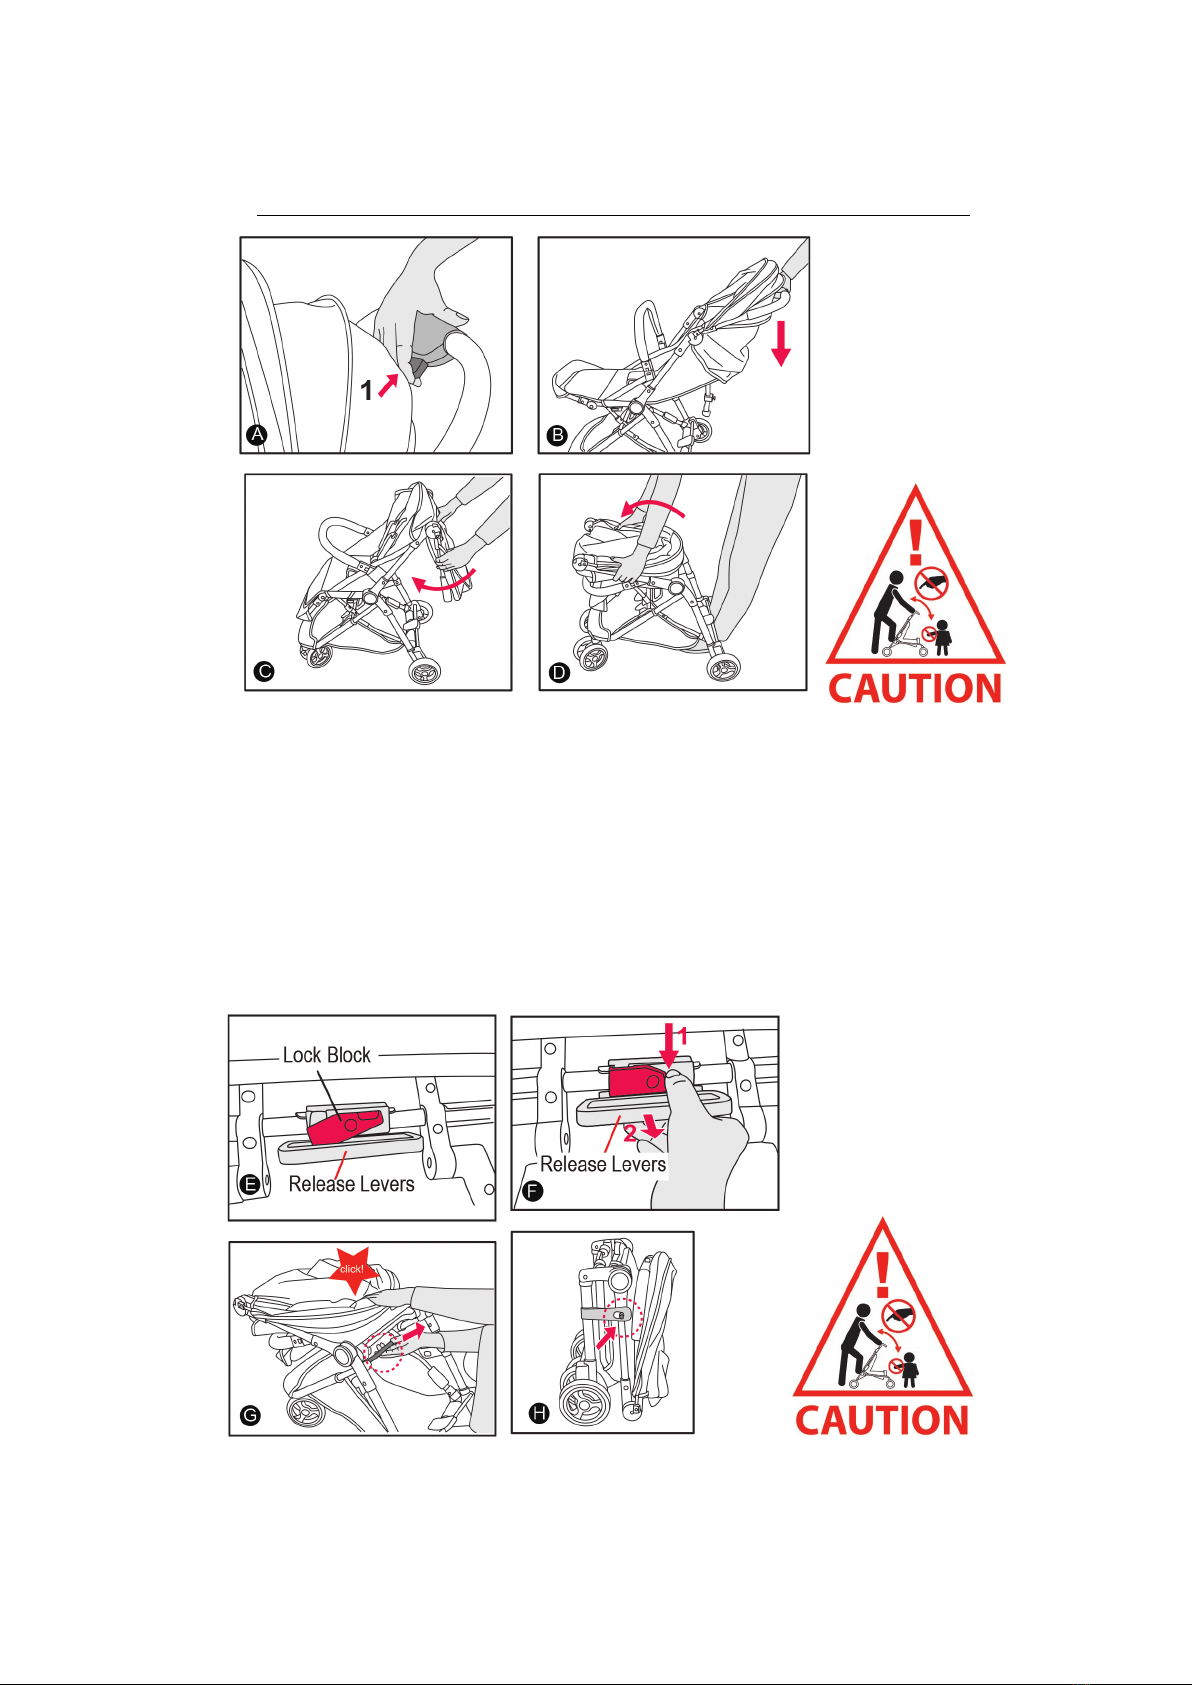
-Press the button (1), and push downward to fold the handle. (Fig A、B).
-Pull the to seat back forward and pull the handle downward to seat back; then pull handle/seat back to forward to seat.
Fig C & D
-Appuyez sur le bouton (1) et appuyez vers le bas pour plier la poignée. (Illustrations A et B).
-Tirez la poignée vers l'avant pour incliner le siège en arrière et tirez la poignée vers l'arrière pour incliner le siège en
arrière; puis tirez la poignée / le siège vers l’avant pour l'installation assise. Illustrations C et D
-Druk op de knop (1) en duw omlaag om de handgreep op te vouwen. (Fig. A. B).
-Trek de rugleuning naar voren en trek de hangreep richting de rugleuning; trek de handgreep/rugleuning vervolgens
naar voren richting het stoeltje. Fig. C, D
-Frame Release Levers is under the seat, Depress the Lock Block, then pull up the Release Levers untill the frame
colapse as shown Fig. E、F、G.
-Make sure the auto-lock lever clicks into place. Stroller can standup after fold. Refer to Fig.H.

15
-Les leviers de dégagement du cadre sont sous le siège. Appuyez sur le bloc de verrouillage, puis relevez les leviers de
dégagement jusqu'au dégagement du cadre, comme indiqué sur les illustrations E, F et G.
-Assurez-vous que le levier de verrouillage automatique s'enclenche bien. La poussette peut se lever après le pliage. Voir
l'Illustration H
-De frame-ontgrendelingshendels zitten onder het stoeltje. Druk op het vergrendelingsblok, en trek de
ontgrendelingshendels vervolgens omhoog totdat het frame inklapt, zoals getoond in Fig. E, F, G.
-Zorg ervoor dat de automatische vergrendelingshendel op zijn plaats klikt. De kinderwagen kan na het opvouwen
rechtop worden gezet. Zie Fig. H.
REVERSING SEAT PAD - COUSSIN DE SIÈGE RÉVERSIBLE - HET ZITKUSSEN OMKEREN
WARNING: REVERSING FUNCTION IS USED FOR BABY FROM BIRTH TO 6 MONTHS ONLY
-Press the buttons on two sides of the arm together to take the Bumper bar off; Fig. A
-Turnup the main Seat pad, then push the “日” Buckle(end of Crotch strap) from Seat Back go through the slot, then
the Crotch strap was released. Fig B.
-Repeat to release other four “日” Buckle which end of Shoulder straps and Waist strap, Fig C & D.
AVERTISSEMENT : LA FONCTION RÉVERSIBLE EST UTILISÉE POUR LE BÉBÉ DE LA NAISSANCE À 6 MOIS SEULEMENT
-Appuyez simultanément sur les boutons situés des deux côtés du bras pour retirer la barre de protection; Illustration A
-Mettez le coussin de siège principal en place, puis poussez la boucle «日» (extrémitéde la sangle de fourche) àpartir du
dossier du siège àtravers la fente, la sangle d'entrejambe a étérelâchée. Illustration B
-Répétez l'opération pour libérer les quatre autres boucles «日» situées aux extrémités des sangles d'épaule et de la taille,
Illustrations C et D.
WAARSCHUWING: DE OMKEERFUNCTIE MAG UITSLUITEND WORDEN GEBRUIKT VOOR BABY'S MET EEN LEEFTIJD VAN 0
TOT 6 MAANDEN.
-Druk tegelijkertijd op de knoppen aan beide zijden van de veiligheidsbeugel om de beugel te verwijderen; Fig. A
-Draai het hoofdzitkussen en druk vervolgens de “日” gesp (uiteinde van kruisgordel) van de rugleuning door de sleuf
om de kruisgordel los te maken. Fig. B.
-Herhaal om de vier andere “日” gespen, aan de uiteinden van de schouder- en heupgordel los te maken, Fig. C & D.

16
-Hold the footrest front and raising it to up position, Fig. E
-Put the Reversing Seat Pad into seat.Fig. F.
-Align The Reversing Seat Pad Velcro (5) to Seat Velcro, Fig G & H.
-Tenez le repose-pieds par l'avant et soulevez-le, Illustration E
-Placez le coussin de siège réversible dans le siège. Illustration F.
-Alignez le velcro du coussin de siège réversible (5) sur le velcro du siège, Illustrations G et H.
-Houd de voorkant van de voetensteun vast en til de steun op tot de juiste stand is bereikt, Fig. E
-Plaats het omgekeerde zitkussen in het stoeltje. Fig. F.
-Lijn het klittenband van het omgekeerde zitkussen (5) uit met het klittenband van het stoeltje, Fig. G & H.
-Push the “日” Buckle 3 (end of Waist strap) from Seat front go through the slot, then the Waist strap was fixed. Fig I.
Repeat for another one. Push “日” Buckle 1 which end of Crotch strap from Seat front go through the slot, then the
Crotch strap were fixed. Fig J.
-Release the Fix Buckle which under the Reversing Seat Pad, and adjust the buckle to make the belt longer. Fig K. Setup
the bucker again under the footrest, and adjust belt to make sure Reversing Seat Pad was fixed to seat well. Fig. L & M.
-Lift the Reversing Seat harness, no Strap release and seat pad no movement and slipe out, Fig. N.

17
-Poussez la boucle "日" 3 (extrémitéde la ceinture de taille) du siège vers l’avant pour passer dans la fente, la ceinture
de taille a étéfixée. Illustration I Répétez la procédure pour les autres. Poussez la boucle “日” 1 dans l'extrémitéde la
sangle d'entrejambe de l'avant du siège pour passer dans la fente. La sangle d'entrejambe a étéfixée. Illustration J
-Libérez la boucle de fixation qui se trouve sous le coussin de siège réversible et réglez la boucle pour allonger la
ceinture. Illustration K Installez à nouveau la boucle sous le repose-pieds et ajustez la ceinture pour vous assurer que la
protection de siège réversible est bien fixée. Illustrations L et M.
-Soulevez le harnais du siège réversible; la sangle et le coussin de siège ne doivent pas bouger, Illustration N.
-Druk de “日” gesp 3 (uiteinde van heupgordel) van de voorkant van het stoeltje door de sleuf om de heupgordel vast
te zetten. Fig. I. Herhaal voor de andere. Druk “日” gesp 1 aan het uiteinde van de kruisgordel van de voorkant van
het stoeltje door de sleuf om de kruisgordel vast te zetten. Fig. J.
-Ontgrendel de vergrendelde gesp die zich onder het omgekeerde zitkussen bevindt en verstel de gesp om de riem
langer te maken. Fig. K. Maak de gesp weer vast onder de voetensteun en verstel de riem om ervoor te zorgen dat het
omgekeerde zitkussen goed is vastgezet in het stoeltje. Fig. L & M.
-) Til het harnas van het omgekeerde stoeltje op, de gordels mogen niet losraken en het zitkussen mag niet bewegen en
uit de kinderwagen glijden, Fig. N.
REVERSING THE CANOPY - INVERSER LE CANOPY - DE KAP OMKEREN
-Unzip the Zipper on the Canopy, Fig A. Press the Canopy Clip (both side) and take the Canop out. Fig B.
-Put the Canopy Clip into Reversing parts (Both Sides) , Fig. C
-Ouvrez la fermeture à glissière sur le auvent, Illustration A. Appuyez sur le cliquet du auvent (des deux côtés) et sortez
le auvent. Illustration B
-Placez le cliquet du auvent dans les pièces réversibles (des deux côtés), Illustration C
-Rits de ritssluiting op de kap los, Fig. A. Druk op de klem van de kap (aan beide zijden) en haal de kap van de
kinderwagen. Fig. B.
-Plaats de klem van de kap in de omkeeronderdelen (aan beide zijden) , Fig. C
-Connect the Canopy. Snap and Seat Sidewing Snap (Both sides). Fig. D & E.
-Take out Fabric Connector from fabric cover which under the footrest, Fig F.

18
-Remarks: For America Version, there is a Foot Barrier under the footrest too, just use Fabric Connector in this step.
-Zip up the Canopy and Fabric Connector.Fig. G.
-0+ Reversing Seat Kit instrall finised, Fig. H.
-To remove Reversing Seat,Reversing the install step.
-In NON Reversing status, Reversing Seat Pad can replace the Main Seat Pad, refer to Fig. J , Push “日” Buckle 1/3/4
from Seat front go through the slot, then the Seat pad were fixed.
-Sortez le connecteur en tissu du revêtement en tissu situé sous le repose-pieds, Illustration F. Remarques: Pour la
version américaine, il y a aussi une barrière pour les pieds sous le repose-pieds; utilisez simplement le connecteur en
tissu pour cette étape.
-Refermez la glissière du auvent et du connecteur en tissu. Illustration G
-0+ Ensemble de siège réversible, Illustration H.
-Pour retirer le siège réversible, suivez les étapes d'installation dans le sens inverse.
-En mode NON inversé, le coussin de siège réversible peut remplacer le coussin de siège principal, voir Illustration J,
Poussez la boucle “日” 1/3/4 àpartir du siège avant par la fente, les coussinets du siège sont fixés.
-Druk de drukknoop op de kap in de drukknoop op de zijvleugel van het stoeltje (aan beide zijkanten). Fig. D & E.
-Haal het stoffen verbindingsstuk uit de stoffen afdekking die zich onder de voetensteun bevindt, Fig. F. Opmerkingen:
Bij de Amerikaanse versie zit er ook een afscherming voor de voeten onder de voetensteun, maar in deze stap hoeft u
alleen het stoffen verbindingsstuk te gebruiken.
-Rits de kap en het stoffen verbindingsstuk vast. Fig. G.
-0+ Het installeren van de omgekeerde zitplaats is nu voltooid, Fig. H.
-U kunt het omgekeerde stoeltje terugdraaien door de installatiestappen in omgekeerde volgorde te volgen. In de NIET-
omgekeerde status, kan het omgekeerde zitkussen het hoofdzitkussen vervangen, zie Fig. J , Druk “日” gesp 1/3/4 van
de voorkant van het stoeltje door de sleuf om het zitkussen vast te zetten.
TO LIFT AND CARRY THE STROLLER - SOULEVER ET TRANSPORTER LA POUSSETTE - DE KINDERWAGEN OPTILLEN EN DRAGEN
-CAUTION:To lifting or carrying the stroller, ensure that the storage latch is engaged and grasp the frame
approximately halfway along the stroller, so the stroller is balanced. Attach the shoulder strap and you can carry the
stroller on your shoulder conveniently.
-WARNING:Make sure to store the shoulder strap at the basket when the stroller is in use to avoid from catching
external object and cause any accident.
-ATTENTION: Pour soulever ou transporter la poussette, assurez-vous que le loquet de rangement est engagé et
saisissez le cadre à peu près au milieu de la poussette pour qu'elle soit en équilibre. Attachez la bandoulière et portez
facilement la poussette sur votre épaule.
-ATTENTION! Assurez-vous de ranger la bandoulière dans le panier lorsque vous utilisez la poussette afin d’éviter
d’attraper un objet extérieur et de provoquer un accident.
-LET OP: Zorg er bij het optillen of dragen van uw kinderwagen voor dat de opbergvergrendeling is vergrendeld en pak
het frame ongeveer halverwege de kinderwagen vast, zodat de kinderwagen in balans is. Bevestig de schouderriem om
de kinderwagen eenvoudig op uw schouder te dragen.
-WAARSCHUWING: Zorg ervoor dat u de schouderriem opbergt in de mand wanneer u de kinderwagen gebruikt om te
voorkomen dat de riem blijft hangen achter een extern voorwerp en een ongeluk veroorzaakt.

19
CARE AND MAINTENANCE - ENTRETIEN ET MAINTENANCE - ZORG EN ONDERHOUD
-To prolong the life of your stroller keep it clean and do not leave it in the direct sunlight or in the car boot for extended
periods of time.
-Removable fabric covers and trims may be cleaned using warm water with a household soap or milddetergent. Allow it to dry
fully, preferably away from the direct sunlight.
-Non removable fabric covers and trims may be spot cleaned using a damp sponge with soap or a mild detergent. Allow it to
dry completely before folding or storing it away.
-In some climates the covers and trims may be a-ected by mould and mildew. To help prevent thisoccurring, do not fold or
store the product if it is damp or wet.
-Always store the product in a well ventilated area.
-When using your stroller at the beach - completely clean your stroller afterwards to remove the sandand salt from the
mechanisms and wheel assembly. Sand and salt will cause premature wear andcorrosion.
-If there are compression marks on the tyres - Use a domestic hair dryer to gently warm (DO NOTOVERHEAT) the tyre and the
compression marks should slowly disappear.
-Always check parts regularly for tightness of screws, nuts, and other fastenerstighten if required.To maintain the safety of
your nursery product, seek prompt repairs for bent, torn, worn or broken parts.
-Pour prolonger la durée de vie de votre poussette, maintenez-la propre et évitez toute exposition prolongée au soleil ou
dans le coffre de votre voiture.
-Les revêtements et les garnitures en tissu amovibles peuvent être nettoyés à l’eau chaude avec un savon ou un détergent
doux. Laissez-les sécher complètement, de préférence à l'abri de la lumière directe du soleil.
-Les revêtements et les garnitures en tissu non amovibles peuvent être nettoyés avec une éponge humide avec du savon ou
un détergent doux. Laissez-les sécher complètement avant de les plier ou de les ranger.
-Dans certains climats, l'humidité et la moisissure peuvent affecter les garnitures et les coutures. Pour éviter cela, ne pliez pas
et ne stockez pas la poussette si elle est humide ou mouillée.
-Toujours stocker la poussette dans un endroit bien ventilé.
-Lorsque vous utilisez votre poussette à la plage - nettoyez complètement votre poussette après utilisation pour éliminer le
sable et le sel des mécanismes d'assemblage des roues. Le sable et le sel provoqueront une usure et une corrosion
prématurées.
-S'il y a des marques de compression sur les pneus, utilisez un sèche-cheveux pour réchauffer doucement le pneu (NE PAS
SURCHAUFFER) et les marques de compression devraient disparaître lentement.
-Vérifiez toujours régulièrement si les pièces, les vis, les écrous et autres attaches sont bien serrés.
-Pour maintenir la sécurité de votre produit pour enfants, réparez rapidement les pièces tordues, déchirées, usées ou
cassées.
-Om de levensduur van uw kinderwagen te verlengen, dient u de kinderwagen schoon te houden en de kinderwagen niet
gedurende lange periodes in direct zonlicht te zetten of in de kofferbak van uw auto te laten liggen.
-Afneembare stoffen hoezen en randafwerkingen mogen worden gereinigd met behulp van warm water met een
huishoudzeep of mild reinigingsmiddel. Laat volledig drogen, bij voorkeur uit de buurt van direct zonlicht.
-Niet-afneembare stoffen hoezen en randafwerkingen mogen ter plekke worden gereinigd met een vochtige spons met zeep
of mild reinigingsmiddel. Laat volledig drogen alvorens de kinderwagen op te vouwen of op te bergen.
-In sommige klimaten kunnen de hoezen en randafwerkingen worden aangetast door schimmel en meeldauw. U kunt dit
voorkomen door het product niet op te vouwen of op te bergen wanneer het vochtig of nat is.
-Berg het product altijd op in een goed geventileerde ruimte.
-Als u uw kinderwagen op het strand gebruikt, reinig uw kinderwagen daarna dan volledig om het zand en zout van de
mechanismen en de wielen te verwijderen. Zand en zout veroorzaken vroegtijdige slijtage en corrosie.
-Als er drukpunten op de banden zitten, gebruik dan een huishoudelijke föhn om de band voorzichtig te verwarmen (NIET
OVERVERHITTEN). De drukpunten zouden nu langzaam moeten verdwijnen.
-Controleer regelmatig of de schroeven, moeren en andere bevestigingsmiddelen van alle onderdelen goed zijn vastgedraaid.
Draai aan indien nodig.
-Om ervoor te zorgen dat uw kinderproduct veilig gebruikt kan blijven worden, dient u verbogen, gescheurde en beschadigde
onderdelen snel te laten repareren.
This manual suits for next models
1


