Bombfrog DW-15 V2 User manual

DW-15 (V2)
user manual

1.0 Introduction
Thank you for choosing the BOMBFROG DW-15 (V2) watch. This
watch contains major functions as below:
Current time, alarm, chronograph, timer, pacer, dual time;
Pedometer, calorie counter, sport mileage;
Weather forecast, thermometer, altimeter, barometer,
compass;
Detailed specification please see attached appendix.
In order to operate and perform the watch well, please follow the
below instructions:
Read the instruction carefully and keep it well before usage;
Avoid using the watch in extreme conditions;
Do not disassemble the watch yourself;
Clean the watch with one soft cloth, do not use the organic
solvent;
Keep the watch away from the magnet or magnetic objects;
Keep the watch in one dry place when not in use.

2.0 Button Introduction
LIGHT(A):switch on EL back light for 3 seconds/zero-clear/delete data;
MODE(B):function convert/press and hold will start setting;

ALTI-(C):altimeter mode/decrease;
COMP(D):compass mode;
BARO+(E):barometer mode/increase.
3.0 Function Diagram

4.0 Current Time Mode—Function Display
Function Display
Top: weather forecast and press E button for 2 seconds will convert
the following 4 functions,
Weekday
Temperature
Altitude tendency chart
Sea level air pressure tendency chart
Medium: time

Bottom: date
NOTE: If you want to achieve one accurate atmosphere temperature,
you need to take the watch down for 20-30 minutes, in order to
eliminate the influence of body temperature.
4.1 Current Time Mode-Weather Forecast
Weather Forecast
With the change of air pressure before, the watch will achieve the
corresponding weather forecast, but it will be different from the
actual weather;
How to Display the Weather in Future
The watch will display the weather in future by the following 4 icons:
Sunny

Partly cloudy
Cloudy
Rainy
This function only could display under current time and dual time
mode.
4.2 Current Time Mode-Current Time Setting
How to Set the Current Time
1. Under time mode, press and hold B button until the flashing icon
“SET” and second digit appear;
2. Press B button to convert;

3. When the digit of second is flashing (selected), press E/C button to
clear the digit to “00”.
4. When the other digit of minute, hour, year, month or day is flashing
(selected), press E/C button to increase/decrease the digit (press and
hold button to change faster);
5. When the month/day and 12/24 hour format is flashing, press E/C
button to convert;
6. When the LCD contrast is flashing, press E/C button to
increase/decrease the contrast level (1-10);
7. When the beep is flashing, press E/C button to switch ON/OFF it;
8. Press and hold B button to save and exit.

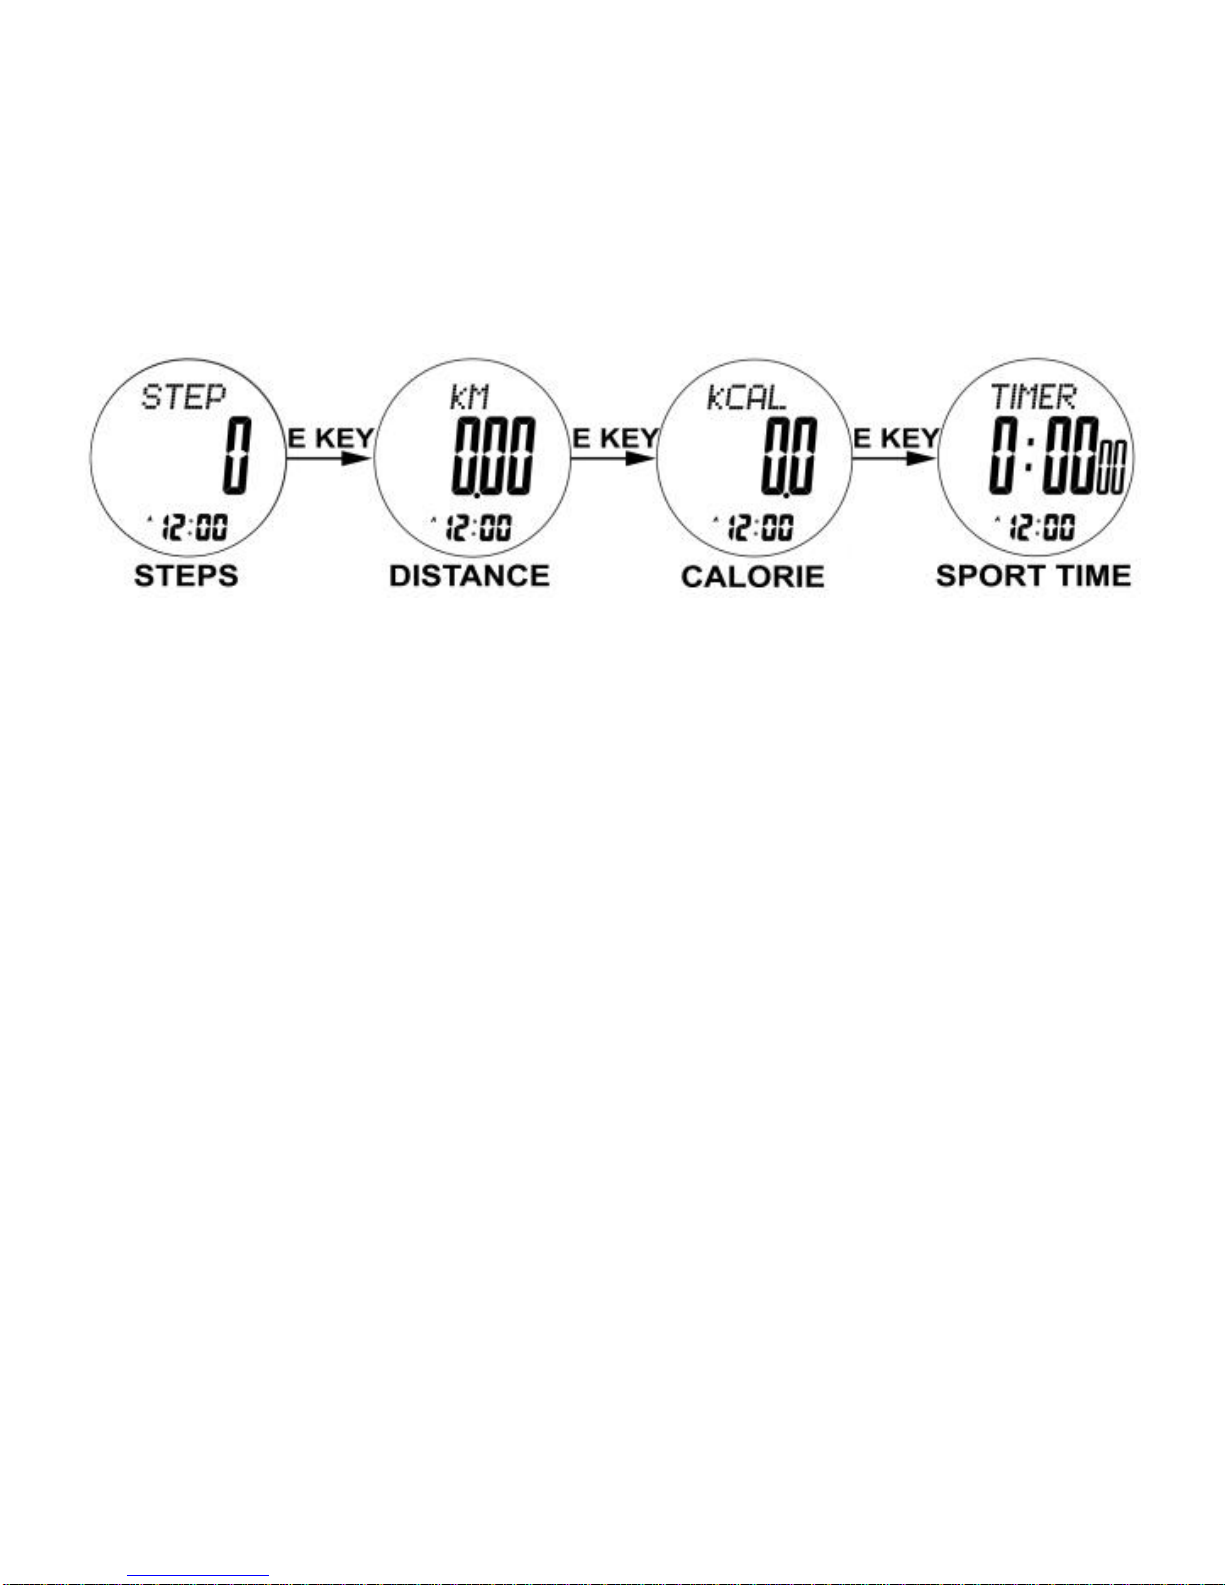
5.0 Pedometer Mode
Under time mode, press B button to enter into pedometer
mode and the step value will be 0;
Under pedometer mode, press A button, EL back-light will last
3 seconds;
Press and holdA button for 3 seconds to zero-clear the step
value;
Press B button to enter into pedometer storage mode, press
and hold B button to enter into pedometer setting mode;
Press C button, nothing will happen; press and hold C button
to switch ON/OFF pedometer;
Press D button, nothing will happen;
Press E button to convert the modes sequentially as below:
Step→Mileage→Calorie→Sport time→Step
NOTE:
1. The step icon will appear if pedometer starts;
2. Only under pedometer mode, press and hold C button to
switch ON/OFF pedometer.
5.1 Pedometer Setting Mode
Under pedometer mode, press and hold B button to enter into
setting and reviewing user information, the default setting of
metric system will flash;
Press B button to convert the modes sequentially as below:
Metric/Imperial System→Step distance→Weight→Metric/Imperial
System
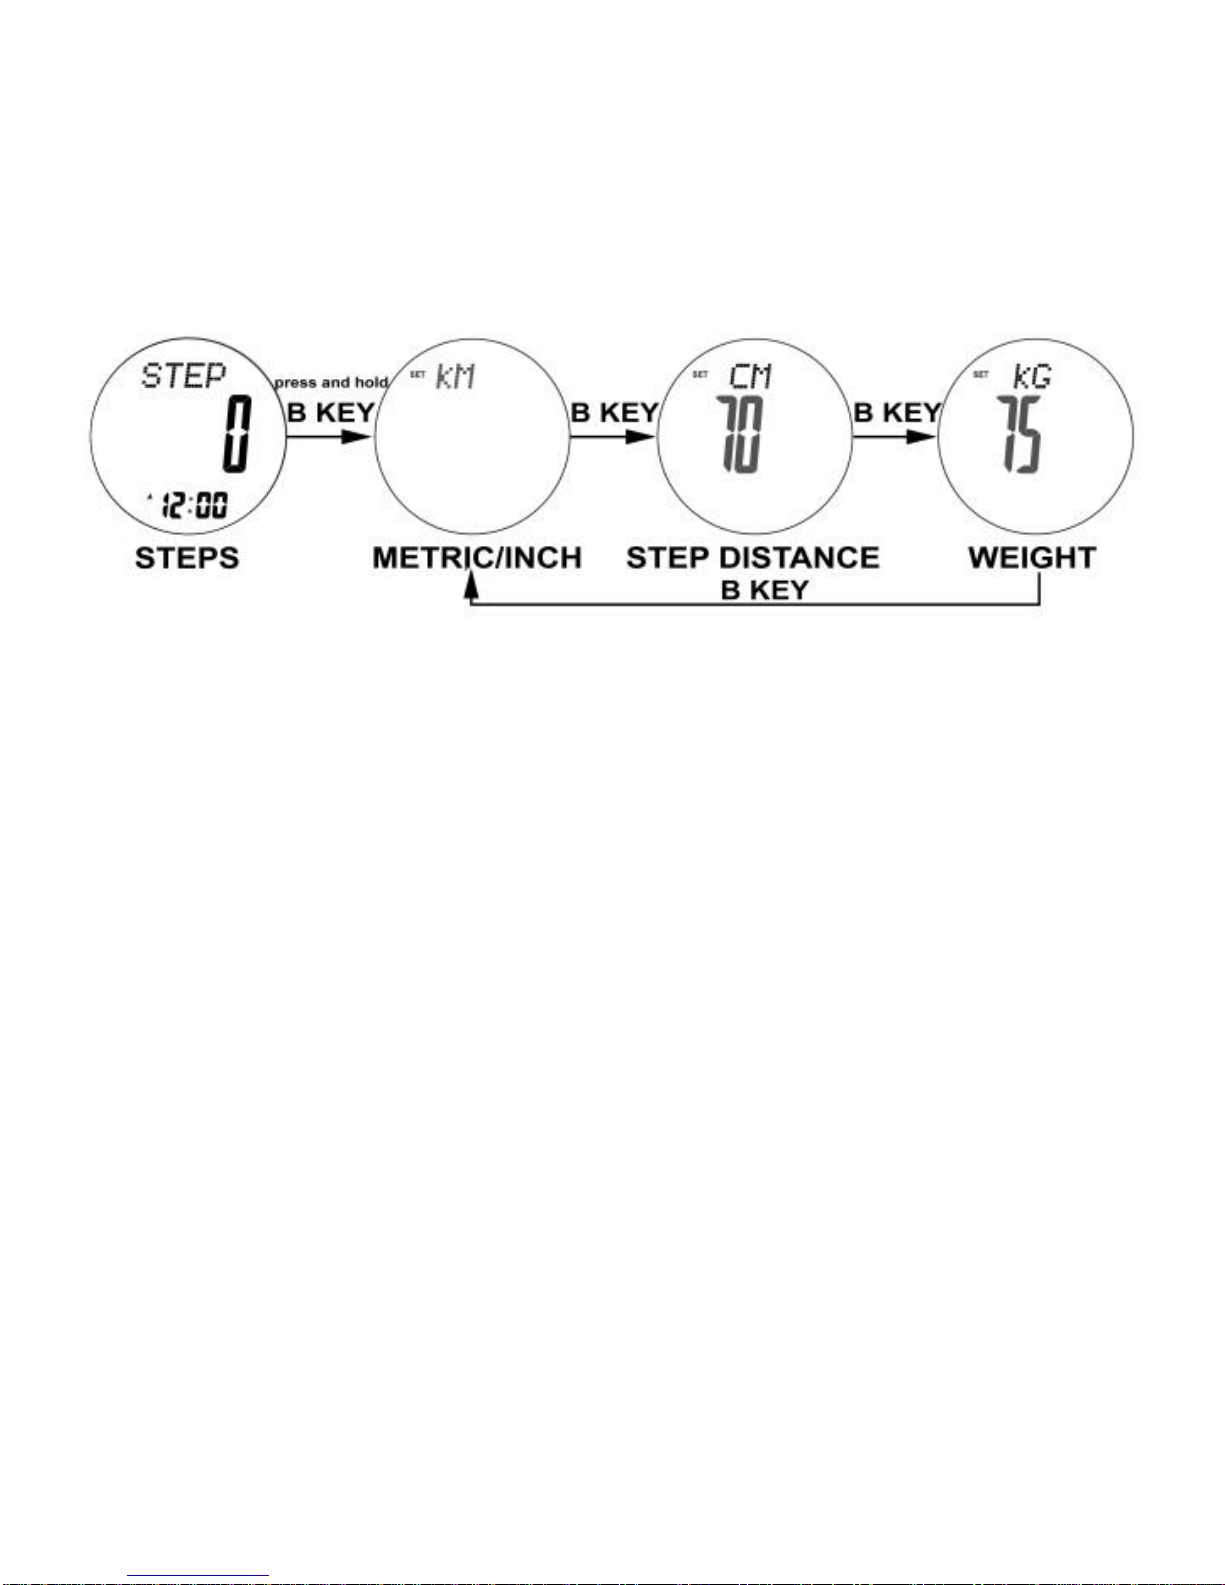
Metric/Imperial system: the default system is metric, press
E/C button to convert metric/imperial system. After
adjustment, weight and step distance unit will be changed
automatically;
Weight setting: the default value is 75 kg(165LB), the setting
range is: 20-200KG/44-441LB;
Step distance setting: the default value is 70CM(28INCH), the
setting range is: 30-180CM/12-77INCH;
Press E/C button to increase/decrease the digit, press and
hold E/C button to change faster;
Press B button to save and exit.

6.0 Pedometer Storage Mode
1. Under time mode, press B button two times to enter into
pedometer storage mode, then will display the default data;
2. Under pedometer storage mode, press A button, EL back-light
will last for 3 seconds;
3. Press and holdA button over 3 seconds, then the storage data
will be cleared;
4. Press B button to enter into alarm mode;
5. Press C button, nothing will happen;
6. Press C button to review 7 days history data (if any);

7. Press E button to convert the data of each day sequentially (if
any): steps-->distance-->calorie-->sport time
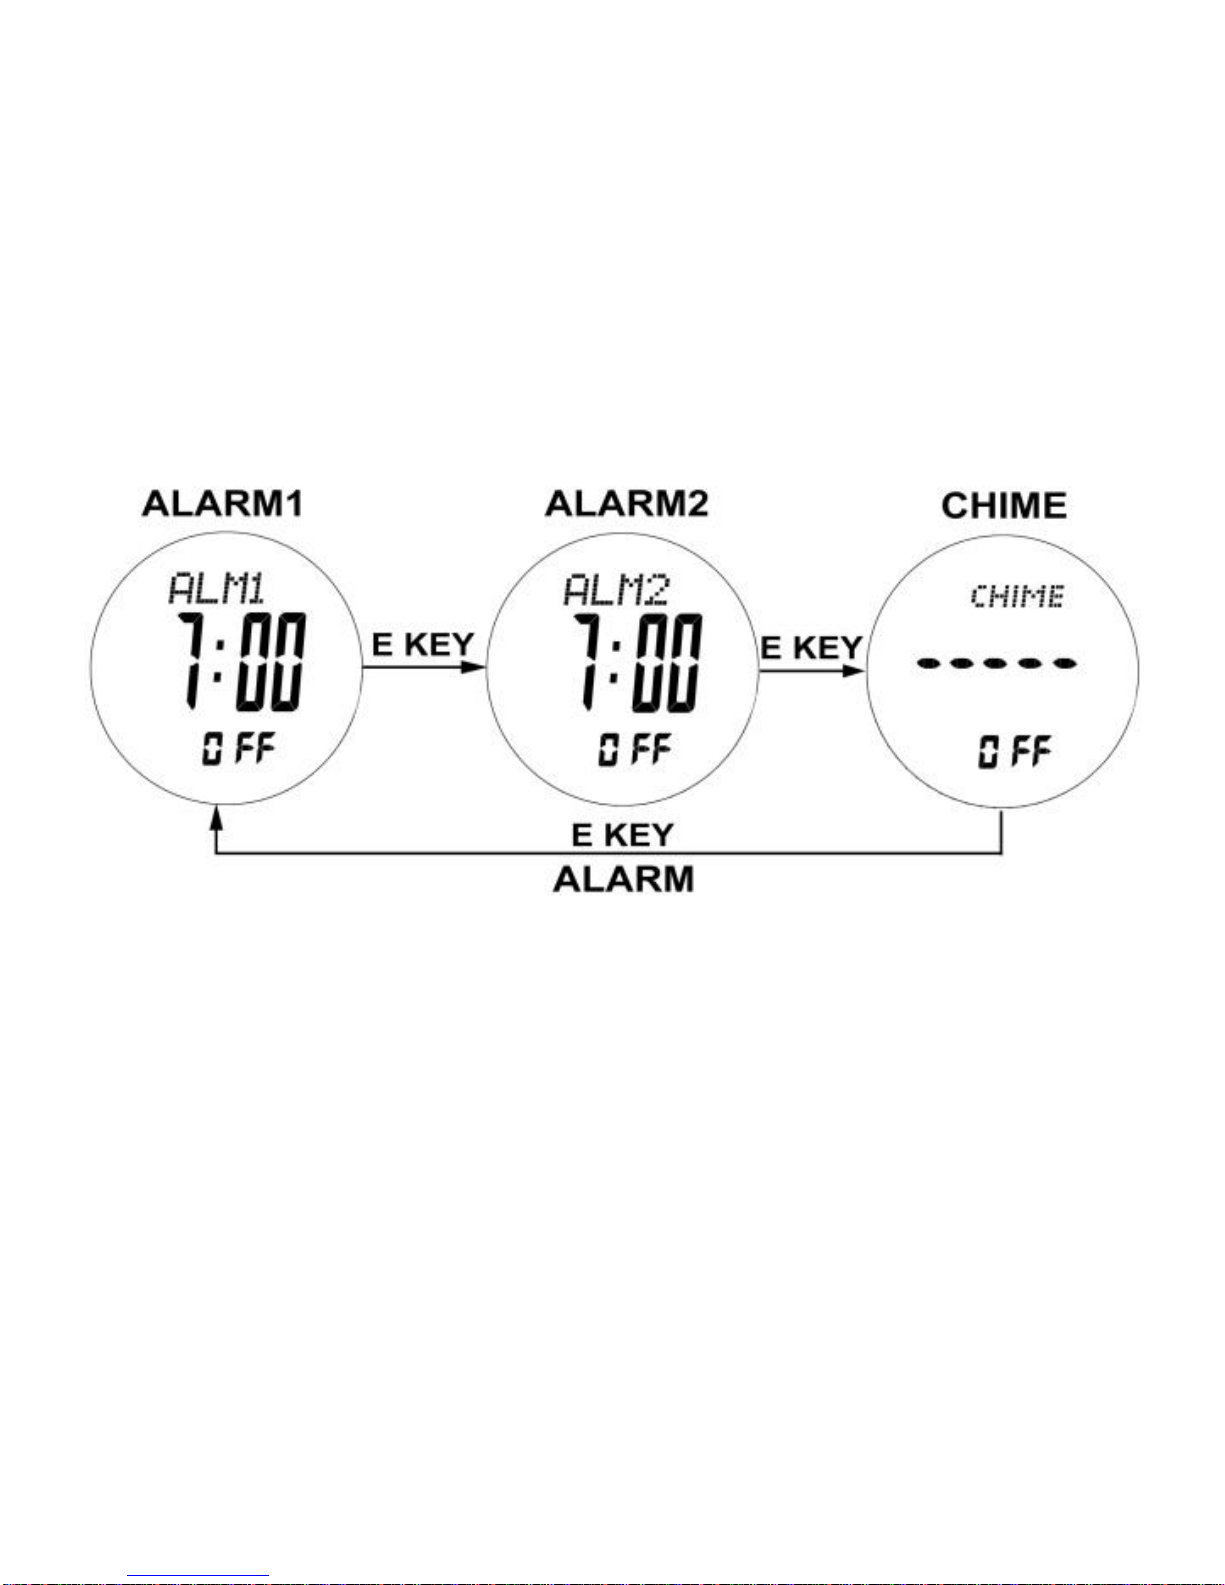
7.0 Alarm Mode-Alarm 1, Alarm 2 and Hourly
Chime
Alarm 1, Alarm 2
The watch contains 2 sets of alarm: alarm 1 and alarm 2,
working independently;
Press E button to convert among alarm 1, alarm 2 and hourly
chime;
How to Switch ON/OFF Alarms
1. Under alarm 1 (2) mode, press C button to switch ON/OFF alarm
1 (2);
2. When alarm 1 (2) is ON, the icon will appear;
3. If the alarm icon appears, the watch will beep at the presetting
alarm time every day, then press any buttons to stop the sound or it
will stop automatically after 30 seconds;
How to Switch ON/OFF Hourly Chime
1. Under hourly chime mode, press C button to switch ON/OFF;
2. When hourly chime is ON, the icon “CHIME”will appear, and the
watch will beep at the hourly time.
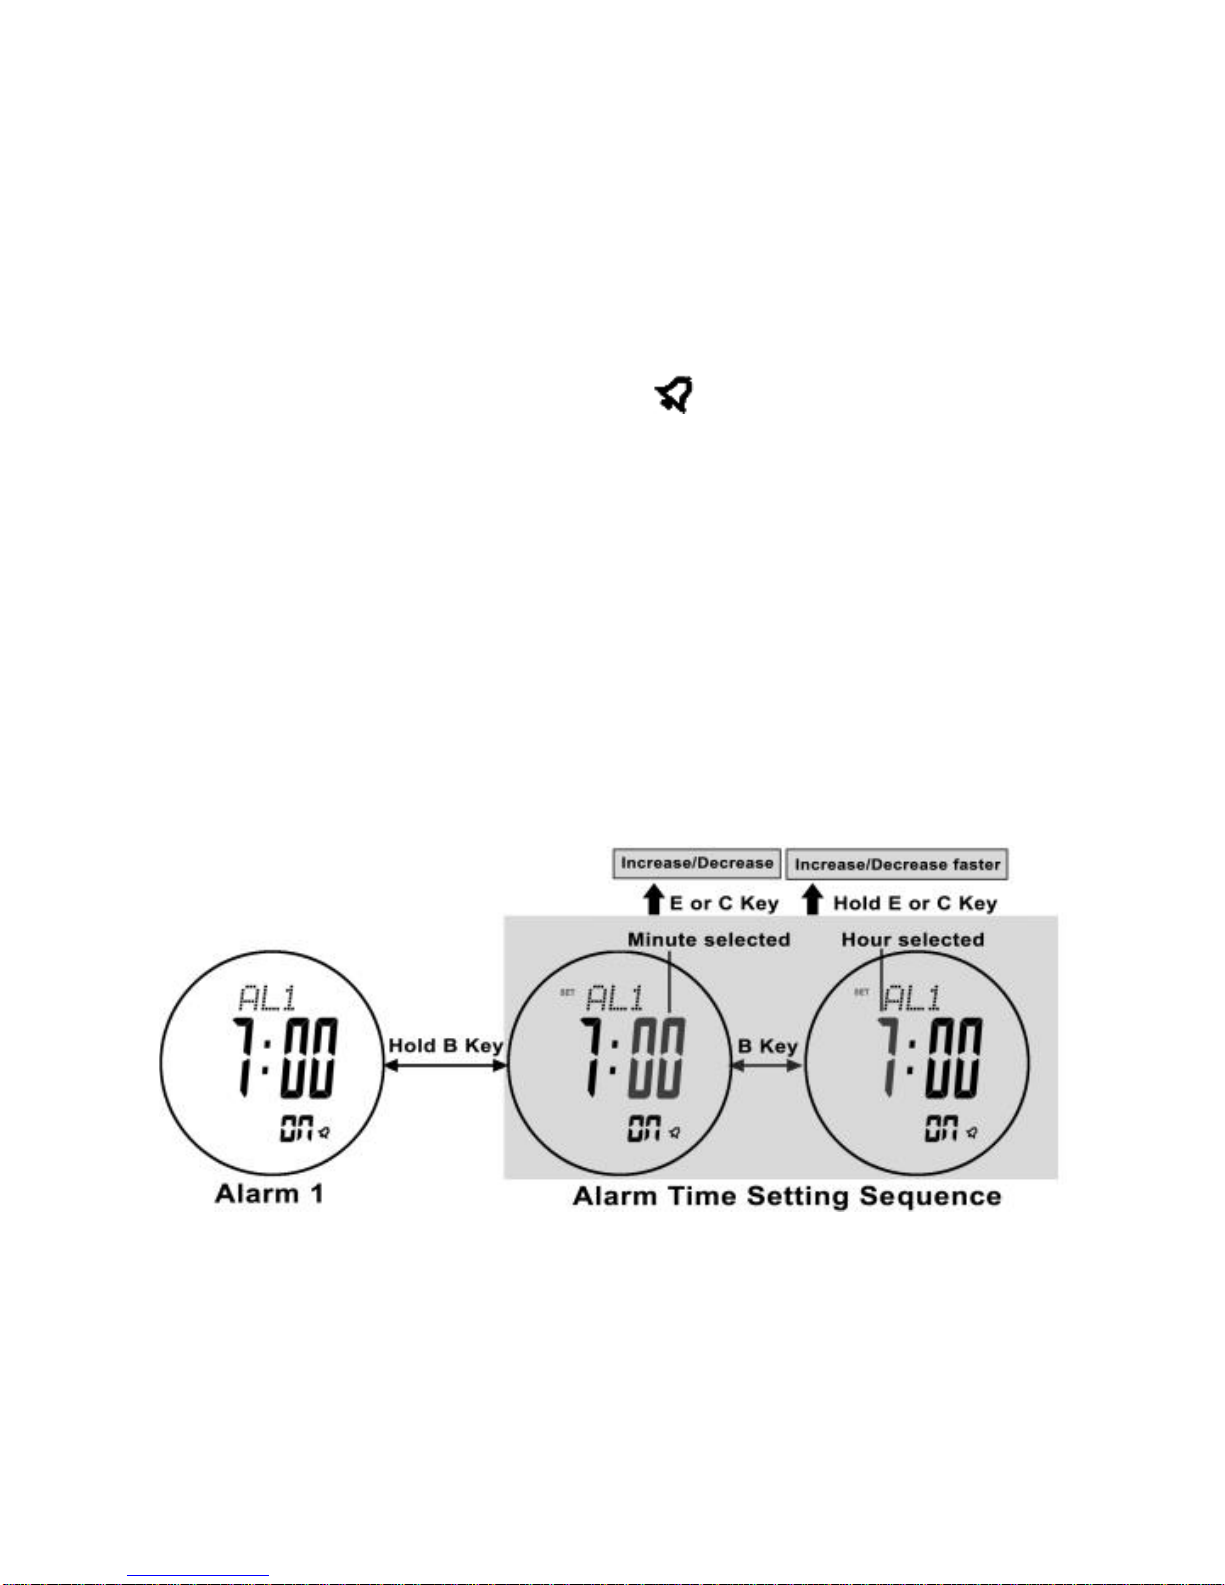
7.1 Alarm Mode-Alarm Setting

How to Set the Alarm 1 and Alarm 2
1. Under alarm 1 (2) mode, press and hold B button until the
flashing icon “SET” appears;
2. Press B button to convert between minute and hour;
3. When the minute or hour is flashed (selected), press E/C button
to increase/decrease the digits (press and hold button to change
faster);
4. Press and hold B button to save and exit.
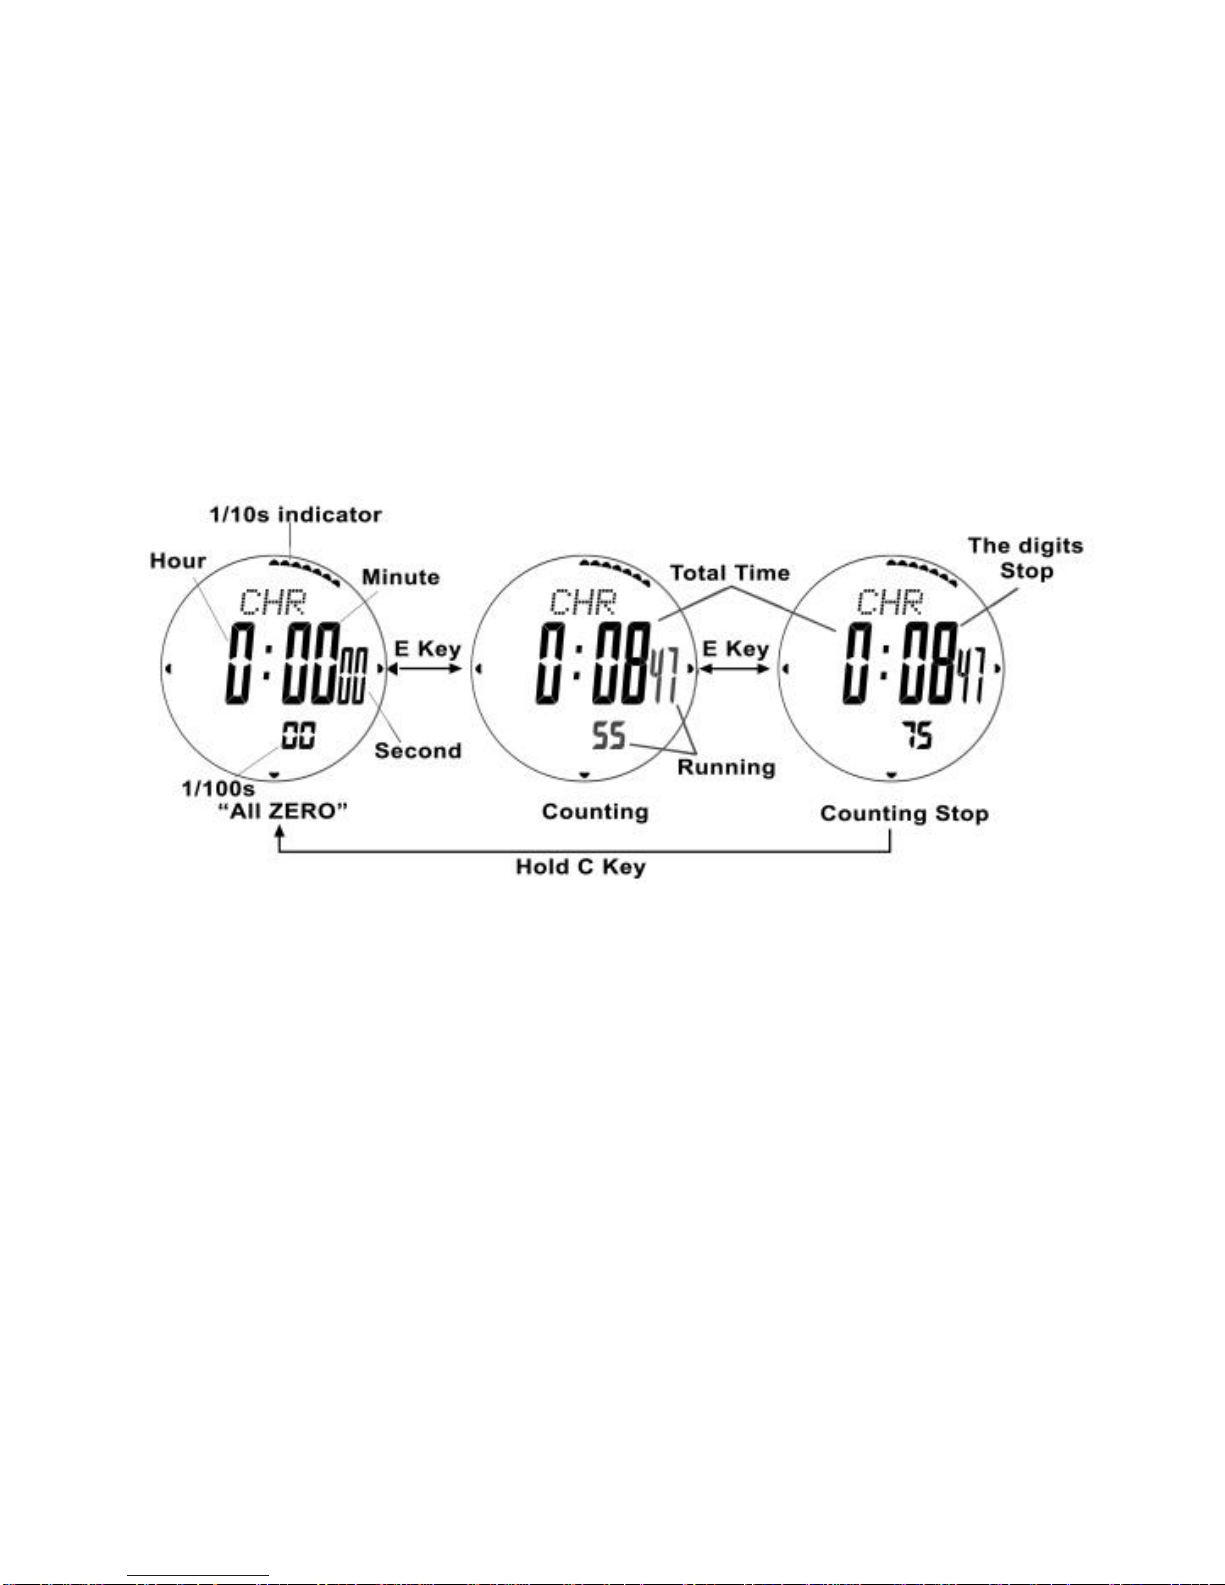
8.0 Chronograph Mode-Switch ON/OFF
Chronograph
Chronograph Mode
The watch contains functions of cumulative time and lap time;
The digits are 0 in the first use or after zero clearing;.
How to Switch ON/OFF the Chronograph
1. Under chronograph mode, press E button to switch ON/OFF the
chronograph;
2. Repeat the above mentioned steps, the watch will start

accumulative time;
How to Reset the Chronograph
Press and hold C button, the chronograph will be reset after it
has been switched off.
NOTE: The lap time before also will be deleted after zero clearing
the chronograph.
8.1 Chronograph Mode-Record and Review Lap Time
Lap Time
The watch could start lap time up to 100 laps, even if switch
on accumulative time;

How to Record Lap Time
1. When start the chronograph, press C button one time will record
one lap (it will not influence the accumulative time);
2. The lap and time will be displayed; the watch will return to timing
display after 15 seconds and the lap icon will disappear;
3. Repeat the above mentioned steps to achieve the other lap time.
How to Review Lap Time
1. Under chronograph mode, press and hold B button to enter into
reviewing display;
2. Press E/C button to review the lap time before or after (press and
hold button will change faster);
3. Press and hold B button to exit
How to Delete Lap Time
Press and hold C button, the digits will be zero cleared when
switch off the chronograph.

9.0 Timer Mode
Timer
The watch will count down from starting time to 0;
The starting time could be preset.
Table of contents
Other Bombfrog Watch manuals

Popular Watch manuals by other brands


Fitbit Zip
Fitbit Zip Versa Troubleshooting steps

TAG Heuer
TAG Heuer Connected Series Instructions and guarantee card

Hamilton
Hamilton FACE 2 FACE III LIMITED EDITION instruction manual

S.Coifman
S.Coifman Movement Caliber 1069 instruction manual

Diesel
Diesel 515.2-3 instructions

Canyon
Canyon Lollypop SW-63 quick guide


