Bondtech Prusa i3 Setup guide
Bondtech for Prusa i3
Assembly and installation manual
This work is licensed under a GNU General Public License v3.0

Installation manual extruder upgrade for Bondtech_Prusa_i3 V1.1 1
Table of Contents
Acknowledgements 1
Introduction 1
Compatibility 2
What’s in the box? 2
Mechanical Installation 3
What you need 3
Preparation 3
Software Configuration 15
Set new E-step value 15
Acknowledgements
This is a co-development work with awesome guys in the Prusa Community like
Chris Warkocki, Grégorie Saunier (Bear Upgrades), Olof Ogland, Erik Bjorgan, Josh
Jones, Kyle Wiehe, Marc Evertz, Matt Harrison, Ocie Ward, Sando Bendig, Vecko
Kojchevski (Vecko Extruder), Steven Mölby that have provided excellent feedback
and suggestions of how to develop the "perfect" extruder setup for the Prusa series
printer. A lot of work has been spent in this project and we have tried to listen to all
the inputs in order to find a solution that can be fitted to a Prusa I3 MK2, MK2S,
MK2.5 and MK3.
Introduction
This kit contains the necessary parts to convert to our freshly designed
extruder that uses 3:1 gearing ratio for improved precision and resolution,
optimized geometry for the heat-sink cooling and many other improved
features.
It also reduces the moving weight to reduce vibrations and ghosting.

Installation manual extruder upgrade for Bondtech_Prusa_i3 V1.1 2
Compatibility
The upgrade is compatible with the following machines:
- Prusa i3 MK2
- Prusa i3 MK2s
- Prusa i3 MK2,5
- Prusa i3 MK3
What’s in the box?
All customers
1x Bondtech extruder for Prusa i3.
1x PTFE tube (80mm).
1x SLS printed Extruder front.
1x SLS printed Extruder rear.
1x Bag with screws and bolts.
1x Fan shroud.
1x Mounting bracket.
MK2, MK2s, MK2.5 and MK3 without BMG
1x Nema17 Pancake stepper motor.
1x Stepper motor cable.
1x Shaft with 50T gear.
1x Thumbscrew.
2x Ball bearings.
1x 3x32mm shaft.
1x Sensor cover
MK2 and Mk2s
2x Needle bearing.
1x 3x20mm shaft.
1x Primary drive wheel (direct).
1x Secondary drive wheel (direct).
1x Sensor cover

Installation manual extruder upgrade for Bondtech_Prusa_i3 V1.1 3
Mechanical Installation
What you need
To install the upgrade you will need.
- M1.5- Hex Wrench
- M2.5- Hex Wrench
- Hobby knife with sharp tip or similar.
Recommended: Download and print out Bondtech’s PTFE fixture for precise
measurement of the tube length. STL-file available at
https://github.com/BondtechAB/Bondtech_Prusa_i3/tree/master/CAD-Files
Preparation
Remove your old extruder. Use Prusa’s extruder assembly guide to reverse the
steps if you need to. This kit will use a different motor, so you can unwrap the cables,
remove your current motor to prepare for a new one.
Installation manual extruder upgrade for Bondtech_Prusa_i3 V1.1 4
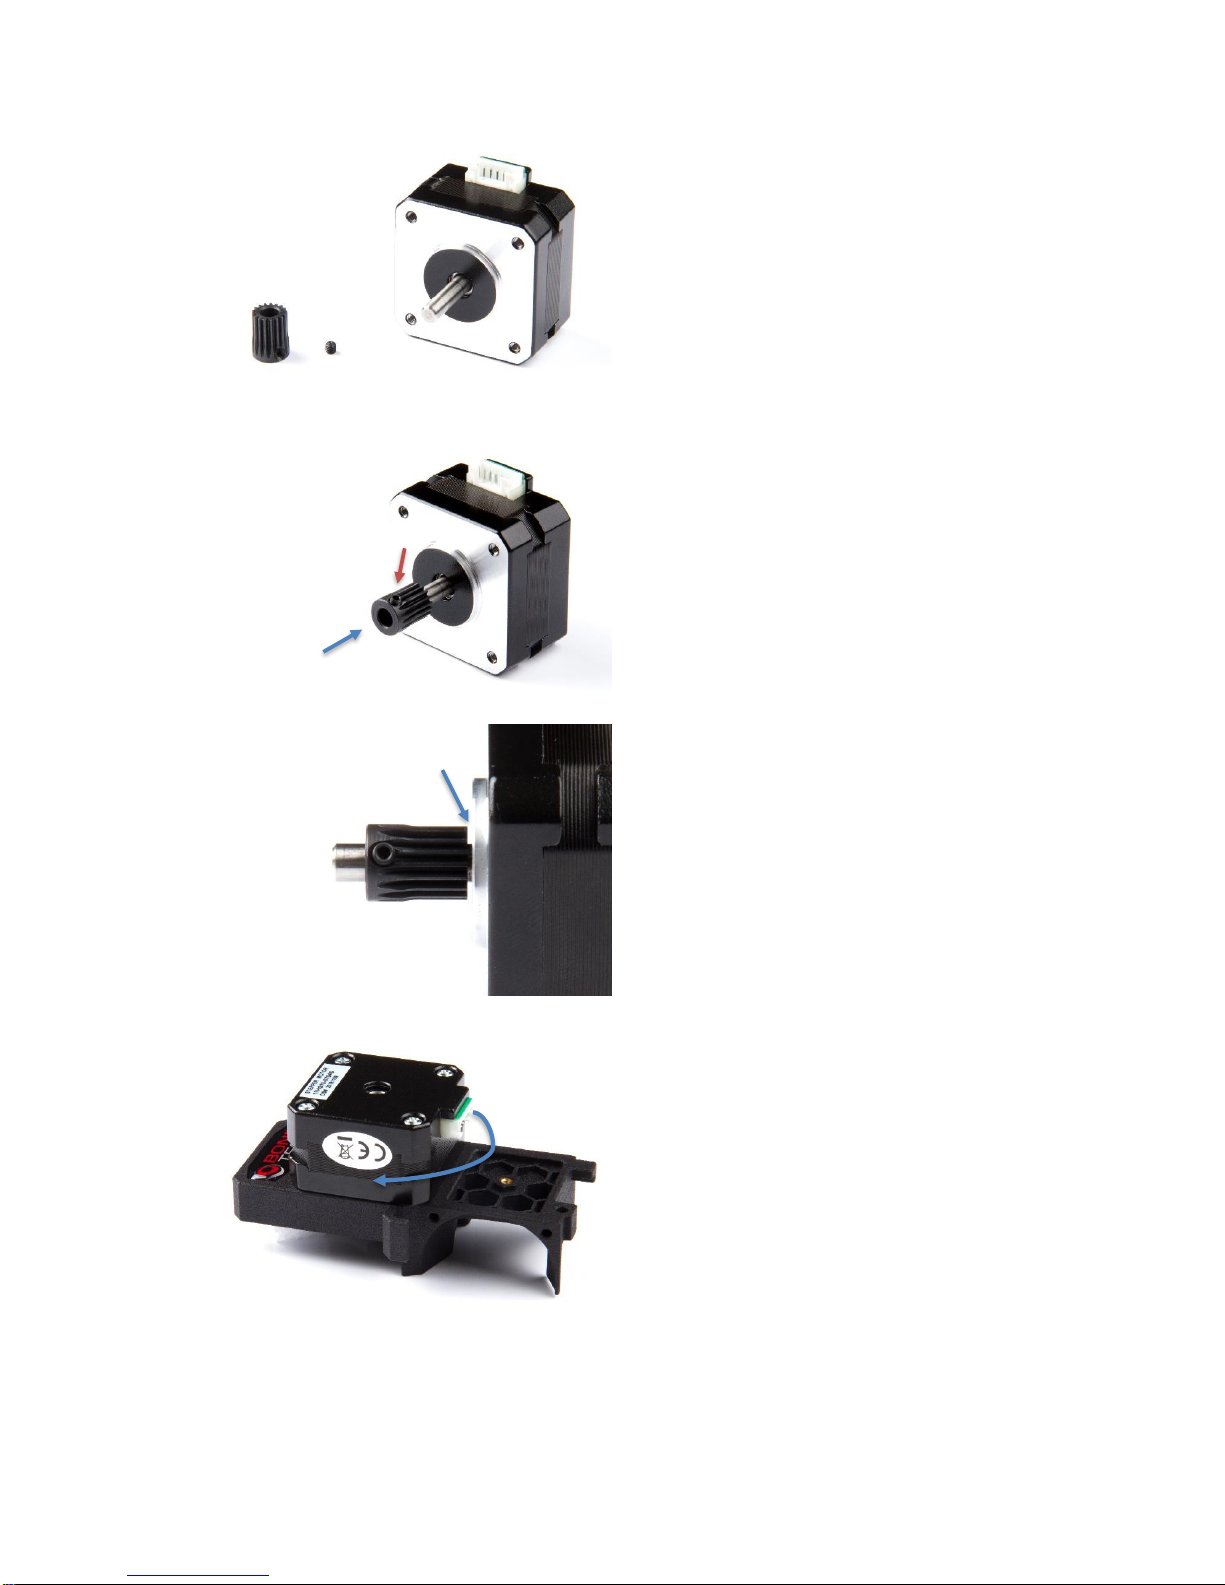
●Preparing your motor.
●Insert the M2x3 setscrew and
slide the motor gear onto the
shaft as oriented in the picture.
●Leave a 1-1,5 mm gap between
the gear and the motor and
tighten it using your 1,5mm Allen
key.
Recommended: Use Loctite to
secure the screw.
•Assembly the extruder front.
•Place the motor on the extruder
front and orient the cable
connection as you choose.
(Downwards or to the left.)

Installation manual extruder upgrade for Bondtech_Prusa_i3 V1.1 5
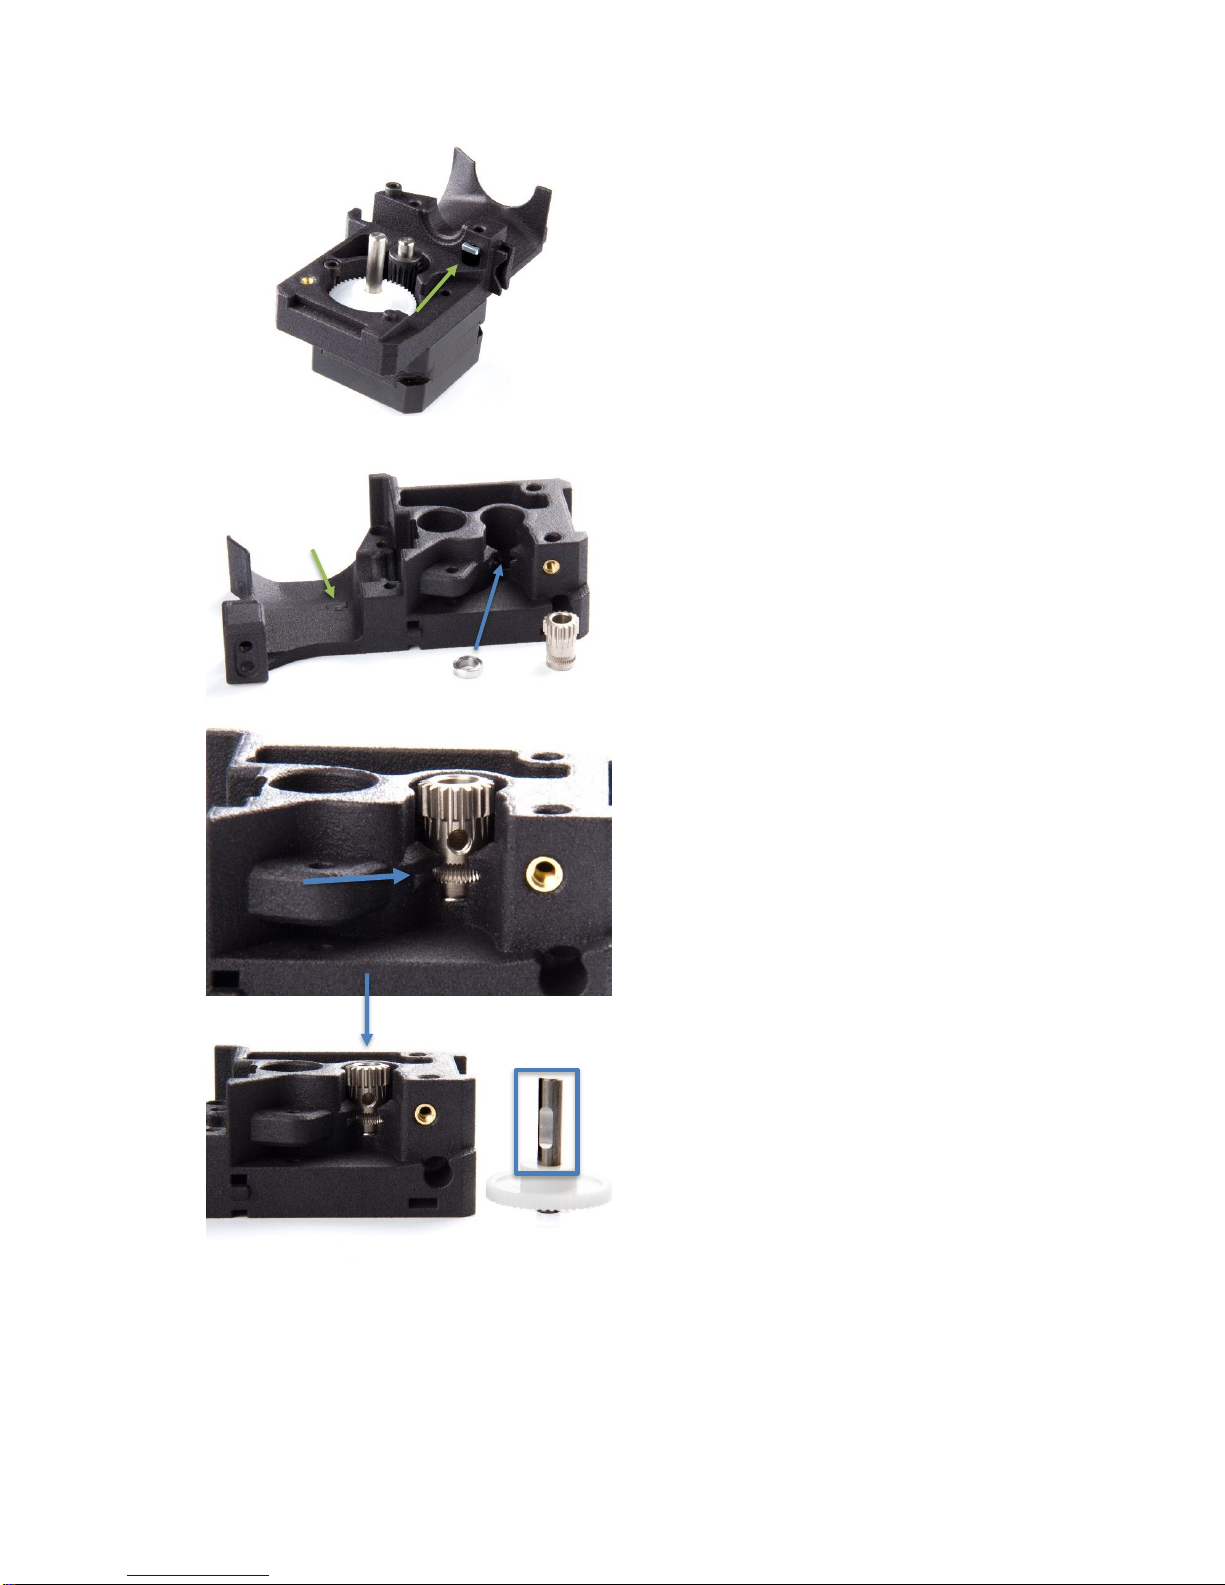
●Insert three M3 screws and
loosely tighten them using a
2.5mm Allen key.
•M3x8
•M3x12
•M3x25
●Insert a ball bearing. Ensure it is
fully pressed down into the slot.
●Insert the shaft with the white
plastic gear into the bearing.
Rotate the shaft to ensure correct
alignment of the gears.
•Tighten the screws with
reasonable force.
•Important: Be careful
when tighten the M3x12
screw to avoid damaging
the pocket!
Installation manual extruder upgrade for Bondtech_Prusa_i3 V1.1 6
●Insert a square nut into the
pocket.
●Prepare the extruder rear.
Insert a ball bearing and press it
down using a primary drive gear.
•If you are using the bear X-
carriage remove hex cover plug
by pushing it from the rear side.
This hole is for a M3 nut.
●Press the primary drive gear
down until the groves align with
the filament path.
●Slide the shaft inside the drive
gear. Note the orientation of the
parts. The hole and the flat
surface on the shaft must align.

Installation manual extruder upgrade for Bondtech_Prusa_i3 V1.1 7
●Insert the M3x2 setscrew and
tighten it with your 1,5 Allen key.
Important: Ensure the groves
align with the filament path!
Recommended: Use Loctite to
secure the screw.
Important: If the setscrew is
not properly aligned with the
flat surface it will stick out and
start grinding on the
secondary drive gear when you
start printing!
•Assemble the hinge.
•Slide the two needle bearings
onto the 3x20 mm shaft.
•Use a small dab of lithium based
grease to lubricate the bearings
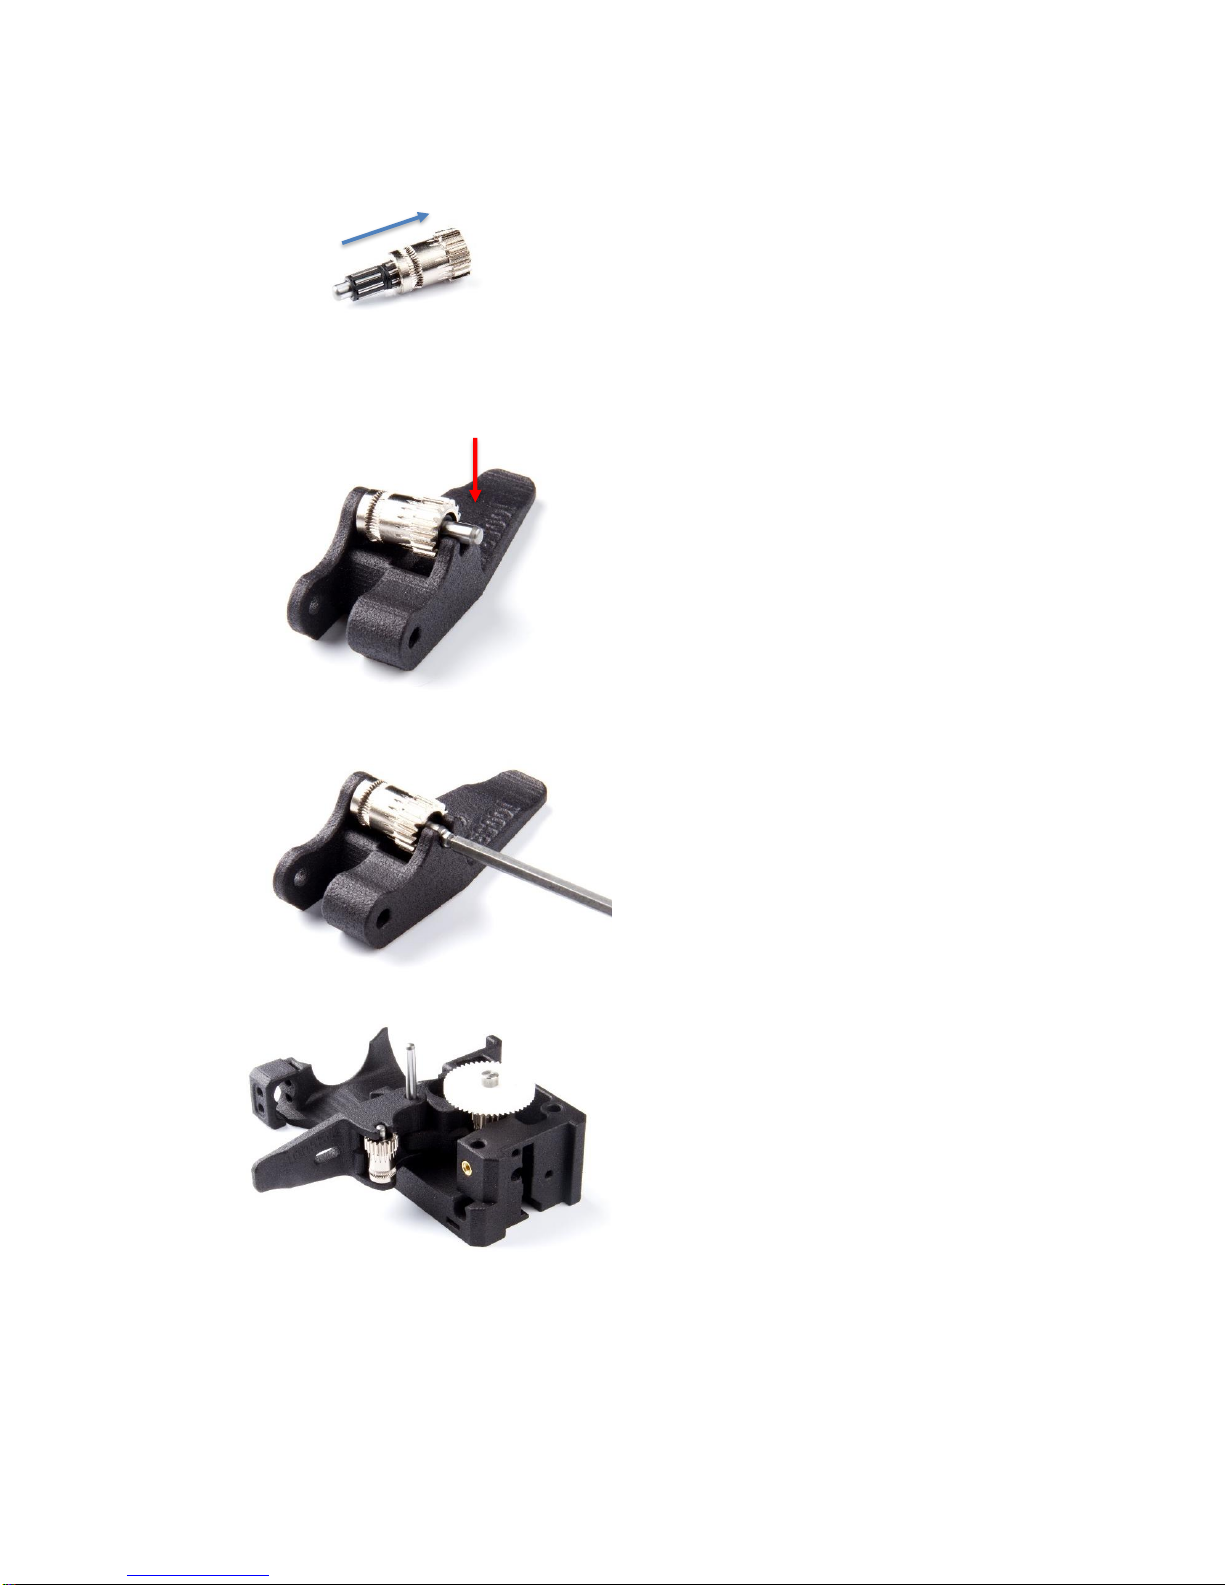
Installation manual extruder upgrade for Bondtech_Prusa_i3 V1.1 8
•Slide the shaft with the bearings
through the secondary drive gear.
•Align the gear with the hinge as
shown in the photo and press the
shaft down until you hear the
click.
•Carefully press the shaft in place
using your 2.5mm Allen key.
•Put a small dab of lithium based
grease on the gear section to
reduce friction. Make sure that
you do not get it on the drive
section of the gear.
●Install the hinge to the extruder
rear using the 3x32mm shaft.

Installation manual extruder upgrade for Bondtech_Prusa_i3 V1.1 9
●Install the thumbscrew.
•If you are a MK2/s user
insert a square nut in the
front pocket for the Pinda
Probe.
●Prepare the HotEnd. Take the
new supplied PTFE tube. Cut one
of the ends according to Prusas
recommendation, using a knife or
a razor. Using this fixture will
help. (Credits to Olof Ogland)
●Insert the newly cut end of the
tube into the HotEnd.
●Cut the tube 6.3 mm from the top
of the HotEnd. Save the
remaining piece for the sensor
cover.
●Recommended: Use Bondtech’s
cutting fixture for precise
measurement. STL-file is
available at:
https://github.com/BondtechAB/B
ondtech_Prusa_i3/tree/master/C
AD-Files
Installation manual extruder upgrade for Bondtech_Prusa_i3 V1.1 10
●Use a knife or razor to chamfer
the inside of the tube for better
filament guidance.
Important: Do not let any left
over from the tube fall into the
HotEnd we recommend you
remove the tube before
chamfer the inside!
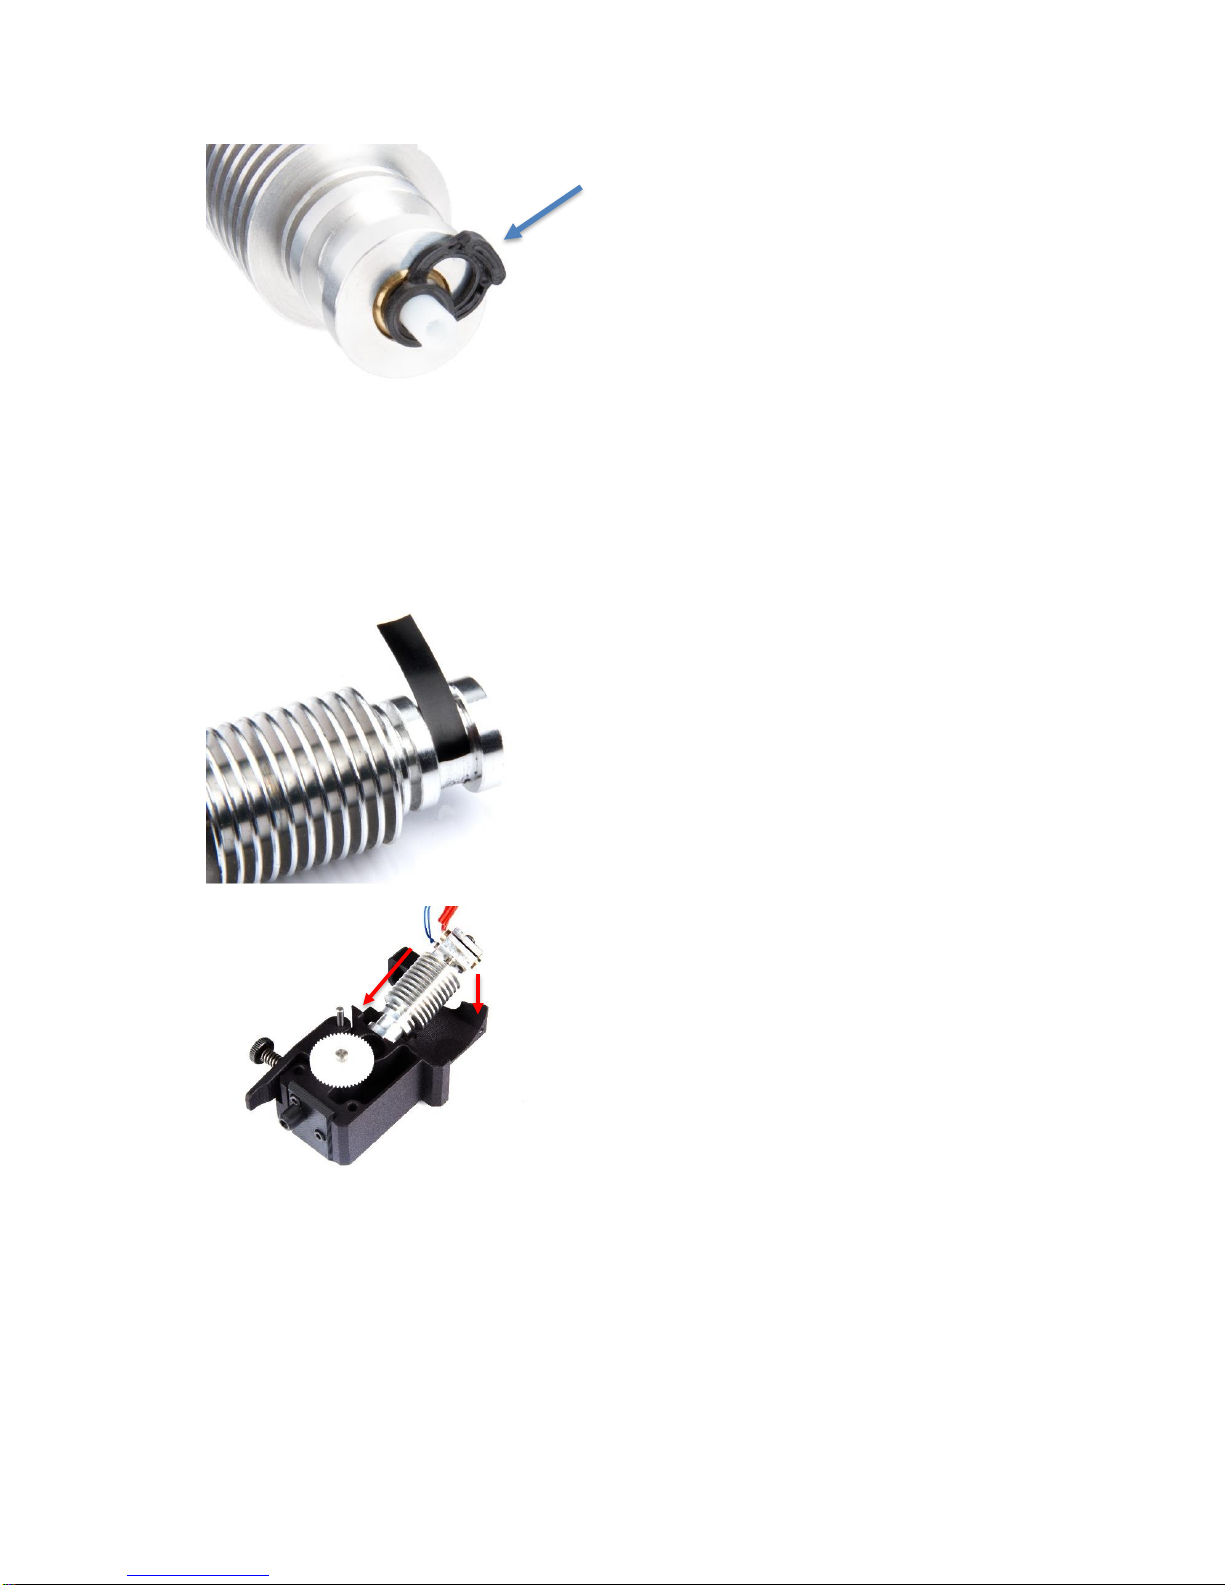
●Insert a push fit clip between the
HotEnd and the collet.
●Recommended: Add a small
piece of tape, 5x20mm on the
inner ring. The low friction
between the parts may cause the
HotEnd to rotate to easily when
installed.
●Install the HotEnd into the
extruder rear, angled as shown in
the photo. And push it in place.
Installation manual extruder upgrade for Bondtech_Prusa_i3 V1.1 11
•Attach the front onto the rear
part. Push the HotEnd upwards
to align the neck correctly.
•Ensure everything is aligned and
carefully clamp the parts
together.
Important: The parts should fit
together easy. Do not use any
excessive force!
•Install the extruder to your X-
Carriage using three M3 screws.
•M3x40
•M3x45
Important: These screws are
sized to use on your stock
MK2,5/MK3 carriage or the
modified MK2/s carriage. If you
have another carriage different
screw length could be
necessary!
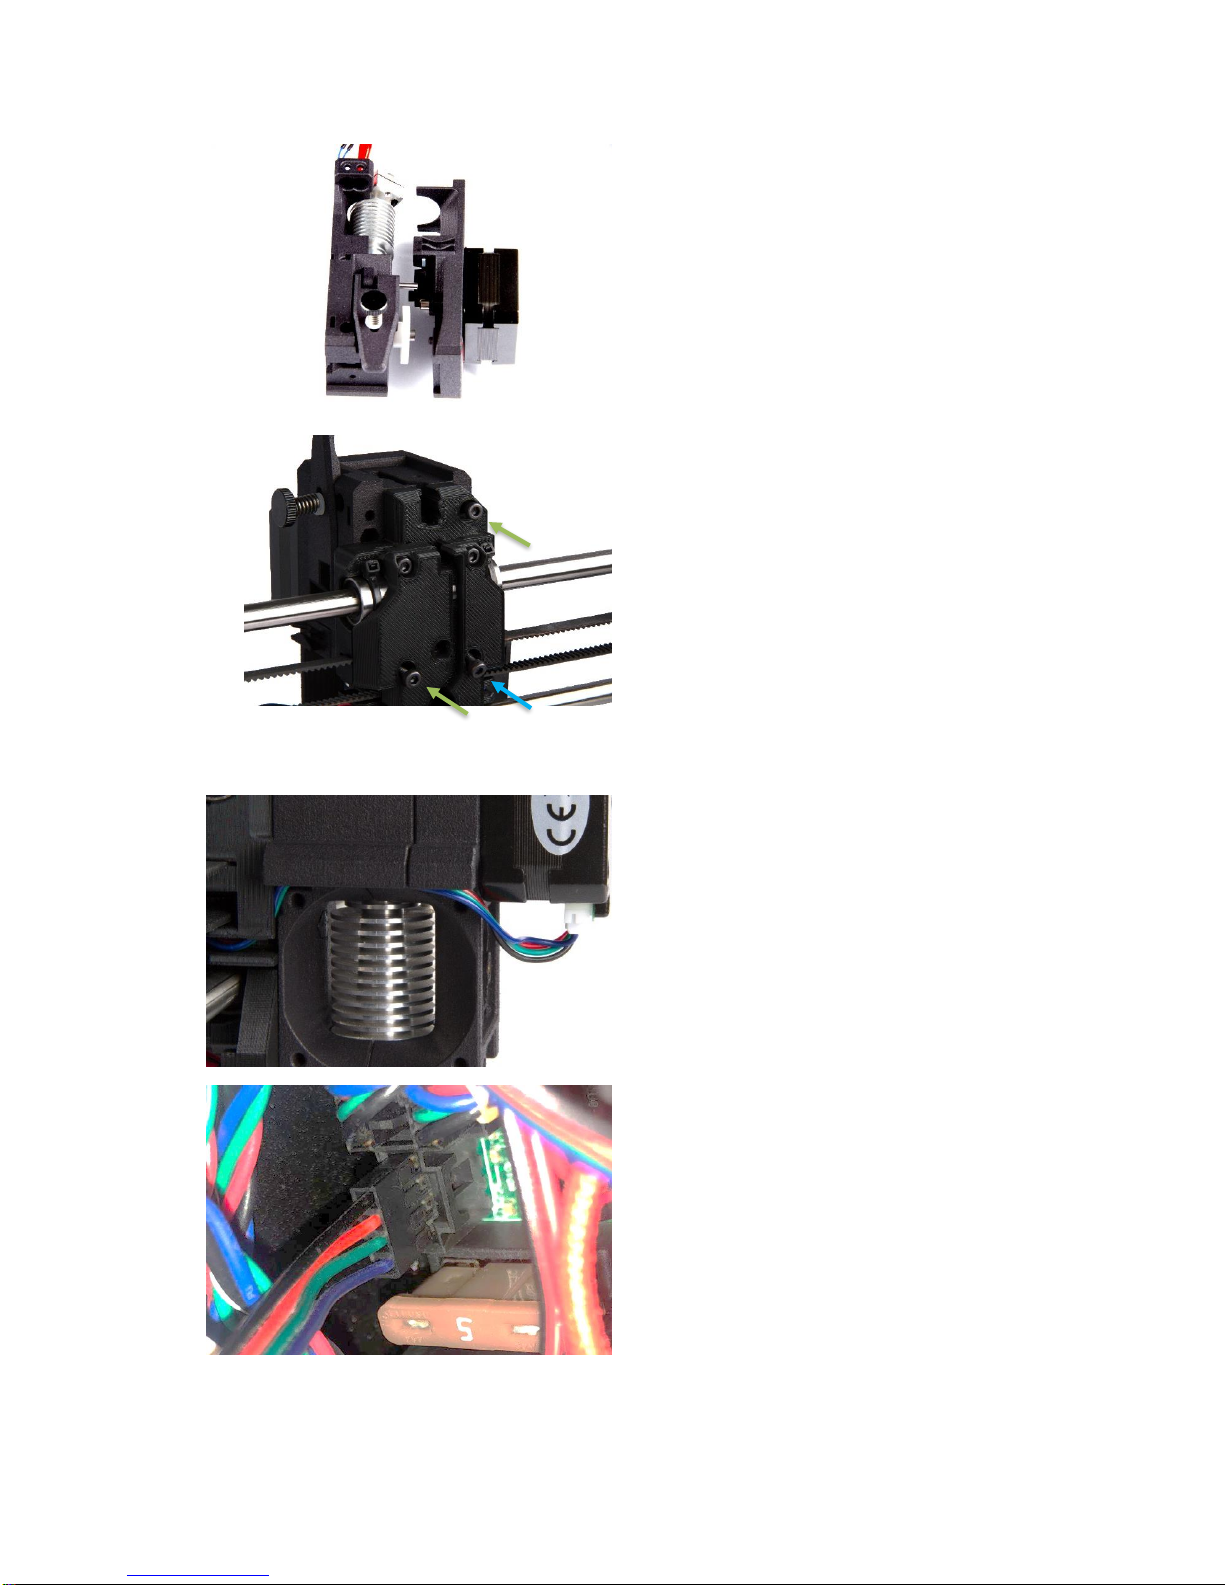
●Connect the cable to the motor
and use the cable path to the left
of the extruder for guidance.
●When connecting the cable to
you board ensure the black cable
is the top most cable or the motor
will rotate the wrong way!
Installation manual extruder upgrade for Bondtech_Prusa_i3 V1.1 12
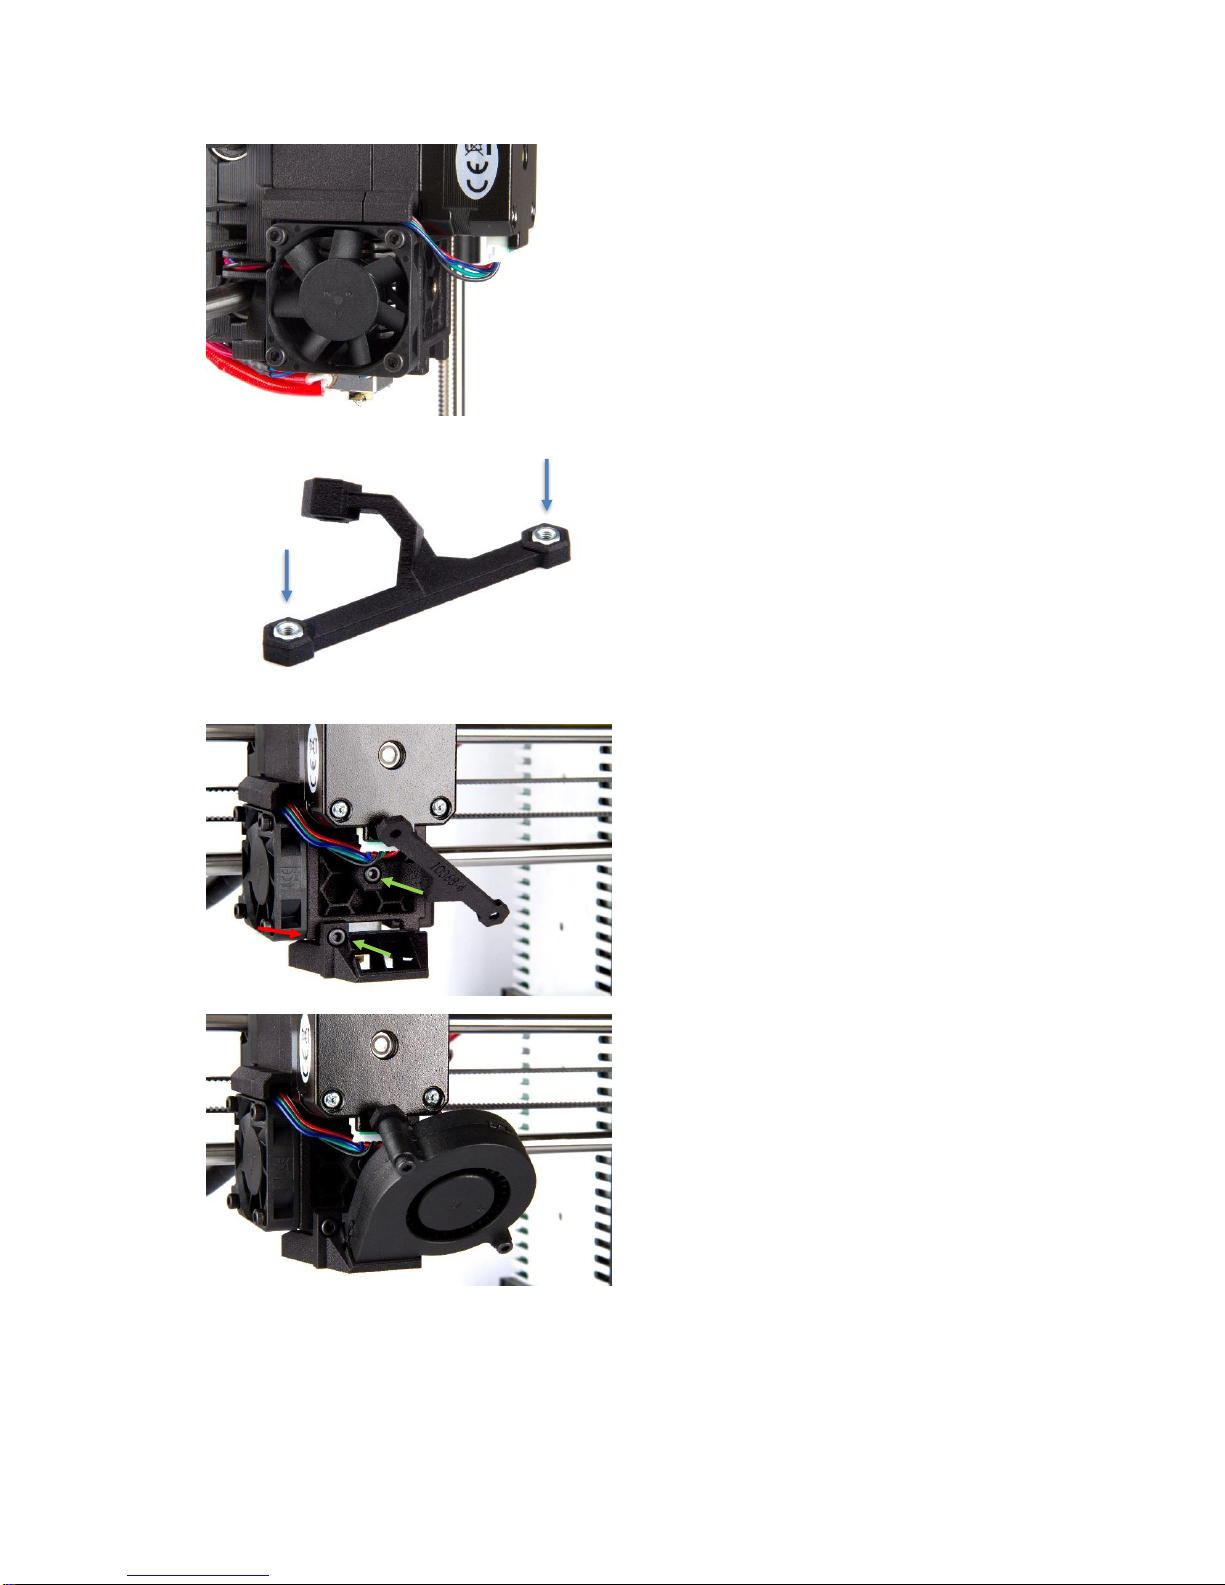
●Install your 40x40 fan using four
M3x12 screws.
●Press down the hex nuts into the
pockets of the mounting bracket.
●Install the mounting bracket and
fan shroud using two M3x10
screw.
•M3x10
●Place two hex nuts into the slots
on the mounting bracket and
slide your 5015-blower fan down
the fan shroud and mount it using
two M3x20 screws.
●Place the cable in the channel on
the right side of the extruder to
help guide the way.

Installation manual extruder upgrade for Bondtech_Prusa_i3 V1.1 13
●The position of the P.I.N.D.A
probe depends on your version of
the printer. MK2/s users place the
probe to right (Closer to the X-
axis) MK2.5 and MK3 users place
the probe to the left (furthest
away from the X-axis).
●Optional P.I.N.D.A cable position.
This technique is developed by
Grégoire Saunier, creator of the
Bear Extruder, to improve air flow
and reduce turbulence. Check
out his work here:
●MK2.5, MK3 users insert a
square nut into the right slot
(MK2s in the left as shown
earlier). Secure the P.I.N.D.A
using a M3x16 screw.
•Square nut
•M3x16
Reminder: Adjust the height of
the probe according to Prusa’s
instructions.
●Cut a 14.5mm long piece of the
left-over PTFE Tube and insert it
into the filament path on top of
the extruder.
Recommended: Before inserting
the tube use a knife or razor to
chamfer the inside of the tube for
better filament guidance.
●If you have a filament sensor
install it according to Prusa’s
instructions.
Installation manual extruder upgrade for Bondtech_Prusa_i3 V1.1 14
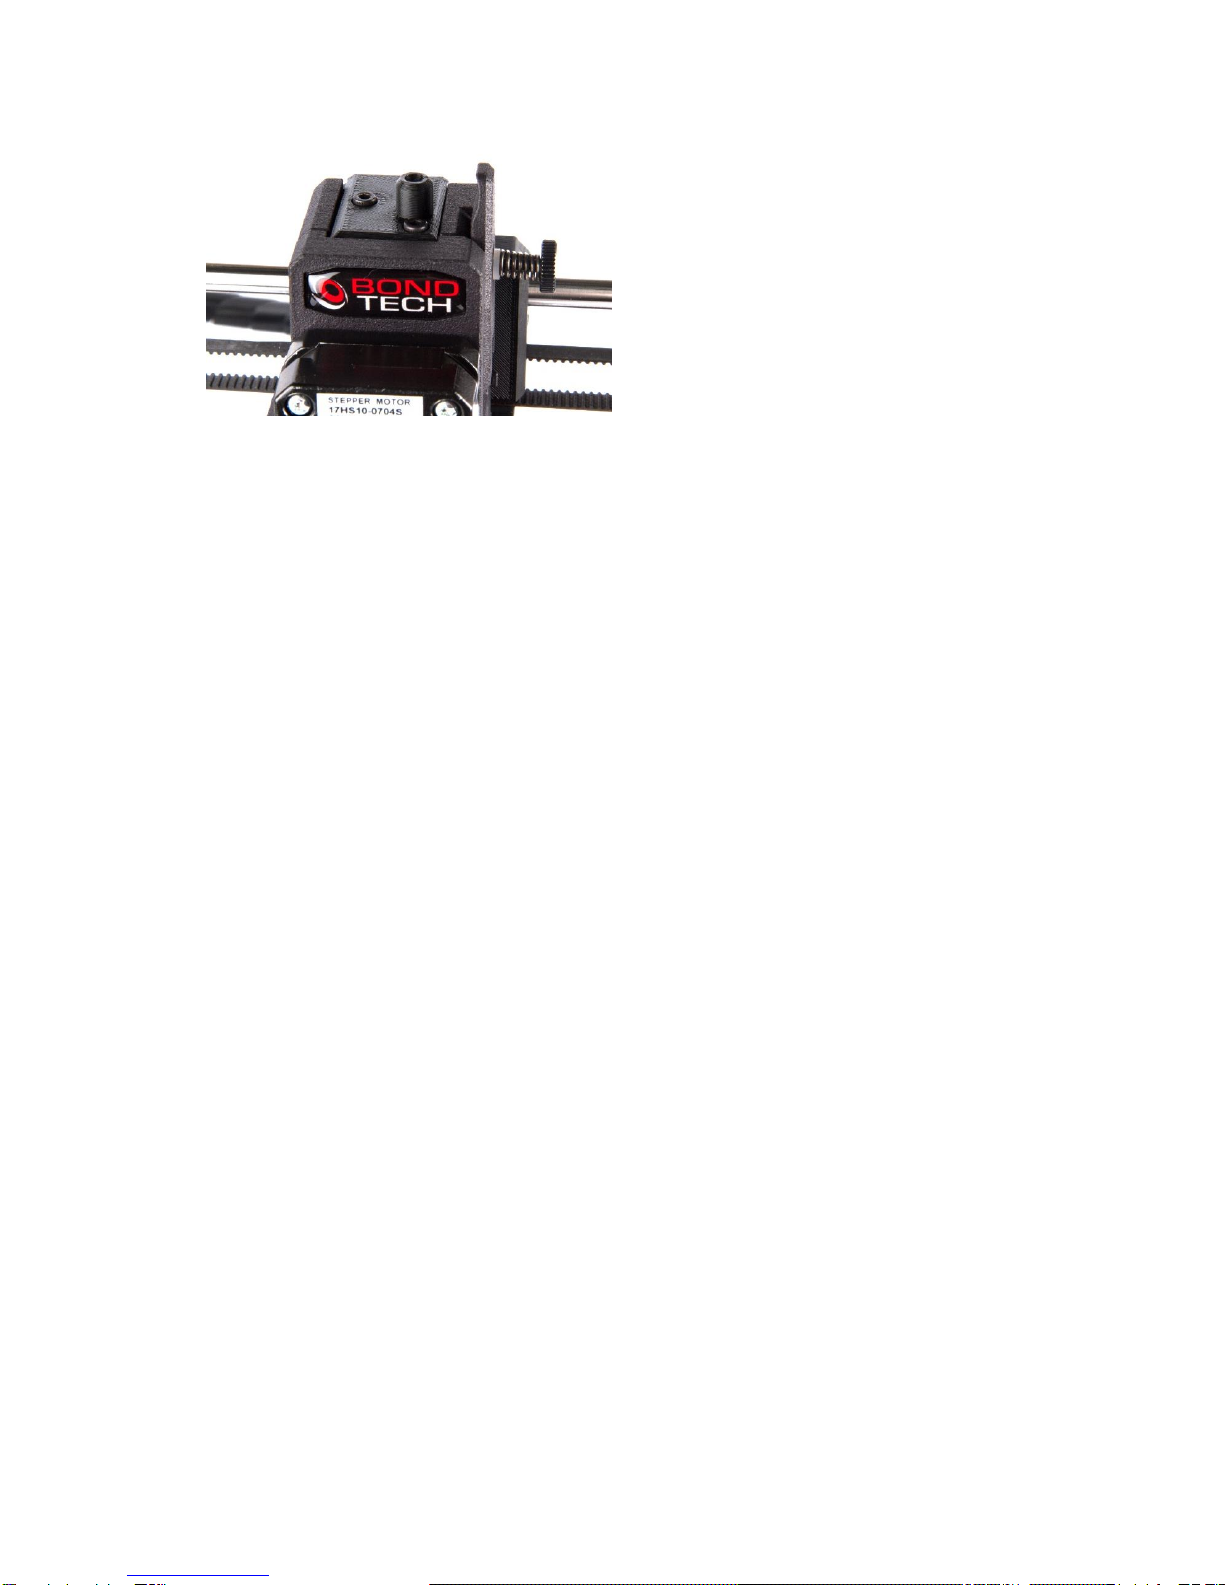
●Place the sensor cover on top
and fasten it using two M3x8
screws.

Installation manual extruder upgrade for Bondtech_Prusa_i3 V1.1 15
Software Configuration
As the new extruder uses a gear reduction to create a high extrusion resolution and
high torque the E-step value needs to be changed. The E-step value tells the printer
how many steps to send to the motor for each mm of filament.
Set new E-step value
The E-step value is set using a G-code file that you can download here:
These files are used to set the new E-step value on the printer. On MK2, MK2S and
MK2.5 the E-step value should be 415 as it uses 16-bit microstepping, on MK3 it
shall be 830 as it uses 32-bit microstepping, this is valid for standard 1.8-degree
stepper motors, if a 0.9 degree motor is used the E-step needs to be doubled, so
830 and 1660.
Copy the file to the SD-card and put it in the printer, select to print the file and the
new e-step value will be set and saved to the controller.
Good luck with your Bondtech feeder!
If you have any questions please first read the FAQ
(http://www.bondtech.se/en/faq/). If the question still hasn’t been answered feel free
to contact us by email or our online chat.
Repslagarvägen 3 J
33153 Värnamo
Sweden
e-mail: [email protected]
phone: +46702220193
web: www.bondtech.se
VAT-registration number: SE556995564301
This manual suits for next models
3
Table of contents
Other Bondtech 3D Printer manuals

Bondtech
Bondtech Wanhao D9 V1.7 Setup guide

Bondtech
Bondtech LGX ACE User manual

Bondtech
Bondtech ULTIMAKER 2.85 User manual

Bondtech
Bondtech LGX PRO User manual

Bondtech
Bondtech Raise3D DualDirect Setup guide

Bondtech
Bondtech LGX ACE and Mosquito User manual

Bondtech
Bondtech Raise3D N1 Setup guide

Bondtech
Bondtech BMG Setup guide


