MiiCraft Profession Series User manual

MIICRAFT 3D Production System --> An important step in making a better world
1
Maintenance Manual
Profession Series / Advance Series
Version 1.0
MiiCraft Profession & Advance series printer are well designed by the finest design & optical engineers
to provide additive manufacturing process more compatibility, with low maintenance on the machine.
Maintenance work should be regular in order to keep the printer in good condition and achieve high
quality prints every time. Some parts require maintenance before each print and some every few
hundred working hours. All maintenance activities do not take much time and are not complicated.
Before commencing any repair, it is extremely important to turn off the printer. Remember to always
wear safety gloves and glasses while working with printer.

MIICRAFT 3D Production System --> An important step in making a better world
2
Contents :-
Common & frequently performed practices __________________________________________ Page 3
Main Components to be checked frequently _________________________________________ Page 4
Glass ___________________________________________________________________ Page 4
Teflon __________________________________________________________________ Page 8
Picker __________________________________________________________________ Page 13
Recoater ________________________________________________________________ Page 14

MIICRAFT 3D Production System --> An important step in making a better world
3
Common & frequently performed practices
The following tables present maintenance and repair guidelines connected with each section of the
MiiCraft Profession & Advance series printers, together with specific check points, necessary activities
and their frequency.
Sr.
No.
Activity
Frequency
1
Cleaning the machine &
interior Surroundings
Before Every Print
2
Cleaning Picker Surface
Before Every Print
3
Cleaning teflon glass
After change of teflon or print failure
4
Change of Teflon
After 20 prints
5
Resin Mixing
Before Every Print
6
Checking for printing
residuals in the resin
tank
After Printing / Must check if print failure occurs
7
Cleaning Recoater Stirrer
After Change of resin in tank / After print failure /
Before starting Printing if standby 12Hours or
More
8
Cleaning Tank
After Print Failure
9
Restart / Shut Down
Shut Down the printer if there’s no use
10
Checking Tension in
recoater belt
After 2 Years
11
Tightening Picker
Locking Screws
Before Every Print
12
Tightening Tank Locking
Screws
Before Every Print

MIICRAFT 3D Production System --> An important step in making a better world
4
Main Components to be checked frequently
Glass
Teflon
Picker
Recoater
Glass :-
Required tools :-
1) Hand Gloves
2) Hex Allen Key –3mm
3) Cotton Cloth
4) Alcohol / Acetone
Procedure :-
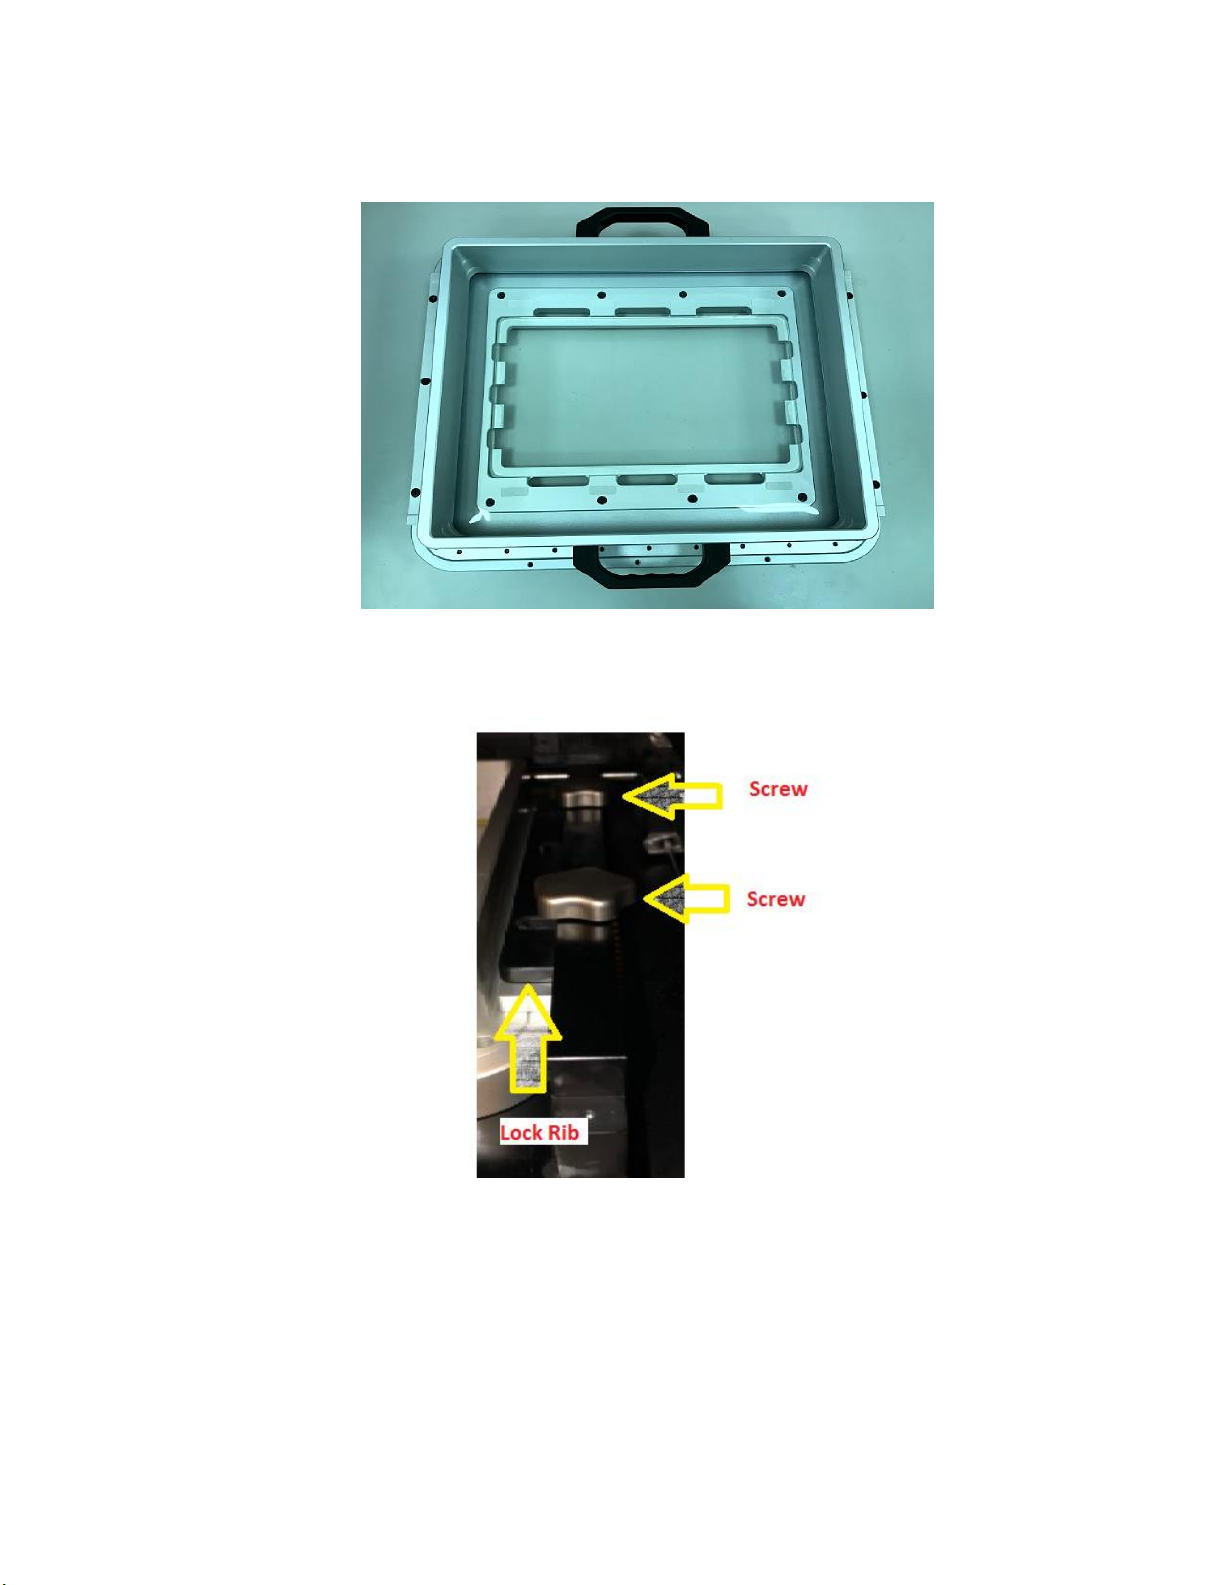
Glass is located in between tilt tray & teflon module.
MIICRAFT 3D Production System --> An important step in making a better world
5
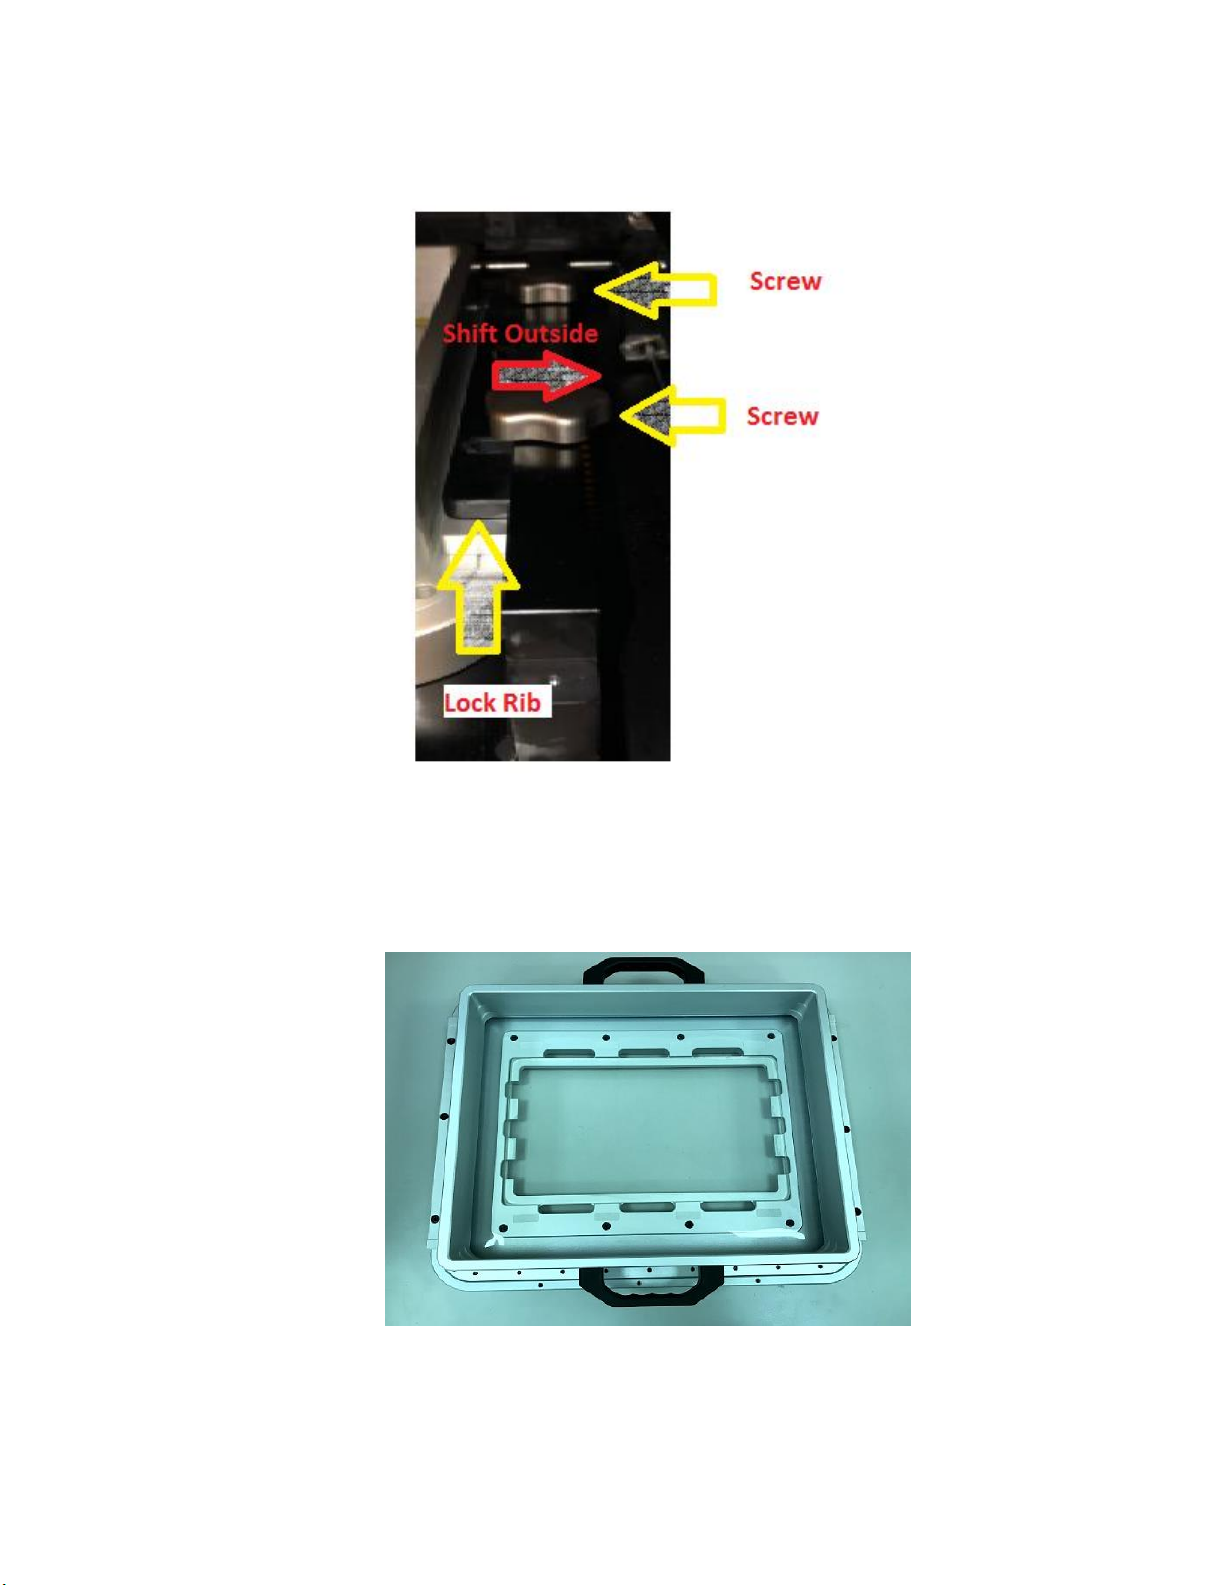
Remove the module by unscrewing tank holders 4 screw & shifting ribs on the outside.
(Image contains one side only)
Pull out the tank outside by holding tank handle & place it on safe cart to start further
procedure.

MIICRAFT 3D Production System --> An important step in making a better world
6
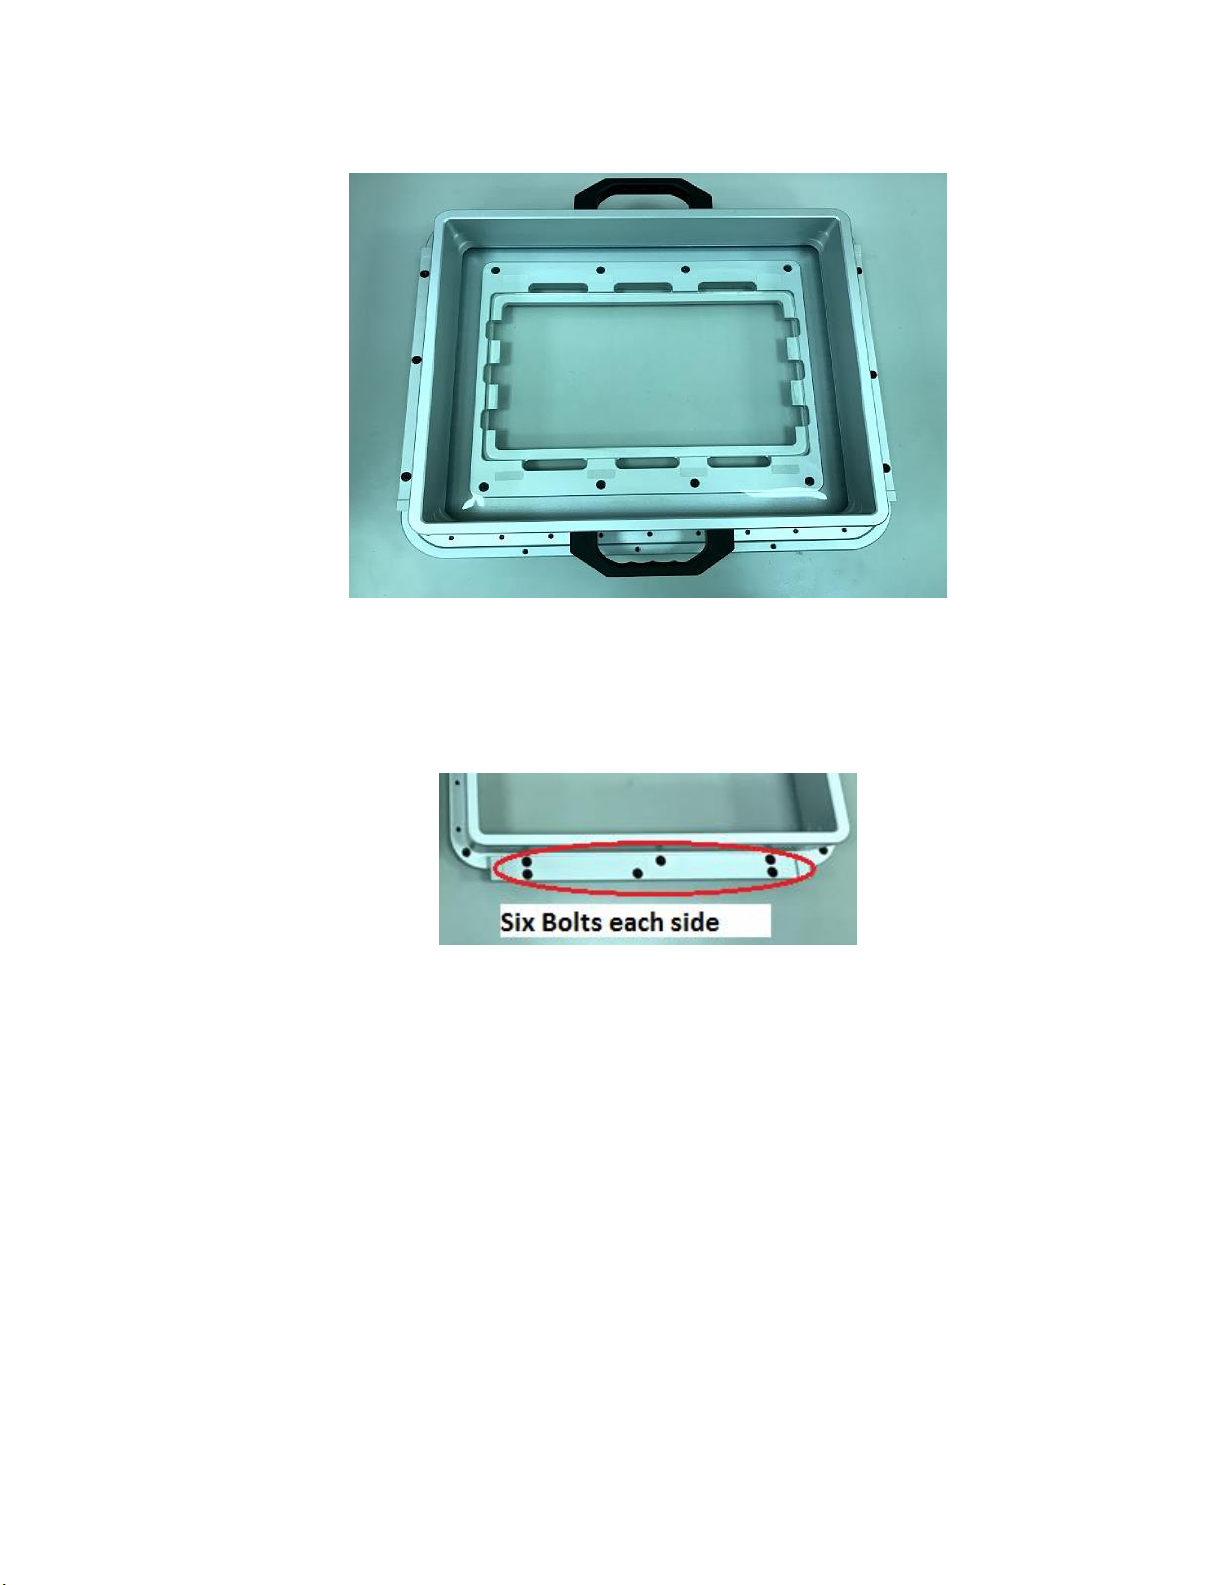
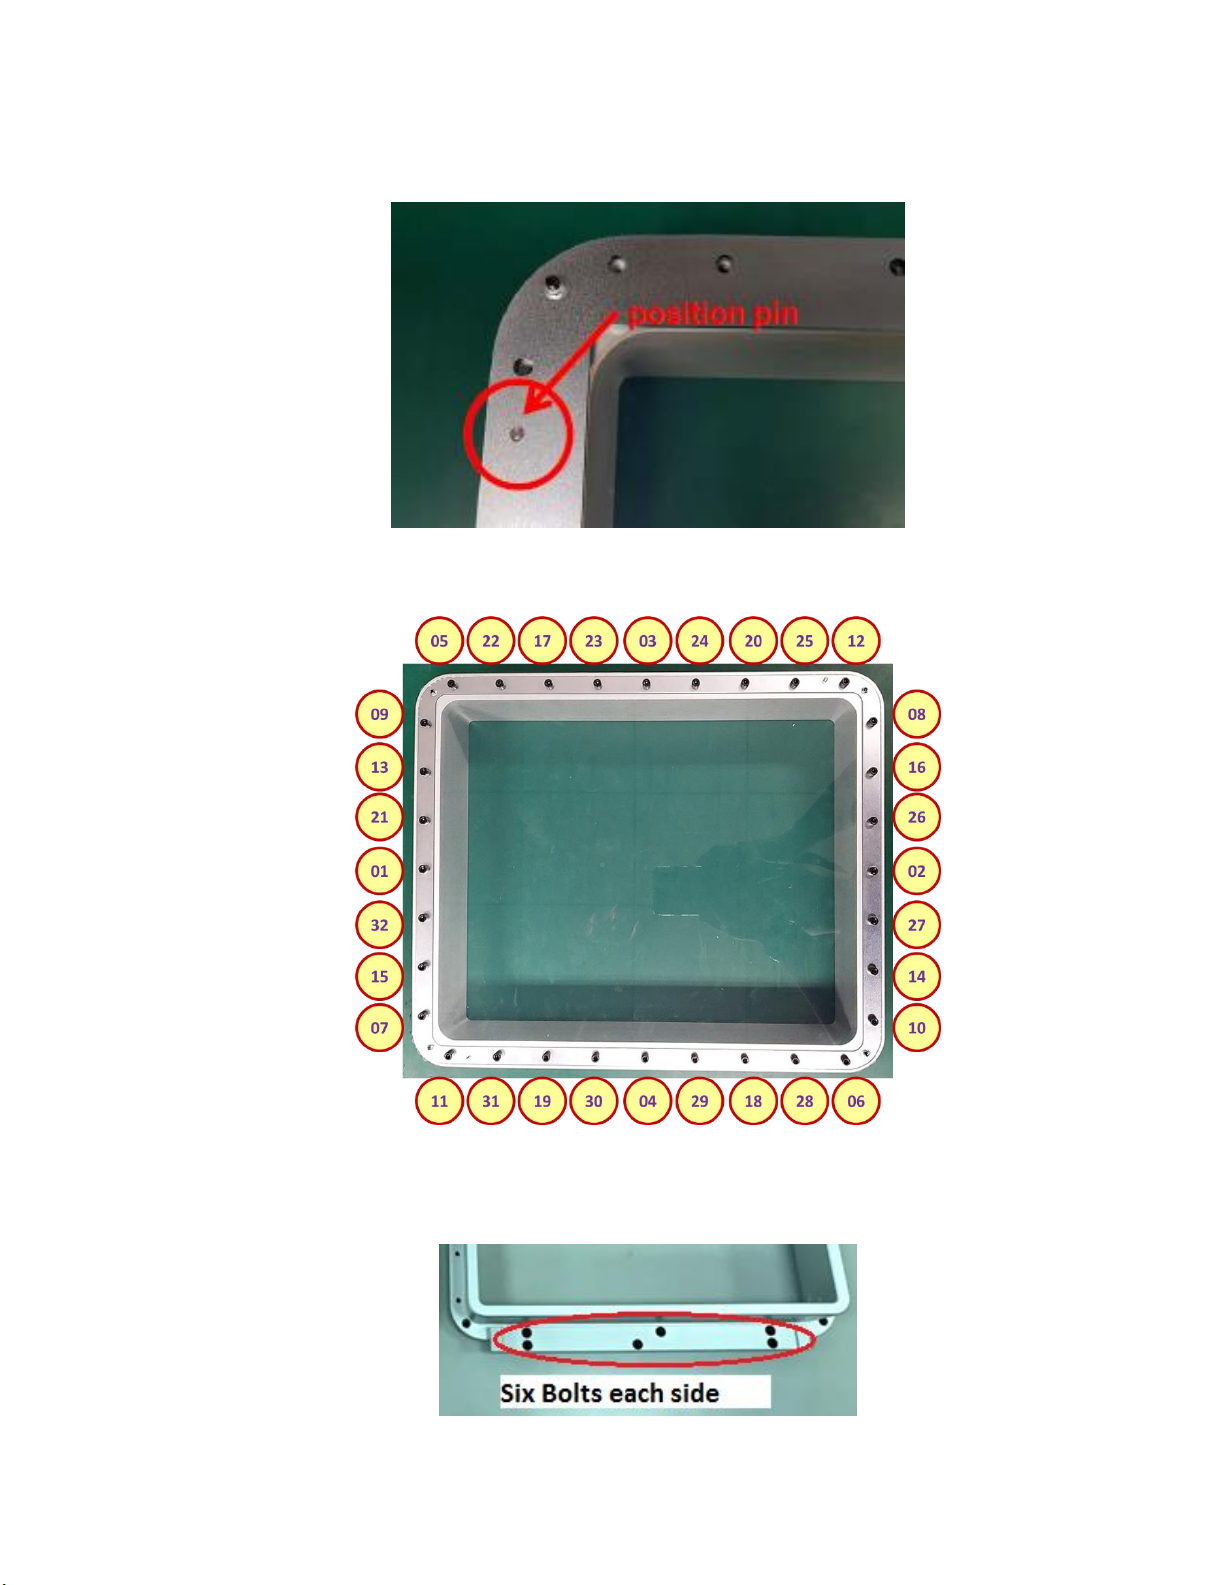
Remove the 6 locking bolts using hex allen key as shown in the image.
Lift up the teflon module to check if glass have some residuals or dirt on it.
Take out the glass & teflon tank assembly. (Refer following image)
If glass contains any kind of dirt on it, clean it with alcohol or acetone using cotton or tissue.
Cleaning procedure should be done soft & slowly on both sides to avoid damage to the glass.

MIICRAFT 3D Production System --> An important step in making a better world
7
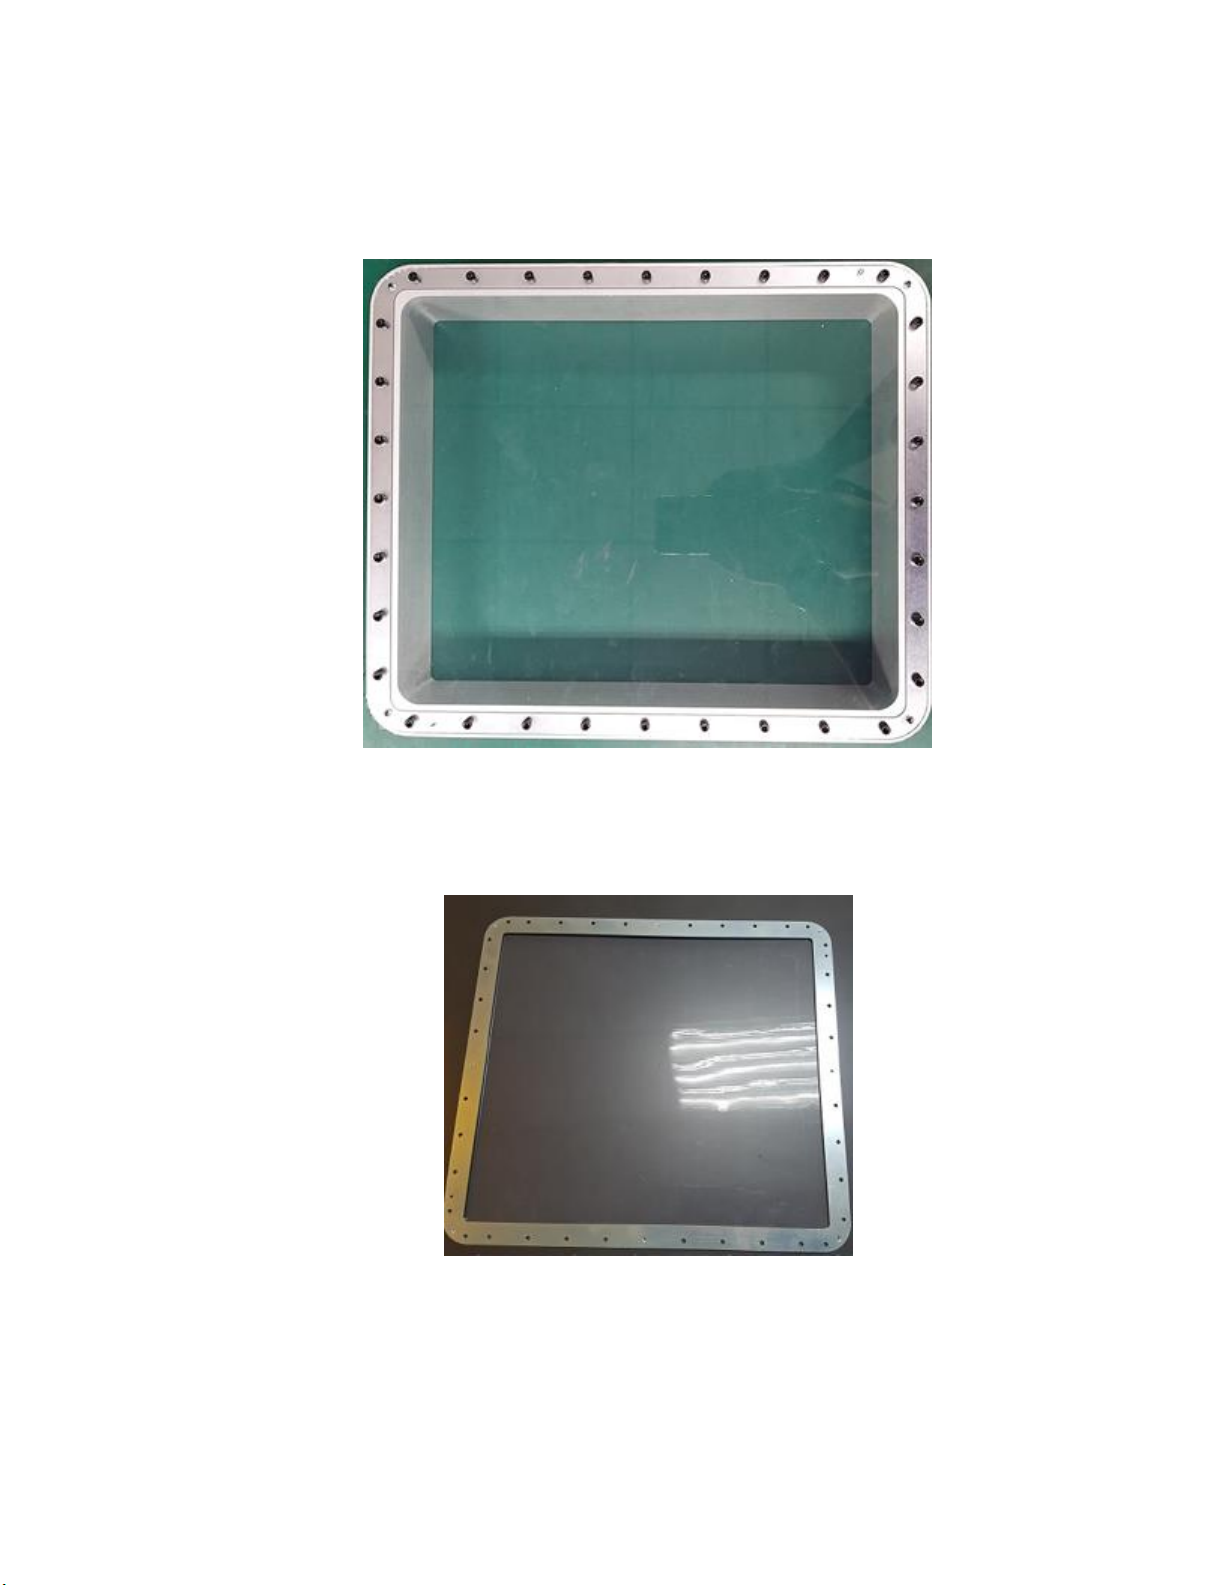
The cleaned glass will be transparent as shown in the image.
Check if teflon is leaking resin from its surface, if yes, there’s need to change teflon.
Reassemble the teflon module on the glass using hex allen key by tightening 6 screws & insert
the assembled glass & tank module on the tilt tray mechanism.
Lock the top 4 screws after shifting both side ribs inside to secure the fixed position of tank
module on the tank holder.
(Image contains one side only)

MIICRAFT 3D Production System --> An important step in making a better world
8
Teflon :-
MiiCraft suggest end users to change teflon after 20 prints for avoiding print failure & wastage of time in
case of teflon failure.
Require tools :-
1) Hand Gloves
2) Power screw driver
3) Allen Key Hex - 3mm
4) Teflon Module
Procedure :-
Remove the 4 locking screws & shift the rib in unlocking position.
(Image contains one side only)
MIICRAFT 3D Production System --> An important step in making a better world
9
Take out the glass & teflon tank assembly
Clean the tank module by removing excess amount of resin in the resin container.
Remove 12 bolts (6 bolts on each rib) using hex Allen key or power screw driver.
Lift up the teflon module to check if glass have some residuals or dirt on it.
(Image contains one side only)
Clean it if there’s any dirt by using cotton cloth & alcohol.
MIICRAFT 3D Production System --> An important step in making a better world
10
Place the tank upside down for removing the 32 screws using power screw driver.
Using hex allen key or power screw driver, remove all of the screws from the tank module.
Take new teflon module.
MIICRAFT 3D Production System --> An important step in making a better world
11
Put the teflon film module on the tank surface & fit with pin position.
Assemble the bolts in order from 1 to 32 as shown in following image.
After fastening 32 bolts, assemble the removed ribs which holds tank & glass module using rest
of 12 bolts & power screw driver.
MIICRAFT 3D Production System --> An important step in making a better world
12
Place the assembled glass & tank module on the tank holder.
Simply shift tank holder’s 2 ribs at inner side & lock the 4 screws.
(Image contains one side only)
MIICRAFT 3D Production System --> An important step in making a better world
13
Picker :-
Required Tools :-
1) Hand Gloves
2) Cotton Cloth
3) Alcohol / Acetone
Reference :-
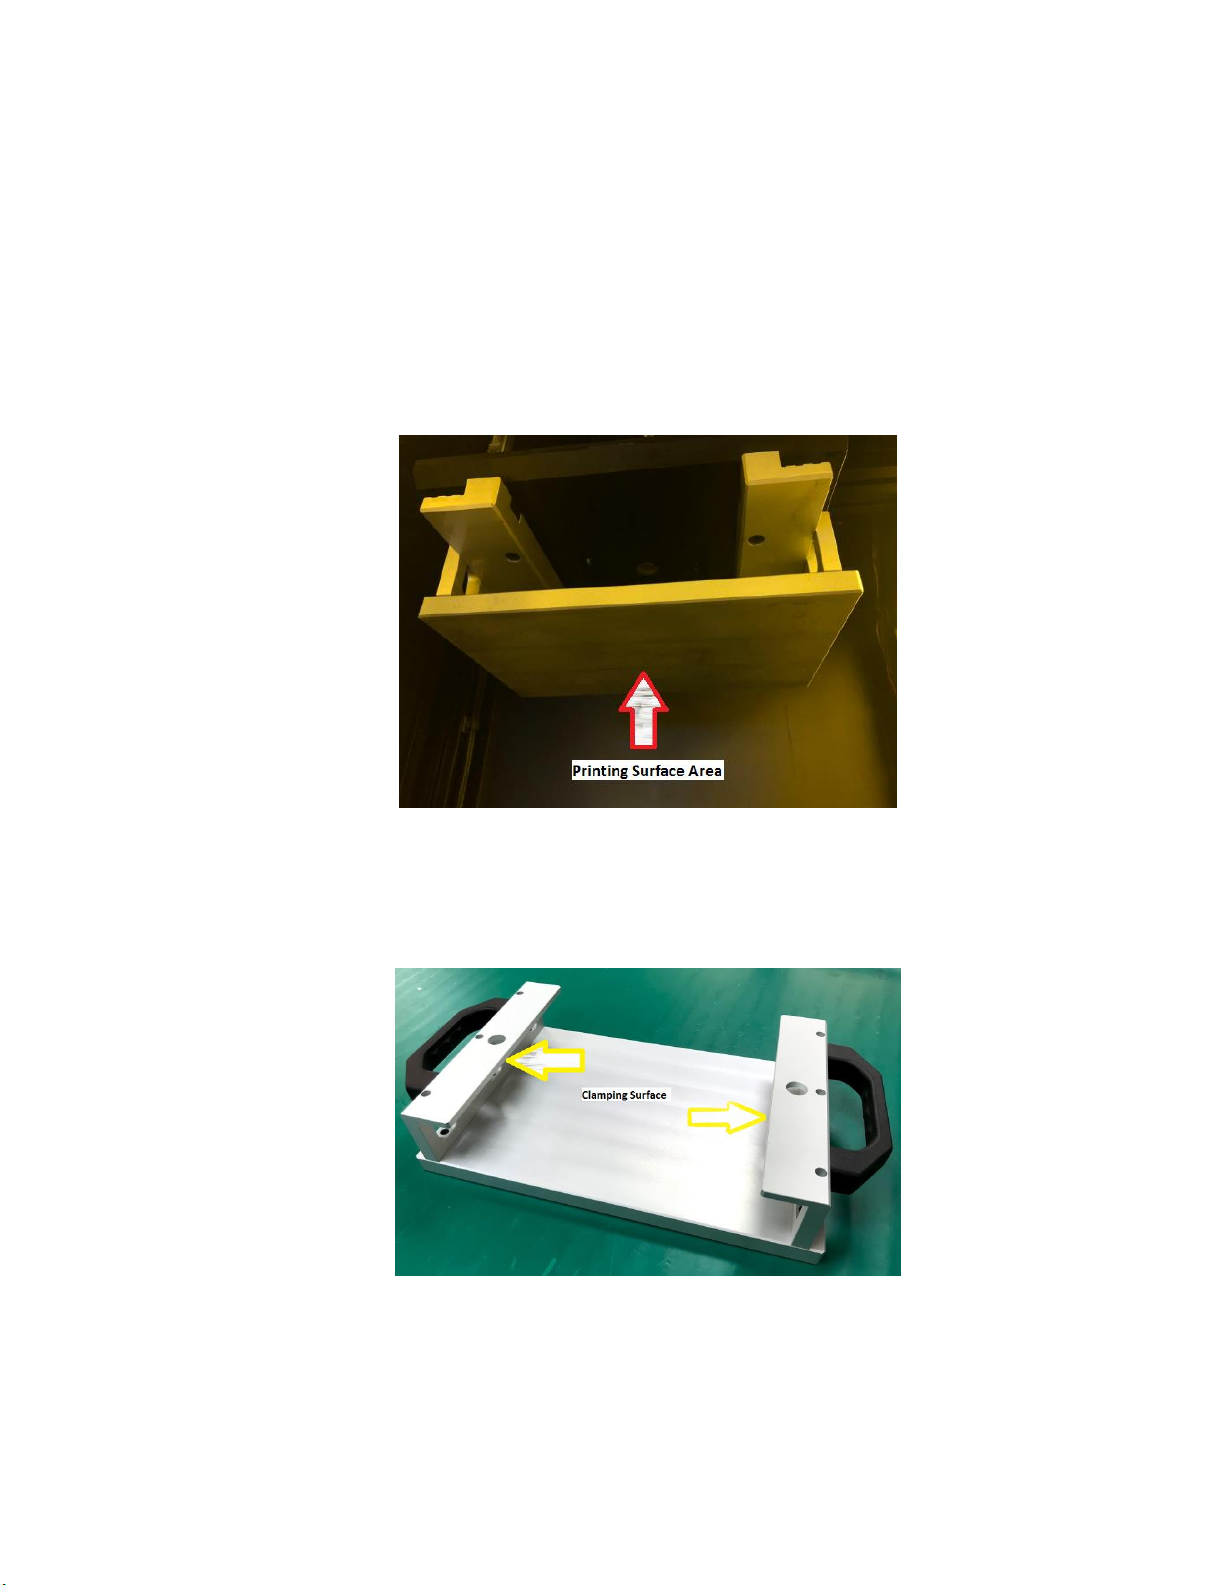
Keep the printing surface as clean as possible for each printing process by using cotton cloth &
alcohol. (Refer following image for cleaning area reference)
Keep inner clamping surface clean for each printing process by using cotton cloth & alcohol.
(Refer following image for cleaning area reference)

MIICRAFT 3D Production System --> An important step in making a better world
14
Recoater :-
Required Tools :-
1) Hand Gloves
2) Cotton Cloth
3) Alcohol / Acetone
4) Hex Allen Key –3mm
Procedure :-
The right side mounting after opening door is recoater assembly.
Open Engineering Mode in touch panel window

MIICRAFT 3D Production System --> An important step in making a better world
15
Select Motor Control in next window
Select next page on screen by swiping down action in next window

MIICRAFT 3D Production System --> An important step in making a better world
16
Select front action sweep menu as following
Recoater will get forward (Near Door)
Remove the front end screw from the module by using hex Allen key as shown in following
image & remove the stirrer.

MIICRAFT 3D Production System --> An important step in making a better world
17
Using cotton cloth & alcohol, slightly clean stirrer.
Reassemble stirrer on recoater module using the hex Allen key.
Note :-
Recoater cleaning must be performed after change of resin for printing.
After placing machine on standby mode for more than 12 hours or more, stirrer needs to be
cleaned.
Thanks for reading carefully,
Team MiiCraft.
This manual suits for next models
1
Table of contents
Other MiiCraft 3D Printer manuals


