Bonga BON6510DC User manual

INSTRUCTION MANUAL 10M x 6,5M
10m x 6,5m PART LIST
STANDARD PARTS
These parts are included in the Standard 10m x 6,5m Bonga Stretchtent
OPTIONAL PARTS
These parts are available on demand. (NOT INCLUDED IN STANDARD TENT)
SET OF ALUMINIUM POLES
DESCRIPTION SIZE MATERIAL QUANTITY
CANVAS 10m x 6,5m fabric 1
SIDE CLAMPS + GRIP 10cm x 11 cm x 10cm reinforced polymere 12+2
CORNER CLAMPS + GRIP 10cm x 11 cm x 10cm reinforced polymere 4
POLECAPS 9cm x 5cm reinforced polymere 6
WOOD ADAPTORS 4cm x 4,5cm reinforced polymere 6
PEGS for lawn and clay 50 cm galvanised steel 20
STRAPS lenght: 4 meter nylon, galvanised steel 20
BAG PVC PVC 2
DESCRIPTION SIZE material QUANTITY
POLE 110CM 110cm x 40mm diameter aluminium extrusion 38
POLE 50CM 50cm x 40mm diameter aluminium extrusion 8
CONNECTOR 20cm x 40mm aluminium extrusion 24+4
POLE FEET 60mmx 40mm reinforced polymere 18

TENT PARTS: DETAILS
SIDE CLAMP
The Bonga Stretchtent uses side clamps to hold the tent.
You can put them on the reinforced zones every meter in the
sideseams of the tent
Material: reinforced polymere
Size: 11cm x10cm x 10cm
Weight: 300gr
Galvanized steel nut, bolt and ring
The side clamps have a grip on the bottom side: you can slide a pole of 40mm diameter on the grip
If you remove the grip and put back the M8 nut, you can use this conguration to simply slide it on a
wooden pole
STRAPS
The straps connect the clamps with the pegs
Material: nylon and galvanized steel
Size: 4m x 30mm
Weight: 190gr
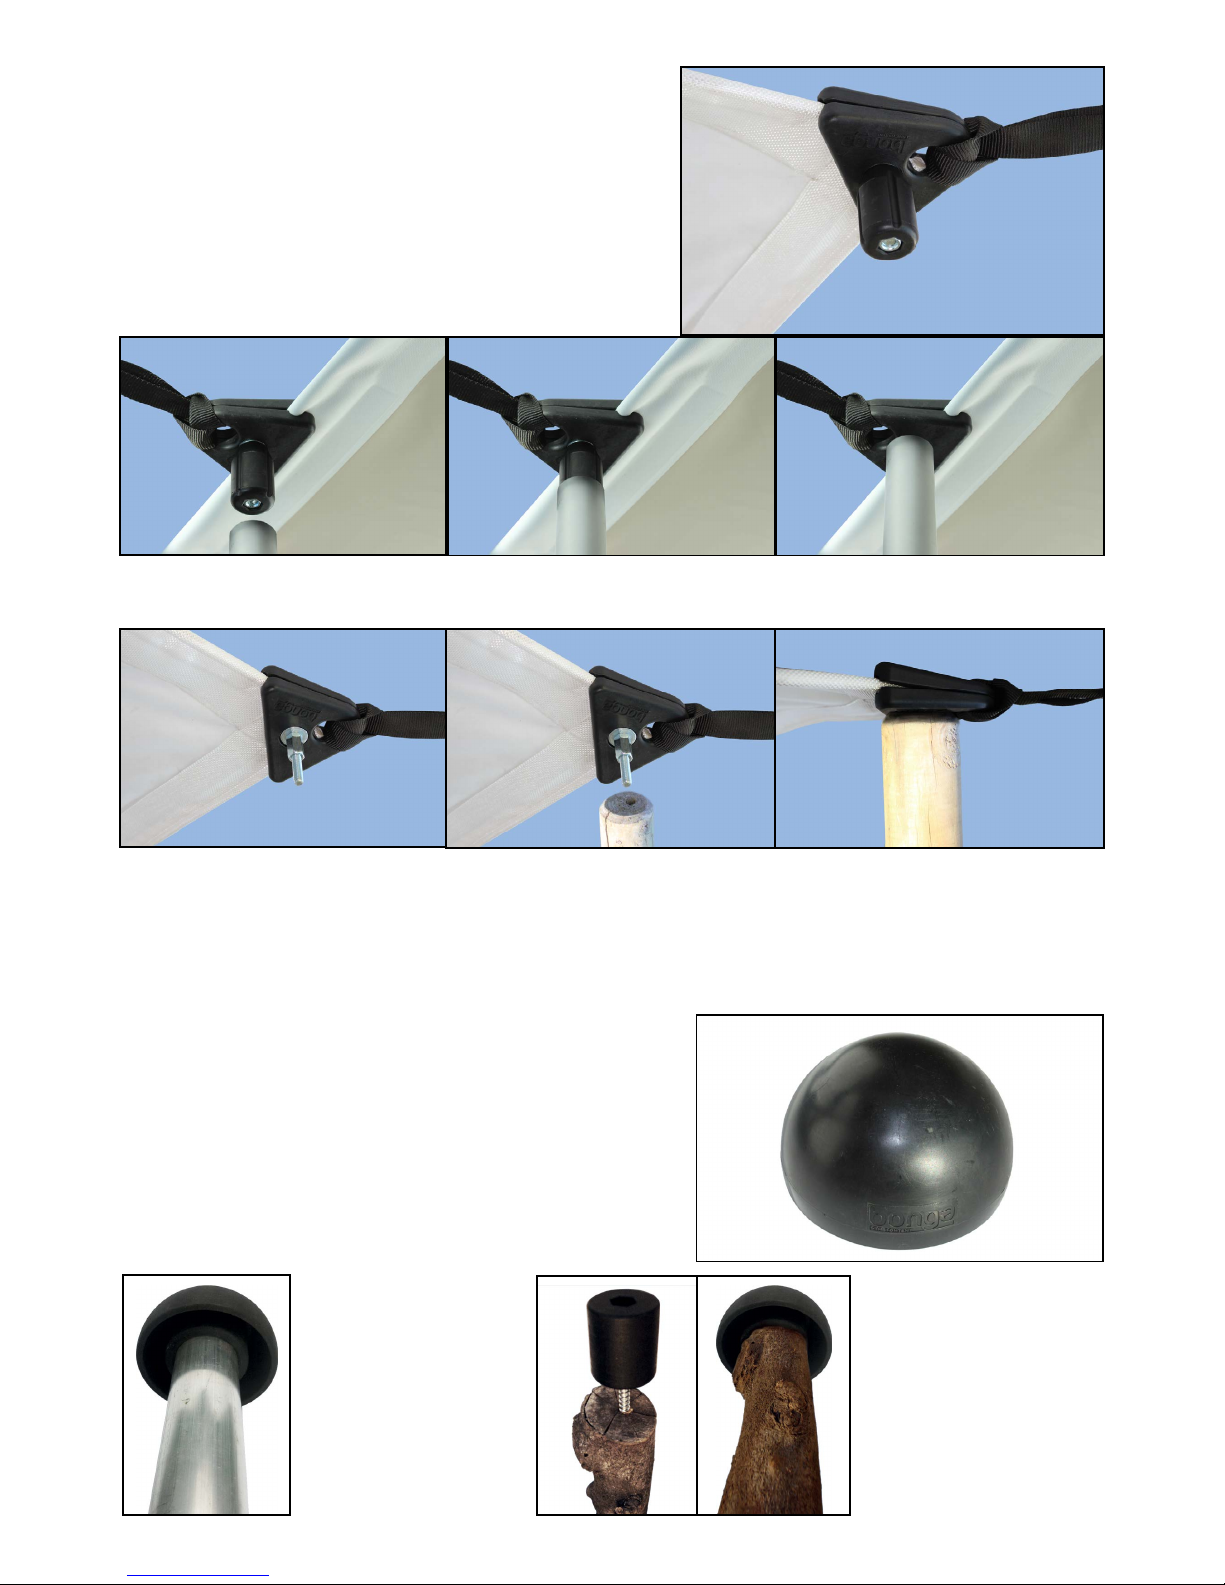
CORNER CLAMP
The Bonga Stretchtent uses 4 corner clamps to hold
the tent.
Material: reinforced polymere
Size: 11cm x10cm x 10cm
Weight: 300gr
Galvanized steel nut, bolt and ring
The corner clamps have a grip on the bottom side: you can slide a pole of 40mm diameter on the grip
If you remove the grip and put back the M8 nut, you can use this conguration to simply slide it on a
wooden pole
POLECAPS/ MUSHROOM
This cap is used to put at the end of the CENTER POLES,
to protect the canvas.
Material: reinforced polymere
Size: 90mm x 50mm
Weight: 110gr
You can slide
aluminium
standard poles
of 40mm and
60mm into the
pole cap
If you use wooden
poles, you can use
the wood adaptors
delivered with your
tent to x a pole cap
on a wooden pole

WOOD ADAPTOR
You only need this adaptor if you want to use wooden
CENTER POLES.
It is used to x a pole cap on a wooden pole.
Material: reinforced polymere
Size: 40mm x 45mm
Weight: 100gr
LAWN AND CLAY PEGS
We deliver standard pegs for lawn and clay of 50cm
Material: galvanised steel
Size: 50cm x 70mm x 20mm
Weight: 450gr
With the

OPTIONAL PARTS These parts are available on demand. (NOT INCLUDED IN STANDARD TENT)
SET OF ALUMINIUM POLES
- diameter 40 mm
- includes: poles of 110 cm
poles of 50 cm
adaptors to connect poles in between
polefeet
- modular and compact
- in a heavy PVC bag
- pole feet (can be used for poles 40 diameter and 60 diameter)
XL POLE CAP
- extra wide polecap
- used for large tents
- sizes: diameter: 19 cm height: 5 cm
- ts for poles of 40mm diameter and 60mm diameter or with woodadaptor on wooden poles
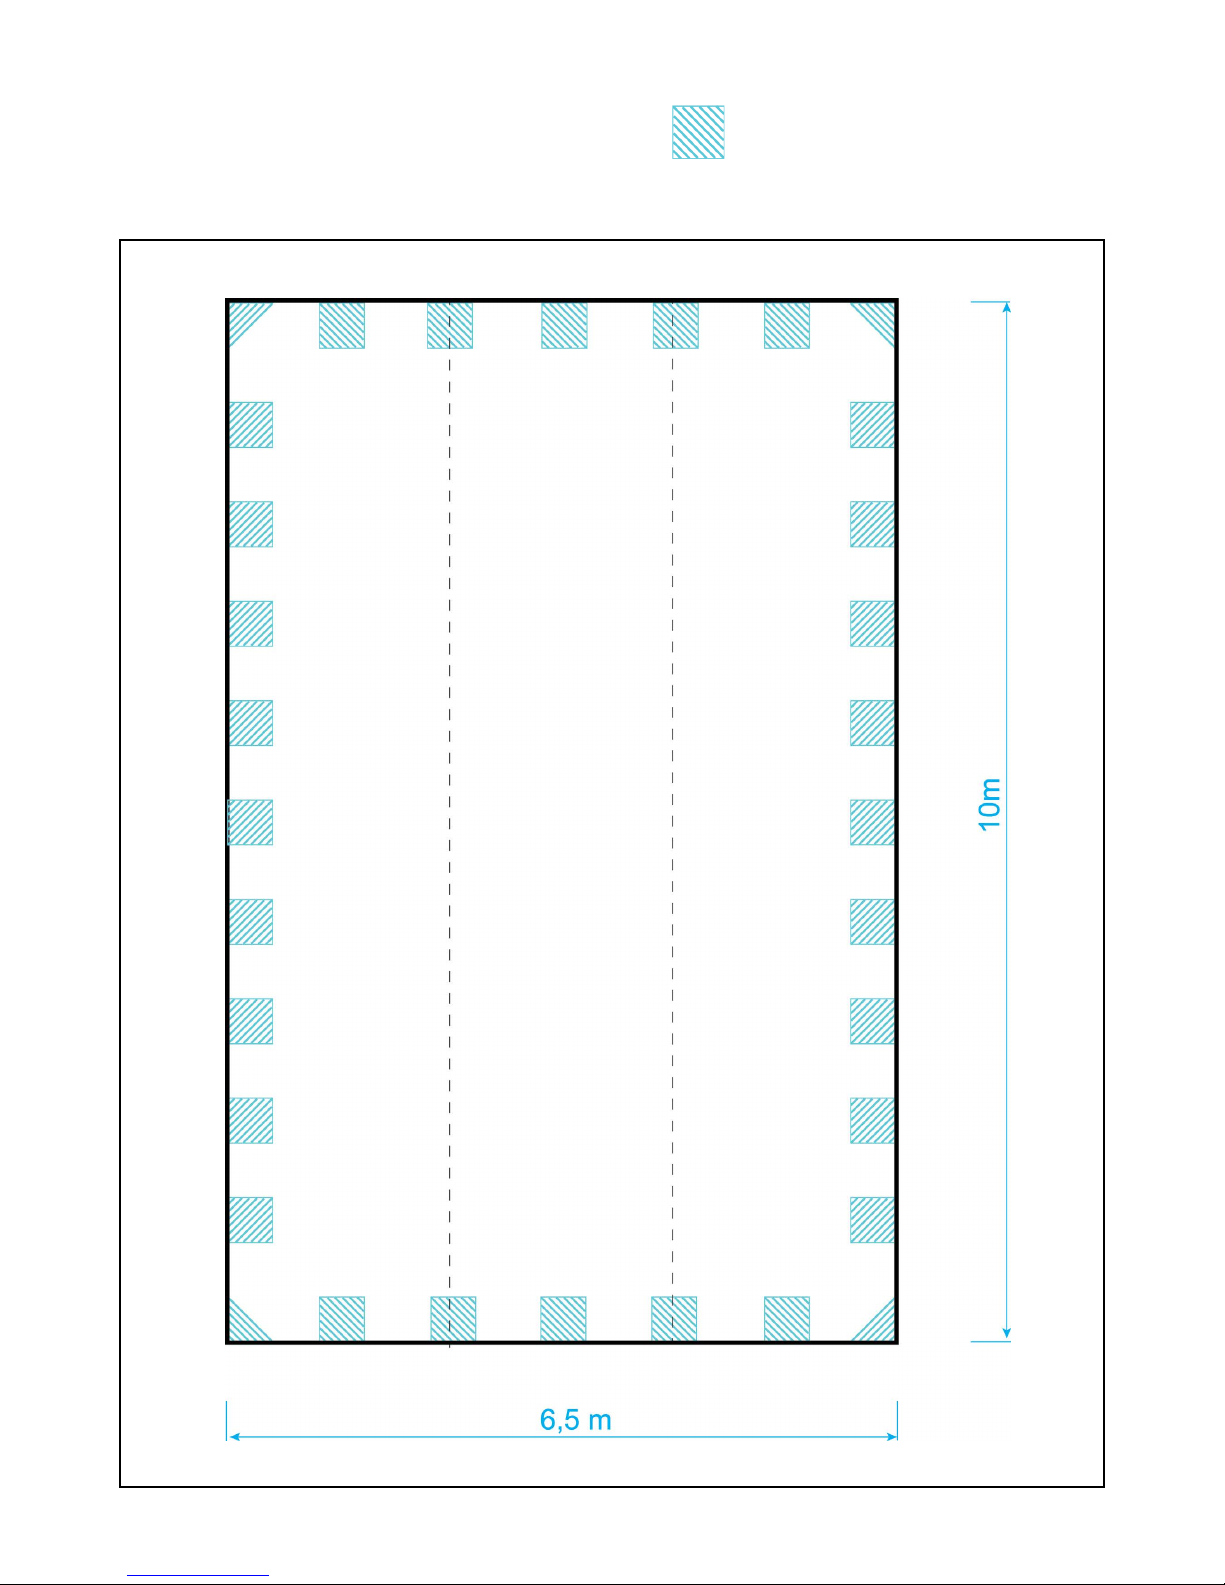
REINFORCED ZONES ON 10m x 6,5M
Warning: Only put the side xings on the reinforced zones! See setup instructions.
OVERALL INSTRUCTIONS
ALways put a clamp at least every 2 meter on a reinforced zone
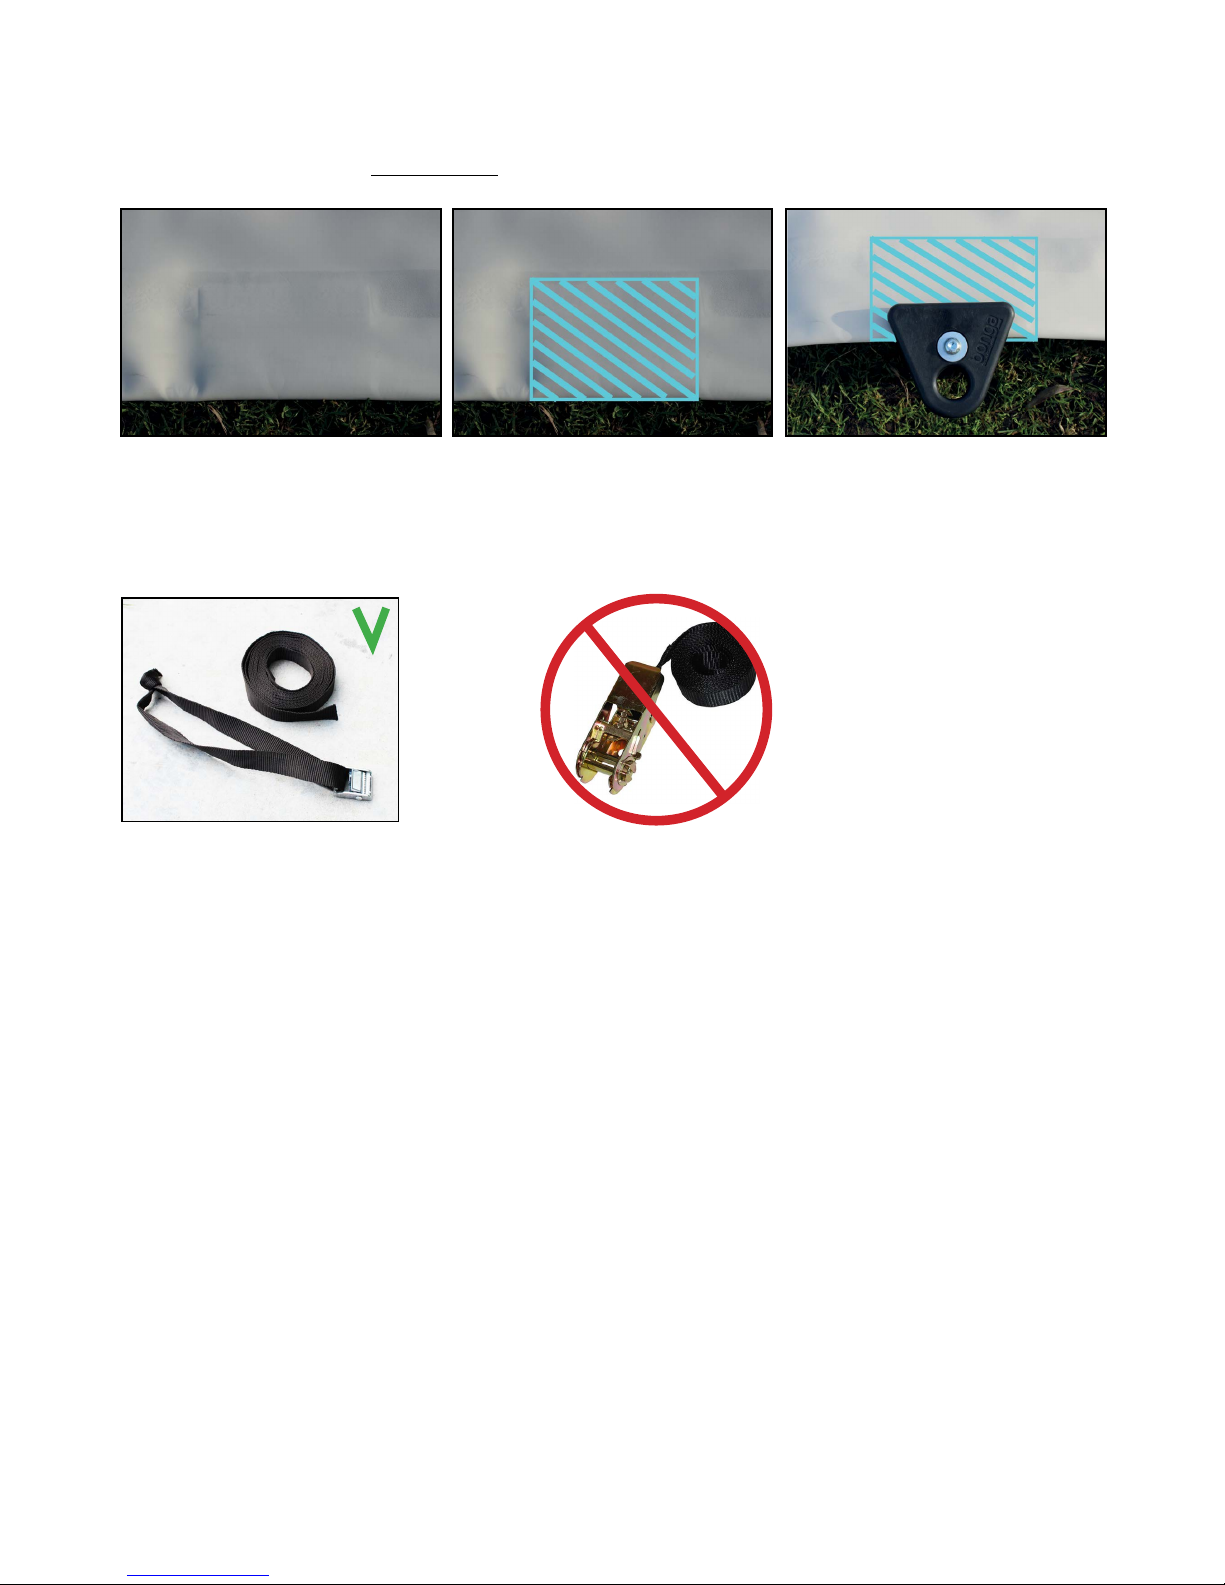
Never use straps with ratchets, use the straps delivered with the tenT
WASHING INSTRUCTIONS
Use a jetwasher. Never go closer then 20cm!
Use a soft brown/black soap with a soft sponge to remove stains
Never use aceton / thinner or anu kind of solvent
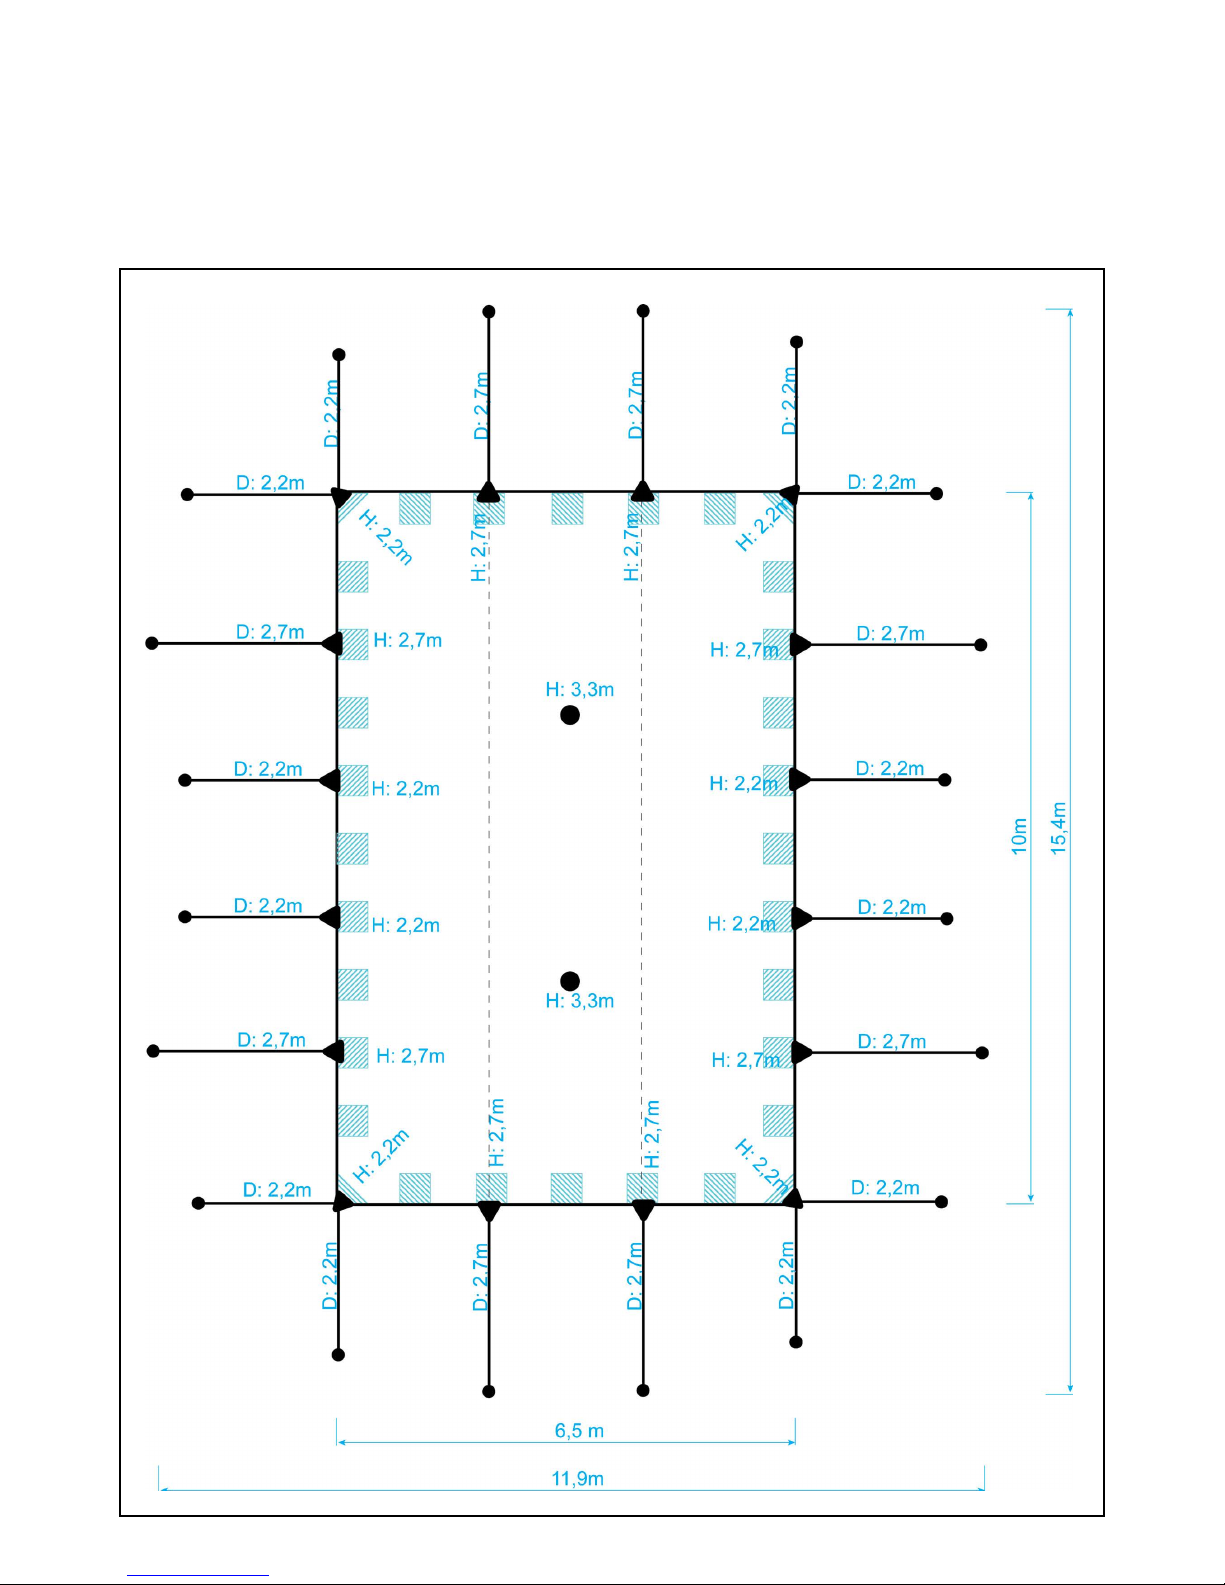
SETUP OPTION 10m x 6,5m: 4 sides open
This is a recommended setup option to start with
H= Height of the pole
D= Distance from pole to peg
Warning: Only use when less then 85 kmph

SETUP: STEP 1
PROTECT YOUR TENT
Unfold a plastic groundsheet to prevent stains
Unfold the tent on the plastic groundsheet
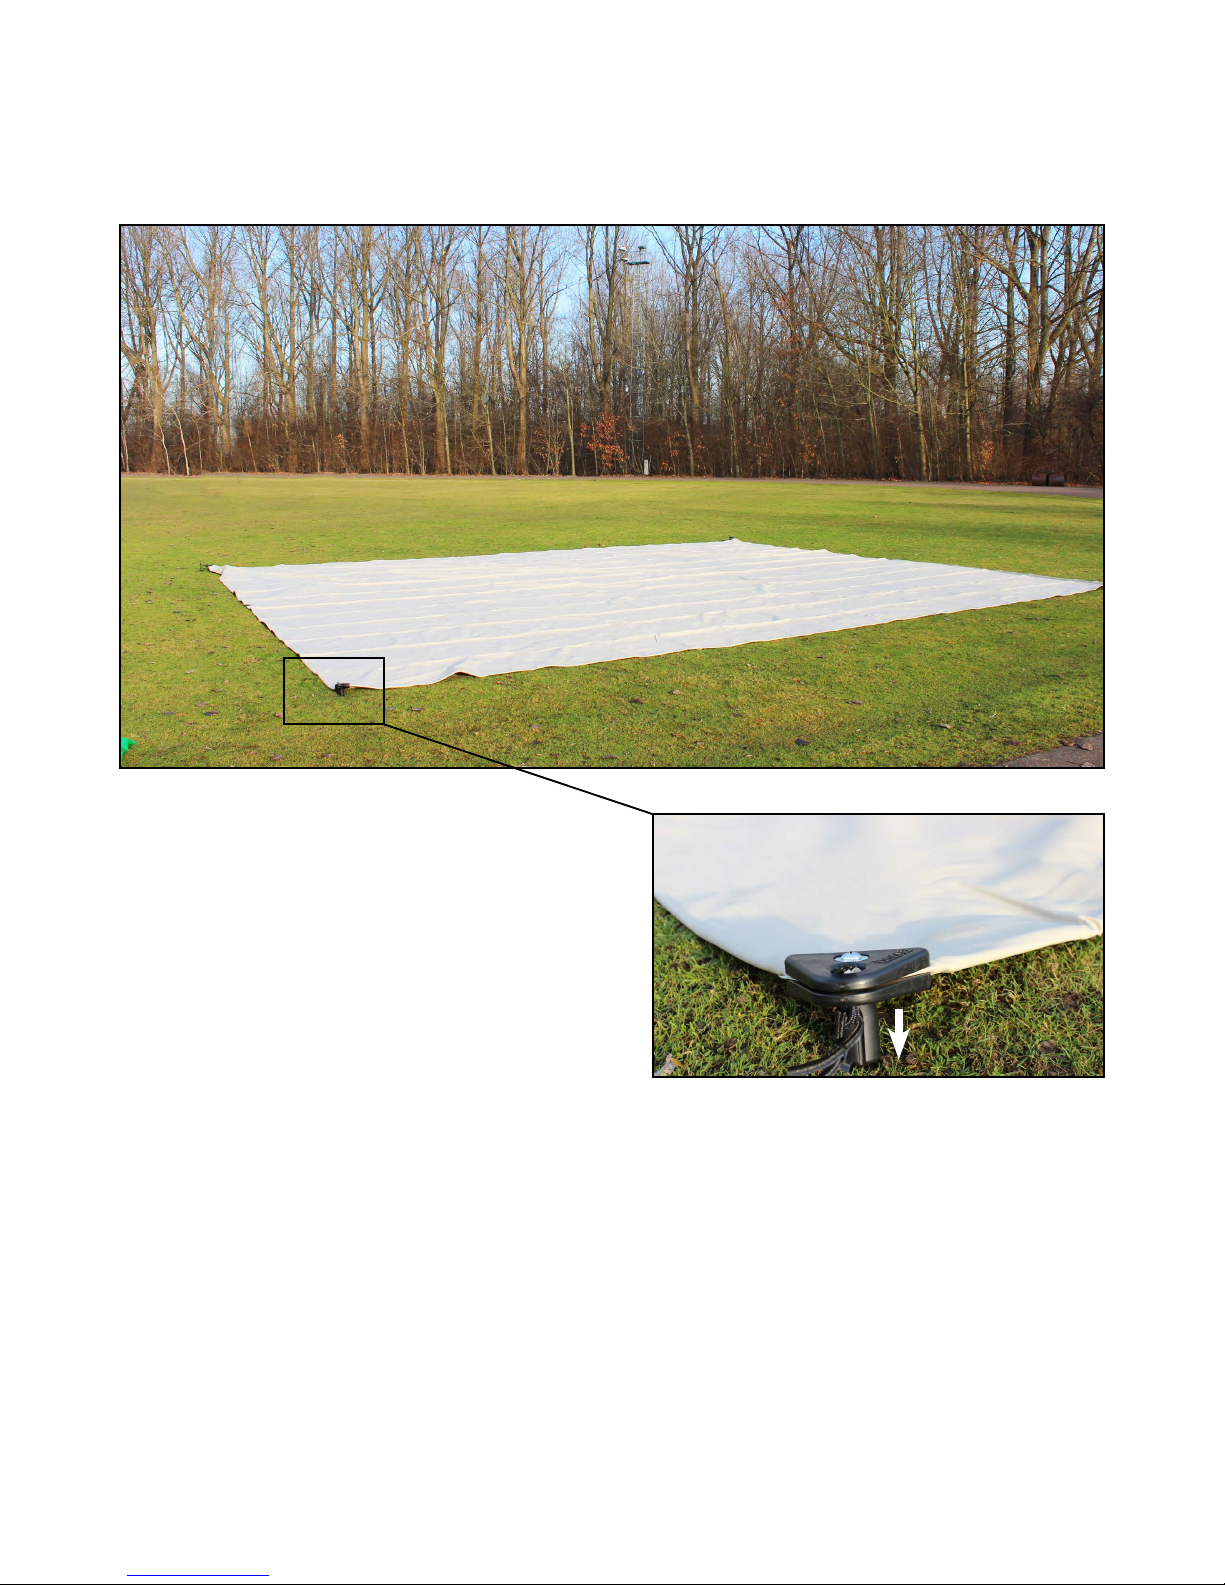
RIGHT SIDE UP
The tent is always delivered with the corner xings attached.
When you unfold the tent, the grips of the corner xings should face the ground.
Warning: always make sure the grip is well tightened! Check before you put up the tent!

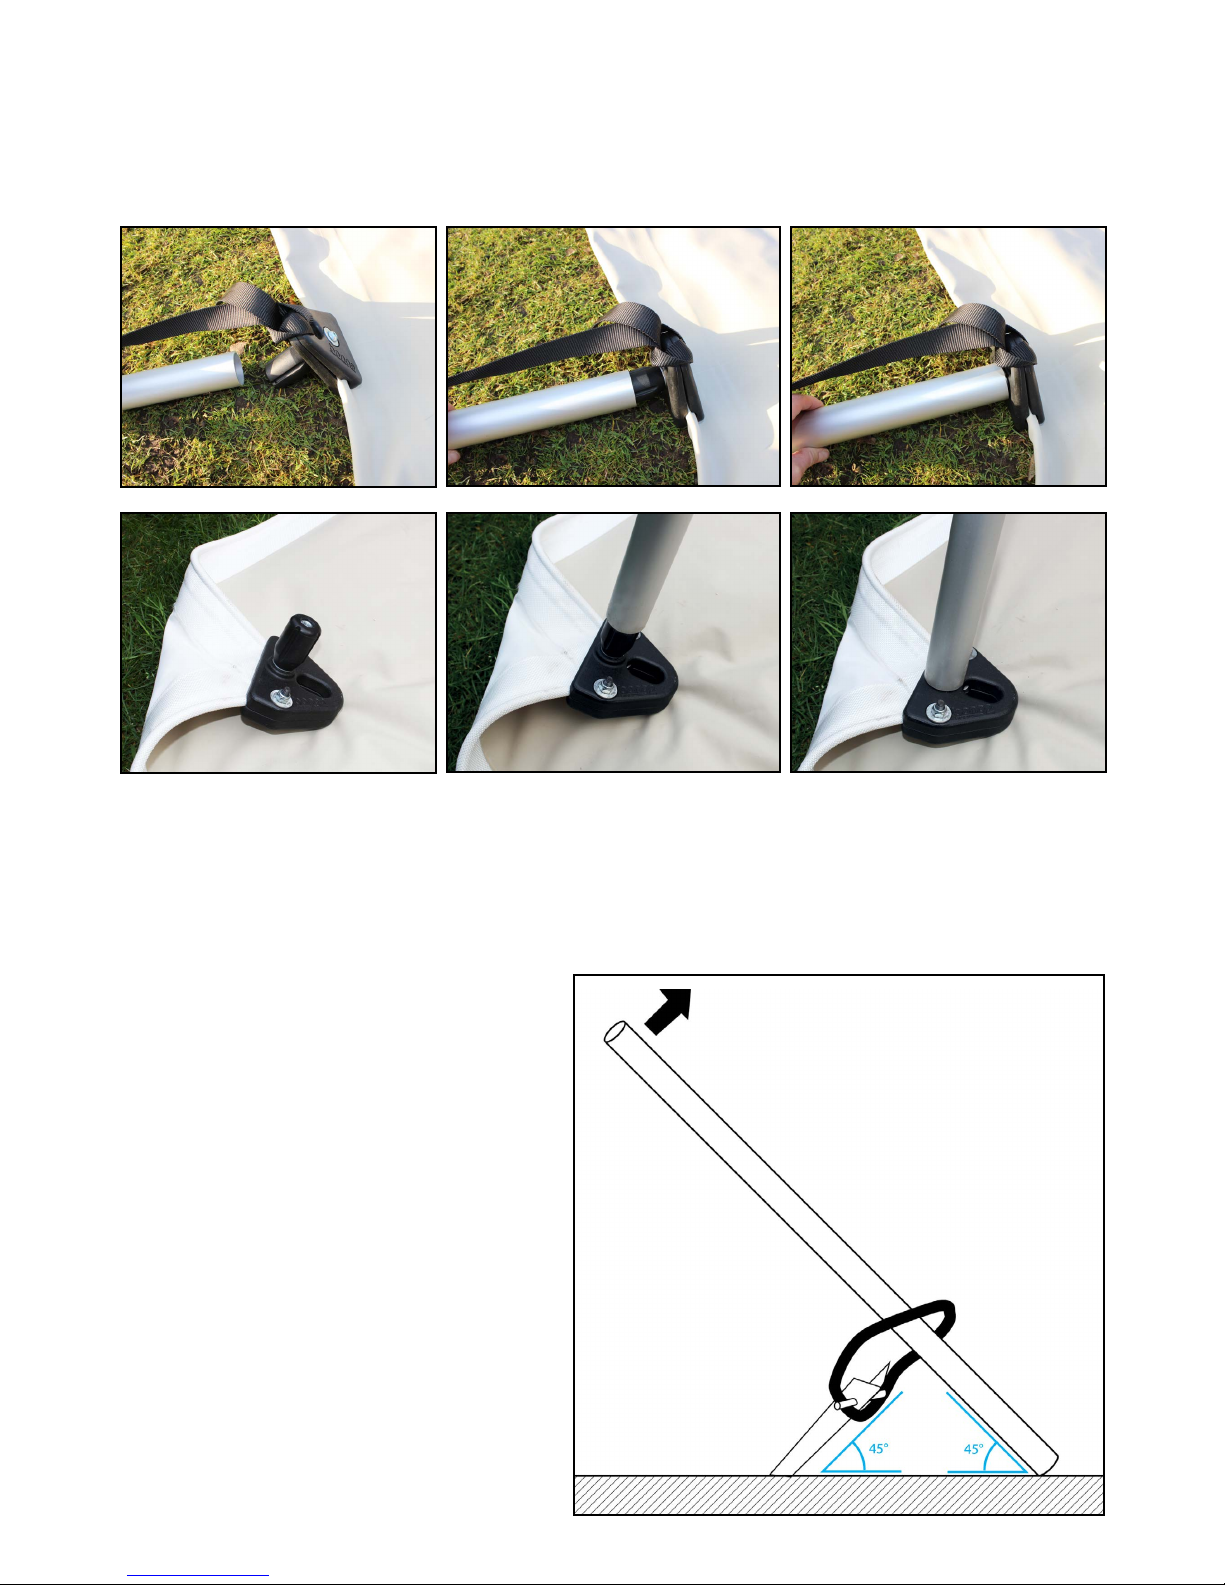
SETUP: STEP 2
ATTACH THE SIDE clampS
Take the plan ‘REINFORCED ZONES’ delivered with this tent to guide you further
Only put the side clamps on the reinforced zones! You can see and feel them when you go over the canvas
Always make sure the grip is well tightened! Check before you put up the tent!
ATTACH the straps to the clamps

SETUP: STEP 3
Put the pegs
The Bonga Stretchtent is standard delivered with pegs for lawn and clay.
If you have another surface, please use the suitable pegs! (to nd in section ‘optional parts’)
The distance (D) of the pegs from the tent is equal to the height (H) of the pole you will use (H=D).
The pegs should be placed under an angle of 45° for optimal grip and force resistance.
ATTACH THE STRAPS BETWEEN THE PEGS AND THE FIXINGS
Make the tension on the straps very loose.
D

SETUP: STEP 4
USE OF WOODEN POLES (turn you page if you use aluminium standard poles)
If you wish to use wooden poles on the sides follow these instructions:
If you wish to use wooden poles on the corners follow these instructions:
1.
make a
hole in
the top of
your pole
of 13mm
diameter
and 60mm
deep
2.
unscrew
the grip
3.
put back
the extra
long M8
nut
4.
slide the
screw
into the
hole
of the
wooden
pole
1.
make a
hole in
the top of
your pole
of 13mm
diameter
and 60mm
deep
2.
unscrew
the grip
3.
put back
the extra
long M8
nut
4.
slide the
screw
into the
hole
of the
wooden
pole
SETUP: STEP 4
USE OF aluminium POLES 40mm DIAMETER
Slide the grip into the aluminium pole of 40 diameter
SUGGESTION: REMOVE PEGS EASILY
Do you want to remove a peg? Use this system. Take a wooden or alumium pole from +/- 2m, attach a
short strap around it. Attach the strap to the peg and push the top of the pole upwards.
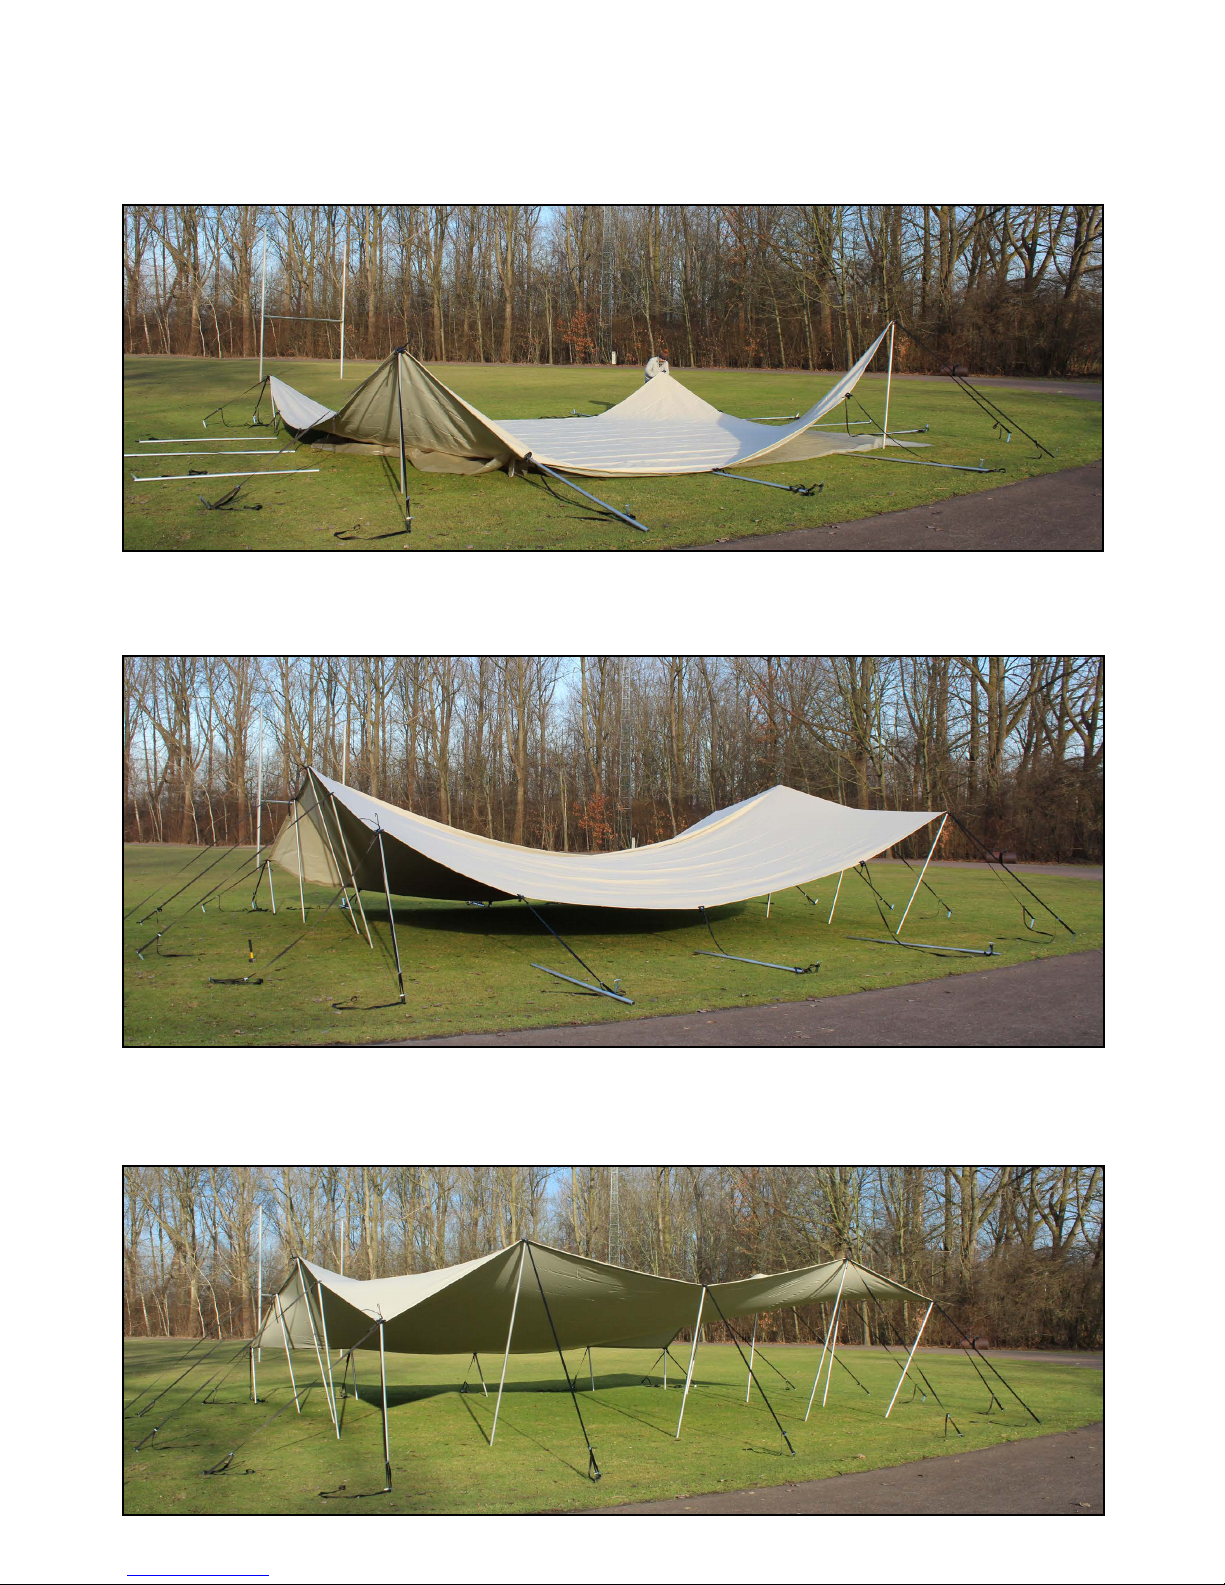
SETUP: STEP 5
put up the side poles
Put up the 4 corners. Adjust the straps so they are still quite loose.
Put up 2 oposite sides. Always choose the sides in the direction of the wind. It will help you!
Don’t put too much tension on the straps! Just a little, so the canvas is off the ground.
Put up the 2 other sides

put the pole cap on the center poles
put the center poleS
Warning: Never put a center pole without a polecap!
Start with the side poles of the tent. Keep the center poles always for last.
If you use alumium poles of
40mm diameter or
60mm diameter, you can easily
slide them on the poles.
If you use wooden poles, you can follow these steps:
1. make a hole in the wood, screw the wood adaptor onto the
wooden pole
2. slide the pole cap over it.

THE ‘PERFECT’ TENSION
THE ‘perfect’ tension
How do you measure the ‘perfect’ tension?
If you are still able to move a strap of 2meters,
10cm back and forth with your ngers, the tension
is ‘perfect’. If you cannot do that, you have put too
much tension on the tent.
Warning: Never put too much tension on the tent!
It can dammage your tent. Never use straps wit
ratchets
You can also put extra side clamps in the line of the welded seams. It is in any case always a good idea to
put the clamps at the end of the welded seams, it will give you less ‘wrinkles’.
This manual suits for next models
3
Table of contents
Other Bonga Tent manuals


Popular Tent manuals by other brands

Coleman
Coleman STITCHLINE 4-POLE SUN SHADE 2000001652 user manual

Tentsile
Tentsile Safari Stingray Tree Tent owner's manual

Wechsel
Wechsel VENTURE 2 Pitching instructions

Clarke
Clarke J45618 manual

RioOutdoors
RioOutdoors 4P-DH installation instructions

KING CANOPY
KING CANOPY AT1224S Assembly instructions


