Bonga PROFLEXX SINGLECOATED 6,5 M X 10 M User manual

MANUAL 6,5 M X 10 M


EN.......................................................................................................................................................4 - 21
Important information.........................................................................................................................................................................................................................4
Parts..........................................................................................................................................................................................................................................................5 - 6
Set-up options..................................................................................................................................................................................................................................7 - 8
Step-by-step plan ....................................................................................................................................................................................................................... 9 - 21
Guarantee & repairs............................................................................................................................................................................................................................21
NL.....................................................................................................................................................22 - 39
Belangrijke informatie .........................................................................................................................................................................22
Onderdelen.....................................................................................................................................................................................23 - 24
Setup-opties ..................................................................................................................................................................................25 - 26
Stappenplan...................................................................................................................................................................................27 - 39
Garantie & herstellingen ................................................................................................................................................................... 39
FR.................................................................................................................................................... 40 - 57
Informations importantes..............................................................................................................................................................................................................40
Composants.................................................................................................................................................................................................................................. 41 - 42
Configurations ............................................................................................................................................................................................................................43 - 44
Plan par étapes..........................................................................................................................................................................................................................45 - 57
Garantie et réparations................................................................................................................................................................................................................... 57
DE.................................................................................................................................................... 58 - 75
Wichtige Informationen...................................................................................................................................................................................................................58
Teile.....................................................................................................................................................................................................................................................59 - 60
Aufbauoptionen.......................................................................................................................................................................................................................... 61 - 62
Schritt-für-Schritt...................................................................................................................................................................................................................... 63 - 75
Garantie und Reparaturen............................................................................................................................................................................................................ 75

IMPORTANT INFORMATION 4
Read the assembly manual thoroughly before use and keep it in a safe place, so you can consult it
later if necessary. You can also download the manual from our website.
SAFETY AND DURABILITY
»Tents are intended as temporary shelter.
»The person who erects the tent is responsible for its correct anchoring and therefore for its
safety. Check the anchoring of the tent to the ground regularly to ensure the safety of the tent,
to prevent damage to the tent and to protect other users.
»In the event of severe weather conditions, keep an eye on the weather forecasts and provide
temporary extra anchoring for the tent or dismantle the tent. In the event of stormy weather you
must take down the tent to prevent permanent damage.
»With the use of an appropriate heating appliance, a distance of at least 1.2 m from the tent
canvas must be maintained. Open fires and heating appliances with an open flame may not be
used under any circumstances.
»In the event of snowfall, you must regularly remove the snow from the tent canvas. This also
applies to heavy rainfall and loading of the tent canvas with other materials. If you cannot free
the canvas from snow accumulation you must store the tent dry. In the event of snowfall, you can
also heat the tent to 2 degrees so that the snow melts and the tent canvas flows.
»You can use the tent in light frost. The tent canvases must however be kept sufficiently long at a
temperature of at least 10 °C and must be folded at the same or higher temperature. Otherwise
the canvases might split in the places they are folded.
»Only use materials that are supplied with the tent. Make sure that the ground underneath is
suitable for the purpose for which you wish to use the tent.
»Check the tension on the tent regularly and adjust it if necessary.
»Ensure sufficient water run-off to prevent water pockets.

1 2
5 6
9 10
7 8
N° DESCRIPTION QUANTITY
13 a Optional: Screw thread 1
13 b Optional: Eye nut 20
13 c Optional: Carabiner 36
14 Optional: Heavy-duty pegs
12
a
b
c
13 14
PARTS 6,5 M X 10 M 5
To begin with, check that all of the parts are complete. Depending on which poles you
are using and which design you have chosen, you may need certain accessories. Please find below
a list of all the accessories supplied with your Bonga tent:
11
3 4
N° DESCRIPTION QUANTITY
1Tent canvas 1
2Side clamps + hand clamp 18
3Corner clamps 4
4Hand clamp
(inside zip bag #1) 4
5Pegs 50 cm 8
6Pegs 80 cm 6
7Tension band 4 M 26
8Tension band short with
ratchet 26
9Pole cap small 3
10 Pole cap (XL) 2
11 Wood adaptor (only required
for wooden poles) 5
12 Zip bags * 2
* Zip bag #1 contains: hex bolt M8 x 60 (4 x), nut M8 (8 x), connector nut M8 for use with wooden poles (4), hand clamp (4 x)
Zip bag #2 contains: flange screw with socket head M8 x 35 (18 x), cap nut (18 x), tear aid patch (1 x),
5 mm hexagonal wrench (1 x), wood screw (5 x),

PARTS 6,5 M X 10 M 6
N° DESCRIPTION QUANTITY
1Aluminium pole
50 cm (Ø 40 mm) 6
2Aluminium pole
110 cm (Ø 40 mm) 20
3Aluminium coupling piece
20 cm (Ø 40 mm) 16
8Centre pole 110 cm
(Ø 60 mm) 6
9Centre pole 50 cm
(Ø 60 mm) 2
10 Aluminium coupling piece
(Ø 60 mm) 6
6Pole foot 12
1
3
2
6
N° DESCRIPTION QUANTITY
7
Aluminium pole 110 cm
(Ø 60 mm) pre-drilled for use
with eyebolt and threaded rod
10
8Aluminium pole 110 cm
(Ø 60 mm) 16
9Aluminium pole 50 cm
(Ø 60 mm) 8
10 Aluminium coupling piece
(Ø 60 mm) 22
6Pole foot 12
11 a Pre-cut screw thread Ø10 mm 10
11 b Eye nut 20
11 c Carabiner 36
12 Pole cap for pre-drilled pole 10
7
10
12
9
11
8
OPTIONAL: ALUMINIUM POLE SET
If you have chosen the optional aluminium poles, your
pole set will consist of the following parts:
OPTIONAL: STURDY ALUMINIUM SIDE POLES IN
COMBINATION WITH AN EYEBOLT AND CARABINER.
For long-term assembly, all the aluminium poles can
be replaced with a sturdier 60 mm diameter version.
a
b
c

7
SET-UP OPTIONS 6,5 M X 10 M
SAFARI
The safari design is characterised by relatively few poles and more clamps. On the one hand there
is a clamp at the top of each side pole*. There is also a clamp mounted on the canvas on the
reverse sides of the pole. The ratchets of all three clamps are pulled to the same anchoring point.
Each of the short sides has 1 side pole. Each of the long sides has 2 side poles.
Various designs are possible with the Bonga stretch tents, but we will explain two here: the safari
design and the freeform design.
* If the poles are placed outside the canvas, the instructions must be followed for the use of an eyebolt with threaded rod in
step 6 (use of wooden poles) and step 5 (use of aluminium poles). ** Recommended length = pole length
6,5m
10m
Peg
Tension strap**
Reinforced zone
Corner clamp
with pole
Aluminium pole: 220 cm (2 x 110 cm) - Wooden pole: 240 cm
Side clamp
without pole
Side clamp
with pole
Middle pole
Aluminium pole: 270 cm (2 x 110 cm + 1 x 50 cm) - Wooden pole: 280 cm
Aluminium pole: 380 cm (3 x 110 cm + 1 x 50 cm) - Wooden pole: 360 cm

SET-UP OPTIONS 6,5 M X 10 M 8
FREEFORM
One of the advantages of the Bonga stretch tent is the freedom of design. In addition to the two
regular design options, you can let your creativity go wild and even experiment with the design;
open sides, closed sides, a combination of both, part safari design, part standard design - the sky
is the limit. Even when the tent has already been erected, you can easily change the configuration
by adding or removing poles or clamps!
Please find below a few tips & tricks to be aware of:
»Ensure sufficient water run-off. That is to say, there must be sufficient difference in levels between
the centre and side poles. This prevents the formation of water pockets and protects the integrity
of the tent.
»Always place the side clamps on the reinforced zones. If you do not do this, the internal trapeze
cord may be torn away from the canvas.
»For tents with a width less than 10 metres we recommend the use of 330 to 380 cm centre poles.
»Use the supplied small pole caps to distribute the tension better by the addition of extra pressure
points. If you want to close the side walls, you can use the small pole caps to reduce the level
difference by tensing the canvas gradually lower to the ground.
STEP-BY-STEP PLAN 6,5 M X 10 M
The following step-by-step plan outlines how to assemble the tent in the safari design, whilst
remaining aware of the above. Remove the tent from the box supplied along with all of the parts.
It’s a good idea to keep the box for easy storage.
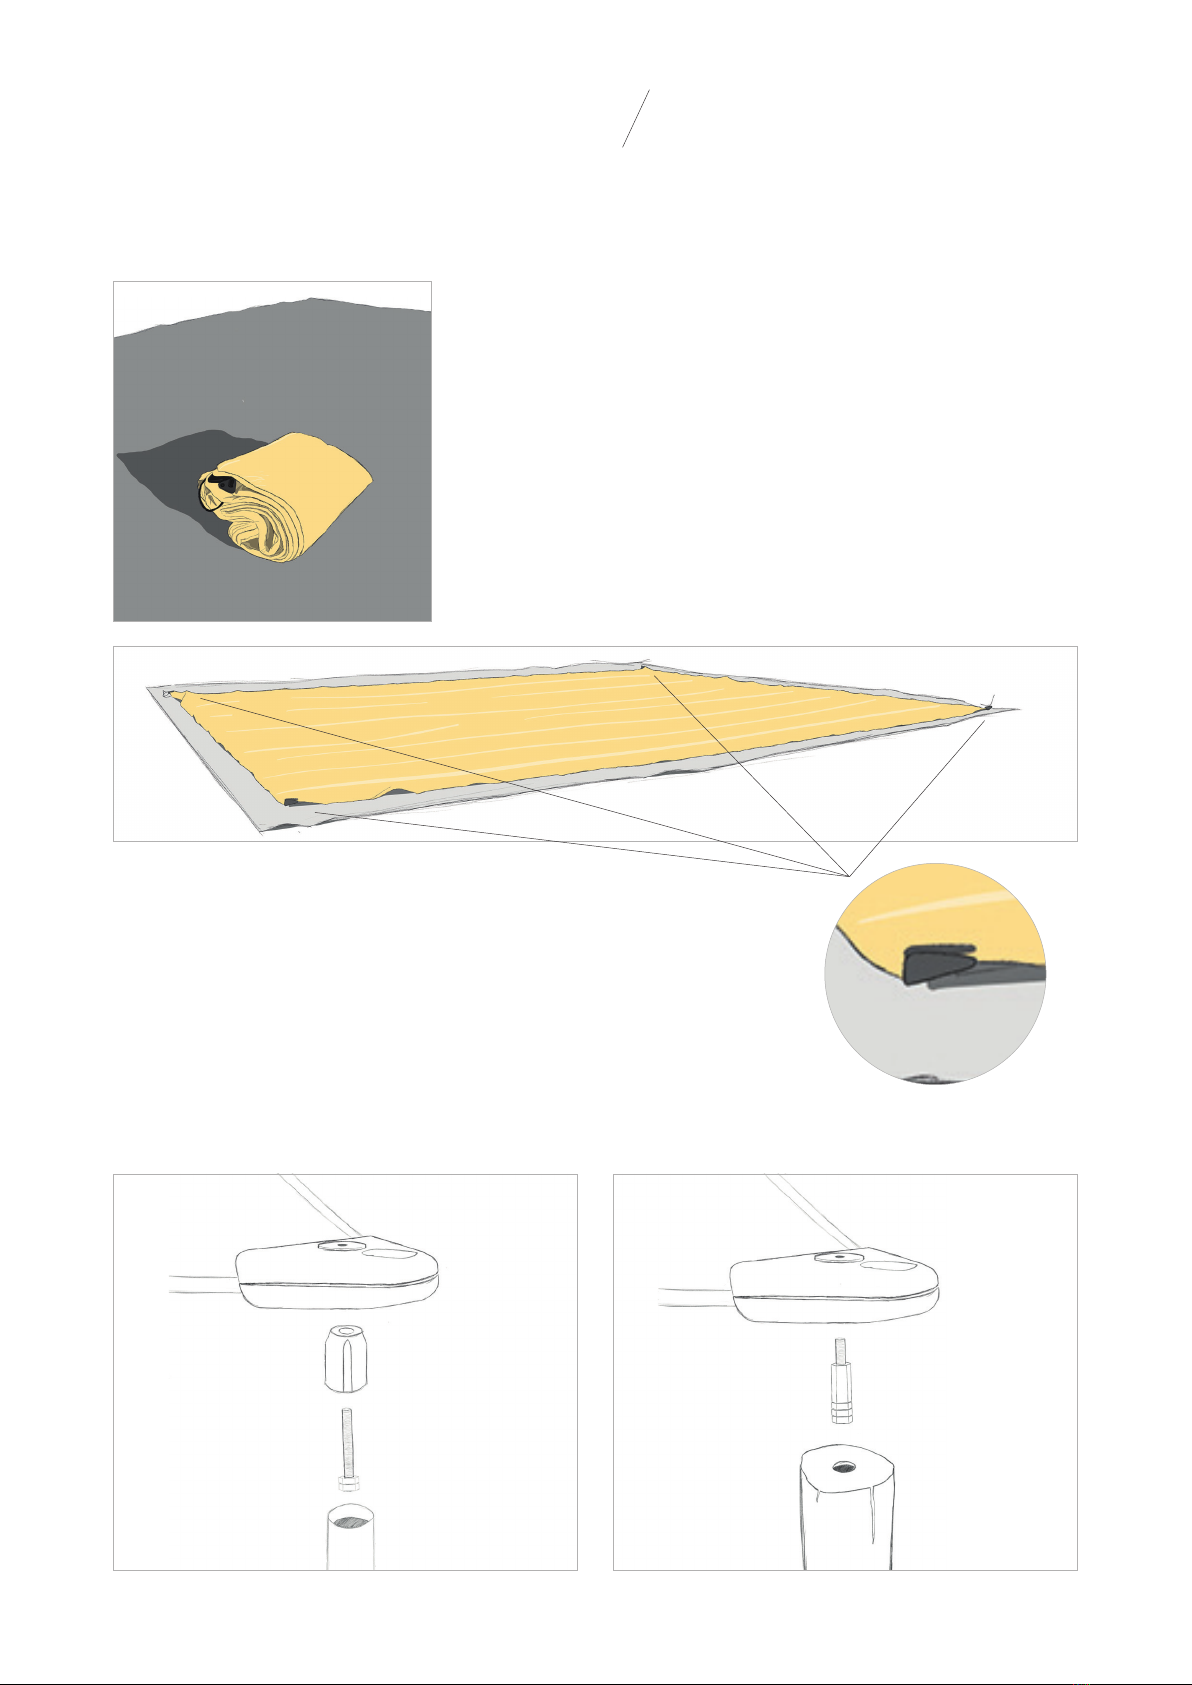
STEP 1: OPEN TENT CANVAS
Lay the stretch canvas open in the location where the tent is
to be assembled. Make sure that the correct side is on top.
TIP: Lay the stretch tent on a groundsheet to avoid marks on
the inside. This groundsheet is not supplied by Bonga.
There are already 4 corner clamps attached to the corners of
the stretch tent. These may not be removed or replaced. Check
regularly that the corner clamp is under sufficient tension.
Use of corner clamp on aluminium pole
(with hand clamp):
Use of corner clamp on wooden pole
(without hand clamp):
9
10
STEP-BY-STEP PLAN 6,5 M X 10 M
STEP 2: ATTACHING SIDE CLAMPS
The edge of the Bonga stretch tent has reinforced zones every metre. Only place the side clamps
on these reinforced zones! You can see and feel the reinforced zones when you look at the tent
canvas closely. This is very important to prevent damage to the canvas edge.
Side clamps under which
an aluminium pole is
standing slide easily into
the pole and are fixed
in place using the hand
clamp.
For side clamps under
which a wooden pole is
standing, remove the hand
clamp and slide the screw
into the pre-drilled holes.
The instructions on how
to do this can be found in
step 7.
The side clamps under
which no pole is standing
can be fitted with a
hexagon socket bucket
head screw (35 mm) with
cap nut which is supplied
in the zip bag. This ensures
a neater appearance
without hand clamps.
Now go to where the reinforced zones are attached on the
assembly plan and fix the side clamps in the locations
indicated. Always tighten the side clamps firmly. To do
this you can use the hexagonal wrench supplied in the
zip bag.
45°
45°
H
D
11
STEP-BY-STEP PLAN 6,5 M X 10 M
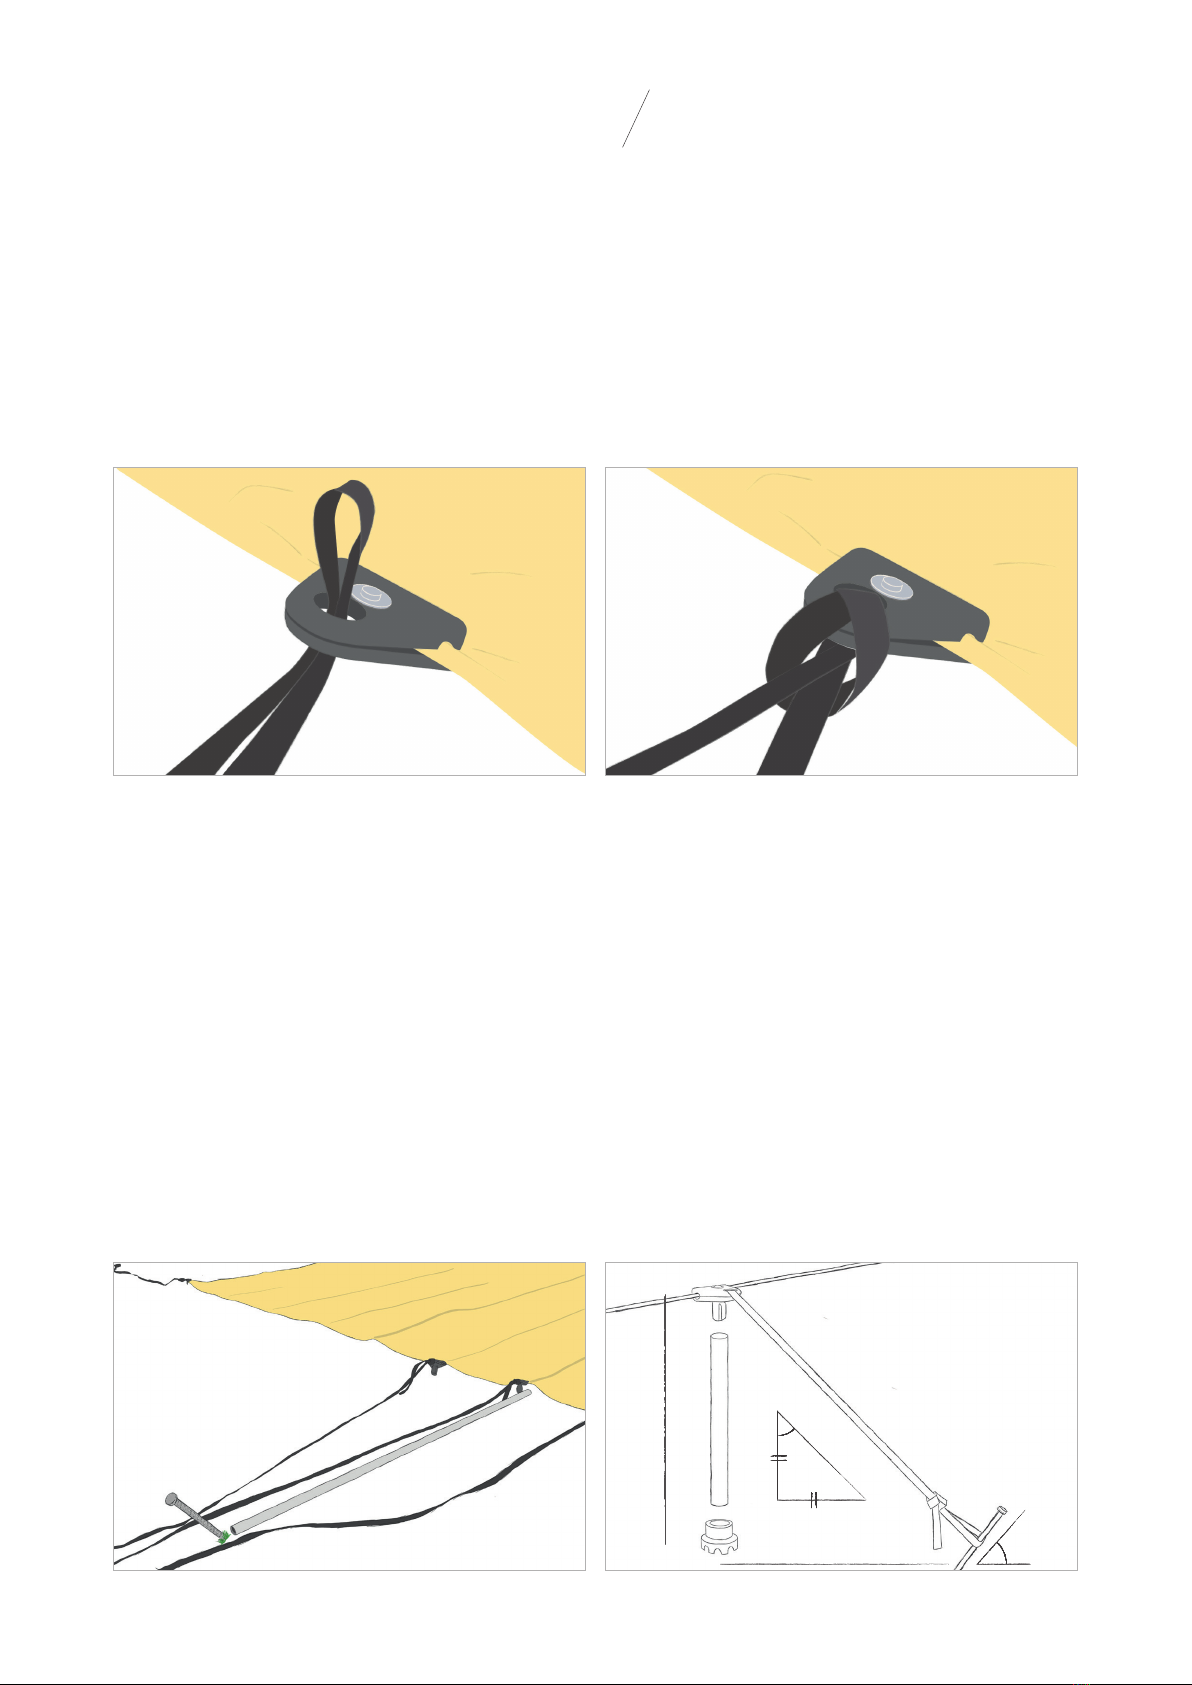
STEP 3: ATTACHING TENSION STRAPS
Attach the supplied tension straps to the corner and side clamps as follows.
»Make a loop at the end of the tension strap.
»Pull the loop through the hole in the clamp.
»Pull both ends of the tension strap through the loop.
There is one tension strap on each side clamp. There are two tension straps on each corner clamp.
STEP 4: PEGS
The tension straps are fixed using pegs in the ground. The pegs supplied are suitable for soft
ground. Make sure that if the ground is hard you use the right pegs or other anchoring methods
(eyebolts), hooks, concrete blocks etc... - not included.
Consider the following aspects when placing the pegs:
»Use the 50 cm pegs where one tension strap per anchoring point is attached, use the 80 cm ones
in the places where three tension straps come together. Only 80 cm tension straps are supplied
with tents of 100 m2and larger.
»Place the peg at a distance which is roughly the same as the height of the pole on that location.
»Place the peg in the ground at an angle of 45°. Place the peg in the direction of the tent with the
peg head facing away from the tent

12
STEP-BY-STEP PLAN 6,5 M X 10 M
When the pegs are in the ground, knot the short tension strap with the tension clamp around the
peg. Thread the long end of the tension strap which is hanging from the side clamp through the
small clamp on the peg.
Let the tension strap lie loose on the ground for a moment and don’t increase the tension on it yet.
The tension straps may only be put under tension once the poles have been erected underneath
the tent.
Optional: If you want to anchor the tent more sturdily, you can use long pegs (>80 cm) throughout
instead of only in locations where several tension straps come together. The use of extra long pegs
is useful for long-term assemblies or on marshy ground.
STEP 5: PREPARE ALUMINIUM POLES
If you are assembling the stretch tent using wooden poles, you can skip this step.
You have poles of 110 cm and 50 cm in length. You can connect these poles using a coupling piece
to achieve the desired height. Now slide the connected aluminium poles on the underneath of the
corner or side clamps over the hand clamp.
13
STEP-BY-STEP PLAN 6,5 M X 10 M
Use the same method to combine poles to the required length to create one or more centre poles.
Each time, mount a pole cap (XL or small) on the top.
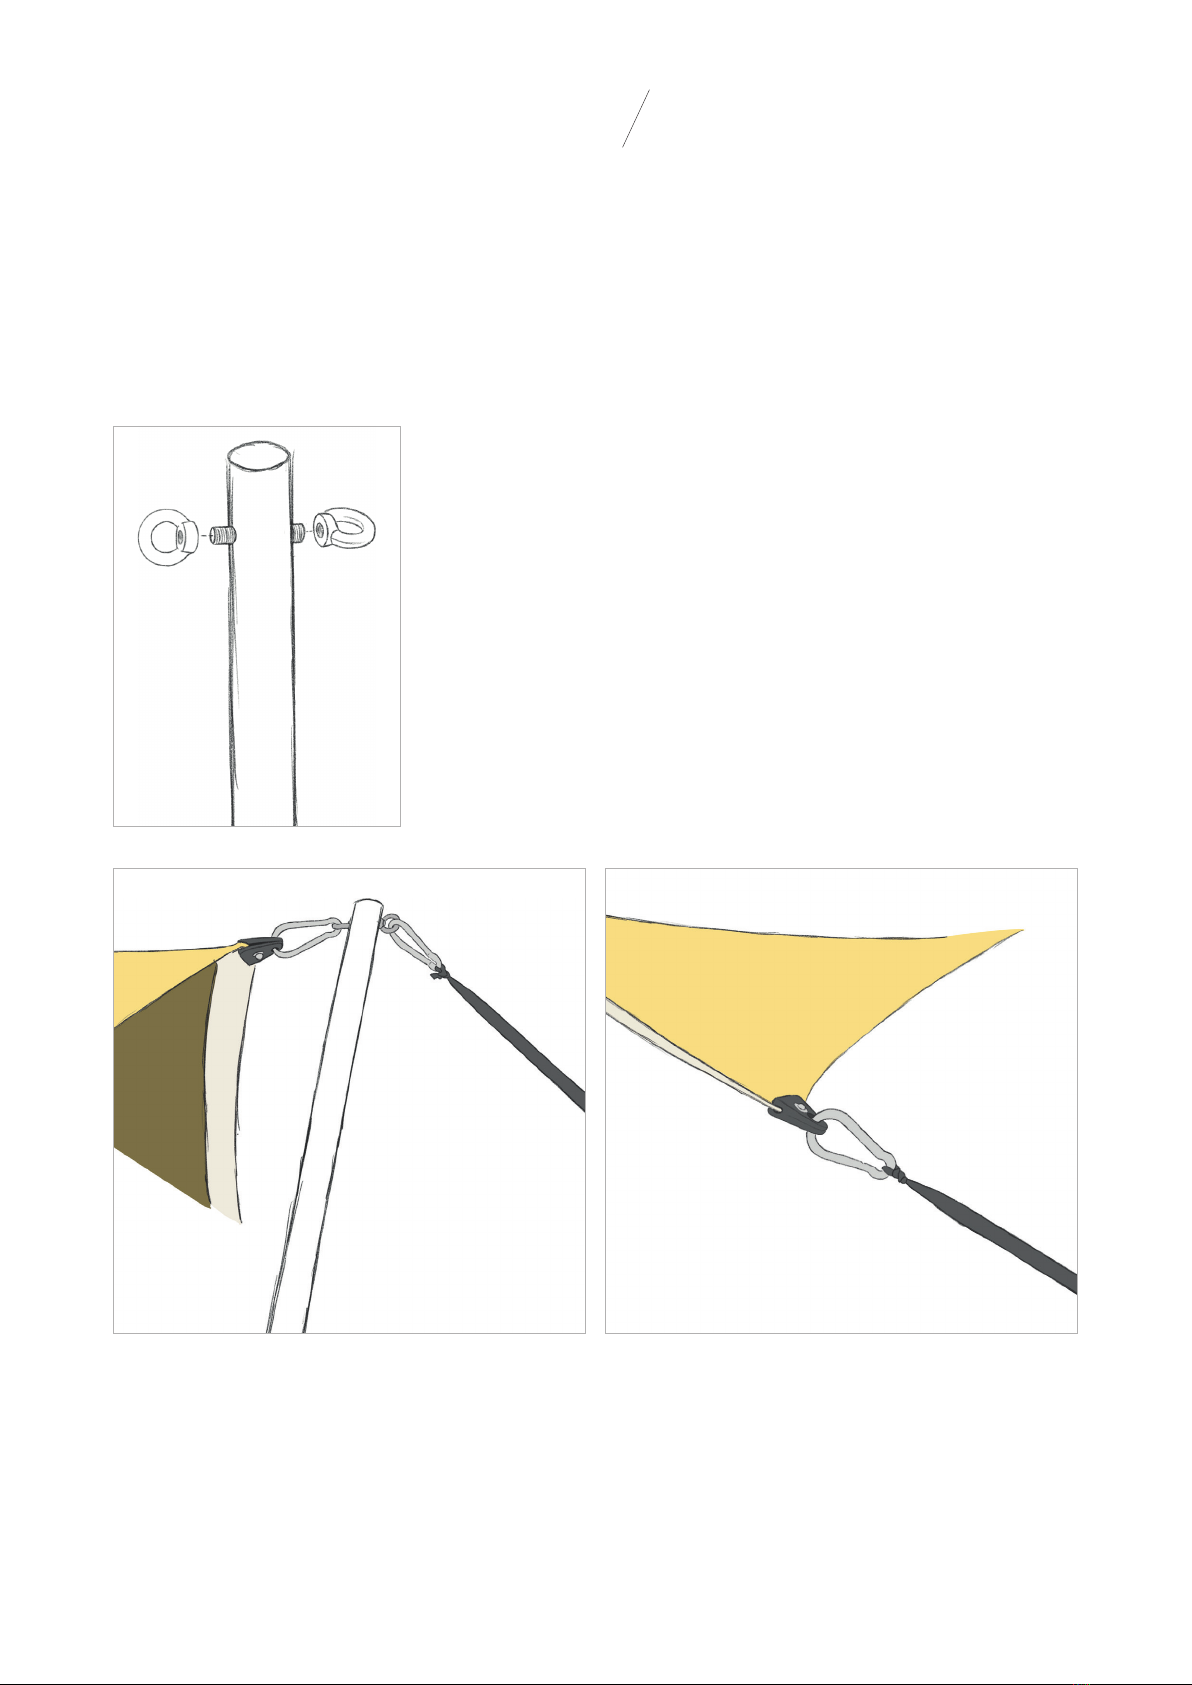
OPTIONAL FOR LONG-TERM ASSEMBLY: STURDY ALUMINIUM POLES WITH CARABINER + EYEBOLT &
PRE-CUT THREADED ROD
You can also place the poles outside the canvas and bring the canvas to tension using a carabiner
which clicks fast in the side clamp.
»Attach the threaded rod in the opening and tighten the eyebolt
at both ends.
»Place the pole so that the (opening with the) eyebolts is/are
perpendicular on the canvas.
»Connect the side clamp with one eyebolt using a carabiner.
»Bring the canvas to tension by fitting a carabiner with tension
strap to the eyebolt on the other side of the pole which you pull
toward the anchoring point.
»The clamps on the left and right of the pole are also fitted with
a carabiner and pulled individually to the anchoring point.
Carabiner on corner or side pole Carabiner on side clamp without pole
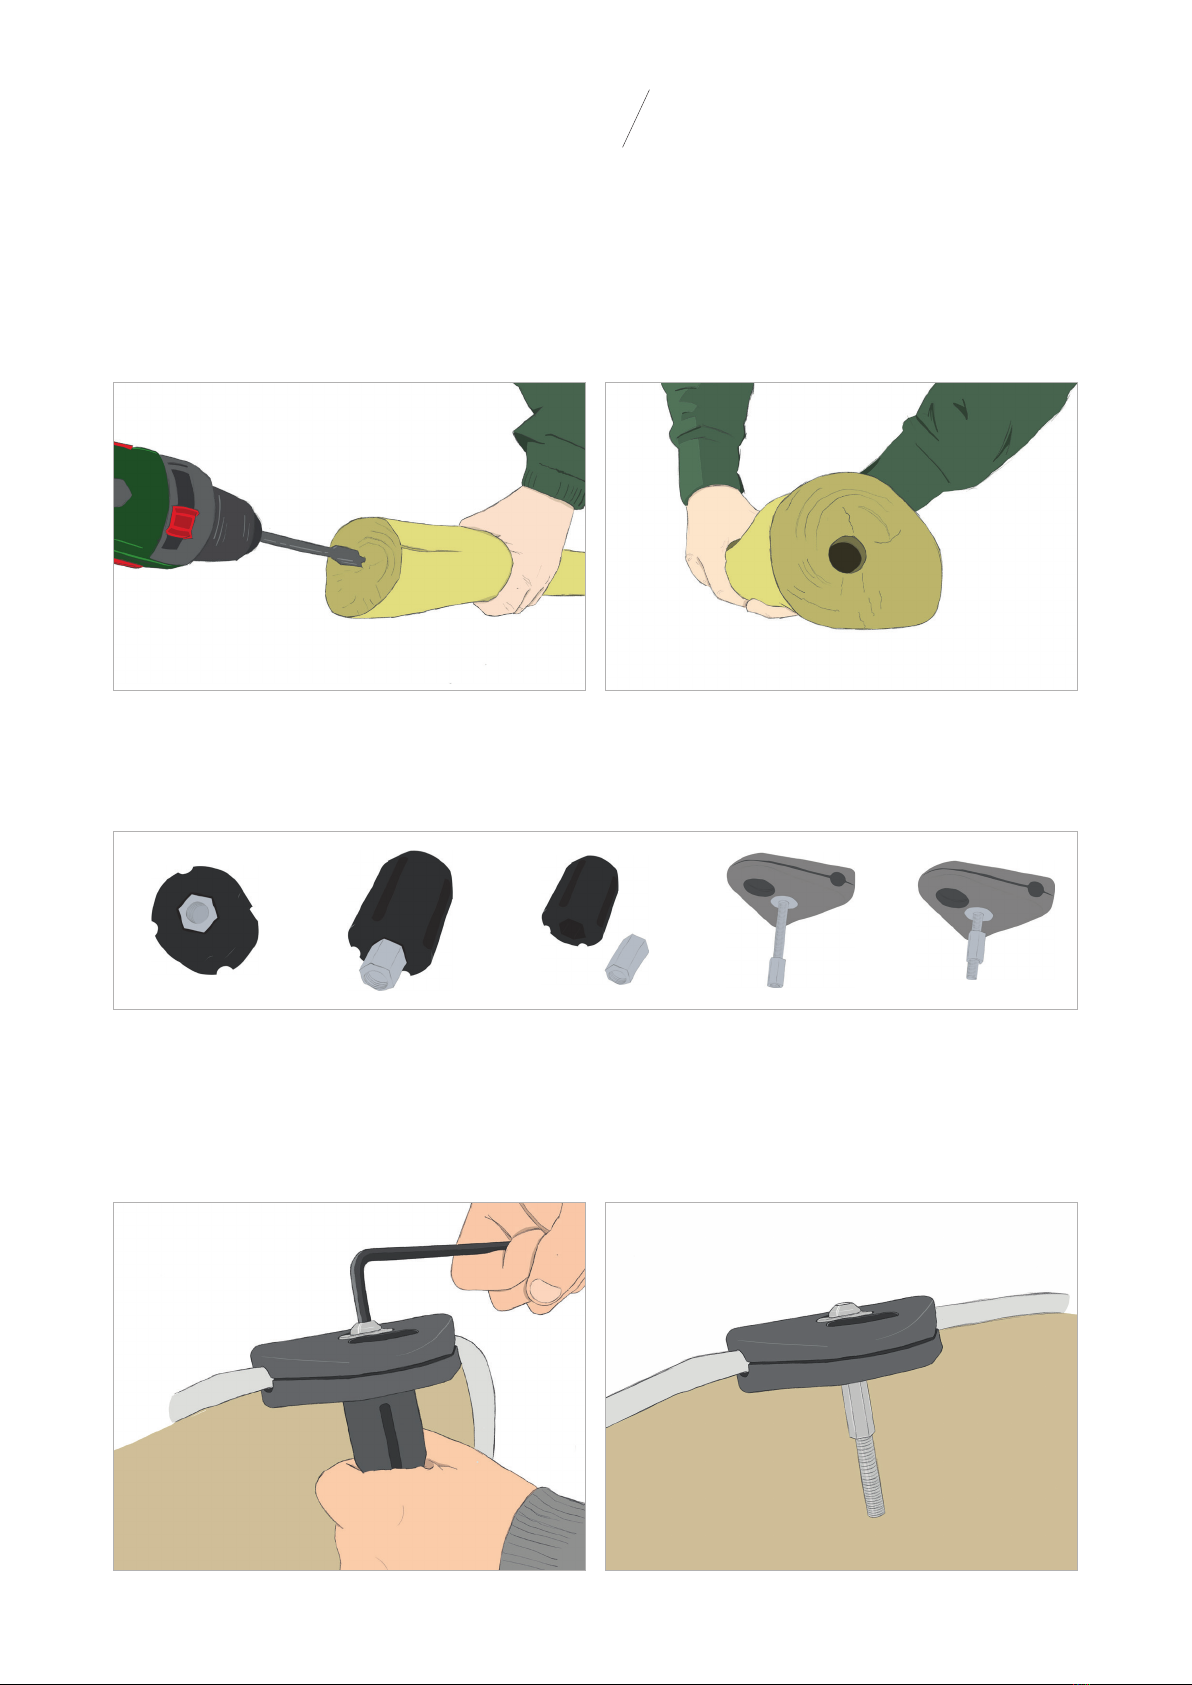
STEP 6: PREPARE WOODEN POLES
If you are assembling the stretch tent using aluminium poles, you can skip this step.
Each pole to which corner or side clamps are attached must be pre-drilled. To do this, use a 16 mm
drill bit and drill a 7 cm deep hole as centrally as possible.
»Remove the hand clamp from the side clamps.
14
STEP-BY-STEP PLAN 6,5 M X 10 M
»Use the oblong nut in the hand clamp to re-tighten the side clamps. You can use the hand clamp
and the supplied hexagonal wrench to tighten the nut. The hand clamp is not used in the side
clamps if you are using wooden poles.
15
STEP-BY-STEP PLAN 6,5 M X 10 M
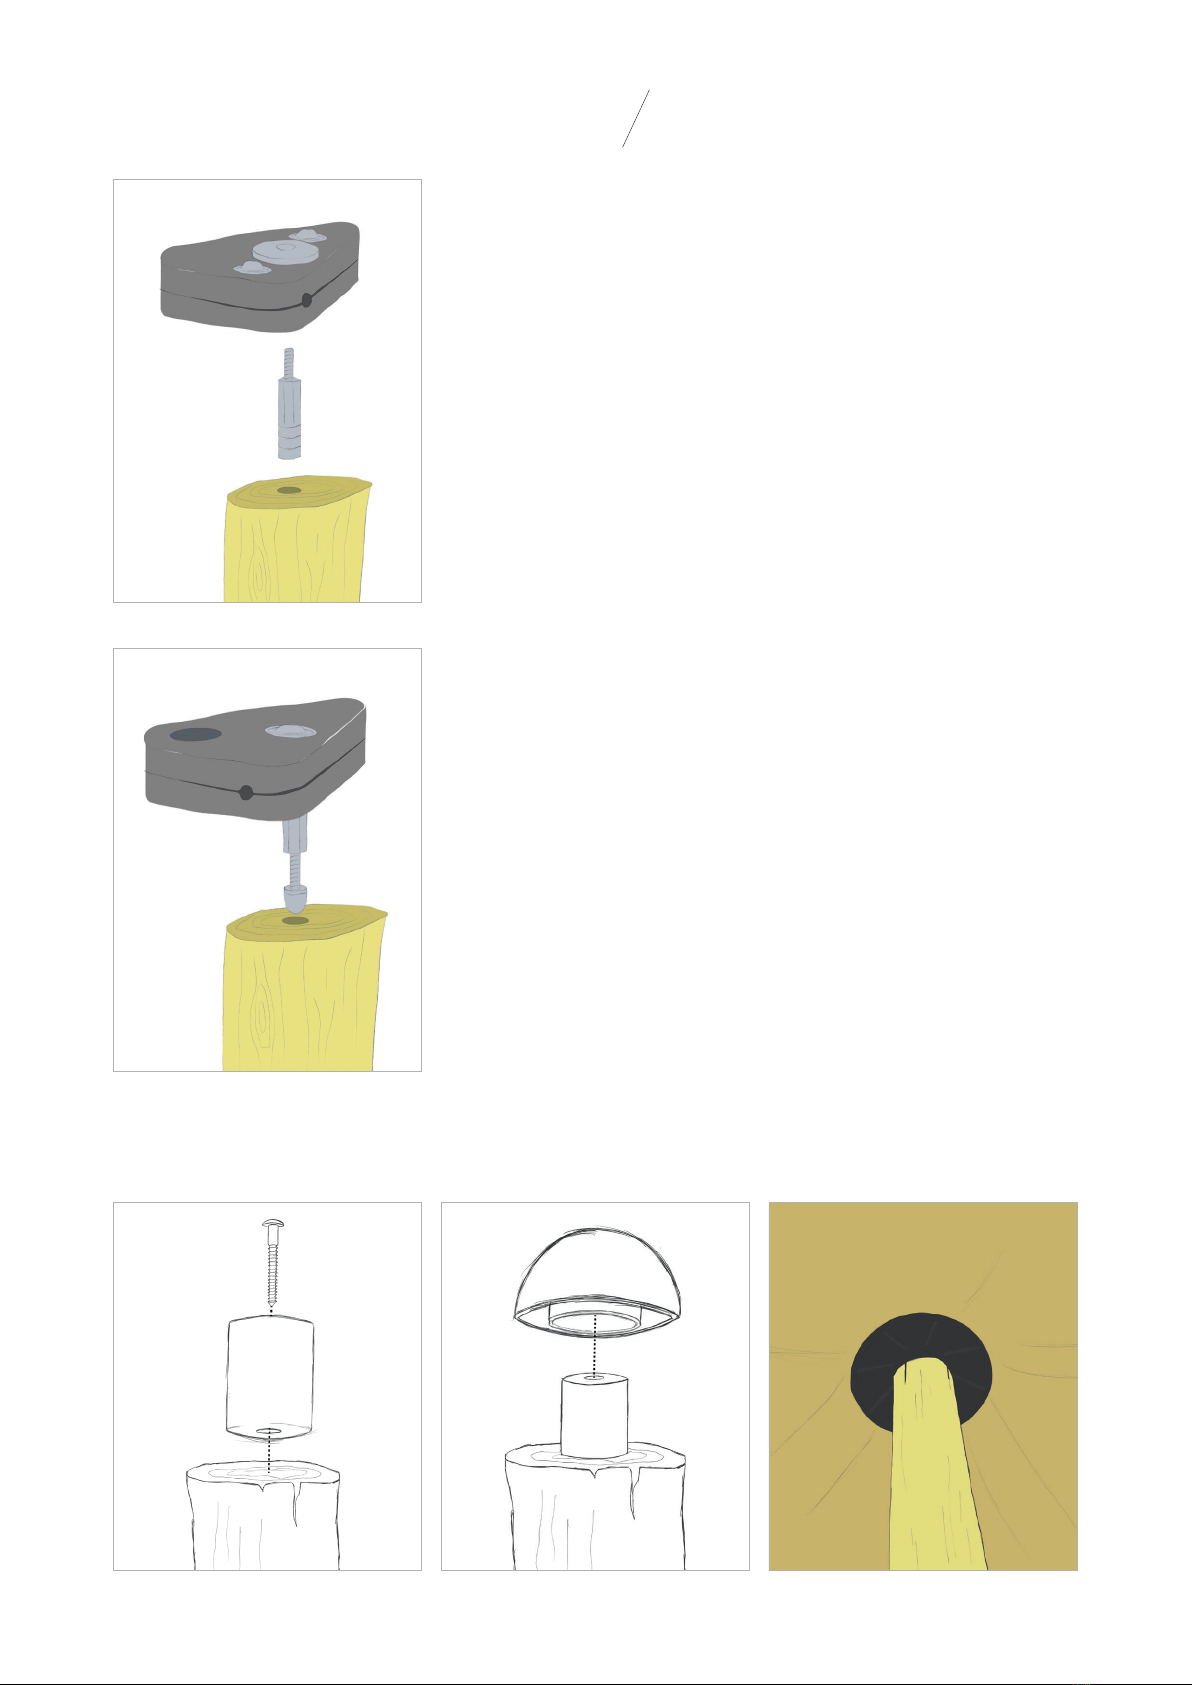
Screw the adaptor for wooden poles to the top of the centre using a screw of around 10 cm. Now
slide the supplied pole caps (small or XL) over the wooden adaptor.
Side clamp: The supplied cap nuts go onto the long bolt
of the side clamps which are attached to a wooden pole. If
everything has been assembled correctly, the assembly will
fit perfectly in the pre-drilled 16 mm hole.
Corner clamp: Screw the two nuts and the connector nut on
the bolt up to the head of the bolt. Then screw the bolt on the
corner clamp until it’s firmly secured.
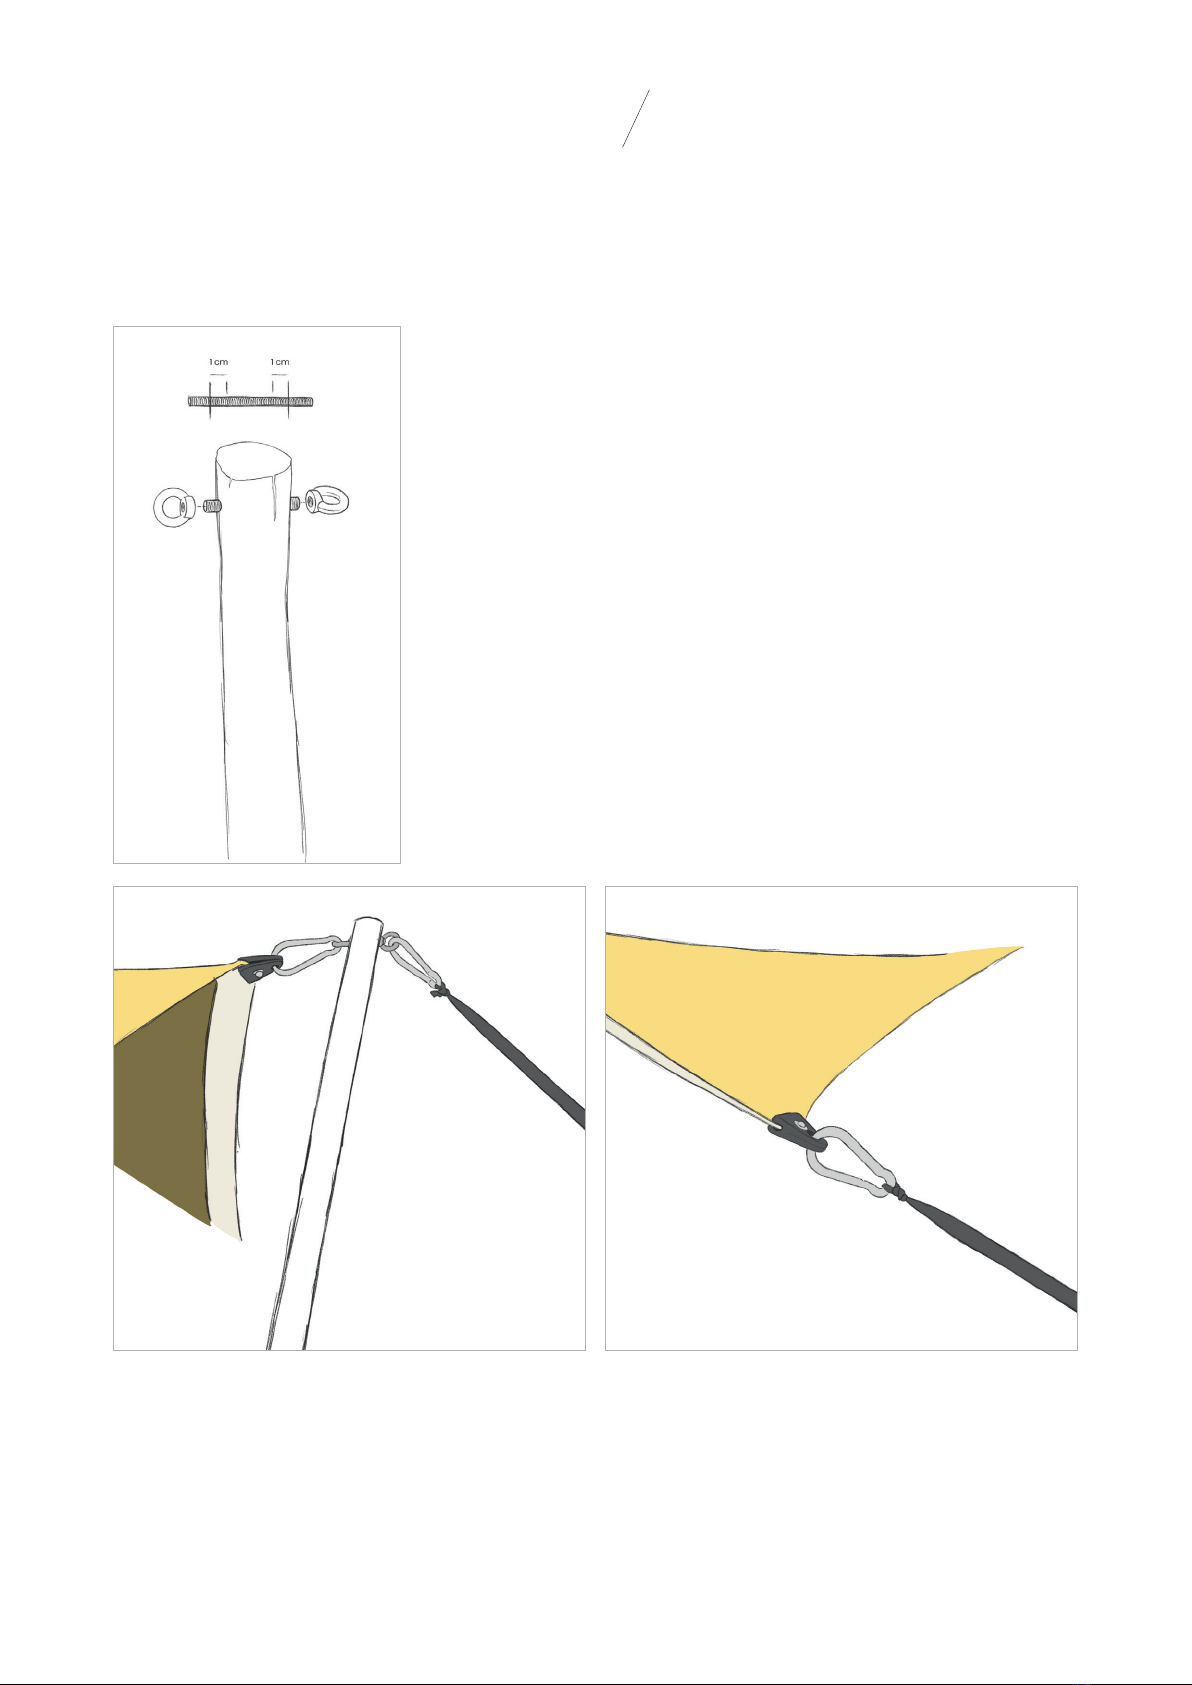
»Drill a horizontal opening (Ø10 mm) on the top of the pole. Do
this 5 to 10 cm from the top of the pole.
»Cut the threaded rod to the desired length. Create a protrusion
of 1 cm threaded rod on both sides of the pole.
»Attach the threaded rod in the opening and tighten the eyebolt
at both ends.
»Place the pole so that the (opening with the) eyebolts is/are
perpendicular on the canvas.
»Connect the side clamp with one eyebolt using a carabiner.
»Bring the canvas to tension by fitting a carabiner with tension
strap to the eyebolt on the other side of the pole which you pull
toward the anchoring point.
»The clamps on the left and right of the pole are also fitted with
a carabiner and pulled individually to the anchoring point.
Carabiner on corner or side pole Carabiner on side clamp without pole
16
STEP-BY-STEP PLAN 6,5 M X 10 M
OPTIONAL FOR LONG-TERM ASSEMBLY: WOODEN POLES WITH CARABINER + EYEBOLT &
THREADED ROD
You can also place the poles outside the canvas and bring the canvas to tension using a carabiner
which clicks fast in the side and corner clamp.
»Now erect the side poles on the two other opposite sides.
The side and corner poles are never fully perpendicular to the ground but are always slanted
slightly outwards.
17
STEP-BY-STEP PLAN 6,5 M X 10 M
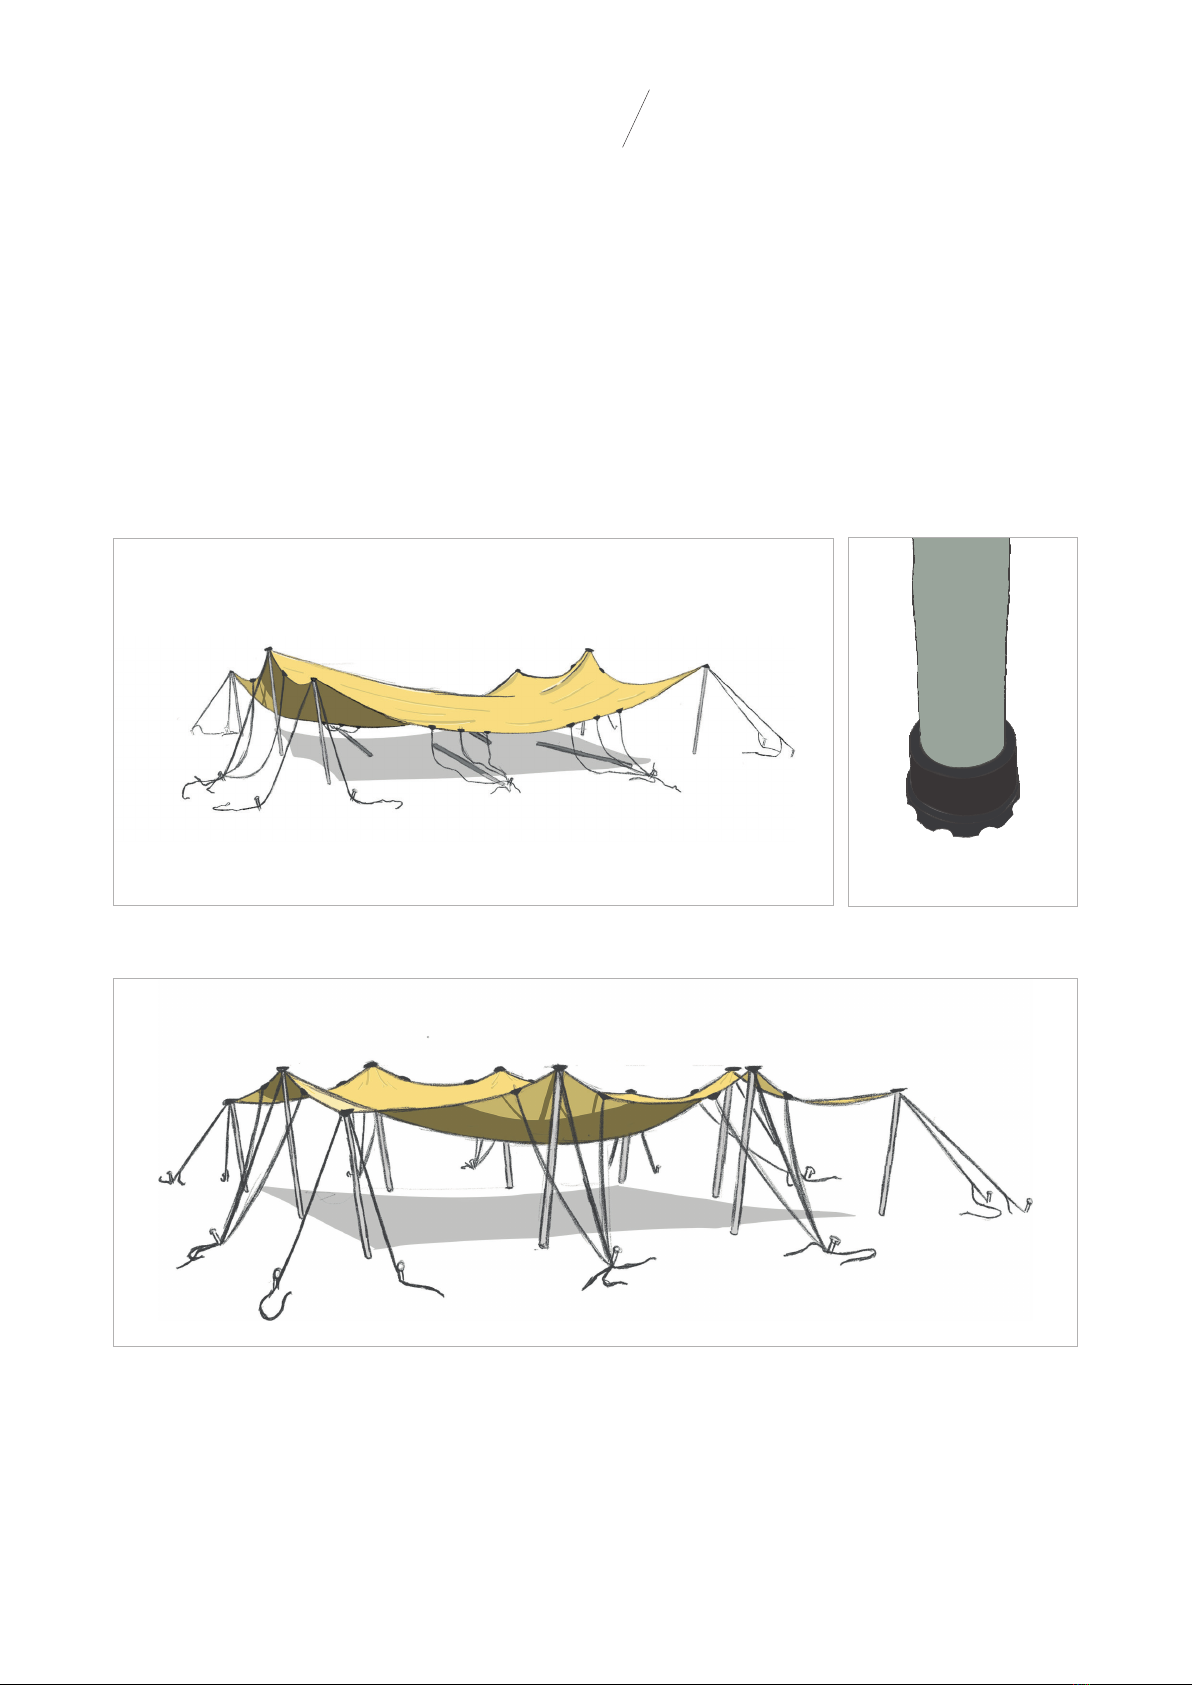
STEP 7: ERECTING THE CORNER AND SIDE POLES
»Erect the four corner poles one by one. Always start from the inside out beneath the canvas so
that the poles are erect and with aluminium poles always use a pole base to keep the pole neatly
in place.
»Tighten the tension straps of the corner poles slightly so that the pole remains upright, but do not
tighten them fully at this stage.
»Erect the side poles of two opposite sides. It is recommended that the sides facing the wind
direction be erected first.
»Tighten the tension straps slightly until the tent canvas floats above the ground, but do not
tighten the tent to full tension yet.
18
STEP-BY-STEP PLAN 6,5 M X 10 M
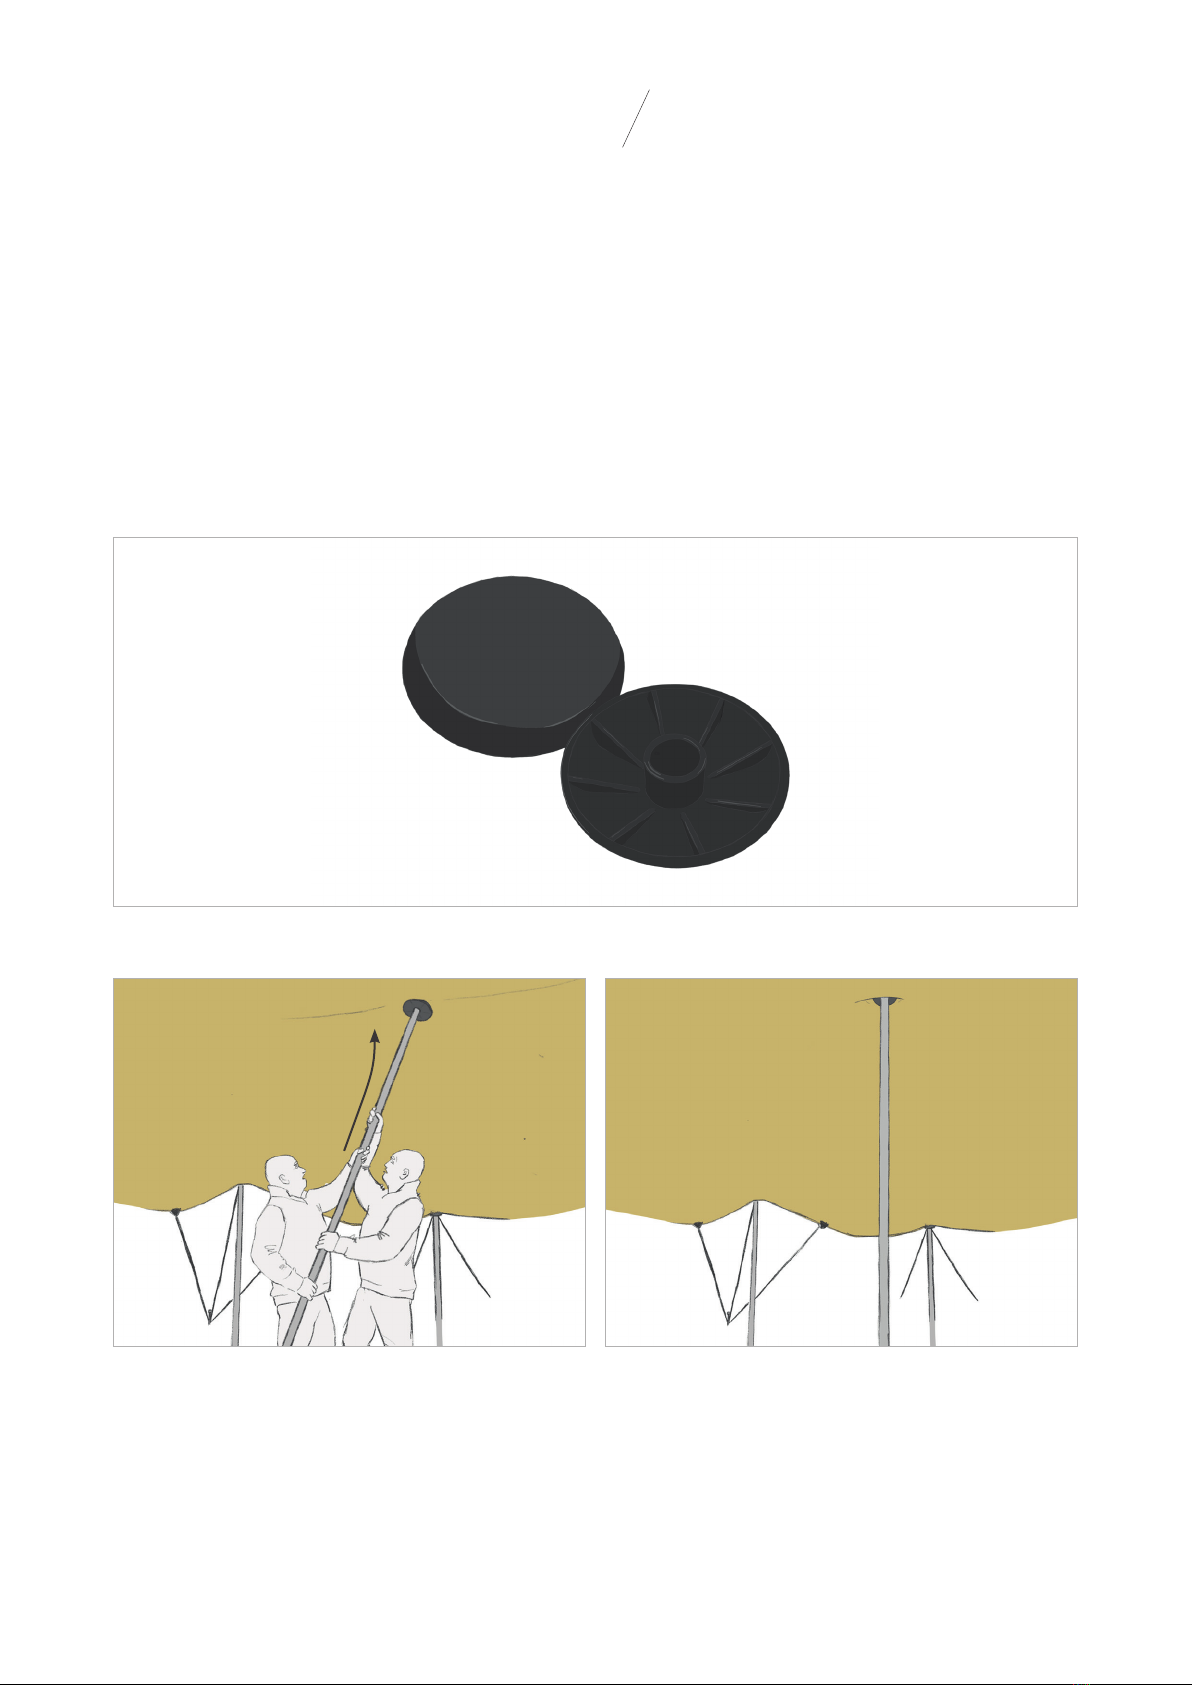
STEP 8: ERECTING THE CENTRE POLE WITH POLE CAP
Thanks to the large surface area of the pole cap (XL), the pressure on the canvas is better distributed
and there are fewer remaining imprints of the pole cap in the canvas after use.
»Please ensure that all of the desired corner and side poles are set up.
»Raise the centre pole via the side of the tent until it stands upright in the centre. Take care never
to use the centre poles without a pole cap to prevent tears. It’s best to push the pole upwards
in one smooth movement, using two people, whereby one person indicates directions and the
other person makes any necessary adjustments. If you are having difficulty getting the centre
pole fully upright, loosen the tension straps slightly.

19
STEP-BY-STEP PLAN 6,5 M X 10 M
STEP 9: PUT THE TENT UNDER TENSION.
Once all of the poles are upright, put the stretch canvas under the correct tension by tightening
the tension straps.
It’s best to tighten the tension straps evenly and increase the tension gradually. For example, you
can go around the tent several times until you achieve the correct tension.
For each pole, it’s best to start with the tension strap that comes out from the pole. Tighten the
tension strap which is attached to the pole more easily by using a second person who pulls the top
of the pole outwards.
To bring the side clamps under tension smoothly, one person pulls the tension strap towards
themselves, while the other person tensions the strap.
TIP - The tension strap can move back and forth 10 centimetres or so for the perfect tension.
TIP - Don’t overtighten the tension straps as this can damage your tent. Never use a ratchet for
this.

45 °
Carry out the following checks once the tent has been standing for half a day or so and carry them
out regularly for long-term assemblies.
»Are the pegs still anchored well?
»Are the tension straps still under sufficient tension?
»Have any water pockets formed on top of the tent?
TAKING THE TENT DOWN
Taking the tent down goes smoothest if you pay attention to the following points.
»Take the tent down during dry weather and put a groundsheet down to protect the canvas
against dirt.
»Loosen the tension straps and take down the poles. Begin with the centre poles and finish with
the side and corner poles.
TIP - to remove the pegs more easily
»Take a pole of around two metres and tie
a loop around the pole.
»Attach the loop to the peg and pull on the
top of the pole.
TIP - If you are using longer pegs that are
difficult to remove from the ground, you
can always use a peg lifter.
20
EXTRA INFORMATION 10 M X 15 M
This manual suits for next models
1
Table of contents
Languages:
Other Bonga Tent manuals


