Bonoch BBM04 User manual
Video Baby Monitor


We will update the manual frequently, you can scan the QR code or visit
the website to get the latest version of the manual

Contents
1. Overview (01-03)
Packing List (01)
Baby Unit (02)
Parent Unit (03)
2. Getting Started (04)
3. Camera Placement ( on the wall ) (05)
4. Function Operation (06-07)
5. Switching Cameras (08)
6. Replacing the Camera Len (09)
7. Maintenance and Warranty (10)
8. Information on Disposal of Product (10)
9. Warning and Safety Instructions (10)
10. Troubleshooting (11)

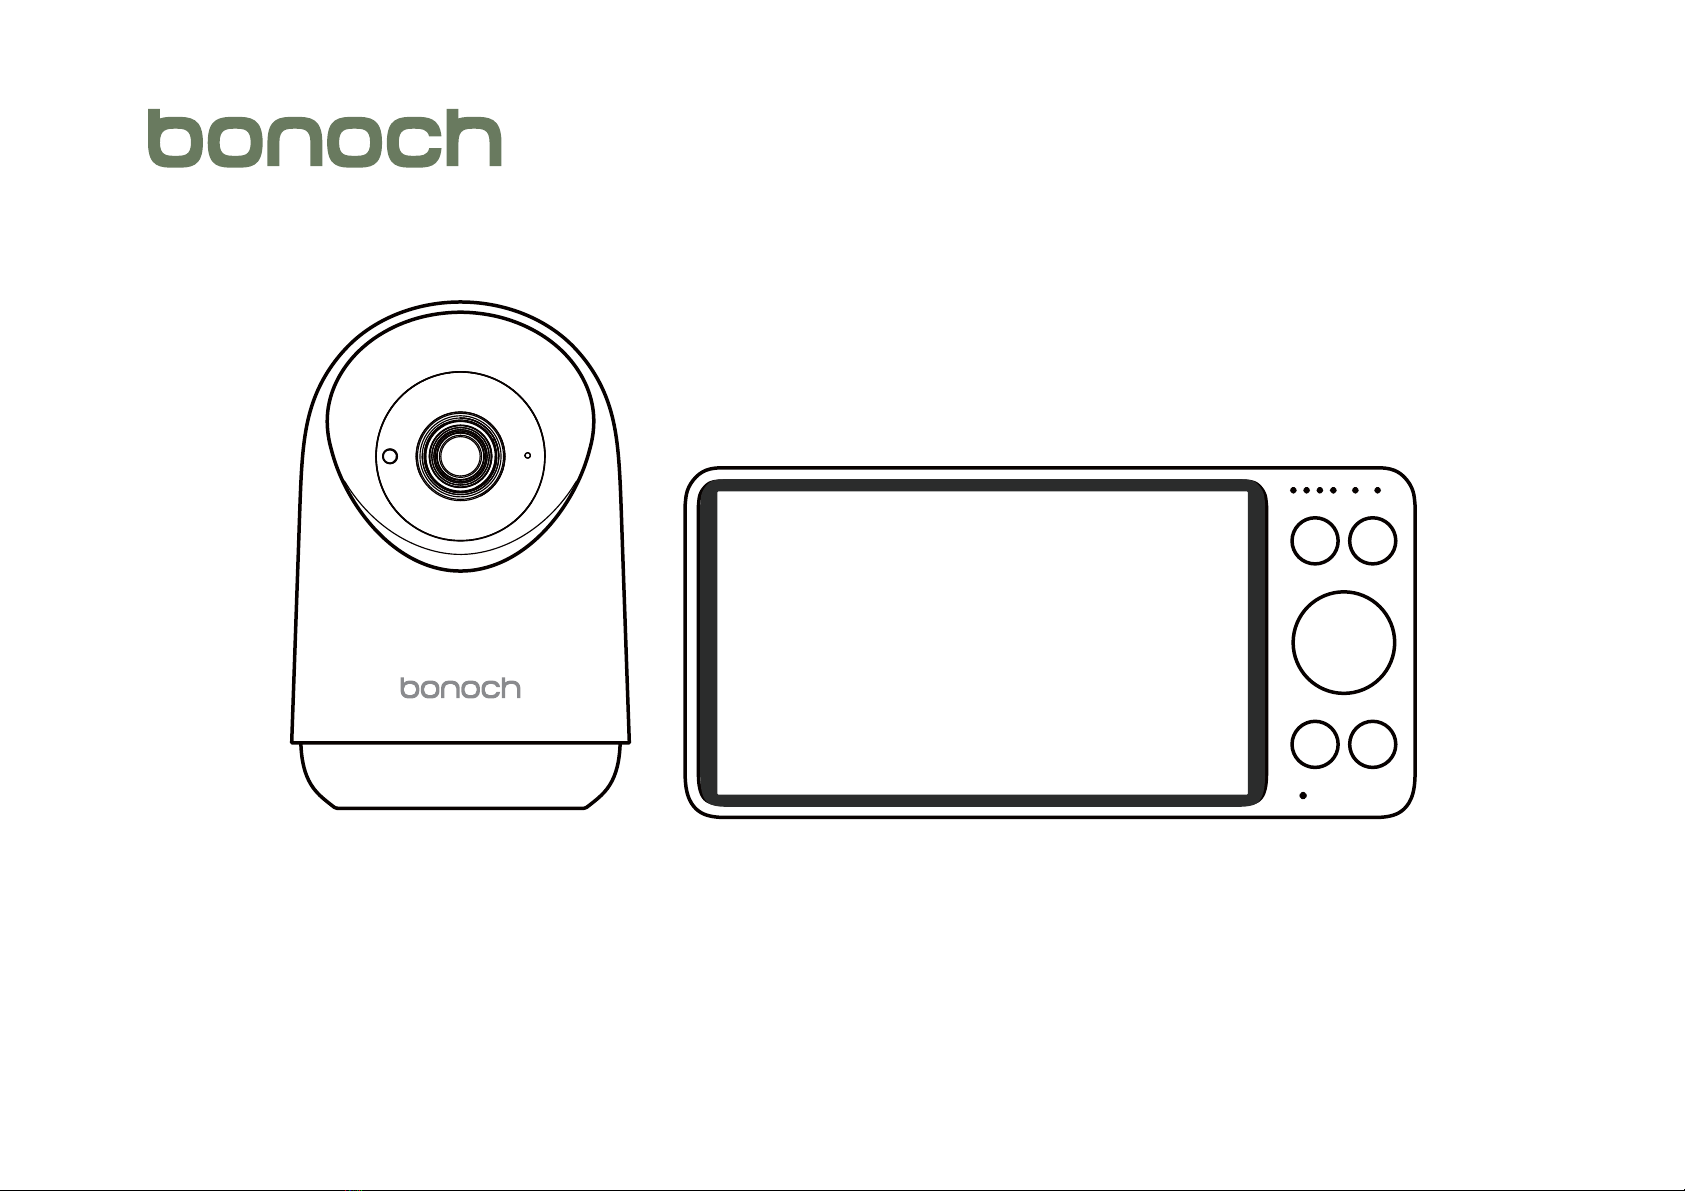
1. Overview
1.1 Packing List
EN
01
Baby Unit (Camera) x 1
Set Screw x2
Parent Unit x 1
Wide-Angle Len x 1
Positioning Card
USB C Cable x 2
USB Chargerx 2
User Manual x 1
7800mAh Extra-Long
Battery Life
USER MANUAL

05
06
03
02
10
09
08
01
1.2 Baby Unit
01.
02.
03.
Light Sensor
Standard Camera
Microphone
04.
05.
06.
Pairing Button
TF Slot
Reset Hole
07.
08.
09.
10.
USB-C Charging Port
Antenna
Temperature Sensor
Power Switch
04
EN
02
07

02 03
05
08
11
12
09 10
1.3 Parent Unit
Display
Power Button
Volume
Volume Level Indicator
Power Indicator
Menu/Back/Camera/Video Recording
1.
2.
3.
4.
5.
6.
7.
8.
9.
10.
11.
12.
Zoom
Up Arrow Key
Left Arrow Key
OK Button
Right Arrow Key
Down Arrow Key
13.
14.
15.
16.
17.
18.
19.
Play Music
Intercom
Microphone
Antenna
Speaker
USB-C Charging Port
Reset Hole
01
06 07
14
15
16
17
19
18
04
13
EN
03

2. Getting Started
Step 1.
Connect the AC power
adapter with camera.
Plug the AC power adapter
into power socket.
Notes:The two units has already been paired in factory settings, so no repeated operation is needed in most cases.
But if the auto pairing failed or you want to add more cameras, please try step 3 and step 4.
Step 2.
Press for two seconds to
turn on the parent unit.
Step 3.
Set the parent unit to
prepare for connecting.
Step 4.
Long Press PAIR button for five
seconds until you hear the
prompt tone.
4
yg p p
re cameras, p
l
ease try step 3 and step 4.
o
i
ng
.
S
L
o
se
p
EN
04
S
t
Se
pr
123
Long Press OK button to unbid

3. Camera Placement ( on the wall )
Put the camera at the pre-installation angle,
then viewing from the display monitor,
check if the angle is OK
Using positioning card included, punch two holes
horizontally apart with the same separation as the
installation holes at the bottom of the camera
Push the matching anchors into the holes.
Screw on with a screwdriver, leaving 1cm of
the screw outside of the hole
Align the camera with the protruding screw,
press and hold it down
Step 1. Step 2.
Step 3.
EN
05

4. Function Operation
1234
08 08
Crying Detect
Motion Detect
Alarm Volume
15
33
High
Low
EN
06
Long Press OK button to unbid

Lullaby
Loop Playback
Volume
Anti-flicker
Dormant
Brightness
Languages Date/Time Camera Info Version Info
1 2
EN
07

5. Switching Camera
5.1 Switch cameras manually
When two or more cameras are connected,Press the
"OK" button to enter the split screen mode. You can
now use the arrow keys to select a screen you want to
zoom in, and press the "OK" button again to switch to
the new camera screen.
To turn o multiple cameras scan mode,press the"OK" button for 3 seconds,
the loop logo of the camera at the top of the screen will disappear.
5.2 Turn on multiple cameras scan mode
5.2 Turn o multiple cameras scan mode
When two or more cameras are connected,When the screen
displays a single camera at the same time,press the "OK" button
for 3 seconds, "Scan mode on" displays at the bottom left of the
screen, and the loop logo of the camera appears at the top of
the screen. The baby monitor will automatically loop real-time
video from up to 4 cameras in single-screen mode every
15 seconds or in split-screen mode every 30 seconds.
2
EN
08

6. Replacing the Camera Len
Rotate to remove the decorative ring of
the original lens (please keep the removed
decorative ring properly, it needs to be
reinstalled later when using the standard lens)
Take out the additional wide-angle lens,
align it and screw it in, pay attention to
make sure it is installed in place
Note: After installation, remove the lens protection cover for normal use
ve
ring
of
h
e removed
d
s to be
standard lens
)
Take
out
the
ad
ali
g
n it and scr
e
make sure it is i
s
tallation, remove the lens
p
rotection cover
f
EN
09

9. Warning and Safety Instructions
Follow these safety precautions to prevent fire, injury, or damage to the product and your baby.
Read and keep instructions handy: It's very important to read all the safety and operation instructions before use.
Warnings:
7. Maintenance and Warranty
Maintenance
All of the following maintenance procedures should only be performed when baby and parent units are unplugged and turned o.
Clean the surfaces of the baby and parent units with a soft, flu-free cloth.
Never use cleaning agents or solvents.
If the units become dirty, use a slightly damp cloth to wipe surfaces. Take care not to allow water into any openings.
Warranty terms
This baby monitor comes with a one-year warranty (replace or refund) and lifetime technical support. The warranty terms do not
apply to any product that has been subject to abuse, misuse, negligence, or accident.
If you have warranty or support issues, please contact the customer service of Amazon seller before leaving your review.
8. Information on Product Disposal
Always dispose of your product (with a non-removable pre-installed battery) at the end of its life in an environmentally responsible
way and in accordance with your local waste disposal requirements. All cardboard and paper packaging materials should be
recycled in accordance with your local council waste regulations.
6ft
EN
10

10. Troubleshooting
No signal on the Parent Unit
The power adapters may not be properly connected.
Confirm the toggle switch of the Baby Unit is in "Power On" position
Confirm the Parent Unit has power and is powered on
Ensure the Baby Unit and Parent Unit are not far from each other.
The baby Unit and Parent Unit may not be properly paired. Follow the PAIRING instructions.
Interference or poor connection
Opening the folded antenna upright improves signal reception
Move the Baby Unit closer to the Parent Unit.
The Baby or Parent Units may be too close to metal objects.
Other electronic devices may be interfering with the signal.
Maybe on a low battery.
Image frozen on the Parent Unit
Restart the Baby Unit (pull out the power adapter from the wall outlet, wait for approximately 5 seconds, and plug it back in).
Reset the Parent unit by opening the battery compartment and disconnecting the battery. Wait for 30 seconds and then reconnect
the battery.
A high pitched piercing noise is heard from the units (feedback, static)
The Baby Unit and Parent Unit may be too close to each other. Move them further apart.
The volume on the Parent Unit may be set too high.
Cannot hear the baby sounds on the Parent Unit
Volume setting on the Parent Unit may be too low. Increase the volume.
Background noise
In a quiet environment surrounding the Parent Unit, decrease the volume on the Parent Unit to level 3 or below.
In a loud environment surrounding the Parent Unit, increase the volume on your Parent Unit to its maximum level.
If the above tips do not help, the system may crash. Please disconnect the battery and power adapter from your unit.
Then plug it in again and turn on your unit.
EN
11

FCC WARNING:
This equipment may generate or use radio frequency energy. Changes or modifications to this equipment may cause harmful interference
unless the modifications are expressly approved in the instruction manual. The user could lose the authority to operate this equipment if an
unauthorized change or modification is made.
This device complies with part 15 of the FCC Rules. Operation is subject to the following two conditions:
(1) This device may not cause harmful interference, and (2) this device must accept any interference received,
including interference that may cause undesired operation.
NOTE:
This equipment has been tested and found to comply with the limits for a Class B digital device, pursuant to part 15 of the FCC Rules.
These limits are designed to provide reasonable protection against harmful interference in a residential installation. This equipment generates,
uses and can radiate radio frequency energy and, if not installed and used in accordance with the instructions,
may cause harmful interference to radio communications. However, there is no guarantee that interference will not occur in a particular installation.
If this equipment does cause harmful interference to radio or television reception, which can be determined by turning the equipment o and on,
the user is encouraged to try to correct the interference by one or more of the following measures:
Reorient or relocate the receiving antenna.
EN
12
Increase the separation between the equipment and receiver.
Connect the equipment into an outlet on a circuit dierent from that to which the receiver is connected.
Consult the dealer or an experienced radio/TV technician for help.
The rating information is located at the bottom of the unit.
FCC RF Radiation Exposure and SAR Statements
This camera complies with RF radiation exposure limits set forth for an uncontrolled environment.
This equipment should be installed and operated with a minimum distance of 20 centimeters between the radiator and your body
This monitor has been tested for body-worn Specific Absorption Rate (SAR) compliance.
The FCC has established detailed SAR requirements and has established that these requirements.
RF Exposure Information The radio module has been evaluated under FCC Bulletin C95.1 and IEEE 1528 and found to be compliant to
RF Exposure from radio frequency devices. This model meets the applicable government requirements for exposure to radio frequency waves.
The highest reported SAR level for usage near the body (0mm) is 0.15 W/kg.

ⶏⵍϸPP
Ὠ叇ϸ&
ⵖ梷ϸ⊠┡昱愜`勱
⋚槊ϸ⊠┡昱
support@bonoch.com
Table of contents


