Bornay WIND 13+ User manual

!
!
!
!
!
!
!
!
Wind 13+!
!
Manual!
!
Installation!
!
Operation!
!
Maintenance!
!
!
!
!
!
!
!
!
!
!
!
!
!
!
!
!
!
!
!
!
!
!
!
!
!
!
!
25!

!
!
!
Index!
!
!
!
!
Index!
!
!
!
!
!
!
!
26!
!
Welcome to the world of the wind!27!
!
Wind Turbine Components!29!
!
Datasheet!30!
!
Placing your wind turbine!32!
!
Installation!32!
!
The Tower!33!
!
Electrical wiring!35!
!
Installing the Wind Turbine!36!
!
Maintenance!41!
!
Frequently ask questions!43!
!
Annex!45!
!
Declaration of conformity!47!
!
Warranty!47!
!
!
!
!
!
!
!
!
!
!
!
!
!
!
!
!
!
!
26!
ENG!

!
!
!
Welcome to the world of the wind!
!
!
!
!
!
!
!
!
!
!
Valued Customer,!
!
We want to thank you for purchasing your new Wind 13+ wind turbine and we
hope it will meet all the needs for which you have acquired it and for which
we have produced it.!
!
Warranty conditions are located at the end of this manual. They are
dependent on the proper installation of your wind turbine as this will ensure
the correct functioning of the apparatus and, of course, correct servicing.!
!
We are fully available for consultation should you need any type of
information about your wind turbine or its installation.!
!
Once again, we welcome you to the World of the Wind.
Most sincerely!
!
Bornay Wind turbines!
!
!
!
!
!
!
!
!
!
!
!
!
!
27!
ENG!

!
!
!
Interesting information!
!
In this manual you will find all the information needed to install and maintain
your wind turbine.We strongly recommend that you read this manual
thoroughly and understand it before beginning assembly.!
!
At several points in this manual you will find special notes highlighted. These
notes are to be observed with special care because they have critical
importance. Please pay special attention to those points marked with the
following example notices:!
!
!
!CAUTION:!"WARNING:!
!
!
Important details for the right!
functioning of the system.!
Hazards or unsafe actions!
that could cause an injury to!
your system or yourself.!
!
!
!
Identification!
!
Each wind turbine is labeled with its model, voltage and serial number data as
it follows:!
!
Manual:!Labeled on the cover of this manual.!
!
Alternator:!The wind turbine model, voltage and serial number can be
found on the face of the alternator housing above the
brushes cover.!
!
Regulator:!On the right side of the control box, there is asticker
indicating the characteristics, regulator model, wind turbine
model, voltage, and serial number.!
!
Keep anote of your serial number as this will be useful when you have to
order replacement parts and ask for technical assistance.!
!
!
28!
ENG!

!
!
!
Wind Turbine Components!
!
Next to this documentation, in the original box, you will find the components
listed below. Some items may already assemble:!
!
1Tail!
1Tail tube!
1Nacelle!
1Alternator!
1Hub!
2Blades!
1Frontal cone!
1Set of bolts!
1Fixation plate!
!
Blade!
!
!
Alternator!Tail!
!
Frontal Cone!Nacelle!
!
!
!
!
!
!
!
Hub!Fixation Plate!Tail Tube!
!
!
!
!
!
!
!
!
!
!
!
!
29!
ENG!

!
!
!
Datasheet!
!
Technical specifications!Wind 13+!Wind 25.2+!Wind 25.3+!
Number of blades!
2!
2!
3!
Diameter!
2,86 m!
4,05 m!
4,05 m!
Material!
Fiberglass /Carbon Fiber!
Direction of rotation!
Counterclockwise!
!
Electric specifications!
!
Alternator!
Three phases permanent magnet!
Magnets!
Neodynium!
Nominal power!
1500 W!
3000 W!
5000 W!
Nominal voltage!
220 v!
220 v!
220 v!
Nominal RPM!
600!
400!
400!
!
Wind speed!
!
Operating range!
2-30m/s!
Turn on!
3m/s!
Nominal power!
12 m/s!
Automatic brake system!
14 m/s!
Maximum!
60 m/s!
!
Physical specifications!
!
Wind turbine weight!
41 kg!
93 kg!
107 kg!
Package 1(WT) -Weight!
57 kg!
135 kg!
149 kg!
Pack. 1-Dimensions (cm)!
50x77x57!
120x80x80!
Pack. 1(Blades) -Weight!
6,8 kg!
19 kg!
22 kg!
Pack. 2-Dimensions (cm)!
153x27x7!
220x40x15!
260x40x15!
Total -Volume!
0,23 m3!
0,90 m3!
0,91 m3!
Total -Weight!
63,8 kg!
154 kg!
171 kg!
!
Warranty!3years!
!
!
!
30!
ENG
!

!
!
!
!
!
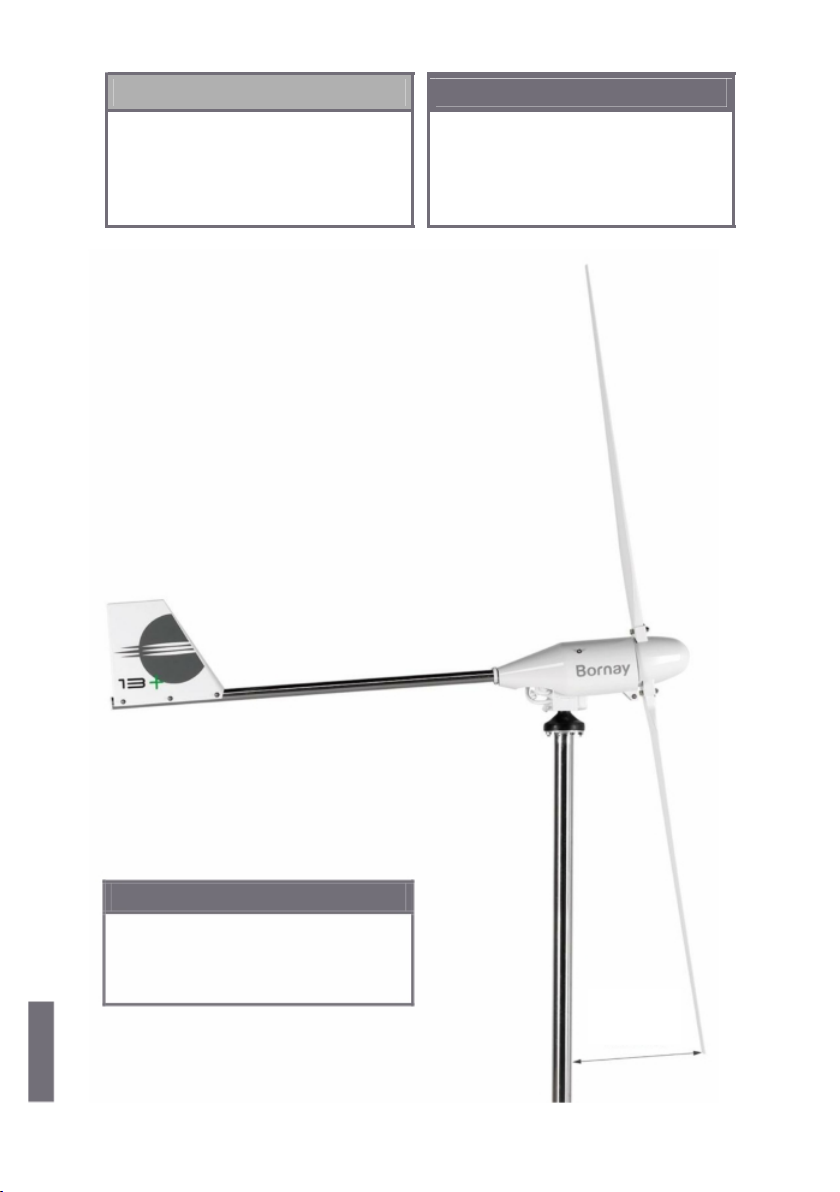
Model!
A(mm)!
B(mm)!
C(mm)!
D(mm)!
E(mm)!
Wind 13+!
1430!
1670!
370!
470!
2040!
Wind 25.2+!
2000!
2140!
470!
645!
2610!
Wind 25.3+!
2000!
2640!
495!
645!
3135!
!
!
!
!
!
!
!
!
!
!
!
!
!
!
!
!
!
!
!
!
!
!
!
!
!
!
!
!
!
!
!
!
!
!
!
!
!
!
!
!
!
!
31!
ENG!

!
!
!
Placing your wind turbine!
!
!
The best site to install awind turbine will be
aplace where it is exposed to the most
constant and highest wind speed possible.
Wind speed depends enormously on the
landscape the air moves over. In almost all
locations the wind speed increases, as you!
!
!
!
!
!CAUTION:!
For more information on
obstacles affecting wind!
turbines, see Annex 2.!
get higher off the ground; vegetation, landscape, nearby buildings, etc. stop
the wind and produce turbulences.!
!
!
The best place for awind machine, is an obstruction-free area, and at the
maximum height available.!
!
!
!
!
Installation!
!
!
Before you begin, run through the steps to follow in order to correctly
assemble your wind turbine and take aseries of important precautions.!
.!
!
!
Tower!
installation!
Electrical!
wiring!
controler!
!
Windturbine!
installation!
!
Functionality!
test!
!
The precautions to follow should be:!
!
•!Don't plan to carry out installation on windy days.!
!
•!Do not leave the generator running freely. With the generator!
running freely, the automatic leaning brake system does not work;
this could cause irreparable damage to the wind turbine.!
!
•!Use the correct wiring.!
!
!
!
32!
ENG
!

!
!
!
The Tower!
!
!
It is recommended to install the wind turbine on an Independent tower, and
not next to the house to avoid turbulences.!
!
Anchoring the tower is carried out according to
the type for installation, and must be fixed
securely to the ground, normally with concrete
foundations. It must be totally vertical and
leveled to avoid poor wind turbine functioning.!
!CAUTION:!
!
Check constantly to
ensure that the tower is!
vertical and level.!
!
In the case of shorter-based towers requiring tensile guy cables: once the
base is anchored and the tower is in place, 3or 4tensile guy cables are
applied, their supports firmly anchored to the ground, generally in concrete
foundations.!
!
Check at all times that your tower remains perfectly vertical.!
!
The guys ropes have to absorb all tower bend in windy conditions. Therefore,
they must be 6-10 mm diameter steel cables.!
Attach the guy wires to the highest point of the
tower but always beneath the diameter of the
blades.!
!
Grounding the tower will provide static and
lightning protection for the system. This can
be made by driving cooper wire into the
ground near the tower base and connecting it
to the tower with wire.!
!
We don’t recommend the installation of
lighting arrestors near to or within the area
occupied by the!
wind turbine.!
!
!
!
!
33!
ENG!
!
!
!
!CAUTION:!"WARNING:!
!
!
Wind turbine must be able to!
turn 360º freely with no!
obstacles in its way.!
Any object touching the blades
in movement, will break them
and will unbalance the system!
causing major problems!
!
!
!
!
Once the wind turbine has been installed on the
tower, check that it can turn freely and that there
are no obstacles within the diameter of the blades.!
!
Under wind pressure, the blades can have up to
15cm of torsion, so there must be aminimum
distance of 20cm between the blades and the
nearest point.!
!
!
!
!
!
!
!
!
!
!
!
!
!
!
!
!
!
!
"WARNING:!
Any object making contact with!
the moving blades can damage!
and unbalance them.!
!
!
!
!
!
!
!
!
!
!
!
!
!
!
!
!
!
!
!
!
!
!
!
!
!
!
!
!
!
!
!
!
!
!
At least!
20 cm!
!
!
!
34!
ENG
!

!
!
!
Electrical wiring!
!
Full electrical wiring installation must be carried out prior to the installation
of the wind turbine and once the tower has been installed.!
!
!CAUTION:!"WARNING:!
Never install the wind turbine if
the regulator and batteries are!
not properly connected..!
!
Never invert polarity.!
Use appropriate sized cables.!
!
The first step in the electrical configuration is to place the correct battery
bank, with its correct connection configuration and connected according the
manufacturer's specifications, thus obtaining the right voltage and capacity
for the installation to be carried out.!
!
Different types of batteries exist. In the case of domestic hybrid wind energy/
solar energy installations, open lead-acid batteries are recommended and, to
meet the installations charge capacities, certain minimum installation
requirements are essential to assure correct running and durability of the
installation.!
!
The minimum installation recommendations and battery-to-regulator cable
recommendations are the following:!
!
Model!
Battery Cable!
Minimum Battery!
Wind 13+ /220V!
10 mm2!
150 Ah C100!
Wind 25.2+ /220V!
16 mm2!
250 Ah C100!
Wind 25.3 +/ 220V!
16 mm2!
550 Ah C100!
!
!
!CAUTION:!"WARNING:!
!
!
The use of stationary open lead-acid!
batteries is recommended.!
Use of the wrong battery can
cause irreparable damage to!
your wind turbine.!
!
!
!
35!
ENG
!
!
!
!
Installing the Wind Turbine!
!
Before assembling the wind turbine on the tower, the electrical installation
must be completed, as well as the interconnection between batteries and
regulator.!
!
Once we have the electrical wiring installed, we will proceed to assemble the
wind turbine.!
!
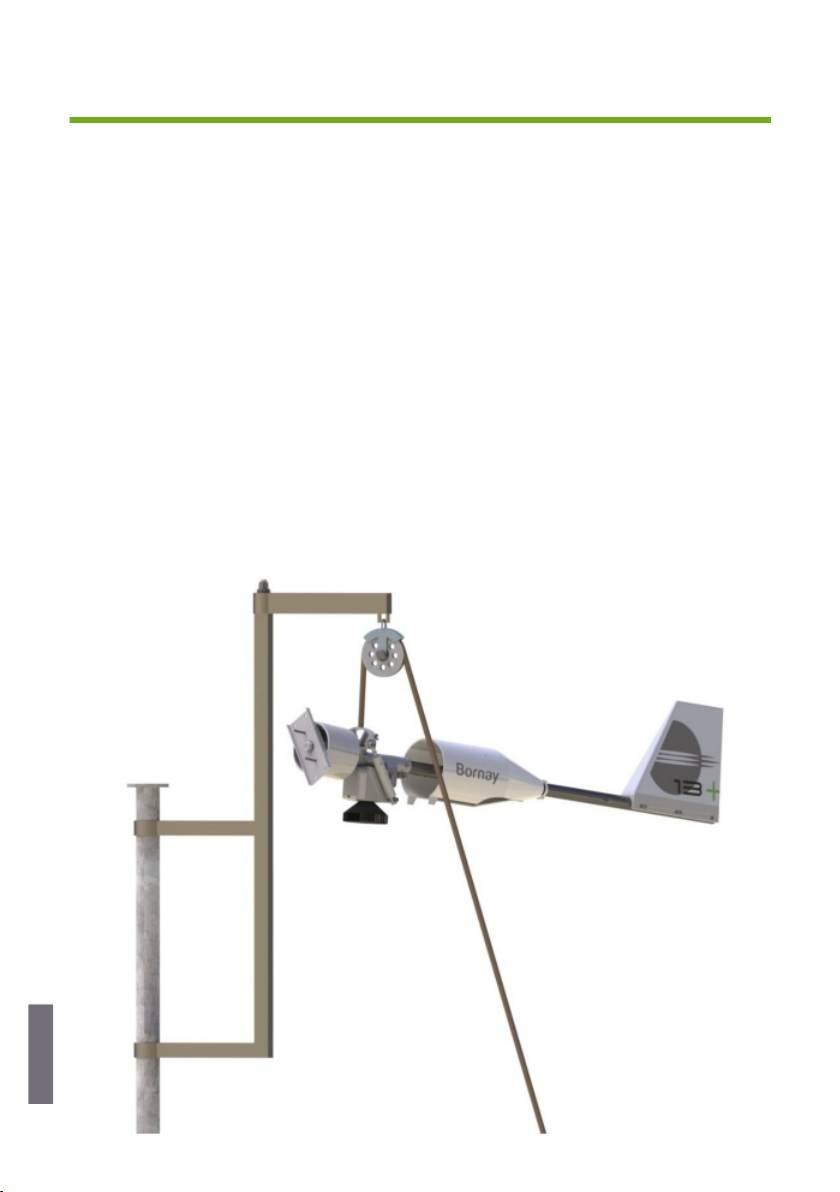
To ease installation of the wind turbine on the tower, abracket and pulley
system should be used.!
!
This system must securely attach to the tower, with the pulley on top.!
!
Using this method, the turbine can be hoisted up and secured while the
electrical connection is completed and the turbine is fitted to the tower.!
!
!
!
!
!
!
!
!
!
!
!
!
!
!
!
!
!
!
!
!
!
!
!
!
!
!
!
!
!
36!
ENG!
!
!
!
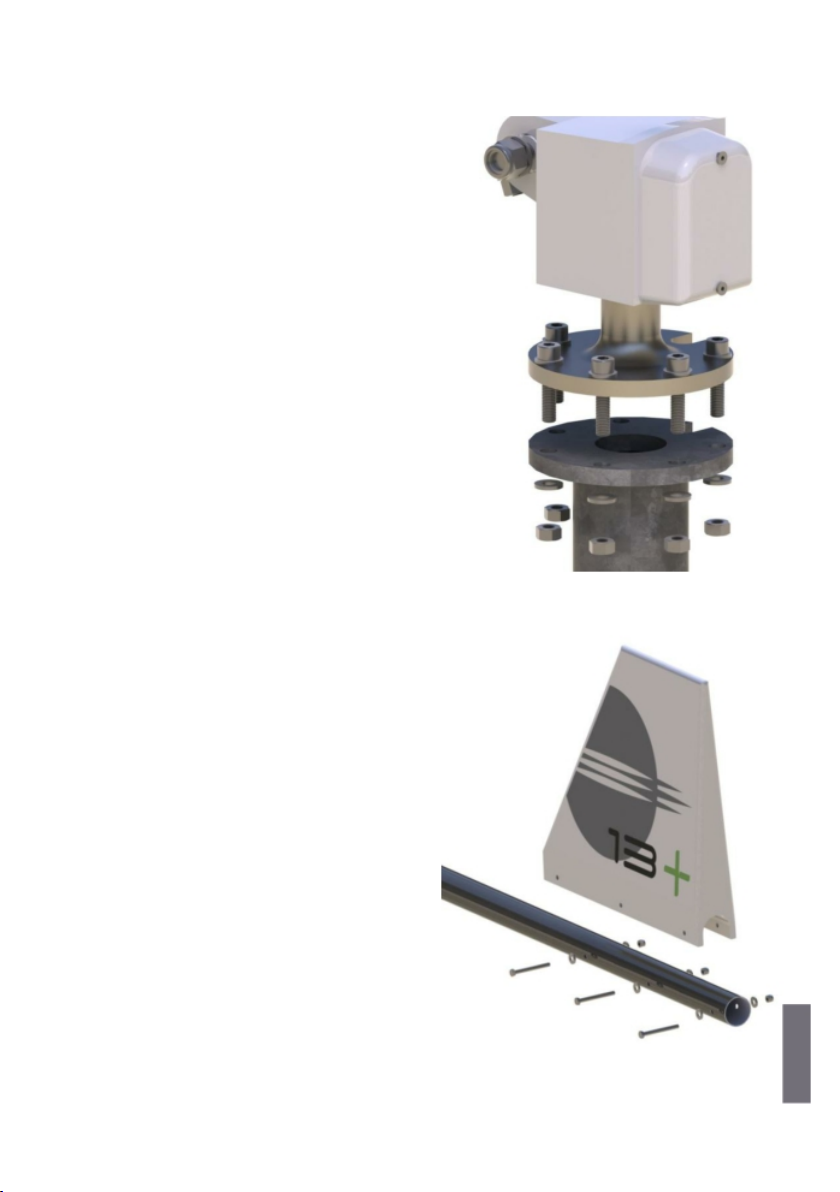
Fixation plate!
!
This plate is provided to be attached to the
tower. Another one is assembled on the
wind turbine base.!
Its function is to secure wind turbine,
offering an ease of installation and
removal from the tower at any moment.
The plates are made with slots to allow
the cables to pass through without twists.
They are attached with Allen bolts and six
holes are provided for six M10x40 Allen
bolts, with M10 washers on both faces and
six M10 nuts. The bolts set and tower plate
are served in an independent plastic bag, if
not mailed before.!
!
!
!
!
!
!
!
!
Tail /Tube tail!
!
The tail is made to keep the wind
turbine facing into the wind at any time.!
!
The tail is made of two different
pieces: apolyethylene vane and asteel
boom. They are put together with
three M6x80 bolts, six wide-series M6
washers on both sides of the vane, and
three M 6 self-locking nuts.!
!
!
!
!
!
!
37!
ENG!
!
!
!
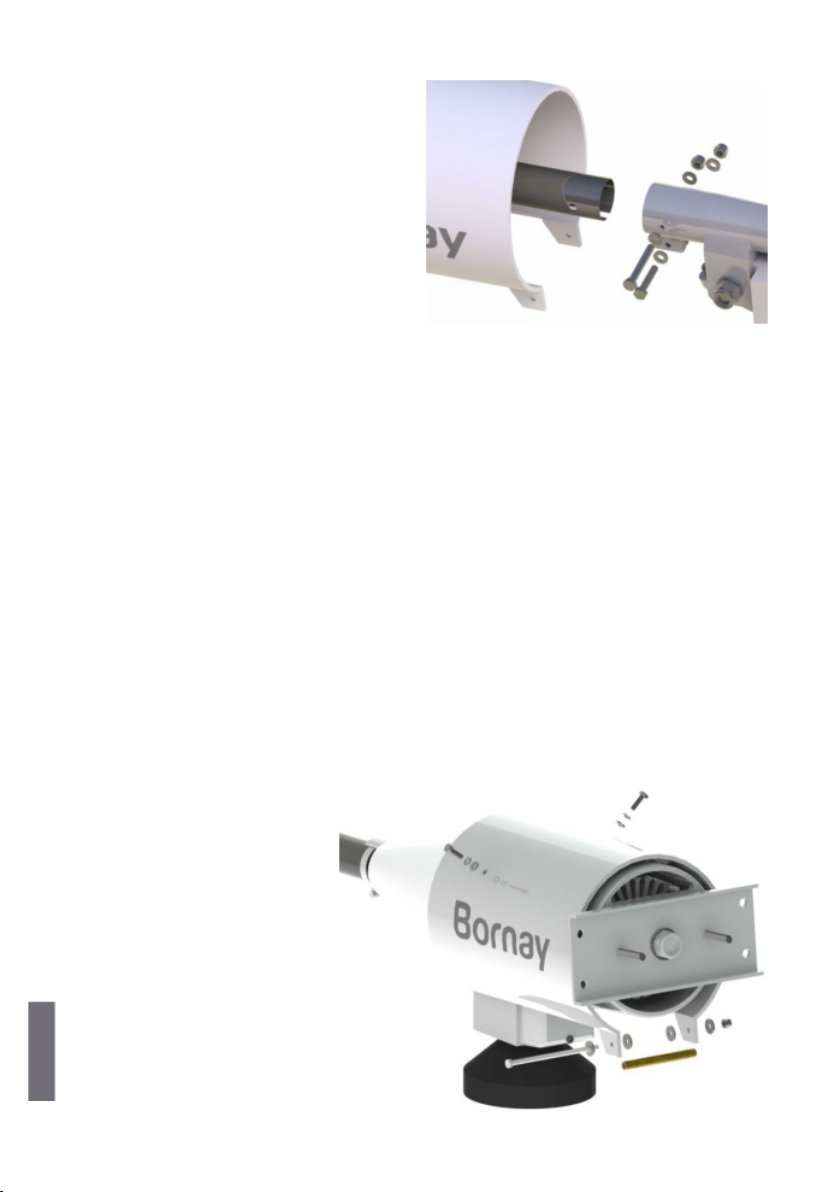
Tail tube /Alternator!
!
The tail is attached to the alternator
at this point. Before bolting the tube
to the alternator, pass the protective
casing through the tail tube. (Once
the tube is bolted, you will not be
able to install the casting).!
!
This joint has two different systems!
to secure, one has abolt going through the tube, and the other one is a
flange system. We first introduce the tail tube into the back side of the
alternator, and match the holes in both pieces. We use now ahexagonal
M8x60 bolt, with two M 8 washers, one in each side and an self-locking M -8
nut. Tighten both to 2,5 Kg.!
!
!
Nacelle!
!
The nacelle protects the alternator from external climatologically agents.
The nacelle is attached with four bolts; two of them are on upper part, one is
on the back with aclamp, and the last one goes in the flange on the lower
frontal section:!
!
On the top of the nacelle there are two holes ready for two M6x15 bolts with
their correspondent wide series M -6 washers and agrover washer, directly
bolted to the alternator!
bridge. The assembly order
is: bolt, grover washer and
wide washer.!
!
Next, the clamp bolt must
be tightened at the back
part of the nacelle.!
!
!
!
!
!
38!
ENG!

!
!
!
!
Finally, on the lower front side, using the two flanges to anchor, we insert the
brass tube (102 mm long x10 mm exterior diameter), one M6x120 bolt, with
an M6 wide series washer on each side, on the inner side of the nacelle
between the two flange-forming flaps. Finally, secure using awasher and
auto-blocking nut.!
!
!
!
Blades and Frontal cone!
!
The blades, made reinforced carbon fiber/glass make direct contact withthe
wind. They are highly stressed. Their aerodynamics, specifically designed for
Bornay wind turbines, makes the alternator turn faster or slower depending
on wind speed.!
!
Blade assembly is carried out by securing them to the hub, with the relief
logo towards the rear part, i.e. facing the alternator.!
!
The two external bolts will be M10x55,while the central internal bolt -now
installed -is M10. Once installed, the blades must be adjusted.!
!
Without using any nuts or washers, the aluminum hub reinforcement layer is
assembled, and this will give the assembled parts more solidity. To secure
this reinforcement we use wide-series washers and normal M10 nuts into the
two internal bolts.With the help of adynamometric Allen key, these two
nuts must be initially tightened to 2kg. Once tightened, both nuts mustthen
be retightened to 2.5 kg.!
!
The next step, having retightened both all nuts, is to insert the frontal nose!
cone into the four external bolts.Once installed, another wide-washer and M -!
10 self-blocking nut are applied. With the help of adynamometric Allen key,
these two nuts must be initially tightened to 2kg. Once tightened, both nuts
must then be retightened to 2.5 kg.!
!
Observe the next illustrations carefully.!
!
!
!
!
39!
ENG!

!
!
!
!
!
!
!
!
!
!
!
!
!
!
!
!
!
!
!
!
!
!CAUTION:!"WARNING:!
Double check that blades fit!
perfectly and that no!
obstacle will get in their!
way.!
Check blades are correctly
mounted in the right place;
the Bornay logo must be to
leeward, on the reverse side!
!
"PRECAUTION:!
!
•!Do not manipulate the wind turbine and its control panel on windy!
days.!
!
•!Do not leave the wind turbine run freely (disconnected from the!
batteries), this could damage the charging system. If you need to
disconnect the wind turbine from the batteries, always brakeit.!
!
•!With the wind turbine turning freely, the automatic breaking system!
does not work, that could cause irreparable damages in your wind
turbine.!
!
•!Do not manipulate the loads in the regulator.!
!
•!Do not invert the polarity in any case.!
!
•!Use the appropriate wiring.!
!
40!
ENG!

!
!
!
Maintenance!
!
After the installation!
One month after the installation of the wind turbine, we recommend checking
that the bolts have the right torque and tightening, if necessary.!
!
Periodic maintenance!
To ensure long life for your wind turbine, we recommend the following
maintenance schedule:!
!
Each 6months!
!
If possible in the station changes, it is recommended to carry out a
maintenance inspection in which the following points should be checked:!
!
•!Checking and readjusting the torque required for every bolt.!
•!Checking state of wiring.!
•!Visual inspection of blades.!
•!Checking that the automatic breaking system works properly by!
tilting it manually.!
!
!
!
The main wind turbine parts for maintenance inspections are:!
!
Bearings!
Bornay wind turbines are equipped with great quality sealed bearings which
require no maintenance. You can check to see if they turn freely or if the
opposite occurs and some kind of friction or vibration is observed.!
!
Bolts!
The bolts used in Bornay wind turbines are stainless steel.If abolt is missing
or in poor condition, it must be replaced right away in order to avoid any
breaking or further damage.!
!
!
!
41!
ENG!

!
!
!
Wiring!
All cable connections and switches must be properly checked in order to
prevent any disconnection and to allow the wind turbine to run freely.!
!
!
Blades!
The reinforced carbon fiber/glass blades are covered by aprotective tape
made of abrasive polyurethane on the leading edges of the blades.!
!
After years of use, this tape may be affected by weather conditions. If the
tape is missing or partially missing, contact your local installation office to
have the tape replaced. By failing to replace the tape, the life of the blade will
be seriously reduced due to the strong erosion the blade is exposed to.!
!
!
Shock absorber!
The wind turbine has one hydraulic shock absorber installed that prevents
abrupt shocks by promoting fast braking and slow return to its original
position.!
!
The shock absorber has alittle slack at the beginning of its return movement,
and this is normal. However, if this slack is observed to continue for over half
the return movement, and if oil is leaking, the shock absorber must be
replaced.!
!
!
Lubrication!
Wind +wind turbines have three moving parts:!
!
The front shaft (blades-alternator) is equipped with sealed bearings and
covered with lubricant. It does not need any special attention; its lubricant will
last during its lifetime.!
!
The yawing shaft (wind turbine-tower) is equipped with sealed bearings and
covered with lubricant. It does not need any specialattention; Its lubricant will
last during its lifetime.!
!
The alternator shaft (alternator-yawing system) is astainless steel tube
covered with lubricant. It does not need any special attention. Its lubricant will
last during its lifetime.!
!
42!
ENG!

!
!
!
Frequently ask questions!
!
!
1.-Can battery polarities be changed?!
No, this would cause the regulator to break down.!
!
2.-¿How can Ifind out what energy the wind turbine is providing?!
The energy can be known through the screen or with the specific
software of Bornay.!
!
3.-Could the drilled holes in the blades be bad?!
No, each wind turbine is assembled completely in production. If the drilled
holes do not match up, try turning the blades round the other way. Some
models have 3and some have 5holes drilled, and one of these is slightly off
centre in order to define correct blade installation.!
!
4.-Will one of these wind turbines provide enough power for ahome?
This kind of wind turbine is normally used together with other components to
form acomplete installation. These components are usually:!
!
•!Solar panels: energy production.!
•!Solar regulators: to control battery charge from the solar panels.!
•!Batteries (accumulation of this energy): These installations are!
normally designed to give three full days of independence, in other
words they can supply the installation for three days without sun or
wind. They use direct current.!
•!Wind regulator: This is included with the wind turbine and this is what!
controls battery life. It ensures that battery voltage does notsurpass
dangerous levels. At the same time, it will brake the machinery when
this does occur.!
•!Inverter/Charger: This is the equipment that transforms direct!
current from batteries into alternating current for consumption
(230V).!
•!Back-up generator: In remote installations, this is installed to!
guarantee complete independent functioning of the installation.!
!
!
!
43!
ENG!

!
!
!
Normally, the inverter handles the start-up and stopping on the
motor according to installation needs. For example, if the battery
runs the inverter will order the motor to start.!
!
5.-Can several wind turbines be set up in parallel?
Yes, several wind turbines can be run in parallel.!
!
6.-What kind of power is generated by the alternator?!
The wind turbine generates an alternating three-phase signal with anominal
voltage of approximately 230V.!
!
7.-Should some protection be installed between the wind turbine and
the regulator or between the regulator/interface and the battery?!
No, never. The regulator/interface is already carrying out these protective
functions.!
!
If you were to install intermediate protection and this disconnected the
electrical connection, the wind turbine would lose its charge and this could
cause irreparable damage to the wind turbine or the regulator/interface.!
!
8.-Should an auxiliary brake switch be installed?!
It is not necessary, but it may be advisable in the installations where you want
to stop the wind turbine completely, in order to make some intervention in
the equipment.!
!
!
!
!
!
!
!
!
!
!
!
!
!
!
!
!
!
!
44!
ENG!
Other manuals for WIND 13+
1
Table of contents
Other Bornay Wind Turbine manuals

Popular Wind Turbine manuals by other brands


AeroDesignWorks
AeroDesignWorks B100F operating manual

BSG Wind power
BSG Wind power BLACK 300-12V owner's manual

Faller
Faller NORDEX 232251 quick start guide

Bergey
Bergey 24 VDC B owner's manual

Leading Edge
Leading Edge LE-600 Installation & operation guide

ista Breeze
ista Breeze i-2000 Windsafe Translation of the original instructions