Boskoncam BG8304-4G User manual
User’s Manual
Infrared Scouting Trail Camera
BG8304-4G

Contents
1Introduction .......................................................................................................................................1
1.1 General Description...........................................................................................................1
1.2 Key Features........................................................................................................................1
1.3 Application...........................................................................................................................1
1.4 Two Way Communication ................................................................................................1
1.5 Cautions................................................................................................................................2
2Camera Overview and Details.......................................................................................................3
2.1 Camera Overview...............................................................................................................3
2.2 Mode Switch Introduction: ..............................................................................................5
3Camera General Operations..........................................................................................................6
3.1 Power Supply......................................................................................................................6
3.2 Insert SD card and SIM card............................................................................................6
3.3 Preview Information Display...........................................................................................6
3.4 Settings Menu .....................................................................................................................6
3.4.1 Setting Items..........................................................................................................................................7
4Quick Set Network Parameters Use profile...............................................................................9
4.1 Do the Camera Settings....................................................................................................9
4.2 Manually Send a MMS or GPRS Photo.......................................................................10
4.3 SMS Control.......................................................................................................................10
5APP and SMS Commands............................................................................................................11
5.1 Change Settings via Android/iOS APP or SMS........................................................11
5.2 User Jurisdiction..............................................................................................................11
5.3 Use Android/iOS APP......................................................................................................11
5.3.1 Firstly, set administrator number...................................................................................................12
5.3.2 Set MMS Parameters:........................................................................................................................13
5.3.3 Set GPRS Parameters:......................................................................................................................13
5.3.4 Set receive numbers and email-address:.....................................................................................14
5.3.5 Set GPS Info: .......................................................................................................................................14
5.3.6 Get one spot picture from camera :...............................................................................................15
5.3.7 Change camera general settings :.................................................................................................15
5.3.8 Other commands:...............................................................................................................................16
5.4 SMS Command List.........................................................................................................16
6Normal Questions and Advice....................................................................................................18
6.1 Camera can’t capture the target...................................................................................18
6.2 Camera stops taking images or won’t take images ................................................18
6.3 Camera stops sending photos/videos to email(s) or MMS(s)..............................18
Appendix I: Specifications .................................................................................................................19
Appendix II: Parts List.........................................................................................................................20

BG8303&BG8304 1 Introduction
Page 1
1 Introduction
1.1 General Description
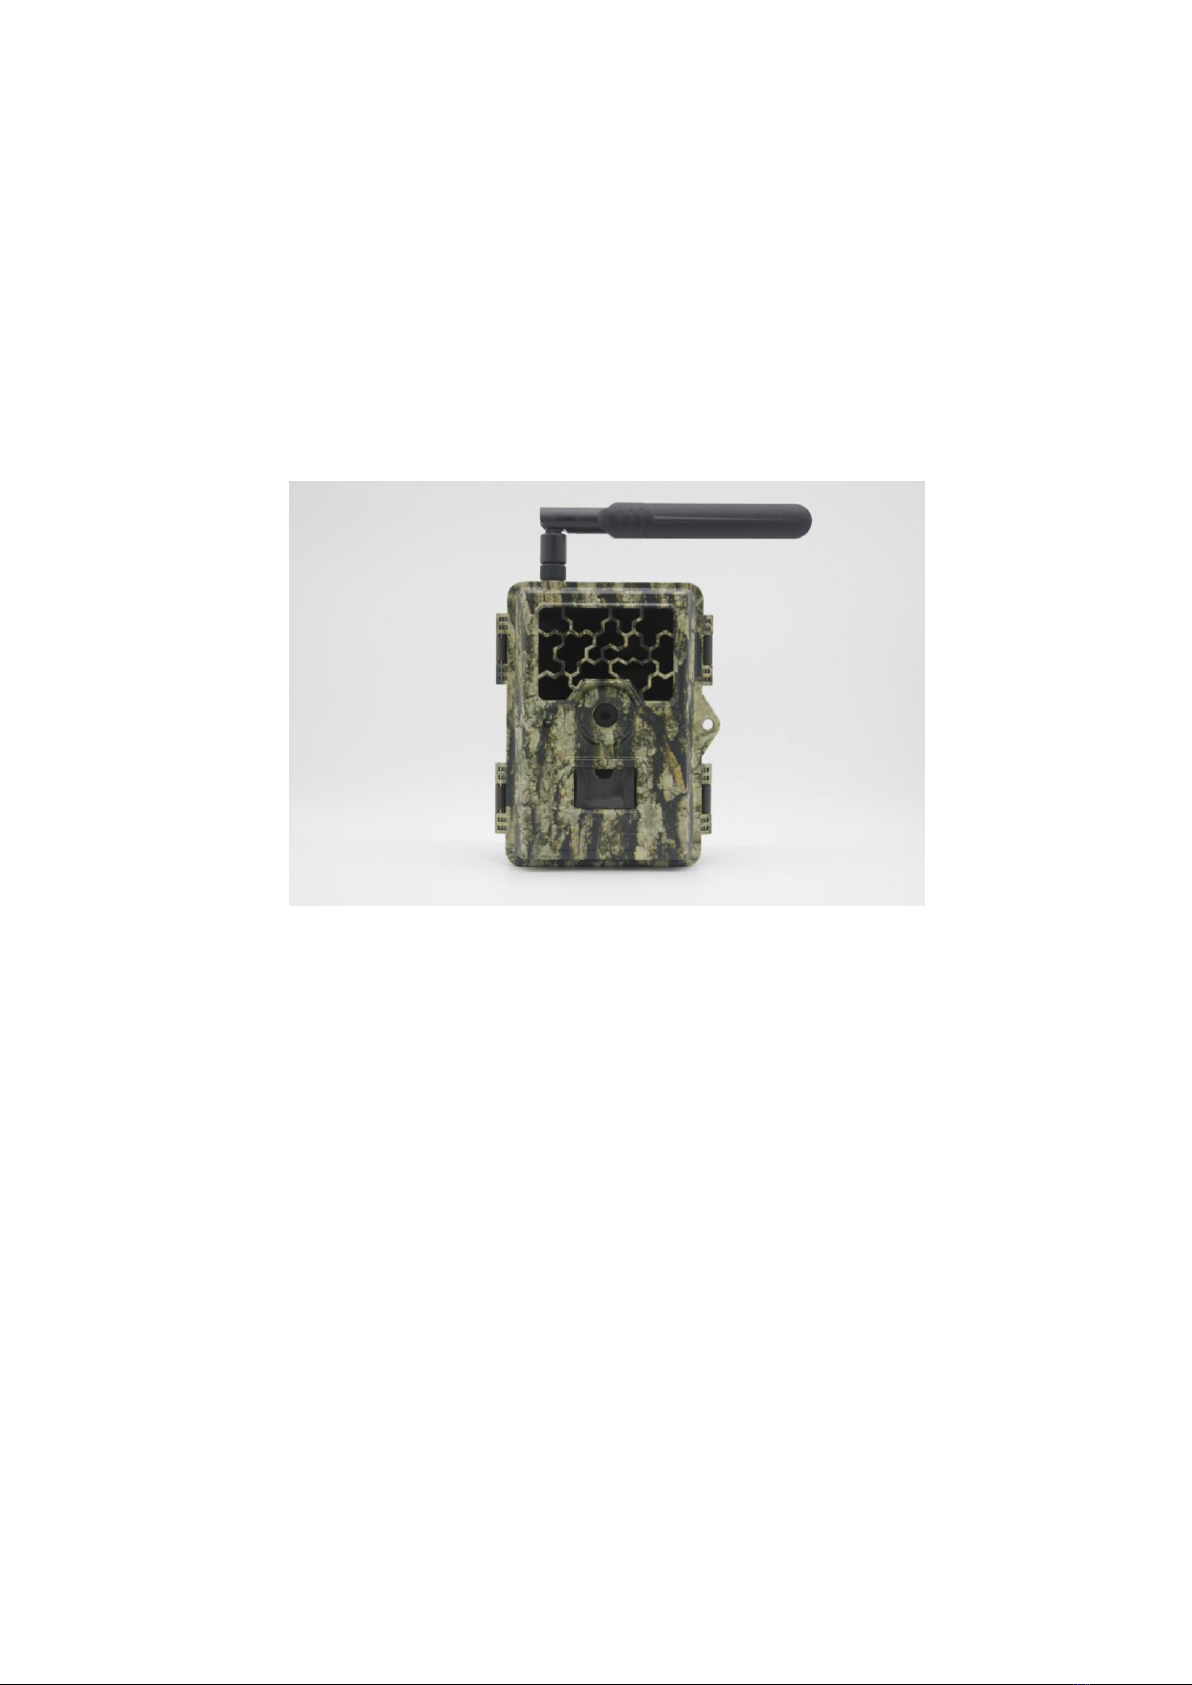
Thank you for choosing Boskoncam high qualified products. This camera is a digital
scouting camera with 3G or 4G communication function. It is an infrared surveillance camera,
triggered by any movement of human or animal monitored by a high sensitive Passive Infrared
(PIR) motion sensor, and then automatically captures high quality pictures (up to 36M pixels) or
records video clips (1080 Full HD). It sends picture instantly to your mobile device or video (less
than 10M) to your e-mail via GPRS network. You’ll be alerted when the camera is triggered or
settings by user.
It is resistant against water and snow. The camera can also be used as a portable digital
camera.
1.2 Key Features
A. Programmable 8/14/30 Megapixel high resolution.
B. Support Full HD(1080p 30fps) video record;
C. Take color pictures daylight and black white pictures at night;
D. 48 pcs IR LEDs for flash range as 100ft;
E. Available operation temperature: -20℃to 60℃;
F. Build-In 2.31” TFT Screen to review photo and video in camera;
G. Support standard 5V-12V adapter and 8AA/12AA batteries; 8AA/12AA recommend;
H. Extra-long range PIR(More than 90ft);
I. Adjustable PIR sensitivity;
J. SMS Remote control (Android and iOS APP).;
K. Support most (maybe all) Bands of operators;
L. MMS/GPRS/SMTP support.
1.3 Application
This camera can be used as an automatic surveillance device for guarding and recording
unexpected intrusion to homes, shops, schools, depots, offices, taxis, work sites, etc. It can also
be used as a trail camera for hunting or monitoring animals by recording the traces of wild
animals. It can be left alone for weeks and months, and it will save event records automatically
in digital format.
1.4 Two Way Communication
You can set SMS control sub-menu as ON to open the two way communication function.
Under this setting, the camera can receive and respond to your SMS command or the
Android/iOS APP command.
This camera can send pictures instantly to your mobile device via LTE(4G)
/WCDMA(3G)/GSM(2G)(GSM&3G dose not work in the USA and Canada) network. You’ll be
alerted just when a picture or video has been taken. The camera sends MMS or Email message
through MMSC(MMS Service Center) or GPRS network; you need to open MMS and GPRS
service from your service provider before using this function. It supports the following bands:
Europe: LTE-FDD: B1/B3/B5/B7/B8/B20; WCDMA: B1/B5/B8; GSM: B3/B8; North America:
LTE-FDD:B2/B4/B12/B13; WCDMA: B2/B4/B5

BG8303&BG8304 1 Introduction
Page 2
1.5 Cautions
The working voltage of the camera is 5-12V. The camera is supplied by the power adapter
or 8AA&12 AA batteries.
Please install batteries according to shown polarity.
Please insert the SD card before powering on camera. The camera has no internal memory
for saving images or videos. The camera will not work if there is no SD card.
Please unlock the write-protect switch before inserting the SD card.
Please do not insert or take out the SD card when the power switch is at ON position.
Please make sure that your SIM card supports the MMS and GPRS data business.
When coming into the SETUP mode, allow the camera approximately 10-20 seconds to
acquire a signal.
It is recommended to format the SD card by the camera when used for the first time. Many
other SD cards formatted by other cameras have poor compatibility with different brands of
cameras. So it is best to format the SD card with this camera or a computer.
In the SETUP mode, the camera will shut down automatically after 3 minutes without any
operation. Please turn on the power again if you want to continue to work with the control.
BG8303&BG8304 2 Camera Overview and Details
Page 3
2 Camera Overview and Details
2.1 Camera Overview
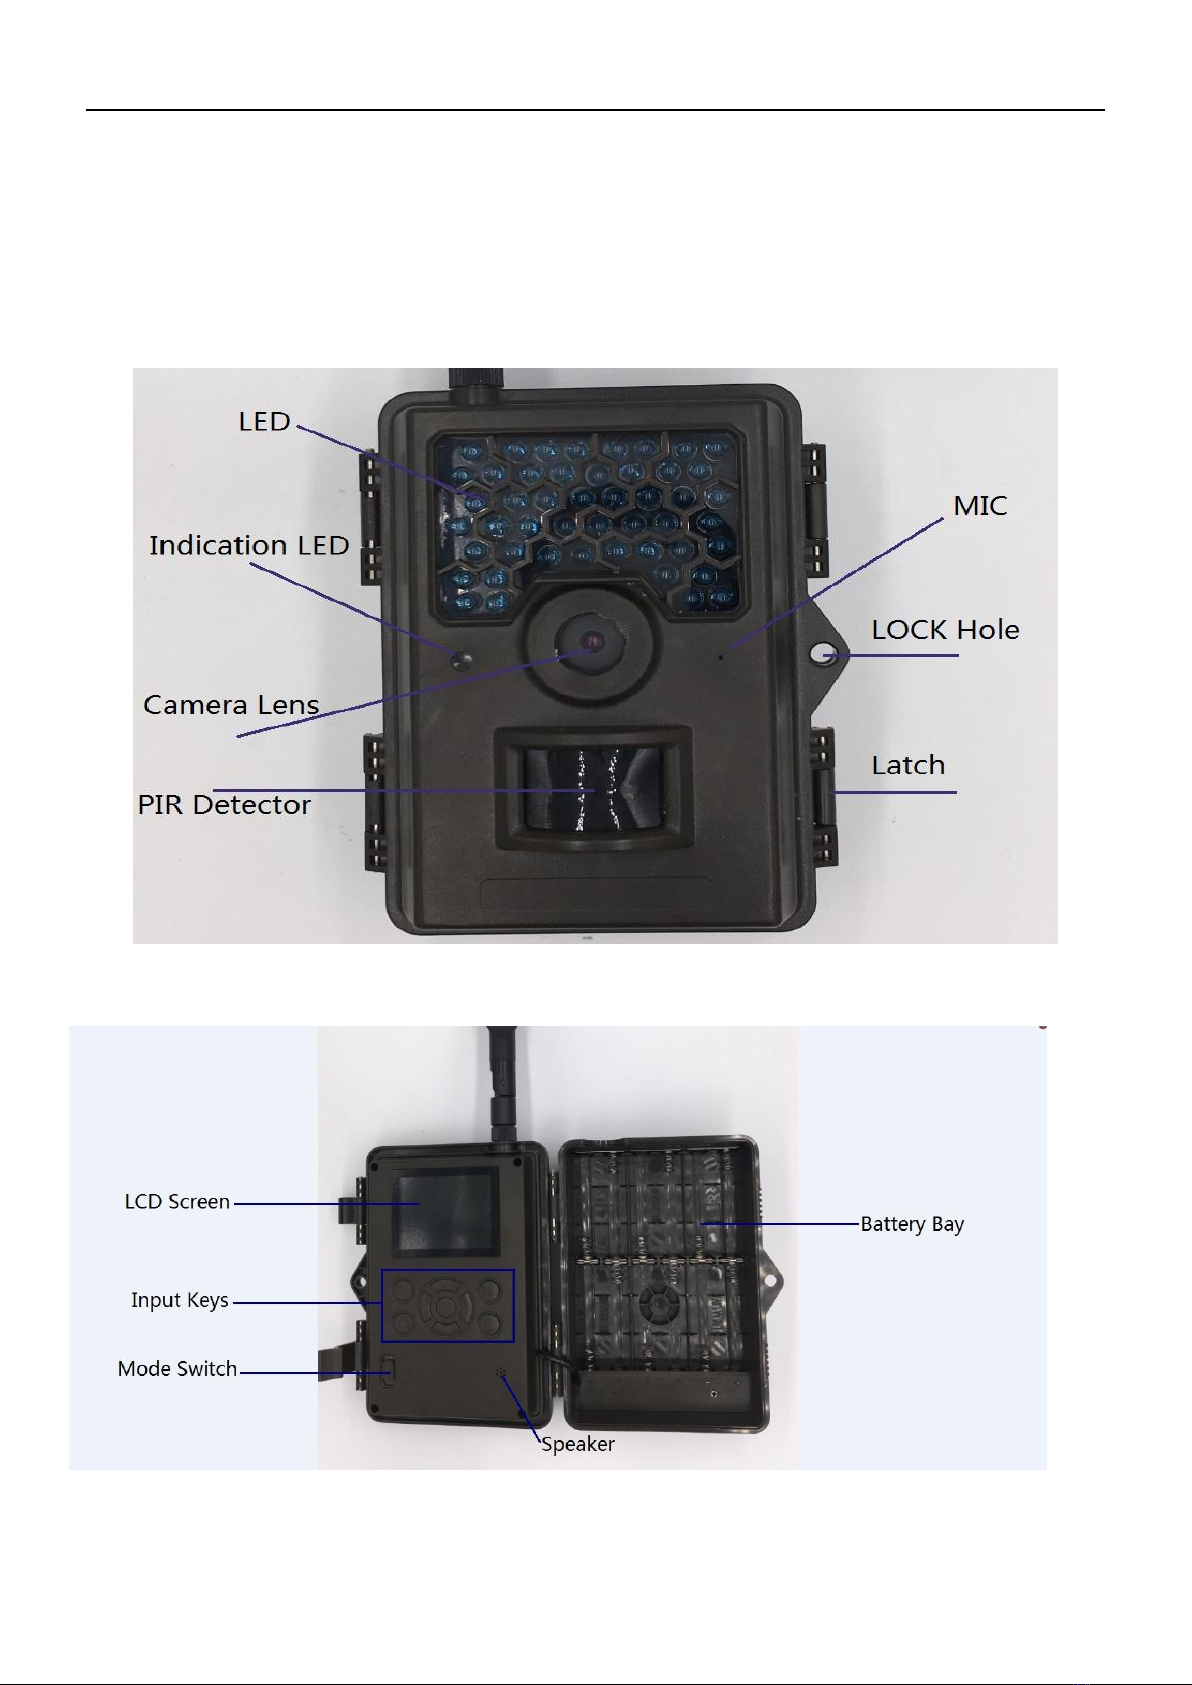
Take a few moments to familiarize with the camera controls and displays. It is helpful to
bookmark this section and refer to it when reading through the rest of the manual.
Figure 1 Diagram of camera functional indicators
Figure 2 Inner panel view
BG8303&BG8304 2 Camera Overview and Details
Page 4
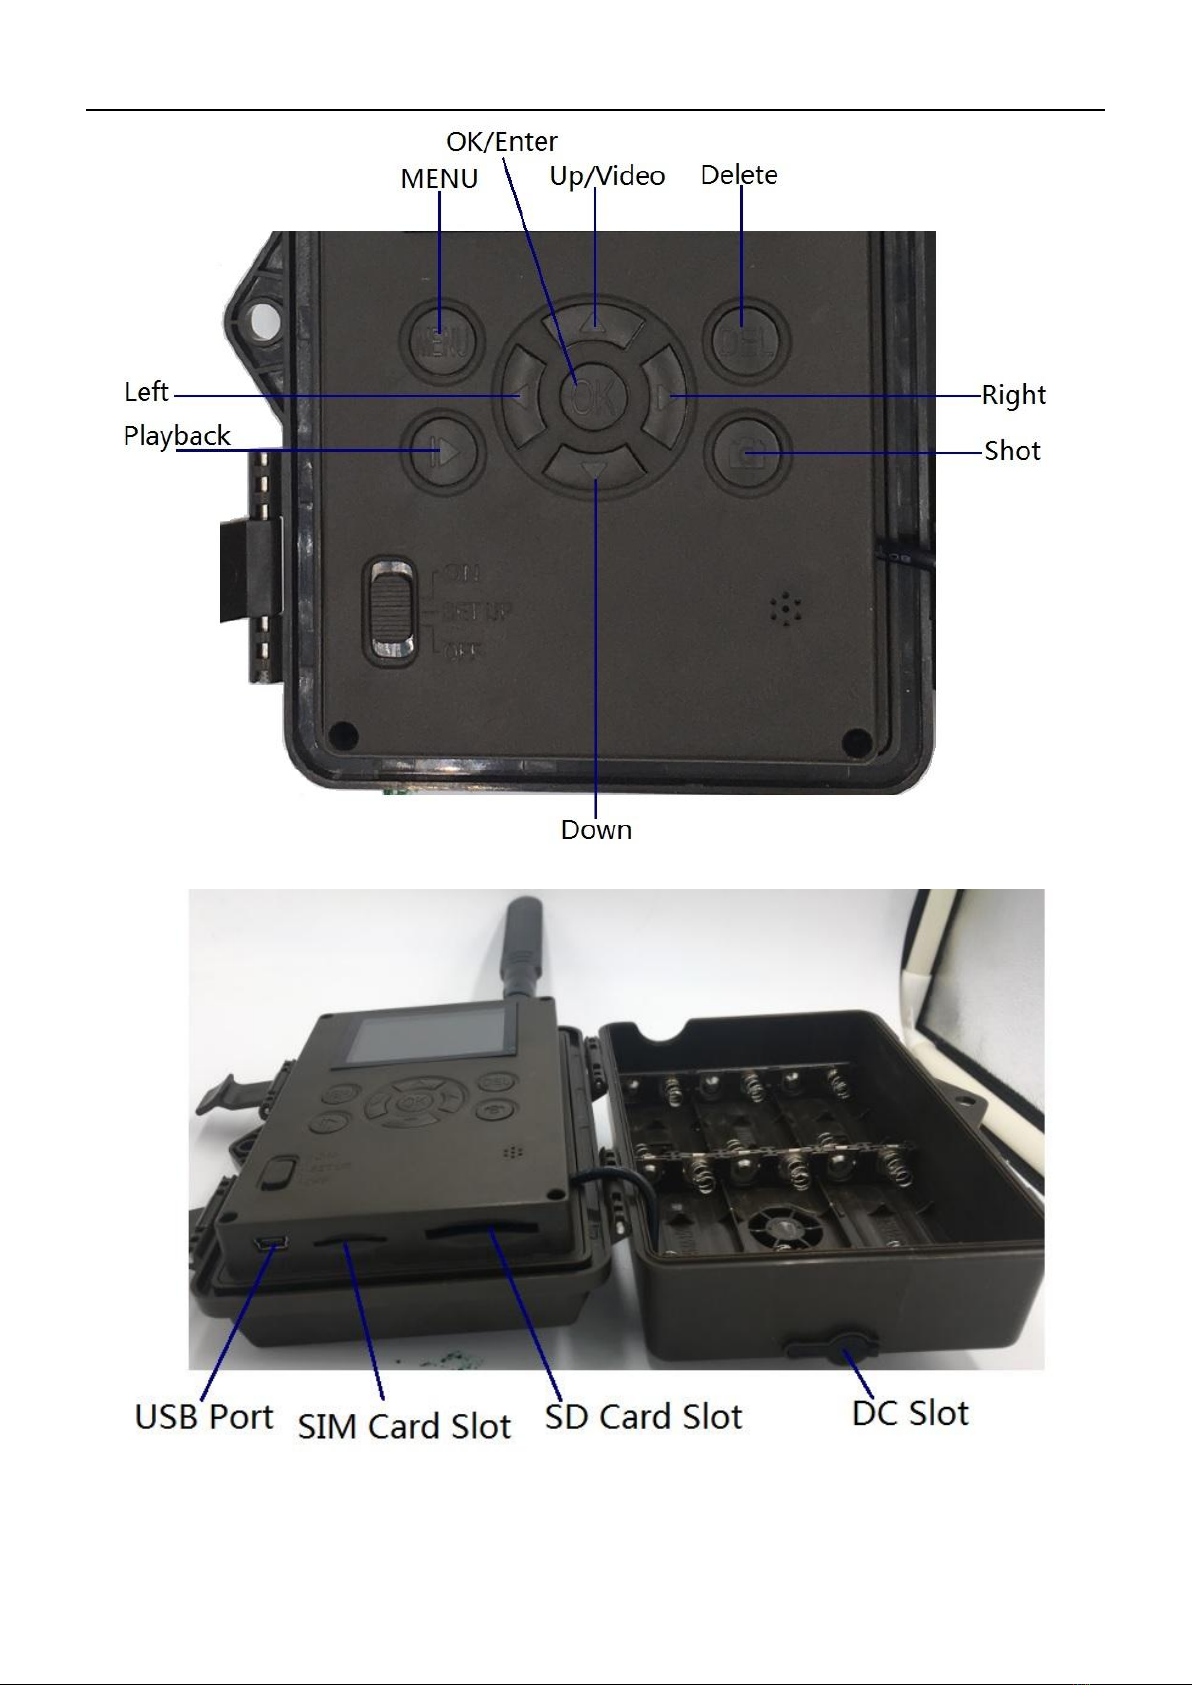
Figure 3 Diagram of Input Keys
Figure 4 Diagram of camera interfaces
BG8303&BG8304 2 Camera Overview and Details
Page 5
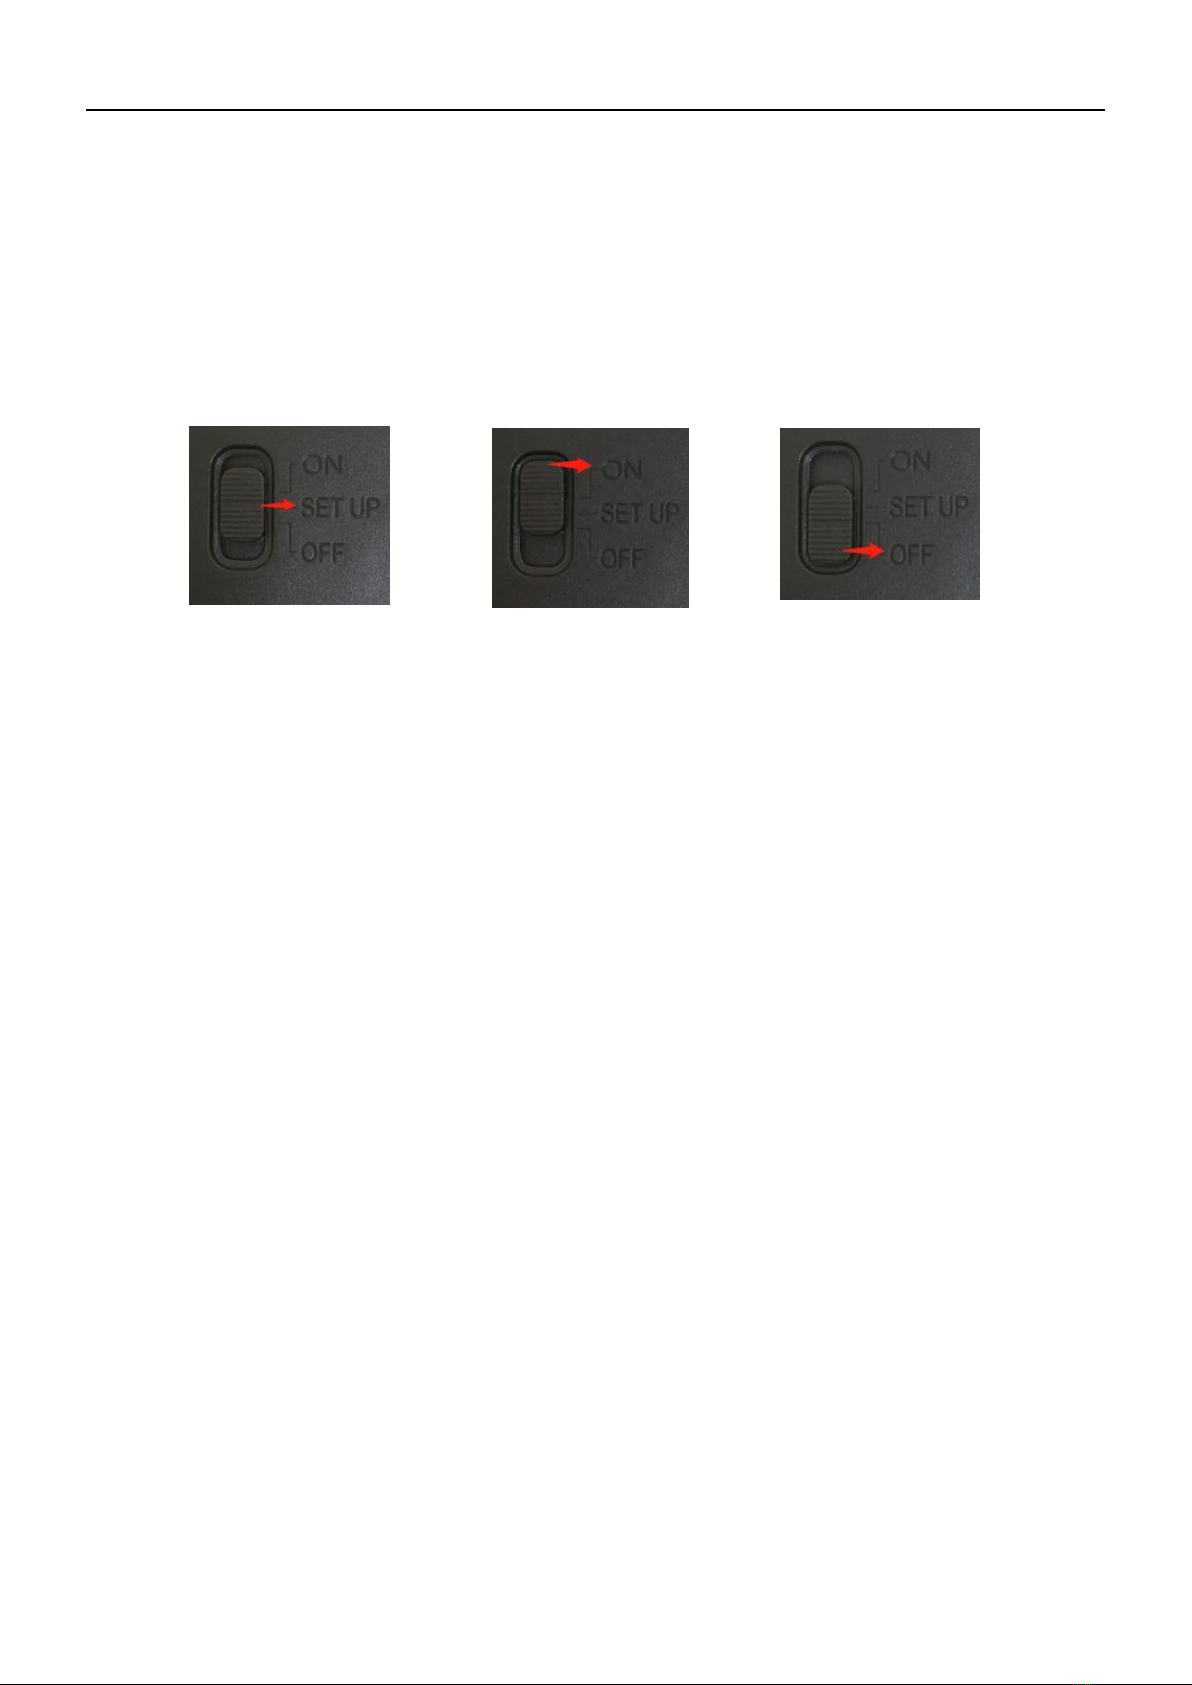
2.2 Mode Switch Introduction:
Setup Mode: Slide the Mode Switch to “SET UP”, then the Camera will enter Set up mode.
In this mode, you can program the camera or to playback the photos or video clips.
Hunting Mode: Slide the Mode Switch to “ON”, then the Camera will enter hunting mode.
In this mode, when animal or human intrudes into the monitoring region, the camera will
take pictures or videos automatically according to the previous programmed settings. After
switching to “ON”position, the motion indication LED (red) will blink for about 10~30
seconds. So you can put the camera in the correct position during this period.
OFF Mode: Slide the Mode Switch to “OFF”, then the camera will power off.
Setup Mode Hunting Mode OFF Mode

BG8303&BG8304 3 Camera General Operations
Page 6
3 Camera General Operations
This chapter explains the general operations for camera settings.
3.1 Power Supply
Use 12 AA batteries. High-density and high-performance alkaline or lithium batteries
are recommended.
Also 5-12V external power supply and solar panel are supported. The battery can be
just a backup for emergency use (5V support).
3.2 Insert SD card and SIM card
Insert an unlocked SD card and an available SIM card.
3.3 Preview Information Display
Slide the Mode Switch to “SET UP”, then the Camera will enter Set up mode.
When the camera is enter “SET UP” mode the current settings will be displayed on
screen.
Figure 5 Preview information display
Indicates the correct SIM card status and the available space of SD card should
be a none zero value.
Indicates the SIM card is not recognized by the camera or the SIM card is not
working due to connection/activation issues.
Please check the signal strength is good before you use sending or SMS functions.
3.4 Settings Menu
Press “MENU”on the keyboard to enter into the menu settings. The settings menu
will be shown on the LCD.
Use “▲” or “▼” key to select the menu item, use “►” or “◄” to change different item
pages or select the different options. Press “OK” to save the settings.

BG8303&BG8304 3 Camera General Operations
Page 7
3.4.1 Setting Items
Setting Items
Description
Basic Settings
Camera Mode
There are three camera modes: Photo,Video and Pic +Video. If you
choose Pic +Video mode, the camera takes a picture with a video clip.
Default: Photo
Photo Size
Choose the image size: 8MP (3264x2448), 14MP (4320x3240) or
36MP (7000x5250).
Default: 36MP
Video Size
Choose the video size: 1920x1080, 1280x720 or 640x480.
Default:1080P
Photo Burst
This parameter affects the number of pictures (1-5 photos) taken for
each triggering in camera mode.
Default: 1 Photo
Video Length
5 to 180 video clips.
Default: 10s
Time and PIR Settings
Set Clock
Set camera RTC (Real-Time-Clock).
Default:2019/01/01
Time Lapse
5Min~8Hour Optional.
Time lapse means the camera can capture images or videos at a
preset time interval regardless of whether motions are detected.
Please note that if the PIR Trigger is set to Off, then Time
Lapse can’t be set to Off.
Default: Off
PIR Trigger
High/Normal/Low/Off
Choose sensitivity of the PIR. The higher sensitivity indicates that
the camera is more easily triggered by motion and takes more
pictures or records more videos. It is recommended to use high
sensitivity in room or environment with little interference, and to use
lower sensitivity for outdoor or environment with lots of interference
like a hot wind, smoke, near the window, etc. For normal use of the
camera, the Normal mode is recommended and is the default setting.
Default: Normal
PIR Interval
0s-60Min Optional
This parameter indicates how long the PIR will be disabled after
each triggering in ON mode. During this time the PIR of the device will
not react to the motion of human (or animal).
The minimum interval is 0 second. It means the PIR can work all the
time.
Default: 5s
Work Hour
ON/OFF
Select “ON” to set the beginning time and ending time. Set Work
Hour as off means the camera works all day.
Default: Off
Network Control Settings
Send to
There are 3 Sending modes:

BG8303&BG8304 3 Camera General Operations
Page 8
1. Phone MMS: send images to a mobile phone.
2. Email GPRS: send images to an e-mail address via GPRS use
SMTP.
3. FTP: send images to ftp.
You should set your receiving phone numbers (Max 4 numbers) and
your receiving e-mail address (Max 4 Mails) from profile or in the APP
program.
Default: Email-GPRS
Send Mode
There are 4 Send modes: “Manual” works in SETUP mode,“Daily”
and “Instant” work in “ON”mode. “OFF” means to close the
communication function.
1. “Manual”:
Choose “Manual” in “SETUP”mode. Please ensure a SIM card is
inserted properly. Phone MMS can only send photos; but you can
send photos or videos( less than 10M) when you choose Email
GPRS.
2. “Daily”:
Daily, just works in “ON”mode. Daily means the camera will report
the summarized information at a preset time on how many pictures it
had taken per day.
3. “Instant”:
Instant, just works in “ON”mode, which means the camera will send
an MMS to your phone instantly with photos or to your email with
Photos/Videos(less than 10M). Send numbers from 0-unlimited.
4. “Off”: to disable Sending function.
Default: Instant(99 number)
SMS Control
SMS Control enables two way communication. When SMS Control to
ON, the camera can receive and respond to your SMS commands.
Default: ON
Attachment Size
Setting the picture size which will be sent to your email. There are 3
options for this setting.
Low: Sends a severely compressed picture.
Normal: Sends a slightly compressed picture.
High: Sends the original pictures. (Not available for Verizon)
Default: High
Network Mode
Choose the network mode. You can choose GSM Only when the LTE
and WCDMA networks are unstable.
Auto: Auto register network (3G/4G priority).
GSM Only: Only register GSM network.
Default: Auto
Other Function Settings
Language
Choose language.
Default: English
Beep Sound
Enable or disable the beep sound.
Default: ON
Format SD
Format the SD card. All images and videos in the SD card will be
deleted.
Default Set
Restore all settings back to the default values.
Version
Version information
BG8303&BG8304 4 Quick Set Network Parameters use profile
Page 9
4 Quick Set Network Parameters Use profile
4.1 Do the Camera Settings
Get the camera set-up profile “BG8304.txt” form Boskoncam.
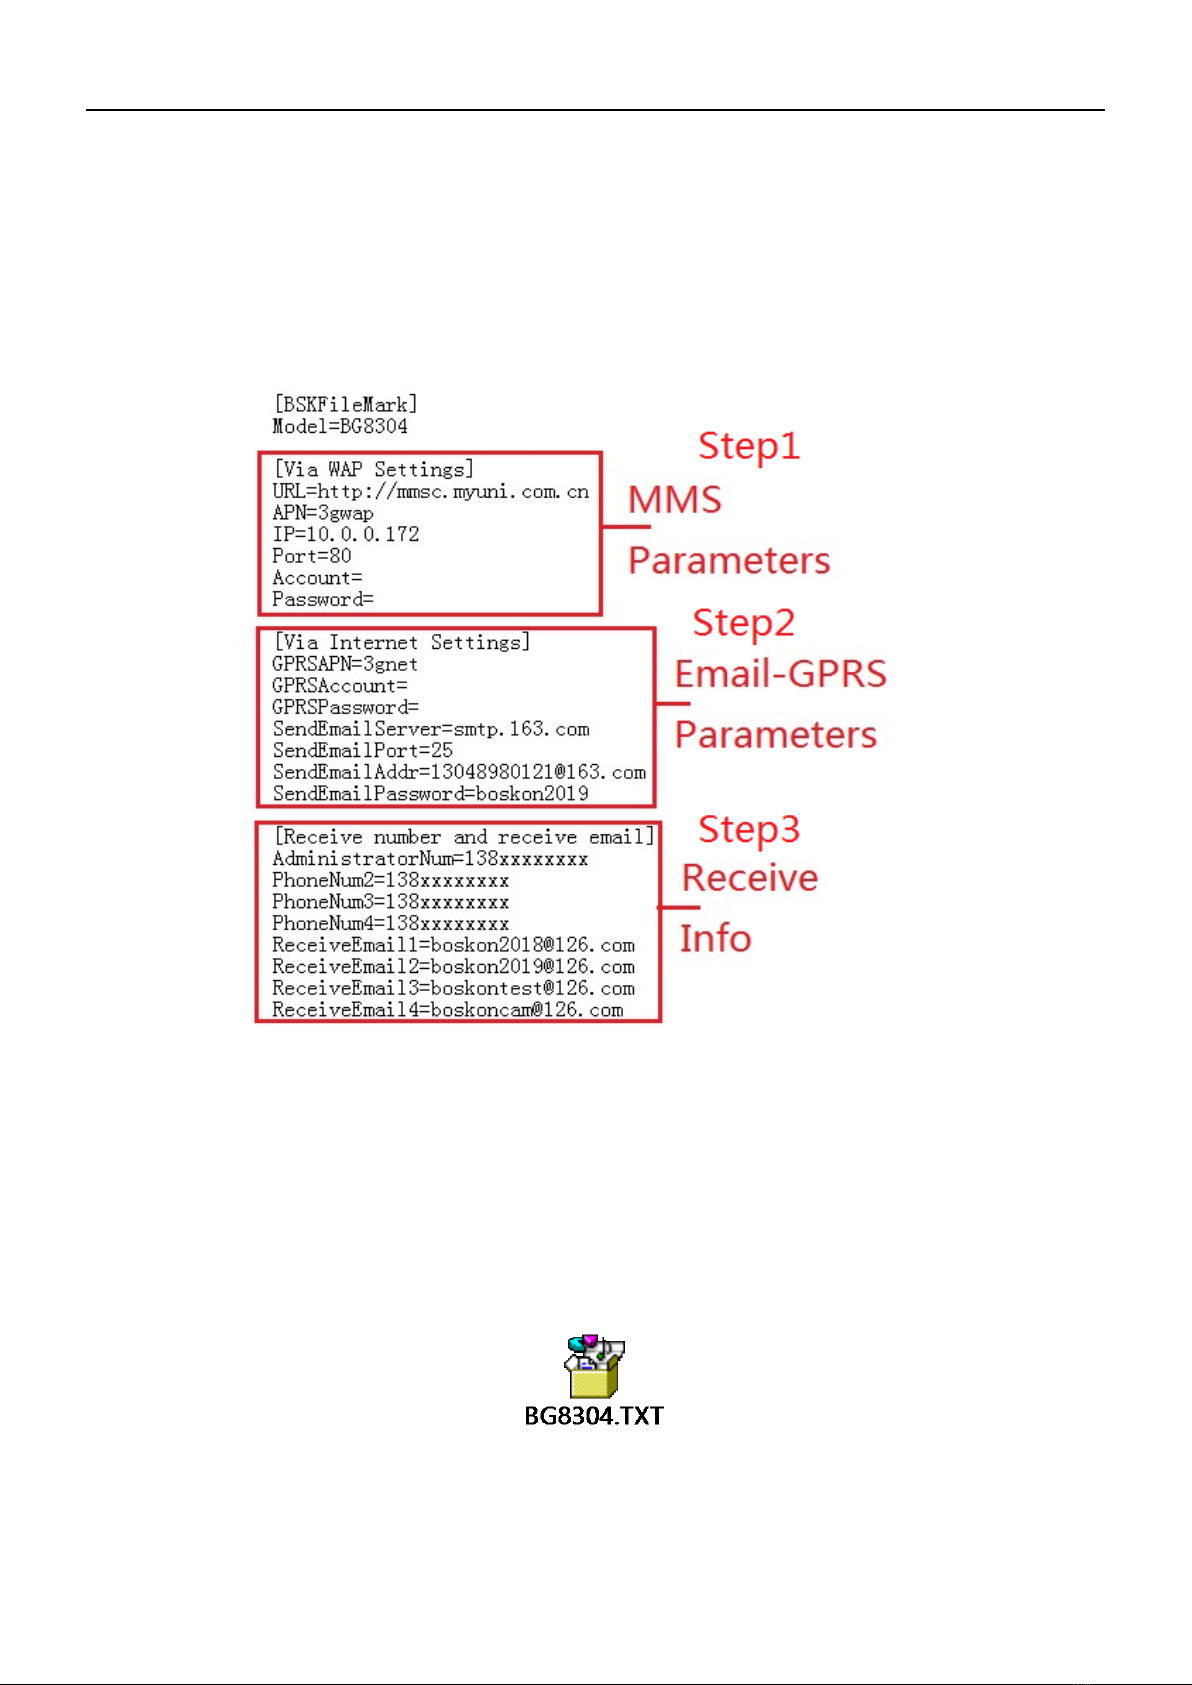
1) Open the profile “BG8304.txt”,then you can change the parameters as following
(China Unicom as sample):
Step1:Set MMS parameters:
Please get the MMS parameters form operator,then fill them into the profile.
If you don’t know how to get the MMS parameters,we will help you to get them.
Step2:Set Email-GPRS parameters:
Please get “APN” from the operator and fill it into the profile.
Then fill your send Email Info,you should make sure the info is correct.
Step3:Set the received info:
1)Please enter your receive Email address and phone numbers.
Make sure they are correct.
2) The attached file is the demo file.
3) After you finish entering the profile, create a folder named “GSM” in your SD Card.
Then put the profile into the folder.

BG8303&BG8304 4 Quick Set Network Parameters use profile
Page 10
Step1: Create the “GSM” folder in SD Card
Step2: Put the profile “BG8304.TXT” into the folder
4.2 Manually Send an MMS or GPRS Photo
After you generate a setting file in your SD card, please slide the power switch to “SETUP”
position. When the camera acquires signal and the SIM card icon appears, target an object
and press “Shot key” to take a photo manually.
Then press the key “Playback” to review the photos, press “▲” and “▼” to switch previous or
next photo. Press “MENU” and you can see a Send Phone [MMS] or Email GPRS interface,
press “OK” to send out the MMS or Email.
After a few seconds (Usually less than 1Min), you will receive an MMS in your phone or
Email in your mailbox.
4.3 SMS Control
When the camera is working, you can send a text message “#T#” to your camera’s SIM
card to get a spot image or use our APP (Chapter 5). Note: you need to set SMS control as ON
when using SMS command. Down load the Android control software from our website. The
specified website is written in the last page of the manual.
For iPhone, just download it from theApp Store by searching Boskoncam.

BG8303&BG8304 5 APP and SMS Commands
Page 11
5 APP and SMS Commands
5.1 Change Settings via Android/iOS APP or SMS
If you find it inconvenient to use PC Settings, we provide an android /iOS APP to
set up the camera.
When you are far away from your house, your camera position, you can get spot
photos or change camera settings via our android/iOS APP or SMS.
If you want to use SMS Commands to control the camera, please make sure the
submenu item “SMS Control” is “ON” as following:
After changing the “SMS Control” to “ON”, slide the mode switch to “ON”. Wait
about 1min when the Indicated LED finish blink, you can send SMS commands.
5.2 User Jurisdiction
There are two user Jurisdiction: administrator and normal users. Each user has a
different Jurisdiction level:
5.3 Use the Android/iOS APP
It’s easy to use the Android/iOS APP to communicate with the camera, so you don’t
need to edit the SMS.
You just need to click the button to finish the operation.
If you not use the “BG8304.txt” to set MMS and GPRS parameters, you should do the
setting as following steps:
Step1: Click the button to add a camera.
Step2: Enter the camera’s name and SIM card number. Then click to add the
Functions
User Jurisdiction
Set administrator phone number
Only administrator’s password
Set administrator’s password
Administrator
Set camera parameters
Administrator
Set normal user
Administrator
Send SMS for on spot picture
Administrator
Receive MMS when triggered
Administrator, normal user
Check camera status
Administrator, normal user
Get help information
Administrator, normal user

BG8303&BG8304 5 APP and SMS Commands
Page 12
camera.
Step3: Click the “ ” to enter the setting page.
5.3.1 Firstly, set administrator number.
1: Click “Advanced setting” the Advanced setting list will be shown.
2: Click “Set Master’s Number”, the Set Master’s Number list will be shown.
3: Enter your master number and password in the Set Master Number page(The initial
password is 6868),
4: Then click Send. After a few seconds, you can receive on message form the
camera like “Dear master, your number is 138********”.

BG8303&BG8304 5 APP and SMS Commands
Page 13
5.3.2 Set MMS Parameters:
Click “Set MMS parameters” to enter the MMS parameters setting page.
Choose your Country and SIM card Operator. You can setting MMS parameters
automatically. Then click Send, you will receive one message from the camera like
“URL= http://******, IP=******, port=**, APN=******, Account=******, Password=******”
5.3.3 Set GPRS Parameters:
Click “Set GPRS parameters” to enter the GPRS parameters setting page.
Enter your sending Email address and password. Enter the port and SMTP server. Then
click Send, you will receive one message from the camera after few seconds like
“SendEmailServer=smtp.***.com,SendEmailPort=***,GPRSAPN=***,GPRSAccount=,
GPRSPassword=,SendEmailAddr=******@**.com,SendEmailPassword=******”.
BG8303&BG8304 5 APP and SMS Commands
Page 14
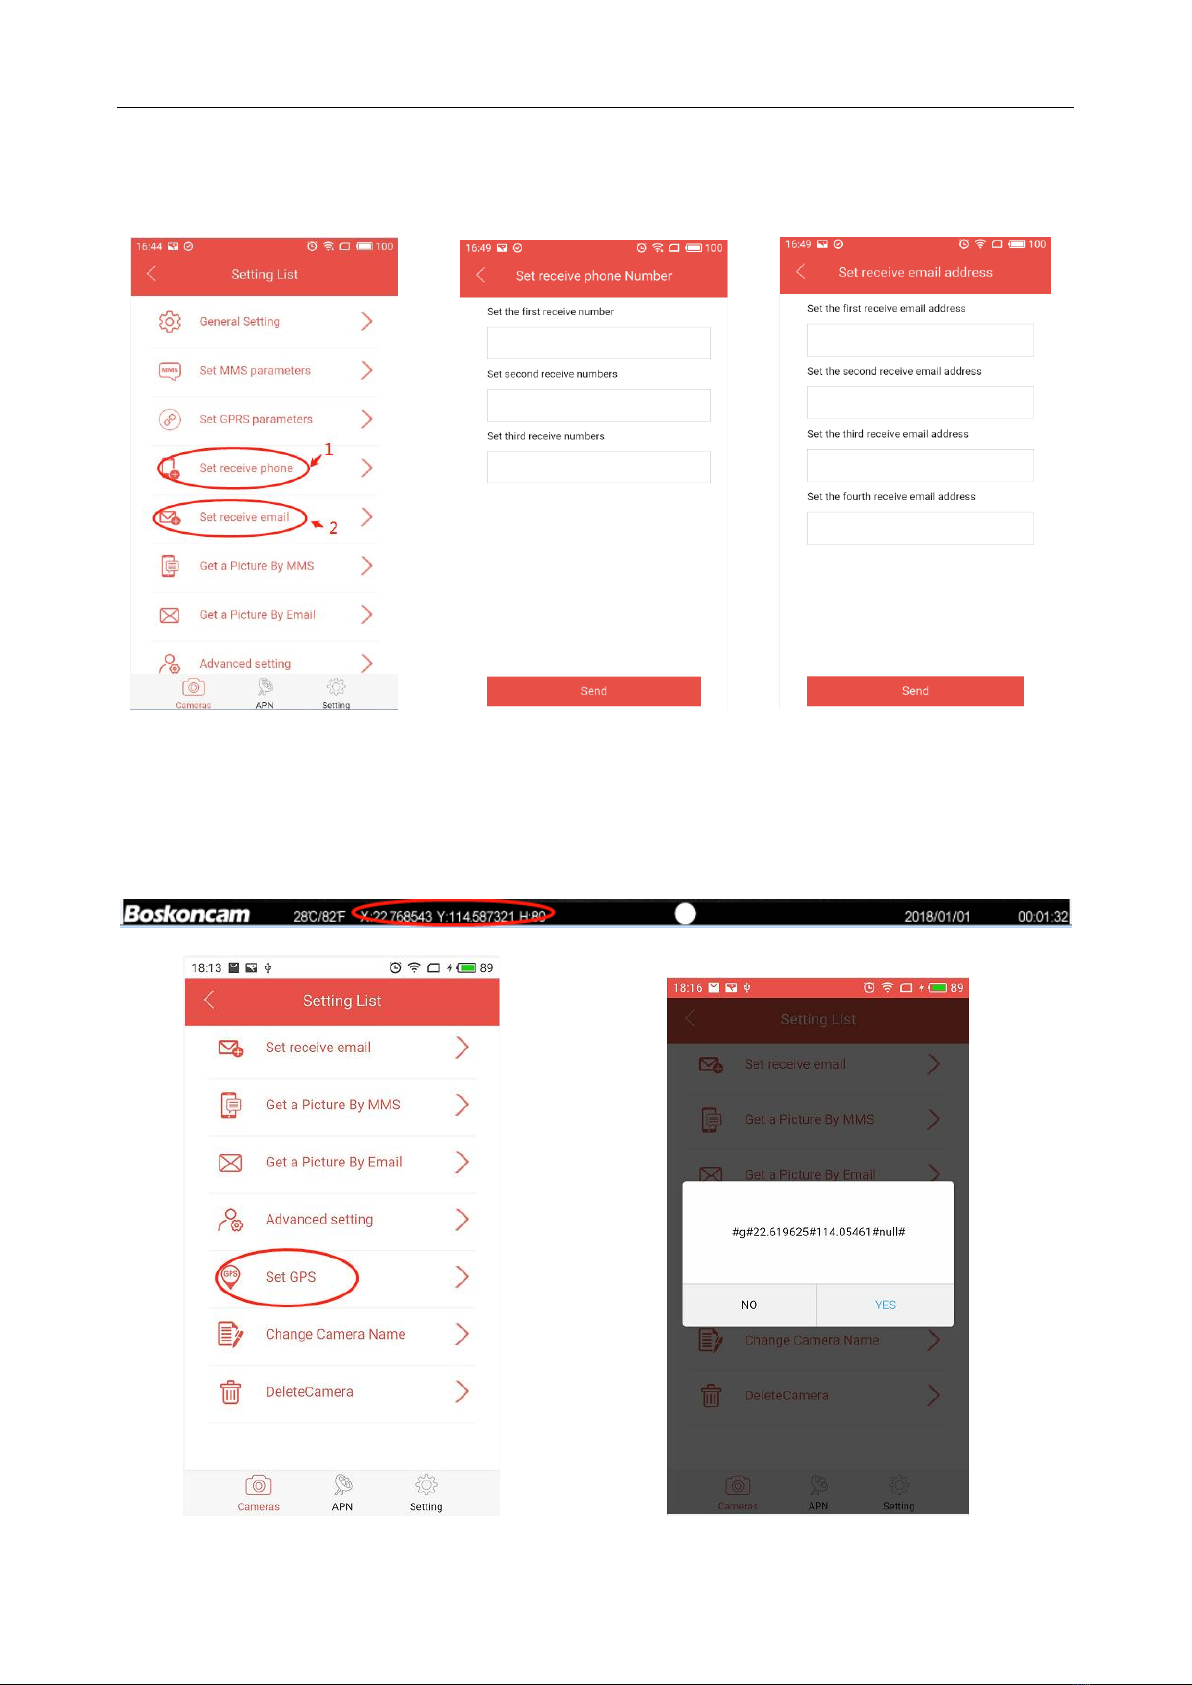
5.3.4 Set receive numbers and email-address:
Enter your received numbers and received email address pages.
5.3.5 Set GPS Info:
Click “Set GPS”to set the current GPS info to the camera. It is the real position when you
put your camera on a tree or some place. Please make sure the switch of “GPS” in your
cell phone (master number) is turned on. Then you can find the GPS info on the stamp as
follows:
BG8303&BG8304 5 APP and SMS Commands
Page 15
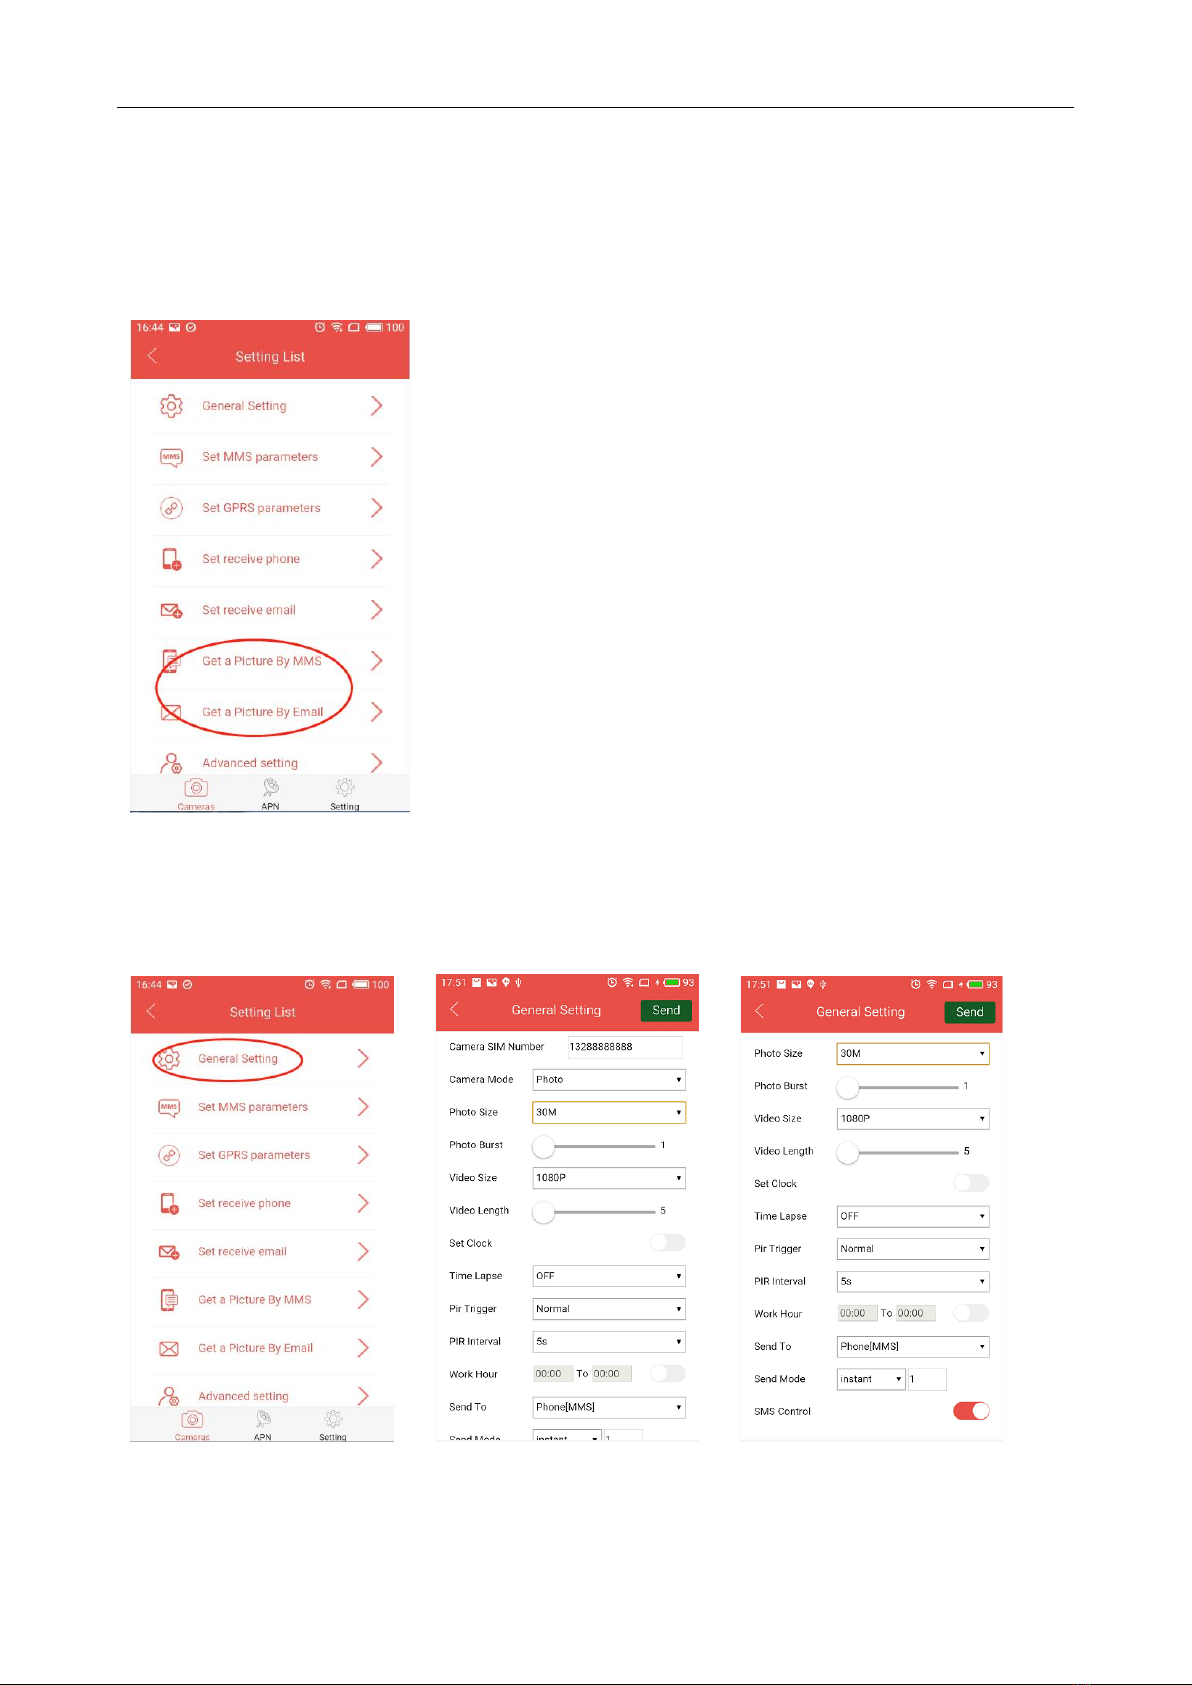
5.3.6 Get one spot picture from the camera :
After you set parameters from 5.3.1~5.3.4 or use “BG8304.txt” to set the parameters.
You can get a picture by MMS or by Email to verify the parameters. If the parameters are
correct, you can receive one picture from the camera after 20s~40s. If not, please recheck
the parameters you set before or do the steps from 5.3.1~5.3.4 again.
5.3.7 Change camera general settings :
Click “General Settings”, then enter general setting page. You can change any item
like operating the camera’s menu settings.

BG8303&BG8304 5 APP and SMS Commands
Page 16
5.3.8 Other commands:
Click “Advanced setting”, then you can change password, format SD/TF card, check
all camera settings
5.4 SMS Command List
The list below shows all the SMS commands for you. You can control your camera
via SMS.
A. Set Network Parameters
No
Functions
SMS Commands
1
Set Normal Users
Phone Number
#n#138********#150********#152********#
2
Set MMS Parameters
#m#http://mmsc.monternet.com#10.0.0.172#80#cm
wap# name#password#
(The example parameters are for the carrier of China
Mobile)
3
Set Send Email
Parameters
#s#[email protected]#bsk123#25#cmnet#smtp.
163.com#name#password#
4
Set Receive E-mail
address
B. Normal Control
No
Functions
SMS Commands
1
Get One Spot Photo
#T# (Send MMS to phone) #T#E#(Send to email by
GPRS)
2
Check Camera
#L#

BG8303&BG8304 5 APP and SMS Commands
Page 17
Settings
3
Format SD Card
#F#
4
Set Administrator’s
Password
#P#0000# (It’s suggested that the administrators
password be changed at the beginning)
5
Set GPS Info
#g# Latitude# Longitude# Altitude#
6
Help
#H#
C. Set Menu Parameter
No
Functions
SMS Commands
1
Change Camera Mode
#e#cp# (photo mode) or #e#cv# (video mode) or
#e#ct#(pic+video)
2
Change Photo Size
#e#s8# (8mp) or #e#s14# (14mp) or #e#s30(36Mp)#
3
Change Photo Burst
#e#b1# (1~5 photos)
4
Change Video Size
#e#ff#(1080p) or #e#fh#(720p) or #e#fl#(VGA)
5
Change Video Length
#e#v5# or #e #v30# (the number after V is
seconds)
6
Change Date Time
#e#t# (adjustment the time)
7
Change Time Lapse
#e#l1h# (1 hour) or #e#l5m# (5 min)
8
Change PIR Trigger
#e#po# (Off) or #e#ph# (High) or #e#pn# (Normal)
or #e#pl# (Low)
10
Change PIR Interval
#e#i30m# (30min) or #e#i30s# (30sec)
11
Change Send To
#e#mp# (phone) or #e#mg# (e-mail gprs)
12
Change Send Mode
#e#ed# (daily) or #e#ei10# (to set instant mode and
the max number per day) or #e#eo# (off) or
#e#em#(Manual)
13
Change Work Hour
#e#hoff# or #e#hon10:00-18:00#

BG8303&BG8304 6 Normal Questions and Advice
Page 18
6 Normal Questions and Advice
6.1 The camera can’t capture the target
1. Please check the protective film of the PIR Fresnel lens is removed or not.
2. Check the “PIR Trigger” (PIR sensitivity) parameter setting. For warm environmental
conditions, set the Sensor Level to “High” and for cold weather use, set the sensor for
“Low”.
3. Try to set your camera up in an area where no heat resources are in the camera’s field
of view.
4. Try to set camera on stable and immovable objects, i.e.: big trees.
5. If human being/animal moves fast, it may move out of the camera’s field of view
before photo is taken. Move camera further back or redirect camera.
6.2 The camera stops taking images or won’t take images
1. Please make sure that the SD card is not full. If the card is full, the camera will stop
taking images.
2. Please make sure the batteries power is sufficient.
3. Make sure the camera mode switch slide to “ON” position.
4. When sending(MMS or Email) function is on, there will be around 1-minute interval for
the camera to send out photo before camera shooting the next photo. Turn off the
sending function; camera can shoot photos continuously.
5. Please format the SD card with the camera before using or when the camera stops
taking images.
6.3 The camera stops sending photos/videos to email(s) or MMS(s).
1. Check if the SIM card is out of the connection.
2. Check if the SIM card is available.
3. Check if the signal is too weak or there is no signal covered.
4. Make sure the GPRS/MMS parameters setting is correct (check the manual).
Table of contents


