Boss Audio Systems MR1580DI User manual

MR1580DI
AM/FM Receiver with with universal docking cradle for iPod, iPhone
USER’S MANUAL
CONTENTS
Installation
To support the unit
Detaching and attaching the front panel
Cleaning the connector
Wire Connection
Location of parts and controls
General operations
Using the RDS function
How to select MP3/WMA files
Playing back USB device / Connect iPod/iPhone
Playing back SD/MMC card
Reset
Troubleshooting
Specifications
2
3
3
4
4
5
6
7
9
10
10
11
11
12

2
Before installing your new AM/FM Receiver, please review the
items below carefully.
Use only the installation parts and hardware provided with the unit to ensure
proper installation. Using other parts can cause malfunction and possible damage
to your AM/FM receiver.
affect performance.

3
10
7
1
2
3
4
4
4
5
5
6
6
8
9
INSTALLATION
PRECAUTIONS
• Installtheunitinanideallocationwhereitwillnotinterferewithnormaldrivingprocedures.
• Donotinstalltheunitinaplacewhereitwillbeexposetohightemperaturesordirectsunlight,or
whereitwillbepronetodirt,dust,moistureoreexcessivevibration.
• Useonlythesuppliedmountinghardwareforasafeinstallation.
• Removerstthefrontpanelbeforemountingtheunit.
NOTE:Donotinstalltheunitsothatitwillbetiltedatmorethan30°upward.
2182mm
53mm
34
TAP
1
2
13
Bend these
claws,ifnecessay
Release screw and
bracket
NOTE: Securethereleasekeyinasafeandconvenientplaceforfutureuseinremovingtheunitfromthecar.
TO SUPPORT THE UNIT
Detaching and attaching the front panel
Thefrontpanelofthisunitcanbedetachedinordertopreventtheunitfrombeingstolen.
Beforedetachingthefrontpanel,turnothepowerrstbypressingthe .
Then press the buttonanddetachthepanelbypullingittowardsyouasillustrated.
Notes:
• Whenattachingthefrontpaneltotheunit,carefullypressthepanellightlyagainsttheunit.Exces-
siveforcemaydislodgetheunitandcausesomemalfunction.
• Whenyoucarrythefrontpanelwithyou,putitinthesuppliedfrontpanelcase.
1.UNIT
2.RELEASECASE
3.DASHBOARD
4.HEXNUT
5.LOCKWASHER
6.PLAINWASHER
7.CARBODY
8.REARSUPPORTSTRAP
9.TAPPINGSCREW
10.M5X15HEXBOLT
Dashboard
1
2
< 10°

4
Cleaning the connector
Theunitmaynotfunctionproperlyiftheconnectorsbetween
theunitandthefrontpanelarecontaminatedwithdirt.Inorder
topreventthisfromhappening,detachthefrontpanelbypress-
ing the buttonandcleantheconnectorfromtimetotime.
Clean the connector with a cotton swab together with contact
cleanerasillustrated.Besuretocleanthemcarefullypinbypin
andmakesurenottodamagetheconnectingpoints.
WIRE CONNECTION
RCA Jack Line Out:
Red (right) White (left)
Subwoofer:Orange
USB Drive: Black
Connect USB Drive /
Use Adaptor Connect iPod/iPhone
Maintenance
FUSE REPLACEMENT
Ifthefuseblows,checkthepowerconnectionandreplacethefuse.Ifthefuseblowsagainafterthe
replacement,theremaybeaninternalmalfunction.Inthiscase,consultyournearestrepairingcenter.
Warning
Usethecorrectamperefortheuseineachlead.Improperuseofsuchamperesmaycauseseriousdamage
totheunit.
Cotton Swab
Rear of
front panel Main unit
GREY +
GREY/BLACK –
FRONT
RIGHT
SPEAKER
VIOLET +
VIOLET/BLACK –
REAR
RIGHT
SPEAKER
FRONT
LEFT
SPEAKER
REAR
LEFT
SPEAKER
+ WHITE
– WHITE/BLACK
+ GREEN
– GREEN/BLACK
ISO A/B PLUG
POWER
CONTROL BLUE
BLUE/WHITE
IGNITION SWITCH (12 V)
RED
CONSTANT
12 VOLTS
YELLOW
BLACK
GROUND (–)
ANTENNA CONTROL
L (WHITE)
LINE OUT
R (RED)
ISO CONNECTOR
B
A
FUSE 10A
ANTENNA
CONNECTOR
SUBWOOFER
CONNECT USB DRIVE ADAPTOR
CONNECT iPod/iPhone

5
Location of Parts and Controls
1. POWERON/OFF( )
2. FUNCTIONSELECTBUTTON:
VOLUME/BASS/TREBLE/BALANCE/FADER/
without RDS (for USA AREA):BEEP/TADJTIME/AUDIODSP/AREA
RDS (for EUROPE AREA):TASEEK/PISOUND/RETUNE/MASKDPI/
EON/BEEP/TAVOL/ADJTIME/AUDIODSP/AREA
3. TURNVOLLEFTORRIGHTTOADJUSTBASS/TREBLE/BALANCE/
FADER
4. PRESETSTATIONS(1,2,3,4,5,6)
5. STEREO/MONO(ST)/
‘AF’function(ALTERNATIVEFREQUENCIES)(AF)
6. EQUALIZER(EQ)/
‘TA’function(TRAFFICANNOUNCEMENT)(TA)
7. LOCAL/DISTANT(LOC)/
‘PTY’function(PROGRAMTYPE)(PTY)
8. DISPLAYBUTTON(DISP)
9. MODE/SUBWOOFERBUTTON(MD/SUB)
10.BAND/LOUDNESSBUTTON(BD/LD)
11.AUTOMATICORMANUALTUNING
(FREQUP ORFREQDOWN /TRACK/SEARCH)
12.AUTOSEEKSEARCHTUNING(A/PS)
13.‘SCAN’AUTOMATICTUNINGCONTROL(SCAN)
14.MUTEBUTTON(MUTE)
15.LCDDISPLAY
16.OPENPANELRELEASEBUTTON( )
17.PAUSEBUTTON
18.REPEATBUTTON
19.INTROBUTTON(PreviewallTracks)
20.RANDOMBUTTON
21,22.SEARCHPREVIOUS/NEXTFOLDER
23.FRONTAUXIN
24.USBTUNETRAY
25.SD/MMCCARDSLOT
26.RESET
MODE
TUNE/SEEK
VOL
VOL
ENTER
SEL
DISP
BAND
LOUD
RPT
2
INT
3
MP3
AS/PS
PAU
1
FL-
5
FL+
6
RDM
4
BD/LD
A/PS
DISP
ST
AF
EQ
TA
LOC
PTY
MD/SUB MUTE SCAN123456
BD/LD
A/PS
DISP
ST
AF
EQ
TA
LOC
PTY
MD/SUB MUTE SCAN123456
111 3 2 8 5 6 15 16
12 914 17 1918 20 21 22 13 23710
4
(1-6)
2624 25
RESET
1
11
10
4
2 93
22
1921
20
17 18
12
8
(1-6)
MODE
TUNE/SEEK
VOL
VOL
ENTER
SEL
DISP
BAND
LOUD
RPT
2
INT
3
MP3
AS/PS
PAU
1
FL-
5
FL+
6
RDM
4
BD/LD
A/PS
DISP
ST
AF
EQ
TA
LOC
PTY
MD/SUB MUTE SCAN123456
BD/LD
A/PS
DISP
ST
AF
EQ
TA
LOC
PTY
MD/SUB MUTE SCAN123456
111 3 2 8 5 6 15 16
12 914 17 1918 20 21 22 13 23710
4
(1-6)
2624
25
RESET
1
11
10
4
2 93
22
1921
20
17 18
12
8
(1-6)

6
HOW TO OPERATE THE REMOTE CONTROL
Installing the battery
Slidethetrayoutfromthebackoftheremotecontrolandinsertbatterywith
the(+)andminus(-)polespointingintheproperdirection.
•Whenuseforthersttime,pulloutthelmprotrudingthetray.
CAUTIONS
•Removebatteryiftheremotecontrolisnotusedforamonthorlonger.
•Donotstorebatterywithmetallicmaterials.
•Intheeventofbatteryleakage,replacetheoldbatterywithanewone.Cleanrstthesurfaceof
theremotecontrolincludingthecompartmentofthebattery.
•Whendisposingofusedbatteries,makesurethatyoucomplywithgovernmentregulationsand
environmentalsafetyproceduresinyourarea.
Using the remote control
Pointtheremotecontrolinthedirectionofthefrontpaneltooperate.
IMPORTANT
•Donotstoretheremotecontrolinhightemperaturesordirectsunlight.
GENERAL OPERATIONS
1. POWER
By pressing ,theunitisswitchedon.Pressandholdagaintoturnounit.
2. SELECT BUTTON
3. VOLUME KNOB (Turn left or right to adjust)
Instandardoperation,theVOLUMEcontrol(3)isforsettingthevolume.
PresstheSELECTbutton(2)onceorseveraltimes,tochangetheparametersBAS(basscontrol),TRB
(treblecontrol),BAL(balancecontrol)andFAD(fadercontrol)byturningtheVOLUMEcontrol(3)
1 2 3 4 5
SEL SEL SEL SEL SEL
Fig.1Selectionofsoundcontrolfunctions
1.VOL2.BAS3.TRB4.BAL5.FAD
Without RDS (for USA Area): Press and hold VOLtoadjustBEEP/TADJTIME/AUDIODSP/AREA
BEEP MODE (2)
PresstheVOLknobagain(formorethan2seconds)toactivateSelectingmodeforBEEP:
2 sec.
SELBEEP 2nd / OFF
VOL
2 sec.
BEEP
SELSELFLAT / POP / ROCK / CLASSICALDSP
SELADJVOL
2 sec.
BEEP
SELSELDSP AREA USA/EUR
SELAREA
SELADJVOL
2 sec.
BEEP
SELSELADJ to set hourto set minute /
VOL VOL
VOL
2nd
Button sound is triggered by secondary button functions (hold button down for a while)
OFF Buttonsoundiso
ADJUST TIME (2)
PresstheVOLknobagain(formorethan2seconds)toactivateSelectingmodeforADJUSTTIME:
2 sec.
SELBEEP 2nd / OFF
VOL
2 sec.
BEEP
SELSELFLAT / POP / ROCK / CLASSICALDSP
SELADJVOL
2 sec.
BEEP
SELSELDSP AREA USA/EUR
SELAREA
SELADJVOL
2 sec.
BEEP
SELSELADJ to set hourto set minute /
VOL VOL
VOL
TurnVOLknobclockwisetosethoursandcounterclockwisetosetminutes.
AUDIO DSP CONTROLS (2)
PresstheVOLknobagain(formorethan2seconds)toactivateSelectingmodeforDSP:
2 sec.
SELBEEP 2nd / OFF
VOL
2 sec.
BEEP
SELSELFLAT / POP / ROCK / CLASSICALDSP
SELADJVOL
2 sec.
BEEP
SELSELDSP AREA USA/EUR
SELAREA
SELADJVOL
2 sec.
BEEP
SELSELADJ to set hourto set minute /
VOL VOL
VOL
USA/EUROPE FREQUENCY TUNING (2)
Thisunit supportsboth theUSA andEUROPE radiofrequenciestuning. Turn VOL knob to adjust
betweenthetwofrequencies.
2 sec.
SELBEEP 2nd / OFF
VOL
2 sec.
BEEP
SELSELFLAT / POP / ROCK / CLASSICALDSP
SELADJVOL
2 sec.
BEEP
SELSELDSP AREA USA/EUR
SELAREA
SELADJVOL
2 sec.
BEEP
SELSELADJ to set hourto set minute /
VOL VOL
VOL

7
USING THE RDS FUNCTION
What is RDS?
TheRDS(RadioDataSystem)isadigitalinformationsystemdevelopedbytheEBU(EuropeanBroad-
castUnion).Piggy-backedonnormalFMbroadcasts,RDSoersavarietyofinformationservicesand
automaticretuningfunctionsforRDS-compatiblecarstereos.
In1988,RDSbecameavailableintheUnitedKingdom,France,WestGermany,IrelandandSweden.
TesttransmissionsarebeingconductedinmanyotherEuropeancountries.ItisexpectedthatRDS
willbeavailableinmostwesternEuropeancountriesinthenearfuture.
RDS (for European Broadcast Union Area): Press and hold VOLtoadjustTASEEK/PISOUND/RETUNE/
MASKDPI/EON/BEEP/TAVOL/ADJTIME/AUDIODSP/AREA
TA
SEL
2 sec.
SEL
BEEP SEL
PI
SEL RETUNE MASK
SEL
SEL
DSP
SEL
AREA SEL
ADJ SEL
TA VOL
SEL EON
SEEK/ALARM (
turnVOLknobtoselectTASEEK/TAALARM)
TA SEEK mode:WhennewlyturnedstationdoesnotreceiveTPinformationfor5sec.,theradio
retunestonextstationwhichhasnotthesamestation(PI)asthelaststation,buthastheTPinforma-
tion.
InTAseekmode,thecurrentstationcanbechangedtothecompletelydierentstationbecausethe
unitsearchesTPstationwhentheeldstrengthofthecurrentstationisveryweak,orthecurrent
stationhasnoTPsignal.
TA ALARM mode: Anyautomaticretunemodeisnotactivated,justcanhearBeepsound.
PI SOUND (
turnVOLknobtoselectPISOUND/PIMUTE)
Actionwhen2stationswithdierentprogrammeidentication(PI)codesareonthesamefrequency:
SOUND: The radio switches to the new channel for a few seconds and then switches back again
MUTE:Theradioismuted
RETUNE L/S (
turnVOLknobtoselectRETUNEL/RETUNES)
RETUNE L:Select90secondsastheinitialtimeofautomaticTAsearch.
RETUNE S:Select30secondsasinitialtime.
MASK DPI/ALL (
turnVOLknobtoselectMASKDPI/MASKALL)
MASK DPI: maskedonlytheAFwhichhasdierentPI.
MASK ALL: maskedtheAFwhichhasdierentPIandNORDSsignalwitheldstrength.
EON (
turnVOLknobtoselectEONON/EONOFF)
SelectedEONcondition,ONorOFF.
BEEP (
turnVOLknobtoselectBEEP2nd/BEEPOFF)
ALL: Buttonsoundisonpermanently
2nd:
Button sound is triggered by secondary button functions (hold button down for a while)
OFF: Buttonsoundiso
TA VOL (
turnVOLknobtoselectTAVOLON/TAVOLOFF)
TracAnnouncementVolume
ADJ (
turnVOLknobtoadjustTIME)
DigitalClock.Toadjust,turnVOLknobtorightforhoursandturnVOLknobtoleftforminutes.
DSP Modes (
turnVOLknobtoselectAUDIODSPmodes)
CLASSIC,ROCK,POP,FLAT,NONE
USA/EUROPE FREQUENCY TUNING (
turnVOLknobtoselectwithoutRDS/RDS)
Thisunit supportsboth theUSA andEUROPE radiofrequenciestuning. Turn VOL knob to adjust
betweenthetwofrequencies.
4. PRESET STATIONS (1-6)
Sixnumberedpresetbuttonsstoreandrecallstationsforeachband.
Storing a station:
1.Selectaband(ifneeded)
2.Selectastation
3.Holdapresetbuttonlongerthanonesecond.Presetstationnumberappearsinthedisplaywhen
stationissaved.
Recall a station:
1.Selectband(ifneeded)
2.Pressapresetbuttonforlessthanonesecondtoselectstoredstation.
Note: This unit is equipped with built-in memory I.C. (Integrated Circuits) to save user settings such

8
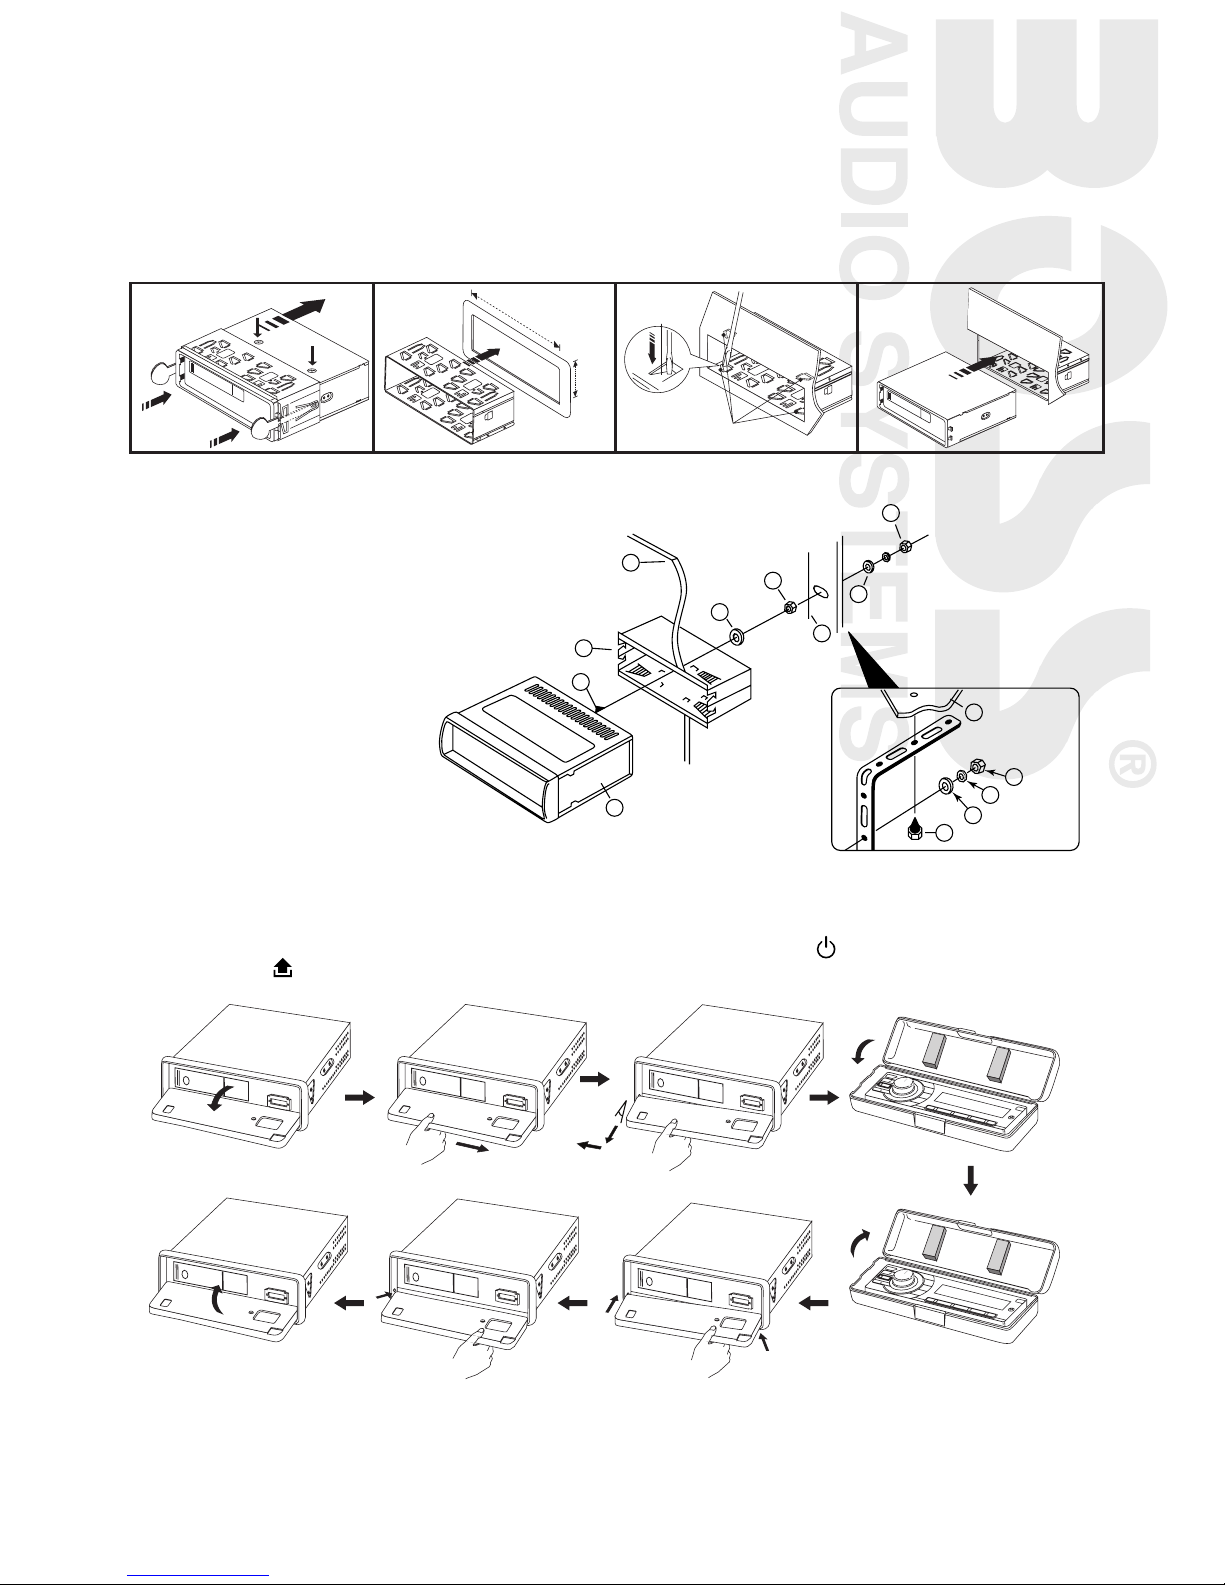
as tuner preset stations and audio control settings. To cancel these settings, switch to Radio mode,
press and hold button “1” for 2 seconds (do not release button) followed by pressing MD button.
Unit will automatically restart after 5 seconds.
5. STEREO/MONO BUTTON (ST)
Press STbuttontoswitchbetweenstereoandmonosoundforFMradioreception.Whenreceptionof
anFMstationisweak,listeningqualitycanbeimprovedbyswitchingtomonosound.
‘AF/REG’ function (ALTERNATIVE FREQUENCIES)
Whenpressedmomentarily,AF/REGswitchingmodeisselected.
WhenAF/REGswitchingmodeisselected,theradiochecksthesignalstrengthoftheAFallthetime.
Whenpressedlong,itactivatetheregionalmodeON/OFFfunction.
– Regional mode ON:
AFswitchingorPISEEKisimplementedtothestationwhichhaveallPIcodessameascurrentstation.
REGsegmentisturnedon,inLCDdisplay.
– Regional mode OFF
TheregionalcodeintheformatofPIcodeisignoredwhenAFswitchingorPISEEKisimplemented.
6. EQUALIZER CONTROL (EQ)
Press EQtoselectbetweenO/Pop/Rock/Classic/Flatequalizermodes.
‘TA’ function (TRAFFIC ANNOUNCEMENT)
Whenpressedmomentarily,itisactivatedasTAmodeonoro
WhenTAmodeisonandtracannouncementistransmitted
–WhentheunitisinMP3mode,itwillswitchtoradiomodetemporarily.
–Ifthevolumelevelwasunderthethresholdpoint,itwillberaisedtothethresholdpoint.
–WhenTPstationisreceived,TPsegmentisturnedinLCDdisplay.
7. LOCAL/DISTANT BUTTON (LOC)
PressLocal/Distant(LO/DX)buttonforlisteningtoweakstations.“LOCAL”indicatorwillappearon
thedisplay.Pressthisbuttonagain(Distantmode)fornormaloperation.
‘PTY’ function (PROGRAM TYPE)
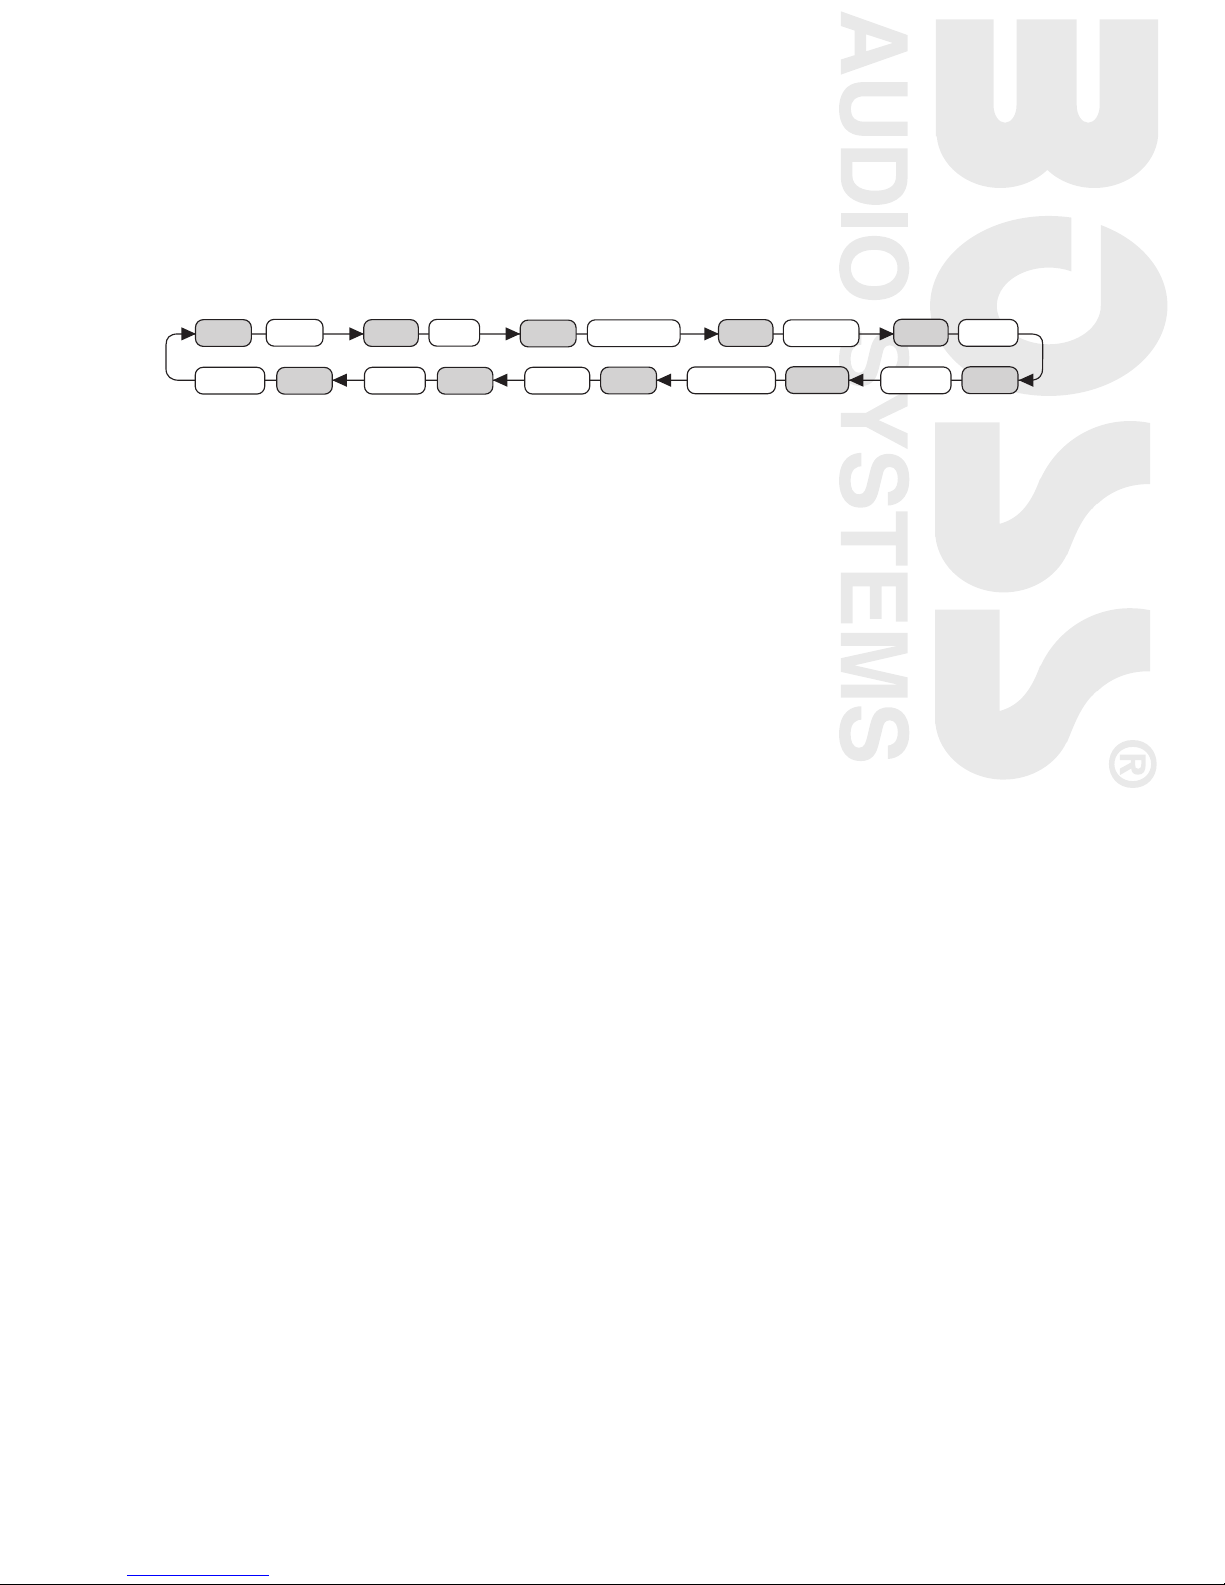
EachpressofPTY button will toggle between PTY Music, PTY Speech and PTY Off.
When PTY Musicisselected,pressButtons(1-6)fordesiredprogramtypes.Unitautomaticallysearch
forcorrespondingprograms.
1PopM,RockM 2EasyM,LightM 3Classics,OtherM
4Jazz,Country 5NationM,Oldies 6FolkM
When PTY Speechisselected,pressButtons(1-6)fordesiredprogramtypes.Unitautomaticallysearch
forcorrespondingprograms.
1News,Aairs,Info 2Sport,Educate,Drama 3Culture,Science,Varied
4Weather,Finance,Children 5Social,Religion,PhoneIN 6Travel,Leisure,Document
Tips:
Program Type function is available only in radio FM mode.
Since each button number can store multiple program types, i.e. Button 1 stores Pop and Rock music,
to switch between Pop and Rock music, simply press button 1 repeatedly until the desired program
type shows in display.
8. DISPLAY (DISP)
Press DISPbuttontoswitchbetweendisplayinformationssuchasradiofrequencies,clock,track
andotherinformationsdependingontheplayingMODE.
9. MODE / SUBWOOFER BUTTON (MD/SUB)
Bypressingthiskey,usercanselectTUNER/USB1/USB2/MMC/SD/AUXmode.
SUBWOOFER:Pressandholdbuttontoengagesubwooferoutput.
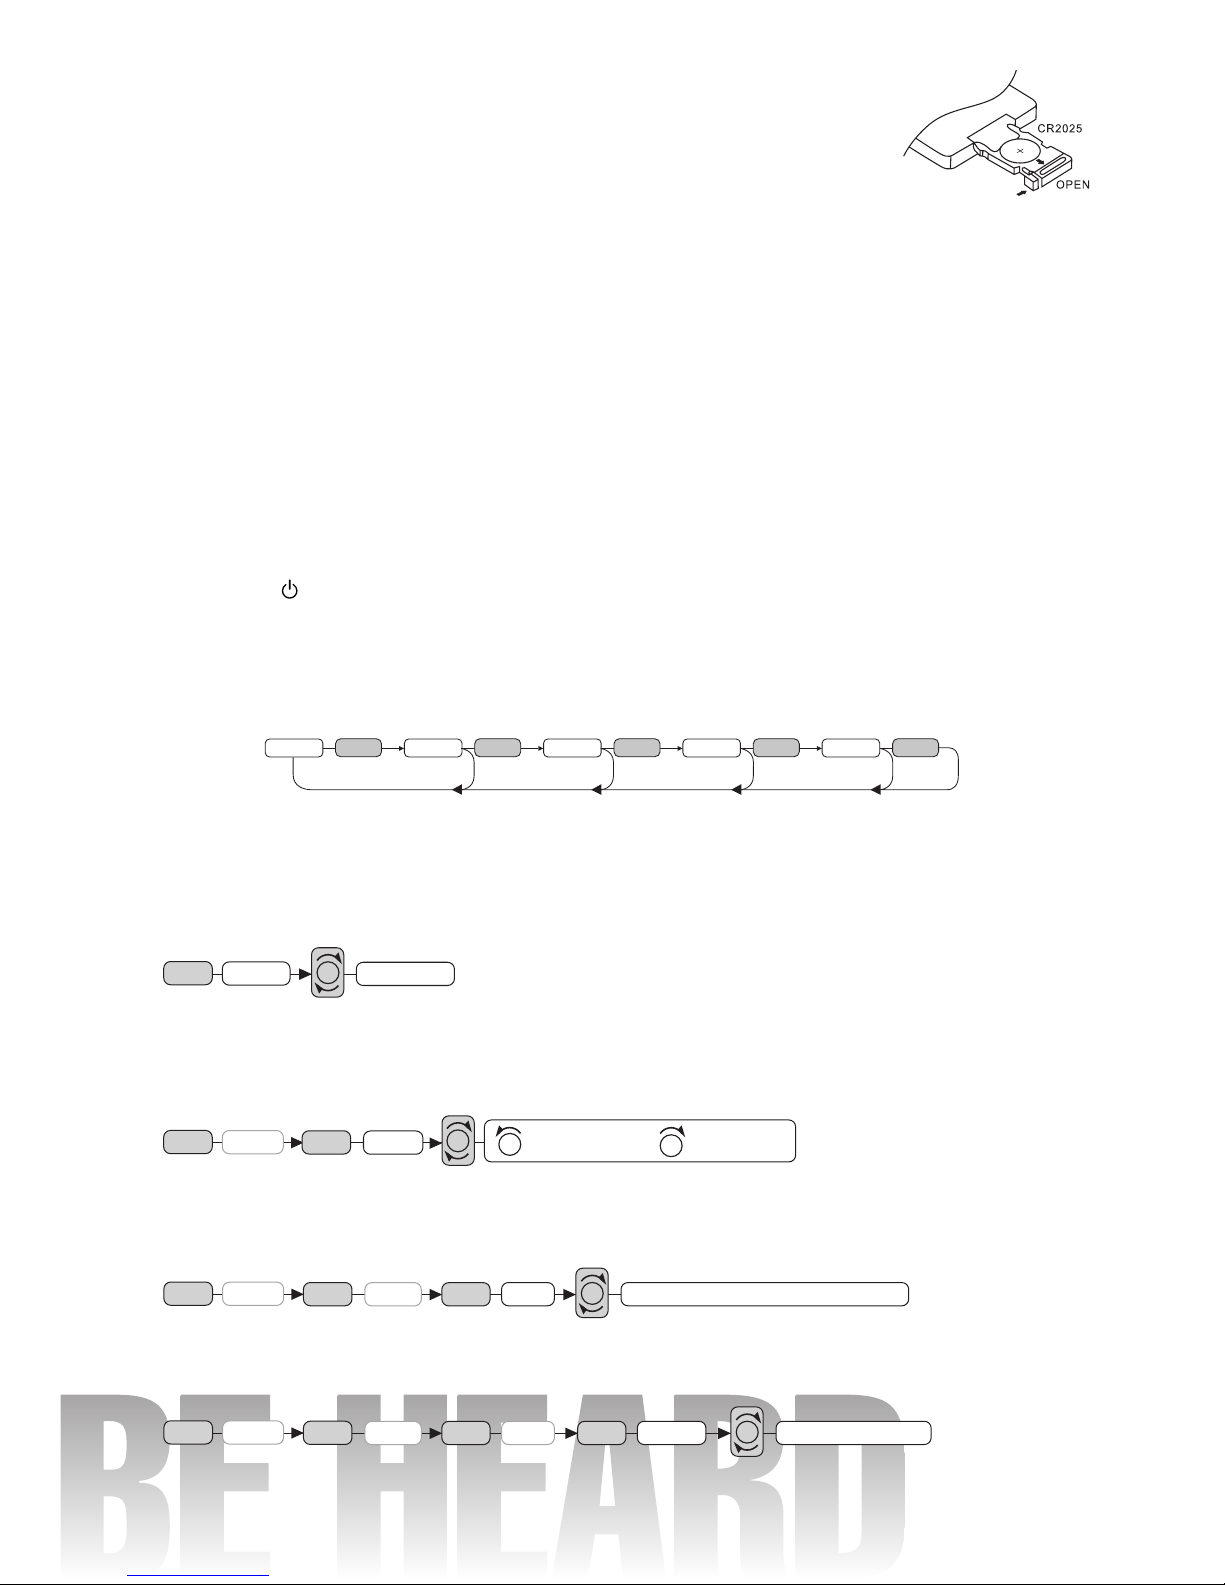
10. BAND / LOUDNESS BUTTON (BD/LD)
EachbandistoggledcyclicallybypressingthiskeyFM1---FM2---FM3---MW(AM)1---MW(AM)2.
LOUDNESS:PressandholdthebuttontoselectLOUDNESSmode.
11. AUTOMATIC OR MANUAL TUNING (FREQ UP OR FREQ DOWN )
(A) RADIO MODE
Whenpressedmomentarily,thesekeysareoperatedasMANUALtuningmode.
Whenpressedlongerthan1sec.,theyoperateasSEEKtuningmode.
(B) MP3/WMA PLAYER MODE
Whenpressedmomentarily,theyoperateasTRACKUPorTRACKDOWNmode.
Whenpressedlongerthan1sec.,theyoperateasCUEorREVIEWmode.

9
12. AUTO SEEK / PRESET SCAN (A/PS)
Preset Scan (PS) -Bypressingshortly,theradioplayseachpresetstationfor5seconds.
Auto Seek (AS)-Bypressinglongerthan1sec,autoseekisactivated.The6strongeststationsare
presetandstoredinthecorrespondingpresetnumber.WhenAutoSeekoperationisnished,the
radioexecutesthepresetscan.
13. ‘SCAN’ AUTOMATIC TUNING CONTROL (SCAN)
Thisbuttonstartstheauto-scan.Whenastationhasbeenfound,itisplayedfor5secondsandthen
theauto-scaniscontinued.Pressthebuttonagaintostoptheauto-scantolistentothecurrently
playedstation.
14. MUTE BUTTON
Pressthisbuttontosilentthesoundatonce.Pressagaintoreturntopreviousvolumelevel.
15. LCD DISPLAY
TheLiquidCrystalDisplaywilldisplaythecurrentstateoftheunit.
16. OPEN THE FRONT PANEL ( )
Press buttonandthefrontpanelwillopen.
MP3/WMA CONTROL LOCATION OF PARTS
TRACK/SEARCH BUTTON (11)
FORWARD AND REVERSE TRACK SEARCH (or changing songs)
PresstheSKIPbutton( or )duringplaytogotothedesiredtrack(song).
....REVERSE ....FORWARD
PressandholdtheSKIPbutton( or )duringplaytoscanathighspeed.Whenthedesiredmusic
sectionisfound,releasethebutton.Normalplaywillresume.
17. PAUSE BUTTON
During“PLAY”,press(17)‘PAU’buttonto“PAUSE”.Pressitagaintoresumeplay.
18. REPEAT BUTTON
Whenthisbuttonispressed,‘RPT’indicationisdisplayedandplayoftheselectedtrackwillbecon-
tinuallyrepeateduntiltheTrackrepeatmodeiscancelledbypressing‘RPT’buttonagain.
19. INTRO BUTTON (Preview all Tracks)
Whenthisbuttonispressed,‘INT’indicationisdisplayedandtherstseveralsecondsofeachtrack
areplayed.Pressagaintostopintroandlistentotrack.
20. RANDOM BUTTON
Whenthisbuttonispressed,‘RDM’indicationisdisplayedandeachtrackareplayedinrandominstead
ofnormalprogression.TocancelRANDOMmode,press‘RDM’buttonagain.
21, 22. SEARCH PREVIOU / NEXT FOLDER: (In case of MP3/WMA files)
Pressthesebuttonstosearchprevious/nextfolder.
NOTE: These buttons (17 to 22) are available only in MP3 and USB mode.
HOW TO SELECT MP3/WMA FILES
Searching by Track:
• Press“A/PS”,digitstartsblinking.
• TurnVOLtorightorleftuntilthedesiredtracknumbershowsthenpressVOLknob.
• Songnumberyouselectedwillstarttoplay.
Searching by Folder:
• Press“A/PS”twice.
• TurnVOLtorightorlefttoselectfoldernamethenpressVOLknob.
• TurnVOLtorightorlefttoselectletoplaythenpressVOLknobtostartplayback.
23. Connecting AUX IN
Anexternalaudiosource(e.g.portableMP3player)canbeconnectedtotheAUXINsockettobeplayed
backbythevehicleloudspeakers.
1. ConnecttheAUXINsocketwiththeaudiooutputoftheexternaldevice.
2. PressMDbuttonandswitchtoAUXmode.

10
PLAYING BACK USB DEVICE / CONNECT iPod/iPhone
A USB device can be connected to the internal/external or both USB connectors. Press MD to select
USB1(internal),USB2(external).
Playing back via the USB (internal) connector
1. Press buttonandthefrontpanelwillopen.
2. PressPUSHOPENontheTUNETRAY.TheTUNETRAYopensslowly.
3. ConnecttheUSBdevicetotheUSBconnector.orUseadaptorConnecttoUSBportforplayingiPod/
iPhone.
4. SlideintheTUNETRAYbypressingPUSHCLOSEontheTUNETRAYuntilitlocksshut.
5. Closethefrontpanel.
6. Theplayerautomaticallyswitchestotheinputusedandstartsplayback.
7. Seethesectiononoperationscommonforaudioles.
Playing Songs in iPod
1. PressMDtoselectUSB1.
2. PressA/PS.
3. RotateVOLtoselectPLAYLIST–ARTISTS–ALBUMS–SONGS–GENRES-COMPOSER
4. PressBD/LD.
IfyouareawareonhowtouseiPOD,thewaytousethecarstereofeatureisbasically
justthesame.Takenoteoftheequivalentkeyfunctionbelow.
Car Stereo iPOD Functions
RotateVOLknob RotateCLICKWHEEL Up/downcategory/lebrowsing
PressBD/LDbutton PressSELECTbutton Selectingacategory/Playsong
CarStereoandiPODequivalentkeyfunction
Note: Please refer to your iPOD user’s manual for operating instructions.
Press A/PS to go back to Main Menu.
Note:•supportiPodClassic•iPodnano2,3,4,5,6•iPodtouch1,2,3•iPhone,3G,3GS,4
PLAYING BACK SD/MMC CARD
< 10°
1. Press buttonandthefrontpanelwillopen.
2. Detachthefrontpanel.
3. InsertSD/MMCintothememorycardreader.
4. Theplayerautomaticallyswitchestotheinputusedandstartsplayback.
5. Seethesectiononoperationscommonforaudiolesonhowtocontrolmemorycardplayback.
Note:
- Due to the great variety of devices with USB and SD/MMC card interfaces that sometimes have
manufacturer-specific functions, we cannot guarantee that all media will be recognized and that all
operational functions will be available with this device.
- You cannot operate USB hard drives on the device.

11
RESET
Thisbuttonisbehindthefrontpanelandresetsallthesettingstotheoriginalsettingsthatweremade
inthefactory.Pressthisbuttoninthefollowingcases:
- whenyouhavecompletedtheinstallationandconnection
- when the display shows undefined characters
Note: You have to detached the front panel and use a sharp object to press the “Reset” button.
RESET
RESET

12
Specifications
MR1580DI
AM/FM Receiver with with universal docking cradle for iPod, iPhone
CD/MP3 PLAYER
Signal to noise ratio >60dB
Channel separation >50dB(1kHz)
Frequency response 20Hz-20kHz
RADIO
FM Section:
Frequency range 87.5-107.9MHz(America),87.5-108MHz(Europe)
Channel step 200kHz(USA),50kHz(Europe)
Sensitivity 2.8µV
Stereo separation 30dB
Signal to noise ratio 50dB
MW(AM) Section:
Frequency range 530-1710KHz(America),522-1620KHz(Europe)
Usable sensitivity 32dBµV
TONE CONTROLS
Bass (at 100Hz) +/-10dB
Treble (at 10kHz) +/-10dB
LINE-OUT
Output 1.5V(max.)
Impedance 10kOhm
AMPLIFIER
Maximum output power 80wattsx4channels
GENERAL
Power supply 12VDC(10.8-15.6Vallowable)
Speaker impedance 4or8Ohm
Fuse 10A
Instructions on environment protection
Do not dispose or throw away this product in the usual household garbage at the end of its life-
cycle.Themethodofdisposalofthisproductisproperlyinscribedinthismanual.Thematerial
usedarerecyclable,andbyrecyclingthisproduct,youarehelpingprotectourenvironment.
Pleaseinquireatthecommunityadministrationfortheauthorizeddisposallocation.
Other manuals for MR1580DI
1
This manual suits for next models
1
Table of contents
Other Boss Audio Systems Stereo Receiver manuals

Boss Audio Systems
Boss Audio Systems MGR450B User manual

Boss Audio Systems
Boss Audio Systems 460BRGB User manual

Boss Audio Systems
Boss Audio Systems MR1580DI User manual

Boss Audio Systems
Boss Audio Systems BVCP9675 User manual

Boss Audio Systems
Boss Audio Systems BV765BLC User manual

Boss Audio Systems
Boss Audio Systems BVCP9675 User manual

Boss Audio Systems
Boss Audio Systems 634CA User manual

Boss Audio Systems
Boss Audio Systems 616UAB User manual

Boss Audio Systems
Boss Audio Systems MR637U User manual