Boss Audio Systems 460BRGB User manual

USER'S
MANUAL
460BRGB
BLUETOOTH® I MP3-COMPATIBLE DIGITAL
MEDIA
AM/FM
RECEIVER
0
Bluetooth
"
.::·
~
··
~
~
OPTIONS
ao~s
AUDIO SYSTEMS
ELliE

CONTENTS
Precautions................................................................................................................................................. 1
Lithium Battery Cell Warnings .............................................................................................................................. 1
Use Cautions ..........................................................................................................................................1
Installation ..................................................................................................................................................2
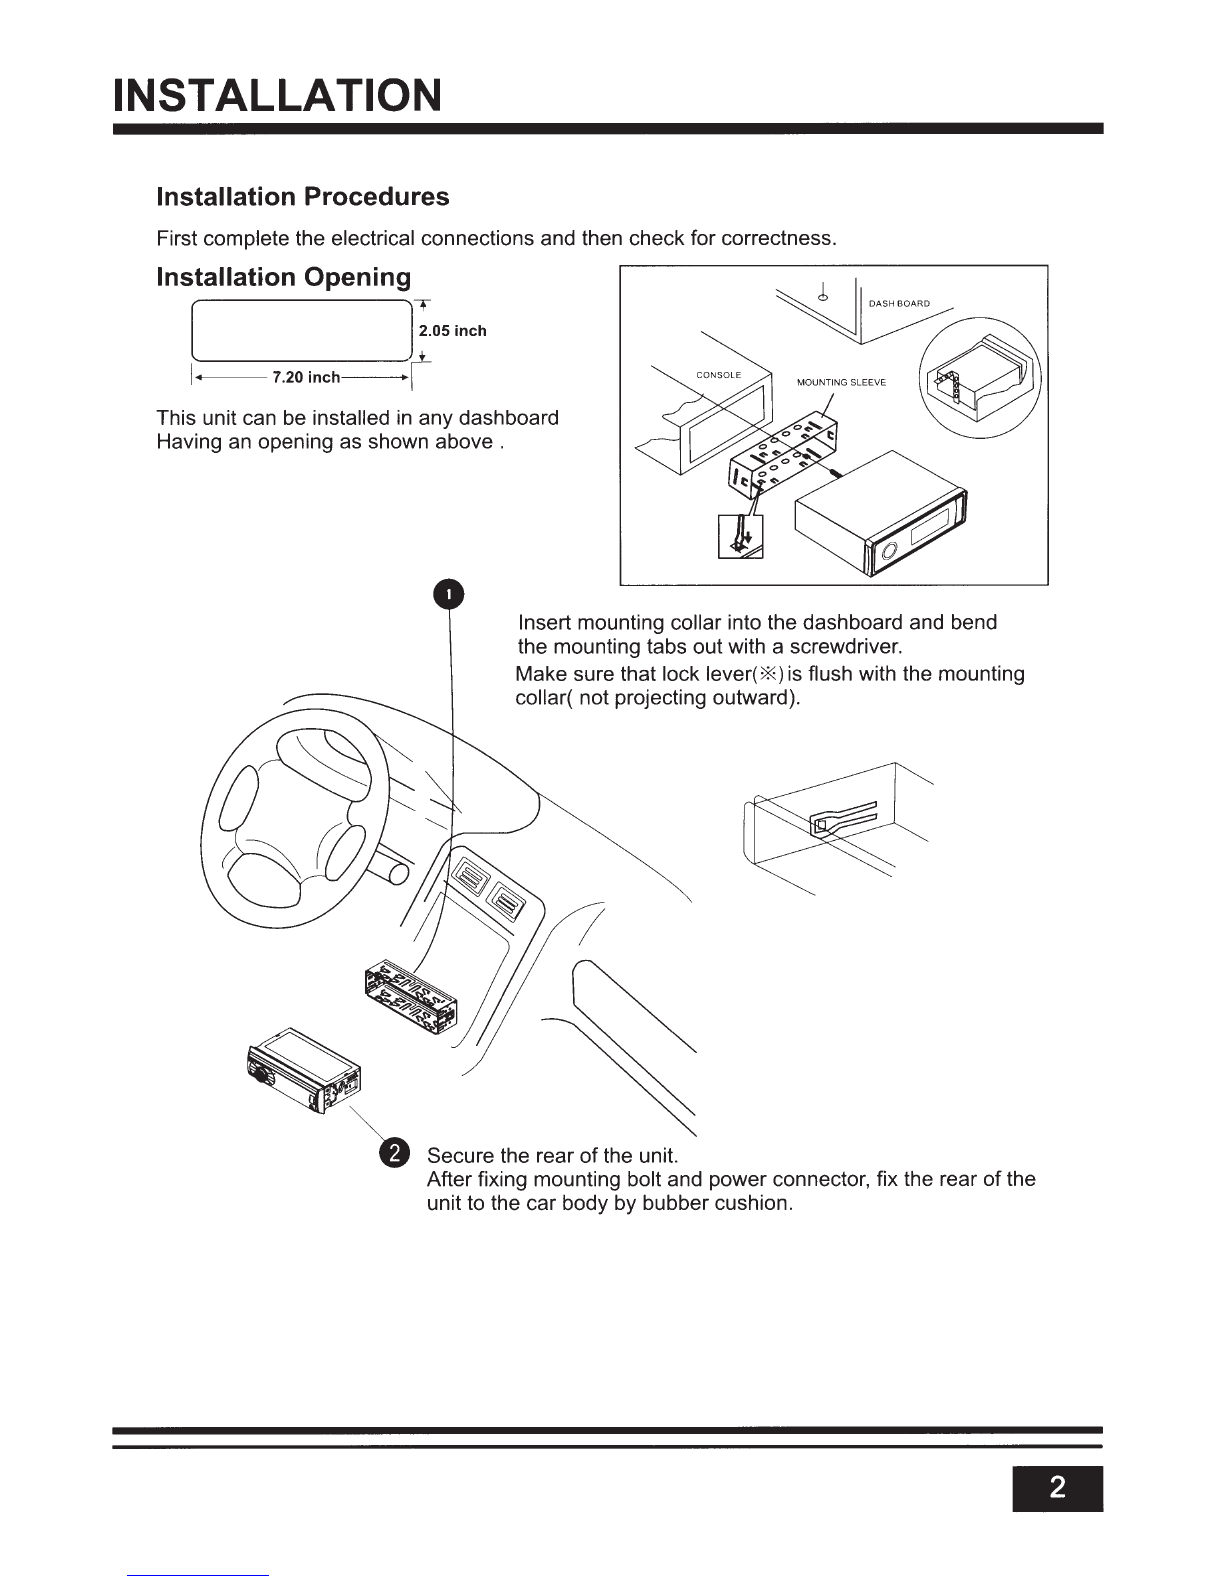
Installation Procedures .......................................................................................................................... 2
Installation Opening................................................................................................................................2
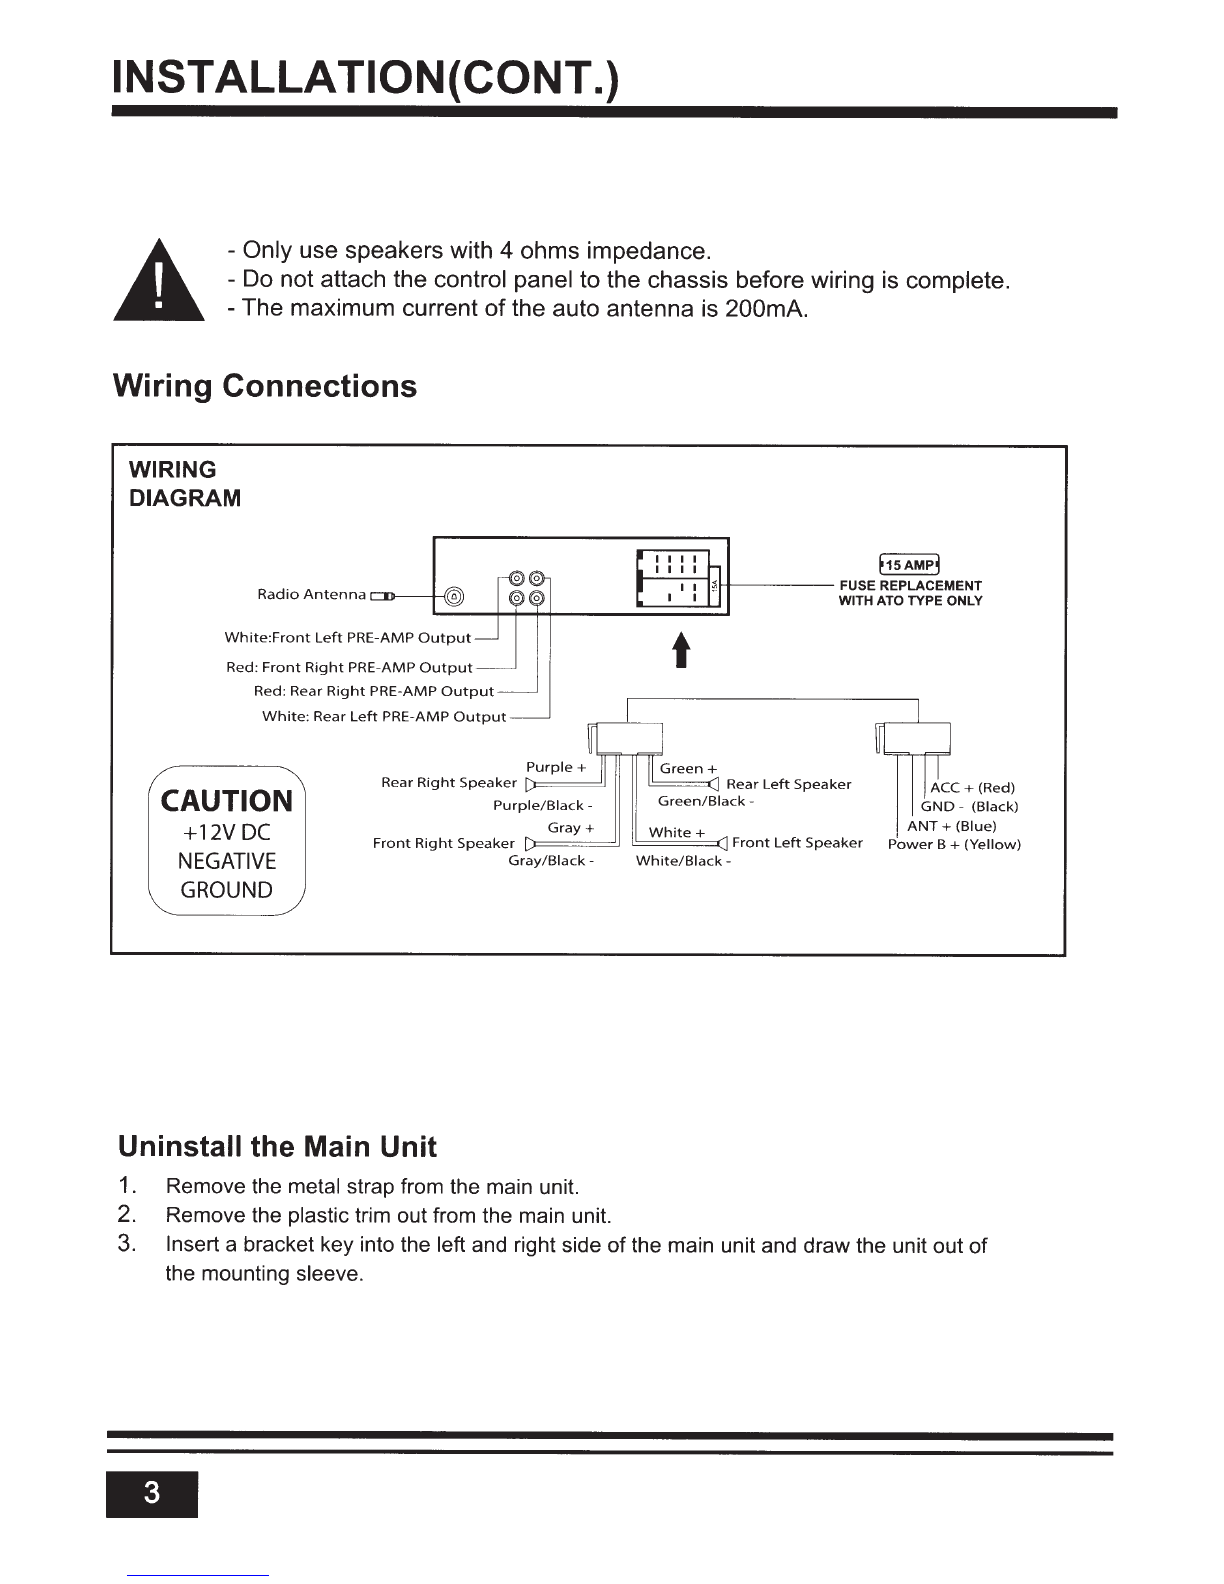
Wiring Connections................................................................................................................................3
Uninstall the Main Unit ...........................................................................................................................3
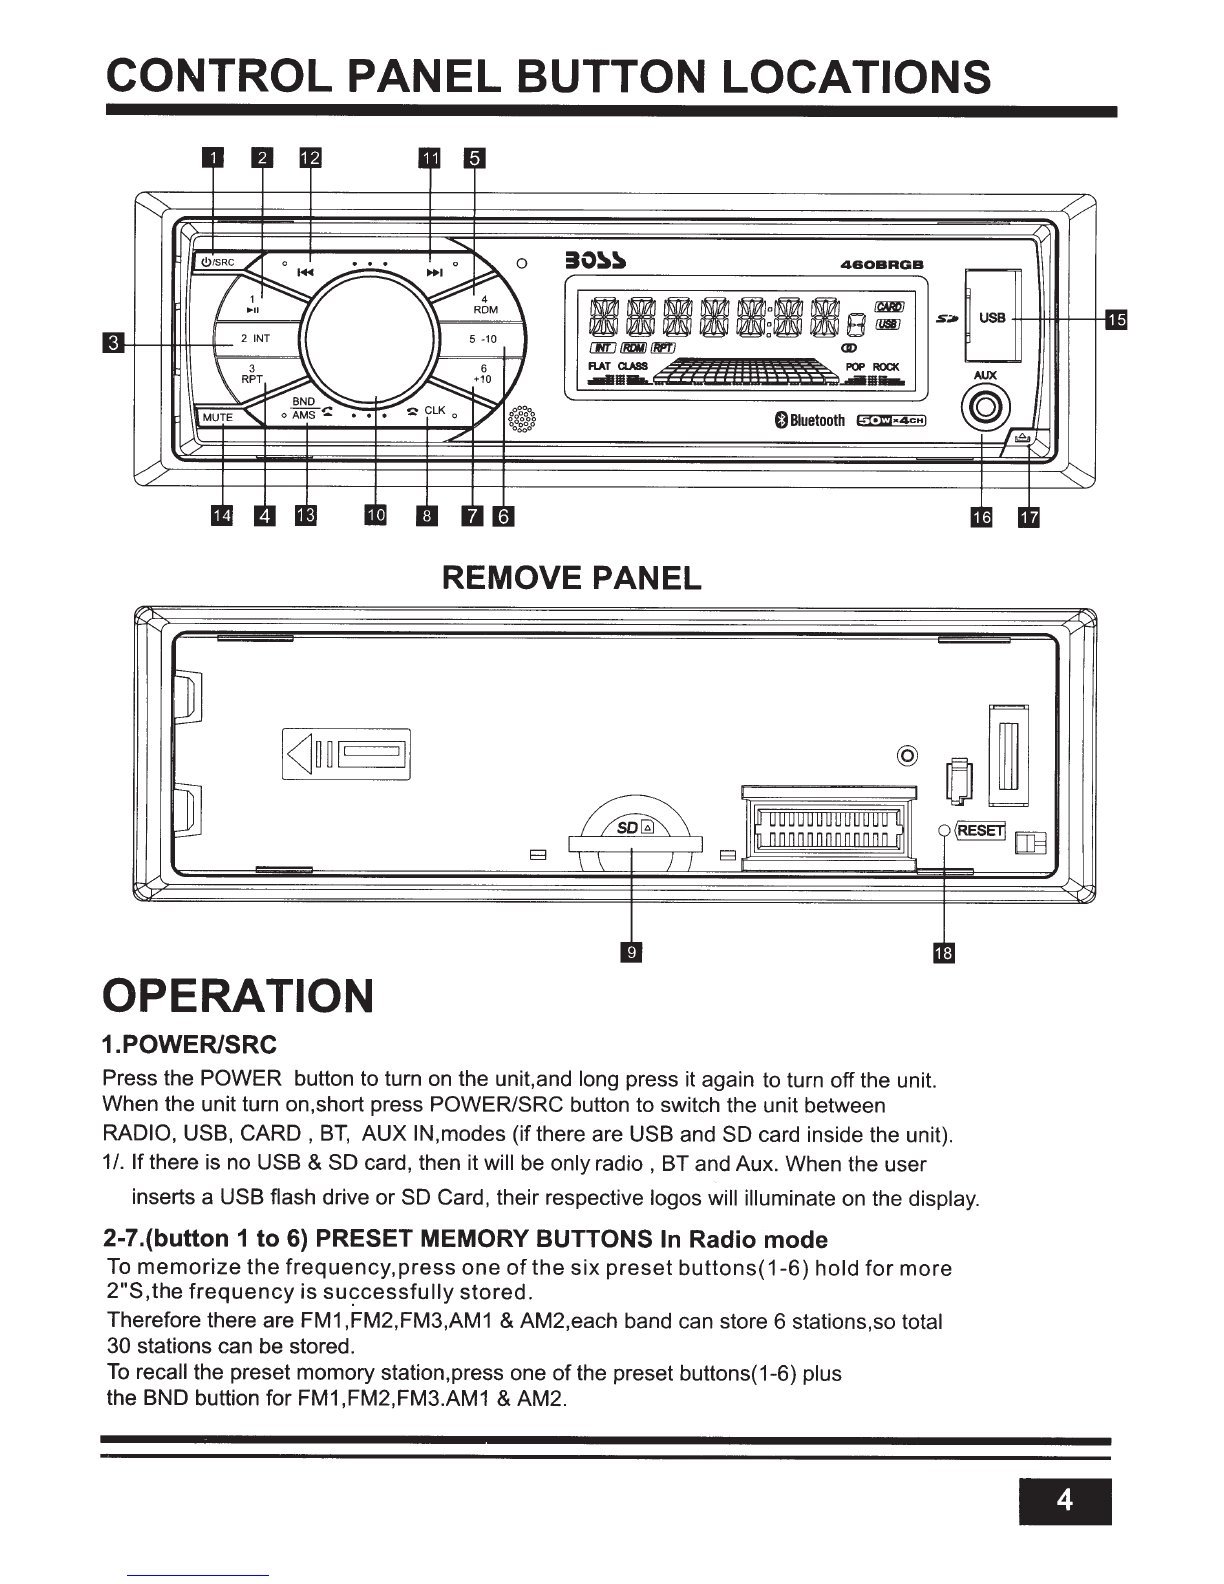
Control Panel Button Locations..................................................................................................................4
Operation ................................................................................................................................................... 4
PowerI SRC ··········································································································································· 4
Change the Source (SRC) ····················································································································4
Store/Recall Preset Stations
(1
-6)·························································............................................... 4
Play/Pause, Intra, Repeat, Random, Tracks playbaGk···········································································5
Track/Folder Navigation ······································
··
·················································································5
Set the Clock (CLK) .............................................................................................................................. 5
Insert
SO
Card ·······································································································································5
Adjust Volume (VOL) ·············································································································
·.
·............. 5
Switch Between US and EU Frequency·································································································5
Manual Tuning
(1<<
I >>I) ····················································································································· 5
Auto Seek Tuning (I<< I >>I).................................................................................................................. 5
Next/Previous Track...............................................................................................................................5
Fast Forward/Backward ························································································································5
Change Bands (BAND)·························································································································· 6
Automatic Music Search (AMS) ············································································································-6
Track Search··········································································································································6
Mute······················································································································································ 6
Insert USB ·············································································································································6
AUXIn
Jack ·········································································································································· 6
Release Panel ····································································································································
···6
Reset System (RESET) ·························································································································7
Bluetooth Operation....................................................................................................................................7
Pair and Connect ...................................................................................................................................7
Make a Call ............................................................................................................................................7
Redial Last Dialed Number ...................................................................................................................7
Answer a Call .........................................................................................................................................7
End a Call ..............................................................................................................................................7
Switch Audio Between Car and Phone ..................................................................................................7
Adjust Talk Volume.................................................................................................................................7
Bluetooth Music (A2DP).........................................................................................................................7
Remote Control .........................................................................................................................................8
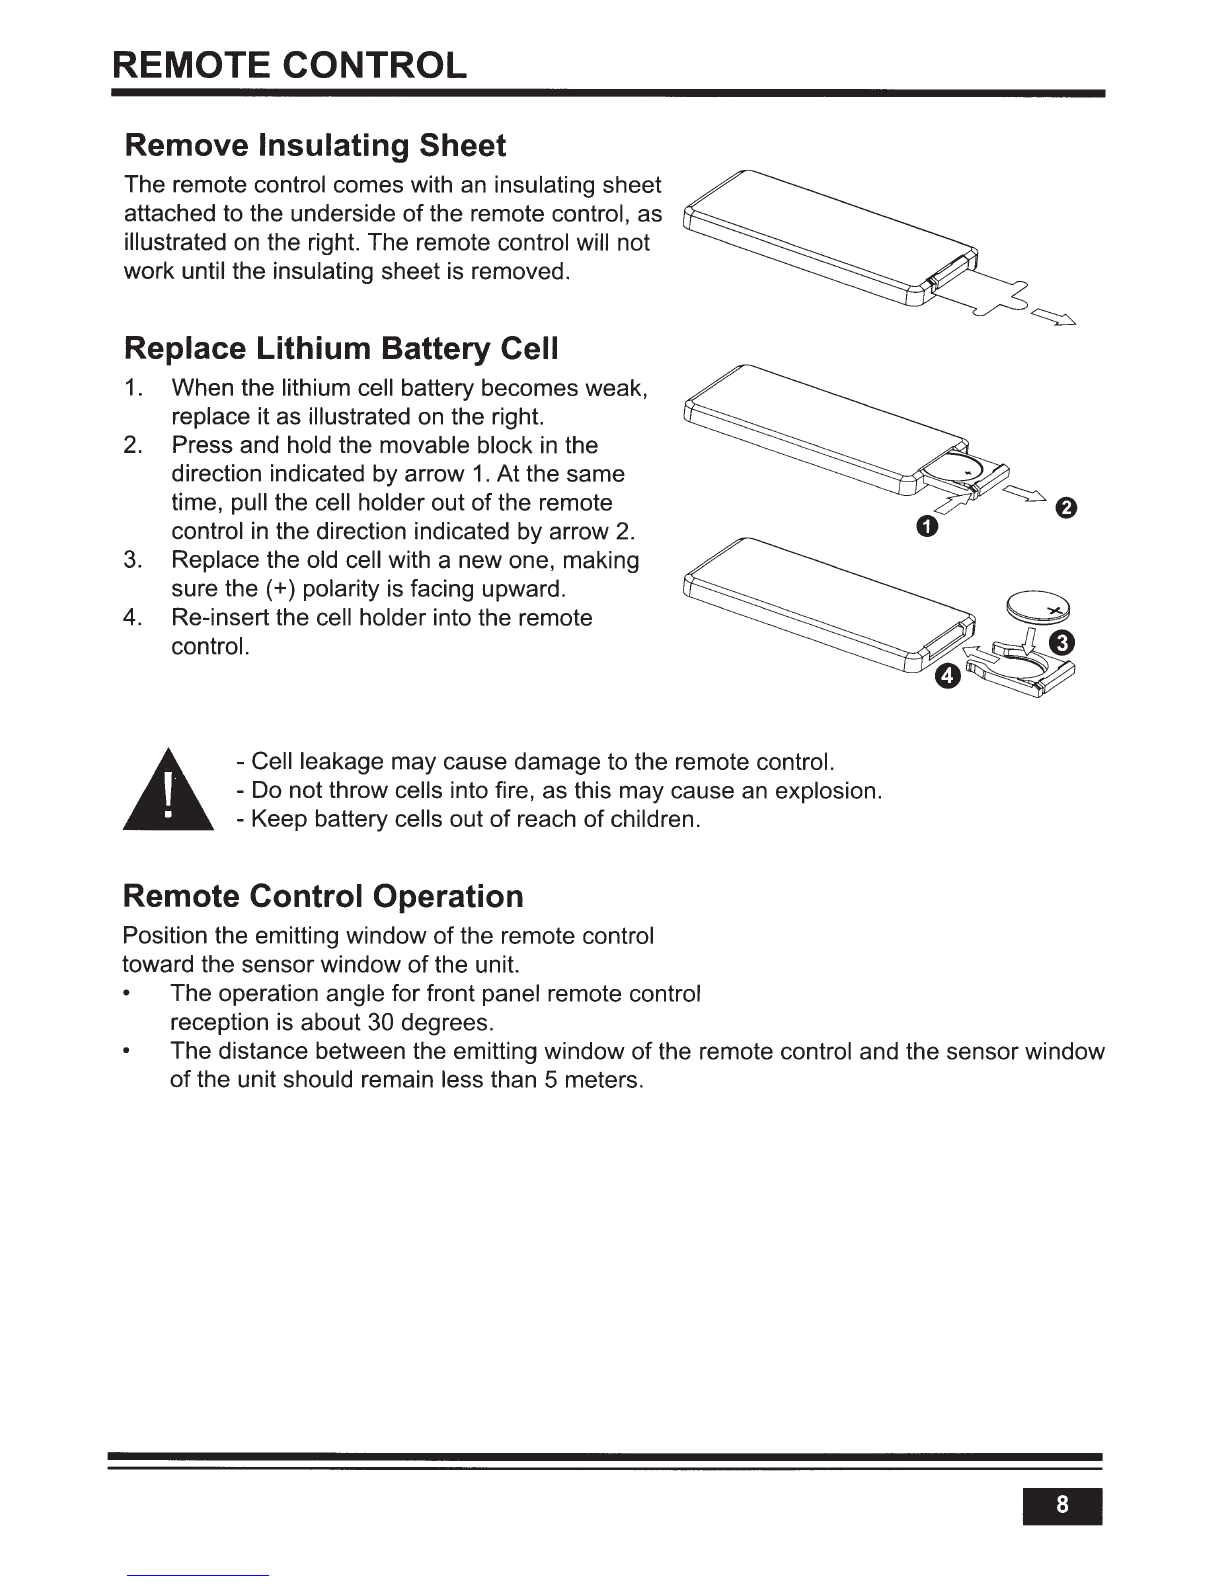
Remove Insulating Sheet....................................................................................................................... 8
Replace Lithium Battery Cell.................................................................................................................. 8
Remote Control Operation ..................................................................................................................... 8
Button Names and Locations................................................................................................................. 9
Troubleshooting.......................................................................................................................................
··1
o
Specifications ...........................................................................................................................................
·11

PRECAUTIONS
Lithium Battery Cell Warnings
Cell leakage may cause damage to the remote control.
Do not throw cells into fire,
as this may cause
an
explosion.
Keep battery cells out of reach of children.
Use cautions
•
To
reduce
the risk
of
fire,
electric
shock, and
annoying
interference,
do
not
•
•
•
•
•
•
•
repair
yourself.
Please
refer
serving
to
qualified
person.
Some MP3/WMAfiles may not be playable.
Keep
lower
volumes
to
concentrate
on
traffic
and road
conditions
for
safety
driving
.
If
users'
car
is
under
sunlight
for
sometime,
please
lower
the
temperature
inside
the
car
then
start
the
player
operation.
If
the
battery
is
disconnected
or
discharged
or
changed,
the
preset
memory
will be
erased
and
must
be
reprogrammed.
Installation
of
unit
is
better
at
a
horizontal
position,
or
if
it is
at
an angle, it
may
be
not
working
at
its
best
situation.
Never
use
force
or
grip
the
display
and
the
buttons
tightly
when
removing
or
attaching,
Be sure to lower the volume before switching off the unit or the ignition key.

INSTALLATION
Installation Procedures
First complete the electrical connections and then check for correctness.
Installation Opening
[.__
________
E.•s
inch
1----
7.20
inch---+~
This unit can be installed
in
any dashboard
Having an opening as shown above .
Insert mounting collar into the dashboard and bend
the mounting tabs out with a screwdriver.
Make sure that lock
lever(~)
is
flush with the mounting
collar( not projecting outward).
Secure the rear of the unit.
After fixing mounting bolt and power connector, fix the rear ofthe
unit to the car body by bubber cushion.
..

INSTALLATION(CONT.)
-Only use speakers with 4 ohms impedance.
-Do not attach the control panel to the chassis before wiring is complete.
-The maximum current
of
the auto antenna is 200mA.
Wiring Connections
WIRING
DIAGRAM
Red
:
Front
Right
PRE-AMP
Output
Red
:
Rear
Right
PRE-AMP
Output
White
:
Rear
Left
PRE-AMP
Output
Purple+
Rear
Right
Speaker
[)=
=
==:::'J
Purple/Black-
Gray+
t
f15AMP~
1-+-----
FUSE REPLACEMENT
WITH ATO TYPE ONLY
l-'====(]
Rear
Left
Speaker
Green/Black
-
CAUTION
+12V
DC
NEGATIVE
GROUND
White+
Front
Right
Speaker
D==
=
===='J
L':::====(]
Front
Left
Speaker
ANT+
(Blue)
Power
B +
(Yellow)
Gray/Black-
White/Black-
Uninstall the Main Unit
1. Remove the metal strap from the main unit.
2. Remove the plastic trim out from the main unit.
3.
Insert a bracket key into the left and right side
of
the main unit and draw the unit out
of
the mounting sleeve.

CONTROL PANEL BUTTON LOCATIONS
••
I~
II
460BRGB
lllll~lls=
[l!f]
{g)
mJ
CJI)
~==&illb
dill&b::...:.:.
0Biuetooth
f04•Mx4c"l
REMOVE PANEL
"
~
I<J~~Ic=::JII
@
~~
~
~
~
~~~~~~~~~~~~~
~
0
(RESETj
[lB
L I
E3
J
J
E3
-\ \
v
1•1
mta
OPERATION
1.POWERISRC
Press the
POWER
button to turn on the unit,and long press it again to turn
off
the unit.
When the unit turn on,short press
POWER/SRC
button to switch the unit between
RADIO, USB,
CARD
,
BT,
AUX
IN,modes (if there are
USB
and SD card inside the unit).
1/.
If
there is no USB & SD card, then it will be only
radio,
BT and Aux. When the
user
inserts a
USB
flash drive
or
SD Card, their respective logos will illuminate on the display.
2-7.(button 1
to
6)
PRESET MEMORY BUTTONS In Radio
mode
To
memorize
the
frequency,
press
one
of
the
six
preset
buttons(1-6)
hold
for
more
2"S,the
frequency
is
su~cessfully
stored.
Therefore there are FM1,FM2,FM3,AM1 & AM2,each band can store 6 stations,so total
30 stations can be stored.
To
recall the preset
momory
station,press one
of
the preset buttons(1-6) plus
the BND buttion for FM1,FM2,FM3.AM1 & AM2.
f""'
"'-..,

OPERATION
During USB or
SO
card mode, press the
'1/>11'
button to pause or resume music playback.
Press the '2/INT' button to play the first 10 seconds
of
each track, press again to stop the introduction
scan, and play the current track.
Press the '3/RPT' button to repeat the current track, press again to stop repeat plaback and resume
normal playback.
Press the '4/RDM' button to play all tracks
in
random order, press again to cancel random playback.
During USB
or
SO card mode,
press
'5/-1 0' button to
go
backward
10 tracks.
Press '6/+10' button to
jump
toward
10 tracks.
During USB
or
SO
card mode, long press '5/-1 0' button to go back 1 folder.
Long press '6/+1 0' button to
go
up 1 folder. You can repeat this
function
depending
on
the number offolders. This button will have no function if the USB or SD card has no folders.
8.
CLK
Press the CLK button once to display the real time, With time appearing
on
the display.Press and hold
CLK button for more than 2 seconds until the hour flashes.
You
can adjust the HOUR by pressing the
>>I
button and
I<<
button. Then press the CLK button briefly, the minute will flash, you can adjust the
MINUTE by pressing the
>>I
button and
I<<
button.
Finally press the CLK button to confirm the time adjustments.
9.
SO
CARD SLOT
Press the
£button
to detach the front panel, and remove the front panel, then you can insert an
SO
card into this
SO
card slot, install and close the the front panel, this player will read and play
the songs
on
the
SO
card automatically.
To
remove the
SO
card from the unit, press
the£
button to detach and remove the front panel,
then push the
SO
card with your finger nail, the
SO
card will
be
ejected.
10.
VOLUME
adjustment
In
the radio mode, rotate the volume knob to increase or decrese the volume level of the sound output
Press the volume knob, it will be switching the sequence as follows:
~--•
BASS-+
TREBLE-+
BALANCE-+
FADER-+
LOUD
OFF/ON-+
EQ
OFF/FLAT/POP/CLASS/ROCK-+DX/LOC
-~
L~
VOLUME -CLR AUTO/CLR BLUE/RED/CYAN/GREEN/
PURPLE/YELLOW/GRAY-
STEREO/MONO .
Rotate the VOL knob
on
the front panel or press the VOL+/- button
on
the remote contol to adjust
the selected item.
This car radio
is
equipped 7 color-changing illumination
in
buttons. The illumination color can be preset
7 colors auto switch mode(color auto change one by one), Blue, Red, Cyan, Green, Purple, Yellow or
Gray by rotate the volume knob
on
the front panel or press the VOL+/- button
on
the remote contol.
At the radio status,press and hold the VOL button to enter switch state of the US(USA) frequency and
EU
(EUROPE) frequency,then rotate the VOL knob to select US frequency or
EU
frequency,after selecting
US or
EU
frequency,the system will switch to the selected frequency 3 seconds later.
11.FF(>>I) &12.FB(I<<)
In
the radio mode:
Long press the
>>I
or
I<<
button for more than 2 seconds, the unit will switch to manual tuning
mode, briefly press the
>>I
or
I<<
button to search the next or previous frequency step by step.
Short press the
>>I
or
I<<
button, the automatic search will start, it will search upward or downward
for the strong signal radio station within the cuttent band. The auto searching will stop until find a
station.

OPERATION
In
the USB or SD card mode:
Briefly press the
>>I
or
I<<
button to play the the next
or
previou track.
Press and hold the
>>I
or
I<<
button to fast forward
or
fast backward.
13.BND/AMS
In
radio mode,short press the BND/AMS button repeatedly to select the one ofthe radio band :
FM
1,
FM 2,FM
3,
AM1
,AM2
in
a cycle sequence. When you select a band, the word F1, F2, F3 for
FM
band,
and A
1,
A2 for AM band will
be
shown on the LCD display.
Press the BND/AMS button for several seconds,the radio searches form the current frequency and check
the signal strength until one cycle search
is
finished. When the 6 strongest stations will be stored into
the corresponding preset number within the current band. Short press the AMS button on the remote
control to scan each preset station
in
each band.
During USB or SD playback, short press the BND/AMS button to enter track search mode, then rotate
the VOL knob to select the number
of
your favorite track with high speed, then press the SEL button to
confirm and play the selected track. If no any operation
in
5 seconds,it will play the current track.
14. MUTE
Short press the MUTE button
to
turn MUTE ON/OFF, when it
is
on, the MUTE will be flash on the LCD
and no sound output. When short press again it will
be
cancelled.
15. USB PORT
16.
AUXIN
JACK
17.£
If you want to insert or remove the SD, reset the unit, remove the front panel from the head unit,
press the £ button to detach the front panel.
18.RESET
To
reset all parameters to factory default values. Press
the£
button to detach the control panel form
the head unit and remove the control panel,then use a subject with a sharp point end to thrush the RESET
hole.
..

BLUETOOTH OPERATION
Pair and Connect
Prior to using the Bluetooth device as a handsfree system for a Bluetooth-enabled mobile
phone for the first time, you must pair and connect the two devices as follows:
1.
In
any mode, prior to pairing and connecting, the BT logo flashes
in
the LCD indicating
that no device is connected.
To
begin pairing, enable BT mode on your mobile phone.
2.
When the phone finds the car audio system, the "BOSS 460BRGB" will be displayed.
3.
Choose the "BOSS 460BRGB" from the device list to pair and connect with the car audio
system. Upon confirming, the BT logo will stop flashing.
4. When pairing is complete, the mobile phone audio will automatically transfer to the car
audio system whenever a call is made or received,
or
when the mobile phone plays
music.
Make a Call
•
To
make a call, dial the call directly from the paired mobile phone.
•
To
make a call with this Bluetooth handsfree system.
a) When linking up the Bluetooth mobile phone to this car audio handsfree system, press
the
~
button to access the dial telephone number mode, then press the
"0-9",
*and#
button on the remote control to input the telephone number, the entered number will be
shown on the LCD.
b) If a number has been incorrectly input, press the DEL button
or
~
button to delete it.
c) Press the
~
button to make outgoing call.
Redial Last Dialed Number
Press and hold the
~
button on the control panel to redial the last dialed phone number.
Answer a Call
• When the mobile phone is called, the incoming telephone number displays
in
the LCD.
•
To
receive the call, press the
~
button on the control panel or remote control.
Reject or End a Call
To
reject the call
or
end
an
active call, press the
~
button.
Switch Audio Between Car and Phone
During a call, press the
VOL
knob/button to switch the audio source from the car audio
system back to your mobile phone.
Adjust Talk Volume
• During a call, use
VOL
knob
or
VOL+
and
VOL
-buttons to adjust the volume level.
• Use the MUTE button to mute sound.
Audio Streaming (A2DP)
1.
Press the {!)JSRC button to enter BT mode and display media
in
the LCD.
2.
When a mobile device
is
paired, music played through that device will automatically be
heard through the car audio system.
3.
Press the
>>I
or
I<<
button to play the next
or
previous song/file on the mobile phone.
4.
Press the
>II
button to pause
or
resume music playback
.
•

REMOTE CONTROL
Remove Insulating Sheet
The remote control comes with
an
insulating sheet
attached to the underside
of
the remote control, as
illustrated on the right. The remote control will not
work until the insulating sheet
is
removed.
Replace Lithium Battery Cell
1.
When the lithium cell battery becomes weak,
replace it as illustrated on the right.
2.
Press and hold the movable block
in
the
direction indicated by arrow
1.
At the same
time, pull the cell holder out
of
the remote
control
in
the direction indicated by arrow
2.
3.
Replace the old cell with a new one, making
sure
the(+)
polarity is facing upward.
4.
Re-insert the cell holder into the remote
control.
A -
Cell leakage may cause damage to the remote control.
-Do not throw cells into fire, as this may cause
an
explosion.
-Keep
battery cells out
of
reach
of
children.
Remote Control Operation
Position the emitting window
of
the remote control
toward the sensor window
of
the unit.
• The operation angle for front panel remote control
reception is about 30 degrees.
The distance between the emitting window
of
the remote control and the sensor window
of
the unit should remain less than 5 meters.
-

REMOTE CONTROL
Button Names and Locations
1.
Power button
2. BAND
or~
button
3.
>II
or 1 button -
~
-l
4. + 10
or
6 button 1
5.
INT (intra)
or
2 button
6. MUTE
or
DEL button 14 5 12
7.
- 10
or
5 button
8. RPT (repeat)
or
3 button 8
9. AMS (automatic music search)
or
9 button 6 17
10. LOUD (loudness)
or
8 button
11.
CLK (clock)
or~
button 3 -
11
12.
VOL
(volume) button 13
13. SEL (select) button
14. PREV (previous) button 15 4
15. ROM (random) or 4 button 7
16.
ST
(stereo)
or
7 button 16 -9
17.
NEXT
button 10
18. SRC (source)
or
*button
19. EQ(Equalizer) or 0 button 18 -
20
20. LOC
(local)#
button
Note:
To
operate remote control, pull out the plastic
from the battery compartment at back
of
remote
control. Then point remote control at unit and start. 19

TROUBLESHOOTING
If
you
suspect
something
is
wrong
immediately
switch
power
off.Do
not
use
the
unit
in
abnormal
condition,for
example
without
sound,
or
with
smoke
or
foul
smell,can
cause
fire
or
electric
shock
Immediately
stop
using
it
and
call
the
store
where
you
purchased
it.
Never
try
to
repair
the
unit
yourself
because
it
is
dangerous
to
do
so.
•
General
Car's
engine
switch
is
not
on.Turn
your
car's
key
toACC
or
ON.
Cable
is
not
correctly
connected.
Check
connection.
Fuse
is
burnt.
Replace
fuse.
Check
volume
or
mute
on/off.
Station
or
signal
is
too
weak.
Select
other
stations
of
stronger
signal
level.
~
'.::::::==============::::::
Battery
cable
is
not
correctly
connected.
Connect the battery cable to the terminal that is always live.
USB or SD card connection is not good.
Take it out and insert again.
USB
or
SD card
is
damaged or no music file inside.
Change to another USB
or
SD card,
or
record music inside
it.
..

SPECIFICATIONS
General
Power supply Requirement :
Maximum power output :
Speaker impedance :
Unit Dimensions(WxHxD) :
Weight:
Fuse:
RADIO
FM
Frequency Range USAI EUROPE:
Channel step:
AM
Frequency Range USAI EUROPE:
Channel step:
USB/Card
DC
12V
50W
X4CH
4-8
Ohm
7.0 X 2.0 X 3.8 inch
1.54
Lb
(0.7 kg)
15
A
87.5
MHz-
107.9 MHz I 87.5
MHz-
108.0MHz
200 KHz I
50
KHz
530KHz-1710KHz
I 522-1620 KHz
10KHz
I
9KHz
Usable Audio Formcrts ......................................................................................... MP3/WMA
Pre-amp Output.................................................................................................. Front and Rear
Frequency Response
..
..
..
....
.. ..
..
.. ..
..
.. .. .. .. .. ..
..
.. .. .. .. .. ..
..
.. .. .. ..
..
.. .. ..
....
..
....
.. .. .. .. .. ..
. 20 Hz -20 KHz
SIN Ratio ............................................................................................................................ 60dB
BT
BT Profile supports ..............................................Headset, Handsfree and A2DP & AVRCP profiles
Range
of
frequency................................................................................................... 2.4GHz spectrum
..


1\:>~S
AUDIO SYSTEMS

iiON
TE~
THANK
YOU
from
BOSS
AUDIO
SYSTEMS
FOR
YOUR
PURCHASE
There's a reason
we
have
been
a
leader
and
innovator
in
the
business since
1987.
Our
goal
is
for
you
to
be
completely
satisfied
with
your
purchase.
If
for
any
reason
you
are
unsatisfied,
please
let
us
be
the
first
to
know.
Contact
our
Customer
Care
dept.
at
800.999.1236
WE
WANT
YOUR POSITIVE FEEDBACK
AND
REVIEWS!
www.bossaudio.com

BO~S
AUDIO SYSTEMS
EIJJE,
BO~S
AUDIO SYSTEMS
3451
Lunar
Court
Oxnard, CA 93030
PLACE
POSTAGE
HERE

ao~s
AUDIO SYSTEMS
EUIE
HEAD
UNIT
PROD
U T
WARRANTY
LIMITED
This
product
has
a manufacturer's warranty against defects
in
materials
and
workmanship
to
the original
purchaser for a period
of
two
years
from the date-of-purchase
(DOP)
. This manufacturer warranty
is
non-transferable. The warranty
is
for repair
or
replacement at the sole discretion
of
BOSS
AUDIO
SYSTEMS
(BAS).
For
service under this warranty you need
to
return the product
to
BAS
.
If
replaced,
BAS
reserves
the right
to
replace
it
with
anew
or
reconditioned product
of
the
same
or
similar design.
Your product
may
qualify
for
afree extended warranty.
Please
see
www
.bossaudio.com
for
the qualifications and details
of
this program.
Obtain Warranty Service
Withinthe first
30
days
from theoriginal
DOP,
BAS
will
provide areturn shipping label for
any
defective product shipped from within the
50
US
States.
After the first
30
days
you
are
responsible
for
the freight
charges
incurred
to
send
the
product back
to
BAS.
To
send
a
product
in
for
warranty service you will need thefollowing:
• A Return Authorization number
(RA#).
Please
contactourTechnical Support
Team
to
receive a
RA#.
• A legible copy
of
the
proof
-of-purchase with your
name,
the name
of
the authorized dealer, the
DOP
and
the model number
of
the product requiri
ng
service.
• Enclose a note stating the problem or
issues
with the product, your daytime phone number, email
and
return shipping
address
(within the
USA
,no
P.O.
Box
please)
.
This warranty does
not
cover
any
product subjected
to
abuse,
neglect, incorrect wiring, water
or
physical
damage
or
any
attempt
to
repair or modify the product by anyone
other
than
an
BAS
Repair
Techn
i
cian.
Any
damages,
J(:!stllting from legal action
for
breach
of
expressed
or
implied warranty shall
be
limited
to
the cost
of
the original purchase price
of
the
product
. All liability
for
coincidental
damages
are
excluded under this warranty.The Customer
agrees
to
retain the original proof-of-purchase
for
establishing the effective
date
of
this warranty.
If
BAS
or
an
Authorized Dealer replace your product under warranty,the replacement productshall
be
considered
atransaction under the original warranty,
and
does
not
extend the original warranty period.
FOLD
HERE
To
register this product fill-in this form and mail this card
to
the
address shown on
the
reverse side.
For
online registration,
see
reverse side
of
this card for instructions.
NAME
AGE
ADDRESS
CITY
STATE
ZIP
E-MAIL
PHONE
MODEL
NO
.
DATE
OF
PURCHASE
PURCHASE
PRICE
PURCHASED
FROM
INSTALLED
BY
SERIAL
NUMBER
(If applicable)
VEHICLE
:
YEAR
,
MAKE
AND MODEL
0116

BO~S
AUDIO SYSTEMS
EU
J
J::,
"'·J~;f'
t
'<>:
:
;.:>-'
H EA D U N IT
~~,
p
~:
R
'
3
YEAR
WARRANTY
E
BOSS
AUDIO
SYSTEMS
(BAS)
will
extend the original manufacturer 2
YEAR
LIMITED WARRANTY on
BOSS
AUDIO
SYSTEMS
Elite
Head Units
for
an
additional 3 years
if
the
unit
is
installed
by
an
Authorized Dealer. The additional 3
YEAR
EXTENDED
WARRANTY
on
BOSS
AUDIO
SYSTEMS
Elite Head Units
will
cover
the
parts and labor
to
repair
or
replace
the
unit. All
other
conditions
of
the
original Limited Warranty applies.
Obtain Warranty Service
Customer
is
responsible
for
freight charges in.curre<]
to
send
unit
back
to
BAS
after
the
first
30
days
from
original date
of
purchase.
To
send a
product
in
for
warranty service you
will
need
the
following:
• A Return Authorization number
(RA#).
Please
conta~t
<;>.t.Jr
,
T~s:hnical
Support
Team
to
receive a
RA#.
• A legible copy
of
the
proof-of-purchase
with
your name,
the
r1a(Oe
,
of
the
authorized dealer,
the
DOP
and
the
model number
of
the
product
requiring service.
• Enclose a
note
stating
the
problem
or
issues
with
the
product,
yourdaytime
phone number, email and return shipping address (within
the
USA,
no
P.O.
Box
please).
warranty does
not
cover any
product
subjected
to
abuse,
neglect,
incorrect
wiring,
the
product
by anyone
other
than
an
BAS
Repair Technician. Any damages, resulting
from
legal
omtsrc
:
ar
damage
or
any
attempt
to
repair
or
modify
for
breach
of
expressed
or
implied warranty shall
be
limited
to
the
cost
of
the
original purchase price
of
the
product. All liability
for
coincidental damages are excluded under this warranty. The
Customer
agrees
to
retain
the
original proof-of-purchase
for
establishing the effective date
of
this warranty.
If
BAS
your
product
under warranty,
the
replacement
product
shall
be
considered atransaction under
the
original
\A/,
....
,.,,
...
"
,,,
,.
.
,.
warranty period.
www.bossaud
io.com
Technical Support: 805.322.8794 I www.bossaudio.com/support/te
0116
Table of contents
Other Boss Audio Systems Stereo Receiver manuals

Boss Audio Systems
Boss Audio Systems BV765BLC User manual

Boss Audio Systems
Boss Audio Systems BVCP9675 User manual

Boss Audio Systems
Boss Audio Systems BVCP9675 User manual

Boss Audio Systems
Boss Audio Systems MGR450B User manual

Boss Audio Systems
Boss Audio Systems 634CA User manual

Boss Audio Systems
Boss Audio Systems MR1580DI User manual

Boss Audio Systems
Boss Audio Systems MR1580DI User manual

Boss Audio Systems
Boss Audio Systems 616UAB User manual

Boss Audio Systems
Boss Audio Systems MR637U User manual