Boss marine MR3.6V User manual

4
10 R - 02 1011

E - 1
Keep the volume level Iow enough to be aware
of your surroundings and environment.
Do not expose the product to water or
excessive moisture. This could cause electrical
shorts, fire or other damage.
Parking in direct sunlight can produce very
high temperatures inside your vehicle. Give the
interior a chance to cool down before starting
playback.
This product is designed to operate with a 12
volt DC, negative ground battery system (the
regular system in a North American vehicle).
Avoid inserting any foreign objects into the slot
of this player. Failure to follow this may cause
malfunction or permanent damage due to the
precise mechanism of this unit.
In some countries, it's unlawful to operate a
vehicle while video is displayed in the
driver's viewing area. Please always switch
the unit's display to "Font Type Display"
mode by pressing the DISP button while
driving.
For safety reason, the driver should only
enjoy / watch the video while the car is in
parking mode.
USE OF CONTROLS OR ADJUSTMENTS OR
PERFORMANCE OR PROCEDURES OTHER
THAN THOSE SPECIFIED HEREIN MAY
RESULT IN HAZARDOUS RADIATION
EXPOSURE.
DO NOT OPEN COVERS AND DO NOT
REPAIR BY YOURSELF PLEASE REFER
SERVICING TO A QUALIFIED
TECHNICIAN.
This product incorporates copyright protection
technology that is protected by method claims
of certain U.S. Patents and other intellectual
property rights owned by Macrovision
Corporation and other rights owners. Use of
this copyright protection technology must be
authorized by Macrovision Corporation, and is
intended for home and other limited viewing
uses only unless
otherwise authorized by Macrovision
Corporation. Reverse engineering or
disassembly is prohibited.
In order to avoid any accident, the driver
must not watch video while driving. This unit
is designed to not allow watching moving
video while driving. Park your car or boat in a
safe place and engage the ‘PARKING
BRAKE WIRE' before watching a video.
WARNINGS
When Using
When Washing
When Parked
Use the Proper Power Supply
Protect the Disc Mechanism
CAUTION
CAUTION
CAUTION
NOTE:
1. TO REDUCE THE RISK OF FIRE OR
ELECTRIC SHOCK, DO NOT EXPOSE
THIS EQUIPMENT TO RAIN OR
MOISTURE.
2. TO REDUCE THE RISK OF FIRE OR
ELECTRIC SHOCK, AND ANNOYING
INTERFERENCE, USE ONLY THE
RECOMMENDED ACCESSORIES.
3. THIS DEVICE IS INTENDED FOR
CONTINUOUS OPERATION.
THIS MOBILE MultiMedia PLAYER IS A
CLASS I LASER PRODUCT. THIS UNIT USES
A VISIBLE/INVISIBLE LASER BEAM WHICH
COULD CAUSE HAZARDOUS RADIATION IF
EXPOSED DIRECTLY. BE SURE TO
OPERATE THE MOBILE MultiMedia PLAYER
CORRECTLY AS INSTRUCTED.

DISC AND FORMAT SUPPORTS
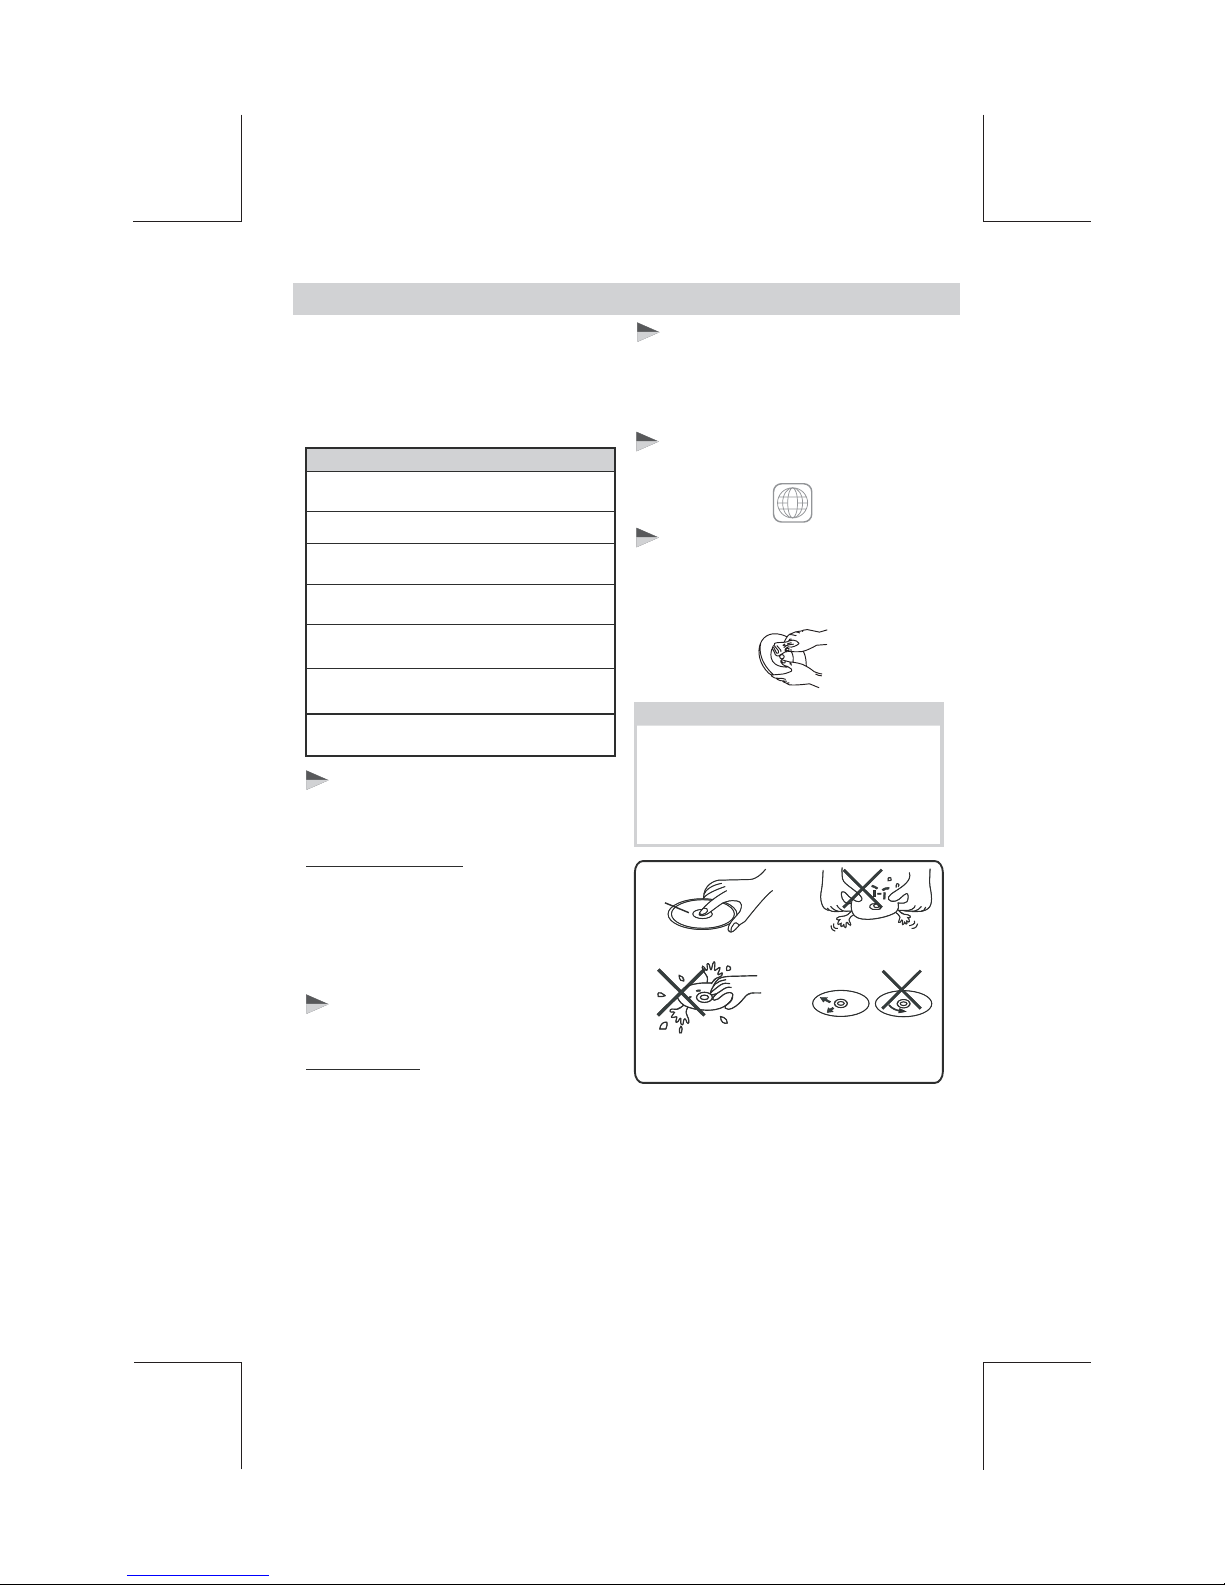
Wipe the disc surface
from the
Label side
Up
Do not bend
Never touch
the under side
of a disc
Note on Region Code
Disc Maintenance
Note of MP3 and WMA:
Noted of MPEG4
Digital Versatile Discs (MultiMedias)
Disc format
Video CDs (VCDs)
DigitalVersatileDiscsRecordable
(MultiMedia+/-R)
DigitalVersatileDiscsRewritable
(MultiMedia+/-RW)
Compact Discs (CDs)
CD Recordable (CD-R)
CD Rewritable (CD-RW)
Audio Format
Video Format
Unsupported Discs
8 cm Disc
CDV, CDI, CDG,
LD
MultiMedia RAM
E - 2
NOTE
center to the edge.
This unit can play various video/audio format
which stored into Disc/USB or SD card on
Media Player.
The following chart helps you to check if a
disc is supported by this unit, as well as what
functions are available for a given disc type.
Supported decoding MPEG-4 video defined by
ISO 14496-2 Standard:
1. Simple Profile (SP) and
2. Advance Simple Profile (ASP)
Supported file format: MP4 and .M4a (audio
only)
Support Maximum 2000 files
Maximum 30 characters display
Supported Sampling frequencies; 32kHz,
44.1kHz, 48kHz.
Supported Bit-Rates: 64-256 kbps variable bit
rate
Before playing, wipe the disc using a clean
cloth, working from the center hole towards the
outside edge.
Never use benzene, thinners, cleaning fluids or
anti-static liquids or any other solvent.
A disc may become somewhat scratched
(although not enough to make it unusable)
depending on you handle it and conditions
in the usage environment. Note these
scratches are not an indication of any
problem with the player.
Playback CD-DA and MP3 or WMA digital
music file on CD-ROM or MultiMedia-
USB or Memory Card.
ROM or
Playback IMAGE JPEG, MultiMedia Video, MPEG4 .
On CD-ROM or MultiMedia-ROM or USB or SD.card
MultiMediaplayers and
Have their own
Can playthe disc of al ALL regioncode numbers.
MultiMedia Video discs
Region Code numbers. This unit
l

E - 3
INSTALLATION
The following illustration shows a typical installation. If you have any questions or require
information regarding installation kits, consult your customer car audio dealer or a company
suppling kits.
If you are not sure how to install this unit correctly, have it installed by a qualified technician.
3
4
182m m
3mm
5
1
21
2
3
123
Trim Plate
Screw
Dashboard
Sleeve
Bend the appropriatetabs
to hold the sleevefirmly
in place.
Trim
Plate
Control
Panel
To attach the front panel back to the unit
chassis, firstly join the right guide block
hole to the right cylinder (Step ), then
join the left guide block hole and the left
cylinder
(Step ).
Step 1
Step 2
1
2
When you stand the unit, be careful
not to damage the fuse on the rear.
Sleeve
Disassembly
tool
Before removing the unit, release the rear section.
Removing the unit
When using the optional stay When installing the unit without
using the sleeve
Step
1
Step
2
1. Press the Panel Release Button
2. After flipping down the front panel, push rightwards
(), then
draw the left of the ( ).
.
Step
1
To remove the front panel
Step
2
Trim Plate Insert the two disassembly tools, then pull
them as illuatrated so that the unit can be
removed.
Disassembly
tools
Release
30°
Dashboard
Nut
Stay(option)
Screw(4x12mm)
Washer
Screw
Sleeve
Install the unit at an angle
of less than 30°.
Screw
Screw
Bracket
Installation using the screw holes on the sides of the unit.
Fastening the unit to the factory radio mounting bracket.

E - 4
CONNECTING THE SYSTEM
About Parking Wire
In order to avoid any accident, the driver must
not watch video while driving. This unit is
designed to not allow watching video while
driving. Park your car ro boat in a safe place
and engage the parking brake before watching
moving video.
CAUTION
NOTE
When the Parking Brake is NOT Engaged,
the Video Blocking System will only affect
the unit's display. The Video Output thru
the rear RCA is not affected.
TIPS
Be sure to connect the Parking Brake
connection lead. ( please see more details
on “ Wiring Diagram.”)
NOTE
NOTE
When watching a video from Disc or AV IN
sources, the video signal will be blocked
by the system IF the Parking Brake is not
properly connected.
When using this product in a boat, the
parking brake wire must be grounded with
the black ground wire of the unit.
Tips
Be sure to connect Reverse wire properly.
(please see more details on “ Wiring
Diagram.”)
If user connected a back up camera system
to this unit, when the vehicle is in reverse
Gear (Back Up mode), the front in-dash TFT
display will automatically switch to Back Up
Camera Video signal regardless whatever
mode is currently displayed on the front in-
dash TFT.
About The Reverse Wire For
Back Up Camera System

E - 5
CONNECTING THE SYSTEM
ISO CONNECTO
SOCKET
ANTENNA
EXTENDER
CABLE
ANTENNA
JACK
BLACK
(See Figure 1)
R-CH
RED
WHITE
L-CH
BLACK
FRONT LINE OUT
YELLOW
YELLOW
RED
WHITE
VIDEO OUT
BACK UP CAMERA IN
OR VIDEO IN
SUB-W OUT
FEMALE WITH MALE TERMINAL
ISO CONNECTOR 4PIN+8PIN
ISO CONNECTOR WIRING CHART
GROUND
FUNCTION/LABEL
BATTERY(+)
POWER ANTENNA
IGNITION(ACC)
RIGHT REAR SPEAKER (+)
RIGHT FRONT SPEAKER (+)
LEFT FRONT SPEAKER (+)
LEFT FRONT SPEAKER (-)
RIGHT FRONT SPEAKER (-)
LEFT REAR SPEAKER (-)
LEFT REAR SPEAKER (+)
RIGHT REAR SPEAKER (-)
BLACK
A8
B1
B8
B6
B5
B4
B3
B7
B2
VIOLET
GREEN/BLACK
WHITE/BLACK
GREEN
GREY/BLACK
VIOLET/BLACK
WHITE
GREY
FUSE
5
6
31
24
7
8
5
6
31
24
7
8
A5
A7
A4
PIN WIRE COLOR
YELLOW
RED
BLUE
Figure 1
CONNECTOR A
CONNECTOR B
SUB-W OUT
REAR
L
R
ISO MALE CONNECTOR
RED
WHITE
REAR LINE OUT
RCA TO RCA CABLE
NOT INCLUDED
RCA TO RCA CABLE
NOT INCLUDED
PARKING
PINK
BRAKE ( )
2.5m extension wire
Connect to Parking Brake.
Ground
Brake
Switch
ORANGE
P
R
N
D
2
L
Gearbox
Switch
Reverse gear signal
Connect to Back Lamp Lead +
REVERSE(+)
OVERRIDE
WIRE
Wiring Diagram
AMP
RCA-TO-RCA CABLE
(not supplied)
AMP
SUB
WOOFER
AUDIO IN (RIGHT)
AUDIO IN (LEFT)
AUDIO IN L
VIDEO OUT
AUDIO IN R
VIDEO IN
VCR or MultiMedia
or
GAME CONSOLE
Note: When using this product in a boat,
the parking brake wire must be grounded
with the black ground wire of the unit.

E - 6
1415 12
13
THE FUNCTIONS OF MAIN UNIT
No. Item Decriptions
(RELEASE)
ENCODER
VOLUME
FUNC
(FUNCTION)
XBS
BAND
AUDIO/SYSTEM
MENU
1
2
3
4
Press this button to open the control panel.
Rotate the Encoder Volume Knob to increase and decrease the
volume. ( The Maximum volume level is “46”.)
Press this button to enter into the Function mode.
Hold & press this button to turn On/Off the Bass booster function.
Under Media playback mode, short press this button to Pause/
Resume Play the music.
Under Tuner mode, short press this button to change between
BAND FM1, FM2, FM3, AM1(MW1).
Short press this button to access into the Audio Menu mode.
5
Hold & press this button to access into the System Menu mode.
(PLAY/PAUSE)
12
3
4
5
6
789
10
11
16
17

E - 7
THE FUNCTIONS OF MAIN UNIT
DISP
(DISPLAY)
MUTE
LIST
TUNE UP/DOWN
FILE UP/DOWN
FAST BACKWARD
/ FORWARD
SOURCE
EJECT
DISC SLOT
RESET
SD CARD
SLOT
ESC
DIM
(POWER)
EQ
6
7
8
9
10
12
13
14
15
16
17
11
Under Media playback mode, short press this button to switch
between OSD display or Video display mode.
Short press this button to turn the Mute On/Off.
Under tuner mode,press this button to stored
station.
Show The List of
Under tuner mode, press and hold this button momentarily to
enter into the Auto Seek/ Manual Seek mode.
Under media playback mode, press these buttons to skip a
chapter / track / scene / file.
Under media playback mode, press and hold momentarily to
fast forward / backward the Disc.
Press this button to select different source playback mode:
TUNER / DISC / USB / SD / AV IN MODE
Press this button to eject the Disc.
Insert the disc into CD slot.The CD will begin to play.
User can reset the unit to its default setting. Press this button
by using a ball-point .pen or sharp object
This unit can support playback MP3/WMA/JPEG/MPEG4/
DIVX format which are stored on the SD Card.
This unit can support playback MP3/WMA/JPEG/MPEG4/
DIVX format which are stored on the USB memory stick.
This unit is allowed to connect with external Audio/Video
system such like Digital Camera or Game Console. User
can connect the external A/V system thru the A/V in jack on
front panel.
Press this button to quick return previous menu or mode.
Hold & press this button to adjust the TFT dimmer High or
Low.
Under the Media playback mode, press this button to list the
searching of Tracks or Files on the Media playback mode.
Under the MultiMedia/MP4 mode, press this button to list the
searching of MultiMedia Root Menu or Files on the playback mode.
Under the VCD mode, press this button to turn On/Off the
PCB function.
Press this button or any other button on the front panel
(except Release button) to turn the unit on. Hold & press this
button again to turn the unit off.
Hold & press this button to select the preset Equalizer setting:
OFF -> ROCK -> POP -> JAZZ -> TECHNO -> CLASSIC
( The USB slot behind the
USB/AV-IN jack door.)
USB SLOT
(The AV-IN slot behind
the USB/AV-IN jack door.)
AV-IN JACK
PWR

E - 8
THE FUNCTIONS OF REMOTE CONTROL
No. Button Item Decriptions
1POWER ON
OFF
MUTE
AUDIO MENU
SYSTEM MENU
SOURCE
VOLUME +
VOLUME -
EQ
Press this button to turn the Mute On / Off.
Press this button to turn On / Off the unit.
Press this button to enter into the Audio Menu mode.
Hold & press this button to enter into the System Menu mode.
Press this button to enter into the SOURCE mode.
Press this button to increase the volume.
Press this button to decrease the volume.
Press this button to enter into the preset Equalizer setting
mode.
Under the tuner mode, press this button to access the
Manual Seek mode.
Under the media playback mode, press this button fast
forward through the music under media player mode.
Under the tuner mode, press this button to access the
Manual Seek mode.
Under the media playback mode, press this button fast
backward through the music under media player mode.
2
3
4
5
7
8
9
6
AUDIO
EQ
10 Use these buttons to move cursor up/down/left/right.
UP/DOWN
LEFT/RIGHT
21
1
5
11
6
17
3
18
20
16
22
7
23
10
2
4
13
14
12
15
19
24
25
26
8
9
L
21

E - 9
THE FUNCTIONS OF REMOTE CONTROL
LL
F
BAND
NUMERIC
BUTTONS
Under the tuner mode, press this button access Auto Seek mode.
Under the media playback mode, press this button to skip
backward of the previous chapter.
Under the media playback mode, press this button to skip
forward of the next chapter.
Use this button to confirm the selection.
Press this button to Pause / Resume Play the music under
media playback mode.
Press this button to return previous menu. Under the tuner
mode, press this button to change the radio Band.
When in media playback mode use this button for track or
file number direct access and use when function need
numeric selection or input.
11
12
13
14
16
17
15
OSD
DISPLAY
Press OSD button and the information displayed on the TFT
may vary according to this disc or files type.
FUNCTION
LIST
GOTO
ZOOM
ANGLE
DIMMER
DISC AUDIO
SUBTITLE
TITLE
Press this button to enter into the function mode.
Under the MP3/WMA mode, press this button to direct
playback time.
Under the MultiMedia mode, press this button to direct Title/Chapter
/ Time selection.
When playback the MultiMedia, press this button repeatedly to
increase the magnification level.
Under MultiMedia mode, press this button while playing a scene
recorded with multiple angles to change the angle.
Press this button to adjust the TFT dimmer High or Low.
Under MultiMedia mode, press this button during playback to change
the audio language, if available on the disc.
Under MultiMedia mode, press this button during playback to turn
on/off subtitles and change the subtitles.
Under MultiMedia mode, press this button to bring up the Title Menu.
18
19
20
21
22
23
24
25
26
ENTER/OK
PLAY/PAUSE
~
D
GOTO
ZOOM
ANGLE
DIMMER
TITLE
SUB
TITLE
DISC
AUDIO
BAND
Under tuner mode,press this button to Show The List of
stored station.
Under the Media playback mode, press this button to list the
searching of Tracks or Files on the Media playback mode.
Under the MultiMedia/MP4 mode, press this button to list the
searching of MultiMedia Root Menu or Files on the playback mode.
Under the VCD mode, press this button to turn On/Off thePCB
function.

ADJUST AUDIO SETTINGS
E - 01
BASS (Bass Level)
TREBLE (Treble Level)
BALANCE
FADER
SUB-W (Subwoofer)
Press Audio Button to access the Audio Menu.
The below Audio Setting can be select:
User has 5 seconds to use the Encoder Volume
knob to adjust the desired Bass level range
from -6 to +6.
User has 5 seconds to use the Encoder Volume
knob to adjust the desired Treble level range
from -6 to +6.
User has 5 seconds to use the Encoder Volume
knob to adjust the Balance between the right
and left speakers from R12 (full right) to L12 (full
left). “C00” represents an equal balance
between the right and left speakers.
User has 5 seconds to use the Encoder Volume
knob to adjust the Fader between the front and
rear speakers from R12 (full rear) to F12(full
front).“C00” represents an equal balance
between the front and rear speakers.
Turn the Encoder Volume knob to select the
Subwoofer function ON / OFF.

ADJUST SYSTEM MENU SETTINGS
E - 11
DIMMER
BACK COLOR (Background)
Hold & press the Audio Button to get into the
System Menu. User can use Track Up/Down to
navigate thru the menu setting & rotate
Encoder Volume Konb to adjust the setting.
This option allows the user to select the nine
colors for the Background of the TFT screen.
User can turn the Encoder Volume Knob to
select from the below colors:
WHITE / BLACK / GRAY / BLUE / CYAN /
YELLOW / RED / PURPLE / GREEN
Turn the Encoder Volume Knob to adjust the
TFT Backlight level between High or Low.
TITLE COLOR
This option allows the user to select the seven
colors for the Title of the TFT screen. User can
turn the Encoder Volume Knob to select from
the below colors:
RED / PURPLE / GREEN / GRAY / BLUE / CYAN
/ YELLOW
FONT COLOR
BEEP TONE
This option allows the user to select the 8
colors of the fonts of the TFT screen. User
can use the Encoder Volume Knob to select
the below colors:
RED / BLUE / GRAY / CYAN / WHITE / YELLOW /
PURPLE / GREEN
The beep tone feature allows the selection of
an audible beep tone to be heard each time a
button is pressed on the face of the radio.
"BEEP TONE ON" is the default display. Rotate
the Encoder Volume Knob to select the “BEEP
TONE OFF” option.
VOLUME PGM (Programmable
Turn-on Volume)
This option allows the adjustment of the volume
level of the radio will automatically assume
when turning on. To program a specific turn on
volume level, use the Encoder Volume knob to
select "VOLUME LEVEL” level from 00 to 46.
TIME SET (CLK)
TIME FORMAT
DATE SET
INFO (Software Information)
The time on the clock will be set to 12:00 as the
default. Program the current time by rotating
the Encoder Volume Knob clockwise to adjust
the minutes and counterclockwise to adjust the
hours.
"12H" is the default setting. User can use the
Encoder Volume Knob to choose the Time
Format between “12 Hours” & “24 Hours”
Once in Date Set mode, User can use the
Encoder Volume Knob to adjust the Date /
Month / Year. Short press the AUDIO button to
confirm the entry and move to the next entry.
This is for displayed the software information of
this unit.

TUNER OPERATIONS
E - 12
BAND BUTTON
FUNCTION BUTTON (FUNC)
LIST BUTTON
TUNING UP/DOWN BUTTON
( / )
Press the BAND button to change between FM
bands and or AM(MW) bands.
Press the FUNC button under Tuner mode, the
below functions are available for Tuner mode:
Press this button to get into the Preseted
stations list, and user can use the Encoder
Volume Knob to select which preseted station
he would listen to, and press Enter button to
confirm the selection.
1. Long press these buttons to access into the
Manual Seek mode.
2. Press these buttons to access into the Auto
Seek mode, and the unit will auto search for
the next radio station.
MANUAL
STORE
AUTO
STORE
LOCAL
SEEK
AF
ON/OFF
TA
ON/OFF
PTY
TUNER
AREA
This feature is used to designate
the strength of the signals at which
the radio will stop during automatic
tuning. "Distance" is the default,
allowing the radio to stop at a
broader range of signals. To set the
unit to select only strong local
stations during automatic tuning,
press the volume control to select
the local ON/OFF.
To change AF in ON or OFF mode.
To change TA in ON or OFF mode.
You can get into the PTY list to
select the desired PTY mode.
This option allows the selection of
the frequency spacing which is
most appropriate for the area this
unit isused in, U.S.A, EUROPE
Use this funtion to saved the
current frequency to memory
station.
After Auto Stored & saved the 6
strongest stations, the unit will
automatically enter present scan
one time.
NOTE
AF, TA & PTY only appears in the
function list, after changing the Tuner Area
to “ Europe”.

ABOUT RDS
-3E 1
The RDS ( Radio Data System ) function
operate only in areas with FM stations
broadcasting RDS signals. If you tune to an
RDS station, an RDS icon, presenter, and
station/program information is displayed.
This unit support below RDS features:
Before tuning to RDS stations, you can select
program type and let the unit search only for
programs of the selected category.
If you do not want to miss traffic announcement
during enjoying music, you can turn on the TA
(Traffic Announcement) function.
The RDS signal broadcast together with the
clock time to the unit automatically.
PTY (Program Type)
TA (Receive Traffic
Announcement )
CT (Clock Time)
SPEECH GROUP
NEWS, AFFAIRS, INFO
CULTURE, SCIENCE, VARIED
SPORT, EDUCATE, DRAMA
SOCIAL, RELIGION, PHONE IN
TRAVEL, LEISURE, DOCUMENT
WEATHER,FINANCE, CHILDREN
MUSIC GROUP
POP M , ROCK M
CLASSICS, OTHER M
JAZZ, COUNTRY
EASY M, LIGHT M
NATION M, OLDIES
FOLK M, TEST, ALARM
When there is traffic announcement,
the unit switches to the tuner mode
(regardless of the current mode) and
begins to broadcast the announcemet
on traffic conditions. When the traffic
announcement is over, it returns to the
previous mode.
Traffic announcement does not cut in.
TA On
TA Off
NOTE
This unit default at USA Tuner Area. RDS
function only activated after selecting the
Tuner Area to “ Europe”.
TIPS
Please refer Tuner operation “ FUNCTION”
for details how to select the Tuner Area.
If the radio signal comming from the current
station is poor, you can turn on the AF
(Alternate Frequency) function to let the unit
search for another station with stronger signal,
but with the same program identification as the
current station automatically.
AF (Alternate Frequencies)

E - 14
MEDIA PLAYER OPERATIONS (Disc/USB/SD Card)
General Operation
PLAY/PAUSE BUTTON ( )
Press the /BAND button to
Press this button again to resume play.
pause the music.
SOURCE BUTTON
Press the SOURCE button to select DISC, USB,
SD CARD. The unit will automatically start
playback.
FUNCTION BUTTON (FUNC)
Under the Function menu,
below options for selection:
user can have the
REPEAT
RANDOM
During the disc playback, select
random “ On” to play all tracks on
a CD in random order, select
random “ Off ” will stop the
random play.
LIST SETTING
Under the Media playback, press this button
access into File List Search mode.
User can rotate the encoder Vol Knob to
navigate thru the file list within the 10 sec time
out. Press the Audio button to confirm to start
play, or to open a selected Folder.
ONE: play the current track
repeatedly.
ALL: play all tracks repeatedly
ALBUM: play all tracks in the
current folder repeatedly
File Searching
Under List Search mode, press Track Up/Down
as folder up/down on the unit.
Album Up
DISPLAY BUTTON ( DISP )
This DISPLAY interchange button can be used
to interchange between the two types of
DISPLAY INTERFACE, the 'OSD Display
Interface” & 'Media Playback Display interface'.
This is useful when playing a CD or MP3 or
WMA or other music disc and if the user prefers
to see the CD Track No/MP3 File number and
elapse time with bigger numerical fonts, the
Media Playback Display offers a better read out
for the numerical display. User can press the
DISP button to interchange from OSD Display
Interface to Media Playback Display Interface.
Media Playback Display Interface
OSD Display Interface
/...F1 064KBPS/T01 MENUETTO.WMA
01/22
00:00:16
..
T01 MENUETTO
T02_1KHZ_SINE_W
T06_10007HZ _ SIN
T05 997HZ SINE
T04_127HZ_SINE_
T03 17HZ SINE W
Filter
Repeat : Off
Mode : Normal
Music Playing
T07 19997HZ SIN
Title: T01 MENUETTO
/...F1 064KBPS/T01 MENUETTO.WMA
01/22
00:00:16
..
T01 MENUETTO
T02_1KHZ_SINE_W
T06_10007HZ _ SIN
T05 997HZ SINE
T04_127HZ_SINE_
T03 17HZ SINE W
Filter
Repeat : Off
Mode : Normal
Music Playing
T07 19997HZ SIN
Title: T01 MENUETTO
/...F1 064KBPS/T01 MENUETTO.WMA
01/22
00:00:16
..
T01 MENUETTO
T02_1KHZ_SINE_W
T06_10007HZ _ SIN
T05 997HZ SINE
T04_127HZ_SINE_
T03 17HZSINEW
Filter
Repeat : Off
Mode : Normal
Music Playing
T07 19997HZ SIN
Title: T01 MENUETTO

-5E 1
MEDIA PLAYER OPERATIONS (Disc/USB/SD Card)
TRACK/FILE SELECT ( / )
Use TRACK/FILE UP ( ) or TRACK/FILE
DOWN ( ) button to move to the next track
on the Disc mode. The selected track number
will appear on the display. Press and hold the
button for more than one second to fast
forward or fast rewind through the media.
Media playback mode will resume to normal
play when the button is released.
This unit does not support any portable
Hard disk / drive.
Click
After an SD card is inserted into the main unit
card slot, press the SOURCE button to select
card mode. The unit will start playing the files
contained on the SD card. Once the unit starts
reading the SD card successfully, the first file
on the SD card will automatically start
playback.
CAUTION
Insert the USB Stick
Back
lC ick
Front
Mode Change to SD Card
Insert the SD Card
Before removing the USB stick from the
front panel, always remember to switch
off the unit's power or switch to other
mode then remove the USB Stick. Never
try to remove the USB Stick while it is in
use. It may damage the USB Stick, may
cause permanent damage to the unit
and/or cause the unit system to freeze.
WARNING

MULTIMEDIA OPERATION
Once a MultiMedia disc is inserted into the unit, the
unit will automatically start the playback from the
beginning of the disc, and then the MultiMedia MENU
or ROOT or TITLE in the MultiMedia disc will appear
on the TFT monitor and “ROOT” will be displayed on
the TFT of the unit.
1. Press this button to pause playback.
2. Press this button again to resume normal
playback.
E - 61
Under the Function menu,
below options for selection:
user can have the
PLAY/PAUSE BUTTON ( )
FUNCTION BUTTON (FUNC)
Selecting the TV Aspect setting
allows the user to select the aspect
ratio of the TV (MultiMedia and VCD only).
The following options are available:
During playback to change the
audio language(MultiMedia/Divx only).
Under the Video Setting mode,
there are have below options for
selection: :
MultiMedia
AUDIO
VIDEO
SETTING
ASPECT
RADIO
4:3 = Aspect ratio of TV is 4:3.
16:9=Aspect ratio of TV is 16:9.
Both wide screen and 4:3
contents will fill the entire
screen.
BRIGHT: to adjust the TFT Bright
level from “01” to “09”;
CONTRAST: to adjust the TFT
Contrast level from “01” to “09”;
COLOR: to adjust the TFT Color
level from “01” to “09”;
DEFAULT: setting the Default on
will reset all options of media
function setting to factory default
setting.
1. Press these buttons to skip forward to the
beginning of the next or previous chapter.
2. Long press these buttons to fast forward or
fast rewind through the disc. Press these
buttons again to resume normal playback.
LIST BUTTON
Under the MultiMedia playback mode, press
this button can access to the MultiMedia Root
menu.
TRACK SELECT ( / )
REPEAT
DISPLAY BUTTON ( DISP )
Media Playback Display Interface
OSD Display Interface
This DISPLAY interchange button can be used
to interchange between the two types of
DISPLAY INTERFACE, the 'OSD Display
Interface” & 'Media Playback Display interface'.
This is useful when playing a CD, MP3, WMA or
other music discs. If the user prefers to see the
CD Track No/MP3 File number and elapse time
with bigger numerical fonts, the Media
Playback Display offers a better read out for the
numerical display. User can press the DISP
button to interchange from OSD Display
Interface to Media Playback Display Interface.
1. Repeat “CH”
the chapter.
2. Repeat “TITLE”
the current title.
3. Repeat “ OFF”
to repeat playback
the current
to repeat playback
to cancel all the
Repeat function.
TIPS
When the MultiMedia MENU, ROOT or
TITLE is displayed on the TFT Monitor,
rotate the Encoder Volume Knob to
navigate thru the file list. Press the Audio
button to open the folder and start
playback.

E - 17
AV-In Mode
Your can connect up to 1 AV device, press the
SOURCE button to enter into the AV mode:
AV in - 1 = Front panel AV in
TIPS
If there is no any external AV System input,
then the TFT will be show “ NO VIDEO
SIGNAL”.
AV in-1
AV in-2
This unit is allowed to connect with external
Audio/Video system such like Digital Camera
or Game Console. User can connect the
external A/V system thru the A/V in jack on front
panel.
Connect the external signal to the RCA line in
jack located at the rear of the unit , then press
SOURCE button to select AV in-2.
Select the AV Mode
Connect the A/V In
Ground
Left Track
Right Track
Connect the external signal to A/V in jack
located at the front of the panel, then press
Source button to select A/V mode. Press Mode
Button again to cancel A/V mode and retrun to
previous mode.
Video

MultiMedia / CD Section
Compatible Disc/Format
Signal to Noise Ratio
Dynamic Range
Frequency Response
Channel Separation
Video Section
Color System
Video Output
Video Input
NTSC / PAL/SCEAM
Composite 1.0 Vp-p (+/- 0.2) 75 - ohm
Audio Section
Max Output Power
Load Impedance (speakers)
Line out level / load
Line out Impedance
80W x 4 channels
4 ohms
400mV / 10k ohm load
200 ohm
Auxiliary Input Section
Frequency response
Input Maximum Voltage
Input Impedance
20Hz to 20KHz -3dB
1200 mV
4.7k ohm
Radio Section
FM
Frequency Range
Usable Sensitivity
Stereo Separation
S/N Ratio
AM or MW
Frequency Range
Usable Sensitivity
S/N Ratio
522-1620 Khz (Europe)
530-1720 (U.S.A)
< 40dB at S/N 20dB
40 dB
See “ Disc Note” for more details description
0dB
20Hz to 20Khz +/-3dB
2 Channel (Stereo) >60dB @1khz
>90dB
>9
87.5-108.0 MHz (Europe)
87.5-107.9 MHz (U.S.A)
< 15dB at S/N 30 dB
25 dB at 1KHz
50 dB
TFT Screen Section
Screen Size: 3.5(Measured Diagonally)
Screen Type: TFT Liquid Crystal Display active matrix
Resolution: 320 x 240
E - 18
General
Operating Voltage
Grounding System
Fuse:
Operating Temperature:
Unit Mounting Angle
DC 11 -14.4V
Negative Ground
15-Amp Mini ATM Type
0°Cto50°C
<30
°
SPECIFICATIONS

ERROR
Disc Error
Mechanism Error
Maybe disc dirty / disc scratched
/disc upside down.
Press the eject button to correct the problem.
If the error code does not disappear, consult
your nearest service dealer.
Replace the disc.
Symptom Cause Solution
No power The car ignition is not on. If the power supply is properly connected to
the car accessory terminal, switch the ignition
key to “ACC”
Disc cannot be
loaded or ejected
The fuse is blown. Replace the fuse.
Presence of CD disc inside
the player.
Remove the disc in the player, then
put a new one.
Inserting the disc in reverse
direction.
Insert the compact disc with the
label facing upward.
Compact disc is extremely
dirty or defective disc.
Clean the disc or try to play a new one.
Temperature inside the car is
too high.
Cool off or until the ambient temperature
returns to normal.
Condensation. Leave the player to off for an hour or so,
then try again.
Volume is in minimum. Adjust volume to a desired level.
Wiring is not properly
connected.
Check wiring connection.
The operation keys
do not work
No sound
The built-in microcomputer is
not operating properly due to
noise.
Press the RESET button.
Front panel is not properly fixed into
its place
Sound skips. The installation angle is
more than 30 degrees.
Adjust the installation angle to less
than 30 degrees.
The disc is extremely dirt or
defective disc. Clean the compact disc. Then try to play a
new one.
The antenna cable is not
connected. Insert the antenna cable firmly.
The signals are too weak. Select a station manually.
The radio does not
work.
The radio station
automatic selection
does not work.
Before going through the check list, check wiring connection. If any of the problems persist
after check list has been made, consult your nearest service dealer.
E -19
TROUBLESHOOTING
If at any time in the future you should need to dispose of this product please note
that Waste electrical products should not be disposed of with household waste.
Please recycle where facilities exist. Check with your Local Authority or retailer for
recycling advice.(Waste Electrical and Electronic Equipment Directive)
Table of contents
Other Boss marine Receiver manuals