BOT LIGHTING SHOT ORLANDO10B Technical specifications

Bot Lighting S.r.l.
Via Lombardia, 37/39
30030 Cazzago di Pianiga (VE) –Italy
www.botlighting.it
ORLANDO
MANUALE D’USO E INSTALLAZIONE
USE AND INSTALLATION MANUAL
PRECAUZIONI IMPORTANTI – IMPORTANT WARNING
•Prima di iniziare leggere attentamente questo manuale e controllare il prodotto in tutte le sue parti
affinché non vi siano danni visibili. Se si notano problemi rivolgersi al rivenditore. Conservare il manuale
per future consultazioni.
•Questo prodotto dovrà essere destinato esclusivamente all’uso per il quale è stato espressamente
concepito. Ogni altro uso sarà da considerarsi improprio.
•Il produttore non potrà essere considerato responsabile per eventuali danni a cose o persone derivanti
da un uso improprio e/o da manomissioni del prodotto acquistato.
•Il prodotto non deve essere modificato. Qualsiasi modifica annulla la garanzia.
•L’installazione deve essere eseguita solo da personale qualificato che si attenga a queste istruzioni e alle
vigenti norme sugli impianti.
•Controllare che i parametri elettrici dell'impianto siano compatibili con l'apparecchio prima di
installarlo.
•Prima di procedere all’installazione o qualsiasi altro intervento sul prodotto disinserire la tensione di
rete.
•Assicurarsi che il prodotto sia adatto alle condizioni ambientali del luogo in cui dovrà essere installato.
•Non installare il prodotto nei pressi di fonti di calore dirette.
•Installare il prodotto in una posizione in cui possa ricevere una sufficiente aerazione per consentirne
un’adeguata dissipazione termica.
•Attendere il raffreddamento del modulo prima di maneggiarlo, al fine di evitare lesioni personali.
•Per utilizzi in condizioni particolari, contattare sempre l’assistenza tecnica.
.
•Read carefully the manual before use and check that not any damage is visible. In case contact the retailer.
Keep this manual for future needs.
•This product must only be used for the purpose for which it was designed. Any other form of use should
be considered improper.
•The manufacturer cannot be held liable for any damage to property or injury to human beings if the
product is improperly or incorrectly used or tampered with.
•The product must not be modified. Any modification will void the warranty.
•Installation must only be carried out by qualified personnel, respecting these instructions and the system
standards in force.
•Check the electrical parameters of the system if they are compatible with the product before installing it.
•Before starting, make sure that the main power is switched off.
•Make sure the device is suitable for the environmental condition in which it will be working
•Do not install the product near direct heat sources.
•Install the product in a position where it can receive enough ventilation to allow adequate heat
dissipation.
•Wait for the module cool down before handling it, in order to avoid personal injury.
•For use in particular conditions, always contact technical assistance.
Bot Lighting S.r.l.
Via Lombardia, 37/39
30030 Cazzago di Pianiga (VE) –Italy
www.botlighting.it
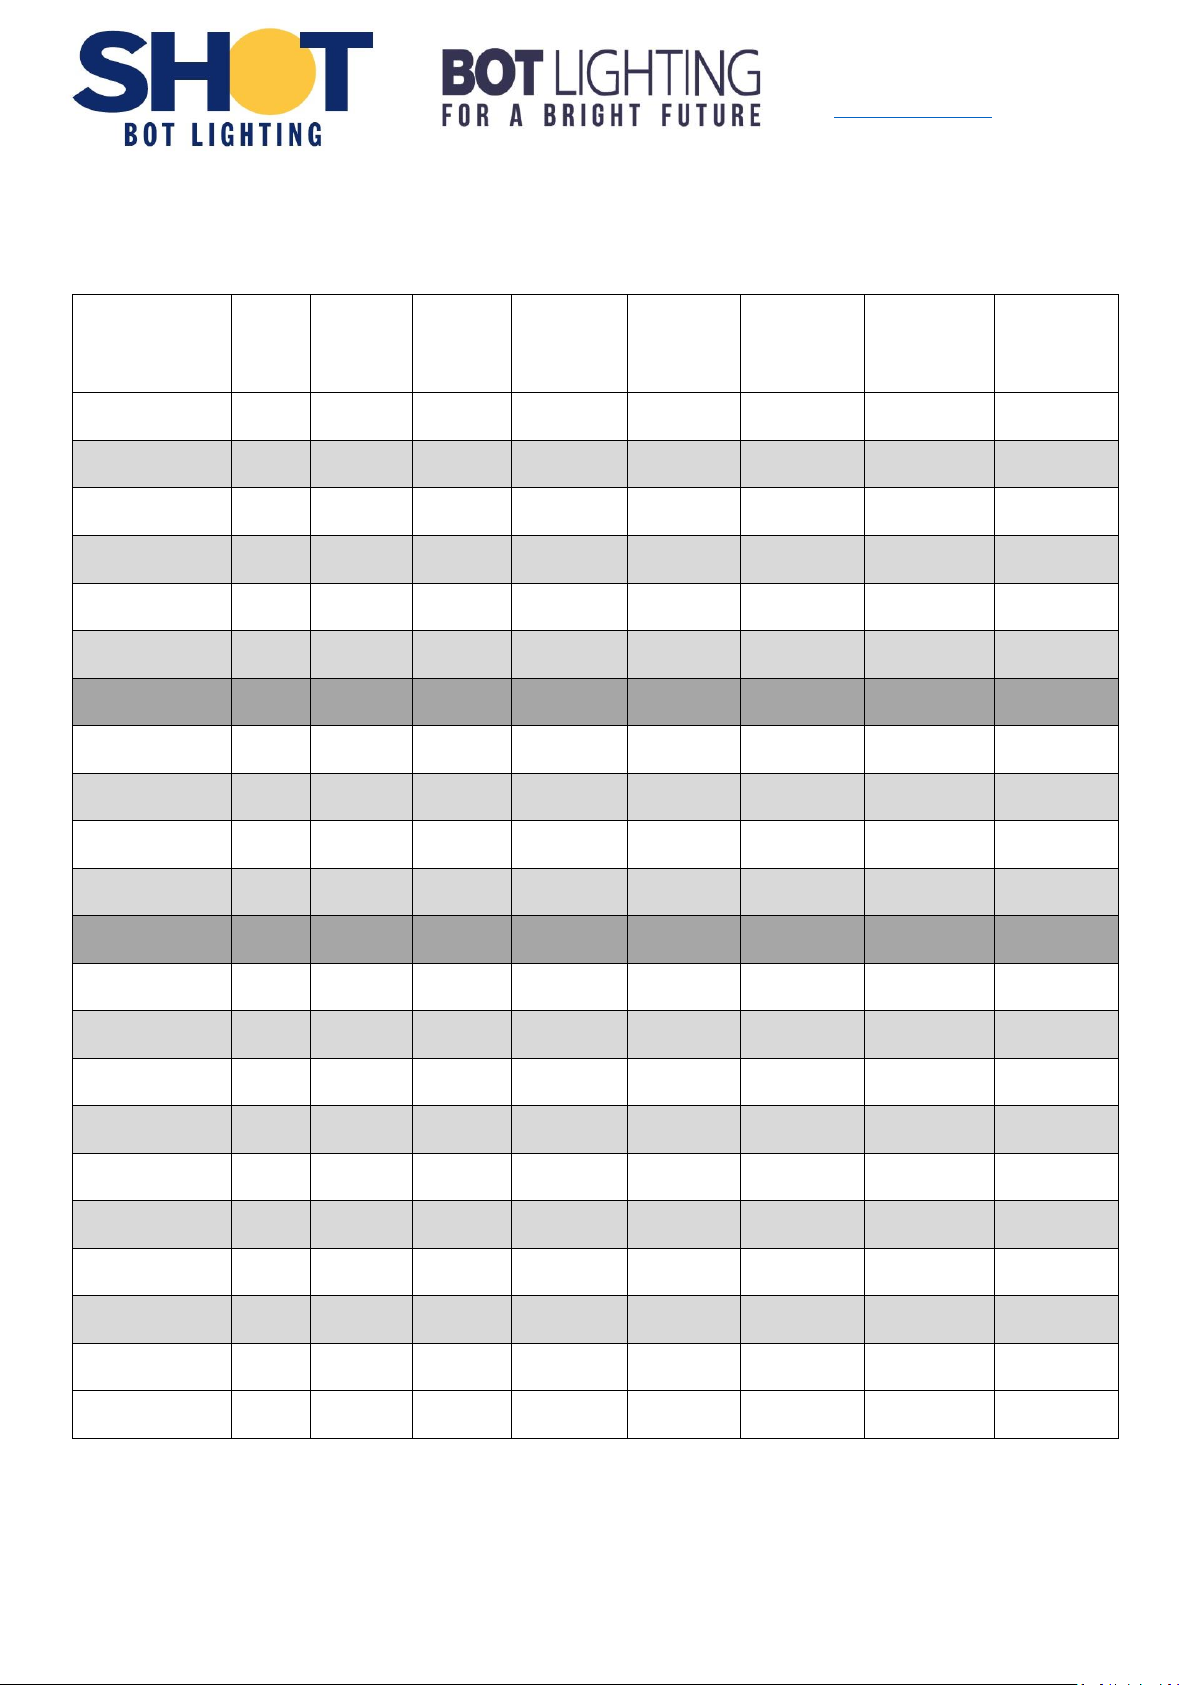
CARATTERISTICHE TECNICHE - TECHNICAL CHARACTERISTICS
MODELLO
MODEL
Potenza
Power
(W)
CCT
(°K)
Lumen
Modulo
Module
Lumen
Lumen
Apparecchio
Fixture
Lumen
Classe
Energetica
Energy
class
Dimensioni
Dimensions
(mm)
Tensione di
alimentazione
Voltage
(AC 50/60 Hz)
Temperatura
di lavoro
Working
Temperature
ORLANDO10B
10
3000
1100
1000
E
133x90x27
220 –240V
-30° - +50°C
ORLANDO10G
10
4000
1200
1100
E
133x90x27
220 –240V
-30° - +50°C
ORLANDO20B
20
3000
2500
2100
E
165x135x30
220 –240V
-30° - +50°C
ORLANDO20G
20
4000
2650
2300
E
165x135x30
220 –240V
-30° - +50°C
ORLANDO20BN
20
4000
2650
2300
E
165x135x30
220 –240V
-30° - +50°C
ORLANDO20GD
20
6500
2650
2300
E
165x135x30
220 –240V
-30° - +50°C
ORLANDO20GIR
20
4000
2650
2300
E
186x135x56
220 –240V
-30° - +50°C
ORLANDO30B
30
3000
3550
3150
E
186x135x30
220 –240V
-30° - +50°C
ORLANDO30G
30
4000
3750
3450
E
186x135x30
220 –240V
-30° - +50°C
ORLANDO30BN
30
4000
3750
3450
E
186x135x30
220 –240V
-30° - +50°C
ORLANDO30GD
30
6500
3750
3450
E
186x135x30
220 –240V
-30° - +50°C
ORLANDO30GIR
30
4000
3750
3450
E
186x135x56
220 –240V
-30° - +50°C
ORLANDO50B
50
3000
6350
5500
E
242x180x30
220 –240V
-30° - +50°C
ORLANDO50G
50
4000
6700
6000
E
242x180x30
220 –240V
-30° - +50°C
ORLANDO50BN
50
4000
6700
6000
E
242x180x30
220 –240V
-30° - +50°C
ORLANDO50GD
50
6500
6700
6000
E
242x180x30
220 –240V
-30° - +50°C
ORLANDO90B
90
3000
11600
9900
E
313x243x37
220 –240V
-30° - +50°C
ORLANDO90G
90
4000
12600
10800
D
313x243x37
220 –240V
-30° - +50°C
ORLANDO90BN
90
4000
12600
10800
D
313x243x37
220 –240V
-30° - +50°C
ORLANDO90GD
90
6500
12600
10800
D
313x243x37
220 –240V
-30° - +50°C
ORLANDO150G
150
4000
18300
16500
E
270x335x43
220 –240V
-30° - +50°C
ORLANDO200G
200
4000
24500
22000
E
307x390x49
220 –240V
-30° - +50°C
ORLANDO 10x/20x/30x/50x/90B/150G/200G:
Questo prodotto contiene una sorgente luminosa di classe di efficienza energetica E
This product contains a light source of energy efficiency class E
ORLANDO90G/90BN/90GD:
Questo prodotto contiene una sorgente luminosa di classe di efficienza energetica D
This product contains a light source of energy efficiency class D

Bot Lighting S.r.l.
Via Lombardia, 37/39
30030 Cazzago di Pianiga (VE) –Italy
www.botlighting.it
ISTRUZIONI DI INSTALLAZIONE –INSTALLATION INSTRUCTION
Quando si utilizzano apparecchi elettrici è necessario seguire le precauzioni di sicurezza di base per evitare il rischio
di incendio, scosse elettriche e danni a cose o persone. Prima di iniziare assicurarsi di aver tolto tensione all’impianto
elettrico.
When using electrical appliances safety precaution must be followed to avoid the risk of fire, electric shock and
personal injuries. Before starting, make sure that the main power is switched off.
1) Praticare due fori sulla superficie di installazione mantenendo la misura di interasse dei fori presenti sulla staffa.
Drill two holes on the installation surface keeping the same distance of the holes on the bracket.
2) Fissare l’apparecchio, con viti e i tasselli, alla superficie precedentemente forata ed effettuare il collegamento
elettrico.
Secure the fixture firmly, with screws and anchors, to the previously drilled surface and make the electrical
connection.
3) Allentare il fissaggio della staffa e orientare il proiettore nella posizione desiderata e serrare nuovamente la vite
di fissaggio, applicare una forza di torsione massima di 2,5 N/m per i modelli da 10, 20, 30 e 50 W e di 9,6 N/m
per i modelli da 90 W applicare una forza maggiore può danneggiare il prodotto.
Loosen the bracket to adjust the floodlight position, afterwards fasten the bracket on the desired position, apply
a maximum torsion force of 2.5 N / m for 10, 20, 30 and 50 W models and 9.6 N / m for 90 W models, over-force
may damage the product.
4) Una volta completata la procedura di installazione è possibile ridare tensione all’impianto.
Once the installation procedure is complete, it is possible to switch the main power on.
ORLANDO20/30GIR
Questi modelli sono dotati di un sensore di presenza PIR, il quale una volta rilevato un movimento accende il
proiettore, può essere impostato secondo le proprie necessità di sensibilità del sensore, tempo di accensione e lux
ambientali:
These models are equipped with a PIR sensor, which once detected a movement turns on the floodlight, can be set
according to your needs of sensor sensitivity, hold-time and daylight threshold:

Bot Lighting S.r.l.
Via Lombardia, 37/39
30030 Cazzago di Pianiga (VE) –Italy
www.botlighting.it
NOTE RELATIVE ALLO SMALTIMENTO - NOTES ON DISPOSAL ON WASTE MATERIAL
Il simbolo del bidone barrato indica che a fine vita il prodotto deve essere smaltito come rifiuto elettrico o elettronico (RAEE).
Secondo la direttiva 2012/19/CE, è’ vietato trattare le parti elettriche come fossero normali rifiuti urbani. Tali rifiuti sono soggetti a
raccolta differenziata organizzata dai comuni. Eventualmente contattare le autorità competenti sul territorio per avere
informazioni circa il sistema di smaltimento disponibile.
Lo smaltimento improprio di tali rifiuti o parte di essi, può danneggiare l’ambiente e la salute a causa di sostanze pericolose. Lo
smaltimento abusivo di detti rifiuti è sanzionato ai sensi del D.Lgs. 25/07/2005 n.151.
The crossed-out wheeled bin indicates that the product must be treated as an electric or electronic waste (WEEE). According to the
Directive 2012/19/EC it’s forbidden to treat electric parts as urban waste. Electric and electronic equipment must be recycled and
separated sending them to the local recycling area. Contact local authorities in case of need
Questo prodotto soddisfa i requisiti delle Direttive Europee 2014/35/UE (LVD-Direttiva Bassa Tensione), 2014/30/UE (EMC-
Compatibilità Elettromagnetica), 2011/65/UE (RoHS-Con modifica introdotta dalla Direttiva Delegata (UE) 2015/863 dalla
Commissione)
Product complying with reference European Directive 2014/35/UE (LVD-Low Voltage Directive), 2014/30/UE (EMC-Electro
Magnetic Compatibility), 2011/65/UE (RoHS-With amendments introduced by Commission Delegated Directive (EU) 2015/863)
SENS:
- Sensibilità di rilevamento del movimento da 2m fino a 8 m. Ruotare in senso orario il selettore per
diminuire la distanza di rilevamento e in senso antiorario per aumentarla.
Si può regolare la sensibilità in base ad un’area o ad una distanza di rilevamento. Regolando
l’inclinazione del sensore si può impostare l’area di rilevamento più accuratamente.
- Movement detection sensitivity from 2m up to 8m. Turn the knob clockwise to decrease, anti-clockwise
to increase the movement detection area.
You can adjust the sensitivity based on the area or the distance from the floodlight. Tilting the sensor
also can help you to find a proper location of the detection range.
SENS.
+
-
SENS.
+
-
TIME:
- Tempo di accensione dopo il rilevamento di un movimento, da 10 secondi a 8 minuti. Ruotare in senso
orario il selettore per diminuire il tempo di accensione e in senso antiorario per aumentarlo. Regolare il
tempo di accensione aiuterà il controllo automatico della luce per una durata adeguata e ridurrà
direttamente il consumo di energia.
- Duration of illumination after movement be detected, from 10 seconds to 8 minutes. Turn the knob
clockwise to decrease, anti-clockwise to increase the illumination time.
Adjusting the TIME will help automatic light controlling with a proper duration, and directly reduce the
energy consumption.
TIME
+
-
TIME
+
-
LUX:
Livello di luce ambientale da 30 lux (Icona della Luna) a 10000lux (Icona del Sole) Ruotare in senso
orario il selettore per aumentare il livello di lux sotto il quale il proiettore si accenderà e in senso
antiorario per diminuirlo. Al valore minimo di luce ambientale (Icona della Luna) il proiettore sarà
attivato solo dal tramonto all’alba in caso venisse rilevato un movimento, non si attiverà durante il
giorno. Al valore massimo di luce ambientale (Icona del Sole) il proiettore si attiverà in caso venisse
rilevato un movimento, sia di notte che di giorno.
Ambient light level from 30 lux (Moon icon) to 10000 lux (Sun icon). Turn the knob clockwise to increase,
anti-clockwise to decrease.
The minimum value (Moon icon) means light will only be triggered lighting on from Dusk to Dawn after
movement being detected. Light will not be triggered during the daylight. The maximum value means
light will be triggered lighting on once movement being detected, whenever it is day or night.
LUX
LUX
This manual suits for next models
21
Other BOT LIGHTING Lighting Equipment manuals


Popular Lighting Equipment manuals by other brands


FormaLighting
FormaLighting MOTO-ZERO LOW VOLTAGE 40 Installation instruction

EGAmaster
EGAmaster 79650 operating instructions

Show Tec
Show Tec Phantom 25 LED Wash user manual

STUDIODUE
STUDIODUE CityBeam LED 12 user manual

FOS Technologies
FOS Technologies VINTAGE 7 user manual

ledscom
ledscom LC-L-370 Assembly instructions