bover AMPHORA 01 User manual

Assemblyinstructions
Instructionsdemontage
DATA/RENSEIGNEMENTS
LIGHT/ LUMINAIRE:AMPHORA 01- 02-03
TYPOLOGY/TYPOLOGIE:FLOOR/LAMPADAIRE
YEAR/ANNÉE: 2013
MADEINSPAIN/ PRODUITENESPAGNE
ProductentirelyproducedinBarcelona.
Produitfabriqué entièrement àBarcelona.
TESTS/TESTS
Thisproducthasbeensubjectedtotheelectricalsafetytestfor:continuity,
insulation,dielectricstrength.
Ce produit a été soumis à des tests de sécurité électrique: continuité,
isolation,rigiditédiélectriqueetprisedeterre.
RAWMATERIALS /MATIÈRESPREMIÈRES
Shade made of sinthetic fibers HDEP. Resistence to UV rays and
atmosphericagents.Environmentallyfriendly.
Écran en fibre synthétique HDPE. Résistance aux rayons UV et aux
agentsatmosphériques.N’affectepas l'environnement.
CLEANING INSTRUCTIONS
INSTRUCTIONPOURLENETTOYAGE
Donotusealcoholorsolvents,useasoftcloth.
Ne pas utiliser d'alcool ou d'autres solvants, utilisez un chiffon doux.
CERTIFIEDBY/CERTIFIÉPAR
Thisproductismanufacturedaccordingtothestandards:
Ceproduit est fabriquéselonlesstandardssuivants:
Conformsto ULStd.1598
Cert.to CSAStd.C22.2 No250.0
AMPHORA01
T42xMAX20WE26
AMPHORA02-03
T42xMAX29WE26
TECHNICALDATA/ INFORMATIONS TECHNIQUES
Lightforwetlocationsuse.
Inputvoltage:120V~60Hz
Luminairepouremplacementshumides.
Tensiond'alimentation: 120V~60Hz
AMPHORA01-02-03
AlexFernándezCamps
&
GonzaloMilà
NOTE/NOTE
Incasetheflexible wiregets damaged, it must be replaced
only and exclusively by the manufacturer, its technical
serviceoranyotherqualified personinordertoavoidany
risk.
Dans le cas où le câble flexible est abîmé , il doit être
remplacé uniquement et exclusivement par le fabricant,
son service technique ou toute autre personne qualifiée
afind'évitertout risque.
BOVER IL·LUMINACIÓ& MOBILIARI SL
AvingudaCatalunya,173
Pol.Ind. Sud
08440Cardedeu
Barcelona·Spain
Tels.: +34 938713152 / +34 93 8444754
Fax:+349384620 89
e-mail:info@bover.es
e-mail:export@bover.es
www.bover.es
CAUTION
THIS PRODUCT MUST BE INSTALLED IN
ACCORDANCEWITHTHEAPPLICABLEIN-
STALLATIONCODEBYAPERSONFAMILIAR-
WITH THE CONSTRUCTION ANDOPERA-
TION OF THE PRODUCT AND THE
HAZARDSINVOLVED. NOLOOSESTRANDS
OR LOOSE CONNECTIONS SHOULD BE
PRESENT. SECURE WITH ULCERTIFIED
CONNECTORS AND ELECTRICALTAPE.
WARNING
The electricity MUST be turned off at the MAINS before
installingthisluminaire;turningthepoweroffusingthelight
switchisnotsufficienttopreventelectricalshock.
Luminairesthatweight25lbs(50lbsforU.S.A)ormoremust
bemounteddirectlytothebuildingstructure,independently
oftheelectricalbox;thisinstallationshouldnotbe madeon
aradiantyheattypeceiling.
The luminaire is not intended to support external weight
otherthantheprovidedcomponents.
ELECTRICALCONNECTION-SAFETY
Attachgroundingwire(greeninsulateor bare copper)from
the supplier circuit to the mounting bracket with the green
groundattachementscrewprovided.
Connect the grounding wire of the luminaire to the ground
conductor of the supply circuit. Attach all grounding
conductors to the mounting bracket with the green ground
wireattachmentscrew.
Referring to the Wire Connection Chart, connect the black
andwhitewires
FINALINSTALLATION
Installlightbulbs,refertotherelampinglabellocated
nearthelampholderforrecommendedwattage.
DO NOT EXCEED THE RECOMMENDED WATTAGE.
Restore electricity and check the operation of the
luminaire.
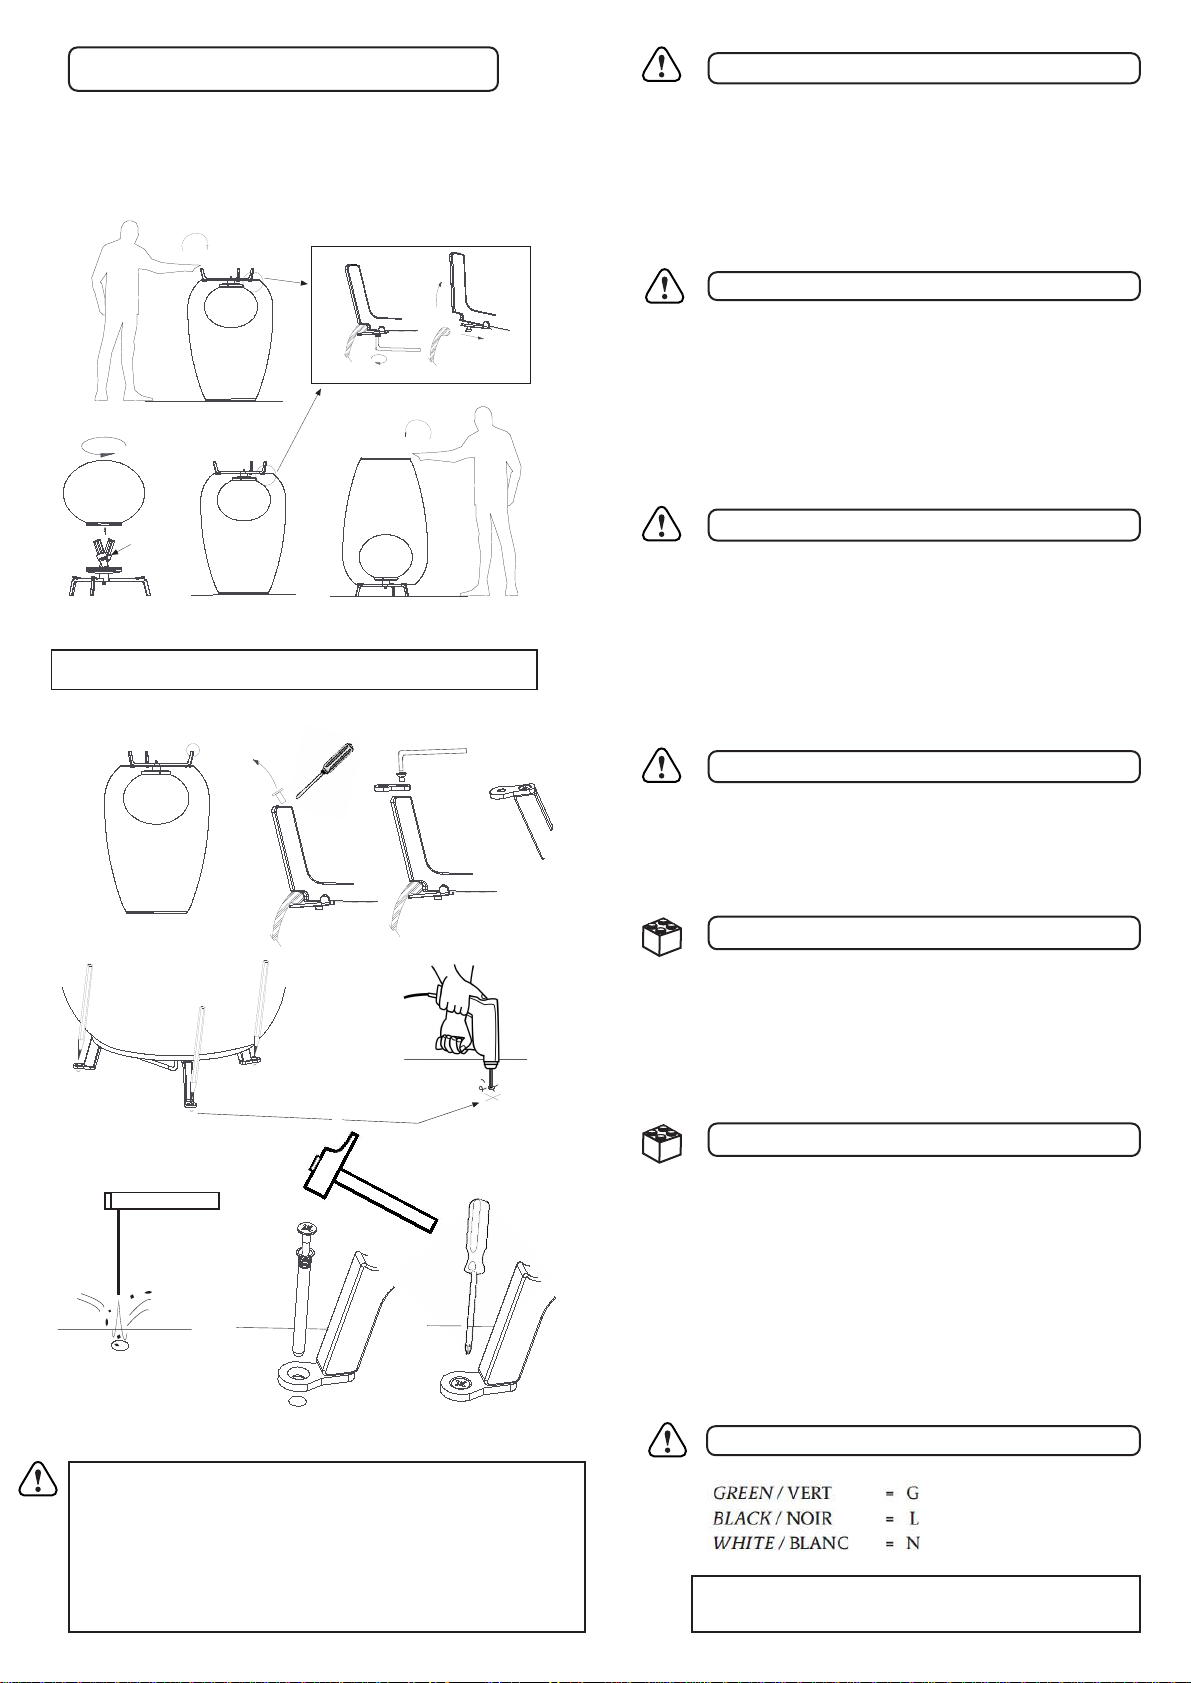
ASSEMBLYINSTRUCTIONS
CHANGELIGHTBULBS:
Placethelampupsidedown.
Unscrew theinteriorscrewsAwithallen key(included),
butdonottakethemout.
SlidepartBtotheleftandextractbaseD.
DismountshadeFbyturningit,placelightbulbsandredo
theoppositetoplacetheshadelamp
OUTDOORINSTALLATION
Hammerfixassembledanchorsaw-toothincluded.Suitablefor
concrete,hollowconcrete,lightweightconcrete,brick,hollow
brickandnaturalstone.
PulltheEplasticcapsoutfromthetripodbyusingaflat
screwdriver.
MountpieceGonthetripodbyscrewingthenarrowestsidewith
asunkscrewAllen(keyincluded).LookatimageHtocheck
correctdirectionforthecountersink.Make3marksonthefloor
likepictureJ,drillthreeholesØ8x45ontheflooraccording the
marksJ.
TaketheairoutoftheholesK.Placethelampontheholesand
pinbothnailsandpegsonthefloorL.
FinallyscrewtheboltbyusingthescrewdriverM.
CONNECTIONSCHART
OPTION
INSTALLATIONEN PLEIN AIR
A)
C)
B)
C)
D)
C)
F)
E) G) H)
x3
K) L)
SOL x3
Ø8x45
J)
IMPORTANT:
Connectthepowersupplycordtomainsbywatertight
strainrelieforothersuitablemeanstotheelectricalbox.
Donotremoveorloosethecentralwatertighstrainrelief
supplied. SAVE THESE INSTRUCTIONS
Warning: Read all instructions
PRÉCAUTION
CEPRODUITDOITÊTREINSTALLÉCONFORMÉMENTAU
CODED'INSTALLATION APPLICABLEPARUNE
PERSONNECONNAISSANTLACONSTRUCTIONET LE
FONCTIONNEMENT DUPRODUITAINSI QUELES
DANGERSINHÉRENTS. ILNEDOIT PASYAVOIRDE
TORONSOUDECONNEXIONSLÂCHES. SÉCURISÉAVEC
DESCONNECTEURSCERTIFIÉSUL ETDU RUBAN
ÉLECTRIQUE.
AVERTISSEMENT
L'électricitéDOITêtrecoupéesurle secteur avantd'installer ce
luminaire;ilne suffitpas decouper l'alimentationélectrique à
l'aidede l'interrupteurd'éclairagepourévitertoutchocélectrique.
Lesluminaires quipèsent 25 lb (50lb pour les États-Unis)ouplus
doiventêtremontés directement surlastructuredubâtiment,
indépendammentde la boîte électrique ; cetteinstallationnedoit
pasêtrefaitesurun plafond radiant.
Leluminaire n'estpasdestinéàsupporterun poids externeautre
quelescomposantsfournis.
RACCORDEMENTÉLECTRIQUE-SÉCURITÉ
Fixezlefilde terre (isolant vertou cuivrenu) ducircuitdu
fournisseurau supportdemontageàl'aide de la visde mise à la
terrevertefournie.
Raccordezle fil de terre du luminaire au conducteurdeterredu
circuitd'alimentation.Fixeztouslesconducteursdemiseàla terre
ausupportde montage à l'aide dela visde fixationdufilde terre
verte.
Reportez-vousau schéma debranchementdesfilspour brancher
lesfilsnoiret blanc.
MONTAGEDÉFINITIF
Installezlesampoulesélectriques,reportez-vousàl'étiquette
deremplacement situéeprès deladouillepourconnaître
lapuissancerecommandée.
NEPAS DÉPASSERLAPUISSANCERECOMMANDÉE.
Rétablirl'électricitéetvérifierle fonctionnementdu
luminaire.
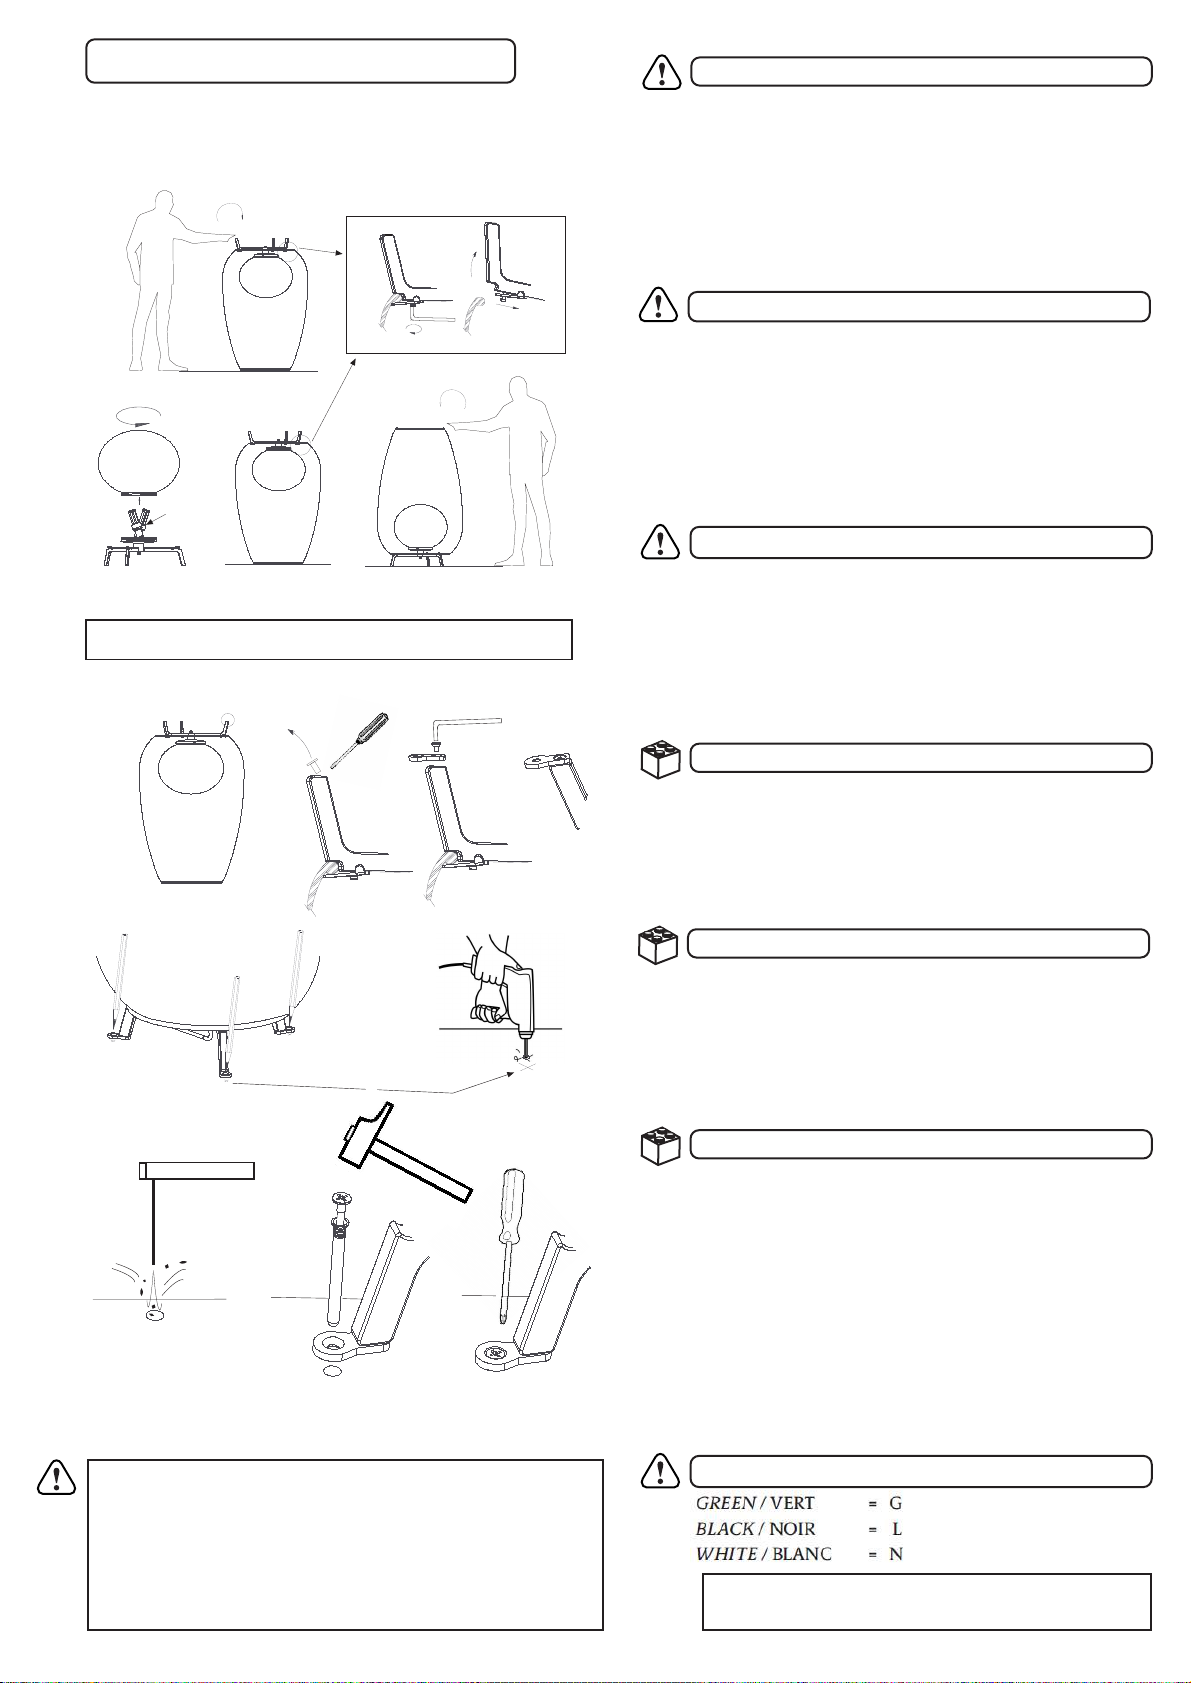
INSTRUCTIONS DEMONTAGE
CHANGERLES AMPOULES:
Placezlalampe àl'envers.
DévissezlesvisintérieuresAàl'aidedelacléAllen(fournie),
maisne lesretirezpas.
Glisserla partieB versla gaucheet extraire labaseD.
Démonterl'abat-jourFen letournant,placerles ampoules
etrefaire l'inversepour placerla lamped'abat-jour.
INSTALLATIONENEXTÉRIEUR
DentdescieàancreassembléeHammerfixincluse.Convient
pourle béton,lebéton creux,le bétonléger, labrique,la
brique,labriquecreuse etla pierrenaturelle.
RetirezlescapuchonsenplastiqueEdutrépiedàl'aided'un
tournevisplat.
Monterla pièceG surletrépieden vissantlecôtéleplus
étroitavecunevisàsix panscreux(cléincluse). Regardez
l'imageH pourvérifierladirection correcteduchanfrein.
Faire3marquessurlesolcommesurla photoJ, percer3
trousØ8x45 surlesolselon lesmarques J.
Retirezl'airdestrousK.Placezlalampesurlestrousetfixez
lesclous etleschevillessurle plancherL.
Enfin,vissezleboulonà l'aidedutournevisM.
TABLEAUDESCONNEXIONS
OPTION
INSTALLATIONEN PLEIN AIR
A)
C)
B)
C)
D)
C)
F)
E) G) H)
x3
K) L)
SOL x3
Ø8x45
J)
CONSERVEZCES INSTRUCTIONS
Avertissement: Liretouteslesinstructions
IMPORTANT :
Raccordezle cordon d'alimentationau secteur par une
déchargedetractionétancheoutoutautremoyen
appropriéauboîtierélectrique.
Neretirezpasounedesserrezpasladéchargedetraction
centraleétancheàl'eau fournie.
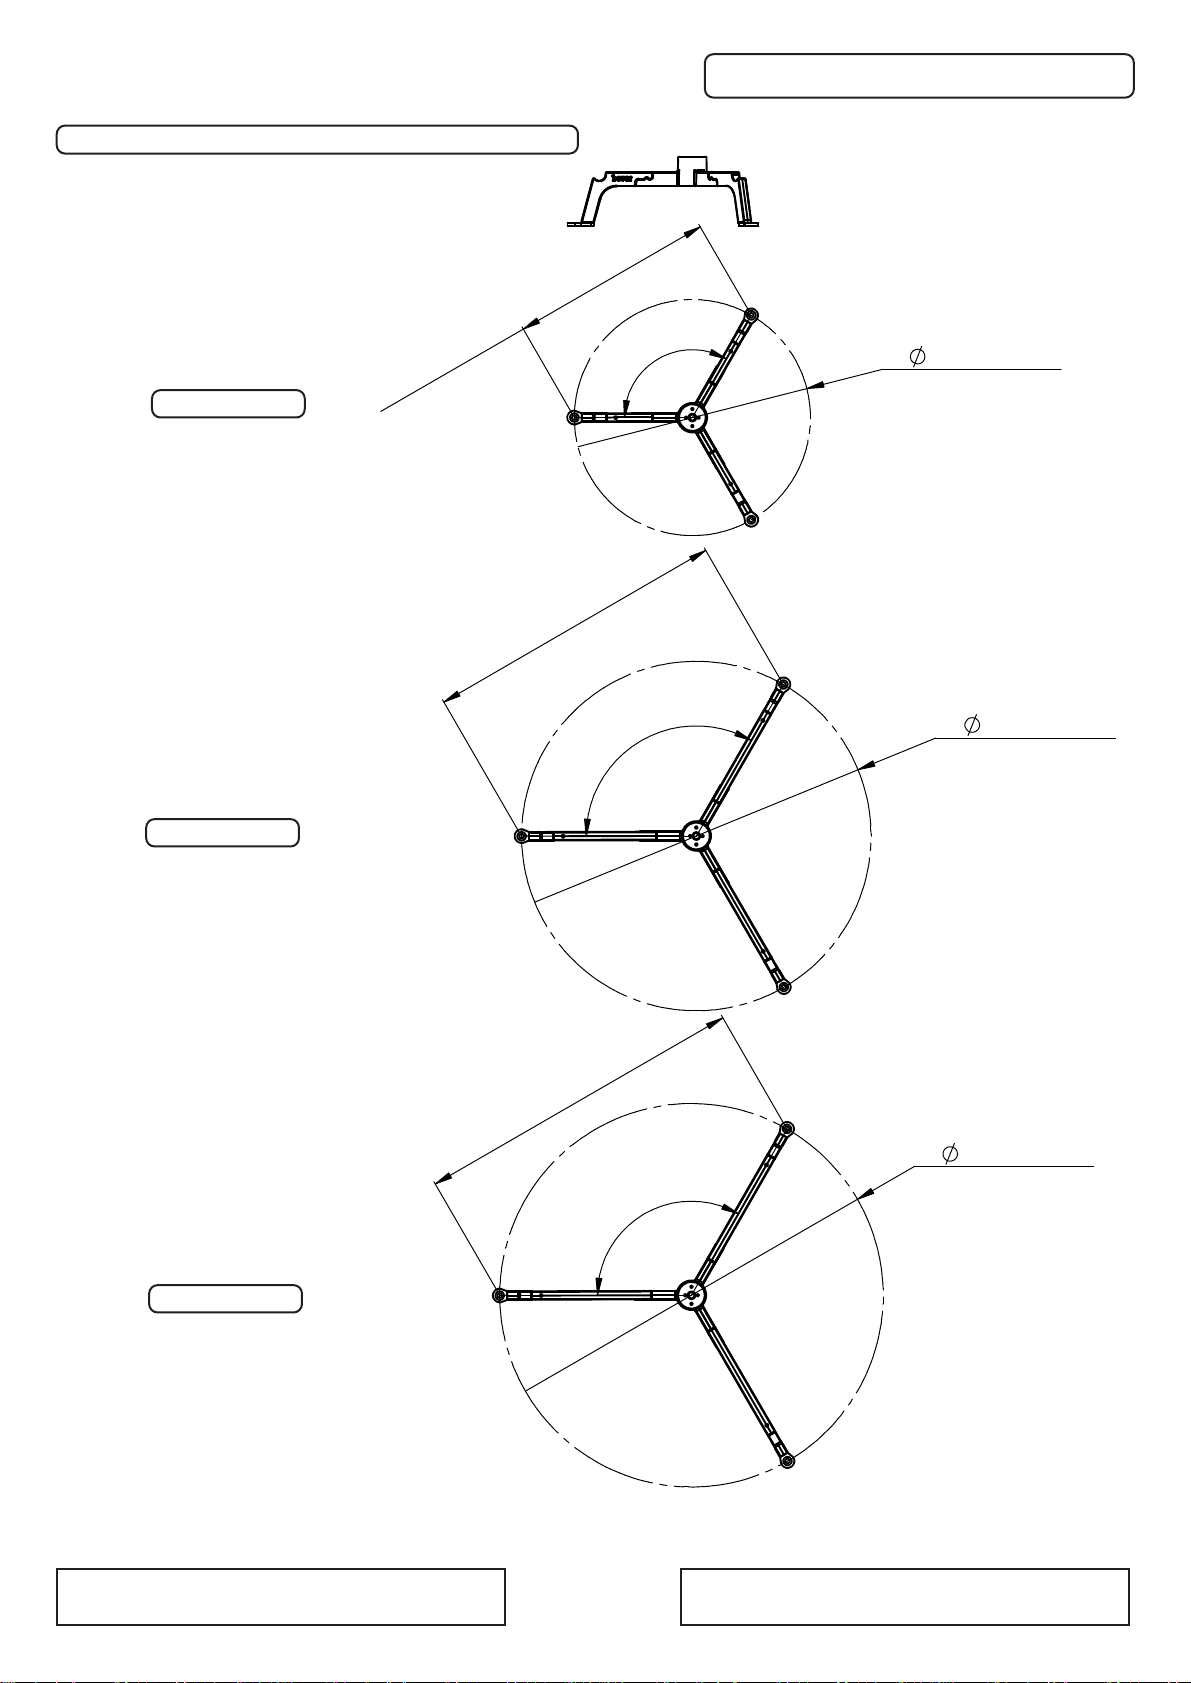
TEMPLATESHOLESPOSITION / MODELESTROUSPOSITION
AMPHORA01
AMPHORA02
AMPHORA03
616 / 24,25"
120°
534/21,02"
120°
416 / 16,37"
361/14,21"
120°
676 / 26.61"
586/23,07"
SAVE THESE INSTRUCTIONS CONSERVEZCES INSTRUCTIONS
Avertissement: Liretouteslesinstructions
This manual suits for next models
2
Table of contents
Languages:
Other bover Home Lighting manuals


