Bowcom GMX Guide
ADVANCED SPORTS LINE MARKING
PITCHMARKING MACHINE
INSTRUCTION MANUAL
& SPARE PARTS LIST
GMX
www.bowcom.com
t: +44 (0) 29 2038 8349

Page
1
GMX –INSTRUCTIONS FOR USE
** New battery may be partially charged, fully charge before use
** Ensure spray switch connected inside control box (see maint-page 2)
1) Ensure power turned off on both pump isolator switch (on control panel) and
spray switch (on handle bar).
2) Unplug and remove 2 x connectors (top of paint tank). Remove paint tank (using
front and rear recesses) by lifting out back first, then the front.
3) Make up paint mix (using paint concentrate and water) –using only BOWCOM
paints. Pour into tank through integral basket filter.
4) Replace paint tank lid and place onto GMX machine, re-connecting both plug-in
connectors (ensure matching sides-colour coded).
5) When closing bonnet with connectors attached to tank, carefully push surplus
hose down back of tank to avoid restricting bonnet closure.
6) Fill cleaning bottle with tap water (located on top of control panel).
7) Ensure direction tap is set to Paint and recycle tap is set to spray.
8) The machine is now ready to mark a line.
9) Set the spray limit plates to the required line width. Ensure that the spray gun is
set high enough for the paint spray to hit the limit plates.
NB. To locate the spray head inside the frame –use the right-hand stub
(from behind machine)
To locate the spray-head outside the frame –use the left-hand stub
(from behind machine)
NB. For offset (left or right side) spray marking –use the extended spray bar
(optional extra).
10) Turn on the pump isolator switch (located on control panel) –observe the volt
meter reading (12 volts). If too low, place battery on charge.*
11) To activate pump, use the button located on the handle bar. This can be used in
the locked-on position or Hold-position (using a light finger touch).
NB. The push button spray switch is positioned on the right side of the handle,
this can be moved to the left side if required.
12) To clean the machine: Turn off pump. Turn the paint/water tap to water (located
next to the water bottle inside control box).

Page
2
13) Turn on paint spray switch (as when spraying paint) and water will appear at the
nozzle. On sight of water, turn off. Also spray water whilst on the re-cycle mode
(to clean re-cycle pipes). Remove and clean top-hat filter –inside spray head
above the nozzle.
NB. A full water bottle should equal approx. 3 x cleans.
14) Should paint be left in the paint tank overnight, it can be agitated by using the
recycle option on the tap inside the control box (to the right of the pump). Turn
pump on as normal and the paint will re-circulate back into the tank. Turn off
when fully re-mixed.
15) NB. For ease & weight of transporting the GMX, remove paint tank (if full). When
disconnected, always place the tank connectors into the slots provided on
underside of bonnet.
* NB. Battery Charger Use Battery Charger provided. Place 3-pin plug into 240 volt
mains socket. Plug other end (12 volt) into socket on side of
Control Box. A full charge will take up to 10 hours. Full
battery should operate pump for several days (dependent
on use).
** NB. Handle & Switch Handle height can be adjusted for comfort of user and can
also be removed for ease of transportation.
NB. For handle removal, disconnect 2 x bullet connectors
inside control box (terminals are both common & not sided)
MAINTENANCE
1) During prolonged periods of non-use, the paint tank should be washed out
manually and drained (using black rubber plug on rear of tank). Also clean the
basket filter (in top of tank) and the paint filter (on end of paint suction tube)
2) Remove all 3 x plug-in connectors (2 on tank, 1 on spray hose coil) and lubricate
with WD40 on a daily basis.
NB. When not in use, leave the 2 x tank connectors disconnected & clipped to the
underside of the bonnet.
3) During prolonged periods of non-use, disconnect the spray hose coil.
4) Keep control box interior free of water & paint. Remove any surplus / spillage by
using small black rubber plug on the base of the control box.

Page
3
Technical Information:-
Paint tank capacity: 25 litres
Water bottle capacity: 3.5 litres
Weight –Dry, no tank: 27 kg
ACCESSORIES -How to fit
1) Extended Spray Arm: Fit instead of standard spray arm, locate to the left or right
of machine. Re-fit spray head to clear the front wheel. If
used at the end of bar to left side, an extended spray coil
hose may be required (available on request).
2) Hand Lance: To use the hand lance, first remove spray hose coil from
connector & connect hand lance. Turn on paint spray (as
if spraying paint). Hand lance is then controlled by its own
trigger action.
NB. Choice of fan or straight nozzle.
NB. Take care not to operate spray switch with no
connection, the male connector is NOT self-sealing.
3) Twin Jet Nozzle: Remove standard nozzle and replace, then operate spray
as normal.
4) Running Track Guide: Fit to spray bar mounting post (other side to spray bar).
Slide out until correct distance set between centre wheel
and centre of nozzle.
5) Chemical Boom: Remove complete spray bar and detach spray head from
connector. Attach the chemical boom L-shaped mounting
brackets to both of the mounting posts on the GMX –
using the double-box adapters provided (sided). Plug in to
connector. Spray as normal.
NB. Use of chemicals may require a separate paint tank
to avoid cross-contamination. Available on request.
6) Running Track Double Spray Marker:

Page 4
GMX PARTS LIST
Part No.
Description
Metal Work
1000X
Handle
1001X
Spray Bar (standard)
1002X
Spray Bar (long)
1003X
Spray Limit Plate
1004X
Gun Holder
1005X
Gun Top
Plastics
1007X
Spray Switch Housing
994X
Paint Tank (only) –Replacement
994AX
Paint Tank Complete –(spare; chemical use)
995X
Bonnet
997X
Control Box Door
998X
Water Bottle
989X
Paint Tank Lid
BL/BD18
Paint Tank Drain Plug
Control Box Drain plug
Pump &
Electrics
981X
Pump Complete
982X
Pump Diaphragm
983X
Pump Upper Housing
1029X
Battery Charger
993X
Battery
Battery Securing Strap
992X
Battery Gauge
Switches
984XA
Pump Isolator Switch
1032XA
Spray switch (inc. cable & bullet connectors)
Filters
990X
Tank Basket Filter
991X
Tank Hose Filter
166GM
Spray Housing Filter (top-hat)
Spray Head
712TK
Spray Housing
743TK
Union Nut
1016X
Nozzle
72TK
Spray Housing Connector
Hoses
986X
Clear PVC Hose
987X
Spray Coil (standard)
987XA
Spray Coil (long)
987XB
Spray Coil (track spray)

Page 5
Control
Components
1017X
Paint / Water Tap
720TK
Re-cycle Tap
1015X
Wheel (Pneumatic)
1014X
Wheel (Puncture Proof)
1020X
Snap-Connector (male)
1019X
Snap-Connector (female)
023ACP
Bonnet / Control Door Hinge Rod
24
M8 Star Wheel
1027X
Control Door Latch (complete)
Accessories
1030X
Bull-Bar handles
1028X
4 –Head Chemical Boom
706/707TK
Hand Lance
021GM
Running Track guide
1040X
Running Track Double spray marker
GMX Spares
Kit
1054X
Contains all commonly used parts

EXPLODED VIEW
CONTENT
Drawing -1- Control Box
Drawing -2- Paint Tank / Mid-section
Drawing -3- Spray Assembly

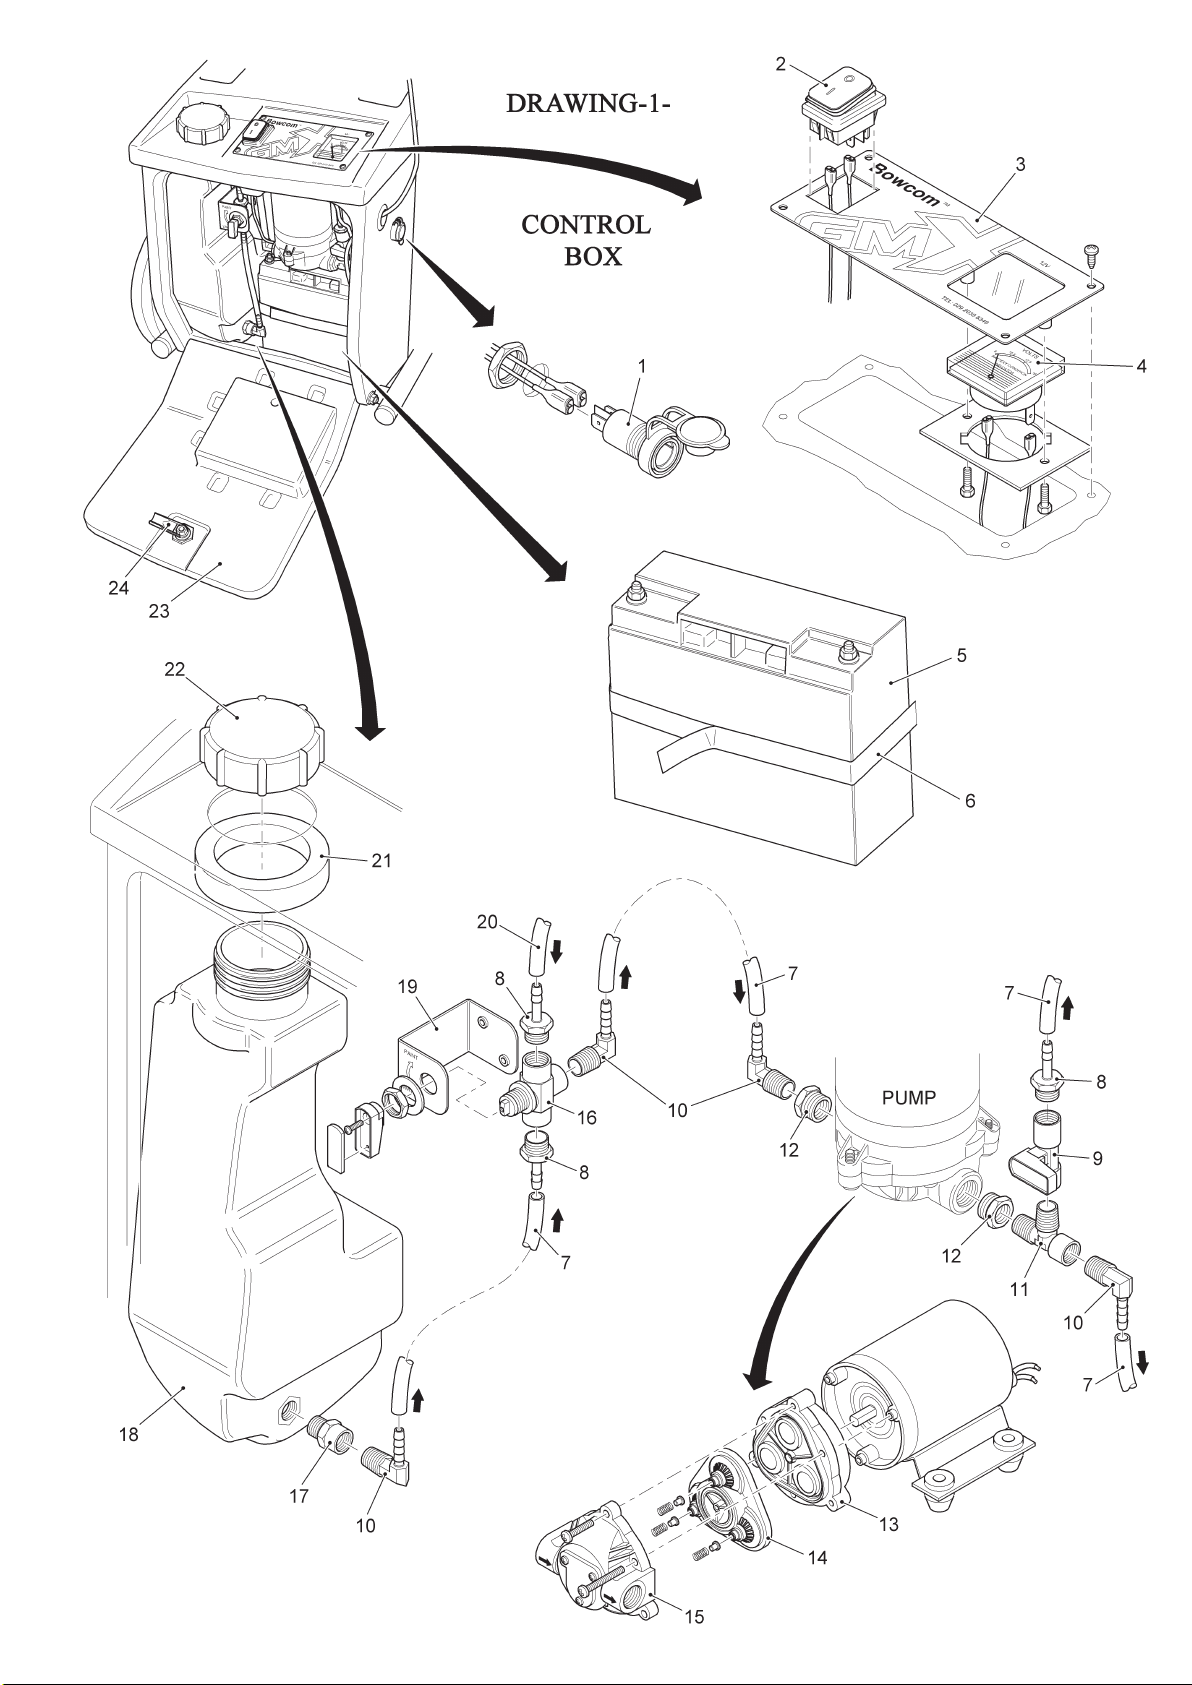
DRAWING -1- CONTROL BOX
Item No.
Description
Part No.
1
Charger Socket
735TK
2
Pump Isolator switch
984XA
3
Dash-Board (inc. gauge plate)
1008X
4
Battery Gauge
992X
5
Battery
993X
6
Battery securing strap
7
Hose (soft grade)
986X
8
Hose Tail (straight)
1021X
9
Re-cycle tap
720TK
10
Hose Tail (elbow)
1018X
11
T – piece
1024X
12
Pump Reducer
56GM
13
Pump Diaphragm Drive
984X
14
Pump Diaphragm
982X
15
Pump Upper Housing
983X
16
Paint / Water Tap
1017X
17
Water Bottle Reducer
988X
18
Water Bottle
998X
19
Tap Bracket
1006X
20
Hose (hard grade)
986X
21
Water Bottle foam ring
22
Water Bottle Cap
23
Control Box Door
997X
24
Control Box Door Latch
1027X

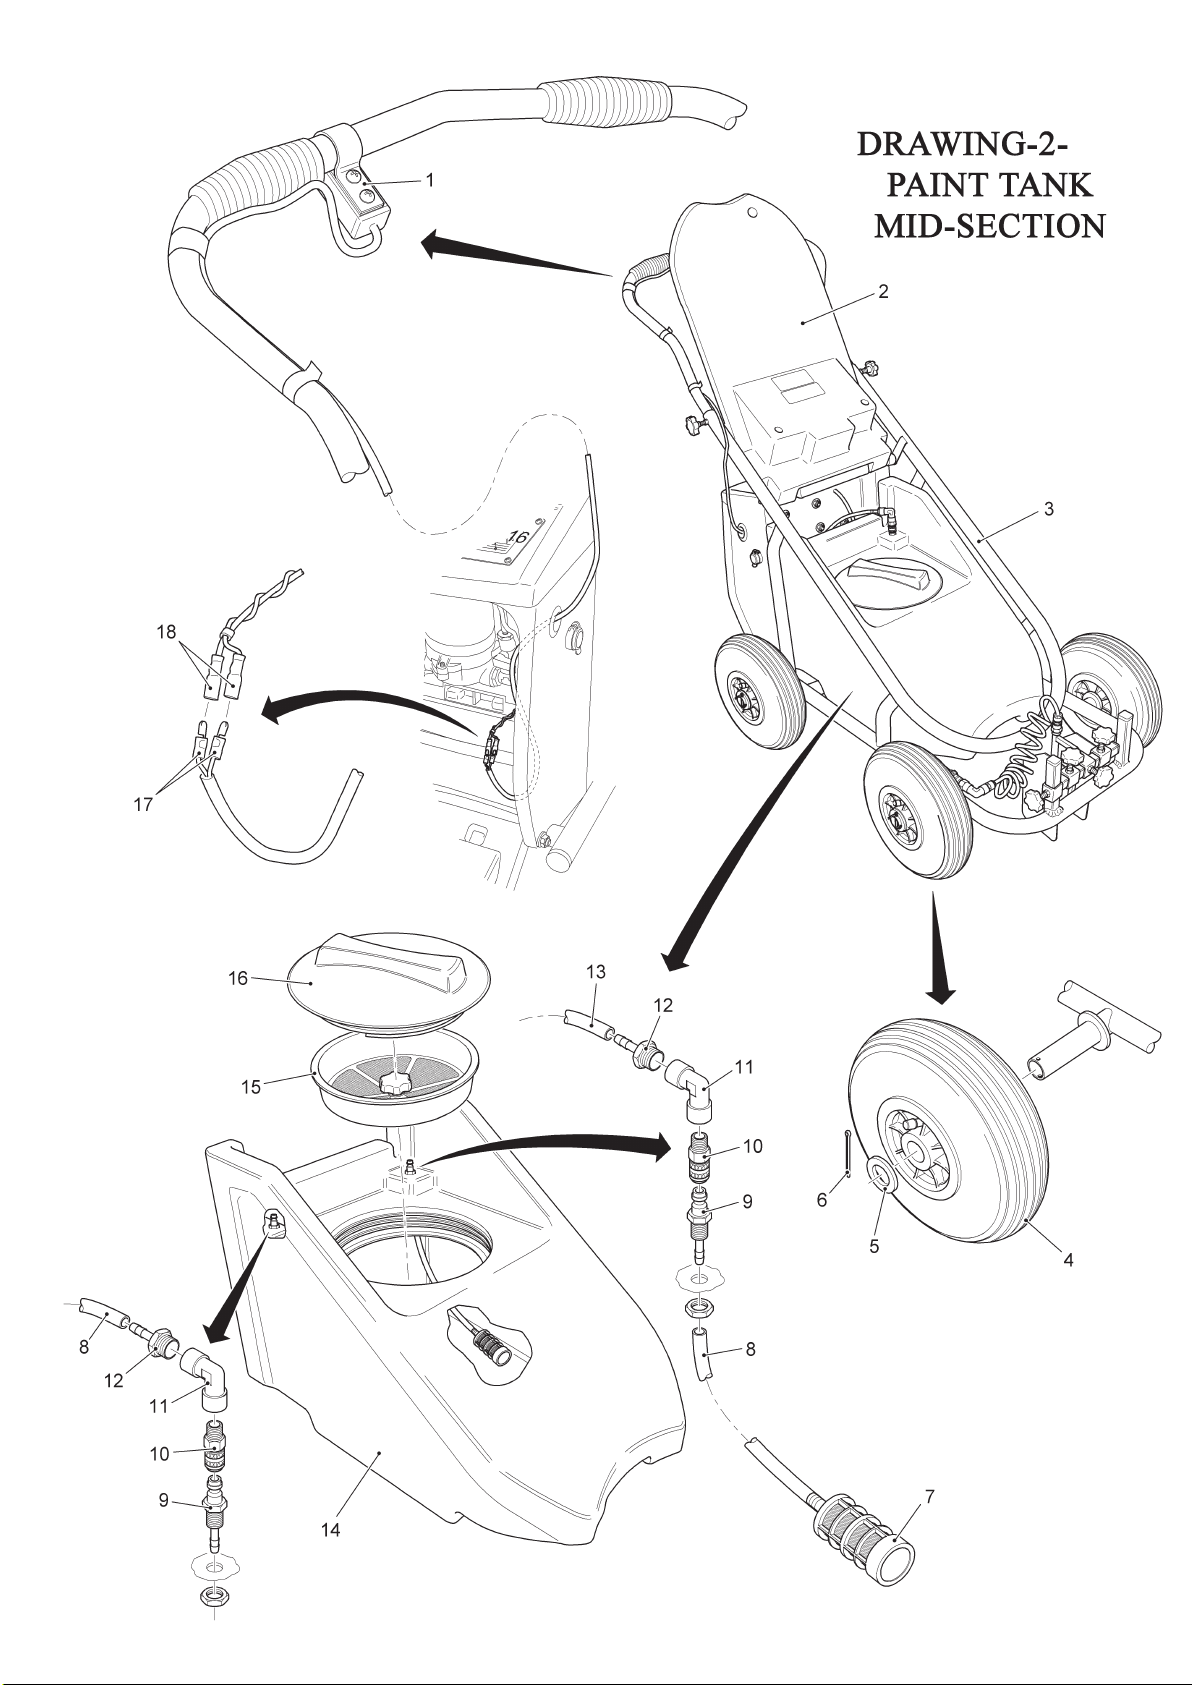
DRAWING -2- PAINT TANK / MID-SECTION
Item No.
Description
Part No.
1
Spray switch –c/w cable & connectors
1032X
2
Bonnet
995X
3
Chassis
999X
4
Wheel (inc.tyre)
1015X
5
Wheel Washer
6
Split Pin
7
Tank Filter
991X
8
Hose (soft grade)
986X
9
Male Snap Connector
1020X
10
Female Snap Connector
1019X
11
Female Elbow
1023X
12
Hose Tail
1021X
13
Hose (hard grade)
986X
14
Paint Tank
994X
Paint Tank c/w fittings
994AX
15
Basket Filter
990X
16
Tank Lid
989X
17
Bullet Connectors (pair) –male
18
Bullet Connectors (pair) -female

DRAWING -3- SPRAY ASSEMBLY
Item No.
Description
Part No.
1
Hose (soft grade)
986X
2
Male Snap Connector
1020X
3
Female Snap Connector
1019X
4
Female Elbow
1023X
5
Spray Hose End
1022X
6
Spray Hose Coil
987X
7
Spray Housing Connector
72TK
8
Gun Top
1005X
9
Limit Plate
1003X
10
Gun Holder
1004X
11
Spray Bar (standard)
1001X
12
Union Nut
743TK
13
Nozzle
1016X
14
Top Hat Filter
166
15
Spray Housing Complete
712TK
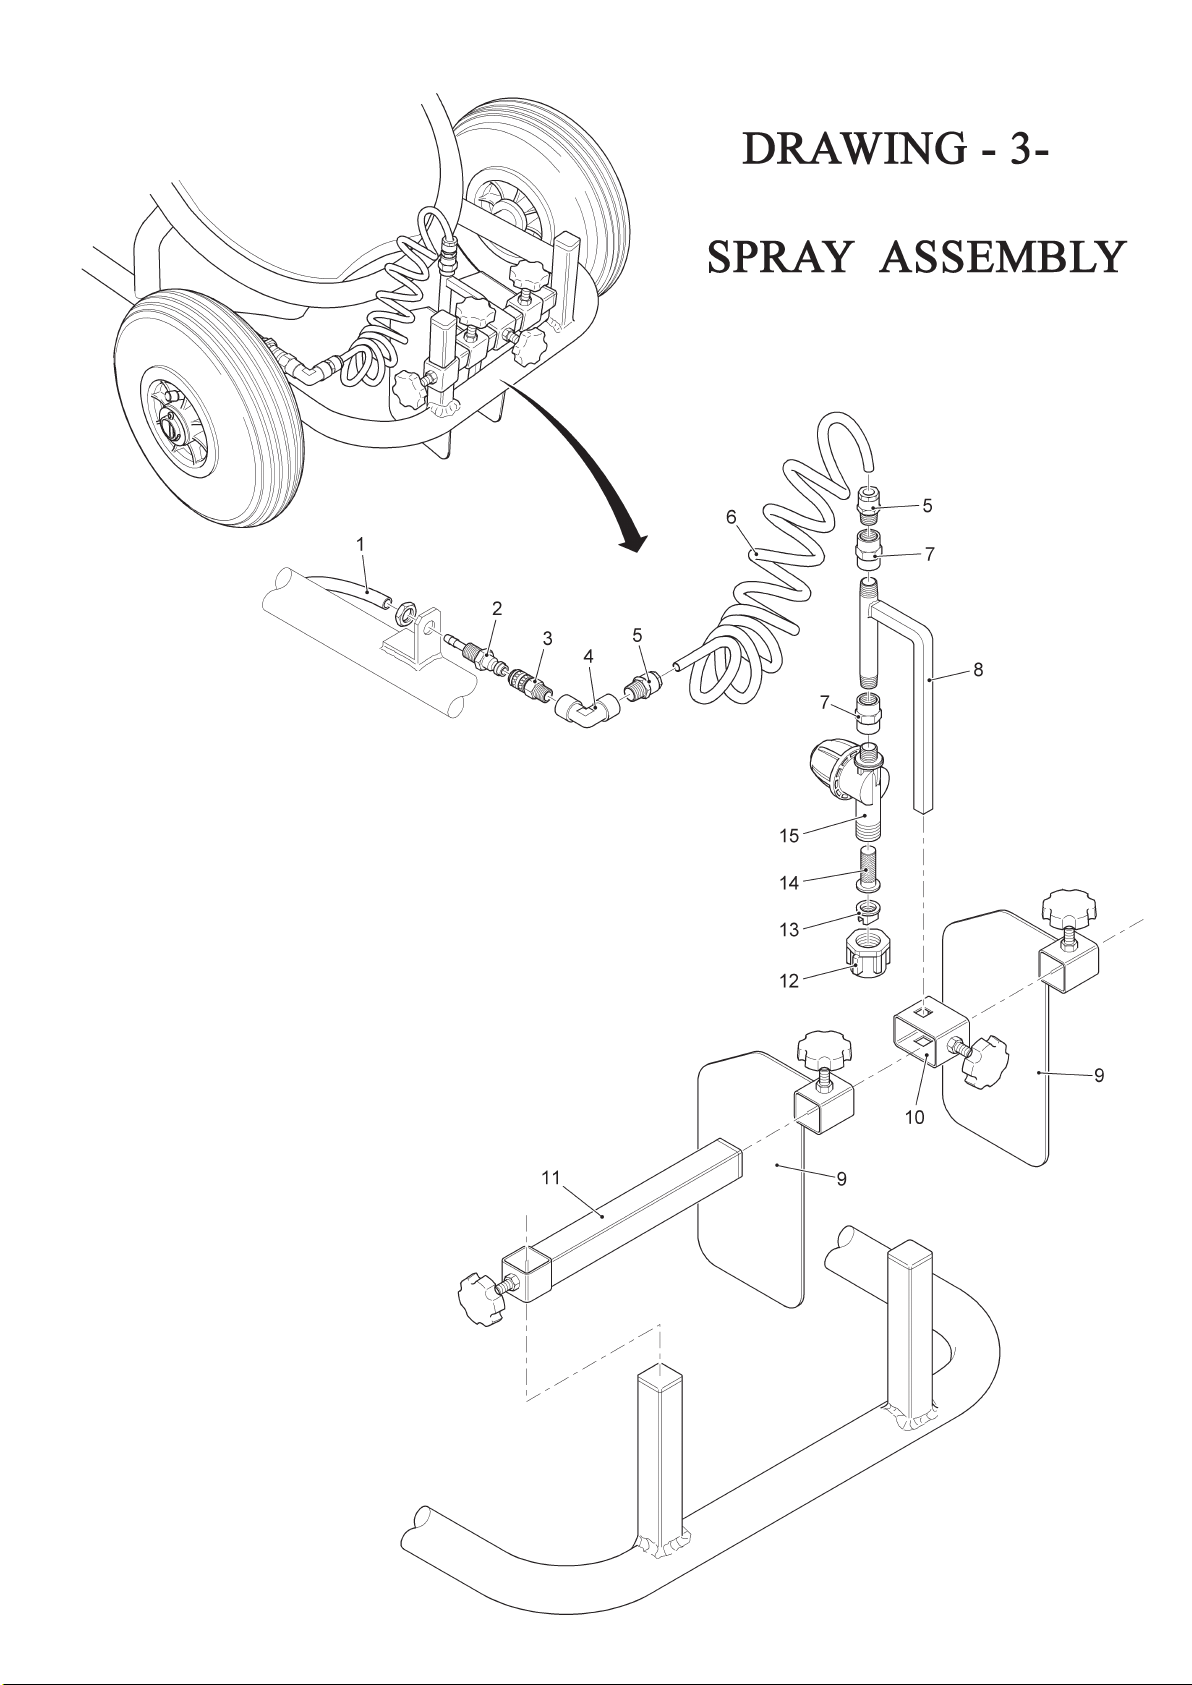
Table of contents
Popular Industrial Equipment manuals by other brands

SMC Networks
SMC Networks ZXP7 Series Operation manual

INOXPA
INOXPA MCR Ex Installation, service and maintenance instructions

PAW
PAW HeatBloC K32 Installation and operation instruction

MITS
MITS FP-21T 60 Maintenance Procedure

Marathon
Marathon HMT4000T Operating instructions & parts list

CERATIZIT
CERATIZIT KOMdrive operating instructions


