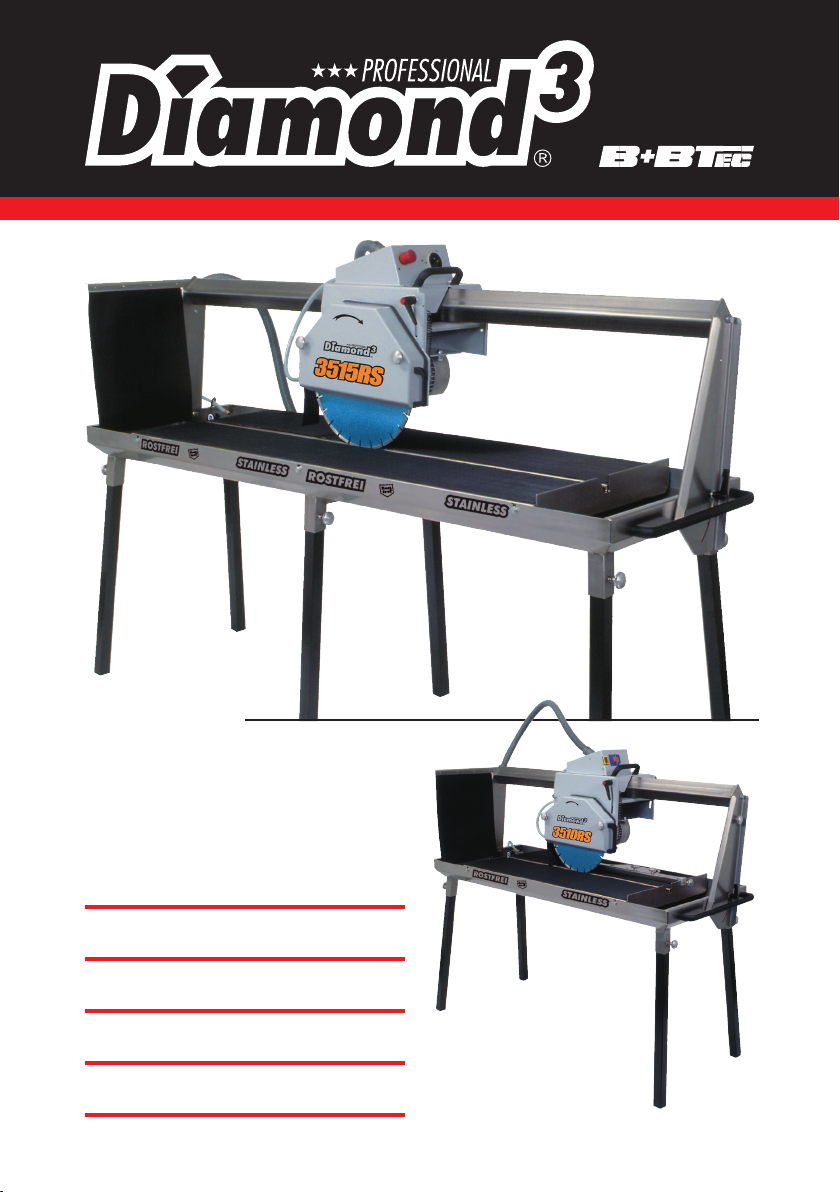
B+BTec Diamond3 3510?RS User manual
by
3510RS
3515RS
4015RS
GEBRUIKSAANWIJZING
OPERATING MANUAL
BEDIENUNGSANLEITUNG
MANUEL D’UTILISATION

2
DIAMOND3®3510/15RS - 4015RSNL
begrip ‘elektrisch gereedschap’ heeft
betrekking op elektrische gereedschap-
pen voor gebruik op het stroomnet (met
netsnoer) en op elektrische gereedschap-
pen voor gebruik met een accu (zonder
netsnoer).
1) Veiligheid van de werkomge-
ving
a) Houd uw werkomgeving schoon en
goed verlicht. Een rommelige of onver-
lichte werkomgeving kan tot ongevallen
leiden.
b) Werk met het elektrische gereedschap
niet in een omgeving met explosie-
gevaar zich brandbare vloeistoffen,
brandbare gassen of brandbaar stof
bevinden. Elektrische gereedschappen
vonken die het stof of de dampen tot
ontsteking kunnen brengen.
c) Houd kinderen en andere personen
tijdens het gebruik van het elektrische
gereedschap uit de buurt. Wanneer u
wordt afgeleid, kunt u de controle over
het gereedschap verliezen.
2) Elektrische veiligheid
a) De aansluitstekker van het elektrische
gereedschap moet in het stopcontact
passen. De stekker mag in geen geval
worden veranderd. Gebruik geen
adapterstekkers in combinatie met
geaarde elektrische gereedschappen.
Onveranderde stekkers en passende
stopcontacten beperken het risico van
een elektrische schok.
b) Voorkom aanraking van het lichaam
met geaarde oppervlakken, bijvoor-
beeld van buizen, verwarmingen, for-
nuizen en koelkasten. Er bestaat een
verhoogd risico door een elektrische
schok wanneer uw lichaam geaard is.
c) Houd het gereedschap uit de buurt
van regen en vocht. Het binnendringen
van water in het elektrische gereed-
schap vergroot het risico van een elek-
trische schok.
OPMERKING: Omdat onze engi-
neers constant bezig zijn om de
kwaliteit van onze producten ver-
der te verbeteren, kan de vorm
of uitvoering van onze producten
wijzigen, zonder mededeling
vooraf.
Inhoud
Algemene veiligheidswaarschuwingen
voor elektrische gereedschappen ...2
Speciale veiligheidsvoorschriften ......5
Inleiding ......................5
Technische gegevens..............6
Elektriciteit en veiligheid............6
Kenmerken ....................6
Ingebruikname ..................7
Verschillende zaagprocessen ........8
Veiligheid .....................9
Onderhoud ....................9
Milieubescherming ...............9
Storingen ....................10
Conformiteitsverklaring ...........10
Reserveonderdelen ..............11
Algemene veIlIgheIds-
wAArschuwIngen voor
elektrIsche gereed-
schAppen
WAARSCHUWING: Lees alle
veiligheidswaarschuwingen en
alle voorschriften. Als de waar-
schuwingen en voorschriften niet
worden opgevolgd, kan dit een
elektrische schok, brand of ern-
stig letsel tot gevolg hebben.
OPMERKING: Bewaar alle waar-
schuwingen en voorschriften voor
toekomstig gebruik.
Het in de waarschuwingen gebruikte

3
DIAMOND3®3510/15RS - 4015RS NL
d) Gebruik de kabel niet voor een ver-
keerd doel, om het elektrische gereed-
schap te dragen of op te hangen
of om de stekker uit het stopcontact
te trekken. Houd de kabel uit de
buurt van hitte, olie, scherpe randen
en bewegende gereedschapdelen.
Beschadigde of in de war geraakte
kabels vergroten het risico van een
elektrische schok.
e) Wanneer u buitenshuis met elektrisch
gereedschap werkt, dient u alleen
verlengkabels te gebruiken die voor
gebruik buitenshuis zijn goedgekeurd.
Het gebruik van een voor gebruik bui-
tenshuis geschikte verlengkabel beperkt
het risico van een elektrische schok.
f) Als het gebruik van het elektrische
gereedschap in een vochtige omge-
ving onvermijdelijk is, dient u een
aardlekschakelaar te gebruiken. Het
gebruik van een aardlekschakelaar ver-
mindert het risico van een elektrische
schok.
3) Veiligheid van personen
a) Wees alert, let goed op wat u doet
en ga met verstand te werk bij het
gebruik van het elektrische gereed-
schap. Gebruik geen elektrisch
gereedschap wanneer u moe bent of
onder invloed staat van drugs, alcohol
of medicijnen. Een moment van onop-
lettendheid bij het gebruik van het elek-
trische gereedschap kan tot ernstige
verwondingen leiden.
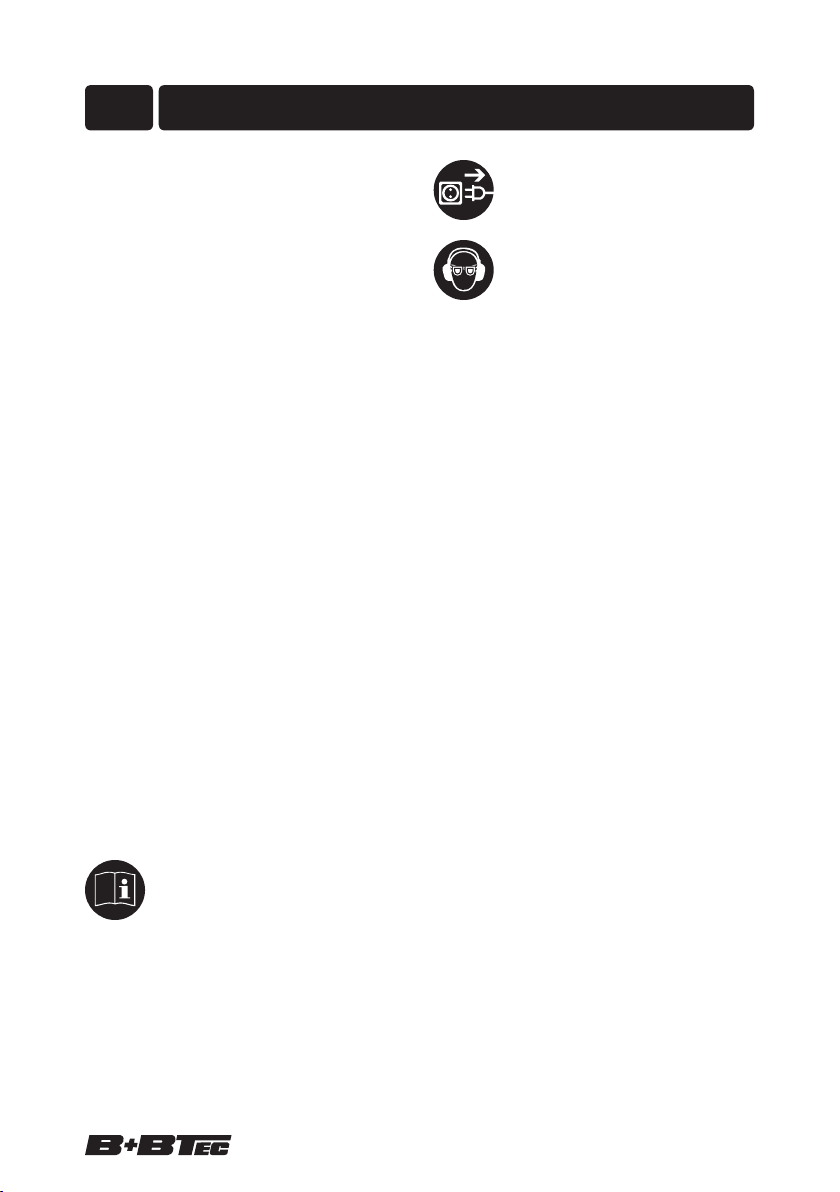
b) Draag persoonlijke beschermende
uitrusting. Draag altijd een veilig-
heidsbril. Het dragen van persoonlijke
beschermende uitrusting zoals een stof-
masker, slipvaste werkschoenen, een
veiligheidshelm of gehoorbescherming,
afhankelijk van de aard en het gebruik
van het elektrische gereedschap, ver-
mindert het risico van verwondingen.
c) Voorkom per ongeluk inschakelen.
Controleer dat het elektrische gereed-
schap uitgeschakeld is voordat u de
stekker in het stopcontact steekt of de
accu aansluit en voordat u het gereed-
schap oppakt of draagt. Wanneer
u bij het dragen van het elektrische
gereedschap uw vinger aan de scha-
kelaar hebt of wanneer u het gereed-
schap ingeschakeld op de stroomvoor-
ziening aansluit, kan dit tot ongevallen
leiden.
d) Verwijder instelgereedschappen of
schroefsleutels voordat u het elek-
trische gereedschap inschakelt. Een
instelgereedschap of sleutel in een
draaiend deel van het gereedschap
kan tot verwondingen leiden.
e) Voorkom een onevenwichtige
lichaamshouding. Zorg ervoor dat
u stevig staat en steeds in evenwicht
blijft. Daardoor kunt u het elektrische
gereedschap in onverwachte situaties
beter onder controle houden.
f) Draag geschikte kleding. Draag geen
loshangende kleding of sieraden.
Houd haren, kleding en handschoenen
uit de buurt van bewegende delen.
Loshangende kleding, lange haren
en sieraden kunnen door bewegende
delen worden meegenomen.
g) Wanneer stofafzuigings- of stofop-
vangvoorzieningen kunnen worden
gemonteerd, dient u zich ervan te ver-
zekeren dat deze zijn aangesloten en
juist worden gebruikt. Het gebruik van
een stofafzuiging beperkt het gevaar
door stof.
4) Zorgvuldige omgang met en
zorgvuldig gebruik van elek-
trische gereedschappen
a) Overbelast het gereedschap niet.
Gebruik voor uw werkzaamheden het
daarvoor bestemde elektrische gereed-
schap. Met het passende elektrische
gereedschap werkt u beter en veiliger
binnen het aangegeven capaciteitsbe-
reik.

4
DIAMOND3®3510/15RS - 4015RSNL
b) Gebruik geen elektrisch gereedschap
waarvan de schakelaar defect is. Elek-
trisch gereedschap dat niet meer kan
worden in- of uitgeschakeld, is gevaar-
lijk en moet worden gerepareerd.
c) Trek de stekker uit het stopcontact
of neem de accu uit het elektrische
gereedschap voordat u het gereed-
schap instelt, toebehoren wisselt of het
gereedschap weglegt. Deze voorzorgs-
maatregel voorkomt onbedoeld starten
van het elektrische gereedschap.
d) Bewaar niet-gebruikte elektrische
gereedschappen buiten bereik van
kinderen. Laat het gereedschap niet
gebruiken door personen die er niet
mee vertrouwd zijn en deze aanwij-
zingen niet hebben gelezen. Elektri-
sche gereedschappen zijn gevaarlijk
wanneer deze door onervaren perso-
nen worden gebruikt.
e) Verzorg het elektrische gereedschap
zorgvuldig. Controleer of bewegende
delen van het gereedschap correct
functioneren en niet vastklemmen en
of onderdelen zodanig gebroken of
beschadigd zijn dat de werking van
het elektrische gereedschap nadelig
wordt beïnvloed. Laat deze bescha-
digde onderdelen voor het gebruik
repareren. Veel ongevallen hebben
hun oorzaak in slecht onderhouden
elektrische gereedschappen.
f) Houd snijdende inzetgereedschappen
scherp en schoon. Zorgvuldig onder-
houden snijdende inzetgereedschap-
pen met scherpe snijkanten klemmen
minder snel vast en zijn gemakkelijker
te geleiden.
g) Gebruik elektrisch gereedschap, toe-
behoren, inzetgereedschappen en der-
gelijke volgens deze aanwijzingen. Let
daarbij op de arbeidsomstandigheden
en de uit te voeren werkzaamheden.
Het gebruik van elektrische gereed-
schappen voor andere dan de voor-
ziene toepassingen kan tot gevaarlijke
situaties leiden.
5) Gebruik en onderhoud van
accugereedschappen
a) Laad accu’s alleen op in oplaadap-
paraten die door de fabrikant worden
geadviseerd. Voor een oplaadap-
paraat dat voor een bepaald type
accu geschikt is, bestaat brandgevaar
wanneer het met andere accu’s wordt
gebruikt.
b) Gebruik alleen de daarvoor bedoelde
accu’s in de elektrische gereedschap-
pen. Het gebruik van andere accu’s
kan tot verwondingen en brandgevaar
leiden.
c) Voorkom aanraking van de nietge-
bruikte accu met paperclips, munten,
sleutels, spijkers, schroeven en andere
kleine metalen voorwerpen die over-
bruggingvan de contacten kunnen
veroorzaken. Kortsluiting tussen de
accucontacten kan brandwonden of
brand tot gevolg hebben.
d) Bij verkeerd gebruik kan vloeistof
uit de accu lekken. Voorkom contact
daarmee. Spoel bij onvoorzien contact
met water af. Wanneer de vloeistof in
de ogen komt, dient u bovendien een
arts te raadplegen. Gelekte accuvloei-
stof kan tot huidirritaties en verbrandin-
gen leiden.
6) Service
a) Laat het elektrische gereedschap alleen
repareren door gekwalificeerd en vak-
kundig personeel en alleen met origi-
nele vervangingsonderdelen. Daarmee
wordt gewaarborgd dat de veiligheid
van het gereedschap in stand blijft.

5
DIAMOND3®3510/15RS - 4015RS NL
specIAle veIlIgheIds-
voorschrIften
Met de machine kan uitsluitend
veilig worden gewerkt, wanneer
u de gebruiksaanwijzing en de
veiligheidsvoorschriften volledig
leest en u zich strikt aan de
gegeven aanwijzingen houdt.
Laat u voor het eerste gebruik
praktisch instrueren.
Trek altijd voor werkzaamheden
aan de machine de stekker uit
het stopcontact.
Draag een veiligheidsbril en
gehoorbescherming.
1. De zaagmachine mag alleen gebruikt
worden voor het zagen van tegels,
betonproducten en natuursteen.
2. Er mogen alleen zaagbladen gebruikt
worden welke door de fabrikant wor-
den aanbevolen.
3. Controleer voordat u met zagen begint
eerst het volgende:
• de machine dient op een stabiele,
vlakke en horizontale ondergrond te
staan,
• het zaagblad moet op de juiste manier
gemonteerd te zijn, (draairichting en
goed gecentreerd)
• de toestand van het zaagblad,
• een correcte bevestiging van de
beschermkap,
• voldoende hoeveelheid schoon koel-
water.
4. Tijdens het zagen mag het te zagen
product niet gekanteld of verschoven
worden.
5. Bij deze zaagmachine wordt tijdens
het zagen het toelaatbare geluids-
niveau overschreden. Door over-
schrijden van de geluidsnorm is het
verplicht om gehoorbescherming te
dragen tijdens het zagen.
6. Het op de machine aangebrachte sym-
bool mag niet worden verwijderd.
7. Als aanvulling op de veiligheidsvoor-
schriften moet de gebruiker aandacht
schenken aan de volgende punten:
• De aanwijzingen voor montage en
gebruik van de zaagmachine goed
lezen.
• Goed controleren of de elektrische
kabel correct is aangesloten op het
net.
• Spanning voerende leidingen mogen
niet in aanraking komen met water of
waternevel.
• Beschadigd zaagbladen dienen direct
te worden vervangen.
InleIdIng
De zaagmachine is ontworpen en bestemd
voor professioneel gebruik. De machine
is voorzien van een in hoogte verstelbare
zaagkop. De machine is voorzien van
een in hoogte verstelbare zaagkop die
zich horizontaal langs een geleidingsbalk
beweegt. Het te zagen materiaal wordt
op de vaste zaagtafel gelegd waarbij
het zaagblad door het materiaal wordt
gevoerd. Door continue toevoer van
koelwater d.m.v. de dompelpomp wordt
ten eerste stofontwikkeling voorkomen
en ten tweede wordt de kwaliteit van de
zaagsnede verbeterd. Tevens blijft de
slijtage van het zaagblad tot een minimum
beperkt.
De kwaliteit en de uitvoering van de zaag-
machine voldoen aan de hoogste normen.
Het ontwerp is gebaseerd op een zeer
lange levensduur en minimaal onderhoud.

6
DIAMOND3®3510/15RS - 4015RSNL
elektrIcIteIt en
veIlIgheId
LET OP! Op bouwplaatsen moe-
ten elektrische machines vanuit
speciaal daarvoor aangebrachte
stroomaansluitingen worden
aangesloten. Als aansluitpunten
gelden hiervoor een bouwstroom
verdelingskast of scheiding-trans-
formator. Niet geaarde wand-
contactdozen in een huisinstalla-
tie of dergelijke aansluitingen
zijn niet geschikt als elektrische
aansluiting.
Voor nat-zaagmachines gelden verhoogde
veiligheidsnormen. Daarom moet als extra
veiligheid de machine worden aangeslo-
ten volgens onderstaande methoden:
• Bouwstroom verdeelkast met aardlek-
schakelaar max. 30 mA.
- - - - - - - - - - - - - - - of - - - - - - - - - - - - - - -
• Scheiding-transformator, waarop echter
maar één machine tegelijk mag wor-
den aangesloten
- - - - - - - - - - - - - - - of - - - - - - - - - - - - - - -
• Met een tussenkabel die voorzien is
van een PRCD-beschermingsschakelaar
van max. 30 mA (alléén bij 230V
machines).
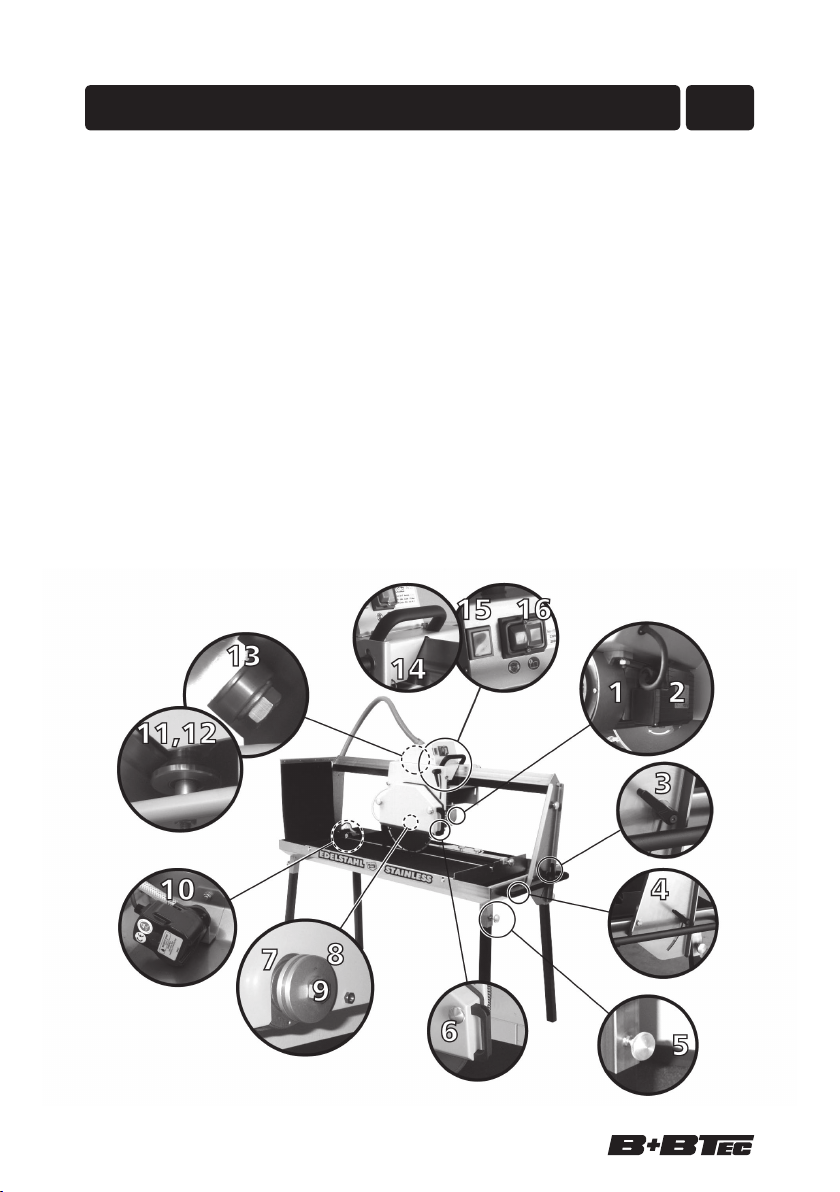
kenmerken
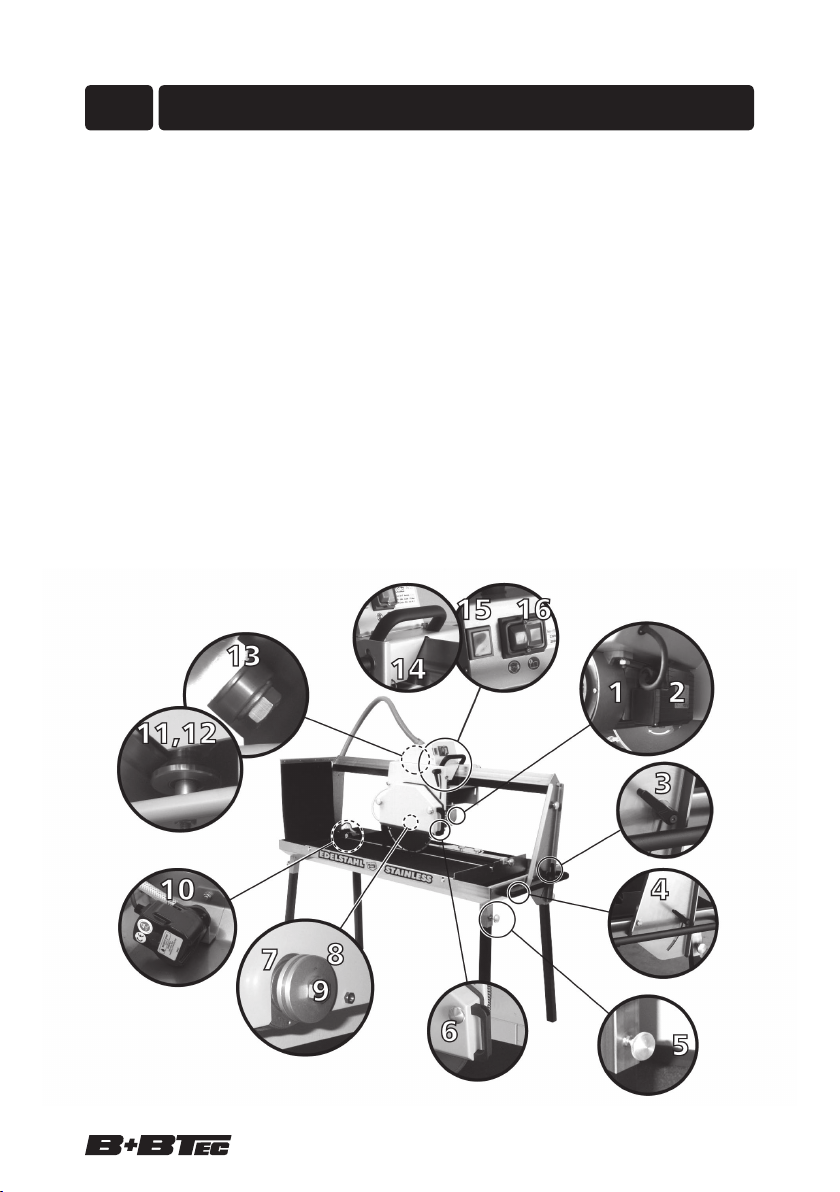
Machine-constructie
De roestvrije staalconstructie draagt bij tot
een stabiele zaagmachine. De afneem-
bare poten worden in de poothouders
onder de waterbak gemonteerd en vastge-
zet met kartelknoppen.
Zaagkop
De zaagkop is opgebouwd uit een gelaste
staalconstructie. De balans voor de hoog-
teverstelling is d.m.v. een trekveer. De
hoogteverstelling wordt vastgezet d.m.v.
twee verstelbare grepen.
Beschermkap
De beschermkap is een gelaste plaatstalen
kap, eenvoudig met twee kartelknoppen te
demonteren en monteren voor het verwis-
selen van het zaagblad.
Zaag-as
De motorflens is op de zaag-as bevestigd.
De zaagflens wordt met een zeskantmoer
technIsche gegevens
Type.......................... 3510RS .. 3515RS ...4015RS
Voeding..............................230V .....230V ..... 400V
Vermogen ...........................2,2 kW ....2,2 kW ..... 3 kW
Toerental van de zaagas . . . .[omw/min] ......2.800 .....2.800 .....2.800
Zaagbladdiameter/gat .........[mm] . Ø350/25,4 Ø350/25,4 Ø400/25,4
Zaaghoogte max. .............[mm] .......105 ...... 105 ...... 130
Zaaglengte tot ...............[mm] ......1.000 .....1.500 .....1.500
Tafelafmetingen ..............[mm] ..1.000x640 .1.500x640 . 1.500x640
Lengte ....................[mm] ......1.650 .....2.150 .....2.150
Breedte ...................[mm] .......650 ...... 650 ...... 650
Hoogte (zonder poten) .........[mm] .......780 ...... 780 ...... 780
Gewicht ....................[kg] .......118 ...... 136 ...... 136
Geluidsniveau ...............dB(A) ........87 ....... 87 ....... 89
Geluidsniveau tijdens zagen ......dB(A) ........96 ....... 96 ....... 98
7
DIAMOND3®3510/15RS - 4015RS NL
op de zaag-as bevestigd voor het klem-
men van het zaagblad. (Let op! Moer is
linkse schroefdraad.)
Zaagtafel
De zaagtafel bestaat uit een roestvrije
gelaste staalconstructie, voorzien van
antislip laag, vaste en verstelbare aanslag
die zowel in lengte als hoekverdraaiing
verstelbaar is.
Zaagkoeling
De elektrische waterpomp wordt gelijk-
tijdig ingeschakeld met de zaagmotor
en zorgt ervoor dat het koelwater naar
beide zijkanten van het zaagblad wordt
gepompt. Aan de waterbak zit een afvoer-
buis, die met een slang verbonden is met
de watertank. De spatlappen zijn voor het
beperken van waternevel en om zoveel
mogelijk koelwater te laten terugstromen in
de waterbak.
IngebruIknAme
Machine opstellen
• De machine uitpakken en controleren
op evt. beschadigingen.
• De poten monteren in de poothouders
onder de waterbak en met de kartel-
knoppen vastzetten.
• De machine zo mogelijk waterpas en
stabiel zetten door de poten te ver-
schuiven in de poothouders.
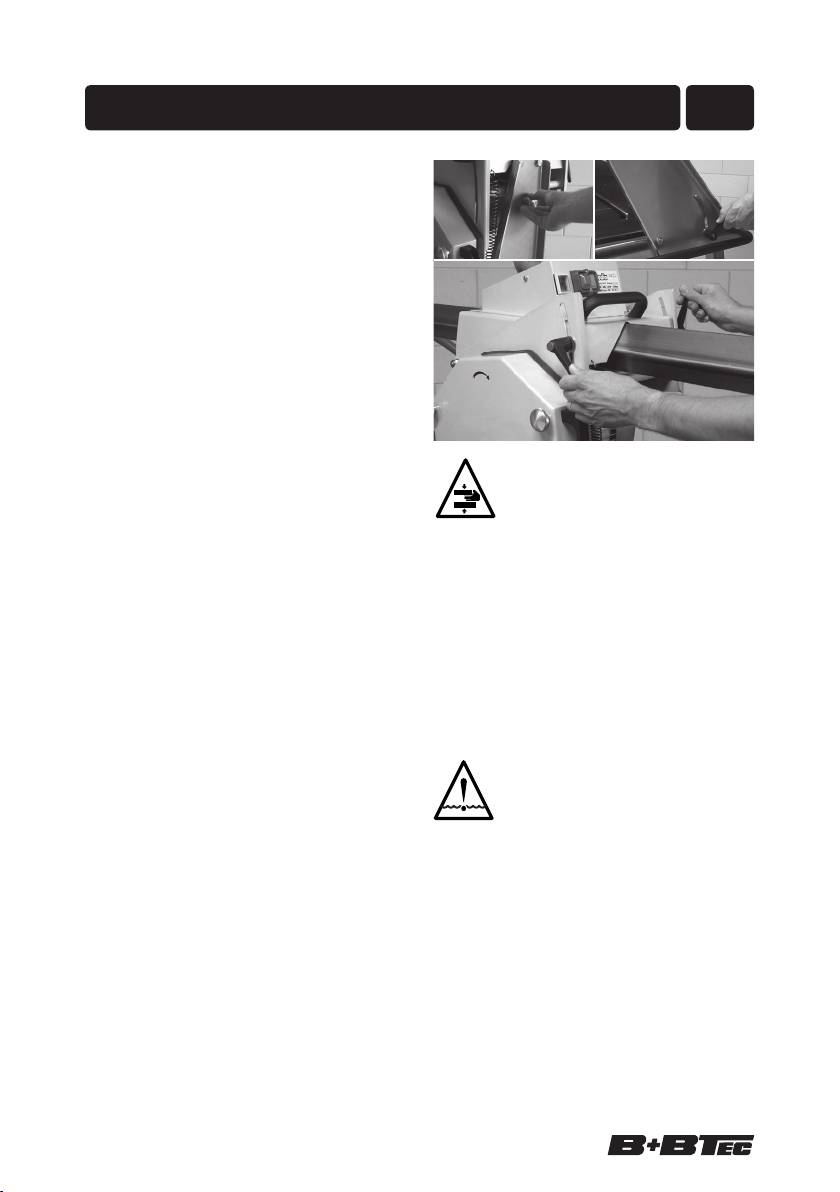
Zaagkop
• De transportblokkering losdraaien.
• De zaagkop kan in hoogte versteld
worden d.m.v. het losdraaien van de
twee verstelbare grepen.
LET OP! De kop is d.m.v. een
trekveer gespannen en kan plot-
seling omhoog springen wanneer
de hendels losgedraaid worden.
• Voor 45° Jolly-zagen kan het boven-
frame met de zaagkop naar een hoek
van 45º worden gekanteld. Door de 2
hendels voor en achter los te draaien
kan het frame worden gekanteld. De
45º hoek is vooraf op de fabriek reeds
ingesteld.
Koelsysteem
LET OP! De pomp mag niet zon-
der water draaien. Bij droog
draaien kan dit schade veroor-
zaken aan de pomp.
• Plaats de stop in het afvoergat.
• De waterbak moet zodanig worden
gevuld dat de pomp volledig onder
water ligt.
Elektrische aansluiting
Controleer allereerst of:
• de netspanning overeen komt met de
gegevens op het machineplaatje,
• er een voorgeschreven aardleiding
aanwezig is,
• de kabeldoorsnede van de toevoerka-

8
DIAMOND3®3510/15RS - 4015RSNL
bel min. 2,5 mm2bedraagt,
• er voor de 400V machines een 5-polig
16 Amp. stopcontact aanwezig is
(3Ph+0+aarde).
Motorbeveiliging
De motor is voorzien van een thermische
beveiliging tegen overbelasting. Bij over-
verhitting valt de schakelaar terug in de
uit-positie en kan pas weer ingeschakeld
worden nadat de motor voldoende is afge-
koeld. Tevens is de schakelaar beveiligd
tegen stroomuitval. Na een stroomuitval
zal de machine niet vanzelf aanspringen
maar moet handmatig opnieuw worden
ingeschakeld.
Montage van het zaagblad
LET OP! Haal bij het verwisselen
van het zaagblad of andere
werkzaamheden aan de
machine altijd de stekker uit het
stopcontact.
• Beschermkap demonteren.
• Blokkeer de zaagas met de 8 mm
inbussleutel.
• De zeskantmoer losdraaien en de
zaagflens verwijderen. (Let op: zes-
kantmoer heeft linkse schroefdraad.)
• Zaagflenzen reinigen.
• Zaagblad monteren op de centreerring
van de motorflens. (Let op de correcte
centrering van het zaagblad en de
draairichting.)
• Zaagflens monteren en vastdraaien
met de zeskantmoer. Beschermkap
monteren en vastzetten met de 2 kartel-
knoppen.
verschIllende zAAg-
processen
In één stap doorzagen
(Gebruik voor het zagen uitsluitend origi-
nele zaagbladen.)
• Zaagkop naar beneden verstellen
zodat het zaagblad ca. 10 mm onder
het zaagtafelvlak zit.
• Zaagkop vastzetten met de hendel.
• Het te zagen materiaal op de zaagta-
fel leggen tegen de vaste aanslag en
evt. tegen de verstelbare aanslag.
• Het materiaal met de ene hand vast-
houden op een zodanige plek dat de
hand voldoende verwijderd is van het
zaagblad.
• Met de andere hand middels de hand-
greep op de zaagkop het zaagblad
met een matige trekbeweging door het
materiaal laten zagen.
In meerdere stappen doorzagen
Bij dit zaagproces wordt de zaag op een
bepaalde diepte ingesteld en heen en
weer door het materiaal gevoerd tot het
materiaal in een aantal stappen volledig is
doorgezaagd. Het aantal stappen hangt
af van type zaagblad en materiaal. Aan-
bevolen wordt om bij dikke en/of harde
materialen deze methode te gebruiken.
• Het te zagen materiaal op de zaagta-
fel leggen tegen de vaste aanslag en
evt. tegen de verstelbare aanslag.
• Zaagbladhoogte instellen.
• Het materiaal met de ene hand vast-
houden op een zodanige plek dat de
hand voldoende verwijderd is van het
zaagblad.

9
DIAMOND3®3510/15RS - 4015RS NL
• De machine aanzetten en het zaag-
blad met een regelmatige zaagvoe-
ding door het materiaal heen laten
zagen.
veIlIgheId
Als aanvulling op de geldende veiligheids-
voorschriften dient er aandacht te worden
besteedt aan de volgende punten:
• Volg de aanwijzingen van montage en
werken met de zaagmachine nauw-
keurig op.
• Controleer zorgvuldig dat de elek-
trische aansluitingen correct zijn
gemaakt.
• Spanningvoerende leidingen mogen
niet in aanraking komen met water of
nevel.
• Beschadigde zaagbladen onmiddellijk
vervangen.
• Houdt gedurende het zagen het mate-
riaal met de hand vast.
• Zorg dat u tijdens het zagen met uw
handen zover als mogelijk uit de buurt
blijft van het zaagblad.
• Draag tijdens het zagen een veilig-
heidsbril.
• Het is voorschrift om tijdens het zagen
een gehoorbescherming te dragen.
onderhoud
• Het koelwater moet regelmatig worden
vervangen en/of bijgevuld.
• Aanbevolen wordt om regelmatig
de waterbak, pomp, slangen en
sproeikoppen te reinigen. Hang
hiervoor bijv. na het werk de pomp
in een emmer schoon water en laat
de machine ±1 min. draaien. Dit ver-
zekert u bovendien van een langere
levensduur van de pomp.
• Wanneer de machine voor een wat
langere tijd niet gebruikt wordt, dient
de pomp niet in het vervuilde koelwa-
ter te blijven maar gereinigd buiten de
waterbak te worden opgeslagen.
• Controleer regelmatig de zaagflenzen
op slijtage en vervang deze indien
nodig.
Opscherpen van het zaagblad
Het diamant zaagblad zaagt het beste
wanneer het is opgescherpt.
Na enige tijd kan door het zagen van
bepaalde materialen het zaagblad bot
worden. Als gevolg daarvan gaat het
zagen moeilijker en kan het zaagblad ver-
buigen. Hierdoor is het niet meer mogelijk
om recht en haaks te zagen.
Wanneer dit probleem zich voordoet,
moet het zaagblad worden opgescherp
met een dress steen.
Het opscherpen kan als volgt:
• Leg de dress steen op de zaagtafel
tegen de vaste aanslag.
• Zaag ± 10 keer door de dress steen.
Hiermee is het zaagblad weer scherp
en kan probleemloos verder worden
gezaagd.
mIlIeubeschermIng
Gooi het apparaat nooit weg
met het normale huisvuil. Verwij-
der het apparaat via een erkend
afvalverwerkingsbedrijf of uw
communale afvalverwerkingsin-
stantie. Neem de actueel geldende voor-
schriften in acht. Neem in geval van twijfel
contact op met uw afvalverwerkingsinstan-
tie. Gooi alle verpakkingsmaterialen weg
op een milieuverantwoorde manier.

10
DIAMOND3®3510/15RS - 4015RSNL
storIngen
Probleem Oorzaak Oplossing
De zaagmachine
wil niet starten De elektra-kabel is beschadigd
of niet goed aangesloten.
Geen netspanning aanwezig
De schakelaar is defect.
Controleer de elektra-kabel op
evt. beschadigingen. Druk de
stekker goed in het stopcontact.
Controleer of er netspanning
aanwezig is.
Laat de schakelaar vervangen.
De waterpomp
draait maar er komt
geen water bij het
zaagblad.
De sproeiers in de zaagkap
zijn verstopt.
Het waterniveau in de bak is te
laag waardoor de pomp niet
volledig onder water is.
De waterkraan is gesloten.
Maak de sproeiers schoon.
Schoon water bijvullen tot de
pomp volledig onder water is.
Open de waterkraan.
De zaagmotor
draait niet of onre-
gelmatig.
Water in de motor.
Condensator is defect.
Kogellager van de motor
defect.
Trek de stekker uit het stopcontact
en laat een servicewerkplaats dit
repareren.
De waterpomp
draait niet. De rotor of het zuigfilter is
defect.
De elektra-kabel is defect.
Vervang de defecte delen.
Controleer de kabel en de aan-
sluitingen.
De machine zaagt
niet haaks en/of
niet recht.
Machine staat scheef opge-
steld.
De bodem waar de machine
op staat is ongelijk.
Niet het juiste zaagblad of het
is bot.
Schroef de beide zaagtafelpoten
los, til de machine iets omhoog
en schroef de poten weer vast.
Controleer vervolgens of de
machine stabiel staat en niet
wankelt.
Zet de machine op een vlakke
bodem.
Monteer het juiste zaagblad of
scherp het zaagblad op.
conformIteIts-
verklArIng
Wij verklaren op eigen verantwoording
dat dit product voldoet aan de volgende
normen of normatieve documenten.
98/392/EEC, 91/368/EEC,
93/44/EEC, 93/68/EEC,
89/336/EEC, 92/31/EEC,
73/23/EEC
02
Wijzigingen voorbehouden.
Voor reserveonderdelen of advies neem
contact op met:
B+BTec
Munterij 8
4762 AH Zevenbergen
The Netherlands
+31 168 331 260
11
DIAMOND3®3510/15RS - 4015RS NL
reserveonderdelen
Pos.# Art.nr Art.nr. Omschrijving
3510/3515RS 4015RS
01 ...6.516.010 ... 6.516.015 ............................. Motor
02 ...6.513.215 ... n.v.t. ..............................Kondensator
03 ...6.509.010 . . . . . . . . . . . . . . . . . . . . . . . . . . . . . . . . . .Verstelbare greep
04 ...6.509.090 . . . . . . . . . . . . . . . . . . . . . . . . . . . . . . . . . . . . . . . . . Greep
05 ...6.005.792 . . . . . . . . . . . . . . . . . . . . . . . . . . . . . . . . . . . . . . Kartelknop
06 ...6.509.053 ... 6.509.054 .............................Greep
07 ...6.516.012 ... 6.516.017 .......................... Motorflens
08 ...6.516.011 ... 6.516.016 ...........................Zaagflens
09 ...6.516.013 . . . . . . . . . . . . . . . . . . . . . . . . . . . . . . . . . . . . . . . Flensmoer
10 ...6.513.295 . . . . . . . . . . . . . . . . . . . . . . . . . . . . . . . . . . . . . . . . . .Pomp
11 ...4.800.080 . . . . . . . . . . . . . . . . . . . . . . . . . . . . . . . . . . . . . . Geleiderol
12 ...6.504.117 . . . . . . . . . . . . . . . . . . . . . . . . . . . . . . . . . . . . . . Kogellager
13 ...6.504.225 . . . . . . . . . . . . . . . . . . . . . . . . . . . . . . . . . . . . . . Kogellager
14 ...6.509.095 . . . . . . . . . . . . . . . . . . . . . . . . . . . . . . . . . . . . . .Handgreep
15 ...6.513.210 ... 6.513.235 ............. Therm. beveiliging/Noodstop
16 ...6.513.220 ... 6.513.255 ..........................Schakelaar
12
DIAMOND3®3510/15RS - 4015RSGB
1) Work area safety
a) Keep work area clean and well lit.
Cluttered or dark areas invite acci-
dents.
b) Do not operate power tools in explo-
sive atmospheres, such as in the pres-
ence of flammable liquids, gases or
dust. Power tools create sparks which
may ignite the dust or fumes.
c) Keep children and bystanders away
while operating a power tool. Distrac-
tions can cause you to lose control.
2) Electrical safety
a) Power tool plugs must match the
outlet. Never modify the plug in any
way. Do not use any adapter plugs
with earthed (grounded) power tools.
Unmodified plugs and matching outlets
will reduce risk of electric shock.
b) Avoid body contact with earthed or
grounded surfaces, such as pipes,
radiators, ranges and refrigerators.
There is an increased risk of electric
shock if your body is earthed or
grounded.
c) Do not expose power tools to rain
or wet conditions. Water entering a
power tool will increase the risk of
electric shock.
d) Do not abuse the cord. Never use the
cord for carrying, pulling or unplug-
ging the power tool. Keep cord away
from heat, oil, sharp edges and mov-
ing parts. Damaged or entangled
cords increase the risk of electric
shock.
e) When operating a power tool out-
doors, use an extension cord suitable
for outdoor use. Use of a cord suitable
for outdoor use reduces the risk of elec-
tric shock.
f) If operating a power tool in a damp
location is unavoidable, use a residual
current device (RCD) protected supply.
Use of an RCD reduces the risk of elec-
tric shock.
generAl power tool
sAfety wArnIngs
WARNING! Read all safety
warnings and all instructions.
Failure to follow the warnings
and instructions may result in
electric shock, fire and/or seri-
ous injury.
ATTENTION! Save all warnings
and instructions for future refer-
ence.
The term ‘power tool’ in the warnings
refers to your mains-operated (corded)
power tool or battery-operated (cordless)
power tool.
contents
General Power Tool Safety Warnings..12
Special Tools Safety Warnings ......14
Technical data .................15
Introduction ...................15
Electricity and safety .............15
Characteristics .................15
Unpacking and set up ............16
Various sawing processes. . . . . . . . . .17
Safety .....................18
Maintenance..................18
Environmental protection ..........18
Troubleshooting ................19
Declaration of Conformity .........19
Spare parts ...................20
ATTENTION! As our engineers
are constantly conducting
research and development on
our machinery to develop quality
products for the marketplace, our
product model(s) can be
changed without notice.

13
DIAMOND3®3510/15RS - 4015RS GB
g) Make sure you have a proper connec-
tion of the tool at a socket outlet.
3) Personal safety
a) Stay alert, watch what you are doing
and use common sense when operat-
ing a power tool. Do not use a power
tool while you are tired or under the
influence of medication. A moment of
inattention while operating power tools
may result in serious personal injury.
b) Use personal protective equipment.
Always wear eye protection. Protective
equipment such as dust mask, non-skid
safety shoes, hard hat, or hearing pro-
tection used for appropriate conditions
will reduce personal injuries.
c) Prevent unintentional starting. Ensure
the switch is in the off-position before
connecting to power source and/or
battery pack, picking up or carrying
the tool. Carrying power tools with
your finger on the switch or energising
power tools that have the switch on
invites accidents.
d) Remove any adjusting key or wrench
before turning the power tool on. A
wrench or a key left attached to a
rotating part of the power tool may
result in personal injury.
e) Do not overreach. Keep proper foot-
ing and balance at all times. This ena-
bles better control of the power tool in
unexpected situations.
f) Dress properly. Do not wear loose
clothing or jewellery. Keep your hair,
clothing and gloves away from mov-
ing parts. Loose clothes, jewellery or
long hair can be caught in moving
parts.
g) If devices are provided for the connec-
tion of dust extraction and collection
facilities, ensure these are connected
and properly used. Use of dust collec-
tion can reduce dust-related hazards.
4) Power tool use and care
a) Do not force the power tool. Use the
correct power tool for your applica-
tion. The correct power tool will do
the job better and safer at the rate for
which it was designed.
b) Do not use the power tool if the switch
does not turn it on and off. Any power
tool that cannot be controlled with
the switch is dangerous and must be
repaired.
c) Disconnect the plug from the power
source and/or the battery pack from
the power tool before making any
adjustments, changing accessories, or
storing power tools. Such preventive
safety measures reduce the risk of start-
ing the power tool accidentally.
d) Store idle power tools out of the reach
of children and do not allow persons
unfamiliar with the power tool or
these instructions to operate the power
tool. Power tools are dangerous in the
hands of untrained users.
e) Maintain power tools. Check for mis-
alignment or binding of moving parts,
breakage of parts and any other
condition that may affect the power
tool’s operation. If damaged, have the
power tool repaired before use. Many
accidents are caused by poorly main-
tained power tools.
f) Keep cutting tools sharp and clean.
Properly maintained cutting tools with
sharp cutting edges are less likely to
bind and are easier to control.
g) Use the power tool, accessories and
tool bits etc. in accordance with these
instructions, taking into account the
working conditions and the work to
be performed. Use of the power tool
for operations different from those
intended could result in a hazardous
situation.
5) Battery tool use and care
a) Recharge only with the charger speci-
14
DIAMOND3®3510/15RS - 4015RSGB
fied by the manufacturer. A charger
that is suitable for one type of battery
pack may create a risk of fire when
used with another battery pack.
b) Use power tools only with specifically
designated battery packs. Use of any
other battery packs may create a risk
of injury and fire.
c) When battery pack is not in use, keep
it away from other metal objects, like
paper clips, coins, keys, nails, screws
or other small metal objects, that can
make a connection from one terminal
to another. Shorting the battery termi-
nals together may cause burns or a
fire.
d) Under abusive conditions, liquid may
be ejected from the battery; avoid
contact. If contact accidentally occurs,
flush with water. If liquid contacts
eyes, additionally seek medical help.
Liquid ejected from the battery may
cause irritation or burns.
6) Service
a) Have your power tool serviced by a
qualified repair person using only
identical replacement parts. This will
ensure that the safety of the power tool
is maintained.
specIAl tools sAfety
wArnIngs
Working safely with this machine
is possible only when the operat-
ing and safety information are
read completely and the instruc-
tions contained therein are
strictly followed. Before using for
the first time, ask for a practical
demonstration.
Before working on the machine
itself, pull the mains plug.
Wear ear protectors and safety
glasses.
1. The sawing machine is only to be used
for sawing tiles, concrete products and
natural stone.
2. Only saw blades advised by the manu-
facturer should be used.
3. Check the following before you start
sawing:
• the machine should be positioned on a
stable, flat and horizontal base,
• the saw blade must be correctly
mounted, (direction of rotation and
centred correctly)
• the condition of the saw blade,
• correct fixing of the saw cover,
• sufficient supply of clean cooling
water.
4. During sawing the material to be cut
should not be tilted or moved.
5. During sawing with this sawing
machine the max. sound pressure level
is exceeded.
Because the max. sound pressure level
is exceeded during operation wearing
hearing protection is mandatory.
6. The safety label on the machine should
never be removed.
7. In addition to the above mentioned
safety regulations the user should pay
attention to the following items:
• Read the instructions for setting up and
using the machine carefully.
• Check that the power cord is correctly
connected to the power supply.
• Electrical cables may not come in con-
tact with water or spray water.
• Damaged saw blades should be
replaced immediately.

15
DIAMOND3®3510/15RS - 4015RS GB
IntroductIon
This sawing machine is designed and
intended for the professional contractor.
The machine is equipped with a height
adjustable saw head which moves
horizontally along a guiding beam. The
material to be cut is positioned on the
saw table. The saw must be fed through
the material. Through continuous supply
of cooling water the cutting quality is
improved as well as the wear on the saw
blade is minimized. The cooling water
also absorbs the saw dust.
The quality and construction of this sawing
machine meet the highest standards. The
design is based on longevity and minimal
maintenance.
electrIcIty And sAfety
ATTENTION! On construction
sites electrical appliances should
be connected to specially
designed power supplies. Suita-
ble are grounded main power
supplies equipped with an earth-
leak switch of max. 30mA or
separating transformers. Non-
grounded common household or
similar power outlets are not
suited as a power source.
For water cooled sawing machines stricter
safety standards are applicable. Therefore,
for extra safety the machine must be con-
nected according to one of the following
methods:
• Main power supply equipped with
earthleak switch 30 mA.
- - - - - - - - - - - - - - - or - - - - - - - - - - - - - - -
• Separating transformer, only 1
machine may be connected at any
given time
- - - - - - - - - - - - - - - or - - - - - - - - - - - - - - -
• With an intermediate cable equipped
with a PRCD safety switch of max.
30mA (ónly 115V/230V machines).
chArActerIstIcs
Machine construction
The stainless steel construction contributes
to a stable, rigid and durable sawing
machine. The 4 detachable legs are to be
installed in the leg sockets at the underside
of the water container and fastened with
technIcAl dAtA
Type.......................... 3510RS .. 3515RS ...4015RS
Power ..........................230V/115V 230V/115V ..... 400V
Capcaity .......................2,2 kW/3 HP 2,2 kW/3 HP . 3 kW/4 HP
Saw spindle speed ............[RPM]......2.800 .....2.800 .....2.800
Blade diameter/hole ............[mm]. Ø350/25,4 Ø350/25,4 Ø400/25,4
Saw height max................[mm].......105 ...... 105 ...... 130
Sawing length up to.............[mm]......1.000 .....1.500 .....1.500
Saw table dimensions ...........[mm]..1.000x640 .1.500x640 .1.500x640
Length .....................[mm]......1.650 .....2.150 .....2.150
Width .....................[mm].......650 ...... 650 ...... 650
Height (without legs) ............[mm].......780 ...... 780 ...... 780
Weight ..................... [kg].......118 ...... 136 ...... 136
Noise level .................dB(A)........87 ....... 87 ....... 89
Noise level during sawing .......dB(A)........96 ....... 96 ....... 98

16
DIAMOND3®3510/15RS - 4015RSGB
the knobs.
Saw head
The saw head is constructed of welded
steel components. The height adjustment
of the saw head is kept in balance by a
spring. Two handles secure the saw head
at the desired height.
Saw cover
The saw cover is a welded steel plate
cap, simple to remove and install for
changing the saw blade by unscrewing
2 knobs.
Saw spindle
The motor flange is mounted on the saw
spindle. The saw flange is to be mounted
on the saw spindle with a hexagon nut
to clamp the saw blade. (Attention: Left-
handed screw thread.)
Saw table
The saw table is constructed of welded
stainless steel components, equipped with
anti-slip rubber and adjustable side stop.
Cooling system
The electrical water pump is switched on
simultaneously with the saw motor and
supplies cooling water to both sides of the
saw blade. A drain hole, with a plug, is
located in the water container. The mud
flaps prevent most of the water mist and
make sure most water flows back in the
water container.
unpAckIng And set up
Setting up
• Unpack the sawing machine and
inspect for any damaged parts.
• Install the legs in the sockets at the
underside of the water container and
fasten with the knobs.
• Level the sawing machine by adjusting
the legs in the sockets and make sure
its stable.
Saw head
• Unscrew the transportation lock.
• By loosening the two handles the saw
head can be positioned at the desired
height.
ATTENTION! The saw head is
tightened by a spring and may
accidentally jump up when the
knob is loosened.
• For 45° Jolly sawing the upper frame
with the saw head can be tilted at a
45° angle. By loosening the 2 handles
at the front and back of the machine,
the upper frame can be tilted until the
end of the factory predefined 45°
angle.
Cooling system
ATTENTION! Operating the
water pump without a sufficient
supply of water may result in
pump damage.
• Place the plug in the drain of the water
container.
• Fill up the container with water until the

17
DIAMOND3®3510/15RS - 4015RS GB
water pump is completely submerged.
Connecting to power supply
First, check whether:
• the line voltage corresponds with the
data on the machineís specifications
plate,
• there is a grounded power supply,
• the extension cord wire cross-section is
at least 2,5 mm2.
Motor protection
The motor is equipped with a thermal
safety switch for protection against an
overload. When the motor gets over-
heated, the switch falls back into its initial
position and can only be switched on
again after the motor is cooled down. The
switch also protects against power failure.
When the power returns, the motor will not
start on its own but must be switched on
by hand.
Installing the saw blade
WARNING! Make sure to dis-
connect the machine from the
power supply before fitting or
switching the saw blade or when
doing any maintenance on the
machine.
• Remove saw cover.
• Block the sawing spindle with the
8 mm Allen wrench.
• Unscrew the hexagon nut with the
wrench and remove the saw flange.
(Attention: Left-handed screw thread.)
• Clean the saw flanges.
• Fit the saw blade on the centre ring of
the motor flange. (Check the direction
of rotation and make sure the blade is
well centered.)
• Mount saw flange and tighten with
the hexagon nut. Place saw cover and
tighten with the 2 knobs.
vArIous sAwIng
processes
One-step sawing
(Use only original saw blades as advised
by the manufacturer.)
• Move saw head down until the saw is
approximately 10 mm below the saw
table.
• Secure saw head with the two han-
dles.
• Place the material to be cut on the
sawing table and position against the
fixed stop and eventually the adjust-
able stop.
• Hold material to be cut with one hand
while making sure your hand is not to
close to the saw blade.
• Pull the saw head with medium force
with the other hand through the mate-
rial.
Multi-step sawing
During this sawing process the saw is posi-
tioned at the desired height and moved
back and forth through the material to be
cut until after a number of steps it is com-
pletely cut through.
• Place the material to be cut on the
sawing table and position against the
fixed stop and eventually the adjust-
able stop.
• Position the saw head at the desired
height
• Hold material to be cut with one hand
while making sure your hand is not to
18
DIAMOND3®3510/15RS - 4015RSGB
container is better.
• Regularly check the saw flanges for
wearing out and replace if necessary.
Diamond blade dressing
Diamond blades performs best when they
are dressed.
After time and use, diamonds on the outer
edge of the blade might become glazed
or dull. This will reduce cutting efficiency
and possibly cause the blade to bend.
As a result the cut will not be straight and
mis-aligned. When this occurs, the blade
needs to be dressed.
The diamond blade can be dressed with a
dressing stick.
Dressing procedure(s):
• Place a dressing stick on the saw table
• Make approx. 10 cuts through the
dressing stick.
The diamond blade should be sharp again
and ready for further efficient cutting.
envIronmentAl
protectIon
Do not dispose of the appliance
with domestic waste. Dispose of
the appliance only via an author-
ized waste management com-
pany or your municipal waste
management organisation. Adhere also to
the applicable regulations. In case of
doubt refer to your waste management
organisation. Recycle all packaging mate-
rial in an environmentally friendly manner.
close to the saw blade.
• Switch the machine on and pull the
saw head with medium force with the
other hand through the material.
sAfety
Besides the valid safety regulations atten-
tion to the following items should be made:
• Carefully follow the directions of set-
ting up and working with the sawing
machine.
• Carefully check that the electrical con-
nections are correct.
• Electrical cables should not come in
contact with water or water spray.
• Damaged saw blades should be
replaced immediately.
• Secure material to be cut by hand dur-
ing sawing.
• Make sure your hands stay away as
far as possible from the rotating saw
blade.
• Wear protective goggles during saw-
ing.
• Wear hearing protection during saw-
ing.
mAIntenAnce
• The cooling water should be replaced
and/or replenished regularly.
• It is recommended to clean the water
container, pump, hoses and spray noz-
zle on a regular basis. For example,
place the pomp in a bucket of clean
water after the sawing job and run the
machine for a minute or so. This also
guarantees a longer lifetime of the
pump.
• When the machine is not used for a
longer period, the pump should not
remain in the muddy cooling water.
Cleaning the pump as described
above and leaving it outside the water

19
DIAMOND3®3510/15RS - 4015RS GB
troubleshootIng
Problem Cause Solution
The machine
doesn’t start. The power supply cable is
damaged or not properly con-
nected.
No voltage in the power outlet.
Start switch is damaged.
Press the plug firmly in the power
outlet. Check the power supply
cable.
Have the power outlet checked.
Have the switch replaced.
Water doesn’t flow
at the blade but the
pump is running.
The sprayers are clogged.
The water level in the water bin
is not sufficient. The pump is not
totally submerged.
Water valve is closed.
Clean the sprayers.
Fill the water bin with clean
water until the pump is totally
submerged.
Open the valve.
Motor isn’t running
smoothly. Water may have seeped
through inside the motor.
Capacitor is damaged.
Damaged motor bearing.
Unplug the power cable and
consult your local dealer.
Pump isn’t running. The impeller or suction filter of
the pump is damaged.
No proper connection of the
power cable.
Replace damaged parts.
Have the connection checked.
Cutting out of align-
ment. Machine is not leveled out.
Unstable working surface.
Improper or glazed diamond
blade.
Loosen the screws for the legs.
Pick up the machine a little bit on
one end. Let the machine down
again and tighten screws. Per-
form the same procedure on the
other end. The machine should
now be leveled out.
Make sure the machine is placed
on a leveled surface.
Replace or dress the diamond
blade.
declArAtIon of
conformIty
We declare under our sole responsibility
that this product is in conformity with the
following standards or standardization
documents.
98/392/EEC, 91/368/EEC,
93/44/EEC, 93/68/EEC,
89/336/EEC, 92/31/EEC,
73/23/EEC
02
Subject to change without notice.
For spare parts or advice contact
B+BTec
Munterij 8
4762 AH Zevenbergen
The Netherlands
+31 168 331 260
20
DIAMOND3®3510/15RS - 4015RSGB
spAre pArts
Pos.# Part nr. 115V Part nr. 230V Part nr. Description
3510/3515RS 3510/3515RS 4015RS
01 6.516.009 ......6.516.010 .......6.516.015 ............Motor
02 6.513.214 ......6.513.215 .......n.a. ..............Capacitor
03 6.509.010 ................................. Adjustable Handle
04 6.509.090 .........................................Handle
05 6.005.792 ..........................................Knob
06 6.509.053 . . . . . . . . . . . . . . . . . . . . . .6.509.054 ...........Handle
07 6.516.012 . . . . . . . . . . . . . . . . . . . . . .6.516.017 .......Motor Flange
08 6.516.011 . . . . . . . . . . . . . . . . . . . . . .6.516.016 ........Saw Flange
09 6.516.013 ......................................Flange Nut
10 6.513.294 ......6.513.295 . . . . . . . . . . . . . . . . . . . . . . . . . . . Pump
11 4.800.080 ......................................Guiding Rol
12 6.504.117 ......................................Ball Bearing
13 6.504.225 ......................................Ball Bearing
14 6.509.095 .........................................Handle
15 Not appl. .......6.513.210 .......6.513.235 ....Thermal Protection
16 6.513.221 ......6.513.220 .......6.513.255 ........... Switch
This manual suits for next models
2
Table of contents
Languages:
Other B+BTec Saw manuals


