Braaap MotoE 10000W User manual
MotoE 10000W
User Manual

- 2 -
Table of Contents
Foreword ............................................................................................................................................................................................................................................................................ - 4 -
Important Information........................................................................................................................................................................................................................................................ - 5 -
User’s Notice...................................................................................................................................................................................................................................................................... - 6 -
Accessories and Safety Roles......................................................................................................................................................................................................................................... - 6 -
Safe Riding..................................................................................................................................................................................................................................................................... - 6 -
Safe Riding Continued ................................................................................................................................................................................................................................................... - 7 -
Operation
.......................................................................................................................................................................................................................................................................... - 8 -
Operation
.......................................................................................................................................................................................................................................................................... - 9 -
Operation
........................................................................................................................................................................................................................................................................ - 10 -
Display
........................................................................................................................................................................................................................................................................ - 10 -
Description of the display features
.......................................................................................................................................................................................................................... - 11 -
Features
........................................................................................................................................................................................................................................................................... - 13 -
Ignition Switch
........................................................................................................................................................................................................................................................... - 13 -
Keys.............................................................................................................................................................................................................................................................................. - 13 -
Steering
Lock................................................................................................................................................................................................................................................................. - 13 -
Left Handlebar
........................................................................................................................................................................................................................................................... - 14 -
Left Handlebar (Cont)
............................................................................................................................................................................................................................................... - 15 -
Right handlebar
........................................................................................................................................................................................................................................................... - 16 -
Right handlebar (Cont)
............................................................................................................................................................................................................................................... - 17 -
Using the Fob
................................................................................................................................................................................................................................................................ - 18 -
If the alarm is in active mode
.......................................................................................................................................................................................................................................... - 19 -

- 3 -
Side stand ..................................................................................................................................................................................................................................................................... - 19 -
Recommended treatment of FOB................................................................................................................................................................................................................................. - 19 -
KickStarter
.................................................................................................................................................................................................................................................................... - 20 -
Brake Fluid................................................................................................................................................................................................................................................................... - 20 -
Running in Period............................................................................................................................................................................................................................................................. - 20 -
Shock Suspension Valve
.......................................................................................................................................................................................................................................... - 21 -
Charging the MotoE
.................................................................................................................................................................................................................................................. - 22 -
Location of Charging.................................................................................................................................................................................................................................................... - 23 -
Bike Charging
............................................................................................................................................................................................................................................................ - 23 -
Riding the MotoE 10000W
...................................................................................................................................................................................................................................... - 25 -
Driving
on slopes
............................................................................................................................................................................................................................................................. - 25 -
Use
Brake
and
Parking
..................................................................................................................................................................................................................................................... - 25 -
Safely Parking your MotoE 10000W ........................................................................................................................................................................................................................... - 25 -
Pre-riding Inspection
..................................................................................................................................................................................................................................................... - 26 -
Inspection and maintenance
........................................................................................................................................................................................................................................... - 27 -
Inspection and Maintenance Manual................................................................................................................................................................................................................................ - 28 -
Service Manual................................................................................................................................................................................................................................................................. - 29 -
Parts, Usage, and Replacements
.................................................................................................................................................................................................................................. - 31 -
Tire Pressure................................................................................................................................................................................................................................................................. - 31 -
If your bike won’t start................................................................................................................................................................................................................................................. - 31 -
Maintenance Record Keeping .......................................................................................................................................................................................................................................... - 34 -
Logbook............................................................................................................................................................................................................................................................................ - 35 -

- 4 -
Foreword
Thank you so much for your purchase of the Braaap MotoE 10000W. The MotoE 10000W is designed and manufactured with cutting-
edge technology. It is engineered for fun and designed to make you want to say ‘braaap’ every time you ride!
Riding is one of the most exciting experiences. For the best performance from your MotoE 10000W become very familiar with the rules
and demands suggested in the manual before riding.
The manual summarises the MotoE 10000W’s general maintenance and service guidelines. Following the under-mentioned rules, you
should ensure a long-term smooth and trouble-free operation of your MotoE 10000W.
The specification and design are subject to change without further notice. The shown weight and size are approximations.

- 5 -
Important Information
This document will take you through the features of the MotoE 10000W. It is designed so that once it has been read, the new rider will have a good
understanding of how to operate this motorcycle.
Using this manual:
The manual generally splits pages into two columns. The bottom of the right column will lead to the following page.
Pleasereadthroughthismanualand abide by eachrule andillustration.
Payspecial attentiontothe partassigned thesewords:
Warning:
High alert to potential danger(s) that may lead to personal injury
or lossof lifeifthe instructions listed are not followed
Caution:
Alertto medium or high dangerthreatsthatmaycause damageto parts or injurytothe rider ifthe instructionsare notfollowed.
Note:
Alert to light danger. The note expands on points made to give you more information about the bike so youcan avoid damage if theinstructions are
followed

- 6 -
User’s Notice
Accessories and Safety Roles
You can select various kinds of accessories to add to your MotoE 10000W,
but improper assembly may bring about danger and damage.
When loading additional cargo or installing accessories that may add to the
air resistance, keep the center of gravity of cargo low and close to the center
of gravity of the motorcycle. You must check the rack and other parts are
installed carefully and make sure they are secured, otherwise, offset of the
center of gravity may induce danger.
Check and make sure the bikes' minimum ground clearance and inclination
toward the sides are balanced. Improper installation of accessories is very
likely to decrease the clearance and may become a safety concern. Always
check the installation before riding it to make sure it won’t prevent you from
parking and turning.
If you install accessories at the steering stem or the fore fork, the steering
may be influenced, and the load may induce vibration of the foreparts.
Therefore, the weight of accessories on the steering stem or the fore fork
must be kept to a minimum.
Greater air resistance caused by windshields, backrests, and travelling
boxes, including saddlebags, may influence the MotoE 10000W’s
stability. Improper installation or badly designed accessories would
endanger riding, soyou must
becareful toselect and install these
accessories properly.
The installation of accessories must not restrict the rider's operation of
the motorcycle.
Additional electricdevices may render primarycoiloverloaded,and
seriousoverload may
damagethe electric devices.This could resultin
significant danger to the bike and the rider because of insufficient power
of the motorcycle battery when riding.
Safe Riding
For your safety, please obey the following rules while riding the
motorcycle:
-
Wear a well-fitted helmet (helmets should be firm but not tight).
A safe ride begins with putting on your helmet.
-
Always wear protective clothing
-
Pay attention to avoid wearing loose clothes. Please wear tight
well fitted clothes to ensure your hands and feet can move freely.

- 7 -
Safe Riding Continued
Please carefully read the contents in the Pre-ride inspection section of the
manual. Always check before starting the engine.
Get familiar with the structure and performance of this motorcycle.
Your riding skills and knowledge of the structure of this motorcycle are the
basis of safe riding. Practice riding in an open area without other vehicles
when first getting used to the MotoE 10000W.
Get to know your speed limit for safe riding
The motorcycles' safety speed depends on the ground condition and your
riding skills.
Do not ride after drinking alcohol, taking drugs, or taking certain
medications.
Be smart and alert while riding your motorcycle.
Pay special attention when riding in the rain.
Riding on wet roads is very dangerous. Keep safe distances from the vehicles
in front of you. The braking distance on wet roads can be up to double the
distance of braking in dry conditions.
This type of motorcycle is suitable to ride on bitumen roads
.
- 8 -
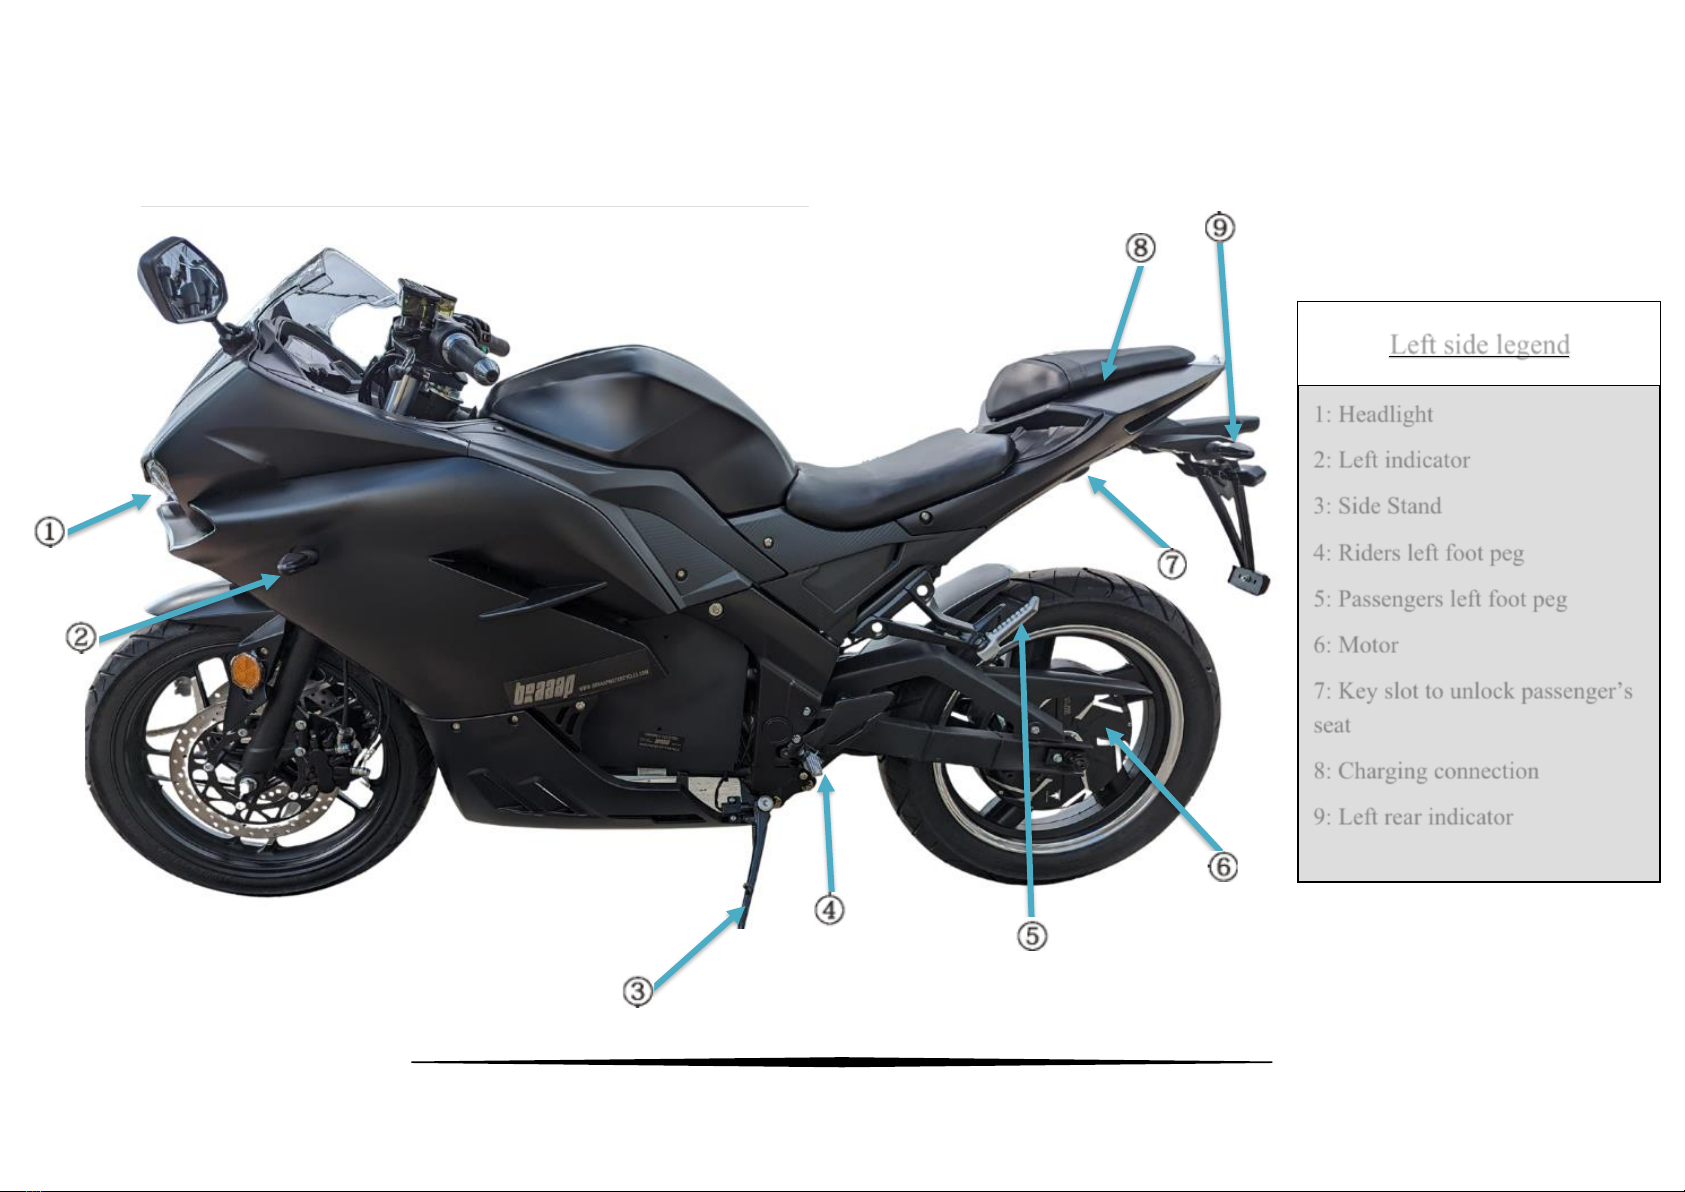
Operation
1: Headlight
2: Left indicator
3: Side Stand
4: Riders left foot peg
5: Passengers left foot peg
6: Motor
7: Key slot to unlock passenger’s
seat
8: Charging connection
9: Left rear indicator
Left side legend

- 9 -
Operation
1: Front right indicator
2: Rider’s foot peg
3: Rear right indicator
4: Rear view mirrors
5: Taillight/breaklight
6: Passenger’s seat
7: Rider’s seat
8: Handlebars with controls
Right side legend

- 10 -
Operation
Display
1. Potentiometer
2. Reverse
3. High Beam
4. Indicators
5. Battery bar
6. Odometer
7. Battery level volt
indicator
8. Speed in KMPH
9. Power selection
10. Lights on
11. Kill switch engaged
12. ECU –Electric Control
Unit
13. Motor
14. Features not included
(Cruise control and heated
grips)
Display legend
** Photos used may alter the colour or
brightness of the appearance of the
display.

- 11 -
Description of the display features
Please refer to the above image for the corresponding description.
Similar to a Potentiometer (1)
The throttle is basically a potentiometer. The readout from that is your rev
counter, it basically duplicates the position of the throttle.
Reverse (2)
The reverse feature of this bike reverses the bike. To use: hold the reverse
button down to activate. You must continue to hold the reverse button down
when engaging the throttle to move the bike backwards.
High Beam (3)
The high beam blue indicator will display on the dashboard when the high
beam has been activated.
Indicators (4)
The indicator lights will flicker on the display when indicators are activated.
Battery Bar (5)
The battery bar will display the level of charge remaining in the battery. 5
bars mean the battery is full or charge, and 1 bar means the battery is low and
requires a charge.
Odometer (6)
The odometer is located to the left of the battery bar. This screen, at the
location of 6 & 7 on the display above will constantly flick between the
odometer and the battery volt indicator.
Battery Volt Indicator (7)
The battery volt indicator and odometer share a screen. The screen will
constantly flick between the two features.
The battery volt indicator displays how much charge remains in the battery.
Learn to read this as you begin to use your bike as it is an accurate way to
determine how much charge remains in the bike.
Speed in KMPH (8)
This will display the speed you are riding the bike at
Power Selection (9)
The power selection indicator shows which power setting the rider is in.
Power selection options are from 1-3.
Lights on (10)
This indicator will display whether your lights are on or not.
Kill Switch Engaged (11)
This indicator shows that a kill switch is engaged. The kill switch for the
MotoE 10000W is the side stand. If the side stand is down, the bike will not
begin to move. If you have the side stand down and pull down on the throttle,
the bike will make a noise to let you know something is wrong as well.
ECU (12)
The electric control unit indicator will display if the bike is registering a
problem with the unit. If this occurs, please get in touch with Braaap support
or take your bike to a registered mechanic.
Motor (13)
The motor indicator will display if the bike is registering a problem with the
unit. If this occurs, please get in touch with Braaap support or take your bike
to a registered mechanic.

- 12 -
Features not included (14)
While the bike seems to indicate it has the option of cruise control and heated
grips, these features are not included with the bike.
Note:
The MotoE 10000W comes with ABS. It is located just to the left and
below the display. It will glow orange whenever the ABS is activated

- 13 -
Features
Ignition Switch
(OFF) All the circuits are closed, and the key can be taken
out
(ON) All the circuits are open, and the engine can start, but
the key cannot be taken out
Keys
The MotoE 10000W comes with two keys. The owner is given a
spare in the event one key gets lost.
Included with the keys are two fobs, and remote clickers for the
bike. The different uses for the fobs are detailed further down in this
manual
Steering
Lock
To lock steering, turn the front wheel to left, then insert the key into
the ignition and turn the key anti-clockwise (left) to the lock
symbol. We suggest using the steering lock while parking
.
Turn front wheel to the left then turn the key
to the left until you reach the lock symbol.
The key will push into the ignition. To be
expected. Check the wheel is firmly locked
in place.
Warning:
After the steering is locked do not push the motorcycle.
- 14 -
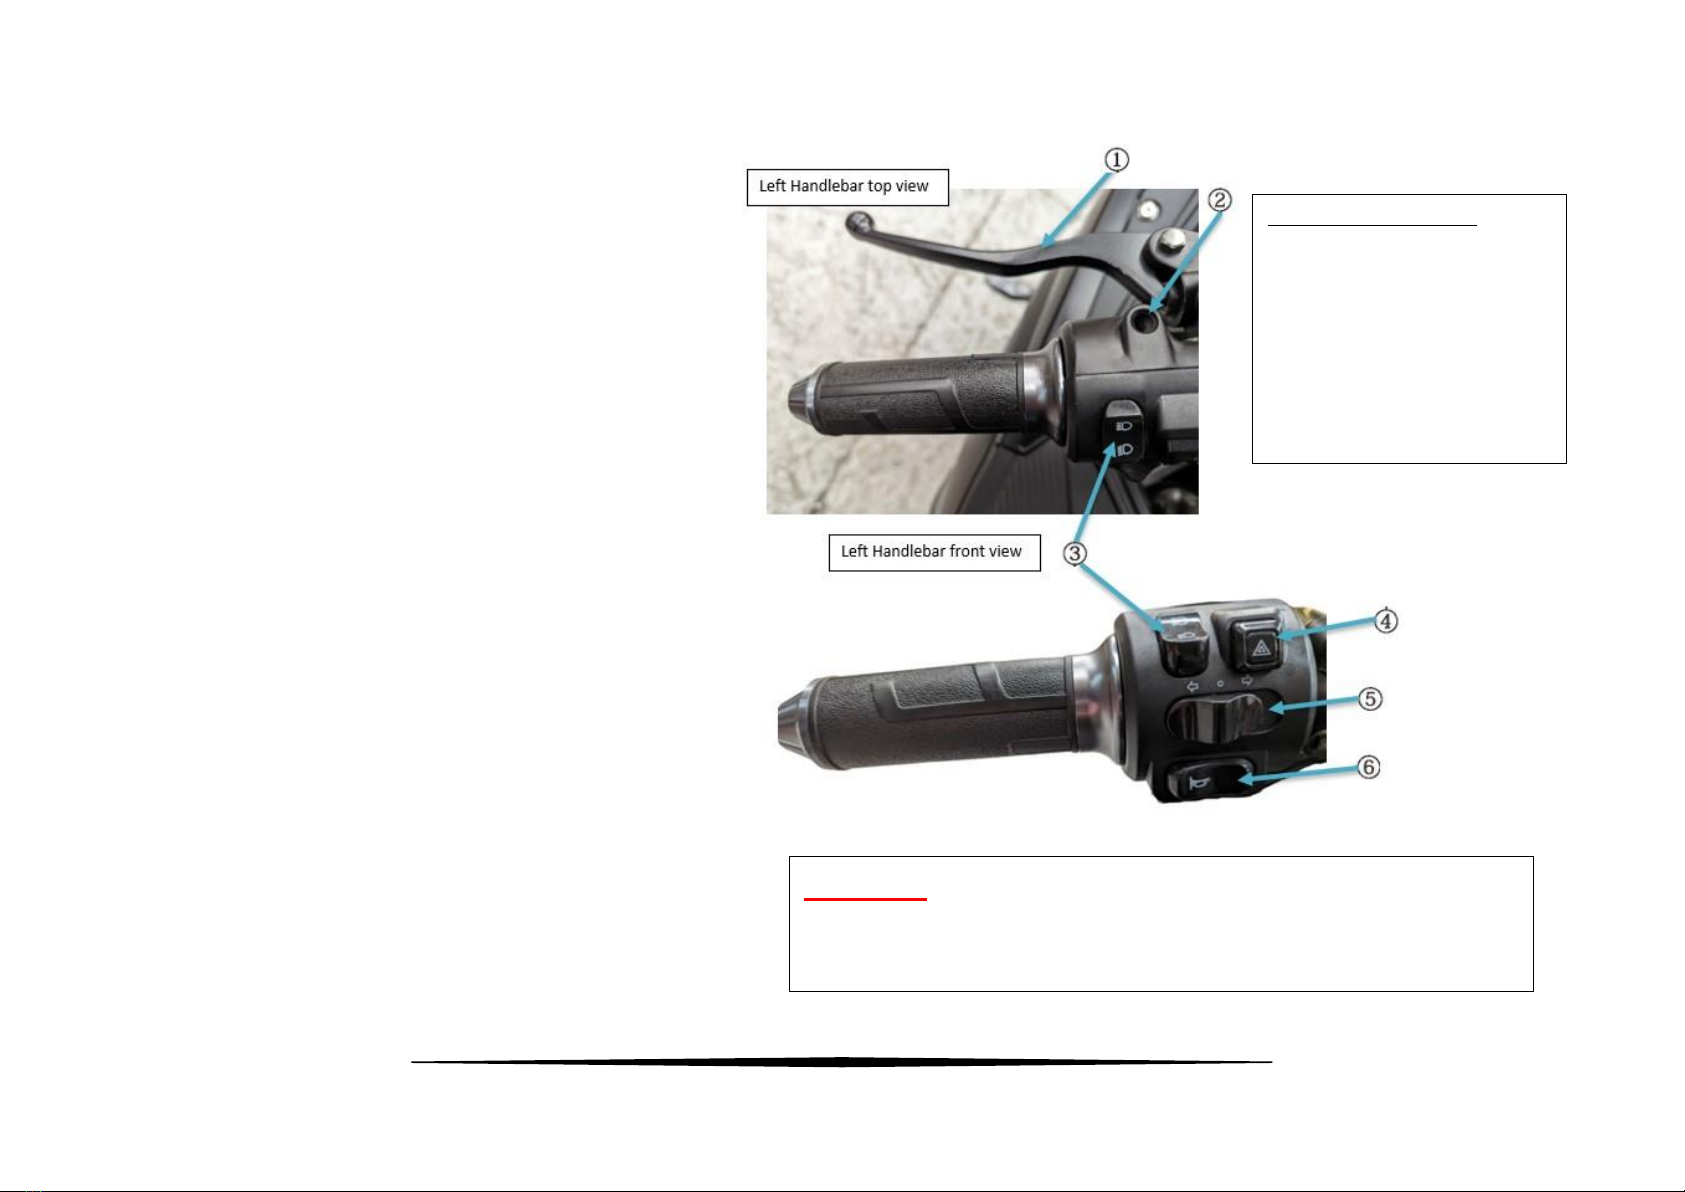
Left Handlebar
Rear brake (1)
The lever above the left handlebar activates the rear brake.
Rear View Mirror Insert (2)
You can use these inserts for a different style and position of the
rear-view mirror.
Headlight Beam Switch (3)
When the beam switch is in the forward position, the high beam is
activated. When the switch is turned to the down position, the low
beam is activated. (More information on the high and low beam
below)
Hazard Lights (4)
When the hazard light button is activated, the indicators will all
flash together on the dashboard and the front and rear indicators
signals.
Turn Signal Indicator Switch (5)
When the turning switch is pushed to the left, the left indicator will
flash. When the turning switch is pushed to the right, the right
indicator will flash. To turn off the indicator, the switch needs to
be positioned in the middle.
Horn Button (6)
When the motorcycle is on, pressing down on the horn button will
activate the horn.
Left Handlebar Features
1) Rear brake
2) Optional rear view
mirror inserts
3) High beam/low beam
4) Hazard lights
5) Indicators
6) Horn
Warning
Applying the brake will deactivate the throttle. You cannot balance
breaking and throttle at the same time.
- 15 -
Left Handlebar (Cont)
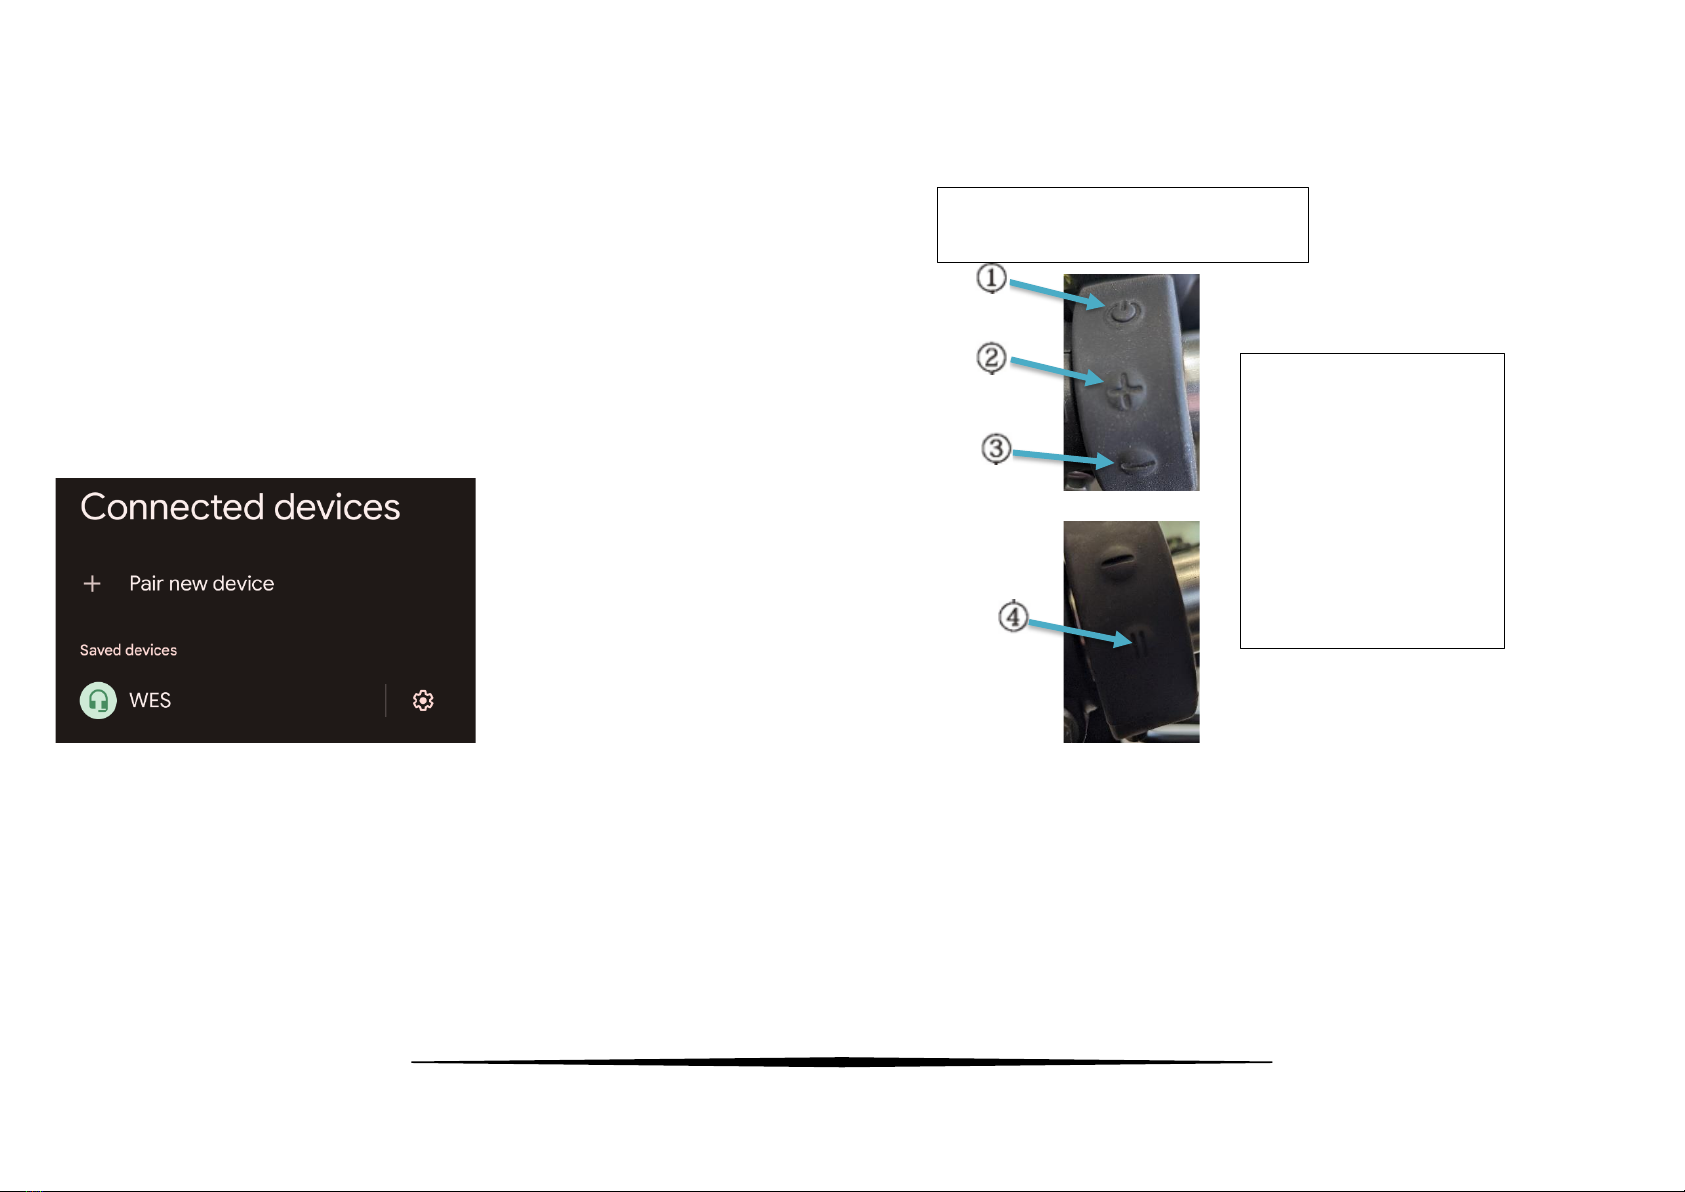
Bluetooth
The MotoE comes with Bluetooth so you can connect your phone.
The Bluetooth option is located on the left handlebar.
To activate Bluetooth, press the ‘on’button located at the top of the
Bluetooth band. You will hear a chime as the Bluetooth function turns on.
The Bluetooth name of the bike is WES as seen in the picture below.
The speaker installed in the bike is a tweeter speaker.
All one band even though there are two
photos
Legend:
Buttons on the band
On (1)
Volume Increase (2)
Volume Decrease (3)
Pause (4)

- 16 -
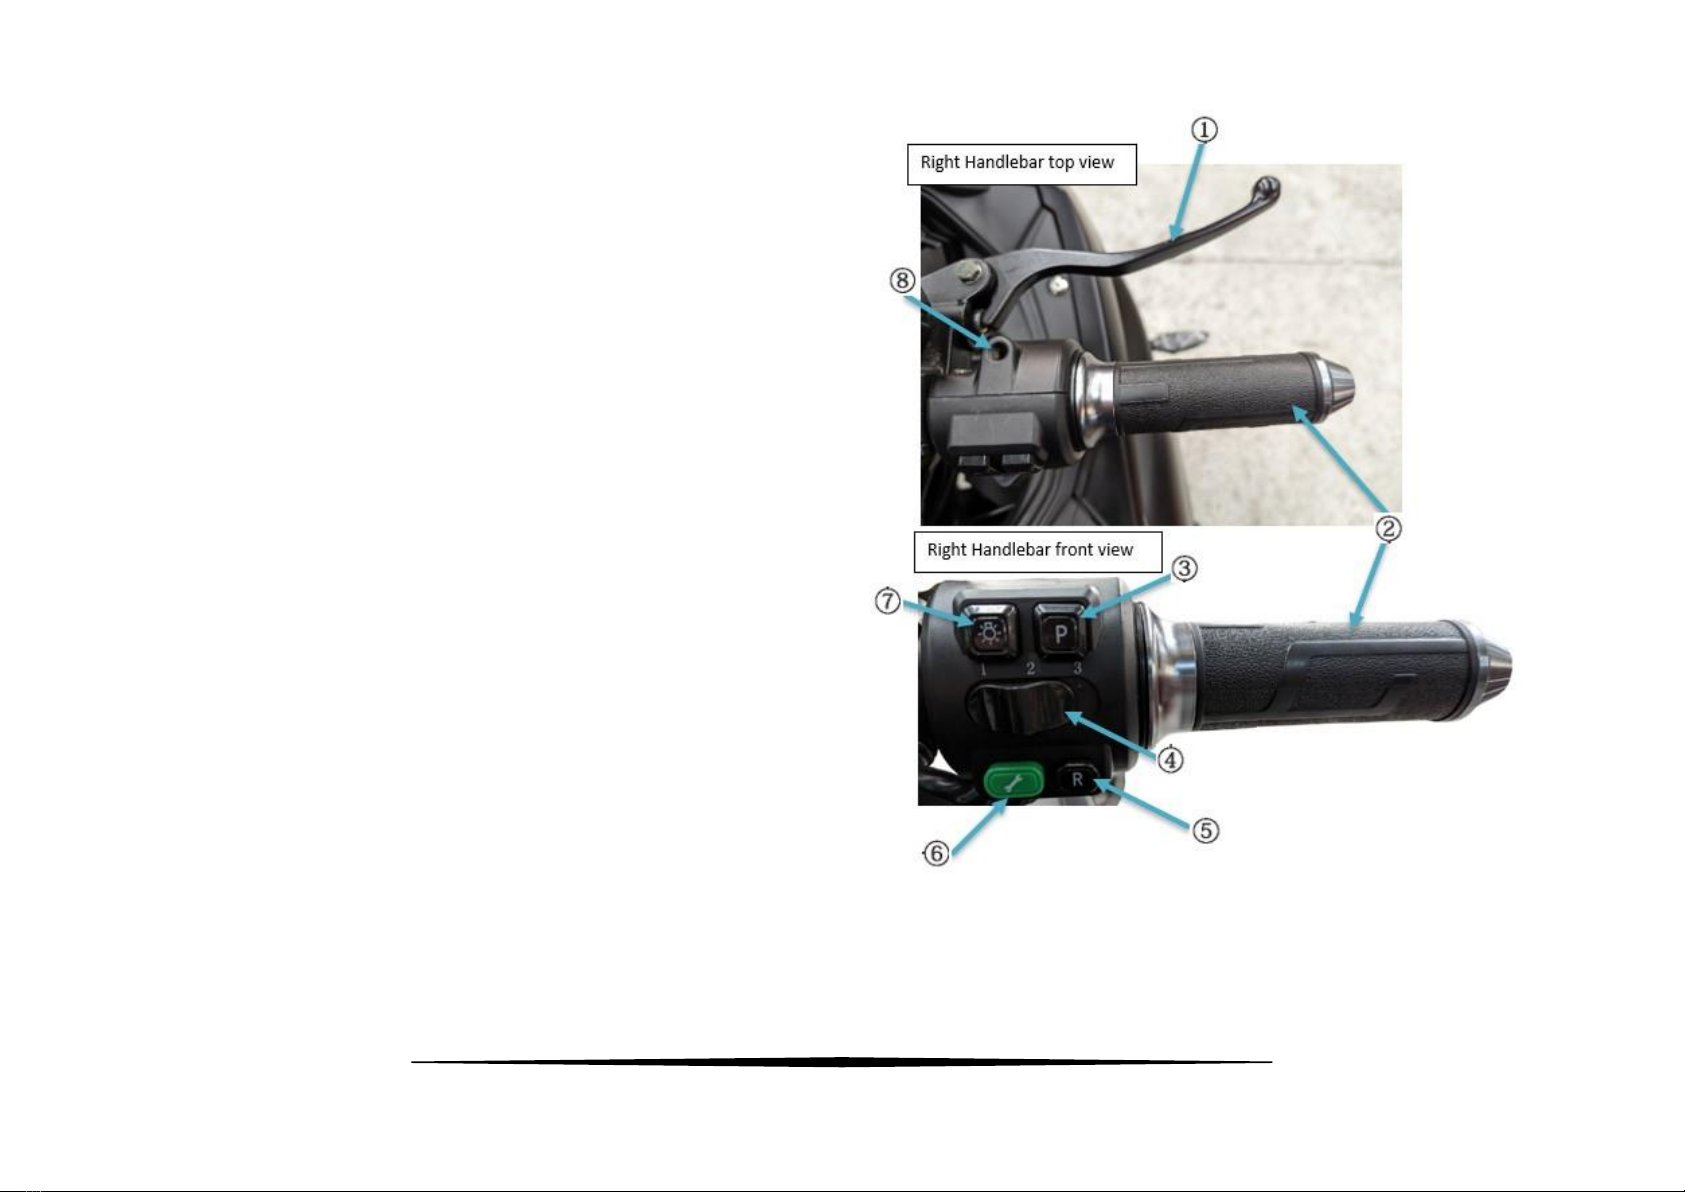
Right handlebar
Lever, Front Brake (1)
This lever will activate the brakes on the front wheel.
Throttle (2)
Pull towards the rider to engage the engine and increase speed.
Releasing the throttle will not cause the engine brake to kick in. It will
only slightly decrease the speed you are travelling at.
Park (3)
Park function disengages the throttle. It will stop the bike from rolling
forwards or backwards.
To activate the park function, click the P twice.
Power selection (4)
Power selection allows the rider to choose the power output of the bike.
The lowest setting, 1, will conserve the charge of the bike, increasing the
range. This selection will also limit the top speed of the bike. The reverse is
true for 3. In the 3
rd
power selection option, the faster the bike will
accelerate and the higher the top speed becomes. 1 is the lowest possible
power selection option. 3 is the highest possible power selection option.
Right Handlebar Features
1) Front brake
2) Throttle
3) Park feature
4) Power selection option
5) Reverse function
6) Removed feature
7) Light activation
8) Optional rear view
mirror inserts
Warning
Applying the brake will deactivate the throttle. You cannot balance
breaking and throttle at the same time.
- 17 -
Right handlebar (Cont)
Reverse function (5)
The MotoE comes with a reverse function. To utilise the reverse function of
the bike, the bike must first be turned on. To reverse, press and hold the
reverse button while gently pulling down on the throttle.
Removed feature (6)
The green spanner is a removed feature. The original purpose was to access
settings on the display. Due to ADR compliance, this feature had to be
disconnected.
Light activation (7)
This button can be used like a passer. To utilise, switch your high beams on
and press the light activation button repeated. It will cause the headlights to
flash quickly.
Rear View Mirror Insert (8)
You can use these inserts for a different style and position of the
rear-view mirror.
- 18 -
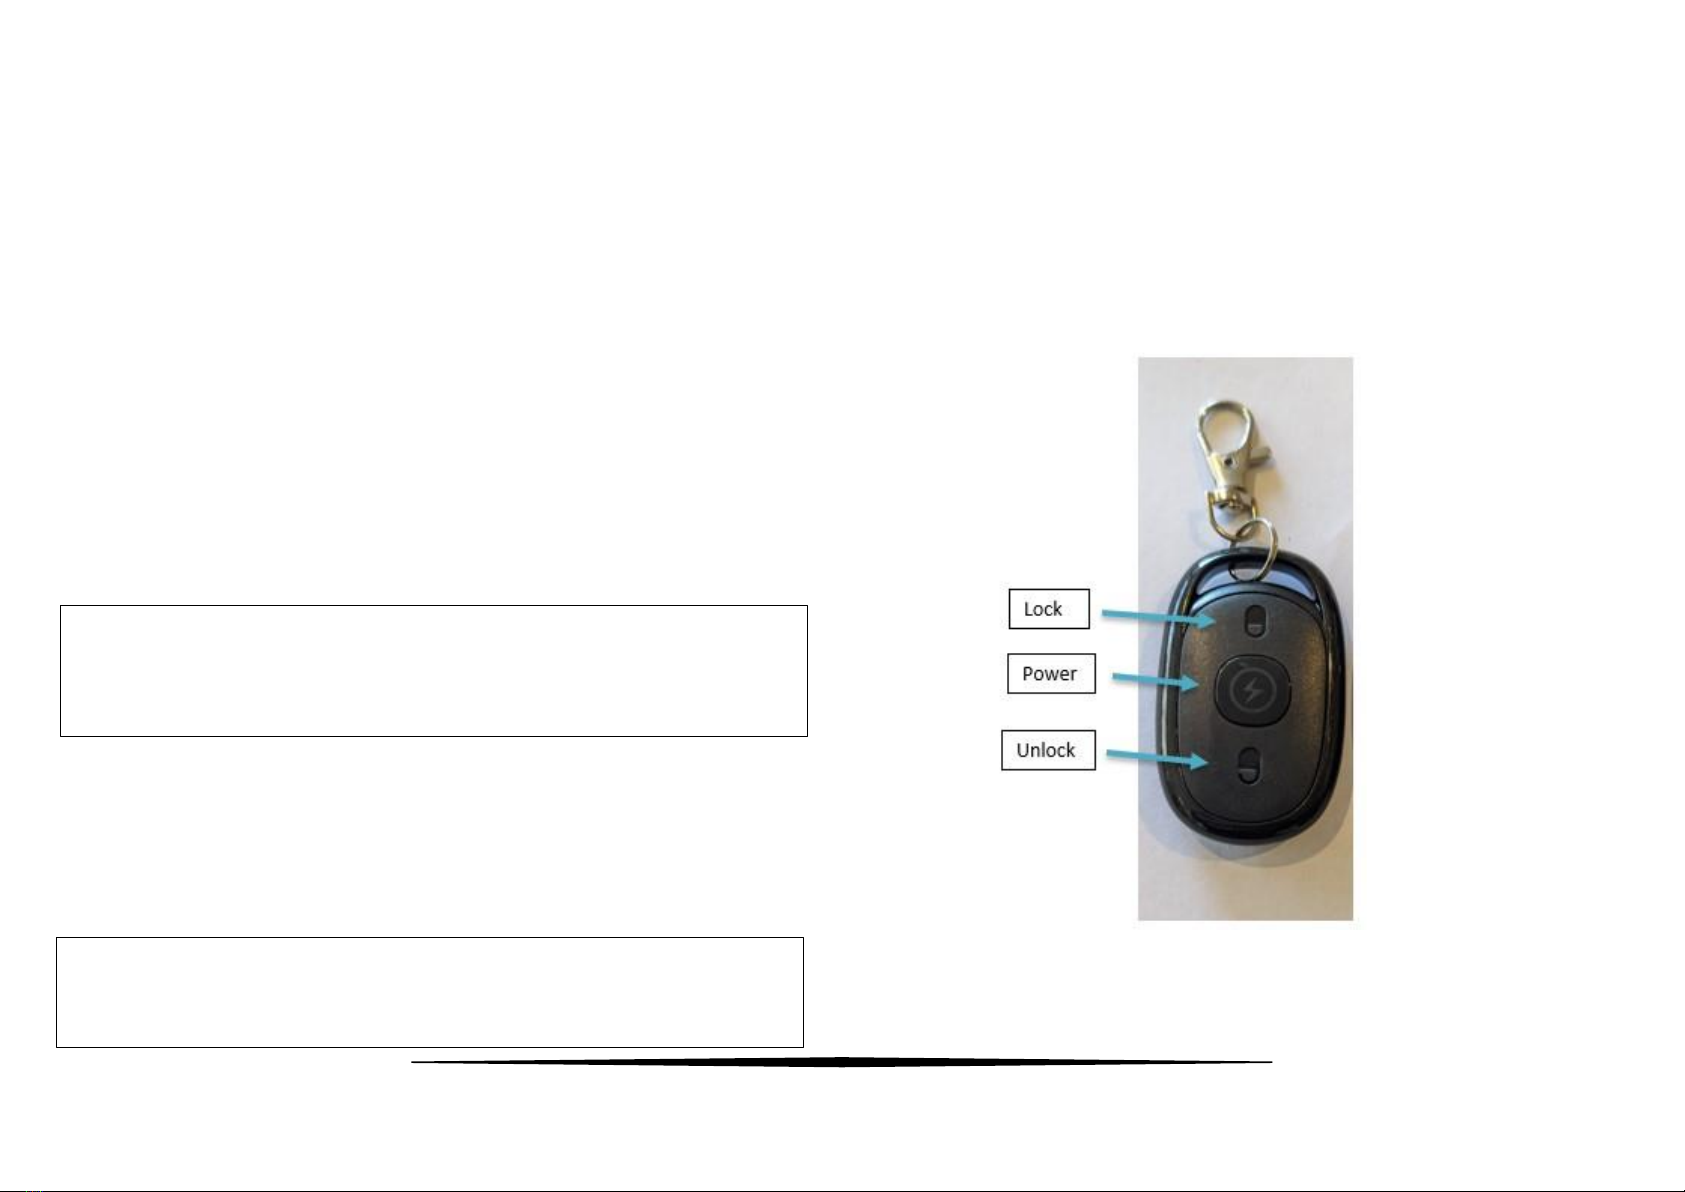
Using the Fob
Features
Lock and unlock
Engine start
Lock and Unlock
The MotoE comes with an alarm system for extra security for your bike. To
activate the alarm, turn the bike off and remove the key from the ignition. Press
the lock button. The bike will make a sound indicating the lock feature has been
activated.
To turn the lock feature off, click the unlock button. The bike will make a sound
indicating the lock feature has been deactivated.
Engine Start
The MotoE can be started and ridden without the use of a key. To start the engine
without the key, press the power button twice on the fob. The bike will make a
noise when you press it the first time. It will start up when you press it a second
time.
To turn it off without the key, press the unlock button on the fob.
.
Note
When you have turned the bike on with the fob, you cannot use the key to turn it off. It
must be turned off using the fob
Note
If you have the bike locked and try to use the key in the ignition, it will sound
the alarm. This can be turned off by pressing the unlock button on the fob.

- 19 -
If the alarm is in active mode
The alarm is activated via the lock button on the FOB, and the ignition is
turned on, the alarm will sound. When the ignition is turned on while the
alarm is activated, it will light up the dashboard momentarily.
If the alarm activated via the FOB and the brakes are applied, the dashboard
may light up momentarily. This is not a fault.
If the alarm is activated and the rider kicks the stand up before deactivating
the alarm, the alarm will sound four times.
All these things are not faults with the bike, they are a pre-alert condition and
are perfectly normal occurrences.
Side stand
If the side stand is down, to park the bike, and the ignition is on, the brake
light will be activated. If the rider applies the brakes while the side stand is
down, the brake light will already be activated and will not increase the
brightness of the brake light.
This is not a fault and is a perfectly normal occurrence.
Recommended treatment of FOB
We suggest it is not a good idea to leave the key FOB dangling off
your ignition keys, as potential swaying in the wind can cause
damage to the delicate internal electronics by it hitting into different
parts of the bike. Suggest carrying it in pocket or secure to top triple
clamp via Velcro or something similar.

- 20 -
Kick Starter
The MotoE 10000W does NOT come with a kick starter. It is an electric start
engine only
.
Brake Fluid
Brake fluid is a hydraulic fluid used in hydraulic brakes. It transfers force
into pressure to amplify braking force.
The MotoE 10000W has two brake fluid indicators on the bike. Both are
located on the handlebars.
Front handlebars
The looking glass on the handlebars indicates brake fluid levels for the front
and rear brakes.
The brake fluid to use is listed on the lid of the housing of the braking fluid.
Brake fluid should be changed every two (2) years.
Running in Period
Running in the MotoE 10000W is a simple process. Because the components
are electric, there are not many moving parts within the bike itself.
Running in the MotoE consists only of taking time to bed the brakes in.
Perform the first but alsothe most important
maintenance.
Maintenance in the initial800-1000km is the most importantof all.
Perform allthe adjustments well and tighten all the fasteners. Timely
maintenance will ensure that
theenginehasgood performanceandlonger
servicelife.
Table of contents
Other Braaap Motorcycle manuals


