Brabantia HALOAIR User manual
紙質:
128gsm雙粉紙(雙銅紙)
印刷顏色:
封面- 彩色印刷
封面以後 - 黑白印刷
摺合尺寸: A5 - 148.5(W) x 210(H)mm
加工方式: 騎馬釘書刊

BEDIENUNGSANLEITUNG
Heissluftfritteuse
DE
TECHNISCHE DATEN
220-240V~50/60Hz
Spannung: 1350W
3 Jahre Garantie
Modellnummer: BBEK1133
INSTRUCTION MANUAL
HALOAIR
EN
TECHNICAL DATA
220-240V~50/60Hz
Power: 1350W
3 year guarantee
Model number: BBEK1133
NOTICE D'UTILISATION
Friteuse à air chaud
FR
SPÉCIFICATION
220-240V~50/60Hz
Puissance : 1350W
3 ans de garantie
Modèle : BBEK1133
HANDLEIDING
Heteluchtfriteuse
NL
TECHNISCHE GEGEVENS
220-240V~50/60Hz
Voeding: 1350W
3 jaar garantie
Modelnummer: BBEK1133
www.brabantia-appliances.com


EN
IMPORTANT SAFEGUARDS
Please follow these basic safety precautions:
1. This appliance shall not be used by children from 0 year to 8 years. This
appliance can be used by children aged from 8 years and above if they are
continuously supervised. This appliance can be used by people with reduced
physical, sensory or mental capabilities or lack of experience and
knowledge if they have been given supervision or instruction concerning
use of the appliance in a safe way and understand the hazards involved.
2. Keep the appliance and its cord out of reach of children aged less than 8
years. Cleaning and user maintenance must not be done by children.
3. This appliance must be positioned on a stable surface with the handles
positioned to avoid the spillage of hot liquids.
4. The surfaces of the appliance are liable to get hot during use.
5. Never operate the appliance by means of an external timer or separate
remote-control system.
6. Children shall not play with the appliance.
7. This appliance is intended to be used in household and similar applications
such as: staff kitchen areas in shops, offices and other working
environments; farm houses; by clients in hotels, motels and other residential
type environments; bed and breakfast type environments.
8. Don’t immerse the appliance in liquid.
9. Never allow water or other liquids to enter the appliance so as to avoid
electric shock.
10. If the supply cord is damaged, it must be replaced by the manufacturer, its
service agent or similarly qualified persons in order to avoid a hazard.
11. Don’t lean or reach over the HaloAir while it is in use as it is hot.
12. Don’t carry or pass anything through the space over or near the HaloAir.
13. Don’t try to move or carry the HaloAir as it contains hot oil and
ingredients. Let it cool down fully first.
14. Don’t leave the HaloAir unattended while plugged in.
15. Don’t put the HaloAir under cupboards, shelves, or anything that might be
damaged by heat or steam. Keep it clear of combustible materials like
curtains, or drapes.
16. Never let the power cord hang over the edge of a work top, touch hot
surfaces or become knotted, trapped or pinched.
17. Don’t put anything on top of the HaloAir while it’s in use and make sure
not to cover the air inlet and outlet.
18. Unplug the HaloAir when not in use and before moving and cleaning.
19. Let it cool down fully before cleaning or storing away.
20. Don’t use accessories or attachments unless supplied with the appliance.
21. Don’t use the HaloAir for anything other than cooking the ingredients
indicated in the manual.
22. Don’t use the HaloAir if it is damaged or malfunctions.
23. Before first use, clean the HaloAir to remove manufacturing dust, etc.
24. Sit the HaloAir on a stable, level, heat-resistant surface at least 75cm
above the floor surface and with at least 5cm space around the HaloAir.
25. Position the HaloAir so the basket handle, when in the raise position,
doesn’t extend beyond the edge of the work surface where it might be
caught or knocked accidentally.
26. Always put ingredients in the frying basket to avoid contact with the
heating element.
27. Never pour oil into the frying basket because it may cause a fire hazard.
28. Line a colander or suitable container with a paper towel to drain the food
after frying.
29. When using your HaloAir, always use oven gloves. They don’t just protect
your hands from heat, they protect them from drips and splashes too which
will cause injury and burns.
30. Do not touch the interior of the appliance during use as it becomes very hot
and can cause injury or burns.
1

Please follow these basic safety precautions:
1. This appliance shall not be used by children from 0 year to 8 years. This
appliance can be used by children aged from 8 years and above if they are
continuously supervised. This appliance can be used by people with reduced
physical, sensory or mental capabilities or lack of experience and
knowledge if they have been given supervision or instruction concerning
use of the appliance in a safe way and understand the hazards involved.
2. Keep the appliance and its cord out of reach of children aged less than 8
years. Cleaning and user maintenance must not be done by children.
3. This appliance must be positioned on a stable surface with the handles
positioned to avoid the spillage of hot liquids.
4. The surfaces of the appliance are liable to get hot during use.
5. Never operate the appliance by means of an external timer or separate
remote-control system.
6. Children shall not play with the appliance.
7. This appliance is intended to be used in household and similar applications
such as: staff kitchen areas in shops, offices and other working
environments; farm houses; by clients in hotels, motels and other residential
type environments; bed and breakfast type environments.
8. Don’t immerse the appliance in liquid.
9. Never allow water or other liquids to enter the appliance so as to avoid
electric shock.
10. If the supply cord is damaged, it must be replaced by the manufacturer, its
service agent or similarly qualified persons in order to avoid a hazard.
11. Don’t lean or reach over the HaloAir while it is in use as it is hot.
12. Don’t carry or pass anything through the space over or near the HaloAir.
13. Don’t try to move or carry the HaloAir as it contains hot oil and
ingredients. Let it cool down fully first.
14. Don’t leave the HaloAir unattended while plugged in.
15. Don’t put the HaloAir under cupboards, shelves, or anything that might be
damaged by heat or steam. Keep it clear of combustible materials like
curtains, or drapes.
16. Never let the power cord hang over the edge of a work top, touch hot
surfaces or become knotted, trapped or pinched.
17. Don’t put anything on top of the HaloAir while it’s in use and make sure
not to cover the air inlet and outlet.
18. Unplug the HaloAir when not in use and before moving and cleaning.
19. Let it cool down fully before cleaning or storing away.
20. Don’t use accessories or attachments unless supplied with the appliance.
21. Don’t use the HaloAir for anything other than cooking the ingredients
indicated in the manual.
22. Don’t use the HaloAir if it is damaged or malfunctions.
23. Before first use, clean the HaloAir to remove manufacturing dust, etc.
24. Sit the HaloAir on a stable, level, heat-resistant surface at least 75cm
above the floor surface and with at least 5cm space around the HaloAir.
25. Position the HaloAir so the basket handle, when in the raise position,
doesn’t extend beyond the edge of the work surface where it might be
caught or knocked accidentally.
26. Always put ingredients in the frying basket to avoid contact with the
heating element.
27. Never pour oil into the frying basket because it may cause a fire hazard.
28. Line a colander or suitable container with a paper towel to drain the food
after frying.
29. When using your HaloAir, always use oven gloves. They don’t just protect
your hands from heat, they protect them from drips and splashes too which
will cause injury and burns.
30. Do not touch the interior of the appliance during use as it becomes very hot
and can cause injury or burns.
2

GETTING TO KNOW YOUR HALOAIR
1: Air vents
2: Display panel
3: Tray
4: Power cord
5: Frying basket
6: Basket release button
7: Basket handle
Display screen
1
4
5
6
7
2
3
3

1. “ON/OFF” key
Press the “ON/OFF” key and the display panel will turn on.
2.“START” key
Press the “START” key and the appliance will begin to work at a
temperature of 180 degrees celsius for a period of 15 minutes.
3. “COOL” key
Press the “COOL” key and the product defaults to cool for 5 minutes.
4. “MENU” key
Press the “MENU” key to select the correct ingredients.
5. “TIME +” key
Press the “TIME +” key to increase the working time by 1 minute at one
time.
6. “TIME –” key
Press the “TIME –” key to reduce the working time by 1 minute at one
time.
7. "TEMPERATURE +" key
Press the "TEMPERATURE +" key, to increase the temperature in
increments of 5 degrees celsius.
8. "TEMPERATURE -" key
Press the "TEMPERATURE -" key to reduce the temperature in increments
of 5 degrees celsius at a time.
Power display
Insert the plug into the wall socket and then the appliance will make a noise.
Press the “ON/OFF” key and the display panel will turn on.
Time/ Temperature display
Press the “START” key and the appliance will be ready for use. The initial set
temperature is 175 degrees celsius. Press the "TEMPERATURE +" and
"TEMPERATURE -" keys to adjust the temperature. The initial time is set for 15
minutes, press the "TIME +" and "TIME -" to adjust the cooking time.
4

USING YOUR HALOAIR
Before first use
1. Remove all packing materials.
2. Remove the sticker or label on the appliance.
3. Thoroughly clean the frying basket and tray with hot water, detergent, and
a non-abrasive sponge.
Note: You can also clean these parts in a dishwasher.
4. Wipe the interior and exterior of the appliance with a damp cloth.
5. The HaloAir is heated by hot air. Never pour oil or grease in the frying
basket or tray.
Preparing for use
1. Place the appliance on a firm and flat surface. Never place the appliance on
a non-heat resistant surface.
2. Place the frying basket correctly in the tray. Never place items above the
appliance. This will obstruct the airflow and affect the hot air heating
process.
Using your HaloAir
This HaloAir can be used to cook many different ingredients.
1. Plug in the appliance.
2. Carefully pull out the tray and frying basket from the HaloAir.
3. Put the ingredients into the frying basket.
4. Place the frying basket back into the tray and slide it into the HaloAir.
5. Never use the HaloAir without the tray.
6. NOTE: Do not touch the tray and frying basket for a while after use because
they become very hot. Use the handle only to remove the frying basket.
7. Press the "ON/OFF" key to activate the display screen. Choose the correct
icon on the screen (see Cooking Guide below). If there is no correct icon for
your chosen ingredients, you can also customise the operation and select
the desired temperature and time of cooking. By default, the initial set
temperature is 180 Celsius and the cooking time is 15 minutes. See the
recommendations below to determine the appropriate temperature.
8. The ingredients begin to heat up after pressing the "START" key. If the
product is cold, the cooking time should be increased by 3 minutes.
9. NOTE: You can preheat the HaloAir without adding ingredients. Preheat for
Working status display
Press the "START" key and the appliance will begin to work and the time/
temperature will show on the display panel alternately.
5

3 minutes, then add the ingredients to the frying basket and adjust the
timer to the desired cooking time.
10. Some ingredients need to be shaken halfway through the cooking process.
To shake the ingredients, hold the handle, lift the frying basket out of the
tray and then shake the basket to move the ingredients around. After that,
place the frying basket back into the tray and then slide it back into the
HaloAir. You do not need to reset the program once you have placed the
frying basket and tray back into the HaloAir.
11. When the display time number is zero, it indicates that the cooking time is
complete. Pull the tray out of the appliance and place it on a heat-resistant
surface.
12. NOTE: You can also manually stop cooking. To do this, press the "ON/OFF"
key.
13. Check if the ingredients have been cooked.
14. If the ingredients still require more cooking time, just slide the tray back
into the appliance and set the time for a few more minutes.
15. After frying with hot air, the tray, frying basket and ingredients are still hot.
Steam can be ejected from the frying basket depending on the type of
ingredients used.
16. Transfer the ingredients from the frying basket into a bowl or dish. To avoid
the excess oil covering the cooked ingredients, you can remove the
ingredients using tongs or another kitchen utensil.
17. TIP: To remove bulky or fragile ingredients, please use tongs to lift the
ingredients out of the frying basket.
18. After a batch of ingredients has been cooked, the HaloAir can start cooking
the next batch at any time.
6
COOKING GUIDE
You can use the 8 preset menus (please see table below) to make the cooking
process easier and quicker. If there is no correct icon for your chosen
ingredients, you can also customise the operation and select the desired
temperature and time of cooking. A detailed guide is provided below.
If you choose not to use one of the preset menus, the guide below will help you
select the right settings for the ingredients you want to cook.
NOTE: Please keep in mind that these settings are for reference only. We can't
guarantee the best setting for your ingredients because of the different sources,
sizes, shapes and brands of the ingredients.
When removing the tray and frying basket during the cooking process, please
return them to the HaloAir as soon as possible to avoid affecting the final
result.
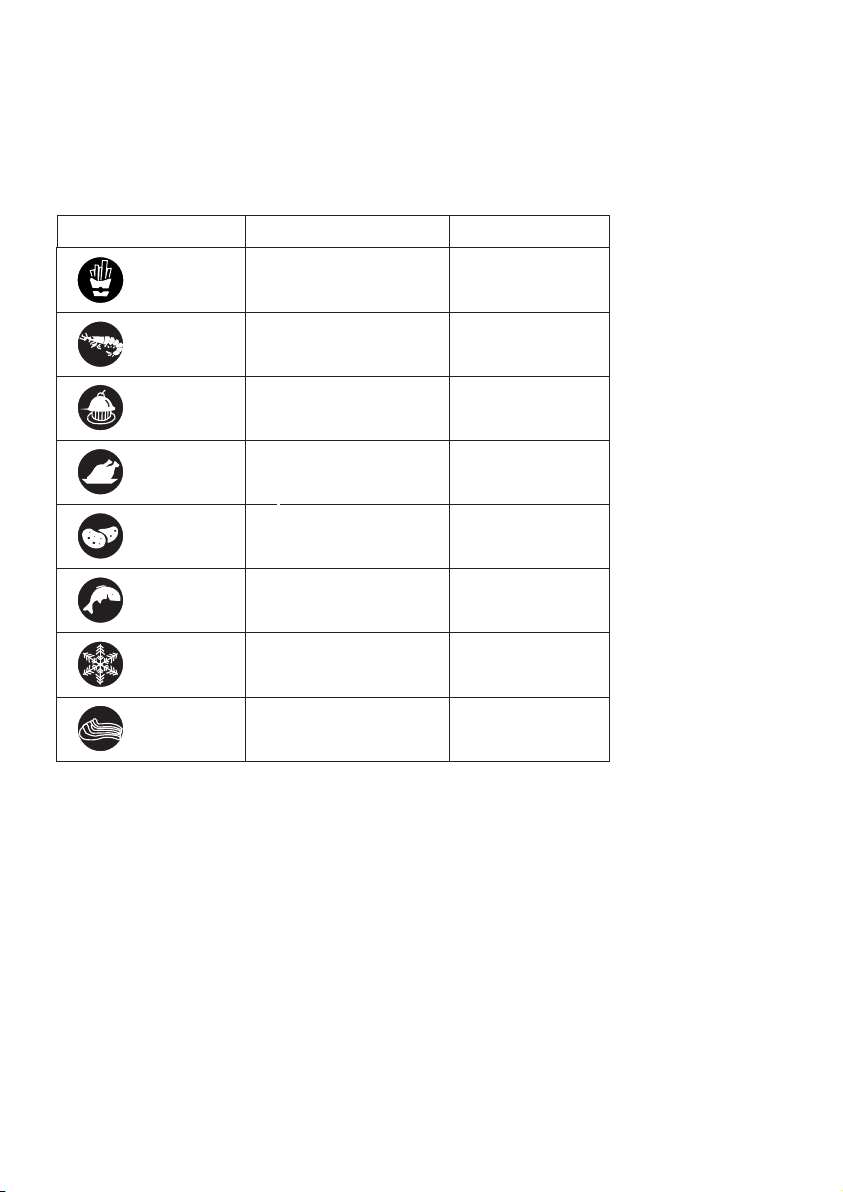
Preset menus Default temperature (°C) Default time (min)
200
French fries 20
160
Shrimp 20
160
Cake 30
200
Chicken 25
180
Potato chips 20
160
Fish 25
40
Unfreeze 20
180
Ribs 25
7

Category Min-Max
amount
of food (g)
Time
(min)
Temperature
(℃)
Additional
information
Frozen french fries (thin) 300-700 22-25 200
Shake
Yes
Potato cake 250 15-18 180 Yes
Frozen french fries
(thick)
300-700 22-25 200 Yes
Mashed potato with
cream
500 18-22 180
Homemade french fries
(8x8mm)
Add 1/2 tablespoon
of oil
300-800 18-25 180 Yes
Homemade potato chips Add 1/2 tablespoon
of oil
300-800 18-22 180 Yes
Homemade potato
pieces
Add 1/2 tablespoon
of oil
300-750 12-18 180 Yes
For best results, it is recommended that you use frozen french fries. However if
you want homemade french fries, follow these steps:
1. Peel the potatoes and cut them into small strips.
2. Soak the potatoes in a bowl of water for at least 30 minutes, then remove
them and put them on kitchen towel to drain.
3. Pour olive oil into a bowl. Add the potatoes and stir well until all the
potatoes are evenly oiled.
Useful tips:
1. Smaller ingredients require shorter cooking times than larger ones.
2. Increase the cooking time when cooking a large amount of food and
decrease the cooking time when cooking a small amount of food.
3. Shaking smaller ingredients during the cooking process can improve the
final cooking effect and help to allow the ingredients to be evenly fried.
4. Add a little oil to fresh potatoes to make the ingredients crunchy. Add the
oil and leave the ingredients for a few minutes before frying.
5. Never cook foods with high oil content, such as sausages, in an HaloAir.
6. A pastry that can be cooked in an oven can also be cooked in an HaloAir.
7. For crisp french fries, it is best to use 500 grams of ingredients.
8. You can reheat ingredients in an HaloAir. To reheat the ingredients, set the
temperature to 180°C, with a maximum cooking time of 10 minutes.
Potatoes and french fries
8

Category Min-Max
amount
of food (g)
Time
(min)
Temperature
(℃)
Additional
information
Beef steak 100-500 10-15 180
Shake
Yes
Pork chop 100-500 10-18 180 Yes
Chicken breast 100-500 10-18 180 Yes
Hamburger 100-500 12-18 180 Yes Add 1/2 tablespoon
of oil
Sausage rolls 100-500 13-15 180 Yes Add 1/2 tablespoon
of oil
Drumsticks 100-500 20-25 200 Yes Add 1/2 tablespoon
of oil
4. Remove the potatoes from the bowl with your hand or kitchen utensils and
leave the excess oil in the bowl. Then put the potatoes into the frying
basket.
Meat
Category Min-Max
amount
of food (g)
Time
(min)
Temperature
(℃)
Additional
information
Spring rolls 100-400 10-15 200
Shake
Yes
Frozen fish fingers 100-400 15-20 180 Yes
Frozen pastries 100-400 8-10 200
Stuffed vegetables 100-400 10-15 180
Frozen fried chicken
nuggets
100-500 20-25 200 Yes
Popular snacks
9

RECIPES
Roasted winter vegetables
Time: 25 mins
Serves: 6
1⅓cup parsnips (1 small)
1⅓cup celery (3-4 stalks)
2 red onions
1⅓cup butternut squash (1 small)
1 tbsp fresh thyme needles
1 tbsp olive oil
Pepper & salt
1. Preheat the HaloAir to 200°C.
2. Peel the parsnips and onions. Cut the parsnips and celery into 2 cm cubes
and the onions into wedges. Halve the butternut squash, remove the seeds
and cut into cubes. (There’s no need to peel it.)
3. Mix the cut vegetables with the thyme and olive oil. Season to taste.
4. Place the vegetables into the frying basket, place the frying basket into the
tray and slide the tray into the HaloAir. Set the timer for 20 minutes and
roast the vegetables until the vegetables are nicely brown and done. Stir the
vegetables once while roasting.
Category Min-Max
amount
of food (g)
Time
(min)
Temperature
(℃)
Additional
information
Cake 300 25-30 200
Shake
Custard 400 20-22 180
English muffin 300 15-20 200
Dessert 400 20-25 180
Sweet treats
Note: If the HaloAir has not been pre-heated, the cooking time should be
increased by 3 minutes.
10

Fried meatballs in tomato sauce
Time: 23 mins
Serves: 3-4
1 small onion
¾ pounds (12oz) ground beef
1 tbsp chopped fresh parsley
½ tbsp chopped fresh thyme leaves
1 egg
3 tbsp breadcrumbs
Pepper & salt to taste
Extra: 10oz of your favourite tomato sauce
1. Finely chop the onion. Place all the ingredients into a bowl and mix well.
Shape the mixture into 10 to 12 balls.
2. Preheat the HaloAir to 200°C.
3. Place the meatballs into the frying basket, place the frying basket into the
tray and slide the tray into the HaloAir. Cook for 8 minutes.
4. Transfer the meatballs to an oven dish and add the heated tomato sauce.
Cod fish nuggets
Time: 25 mins
Serves: 4
1 pound cod
For the breading:
2 tablespoons olive oil
1 cup all-purpose flour
2 eggs, beaten
¾ cup panko breadcrumbs
1 pinch salt
1. Preheat the HaloAir to 200°C. Cut the cod into strips approximately 1-inch
by 2.5-inches in length. In a food processor, blend the panko breadcrumbs,
olive oil and salt to a fine crumb. In three separate bowls, set aside panko
mixture, eggs and flour.
2. Place each piece of cod into the flour, then the eggs and then the
breadcrumbs. Press the fish firmly into breadcrumbs to ensure that they
11

Problem Possible causes Possible solution
CLEANING & MAINTENANCE
1. Unplug the power plug from the power outlet and let the appliance cool
down.
2. Clean the appliance after each use.
3. The tray and the frying basket are covered with non-stick coating. Do not
use metal kitchenware or abrasive cleaning materials for cleaning as this
may damage the non-stick coating.
4. NOTE: Removing the tray and frying basket will allow the HaloAir to cool
down more quickly.
5. Wipe the outside of the appliance with a damp cloth.
6. Clean the tray and frying basket with hot water, detergent and a
non-abrasive sponge. The tray and frying basket can also be cleaned in the
dishwasher.
7. You can use a degreasing agent to wash away the residual dirt.
8. Use hot water and a non-abrasive sponge to clean the inner part of the
appliance.
9. Clean the heating element with a clean brush to remove any food residue.
10. Before storing, make sure that all the parts are clean and dry.
TROUBLESHOOTING
adhere to the fish. Shake off any excess breadcrumbs. Add the cod nuggets
to the frying basket, cooking for 8-10 minutes or until golden brown.
The HaloAir doesn't work. The power plug is not
plugged in.
Plug the plug into the power
outlet.
The ingredients cooked in the
HaloAir are not well done.
There are too many
ingredients in the basket.
Plug the plug into the power
outlet.
The temperature setting is
too low.
Adjust the temperature to the
correct temperature setting.
(See cooking guide)
Cooking time is too short. Adjust the timer knob to the
correct cooking time.
(See cooking guide)
12

SPECIFICATIONS
Rated voltage/ Frequency: 220-240V~50/60Hz
Rated power: 1350W
Ingredients are not evenly
fried in the HaloAir.
Certain ingredients need to be
shaken/ turned over halfway
through the cooking process.
If some ingredients are at the
top or overlap with other
ingredients (such as french
fries), they need to be
shaken/ turned over halfway
during the cooking process.
(See cooking guide)
The snacks made in the
HaloAir are not crunchy.
The fried snacks you chose
should be cooked in a
traditional frying pan.
Choose snacks suitable for
oven baking or brush a little
oil on the pastry to increase
the crispness.
I can’t slide the tray/ frying
basket back into the HaloAir.
There are too many
ingredients in the frying
basket.
Don't let the ingredients in
the frying basket exceed the
maximum amount.
The HaloAir is emitting white
smoke.
You are cooking foods with a
higher oil content.
This will not affect the final
quality of the fried
ingredients.
The frying basket contains
traces of oil after last use.
White smoke is caused by the
heating of fat. Make sure you
clean the tray and frying
basket properly after each
use.
You did not properly drain the
water off the french fries
before frying.
Fresh french fries
(homemade) are not evenly
fried in the HaloAir.
Take them out the HaloAir
and drain them properly on
kitchen towel.
You didn't use the right
potato variety.
Use fresh potatoes.
Error has occurred."E1" (error) message appears
on the screen.
Please contact local dealer to
repair the appliance.
The crispness of french fries
depends on the amount of oil
and water in the french fries.
French fries (homemade)
made in the HaloAir are not
crunchy.
Make sure to drain off the
potatoes properly before
adding to the HaloAir.
Cut the french fries smaller
and/ or add a little oil.
13

WARRANTY EXCLUSIONS
THE WARRANTY WILL ONLY BE VALID IF THE PRODUCT IS RETURNED WITH A
PROOF OF PURCHASE TILL SLIP AND ORIGINAL PACKAGING.
The warranty will not be valid if:
1. The product has not been installed, operated or maintained in accordance
with the manufacturer's operating instructions provided with the product.
2. The product has been used for any purpose other than its intended function.
3. The damage or malfunction of the product is caused by any of the
following:
- Incorrect voltage
- Accidents (including liquid or moisture damage)
- Misuse or abuse of the product
- Faulty or improper installation
- Mains supply problems, including power spikes or lightning damage
- Infestation by insects
- Tampering or modification of the product by persons other than
authorised service personnel
- Exposure to abnormally corrosive materials
- Insertion of foreign objects into the unit
- Usage with accessories not pre-approved by Brabantia
Please refer to and heed all warnings and precautions in the instruction manual.
Due to continuous product development, specifications may be subject to
change without prior notification.
ENVIRONMENT FRIENDLY DISPOSAL
This marking indicates that this product should not be disposed of with
other household waste. To prevent possible harm to the environment or
human health from uncontrolled waste disposal, recycle it responsibly
to promote the sustainable re-use of material resources. To dispose of
your appliance correctly, please contact or take it to your local refuse/
recycling centre. Alternatively, contact your local council for
information on your local re-use centre.
14

NL
BELANGRIJKE VEILIGHEIDSMAATREGELEN
Volg deze algemene veiligheidsvoorschriften:
1. Dit apparaat mag niet worden gebruikt door kinderen van 0 tot 8 jaar. Dit
apparaat kan worden gebruikt door kinderen van 8 jaar en ouder als ze
voortdurend onder toezicht staan. Dit apparaat kan worden gebruikt door
personen met fysieke, zintuiglijke of mentale beperkingen, of mensen met
gebrek aan ervaring en kennis mits zij begeleiding of instructies krijgen met
betrekking tot het gebruik van het apparaat zodat zij het apparaat veilig
kunnen gebruiken en de eventuele risico's hiervan begrijpen.
2. Houd het apparaat en het snoer buiten bereik van kinderen jonger dan 8
jaar. Reiniging en gebruikersonderhoud mogen niet door kinderen worden
gedaan.
3. Dit apparaat moet op een stabiel oppervlak worden geplaatst met de
handgrepen zodanig geplaatst om het morsen van hete vloeistoffen te
voorkomen.
4. Het apparaat kan tijdens gebruik heet worden.
5. Gebruik het apparaat nooit met behulp van een externe timer of een apart
afstandsbedieningssysteem.
6. Kinderen mogen niet met het apparaat spelen.
7. Dit apparaat is alleen bedoeld voor huishoudelijk gebruik. en vergelijkbare
toepassingen zoals personeelskeukens in winkels, kantoren en andere
werkomgevingen, boerderijen, voor gasten van hotels, motels en andere
residentiële omgevingen, type bed and breakfast-omgevingen.
8. Dompel het apparaat niet onder in vloeistof.
9. Zorg ervoor dat er nooit water of andere vloeistoffen in het apparaat
terechtkomen om een elektrische schok te voorkomen.
10. Als het netsnoer is beschadigd, dan moet deze door de fabrikant, of een
gelijk gekwalificeerd persoon worden vervangen om gevaarlijke situaties te
voorkomen.
11. Leun of hang niet op of over de Heteluchtfriteuse terwijl deze in gebruik is,
omdat deze heet is.
12. Plaatst niets boven of in de buurt van de Heteluchtfriteuse.
13. Probeer de Heteluchtfriteuse niet te verplaatsen of te dragen omdat deze
hete olie en ingrediënten bevat. Laat het eerst volledig afkoelen.
14. Laat de Heteluchtfriteuse niet onbeheerd achter als deze aanstaat.
15. Plaats de Heteluchtfriteuse niet onder kasten, planken of iets dat kan
beschadigen door hitte of stoom. Houd het uit de buurt van brandbare
materialen zoals (over) gordijnen enz.
16. Zorg ervoor dat het netsnoer nooit over de rand van een aanrecht hangt,
geen hete oppervlakken aanraakt, niet in de knoop zit, of gekneld raakt.
17. Plaats niets bovenop de Heteluchtfriteuse terwijl deze in gebruik is en zorg
ervoor dat de luchtinlaat (bovenkant apparaat) en -uitlaat (achterkant
apparaat) niet worden afgedekt.
18. Haal de stekker van de Heteluchtfriteuse uit het stopcontact wanneer het
apparaat niet in gebruik is en voordat deze wordt verplaatst en gereinigd.
19. Laat het volledig afkoelen voordat deze wordt gereinigd of opgeborgen.
20. Gebruik geen accessoires of hulpstukken tenzij deze bij het apparaat
worden geleverd.
21. Gebruik de Heteluchtfriteuse alleen voor het bereiden van de ingrediënten
vermeld in de gebruiksaanwijzing.
22. Gebruik de Heteluchtfriteuse niet als deze beschadigd of defect is.
23. Reinig de Heteluchtfriteuse voordat deze voor het eerst wordt gebruikt om
productiestof en dergelijke te verwijderen.
24. Plaats de Heteluchtfriteuse op een stabiel, vlak, hittebestendig oppervlak op
minstens 75 cm boven de vloer en met minstens 5 cm ruimte rond de
Heteluchtfriteuse.
25. Plaats de Heteluchtfriteuse zodanig dat de handgreep van de mand in de
opgeklapte stand niet over de rand van het werkoppervlak steekt, omdat
deze per ongeluk kan worden omgegooid of erachter worden gehaakt.
26. Leg de ingrediënten altijd in de frituurmand om contact met het
verwarmingselement te voorkomen.
27. Giet nooit olie in de frituurmand, omdat dit brandgevaar kan veroorzaken.
28. Leg een papieren doekje in een vergiet of geschikt bakje om het eten na het
frituren af te gieten.
29. Gebruik altijd ovenwanten wanneer u uw Heteluchtfriteuse gebruikt. Deze
beschermen niet alleen uw handen tegen hitte, ze beschermen ook tegen
druppels en spatten die letsel en brandwonden kunnen veroorzaken.
30. Raak tijdens gebruik de binnenkant van het apparaat niet aan, omdat deze
ZEER HEET wordt en letsel of brandwonden kan veroorzaken.
15

Volg deze algemene veiligheidsvoorschriften:
1. Dit apparaat mag niet worden gebruikt door kinderen van 0 tot 8 jaar. Dit
apparaat kan worden gebruikt door kinderen van 8 jaar en ouder als ze
voortdurend onder toezicht staan. Dit apparaat kan worden gebruikt door
personen met fysieke, zintuiglijke of mentale beperkingen, of mensen met
gebrek aan ervaring en kennis mits zij begeleiding of instructies krijgen met
betrekking tot het gebruik van het apparaat zodat zij het apparaat veilig
kunnen gebruiken en de eventuele risico's hiervan begrijpen.
2. Houd het apparaat en het snoer buiten bereik van kinderen jonger dan 8
jaar. Reiniging en gebruikersonderhoud mogen niet door kinderen worden
gedaan.
3. Dit apparaat moet op een stabiel oppervlak worden geplaatst met de
handgrepen zodanig geplaatst om het morsen van hete vloeistoffen te
voorkomen.
4. Het apparaat kan tijdens gebruik heet worden.
5. Gebruik het apparaat nooit met behulp van een externe timer of een apart
afstandsbedieningssysteem.
6. Kinderen mogen niet met het apparaat spelen.
7. Dit apparaat is alleen bedoeld voor huishoudelijk gebruik. en vergelijkbare
toepassingen zoals personeelskeukens in winkels, kantoren en andere
werkomgevingen, boerderijen, voor gasten van hotels, motels en andere
residentiële omgevingen, type bed and breakfast-omgevingen.
8. Dompel het apparaat niet onder in vloeistof.
9. Zorg ervoor dat er nooit water of andere vloeistoffen in het apparaat
terechtkomen om een elektrische schok te voorkomen.
10. Als het netsnoer is beschadigd, dan moet deze door de fabrikant, of een
gelijk gekwalificeerd persoon worden vervangen om gevaarlijke situaties te
voorkomen.
11. Leun of hang niet op of over de Heteluchtfriteuse terwijl deze in gebruik is,
omdat deze heet is.
12. Plaatst niets boven of in de buurt van de Heteluchtfriteuse.
13. Probeer de Heteluchtfriteuse niet te verplaatsen of te dragen omdat deze
hete olie en ingrediënten bevat. Laat het eerst volledig afkoelen.
14. Laat de Heteluchtfriteuse niet onbeheerd achter als deze aanstaat.
15. Plaats de Heteluchtfriteuse niet onder kasten, planken of iets dat kan
beschadigen door hitte of stoom. Houd het uit de buurt van brandbare
materialen zoals (over) gordijnen enz.
16. Zorg ervoor dat het netsnoer nooit over de rand van een aanrecht hangt,
geen hete oppervlakken aanraakt, niet in de knoop zit, of gekneld raakt.
17. Plaats niets bovenop de Heteluchtfriteuse terwijl deze in gebruik is en zorg
ervoor dat de luchtinlaat (bovenkant apparaat) en -uitlaat (achterkant
apparaat) niet worden afgedekt.
18. Haal de stekker van de Heteluchtfriteuse uit het stopcontact wanneer het
apparaat niet in gebruik is en voordat deze wordt verplaatst en gereinigd.
19. Laat het volledig afkoelen voordat deze wordt gereinigd of opgeborgen.
20. Gebruik geen accessoires of hulpstukken tenzij deze bij het apparaat
worden geleverd.
21. Gebruik de Heteluchtfriteuse alleen voor het bereiden van de ingrediënten
vermeld in de gebruiksaanwijzing.
22. Gebruik de Heteluchtfriteuse niet als deze beschadigd of defect is.
23. Reinig de Heteluchtfriteuse voordat deze voor het eerst wordt gebruikt om
productiestof en dergelijke te verwijderen.
24. Plaats de Heteluchtfriteuse op een stabiel, vlak, hittebestendig oppervlak op
minstens 75 cm boven de vloer en met minstens 5 cm ruimte rond de
Heteluchtfriteuse.
25. Plaats de Heteluchtfriteuse zodanig dat de handgreep van de mand in de
opgeklapte stand niet over de rand van het werkoppervlak steekt, omdat
deze per ongeluk kan worden omgegooid of erachter worden gehaakt.
26. Leg de ingrediënten altijd in de frituurmand om contact met het
verwarmingselement te voorkomen.
27. Giet nooit olie in de frituurmand, omdat dit brandgevaar kan veroorzaken.
28. Leg een papieren doekje in een vergiet of geschikt bakje om het eten na het
frituren af te gieten.
29. Gebruik altijd ovenwanten wanneer u uw Heteluchtfriteuse gebruikt. Deze
beschermen niet alleen uw handen tegen hitte, ze beschermen ook tegen
druppels en spatten die letsel en brandwonden kunnen veroorzaken.
30. Raak tijdens gebruik de binnenkant van het apparaat niet aan, omdat deze
ZEER HEET wordt en letsel of brandwonden kan veroorzaken.
16

INTRODUCTIE TOT UW HETELUCHTFRITEUSE
1: Ventilatieroosters
bovenkant en achterkant
2: Displaypaneel
3: Dienblad
4: Elektriciteitskabel
5: Frituurmand
6: Lekplaat
7: Handgreep
Scherm van het display
1
4
5
6
7
2
3
17
This manual suits for next models
1
Table of contents
Languages:
Other Brabantia Fryer manuals


Popular Fryer manuals by other brands


ButterBall
ButterBall 23011114 Operation manual & safety instructions

Gaggenau
Gaggenau VF 230 611 Operating and assembly instructions

Sur la table
Sur la table SLT-1802 quick start guide

Comfee
Comfee CFO-SA231 user manual

Lotus
Lotus F10D-64ET Installation and operating instructions

Healthy Choice
Healthy Choice AF1000 instructions


