Brabantia D3 User manual

BRABANTIA
STAND MIXER
Instruction Manual
D3
www.brabantia-appliances.com
HANDLEIDING
PROFESSIONELE STAANDE MIXER
NOTICE D’UTILISATION
MÉLANGEUR SUR SOCLE
PROFESSIONNEL
BEDIENUNGSANLEITUNG
PROFI-KÜCHENMASCHINE
NL
FR
DE
GUARANTEE
YEAR
3
THANK YOU FOR
PURCHASING OUR
STAND MIXER
We hope it will delight you and
that it will get a special place in
your home. Enjoy!

EN
IMPORTANT SAFEGUARDS
1. Please read the information and safety advice contained in these operating
instructions carefully and thoroughly before you use the Stand Mixer for the
first time.
2. The Stand Mixer should only be used for its intended purpose.
3. Before use, place the Stand Mixer on a horizontal and flat surface.
4. Place this Stand Mixer as close as possible to the power source so that you can
disconnect the plug quickly and easily.
5. This Stand Mixer should not be set up in close proximity to a naked flame,
inflammable materials (curtains, textiles, etc.), a radiator, an oven or any other
heat source.
6. To avoid an electric shock do not use this Stand Mixer in the vicinity of water. Do
not immerse the mains lead in water or other liquid.
7. Do not kink or clamp the mains lead. To avoid an accident do not allow the mains
lead to hang over the edge of a table or a counter.
8. Switch off the Stand Mixer before changing accessories or approaching parts
which move in use.
9. Make sure that the voltage shown on the rating plate corresponds to the voltage
of the mains supply. The rating plate can be found on the bottom of the motor
block. The Stand Mixer may only be connected to an AC power supply
(220~240V). The motor must always be switched off before the Stand Mixer is
connected to the mains supply.
10. The Stand Mixer must be operated with the type of power specified on the rating
plate. If you are unsure about the details of the available power supply, ask your
dealer or the local power supply company.
11. Unplug the appliance when not in use or before cleaning.
12. Do not use outdoors. This Stand Mixer is suitable for indoor use only.
13. Do not use the Stand Mixer when the head unit is lifted up.
14. During use, do not touch moving parts with your fingers.
15. Never operate the Stand Mixer when it is empty. Never leave the Stand Mixer
unsupervised when switched on.
16. Repairs should only be carried out by an authorised service centre.
17. Do not attempt to repair the Stand Mixer yourself, as opening or removing covers
will expose you to live components and other hazardous conditions.
18. If the supply cord is damaged, it must be replaced by the manufacturer, an
authorised service centre or a similarly qualified person in order to avoid a hazard.
19. This is not a toy! Keep this Stand Mixer out of the reach of children. This Stand
Mixer should be used and stored out of the reach of children.
20. Careful supervision is required when the Stand Mixer is used by or in the vicinity of
children.
21. This Stand Mixer is not intended for use by persons (including children) with
reduced physical, sensory, or mental capacities, or lack of experience and
knowledge, unless they have been given supervision or instruction concerning use
of the appliance by a person responsible for their safety.
22. Please note that when passing this Stand Mixer on to a third party, the operating
instructions must be included.
23. No liability is accepted for damage due to improper use or the failure to observe
the operating instructions or the safety notices.
24. IMPORTANT: Do not operate the mixer for more than 8 minutes (continuously) at
a time.*
KNOW YOUR STAND MIXER
EN
IMPORTANT SAFEGUARDS
1. Please read the information and safety advice contained in these operating
instructions carefully and thoroughly before you use the Stand Mixer for the
first time.
2. The Stand Mixer should only be used for its intended purpose.
3. Before use, place the Stand Mixer on a horizontal and flat surface.
4. Place this Stand Mixer as close as possible to the power source so that you can
disconnect the plug quickly and easily.
5. This Stand Mixer should not be set up in close proximity to a naked flame,
inflammable materials (curtains, textiles, etc.), a radiator, an oven or any other
heat source.
6. To avoid an electric shock do not use this Stand Mixer in the vicinity of water. Do
not immerse the mains lead in water or other liquid.
7. Do not kink or clamp the mains lead. To avoid an accident do not allow the mains
lead to hang over the edge of a table or a counter.
8. Switch off the Stand Mixer before changing accessories or approaching parts
which move in use.
9. Make sure that the voltage shown on the rating plate corresponds to the voltage
of the mains supply. The rating plate can be found on the bottom of the motor
block. The Stand Mixer may only be connected to an AC power supply
(220~240V). The motor must always be switched off before the Stand Mixer is
connected to the mains supply.
10. The Stand Mixer must be operated with the type of power specified on the rating
plate. If you are unsure about the details of the available power supply, ask your
dealer or the local power supply company.
11. Unplug the appliance when not in use or before cleaning.
12. Do not use outdoors. This Stand Mixer is suitable for indoor use only.
13. Do not use the Stand Mixer when the head unit is lifted up.
14. During use, do not touch moving parts with your fingers.
15. Never operate the Stand Mixer when it is empty. Never leave the Stand Mixer
unsupervised when switched on.
16. Repairs should only be carried out by an authorised service centre.
17. Do not attempt to repair the Stand Mixer yourself, as opening or removing covers
will expose you to live components and other hazardous conditions.
18. If the supply cord is damaged, it must be replaced by the manufacturer, an
authorised service centre or a similarly qualified person in order to avoid a hazard.
19. This is not a toy! Keep this Stand Mixer out of the reach of children. This Stand
Mixer should be used and stored out of the reach of children.
20. Careful supervision is required when the Stand Mixer is used by or in the vicinity of
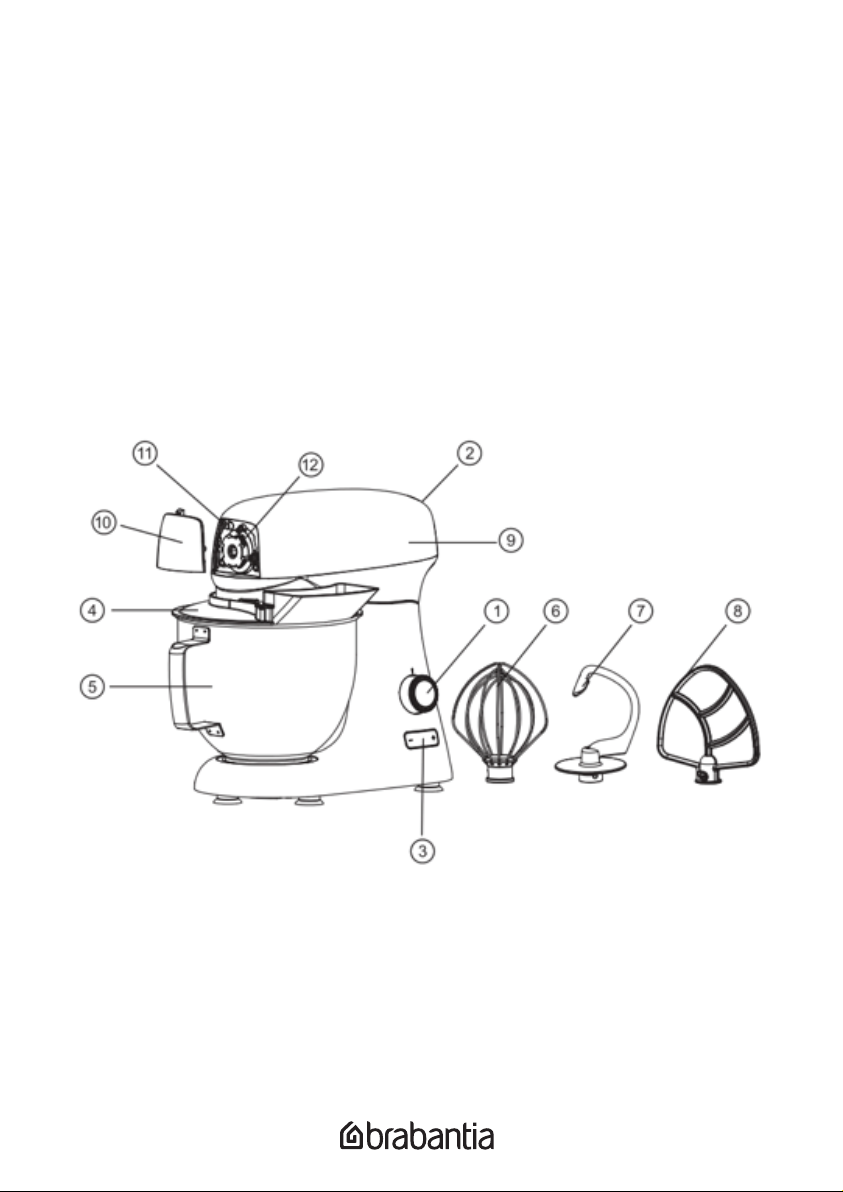
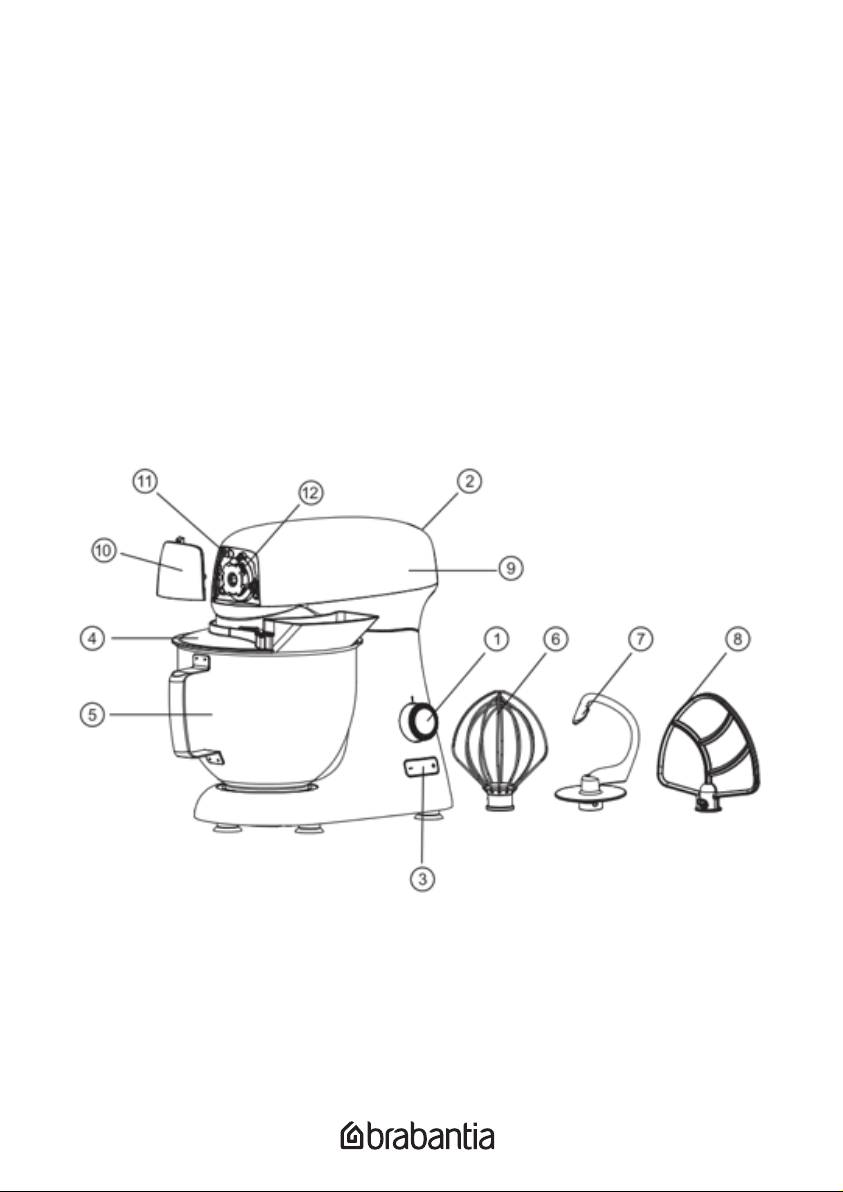
Figure A
1. Speed switch
2. Release button for
multi-functional head
3. Timer
4. Bowl cover
5. Stainless steel bowl with handle
6. Stainless steel whisk
7. Dough hook
8. Beater
9. Multi-function head
10. Removable cover for output
11. Meat grinder release button
12. Outlet drive
children.
21. This Stand Mixer is not intended for use by persons (including children) with
reduced physical, sensory, or mental capacities, or lack of experience and
knowledge, unless they have been given supervision or instruction concerning use
of the appliance by a person responsible for their safety.
22. Please note that when passing this Stand Mixer on to a third party, the operating
instructions must be included.
23. No liability is accepted for damage due to improper use or the failure to observe
the operating instructions or the safety notices.
24. IMPORTANT: Do not operate the mixer for more than 8 minutes (continuously) at
a time.*
KNOW YOUR STAND MIXER

13. Cutting housing
14. Worm shaft
15. Cutter blade
16. Coarse grinding disc
17. Fine grinding disc
18. Medium grinding disc
19. Screw ring
20. Pusher
21. Tray
Figure B
22. Sausage tube
23. Sausage based disc
22 23
Figure C
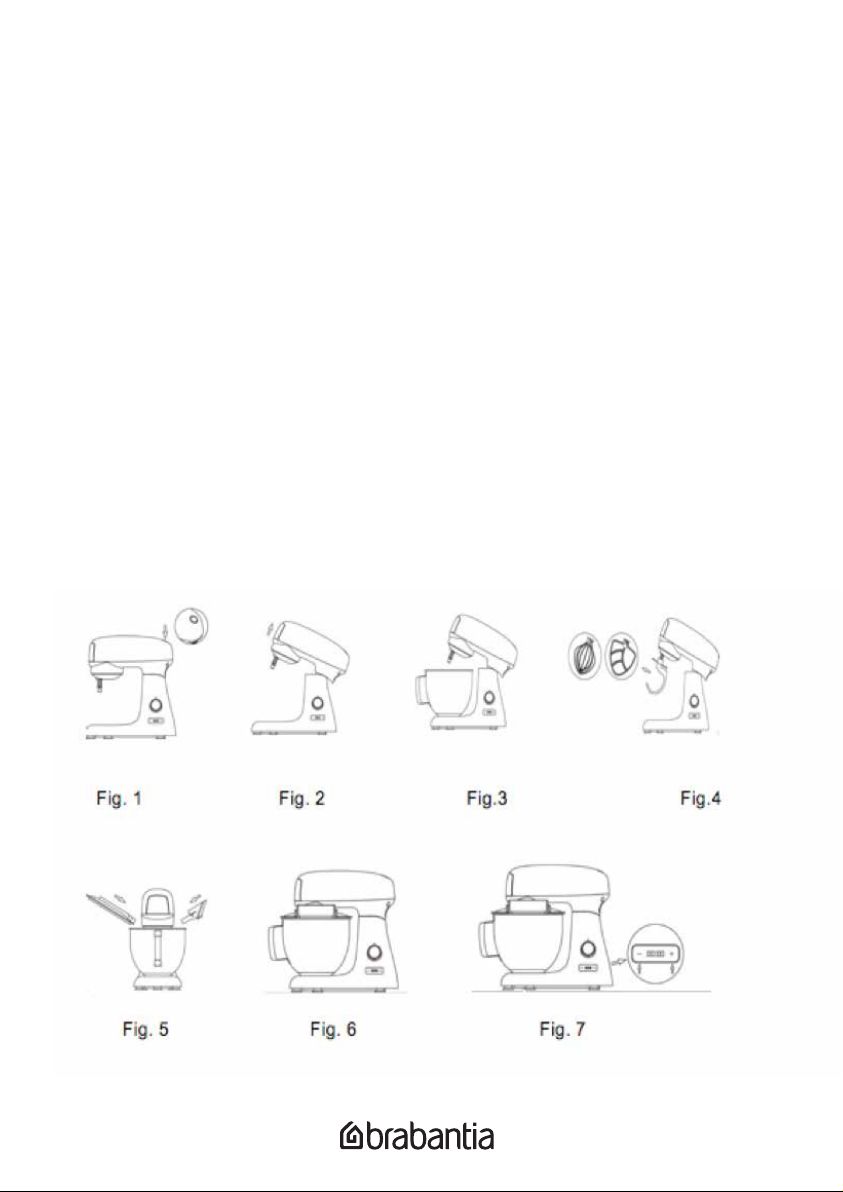
USING THE STAND MIXER
Depending on the nature of the ingredients, the bowl (5) with its cover can be used to
prepare up to 1kg of dough (500g flour).
1. Press button (2) to release the multifunctional head (9) and to raise it to a vertical
position. (Fig. 1 & 2)
2. Fit the bowl (5) onto the appliance by turning until it locks in position and place the
ingredients in it. (Fig. 3)
3. Position the cover (4) on the bowl with the filling opening at the front of the
appliance. Fit the desired accessory (6/7/8) into the power outlet. Push the shaft of
the accessory home and turn it a quarter turn towards you, to lock it into position.
(Fig.4)
5. Lower the multifunctional head of the appliance to a horizontal position and press
the button again until it clicks into place. (Fig. 5 & 6)
6. Set the timer (3) to control the working time of your recipe. Set from a min time of
“0” to a max time of “30” minutes (plus 30 seconds to adjust) in one set. (Fig.7)
7. During preparation, you can add ingredients through the opening in the cover.
8. To stop the appliance, turn off the switch (1).
MEAT GRINDER (Figure B)
1. Lift the cutting housing upward facing towards the outlet drive before using
the meat grinder.
2. Insert the worm shaft (14) (drive pins first) in the cutter housing (13). Fit the cutter
blade (15) on the shaft with the cutting edges facing upwards. (Fig . 9)
3. Place the selected hole-plate (16/17/18) over the blades ensuring that the two lugs
fit into the two cut-outs in the cutting housing. (Fig. 9)
4. Screw the ring cap nut (19) fully home on the cutting housing.(Fig.10)
5. Insert the assembled meat grinder attachment (tilted towards you) into the outlet
drive (12) and engage it fully. Return the feed tube to a vertical position by turning
to the anticlockwise direction until it stops and clicks into place. (Fig.11)
6. Place the removable tray (21) on the feed tube. (Fig.12)
CAUTION:
1. To release the cutting housing (13), press top left corner to open the cover then
press the button (11).
2. Insert pieces of meat into the feed tube piece by piece using the pusher (20),
WARNING: Never push the meat with your fingers or any other utensil.
Always use the pusher!
SAUSAGE STUFFER KEBAB
1. Assemble the sausage stuffer kebab attachment according to FIGURE C.
2. Insert the assembled sausage stuffer kebab attachment (tilted towards you) into the
cutting housing (13) by turning in a anti clockwise direction until it locks into place.
3. Put the sausage casing into water and soak for 10 mins. Slowly and carefully slip it
over the sausage tube (22). Plug it in and set the speed switch to 1 or 2
4. Insert the ground meat into the cutting housing (13) using the pusher(20).
TIMERS
The count-up timer (Fig 13)
The count-up timer is especially useful to guage mixing time or when a recipe does not
specify the mixing time. You can monitor the time it takes to thoroughly mix the
ingredients, so that the next time you mix the same ingredients you can set the
count-down timer to a specific time. The count-up timer will automatically begin
counting up as soon as the Speed Control Dial is rotated from the OFF position to one of
the mixing speeds. When the Speed Control Dial is rotated back to the OFF position, the
LCD screen will display 0:00.
The count-down timer (Fig 14)
The count-down timer is expecially useful for any recipe that specifies the lentgh of time
ingredients should be mixed. For example, if a recipe reads, “beat for 3 minutes”, you
can set the count-down timer to 3 minutes by pressing the”+” “-”. after 3 minutes of
mixing, the lcd screen will display off, an alert will sound and the stand mixer will
automatically turn off. The Speed Control Dial must be rotated back to the OFF position
to reset the timer and continue mixing. To set the count-down timer, press the up or
down arrows until the desired mixing time is displayed on the LCD screen. Rotate the
Speed Control Dial clockwise to select the desired speed and to begin mixing. Once the
Mixer automatically turns off, the Speed Control Dial must be rotated back to the OFF
position to reset the count-down timer and continue mixing.
Fig. 13 Fig. 14

PROCESSING GUIDE
Accessory
Whisk
Cream
(38%fat)
Egg white/Egg
Flour
Salt
Yeast
Sugar
Water
Flour
Berry Sugar
Butter
Egg
500g
250g
250g
4pcs
Oil
800g
10g
10g
5ml
400g
20g
250ml 10minutes 5-Max
12pcs (min:2pcs) 2-10minutes
15 minutes
5 minutes
Min-2(3min)
5-Max(7min)
Min-3(5 min)
4(10min)
Min-4
Dough hook
Beater
Food Maximum Operating time Speeds
CLEANING AND MAINTENANCE
1. Unplug the Stand Mixer from the power supply.
2. Never immerse the motor in water or put it under running water. Wipe it with a soft,
slightly damp cloth and immediately wipe dry.
3. For easier cleaning, quickly rinse the accessories after use.
4. If your accessories are colored by food (carrots, oranges etc), rub them gently with
kitchen towel dipped in cooking oil and then clean in the usual way.
5. Clean accessories thoroughly every time they are used in order.
6. Never immerse accessories in hot water over 50 degrees.
7. Do not wash accessories in the dishwasher as doing so may cause the surfaces to
oxidize
SPECIFICATIONS
Rated Voltage: 220-240V~50-60Hz
Power: 1000W
Mixing bowl capacity: 4.8 Litre
ENVIRONMENT FRIENDLY DISPOSAL
This marking indicates that this product should not be disposed of with other
household waste. To prevent possible harm to the environment or human health
from uncontrolled waste disposal, recycle it responsibly to promote the
sustainable re-use of material resources. To dispose of your appliance correctly,
please contact or take it to your local refuse/recycling centre. Alternatively,
contact your local council for information on your local re-use centre.
WARRANTY
IMPORTANT: In order for your warranty to be valid, you must keep your sales receipt. A
warranty CANNOT be claimed without proof of purchase.
We also highly recommend that you keep both your instruction manual and original
packaging. The original packaging will prove useful if you need to return your product.
Warranty exclusions:
The warranty will not be valid if:
1. The product has not been installed, operated or maintained in accordance
with the manufacturer's operating instructions provided with the product.
2. The product has been used for any purpose other than its intended function.
3. The damage or malfunction of the product is caused by any of the following:
- Incorrect voltage
- Accidents (including liquid or moisture damage)
- Misuse or abuse of the product
- Faulty or improper installation
- Mains supply problems, including power spikes or lightning damage
- Infestation by insects
- Tampering or modification of the product by persons other than
authorised service personnel
- Exposure to abnormally corrosive materials
- Insertion of foreign objects into the unit
- Usage with accessories not pre-approved by Brabantia
- General wear and tear, including, but not limited to, minor discolouration
and scratches
Please refer to and heed all warnings and precautions in this Instruction
Manual.
Due to continuous product development, specifications may be subject to
change without prior notification.

NL
BELANGRIJKE VEILIGHEIDSMAATREGELEN
1. Lees de informatie en veiligheidsadviezen in deze gebruiksaanwijzing zorgvuldig en
grondig door voordat u de staande mixer voor de eerste keer gebruikt.
2. De staande mixer mag alleen voor het beoogde doel worden gebruikt.
3. Plaats de staande mixer voor gebruik op een horizontaal en plat oppervlak.
4. Plaats dit apparaat zo dicht mogelijk bij het stopcontact, zodat u de stekker snel en
eenvoudig kunt loskoppelen.
5. Dit apparaat mag niet worden geplaatst in de buurt van een open vlam, ontvlambare
materialen (gordijnen, textiel, enz.), een radiator, een oven of een andere warmtebron.
6. Gebruik dit apparaat niet in de buurt van water om elektrische schokken te
voorkomen. Dompel het netsnoer niet onder in water of een andere vloeistof.
7. Knik of klem het netsnoer niet. Laat het netsnoer niet over de rand van een tafel of
een aanrecht hangen om een ongeluk te voorkomen.
8. Schakel het apparaat uit voordat u accessoires verwisselt of delen benadert die in
gebruik zijn.
9. Zorg ervoor dat de gegevens op het typeplaatje overeenkomen met de spanning van
de netvoeding. Het typeplaatje is te vinden op de onderkant van het motorblok. De
staande mixer mag alleen worden aangesloten op een wisselspanning (220 ~ 240 V).
De motor moet altijd worden uitgeschakeld voordat de staande mixer op de
netvoeding wordt aangesloten.
10. De staande mixer moet worden gebruikt met het type voeding aangegeven op het
typeplaatje. Als u twijfelt over de gegevens van de beschikbare voeding, neem dan
contact op met uw leverancier of het plaatselijke energiebedrijf.
11. Haal de stekker uit het stopcontact wanneer het apparaat niet in gebruik is of voordat
u gaat reinigen.
12. Niet buitenshuis gebruiken. Dit apparaat is uitsluitend geschikt voor gebruik
binnenshuis.
13. Gebruik de staande mixer niet wanneer de hoofdeenheid is opgetild.
14. Raak tijdens gebruik geen bewegende delen aan met uw vingers.
15. Gebruik de staande mixer nooit als deze leeg is. Laat het apparaat nooit onbeheerd
achter wanneer deze is ingeschakeld.
16. Reparaties mogen alleen door een erkend servicecentrum worden uitgevoerd.
17. Probeer de staande mixer niet zelf te repareren. Door het openen of verwijderen van
de deksels kunt u worden blootgesteld aan onder spanning staande componenten en
andere gevaarlijke omstandigheden.
18. Als het netsnoer is beschadigd dient het ter voorkoming van gevaar door de fabrikant,
een erkend servicecentrum of een vergelijkbaar bevoegde
persoon te worden vervangen.
19. Dit is geen speelgoed! Houd dit apparaat buiten bereik van kinderen. Dit apparaat
dient buiten bereik van kinderen te worden gebruikt en opgeborgen.
20. Zorgvuldig toezicht is vereist wanneer het apparaat wordt gebruikt door of in de buurt
van kinderen.
21. Dit apparaat mag niet worden gebruikt door personen (waaronder kinderen) met
beperkte fysieke, zintuiglijke of mentale mogelijkheden, of door personen met gebrek
aan ervaring en kennis, tenzij deze onder toezicht staan of instructies hebben
gekregen van een voor hun veiligheid verantwoordelijk persoon.
22. Houdt er rekening mee dat wanneer dit apparaat aan derden wordt gegeven, dat de
gebruiksaanwijzing moet worden meegeleverd.
23. Er is geen aansprakelijkheid voor schade als gevolg van onjuist gebruik of het niet
naleven van de bedieningsinstructies of de veiligheidsaanwijzingen.
24. BELANGRIJK: Gebruik de mixer niet langer dan 8 minuten (continu) per keer.
NL
BELANGRIJKE VEILIGHEIDSMAATREGELEN
1. Lees de informatie en veiligheidsadviezen in deze gebruiksaanwijzing zorgvuldig en
grondig door voordat u de staande mixer voor de eerste keer gebruikt.
2. De staande mixer mag alleen voor het beoogde doel worden gebruikt.
3. Plaats de staande mixer voor gebruik op een horizontaal en plat oppervlak.
4. Plaats dit apparaat zo dicht mogelijk bij het stopcontact, zodat u de stekker snel en
eenvoudig kunt loskoppelen.
5. Dit apparaat mag niet worden geplaatst in de buurt van een open vlam, ontvlambare
materialen (gordijnen, textiel, enz.), een radiator, een oven of een andere warmtebron.
6. Gebruik dit apparaat niet in de buurt van water om elektrische schokken te
voorkomen. Dompel het netsnoer niet onder in water of een andere vloeistof.
7. Knik of klem het netsnoer niet. Laat het netsnoer niet over de rand van een tafel of
een aanrecht hangen om een ongeluk te voorkomen.
8. Schakel het apparaat uit voordat u accessoires verwisselt of delen benadert die in
gebruik zijn.
9. Zorg ervoor dat de gegevens op het typeplaatje overeenkomen met de spanning van
de netvoeding. Het typeplaatje is te vinden op de onderkant van het motorblok. De
staande mixer mag alleen worden aangesloten op een wisselspanning (220 ~ 240 V).
De motor moet altijd worden uitgeschakeld voordat de staande mixer op de
netvoeding wordt aangesloten.
10. De staande mixer moet worden gebruikt met het type voeding aangegeven op het
typeplaatje. Als u twijfelt over de gegevens van de beschikbare voeding, neem dan
contact op met uw leverancier of het plaatselijke energiebedrijf.
11. Haal de stekker uit het stopcontact wanneer het apparaat niet in gebruik is of voordat
u gaat reinigen.
12. Niet buitenshuis gebruiken. Dit apparaat is uitsluitend geschikt voor gebruik
binnenshuis.
13. Gebruik de staande mixer niet wanneer de hoofdeenheid is opgetild.
14. Raak tijdens gebruik geen bewegende delen aan met uw vingers.
15. Gebruik de staande mixer nooit als deze leeg is. Laat het apparaat nooit onbeheerd
achter wanneer deze is ingeschakeld.
16. Reparaties mogen alleen door een erkend servicecentrum worden uitgevoerd.
17. Probeer de staande mixer niet zelf te repareren. Door het openen of verwijderen van
de deksels kunt u worden blootgesteld aan onder spanning staande componenten en
andere gevaarlijke omstandigheden.
18. Als het netsnoer is beschadigd dient het ter voorkoming van gevaar door de fabrikant,
een erkend servicecentrum of een vergelijkbaar bevoegde
persoon te worden vervangen.
19. Dit is geen speelgoed! Houd dit apparaat buiten bereik van kinderen. Dit apparaat
Figuur A
1. Snelheidschakelaar
2. Ontgrendelknop voor multifunctionele kop
3. Timer
4. Deksel voor kom
5. Roestvrijstalen kom met hendel
6. Roestvrijstalen klopper
dient buiten bereik van kinderen te worden gebruikt en opgeborgen.
20. Zorgvuldig toezicht is vereist wanneer het apparaat wordt gebruikt door of in de buurt
van kinderen.
21. Dit apparaat mag niet worden gebruikt door personen (waaronder kinderen) met
beperkte fysieke, zintuiglijke of mentale mogelijkheden, of door personen met gebrek
aan ervaring en kennis, tenzij deze onder toezicht staan of instructies hebben
gekregen van een voor hun veiligheid verantwoordelijk persoon.
22. Houdt er rekening mee dat wanneer dit apparaat aan derden wordt gegeven, dat de
gebruiksaanwijzing moet worden meegeleverd.
23. Er is geen aansprakelijkheid voor schade als gevolg van onjuist gebruik of het niet
naleven van de bedieningsinstructies of de veiligheidsaanwijzingen.
24. BELANGRIJK: Gebruik de mixer niet langer dan 8 minuten (continu) per keer.
MAAK KENNIS MET DE STAANDE MIXER
7. Deeghaak
8. Garde
9. Multifunctionele kop
10. Afneembare cover voor uitvoer
11. Ontgrendelknop vleesmodel
12. Uitgangaandrijving

Figuur B
13. Snijbehuizing
14. Wormwielas
15. Snijmes
16. Ruwe maalschijf
17. Fijne maalschijf
18. Gemiddelde maalschijf
19. Schroefring
20. Stamper
21. Blad
22. Worstkoker
23. Basisschijf
Figuur C
22 23

DE STAANDE MIXER GEBRUIKEN (zie afbeelding A).
Afhankelijk van de ingrediënten, kan de kom (5) met deksel worden gebruikt voor het
bereiden van 1 kilo deeg (500 gram bloem).
1. Druk op de knop (2) om de multifunctionele kop (9) los te maken en deze rechtop te
zetten. (Afb. 1 en 2)
2. Plaats de kom (5) op het apparaat door deze te draaien tot hij op zijn plek vastklikt
en plaats de ingrediënten in de kom. (Afb. 3)
3. Plaats de deksel (4) op de kom met de vulopening aan de voorkant van het
apparaat. Plaats het gewenste accessoire (6/7/8) in het stopcontact. Duw de schacht
van de accessoirebehuizing omlaag en draai deze een kwartslag uw richting op tot
deze op zijn plek vastklikt. (Afb.4)
5. Doe de multifunctionele kop van het apparaat omlaag en druk nogmaals op de
knop tot deze op zijn plek vastklikt. (Afb. 5 en 6)
6. Stel de timer (3) op het bedieningspaneel in volgens de bedrijfstijd van het recept.
Stel een minimumtijd van ‘0’ in en een maximumtijd van ‘30’ minuten (plus 30
seconden om aan te passen) voor één set. (Afb.7)
7. Tijdens de bereiding kunt u ingrediënten toevoegen door de opening in het deksel.
8. Schakel de schakelaar (1) uit om het apparaat te stoppen.
VLEESMALER (Afbeelding B)
1. Til de snijbehuizing op richting de uitlaataandrijving voordat u de vleesmaler
gebruikt.
2. Plaats de wormwielas (14) (met aandrijfpinnen eerst) in de snijbehuizing (13).
Plaats de snijbladen (15) op de as met de snijranden naar boven gericht. (Afb 9)
3. Plaats de geselecteerde plaat met gaten (16/17/18) over de bladen en zorg ervoor
dat de twee nokken in de twee uitsneden van de snijbehuizing passen. (Afb. 9)
4. Schroef de ringdopmoer (19) helemaal aan op de snijbehuizing (Afb 10).
5. Plaats de gemonteerde vleesmaalhulpstuk (naar u toe gericht) in de
uitlaataandrijving (12) en plaats het er helemaal in. Zet de invoerbuis weer rechtop
door deze naar links te draaien tot het niet meer verder kan en op zijn plek
vastklikt. (Afb.11)
6. Plaats de verwijderbare lade (21) op de invoerbuis. (Afb.12)
WAARSCHUWING:
1. Druk op de linkerhoek om de deksel te openen druk op de knop (11) om de
snijbehuizing (13) vrij te geven.
2. Plaats stukken vlees stuk voor stuk in de invoerbuis met behulp van de duwer (20),
WAARSCHUWING: Duw het vlees nooit met uw vingers of keukengerei
in de invoerbuis. Gebruik altijd de duwer!
SAUSAGE STUFFER KEBAB (Afbeelding C)
1. Bevestig de kebabaccessoires voor het vullen van de worstjes volgens FIGUUR C.
2. Steek de kebabaccessoires voor het vullen van de worstjes (naar uw lichaam
gekanteld) in de snijbehuizing (13) door deze rechtsom te draaien totdat hij op zijn
plek vast klikt.
3. Leg het worstvel in water en laat 10 minuten weken. Schuif het vel geleidelijk aan
en voorzichtig over de worstkoker (22). Steek de stekker in het stopcontact en stel
de snelheidsschakelaar in op 1 of 2.
4. Gebruik de drukker (20) om de snijbehuizing (13) met gehakt te vullen.
REINIGEN EN ONDERHOUD
1. Koppel het apparaat los van de voeding.
2. Dompel de motor nooit onder water en houd het nooit onder stromend water. Veeg
af met een zachte, vochtige doek en veeg de motor daarna gelijk droog.
3. Voor eenvoudigere reiniging, kunt u de accessoires na gebruik snel afspoelen.
4. Als uw accessoires zijn verkleurd door etenswaren (wortels, sinaasappels, enz.),
veegt u deze voorzichtig af met een keukendoek met olie en vervolgens reinigt u de
accessoires zoals normaal.
5. Reinig de accessoires na elk gebruik grondig.
6. Dompel de accessoires nooit onder water dat heter is dan 50 graden.
7. Was de accessoires niet in de afwasmachine, dit kan oxidatie aan de oppervlakken
veroorzaken.
EXTRA FUNCTIES
De opteltimer (Afb. 13)
De opteltimer is vooral nuttig om de mixtijd te meten wanneer een recept dit niet
duidelijk aangeeft. U kunt controleren hoe lang het duurt voor de ingrediënten goed zijn
gemixt, zodat u de volgende keer wanneer u diezelfde ingrediënten mixt, u de afteltimer
op een bepaalde tijd in kunt stellen. De optel-timer begint automatisch met tellen, zodra
de Snelheidsbediening van de UIT-positie naar een van de mixsnelheden is ingesteld.
Wanneer de Snelheidsbediening weer naar de UIT-positie wordt gedraaid, ziet u 0:00 op
het LCD-scherm staan.
De afteltimer (Afb. 14)
De afteltimer is vooral nuttig voor een recept waarin wordt aangegeven hoe lang de
ingrediënten moeten worden gemixt. Als er bijvoorbeeld in het recept staat: ‘3 minuten
opkloppen.’ kunt u de afteltimer op 3 minuten instellen door op de ‘+’ of ‘-’ te drukken.
Na 3 minuten mixen, wordt er UIT weergegeven op het scherm, u hoort een
waarschuwingstoon en de mixer wordt automatisch afgesloten. De snelheidsbediening
moet naar de UIT-positie worden gedraaid om de timer opnieuw in te stellen en door te
gaan met mixen. Om de afteltimer in te stellen, drukt u op de pijltoetsen omhoog of
omlaag tot de gewenste mixtijd wordt weergegeven op het LCD-scherm. Draai de
snelheidsbediening naar rechts om de geselecteerde snelheid te selecteren om te beginnen
met mixen. Zodra de mixer automatisch wordt uitgeschakeld, moet de snelheidsbediening
terug worden gedraaid naar de UIT-positie om de afteltimer opnieuw in te stellen en door
te gaan met mixen.

DE STAANDE MIXER GEBRUIKEN (zie afbeelding A).
Afhankelijk van de ingrediënten, kan de kom (5) met deksel worden gebruikt voor het
bereiden van 1 kilo deeg (500 gram bloem).
1. Druk op de knop (2) om de multifunctionele kop (9) los te maken en deze rechtop te
zetten. (Afb. 1 en 2)
2. Plaats de kom (5) op het apparaat door deze te draaien tot hij op zijn plek vastklikt
en plaats de ingrediënten in de kom. (Afb. 3)
3. Plaats de deksel (4) op de kom met de vulopening aan de voorkant van het
apparaat. Plaats het gewenste accessoire (6/7/8) in het stopcontact. Duw de schacht
van de accessoirebehuizing omlaag en draai deze een kwartslag uw richting op tot
deze op zijn plek vastklikt. (Afb.4)
5. Doe de multifunctionele kop van het apparaat omlaag en druk nogmaals op de
knop tot deze op zijn plek vastklikt. (Afb. 5 en 6)
6. Stel de timer (3) op het bedieningspaneel in volgens de bedrijfstijd van het recept.
Stel een minimumtijd van ‘0’ in en een maximumtijd van ‘30’ minuten (plus 30
seconden om aan te passen) voor één set. (Afb.7)
7. Tijdens de bereiding kunt u ingrediënten toevoegen door de opening in het deksel.
8. Schakel de schakelaar (1) uit om het apparaat te stoppen.
VLEESMALER (Afbeelding B)
1. Til de snijbehuizing op richting de uitlaataandrijving voordat u de vleesmaler
gebruikt.
2. Plaats de wormwielas (14) (met aandrijfpinnen eerst) in de snijbehuizing (13).
Plaats de snijbladen (15) op de as met de snijranden naar boven gericht. (Afb 9)
3. Plaats de geselecteerde plaat met gaten (16/17/18) over de bladen en zorg ervoor
dat de twee nokken in de twee uitsneden van de snijbehuizing passen. (Afb. 9)
4. Schroef de ringdopmoer (19) helemaal aan op de snijbehuizing (Afb 10).
5. Plaats de gemonteerde vleesmaalhulpstuk (naar u toe gericht) in de
uitlaataandrijving (12) en plaats het er helemaal in. Zet de invoerbuis weer rechtop
door deze naar links te draaien tot het niet meer verder kan en op zijn plek
vastklikt. (Afb.11)
6. Plaats de verwijderbare lade (21) op de invoerbuis. (Afb.12)
WAARSCHUWING:
1. Druk op de linkerhoek om de deksel te openen druk op de knop (11) om de
snijbehuizing (13) vrij te geven.
2. Plaats stukken vlees stuk voor stuk in de invoerbuis met behulp van de duwer (20),
WAARSCHUWING: Duw het vlees nooit met uw vingers of keukengerei
in de invoerbuis. Gebruik altijd de duwer!
SAUSAGE STUFFER KEBAB (Afbeelding C)
1. Bevestig de kebabaccessoires voor het vullen van de worstjes volgens FIGUUR C.
2. Steek de kebabaccessoires voor het vullen van de worstjes (naar uw lichaam
gekanteld) in de snijbehuizing (13) door deze rechtsom te draaien totdat hij op zijn
plek vast klikt.
3. Leg het worstvel in water en laat 10 minuten weken. Schuif het vel geleidelijk aan
en voorzichtig over de worstkoker (22). Steek de stekker in het stopcontact en stel
de snelheidsschakelaar in op 1 of 2.
4. Gebruik de drukker (20) om de snijbehuizing (13) met gehakt te vullen.
REINIGEN EN ONDERHOUD
1. Koppel het apparaat los van de voeding.
2. Dompel de motor nooit onder water en houd het nooit onder stromend water. Veeg
af met een zachte, vochtige doek en veeg de motor daarna gelijk droog.
3. Voor eenvoudigere reiniging, kunt u de accessoires na gebruik snel afspoelen.
4. Als uw accessoires zijn verkleurd door etenswaren (wortels, sinaasappels, enz.),
veegt u deze voorzichtig af met een keukendoek met olie en vervolgens reinigt u de
accessoires zoals normaal.
5. Reinig de accessoires na elk gebruik grondig.
6. Dompel de accessoires nooit onder water dat heter is dan 50 graden.
7. Was de accessoires niet in de afwasmachine, dit kan oxidatie aan de oppervlakken
veroorzaken.
EXTRA FUNCTIES
De opteltimer (Afb. 13)
De opteltimer is vooral nuttig om de mixtijd te meten wanneer een recept dit niet
duidelijk aangeeft. U kunt controleren hoe lang het duurt voor de ingrediënten goed zijn
gemixt, zodat u de volgende keer wanneer u diezelfde ingrediënten mixt, u de afteltimer
op een bepaalde tijd in kunt stellen. De optel-timer begint automatisch met tellen, zodra
de Snelheidsbediening van de UIT-positie naar een van de mixsnelheden is ingesteld.
Wanneer de Snelheidsbediening weer naar de UIT-positie wordt gedraaid, ziet u 0:00 op
het LCD-scherm staan.
De afteltimer (Afb. 14)
De afteltimer is vooral nuttig voor een recept waarin wordt aangegeven hoe lang de
ingrediënten moeten worden gemixt. Als er bijvoorbeeld in het recept staat: ‘3 minuten
opkloppen.’ kunt u de afteltimer op 3 minuten instellen door op de ‘+’ of ‘-’ te drukken.
Na 3 minuten mixen, wordt er UIT weergegeven op het scherm, u hoort een
waarschuwingstoon en de mixer wordt automatisch afgesloten. De snelheidsbediening
VERWERKINGSHANDLEIDING
Accessoires
Garde
Room
(38% vet)
Eiwit/Eieren
Bloem
Zout
Gist
Suiker
Water
Bloem
Bessensuiker
Boter
Eieren
500g
250g
250g
4 stuks
Olie
800g
10g
10g
5ml
400g
20g
250ml 10 minuten 5-Max
12 stuks
(min: 2 stuks)
2-10 minuten
15 minuten
5 minuten
Min-2 (3min)
5-Max (7min)
Min-3(5 min)
4(10min)
Min-4
Deeghaak
Opkloppen
Maximum Maximum Werkingstijd Snelheden
moet naar de UIT-positie worden gedraaid om de timer opnieuw in te stellen en door te
gaan met mixen. Om de afteltimer in te stellen, drukt u op de pijltoetsen omhoog of
omlaag tot de gewenste mixtijd wordt weergegeven op het LCD-scherm. Draai de
snelheidsbediening naar rechts om de geselecteerde snelheid te selecteren om te beginnen
met mixen. Zodra de mixer automatisch wordt uitgeschakeld, moet de snelheidsbediening
terug worden gedraaid naar de UIT-positie om de afteltimer opnieuw in te stellen en door
te gaan met mixen.
Afd. 13 Afd. 13

SPECIFICATIES
Nominale spanning: 220-240V~ 50-60Hz
Voeding: 1000W
Capaciteit mixkom: 4,8 liter
ENVIRONMENT FRIENDLY DISPOSAL
Dit etiket geeft aan dat dit product niet moet worden weggegooid met ander
huishoudelijk afval. Om mogelijke schade aan het milieu of gezondheid door
ongecontroleerde afvalverwijdering te voorkomen dient het apparaat
verantwoordelijk gerecycled te worden om het hergebruik van materiële bronnen
te stimuleren. Voor meer informatie over het weggooien van uw apparaat, dient u
contact op te nemen met uw lokale afvalverwerkingsbedrijf. Of neem contact op met de
lokale gemeente voor meer informatie over uw lokale kringloop. Laat dit product
milieuvriendelijk recyclen.
GARANTIEVOORWAARDEN
De garantie is alleen geldig als het product wordt geretourneerd met het aankoopbewijs en
in de originele verpakking
De garantie vervalt als:
1. Het product niet is geïnstalleerd, gebruikt of onderhouden volgens de
gebruikersinstructies van de fabrikant die zijn meegeleverd bij het product.
2. Het product gebruikt is voor andere doeleinden dan de bedoelde functie.
3. De schade of het defect aan het product is veroorzaakt door het volgende:
- Onjuiste spanning
- Onjuiste spanning
- Ongelukken (inclusief vloeibare of vochtschade)
- Misbruik van het product
- Onjuiste installatie
- Problemen met de netvoeding, inclusief stroompieken of schade door bliksem
- Besmetting door insecten
- Sabotage of aanpassen van het product door personen die hierin niet gespecialeerd
zijn
- Blootstelling aan abnormaal bijtende materialen
- Plaatsen van onbekende objecten in de eenheid
- Gebruik van accessoires die niet vooraf zijn goedgekeurd door Brabantia
Gelieve alle waarschuwingen en voorzorgsmaatregelen in de handleiding te
raadplegen en in acht te nemen.
Door voortdurende productontwikkelingen kunnen specificaties worden
gewijzigd zonder voorafgaand bericht.
Table of contents
Languages:
Other Brabantia Mixer manuals


Popular Mixer manuals by other brands


Samson
Samson MDR MDR 6 Specification sheet

Cuisinart
Cuisinart Precision Master SM50BL INSTRUCTION AND RECIPE BOOKLET

Catler
Catler KM 8020 instruction manual

Metos
Metos Kodiak 20 VL-1C user manual

INOXPA
INOXPA BMI Installation, service and maintenance instructions

Sulzer
Sulzer ABS RW 480 Installation and operating instructions