Brandani Tower Speaker User manual

manuale d’istruzioni
instruction manual
handbuch anweisungen
manuel d’instructions
manual de instrucciones

Italiano
2
manuale d’istruzioni
ALTOPARLANTE A COLONNA MANUALE DUSO
GUIDA INTRODUTTIVA
Togliere l’unità dalla scatola.
Togliere il materiale d’imballaggio e riporlo nella scatola per conservarlo o smaltirlo in sicurezza.
CONTENUTO DELLIMBALLAGGIO
Altoparlante a colonna
Telecomando senza li
Adaatore di corrente
Cavo ausiliare da 3.5mm
Base e viti per montare l’unità
MANUALE D’USO
CARATTERISTICHE
Radio FM incorporato
Ingresso Aux
Porta USB
Alloggiamento scheda SD/MMC
Telecomando senza li
ISTRUZIONI DI SICUREZZA
Quando si usano degli apparecchi elerici, occorre seguire alcune regole di sicurezza basilari.
-Quest’unità non è destinata all’uso da parte di persone (inclusi i bambini) con ridoe capacità
motorie, sensoriali o mentali o da utenti non esperti. Quest’ultimi dovrebbero essere supervisio-
nati e istruiti sull’uso dell’apparecchio da persone esperte e responsabili per la loro incolumità.
-Assicuratevi che l’unità non venga collocata troppo vicino a fonti di calore o al sole direo.
-Prima di collegare l’unità all’alimentazione elerica, controllate che il voltaggio indicato sulla

Italiano
3
manuale d’istruzioni
targhea dei dati corrisponda a quella della rete elerica locale.
-Non lasciare l’unità incustodita quando è connessa all’alimentazione elerica.
-Non immergere l’unità in acqua o in altri liquidi.
-Dopo l’uso, prima di pulirlo e durante eventuali operazioni di riparazione, è assolutamente
necessario scollegare l’unità dalla presa di corrente.
-Sorvegliare eventuali bambini nelle vicinanze quando l’unità è in funzione.
-Non lasciare mai l’unità a portata dei bambini.
-Le riparazioni degli apparecchi elerici dovrebbero essere eseguite da personale qualicato.
Riparazioni improprie potrebbero esporre l’utente a seri rischi.
-Quest’unità è destinata esclusivamente all’uso domestico e non per scopi industriali o com-
merciali.
-Non utilizzare quest’unità con spine o cavi difeosi, se ha subito dei guasti, cadute o danni di
qualsivoglia natura.
-Non usare quest’unità per altri scopi al di fuori di quelli per cui è stato costruito.
-Si consiglia di collocare l’unità sopra una supercie stabile e resistente al calore.
-Non introdurre oggei di nessun tipo nelle fessure per non danneggiare l’unità con conseguen-
te rischio di folgorazione.
-Non usare l’unità in ambienti umidi o in condizioni climatiche avverse.
-Questo prodoo non è un giocaolo.
-Non alzate il volume a livelli eccessivi, soprauo se ci sono bambini nelle vicinanze.
Italiano
4
manuale d’istruzioni
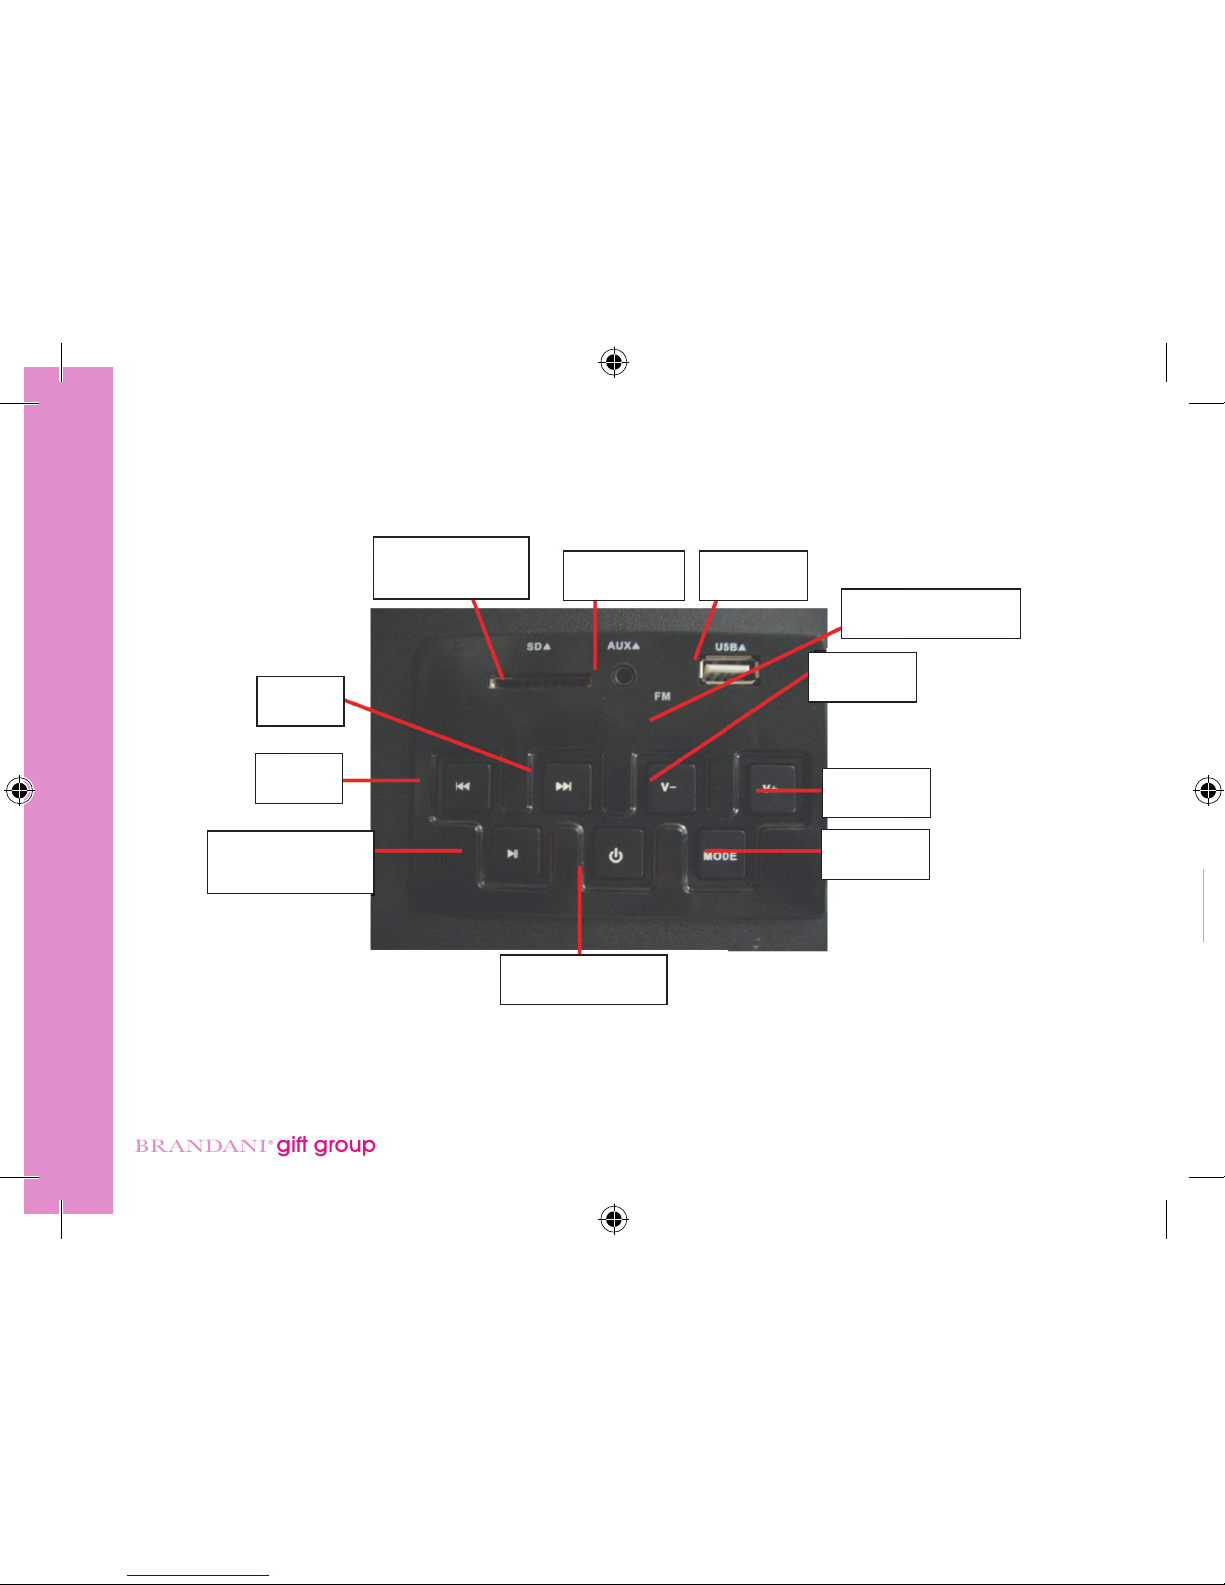
DESCRIZIONE DEI VARI COMPONENTI
PANNELLO SUPERIORE
Alloggiamento
scheda SD/MMC Porta Aux In Porta USB
Indicatore LED FM
Volume -
Volume +
Modalità
Standby/On/O
Riproduci/Pausa
Salta -
Salta +

Italiano
5
manuale d’istruzioni
DESCRIZIONE DEI VARI COMPONENTI
PANNELLO SUPERIORE
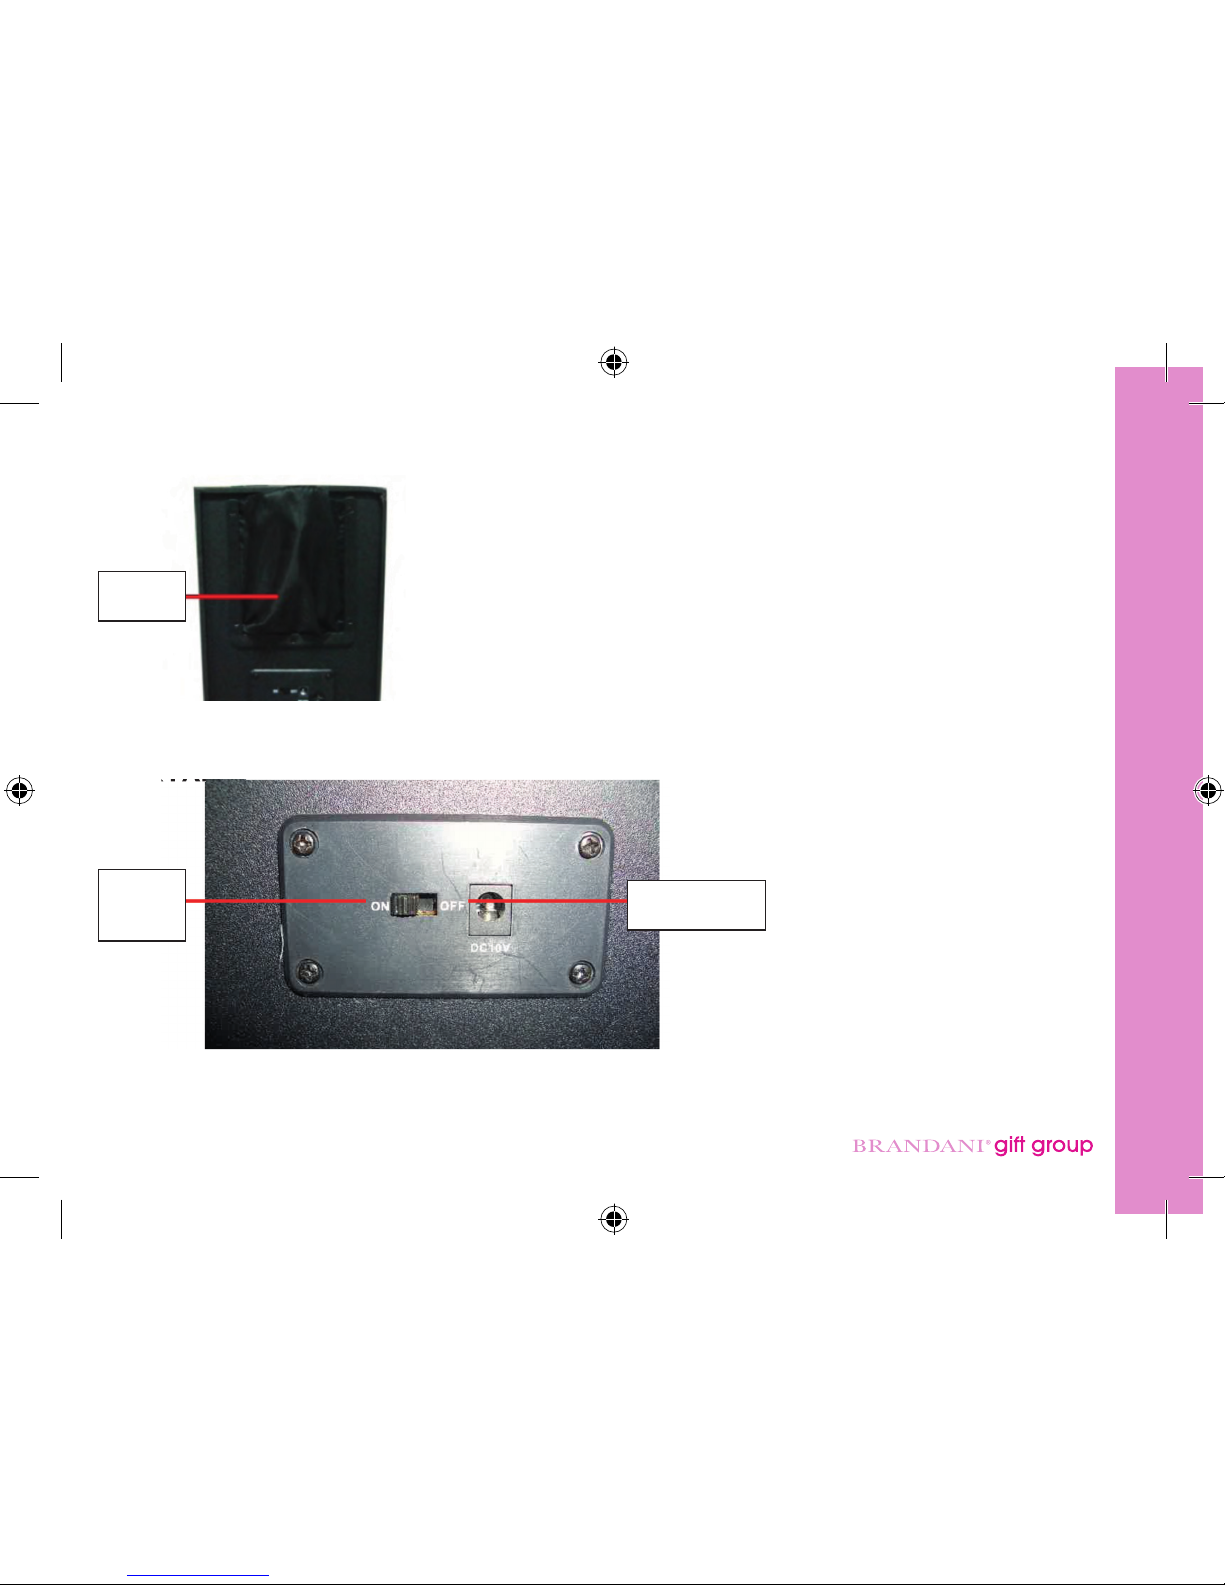
TASCA PANNELLO POSTERIORE
Tasca
PANNELLO POSTERIORE
Power
On/O Presa DC In
LEGENDA: Power On/O = accensione/spegnimento

Italiano
6
manuale d’istruzioni
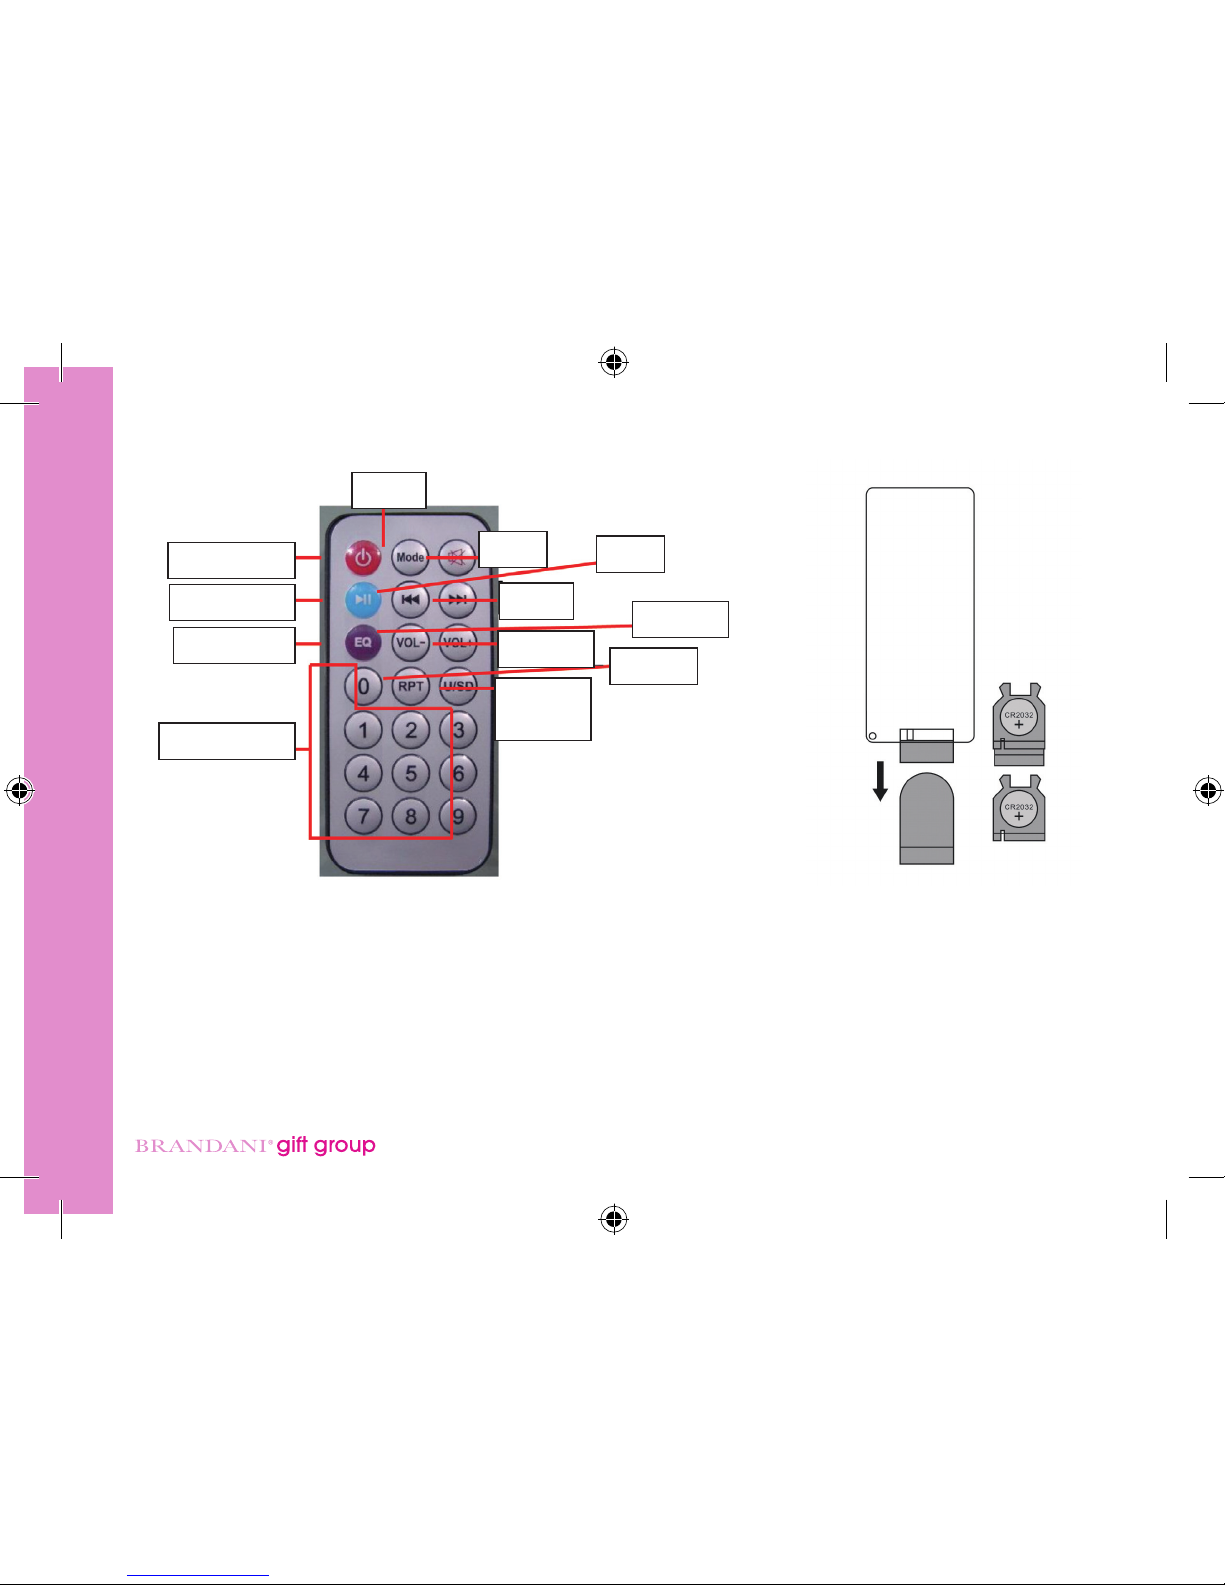
USO DEL TELECOMANDO BATTERIA
Per meere in funzione il telecomando, dopo averlo disimballato, togliere il coperchio del com-
parto baeria e sollevare l’apposita linguea.
Se il telecomando funziona ad intermienza oppure se siete costrei ad avvicinarvi troppo all’u-
nità per poter operare, è probabile che le baerie siano da cambiare
Per cambiare le baerie, fate scorrere il coperchio del comparto baerie situato nell’apposito
Standby/On
Riproduci/Pausa
Equalizzatore
Tasti numerici
Ripeti
Volume +
Volume -
Salta +
Salta -
Muto
Modalità
Scheda
USB/SD
TELECOMANDO

Italiano
7
manuale d’istruzioni
vano alla base del telecomando. Togliere la baeria e sostituirla con una del tipo a boone
CR2025 da 3 volt al litio. Assicuratevi che il polo + della baeria si trovi soo il coperchio quando
richiudete il comparto baeria.
INSTALLAZIONE DELLALTOPARLANTE
Montaggio della base
1. Rimuovete con aenzione l’altoparlante e la base dall’imballaggio.
2. Rimuovete le viti dall’imballaggio.
3. Collegate la base al corpo allineando i quaro fori della base con i quari fori dell’altoparlante.
4. Avvitate la base al corpo dell’altoparlante.
5. Collocate l’altoparlante sul pavimento in posizione diria. L’altoparlante adesso è pronta
all’uso.
INSTRUZIONI PER LUSO
Accensione della Digitower
Posizionare l’unità nel punto in cui intendete utilizzarlo. Collegare l’adaatore AC-DC all’alto-
parlante e inserire l’adaatore nella presa elerica. Posizionare il tasto ON/OFF (situato sul retro
dell’altoparlante) su ON. Accendere l’altoparlante premendo il tasto standby/on situato sul pan-
nello superiore.

Italiano
8
manuale d’istruzioni
Funzione Radio
Dopo aver acceso l’altoparlante, premere il tasto mode (modalità) per entrare in modalità FM. Il
relativo LED indicatore si accenderà. Premere il tasto skip+ / skip- (salta) per selezionare la stazione
radio desiderata.
Regolazione del volume
1. Premere il tasto volume up/down (+/-) per regolare il livello di volume desiderato.
2. Per togliere l’audio all’altoparlante, premere il tasto mute sul telecomando. Premete di nuovo
il tasto mute per ripristinare l’audio.
Riprodurre musica in formato MP3 da una scheda SD/MMC
1. Accendere l’altoparlante ed inserire la scheda SD/MMC nell’apposito slot.
2. Premere il tasto mode ripetutamente per selezionare la modalità scheda SD/MMC. Il LED
indicatore dello slot della scheda SD/MMC si illuminerà e la musica in formato MP3 memoriz-
zata nella scheda si riprodurrà automaticamente
3. Premere il tasto skip+ / skip- per selezionare la traccia musicale desiderata.
4. Inserendo il numero di traccia tramite i tasti numerici del telecomando, è possibile selezionare
direamente la traccia desiderata dalla scheda SD/MMC.
5. Premere il tasto Play/Pause per meere la musica in pausa. Premetelo di nuovo per riprende-
re la riproduzione della musica.

Italiano
9
manuale d’istruzioni
Riprodurre musica in formato MP3 da un Flash driveUSB
1. Accendere l’altoparlante ed inserire il ash drive nella porta USB.
2. Premere il tasto mode ripetutamente per selezionare la modalità USB. Il relativo LED indicato-
re si illuminerà e la musica memorizzata nel ash drive si riprodurrà automaticamente.
3. Premere il tasto skip+ / skip- per selezionare la traccia musicale desiderata.
4. Inserendo il numero di traccia tramite i tasti numerici del telecomando, è possibile selezionare
direamente dal ash drive la traccia desiderata.
5. Premere il tasto Play/Pause per meere la musica in pausa. Premetelo di nuovo per riprende-
re la riproduzione della musica.
Utilizzo dellingresso AUX
La Porta Aux In è situata sul pannello superiore dell’unità e, araverso questo jack, è possibile
inviare all’altoparlante segnali audio analogici provenienti da fonti diverse.
1. Collegare il cavo ausiliario da 3,5mm (incluso) alla porta Aux-in. Collegare l’altra estremità del
cavo da 3,5mm ad un leore MP3 (o qualsiasi altro tipo di fonte audio).
2. Accendere l’altoparlante
3. Premere il tasto mode ripetutamente per entrare in modalità Aux-in mode nchè non si illu-
mina l’indicatore soo l’Aux.
4. Usare i controlli nativi presenti sul dispositivo collegato per iniziare a riprodurre i suoni dirot-
tati araverso l’unità.

Italiano
10
manuale d’istruzioni
Nota: In questa modalità, il Telecomando controlla solo il volume. Tui gli altri comandi devono
essere regolati dalla fonte di partenza.
Cose da fare e da non fare
-Scollegare l’adaatore AC-DC dalla presa elerica quando l’unità non è in uso e prima di pulirlo.
-Non ascoltare musica a livelli di volume eccessivi per non incorrere nel rischio di gravi dannii
all’udito.
-Non usare l’unità in ambienti bagnati o umidi.
Cura e manutenzione
-Scollegare sempre l’unità dalla presa elerica prima di pulirlo.
-Pulire l’unità con un panno morbido, umido e privo di pelucchi.
-Non usare prodoi abrasivi o aggressivi.

Italiano
11
manuale d’istruzioni

English instruction manual
12
TOWER SPEAKER INSTRUCTION MANUAL
GETTING STARTED
Remove the unit from the box.
Remove packaging and place inside the box to either store or dispose of safely.
PACKAGE CONTENTS
Tower Speaker
Wireless Remote Control
Power Adaptor
3.5mm auxiliary cable
Base and screws to aach the unit
Instruction Manual
FEATURES
Built-in FM radio
Aux input
USB port
SD/MMC card slot
Wireless Remote Control
SAFETY INSTRUCTIONS
When using electrical appliances, basic safety precautions should always be taken.
-is unit is not intended for use by persons (including children) with reduced physical, sensory
or mental capabilities or lack of experience or knowledge. ey should be given supervision
and instruction on the use of the appliance by a person responsible for their safety.
-Ensure the unit is not too close to heat emiing devices or placed in direct sunlight.
-Check that the voltage indicated on the data plate corresponds with that of the local network

English instruction manual
13
before connecting the unit to the power supply.
-Do not leave the unit unaended while connected to the power supply.
-Do not immerse the unit in water or any other liquids.
-It is imperative to unplug the power cord aer the unit has been used, before it is cleaned and
while being repaired.
-Close supervision is required when using this unit near children.
-Never leave the unit within reach of children.
-Repairs to electrical devices should only be performed by qualied personnel. Improper repai-
rs may place user at serious risk.
-is unit is intended for household use only and should not be used for industrial or commer-
cial purposes.
-Do not operate this unit with a damaged plug or cord, aer a malfunction or aer being drop-
ped or damaged in any way.
-Do not use this unit for anything other than its intended use.
-is unit must be placed on a stable heat resistant surface.
-Do not push objects into any openings as damage to the unit and/or electric shock may occur.
-Do not use this unit in wet or bad weather conditions.
-is product is not a toy.
-Do not play music at excessive levels, especially near children.

English instruction manual
14
DESCRIPTION OF PARTS
TOP PANEL
SD/MMC
card slot Aux in Port USB Port
FM LED Indicator
Volume down
Volume up
Mode
Standby/On/O
Play/Pause
Skip -
Skip +
English instruction manual
15
POUCH ON REAR PANEL
REAR PANEL
Pouch
REAR PANEL
Power
On/O DC IN socket
English instruction manual
16
REMOTE CONTROL
Standby/On
Play/Pause
Equalizer
Number keys
Repeat
Volume +
Volume -
Skip +
Skip -
Mute
Mode
USB/SD
card
USING THE REMOTE CONTROL THE BATTERY
To get your remote control working, once it is rst out of the box, pull the clear tab out from the
baery compartment at the base (straight) end of the remote.
If your remote becomes intermient or you nd you have to move nearer the unit to operate then
the baery will probably need replacing.
To do this, slide out the cover from the base of the remote. Remove the baery and replace with

English instruction manual
17
a 3 volt Lithium CR2025 buon cell. Ensure that the + side of the baery is on the underside of
the cover as you slide it back in.
SETTING UP YOUR SPEAKER
Aaching the base
1. Carefully take the tower speaker and base out of the packaging.
2. Take the screws out.
3. Aach the base to the body aligning the four holes in the base with the four holes in the tower
speaker.
4. Screw the base into the body.
5. Stand the tower upright on the oor. e unit is now ready for use.
INSTRUCTIONS FOR USE
Turning the Digitower On
Position the unit where it is going to be used. Connect the AC-DC adaptor to the speaker and
plug the adaptor to the power supply. Switch the power on/o buon at the back the speaker to
on position. Press the standby/on buon on the top panel to turn the speaker on.
Listening to the Radio
Aer the speaker is turned on, press the mode buon to select the FM radio mode. e LED indi-
cator of FM will light up. Press the skip+ / skip- buon to select the desire radio station.

English instruction manual
18
Adjusting the volume
1. Press the volume up/down buon to adjust the speaker to the desired volume level.
2. Pressing the mute buon on the remote control will mute the speaker, pressing the mute
buon again will resume the sound.
Listening to MP3 music on an SD/MMC card
1. Aer the speaker is turned on, insert the SD/MMC card to the SD/MMC card slot.
2. Press the mode buon repeatedly to select SD/MMC card mode. e LED indicator of the
SD/MMC card slot will light up and the MP3 music in the card will play automatically.
3. Press the skip+ / skip- buon to select the desired music track.
4. Inpuing the track no. via the number keys on the remote control can directly select the de-
sired track on the SD/MMC card.
5. Pressing the Play/Pause buon will pause the music, pressing the Play/Pause buon again will
resume the music.
Listening to MP3 music on a USB Flash drive
1. Aer the speaker is turned on, insert the ash drive into the USB port.
2. Press the mode buon repeatedly to select USB mode. e LED indicator of USB port will
light up and the MP3 music on the ash drive will play automatically.
3. Press the skip+/skip- buon to select the desired music track.
4. Inpuing the track no. via the number keys on the remote control can directly select the de-

English instruction manual
19
sired track on the ash drive.
5. Pressing the Play/Pause buon will pause the music, pressing the Play/Pause buon again will
resume the music.
Using the AUX Input
ere is an Aux In Port located on the top panel of the unit. Analogue sounds signals from other
sources can enter into the speaker through this jack.
1. Connect the 3.5mm auxiliary cable (included) to the Aux-in port. Connect the other end of
3.5mm cable to an MP3 player or any other audio source.
2. Turn the speaker on.
3. Press the mode buon repeatedly to switch into the Aux-in mode until the indicator light
below Aux is lit.
4. Use the native controls on the connected device to begin playing audio routed through the unit.
Note: In this mode, Remote Control can only control volume. All the other controls are to be
regulated from the source device.
Dos and Donts
-Unplug the AC-DC adaptor from the power supply when not in use and before cleaning.
-Do not play music at excessive volume levels as damage to hearing may occur.
-Do not use this unit in wet or damp surroundings.

English instruction manual
20
Care and Maintenance
-Always disconnect the unit from the power supply before cleaning.
-Clean the unit with a so, damp, lint free cloth
-Do not use abrasives or harsh cleaners.
Table of contents
Languages:


