Branor Systems CamTruck CTHDW01 User manual
Branor Systems HD Fish Eye Camera Trucks "CamTruck" 00 Gauge CTHDW01
Last update 13-5-2013
Thank you for buying this Branor Systems CamTruck. We hope you get as much enjoyment out of this
novel device as we had developing and using it.
Contents:
1. CamTruck: Packed in the original manufactures box.
2. Mini USB cable: For downloading videos to the PC and for charging the internal battery
3. Switch Activator: Steel pin for pressing the internal switches and removing the memory card
4. Memory Adapter For connecting the memory card to a PC directly. Not normally required
5. Lens cleaning cloth For cleaning the Fish Eye lens. Wrapped around truck during shipping.
6. These instructions Please read them!
Introduction: We know you are keen to make videos of your layout but please take some time to get used to the operation of the
Cam Truck before attempting long recordings. Connect the truck with the supplied USB cable to your computer. The green light
on the roof of the truck will come on. The battery is now being charged but the PC will not recognise the truck yet!
When handling the truck try not to put your fingers on the exposed wide angle lens. A finger mark may blur the image.
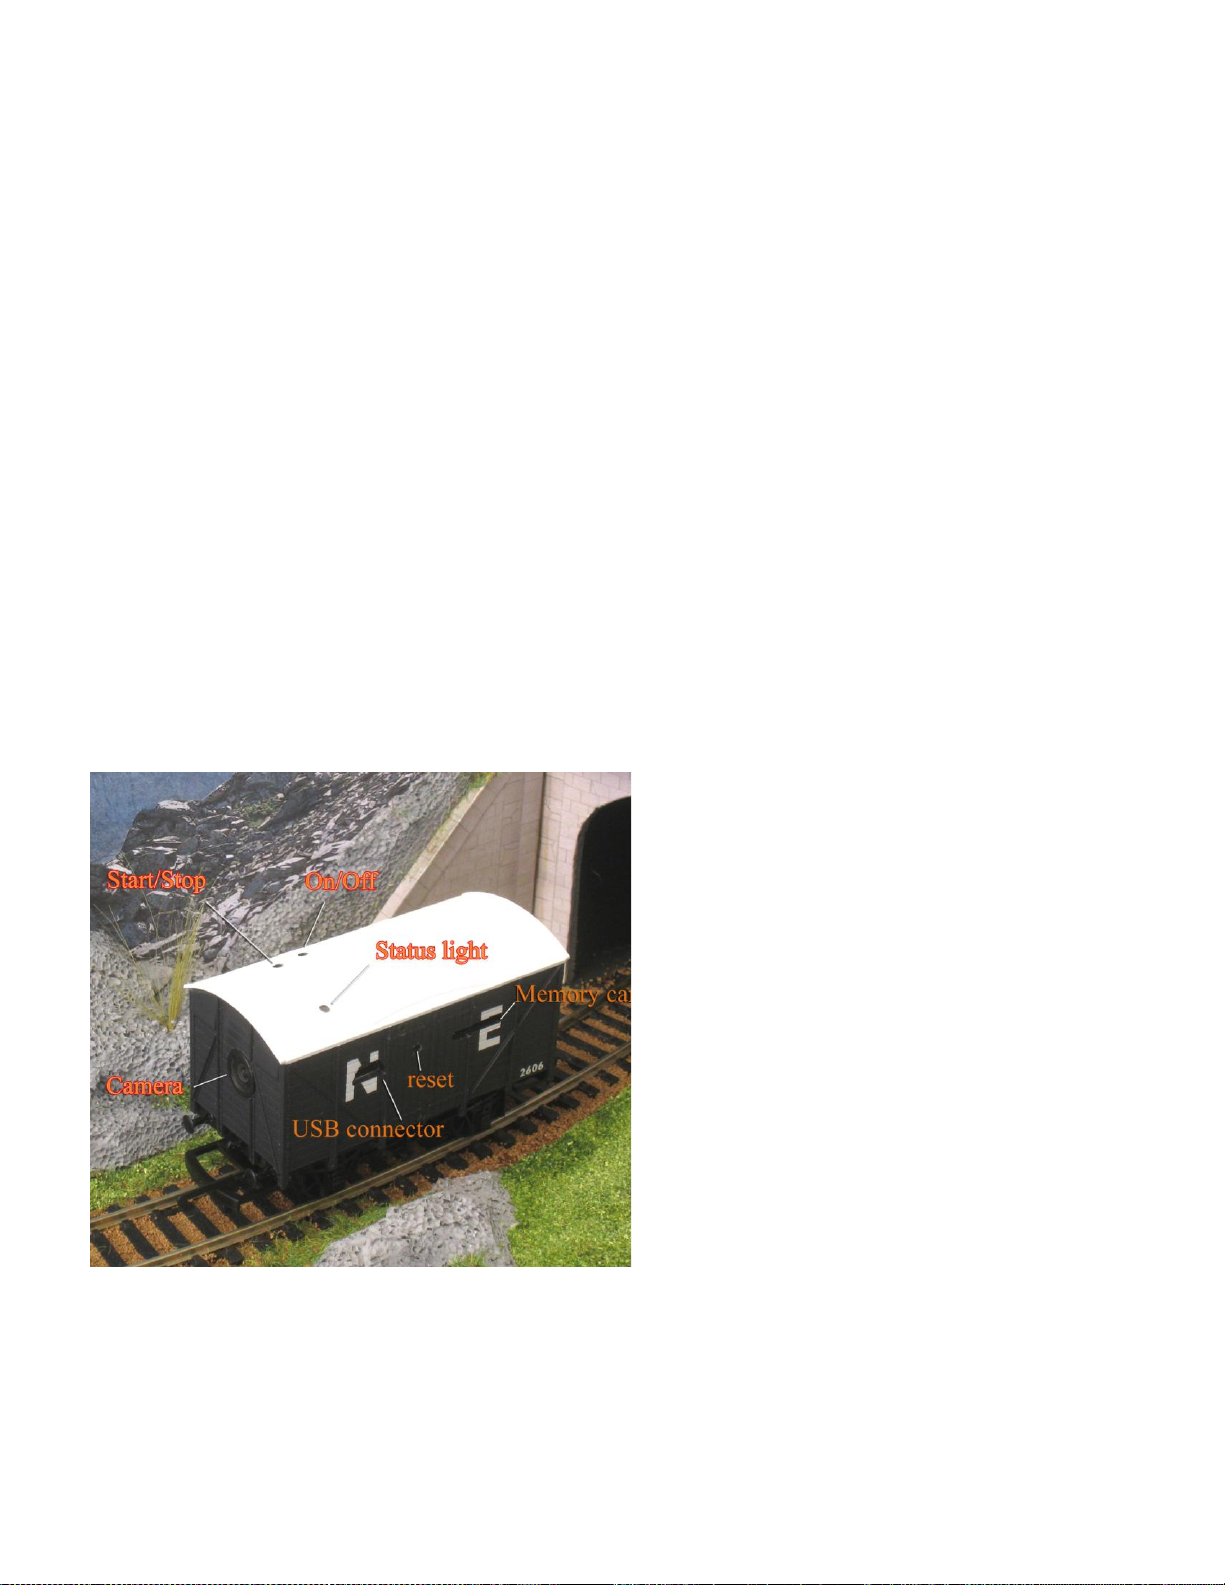
Take time to identify the two control button apertures (on/off) and (video start/stop) from the picture 2 pages down.
Next, using the actuator, insert it into the (on/off) aperture on the truck roof. This is the one furthest from the lens on the front of
the truck. Gently press down on the actuator until the orange light comes on, then release. The computer should now recognise the
truck as a standard USB memory stick. On a Windows PC a window should appear giving the choice of 'open folder to view
files' on the truck. If this window does not appear then navigate through 'My Computer' to the Truck memory. This will be
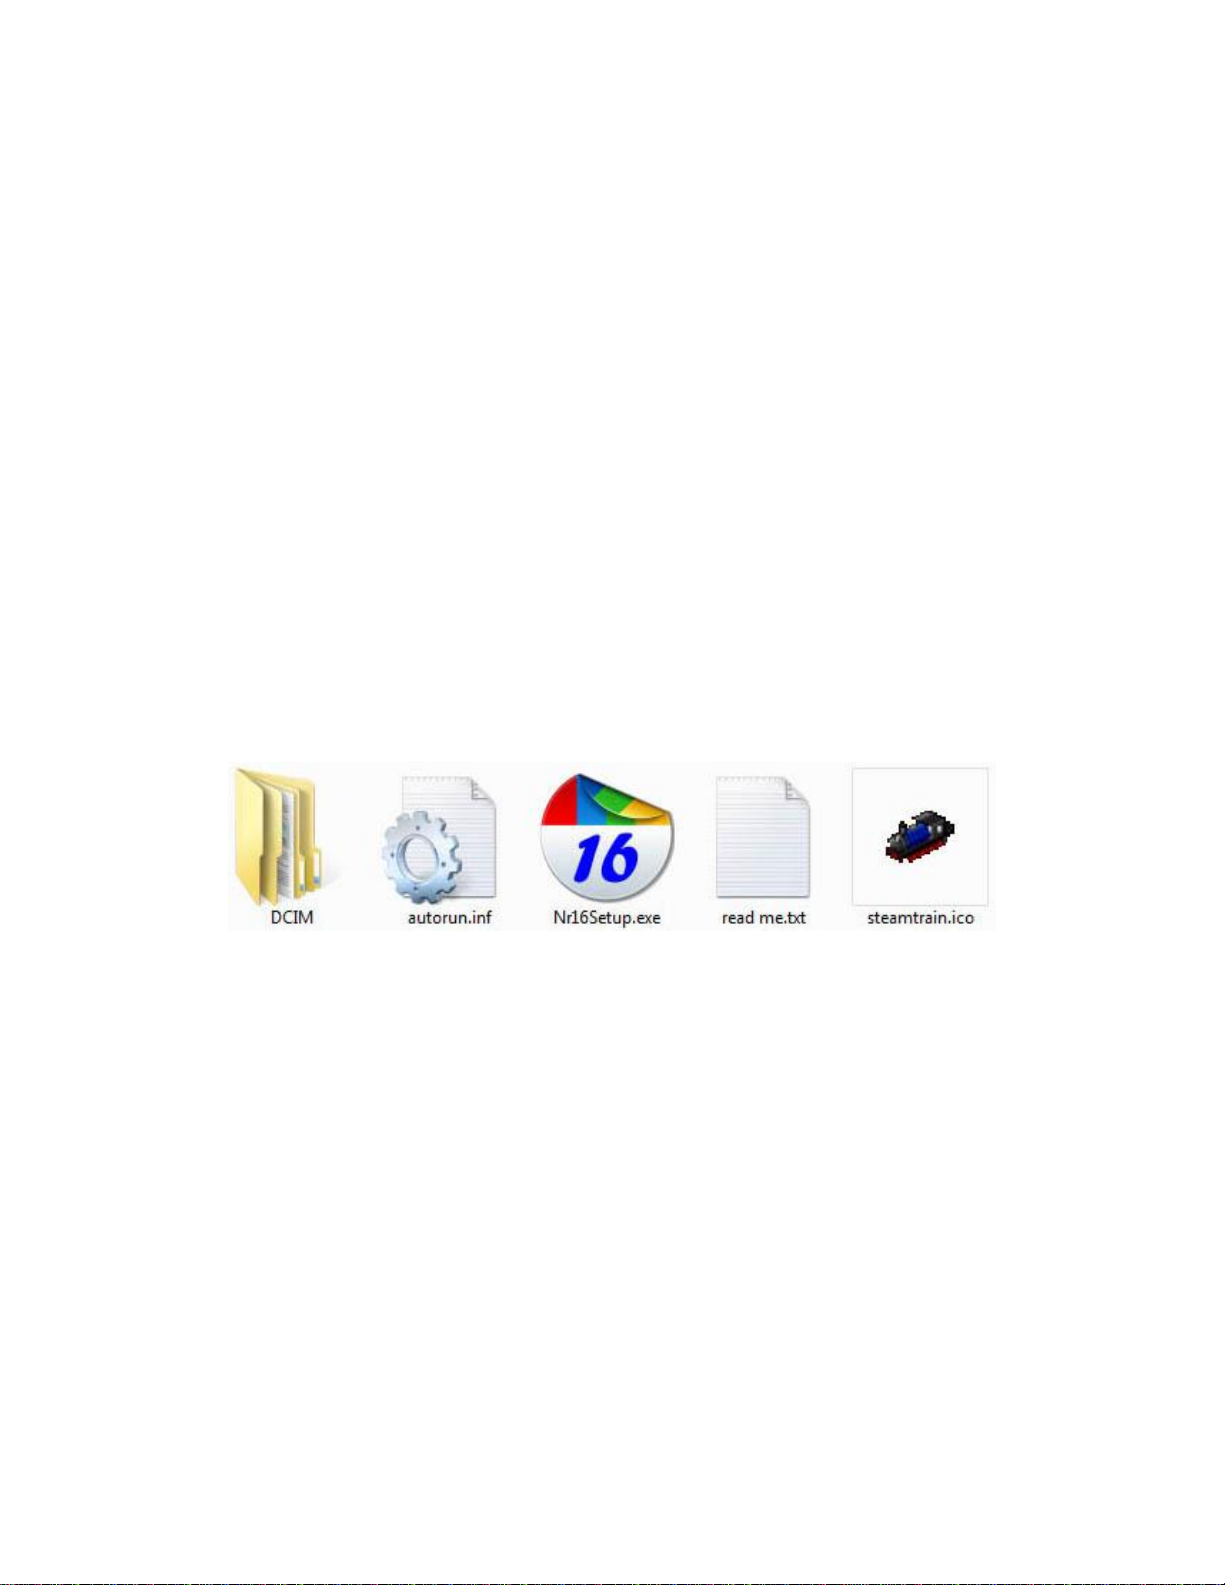
identified as 'Branor Systems HDW Camtruck'. Once the truck memory is opened you should see the following files:
These files are important and they should be saved onto your PC. Now is a good time to create a folder to save your videos to.
E.G. 'Camtruck Videos'. Copy all the above files (except DCIM) to you chosen directory.
These files will allow you to create a duplicate memory card for the Camtruck and also change video options.
The file named 'Nr16Setup.exe' is used for this purpose. More about this later.
Video files are stored in the directory DCIM. Double Click on this to show the next directory 100HDDVR. Finally, double click
on this directory to view the stored video files. There will be some short test videos here and here would be a good opportunity to
test your computers ability to view them. Double click on the video files to view them. The video files have the extension MOV
which is an Apple Quick Time format. If you have a Microsoft Windows PC then Media Player should be able to view them. If
not, you can download a Quick Time viewer from:
http://www.apple.com/quicktime/download/
If you have an Apple Mac PC then Quick Time will be the native video format.
Once you have successfully viewed the test videos you can disconnect the Cam Truck using the safe USB disconnect procedure.
Remove the USB cable and the orange light will flash to red then turn off. It is advisable to now give the Camtruck a full charge
by reconnecting the USB cable. The yellow light will come on and the internal battery will start charging. The truck was fully
charged during manufacture but all rechargeable batteries self discharge over time and may require topping up. The yellow light
will turn off when the battery is fully charged, This can take up to 3 hours for a fully discharged battery.
Congratulations, you are now ready to video your layout.

Operation: All functions are controlled by inserting the supplied activator into two holes on the top of the truck. Only light
pressure is needed and a click should be heard and felt as the internal switch activates. Timing is important in controlling the
operations. It is advisable to practice making recordings and downloading to the PC before running on the track.
Turning on: The CamTruck is turned on by pressing the button furthest from the lens on the front of the truck (on/off) until a red
light turns on quickly followed by a steady yellow light. The Cam Truck is now in Standby mode.
If a recording is not made before about a minute, the truck will turn itself off to save battery power.
Start Video Recording: With the yellow light on (see above), press the button closest to the lens (Video start/stop) button only
briefly then release. The light will flash a few times then pulse on and off at a one second rate.. The Video recorder is now
running.
The pulsing light during videoing is the default setting and can be changed to turning off during recording, see options below.
Do not attempt a long video recording with a part charged battery. If the battery goes flat during a recording this may produce
a corrupt file and lock up the Camtruck.
If the yellow light continues to flash quickly the memory may be full. Delete some files to make space.
Stop Video Recording: Press the (Video start/stop) button only very briefly and release. The yellow light will come on again.
Leave alone for a second to allow the video to be stored on the internal Flash Memory. Starting another operation too soon can
cause a corrupted file. A further video can be recorded by pressing the (Video start/stop) button again briefly. Repeat recordings
can be made in this way. When all required videos have been made, press the (on/off) button until the light turns off.
Still Pictures: In the Standby mode, if the button (on/off) is pressed briefly, the red light will turn on and then still picture mode
is activated. From now on if the (Video start/stop) button is pressed briefly a still picture will be taken. The light will turn off then
on again when the picture is stored. Multiple pictures can be taken in this mode. Pressing the (on/off) button again returns the
camera into Video mode.
Turning off: Press the (on/off) for about 5 seconds until the light turns off then release. The Cam Truck is now off.
Reset: If any of the above sequences are performed without waiting in between operations the electronics can lock up or operate
incorrectly. If this happens, press the reset button for a few seconds using the supplied actuator through the small access hole with
the device off.
Downloading Videos: Connect the CamTruck to a PC via the supplied USB cable. The smaller USB connector should be
plugged directly into the CamTruck. The larger USB connector should be plugged into any available PC USB socket. The Green
light on the CamTruck should turn on, but no data connection is made to the computer. To complete the connection, press the
(on/off) button until the light colour changes.. When the data connection is made to the computer, the Red light will flash.
It will take a few seconds before the PC responds.
With any version of Microsoft Windows or Apple PCs the CamTruck should now be automatically recognised as a standard USB
memory stick. If a choice menu appears, select 'Open folder to view files' then go to the next paragraph.
If this menu is not shown (or you close this menu option) the files can be viewed by going to 'My Computer' and clicking on the
Cam Truck memory. There is a little picture of a steam train to help you locate this. The default name for the Cam Truck memory
is "Branor Systems HDW Camtruck".
A window should appear containing a folder ICON labelled DCIM. Double click this and a further icon labelled '100HDDVR'
should appear. Finally double click on this and you should arrive at a list of videos stored on the CamTruck memory. These will
have the file extension MOV. The sequence of drilling down to the correct folder may be different on an Apple PC.
The videos can be viewed directly from the CamTruck by double clicking on the file name but the access speed of the PC may
produce a slow and jerky playback. It is best to copy the MOV files to a suitable folder on the PC and play them from there.
Once videos are stored on the PC, delete them from the truck to make space for more recordings. You never know how long
the your next video will be and if you run out of memory space during recording you may loose it or worse, jam up the
Camtruck.
Video Format: The videos are stored in the Apple Quick Time format with the extension MOV. For Apple computers this will be
the default playback method. For Microsoft Windows the required application may not be available but it can be downloaded for
free from: http://www.apple.com/quicktime/download/
This is an excellent playback application and can be upgraded to the Professional version which allows for video editing. This
includes cropping unwanted start and stop sections, adding titles, joining videos together and converting to other video formats
like AVI Etc. Microsoft Media Player can play MOV files but on some PCs may be a little jerky.
Disconnecting: There is a safe way of removing a USB memory stick from a PC and this should be the preferred way. If the USB
cable is removed during a file transfer, the file may be lost or damaged!
When the CamTruck is disconnected from the PC the light remains on for a few seconds before turning off.
Playback problems: The files recoded on this CamTruck have been tested on Microsoft Windows versions XP, Vista and
Windows 7 using Apple Quick Time and Microsoft Media player also on Apple Mac computers with no problems.
Charging the internal Battery: All the time the USB cable connects the CamTruck to the PC the internal battery is being
charged from the computer. A full charge from flat will take up to 3 hours. The Green charging light will turn of when fully
charged. We recommend that the battery is given a full charge when first received.
Rechargeable batteries do not like being stored for long periods in a discharged state. Always give a full charge before long
periods of storage.
Recording Suggestions: In order to record a video as seen from the viewpoint of an engine driver just place the CamTruck in
front of a locomotive and push it around your track with the camera facing forwards. Best results are when the speed of the loco is
slow. This gives the eye a chance to take in the scenery. The CamTruck can be pulled backwards to give a 'Guards Van' view. It
is important to get as much light as possible on to your layout. This improves sharpness and reduces grain on the image. If you
have a road system on your layout there is nothing to stop you pushing the CamTruck around the roads to get a car drivers view.
Specifications:
Video format: 1280 by 720 pixels at 30 frames per second in MOV format. Angle of view 120° approx.
Aspect ratio: 16:9. Standard TV widescreen format.
Audio format: 128 KB second, Mono, 22KHZ sample rate.
2GB Micro SD Memory Card. This gives about 20 minutes recording time. This can be replaced with cards up to 32 GB.
Internal Lithium Polymer Battery life when fully charged is just over 40 m minutes.
A full charge from flat takes up to 3 hours.
Guaranteed for one year providing no damage has been caused by modifications or disassembly.
The camera is controlled by inserting the supplied
activator into the holes at the top of the Cam
Truck. Only light pressure is required and a light
click should be felt and heard. Do not press hard.
This could damage the internal electronics.
The USB connector can only be inserted one way.
The memory card can be removed by gently
pressing the supplied activator against the memory
card edge and then releasing. The card will pop out
and one edge should be proud of the access slot.
Use a pair of tweezers to finally extract then card.
Note: The gold contacts are uppermost when re-
inserting. The card should be pressed home using
the activator until it clicks into place,
Be careful not to touch the lens when handling the truck. If the lens is touched and there are grease marks on it the video
image may be blurred. If required, gently clean the lens with a soft lintless cloth (supplied) of the type used to clean
spectacles.
Branor Systems. 135 Daniells, Welwyn Garden City, Herts. AL7 1QT 01707 896880

Changing Recording Options:
Some recording options can be changed by running a special program that was supplied in the Cam Truck memory .The program
is named 'Nr16Setup.exe' .
Do not try to run this program from the Cam Trucks memory. Copy the program onto your hard drive and run it from
there. The Setup Program only runs on a Microsoft Windows PC. For an Apple Mac contact Branor Systems.
With the Cam Truck connected to the computer and turned on, run the 'Nr16Setup.exe' program .
The program has its own help menu and is self explanatory.
The settable options are:
1. Set Date/Time: This sets the internal clock to the PC clock and it continues to run even when the truck is off.
Setting the internal clock is only useful if the Time Stamp option is selected.
2. Auto-shutoff: The duration can be set or turned off completely. The Auto Shutoff saves battery power when idle.
3. Time Stamp: This gives the choice of recording the time/date on the bottom left of the video or not.
4. Audio: The audio level can be set to low/medium, high or off.
5. Loop recording: If selected the Cam Truck will record in 5 minute blocks in a continuous loop. Not really useful.
6. Video Clip Length: Sets the maximum recording block time. The default is 70 minutes and should be left as such.
7. Recording indicator: If selected the light flashes once a second whilst recording.
If deselected, there is no indication whilst recording. Useful for clandestine recording.
8. Video Frame Size: Allows for longer recordings at lower resolution.
The internal battery only last 40 minutes so there is no point in setting to a lower resolution!
9. Video Data Rate: Allows a slight increase in video quality. It is hardly noticeable.
The default settings as supplied are:
Time Stamp off, Auto shutoff = 1 minute, Audio = medium, Video clip length = 70 minutes, Recording indicator ON, Video
Frame Size = 1280x720, Video Data Rate = 7 Mbps.
The default settings as supplied have been chosen to as a result of feedback from previous customers and should not need to be
changed. The only useful options are date/time recording and recording indicator on or off.
The setup program was supplied stored in the Cam Truck memory. If this was not saved contact Branor Systems for a
replacement.
Branor Systems. 135 Daniells, Welwyn Garden City, Herts. AL7 1QT 01707 896880

Resetting the Memory Card:
If the battery goes flat during a video recording, a corrupt video file can be stored on the memory card. Sometimes this locks the
electronics and the truck will not record or connect to the PC. Lock ups can also be caused by pressing the buttons out of
sequence. If all the reset options have been tried with no success then a reformat of the memory card may be required. The truck
uses a Micro SD memory card.
To reformat the memory card it must be removed from the truck. This requires a careful procedure. Locate the memory card slot
which is to the right of the USB connector aperture. The edge of the memory card can be seen about 2 mm deep within the slot.
Make a note of it's position and remember this for when it is reinstalled.
Using the Switch Activator or small flat bladed screwdriver, carefully press the memory card and then release. The memory card
should pop out and be just proud of its aperture slot. Using a pair of tweezers or small nose pliers, grip the protruding edge of the
memory card and pull it free from the truck.
Note: The memory card is at a slight angle to the truck and this is normal.
Put the memory card into an SD converter card and connect this to a PC that has an SD memory card reader. Or alternately, a
USB external SD card reader can be used.
For a windows operating system the option to reformat the memory card will be found under the 'My Computer' icon.
For an Apple PC, select the 'Finder' option and the memory card should appear under 'Devices'. Double click on this to show the
Cam Truck files. Select 'Applications' then select 'Utilities' then select 'Disk Utility' then select this and finally select the Cam
Truck SD memory on the list of memory devices. BE CAREFUL, DON'T SELECT THE APPLE HARD DRIVE!
Select 'Erase' at the top menu and ensure that 'MS-DOS (FAT)' is selected. Select 'Erase' and procede.
Perform a Quick Format which will remove all files and reset the directory structure in the memory card.
Remove the SD converter from the PC and remove the memory card from the SD converter.
To reconnect the memory card into the truck slide the memory card into the slot with the gold coloured contacts uppermost.
Gently push the memory card with the Activator or small screwdriver until it clicks into position. The memory card should now
be in the same positions as it was before removal. Check that it is.
Retest the Camera Truck as above. If the truck is still locked up, repeat all of the above but this time perform a Full Format.
Memory card name: Reformatting the Memory card will reset its name as displayed on the PC. To rename the memory card the
two files 'autorun.inf' and 'steamtrain.ico' must be replaced on the root directory. These two files were stored on the memory card
during manufacture. Keep a copy of these two files if you wish to recover the memory naming function.
Fitting a larger Memory Card:
Longer video recordings or many multiple video recordings can be made by fitting a larger capacity memory card.
The memory card must be a Micro SD type and at least a class 4 and the maximum size is 32 GB.
A 4 GB memory card will just about be filled with a fully charged battery so there is not much point in fitting a memory card
larger than this. If you have a layout that takes more than 40 minutes to traverse, I want to see it!
The battery when fully charged may run for up to 40 minutes. For recordings of this length make sure the battery is fully charged.
Feedback: We appreciate feedback and especially seeing videos of layouts. Please send feedback to Branor Systems at:
brucepiggott@ntlworld.com
Branor Systems. 135 Daniells, Welwyn Garden City, Herts. AL7 1QT 01707 896880
Table of contents
Other Branor Systems Digital Camera manuals


