Brasco SolStop B User manual

BRASCO INTERNATIONAL, INC.
INSTALLATION INSTRUCTIONS
These general setup instructions for Brasco's SolStop™ are for informational purposes only.
With questions, please contact us:
(313) 393-0393
www.brasco.com
TOOLS NEEDED FOR INSTALLTION
Hammer Drill Motor
Standard Hammer
Wrench
Cordless Drill
8” Long 1/2” Masonry Drill Bits
Tamper Proof Hardware Tool (Included)
IMPORTANT NOTICES:
Install the SolStop™ within 3 months of delivery. Sealed lead acid batteries will self-discharge in storage.
It is strongly advised that installation occur as soon as possible to insure maximum battery life is achieved.
Products stored outside must be fully tarped. Wooden crates, cardboard boxes and identifying labels are not
weatherproof and will deteriorate in the elements.
Be cautious when handling batteries as they are capable of generating hazardous short-circuit currents.
Remove all jewelry (bracelets, metal watches, rings) before attempting to handle or disassemble batteries.
Batteries should be stored indoors at a recommended 68 degrees Fahrenheit for max. shelf life.
Batteries should be installed no later than 3 months of delivery or battery warranties will be void.
Brasco International, Inc. Setup Instructions for SolStop™ Model B Updated 2/16/2017
www.brasco.com
Brasco International, Inc.
32400 Industrial Dr.
Madison Heights, MI 48071
P (313) 393-0393
F (313) 393-0499
© 2017 Brasco International, Inc.
All Rights Reserved.

Assembly
BRASCO INTERNATIONAL, INC.
Your SolStop™ comes mostly assembled and is pre-wired for easy installation. See attached assembly drawings and follow the below steps for removing the top tray from the light housing and making the necessary
connections. The SolStop™ should operate the first night, however it may require a full day of peak sun and a week of “learning” to fully program the system for optimal performance.
Be careful to protect the assembly when you are handling it.
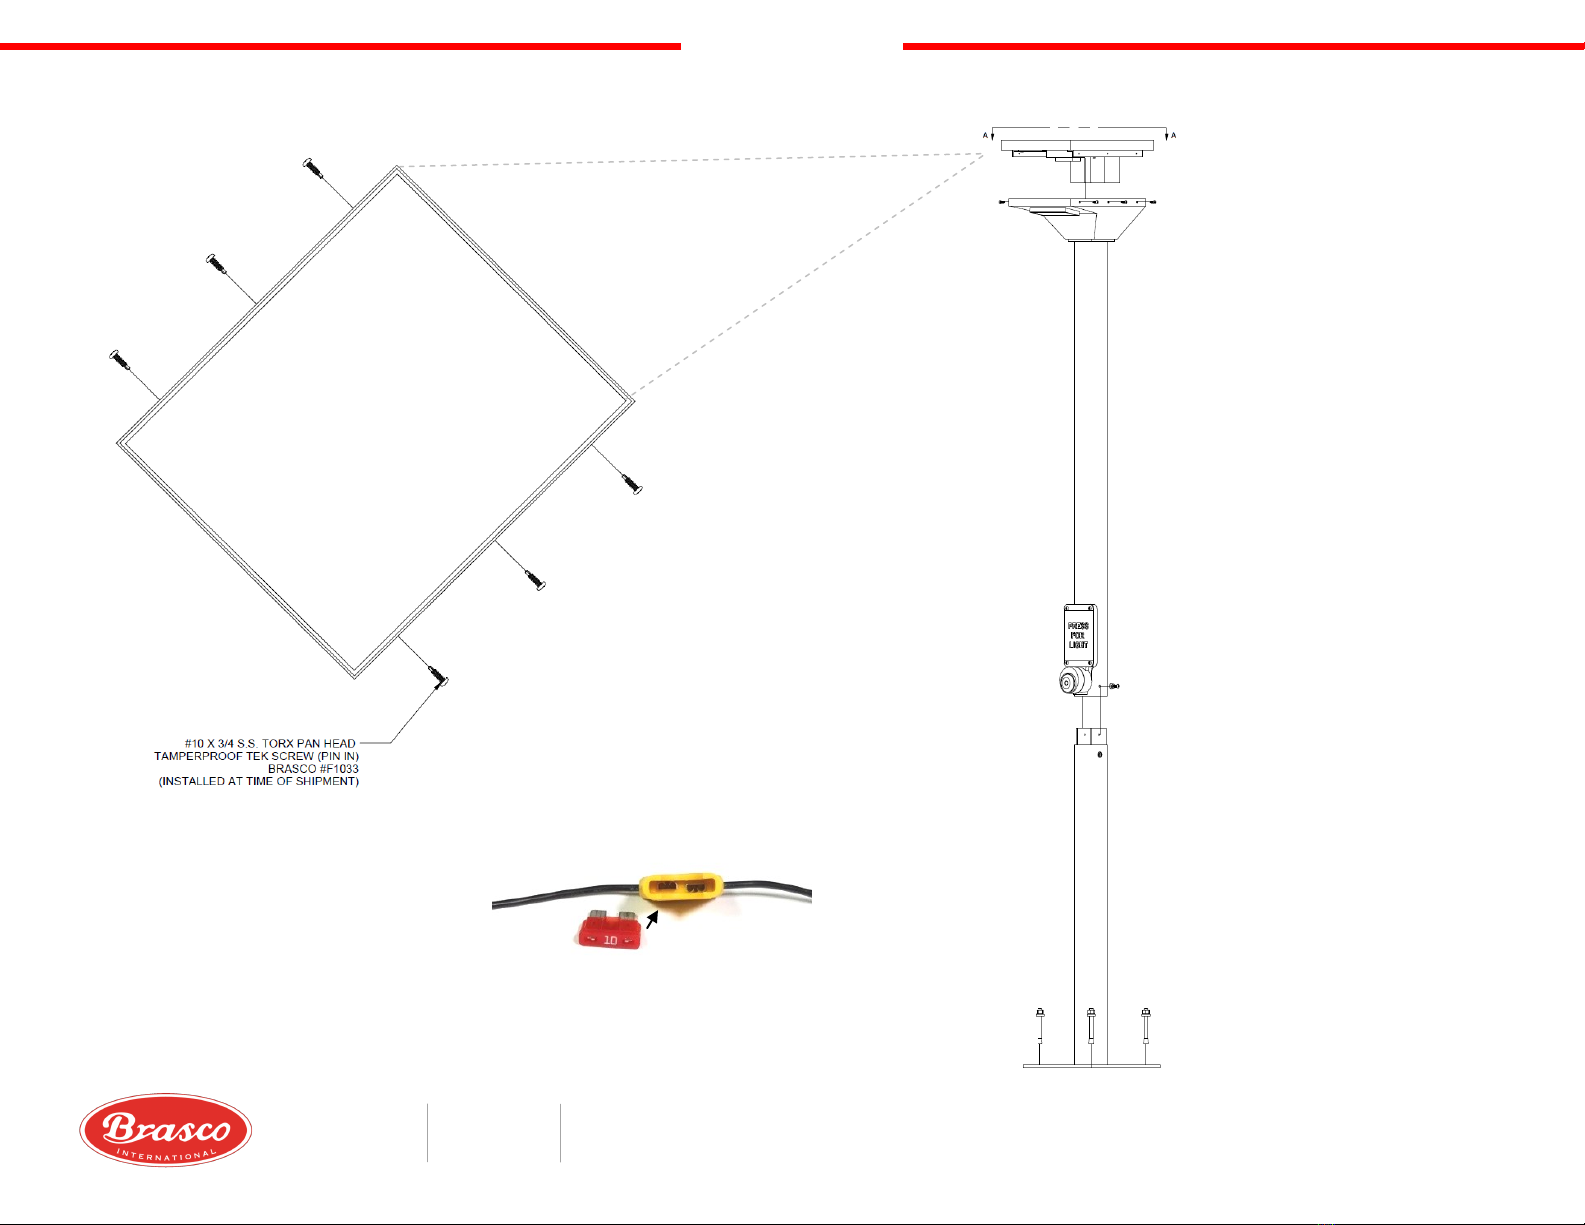
1. Remove six (6) #10 x ¾” SS Pan Head Torx Tamper-resistant screws.
2. Gently remove the top assembly (solar panel tray) and lay it next to the light housing. Keep in mind that the two components are attached by wires. (Figure 1.)
3. You will find two (2) 10AMP fuses in a bag taped to the top assembly –remove the fuses from the bag. (Figure 1A.)
4. Install the fuse into the holder attached to the battery. (Figure 1A.).
5. Install the fuse into the holder attached to the solar panel. (Figure 1A.) Make sure they are pressed in tightly. WARNING: If exposed to sunlight, solar panel is an active power source.
6. Press the test button on the controller and then press the Pole-Mounted push button. (Figure 1,2.)
7. The SolStop™ light will activate and remain on for 5 minutes. (Figure 1.)
8. If there is sufficient daylight, the green light on the controller will light up, indicating the panel is providing a charge to the battery. (Figure 1.)
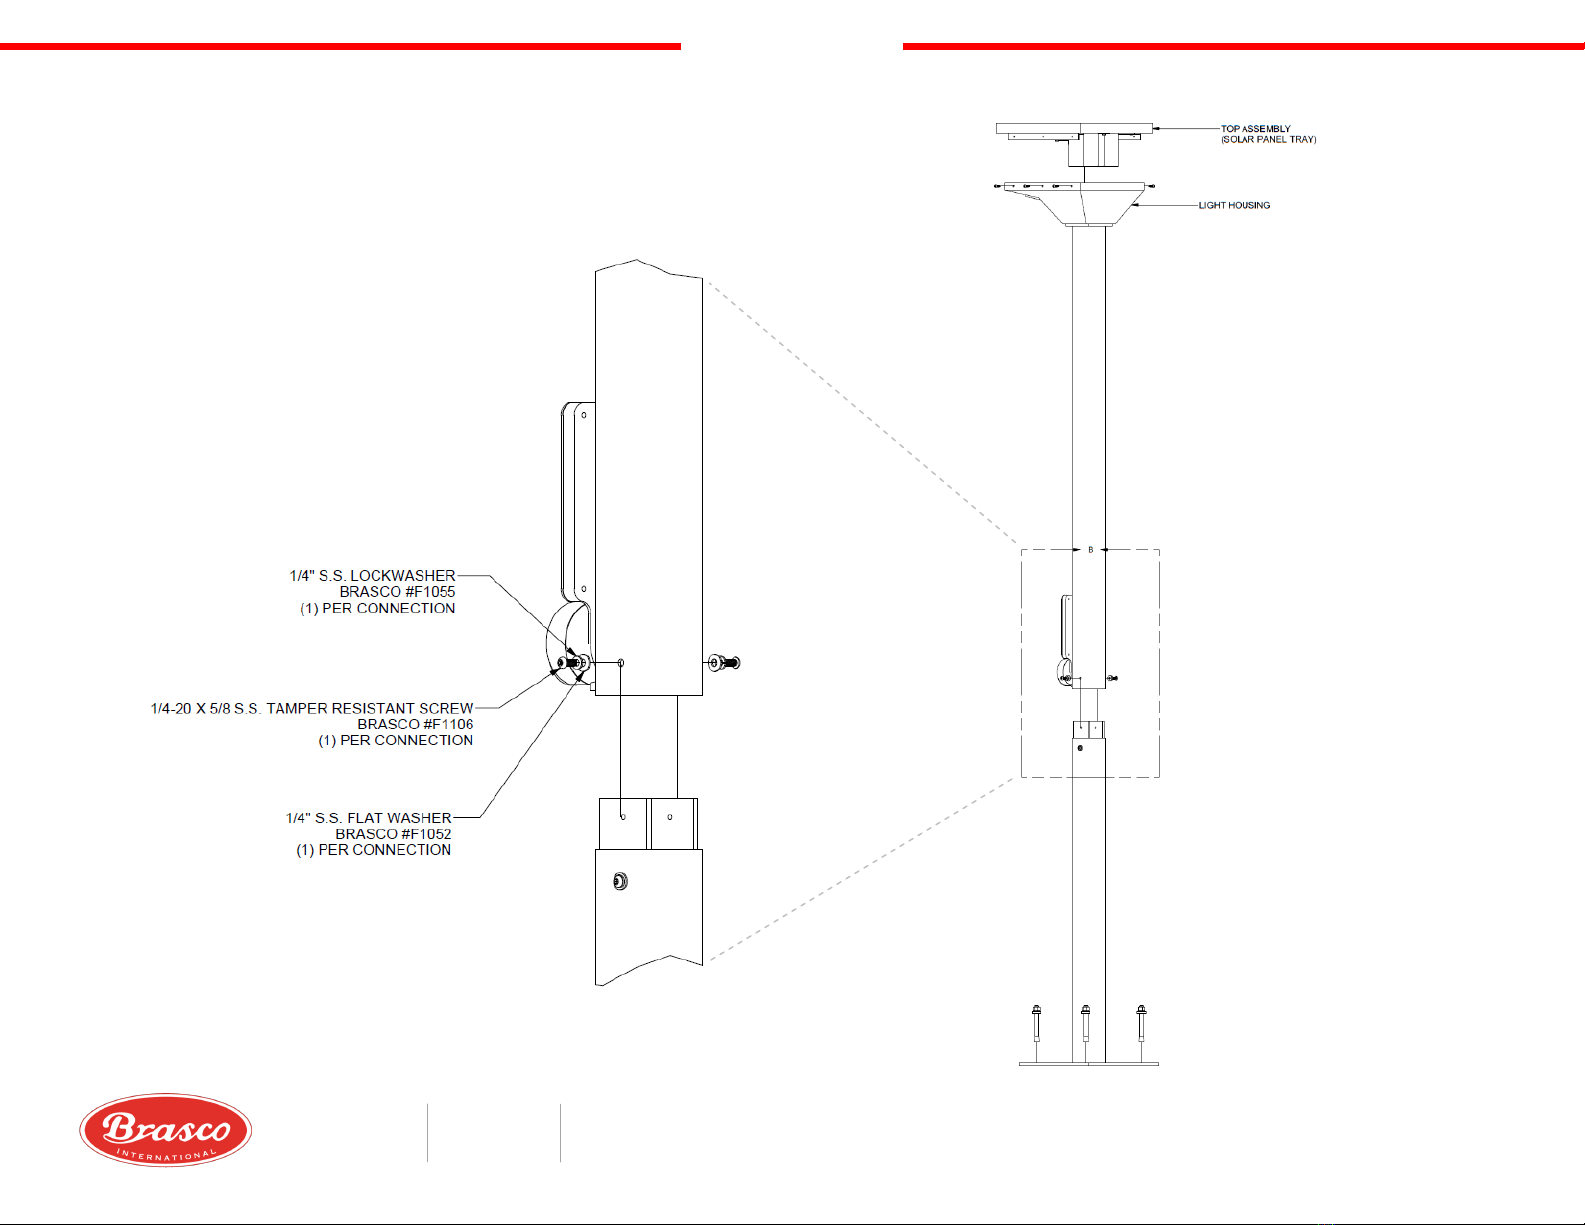
9. Reset and attach the top assembly onto the light housing using the same screws. (Figure 2.)
10. Mount upper unit onto base pole stub –refer to drawing for attachment detail. (Figure 3.)
11. The SolStop™ should be anchored to a minimum 4” thick concrete pad and the base plate edges should be located a minimum of 6” from the edges of the concrete slab.
12. Reference Figure 4. for concrete anchoring guidelines and Figure 5. for concrete anchoring steps.
Battery
Be cautious when handling the battery as it is capable of generating hazardous short-circuit current. Remove all jewelry (bracelets, metal watches, rings) before attempting to handle or disassemble the battery from
the unit. Consult your local municipal laws for information on recycling the battery. Do not place used batteries in the garbage.
Maintenance of your SolStop
Solar panels need to be clean and free from debris. Clean on an annual basis (or more often as needed) with water and a soft cloth or sponge using a mild non-abrasive soap and rinse well.
Brasco International, Inc. Setup Instructions for SolStop™ Model B Updated 2/16/2017
www.brasco.com
Brasco International, Inc.
32400 Industrial Dr.
Madison Heights, MI 48071
P (313) 393-0393
F (313) 393-0499
© 2017 Brasco International, Inc.
All Rights Reserved.
BRASCO INTERNATIONAL, INC.
(SOLAR PANEL BIRDSEYE)
BASE PLATE
Brasco International, Inc. Setup Instructions for SolStop™ Model B Updated 2/16/2017
Figure 1A.
Fuse
Fuse Holder
Figure 1. Figure 2.
www.brasco.com
Brasco International, Inc.
32400 Industrial Dr.
Madison Heights, MI 48071
P (313) 393-0393
F (313) 393-0499
© 2017 Brasco International, Inc.
All Rights Reserved.
BRASCO INTERNATIONAL, INC.
BASE PLATE
Brasco International, Inc. Setup Instructions for SolStop™ Model B Updated 2/16/2017
Figure 3.
www.brasco.com
Brasco International, Inc.
32400 Industrial Dr.
Madison Heights, MI 48071
P (313) 393-0393
F (313) 393-0499
© 2017 Brasco International, Inc.
All Rights Reserved.

Figure 4. Guidelines for Anchoring Expansion Anchors into Concrete
Expansion Anchor Installed
BRASCO INTERNATIONAL, INC.
Expansion Anchor Technical Reference Chart
Brasco International, Inc. Setup Instructions for SolStop™ Model B Updated 2/16/2017
www.brasco.com
Brasco International, Inc.
32400 Industrial Dr.
Madison Heights, MI 48071
P (313) 393-0393
F (313) 393-0499
© 2017 Brasco International, Inc.
All Rights Reserved.
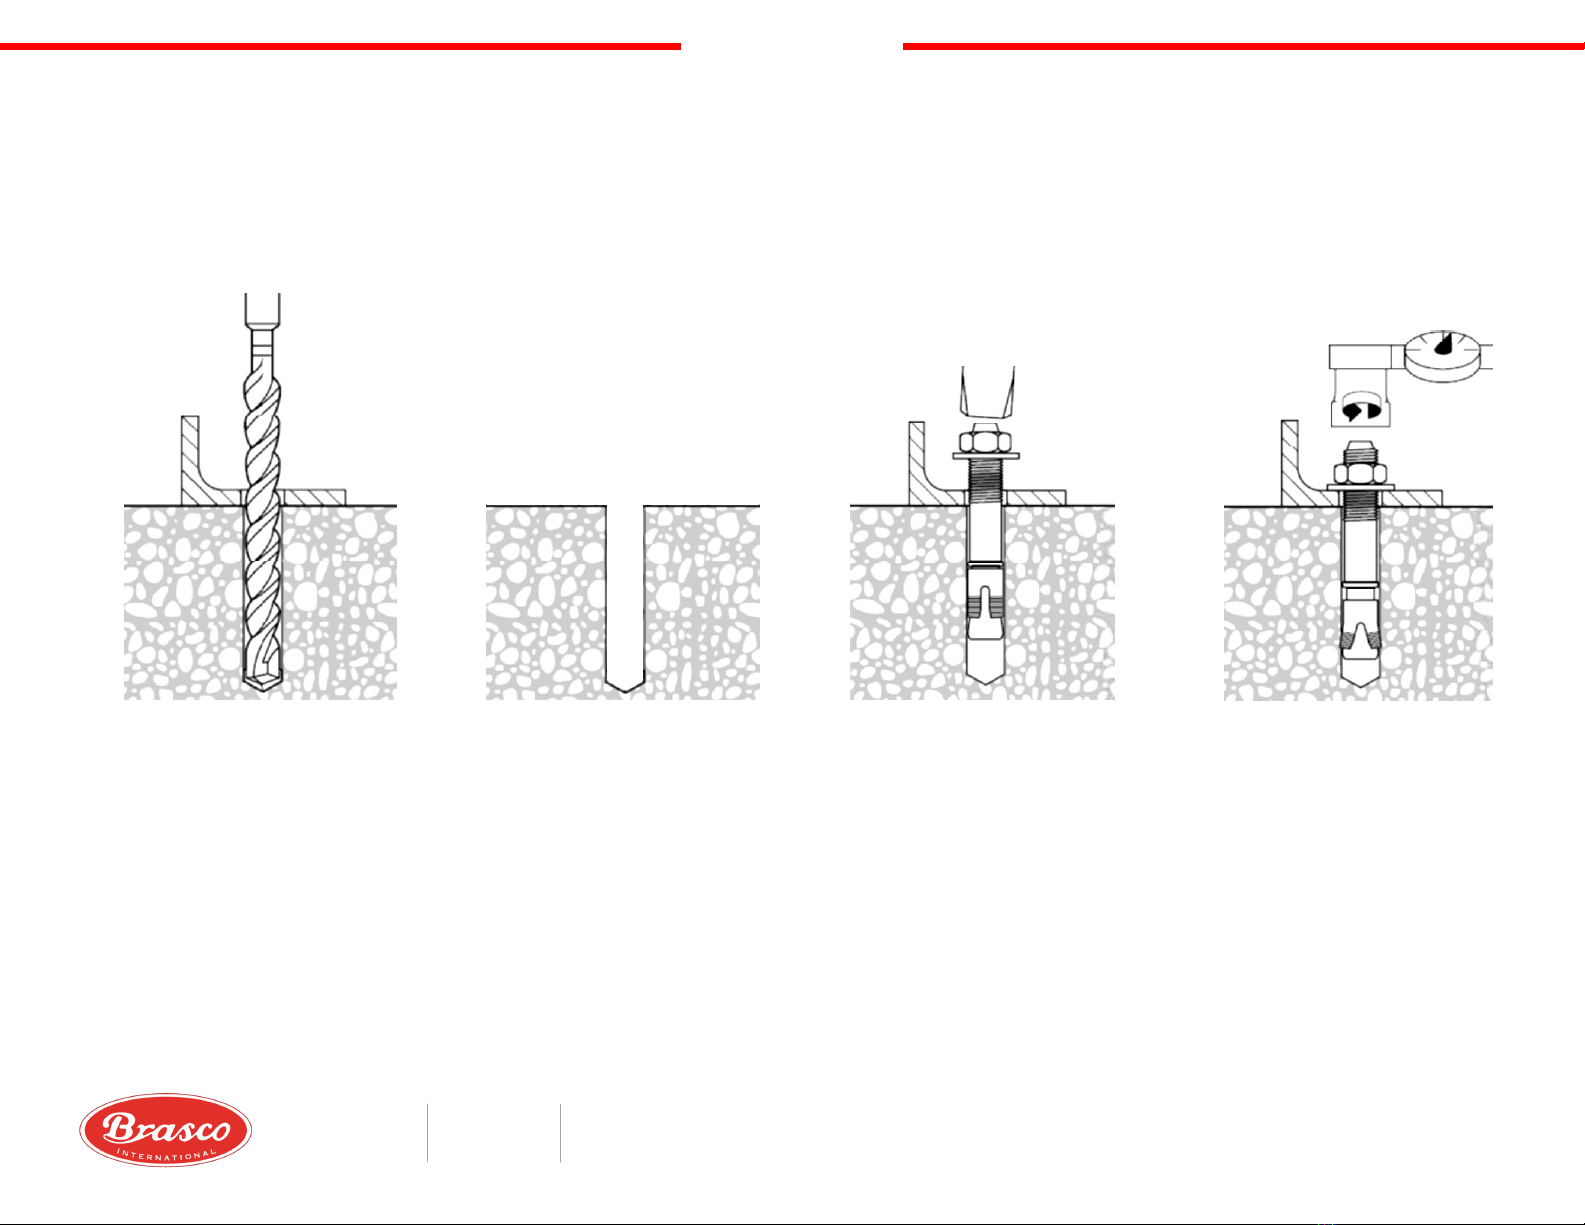
Step 1. Drill Hole
Hammer drill a hole to the same nor-
mal diameter as the Kwik Bolt TZ. The
hole depth must exceed the anchor
may be used as a drilling template
proper anchor location.
Step 2. Clean Hole Step 3. Drive in Anchor Step 4. Tighten Nut
Drive the Kwik Bolt TZ into the hole
using a hammer. The anchor must be
driven until at least 4 threads are
below the surface of the fixture.
Tighten the nut to the recommended
installation torque.
Remove all debris and dirt from hole.
BRASCO INTERNATIONAL, INC.
Figure 5. Steps for Anchoring Expansion Anchors into Concrete
Brasco International, Inc. Setup Instructions for SolStop™ Model B Updated 2/16/2017
www.brasco.com
Brasco International, Inc.
32400 Industrial Dr.
Madison Heights, MI 48071
P (313) 393-0393
F (313) 393-0499
© 2017 Brasco International, Inc.
All Rights Reserved.
Table of contents
Popular Inverter manuals by other brands

Fuji Electric
Fuji Electric FRENIC-Mini 100 V Series instruction manual

GivEnergy
GivEnergy Giv-AC3.0 user manual

Omnik New Energy Co., Ltd.
Omnik New Energy Co., Ltd. Omniksol-13k-TL user manual

Victron energy
Victron energy Phoenix 12/1600 manual

Emheater
Emheater EM-GS Series user manual

Tronic
Tronic TSW 300 A1 operating instructions


