Braun Monocular 8 x 42 WP-C User manual

EINLEITUNG / BESTANDTEILE
1
Sehr geehrter Kunde,
vielen Dank für den Kauf des BRAUN
Monocular 8x42. Sie haben damit ein
Produkt von hoher Qualität erworben.
Bitte lesen Sie diese Anleitung sorgfältig
durch und bewahren Sie sie gut auf, um
später bei eventuellen Fragen noch einmal
nachschauen zu können.
Wir wünschen Ihnen viel Freude mit diesem
BRAUN Produkt.
Bestandteile
1. Okular mit Stülp-Augenmuschel für
Brillenträger
2. Drehring für die Scharfeinstellung
3. Schutzdeckel aus Gummi für das Objektiv
4. Objektiv
5. Einsteck-Ösen für den Handtrageriemen
6. Lichteinlass für den Kompass
DE

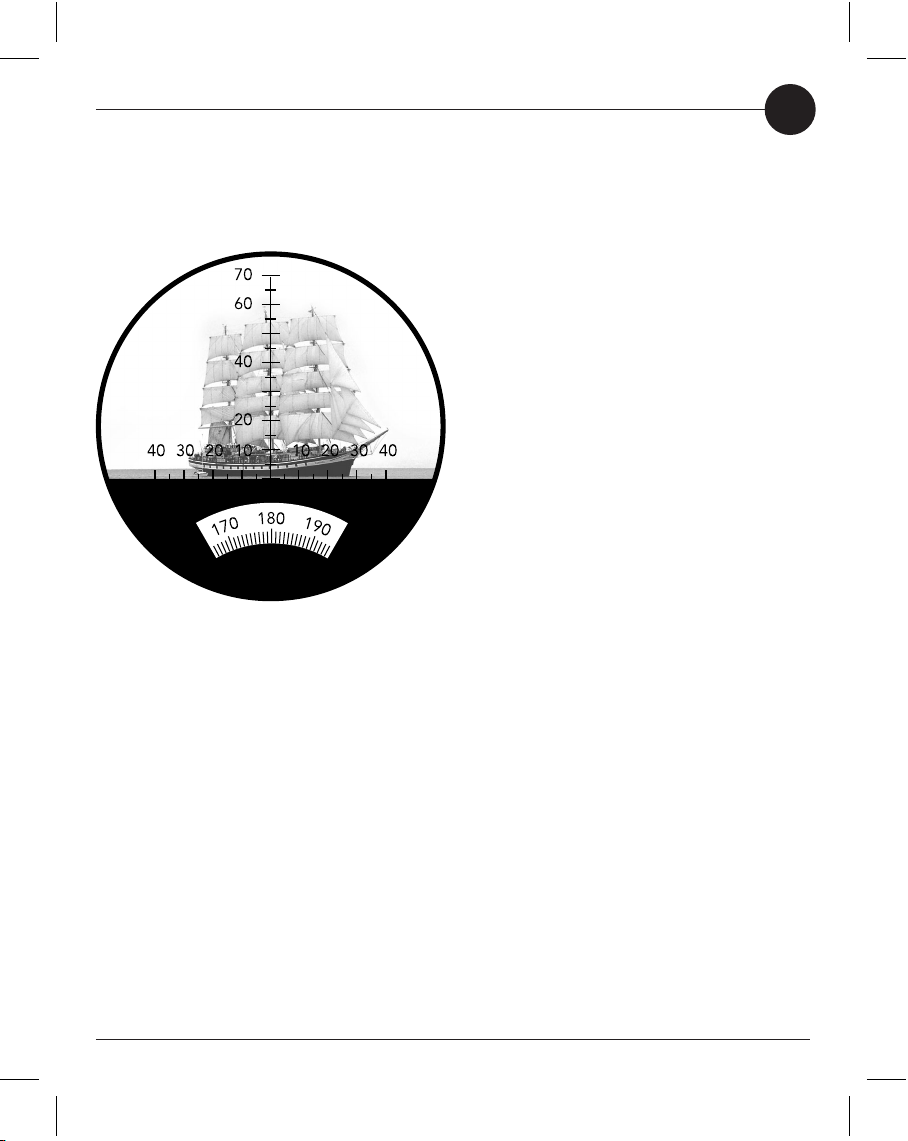
EINSTELLUNGEN / SCHARFSTELLUNG
2
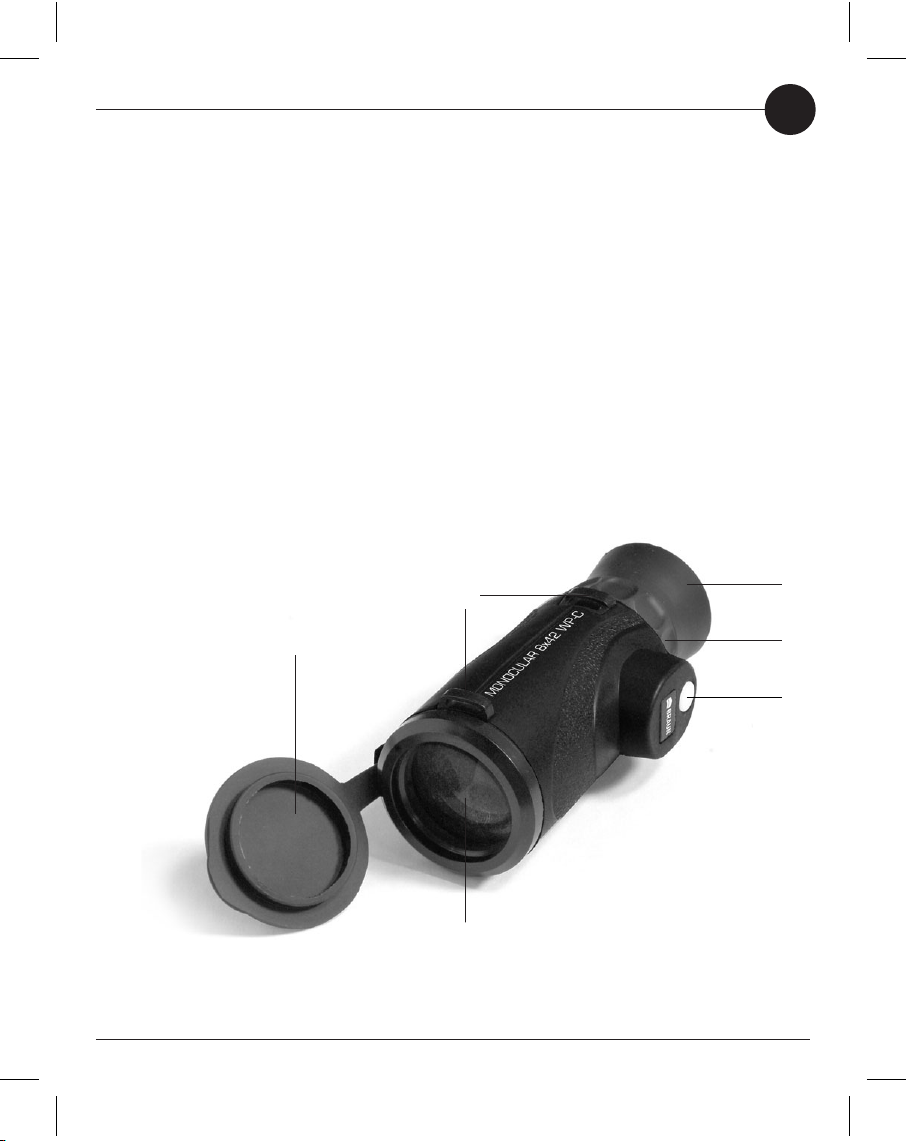
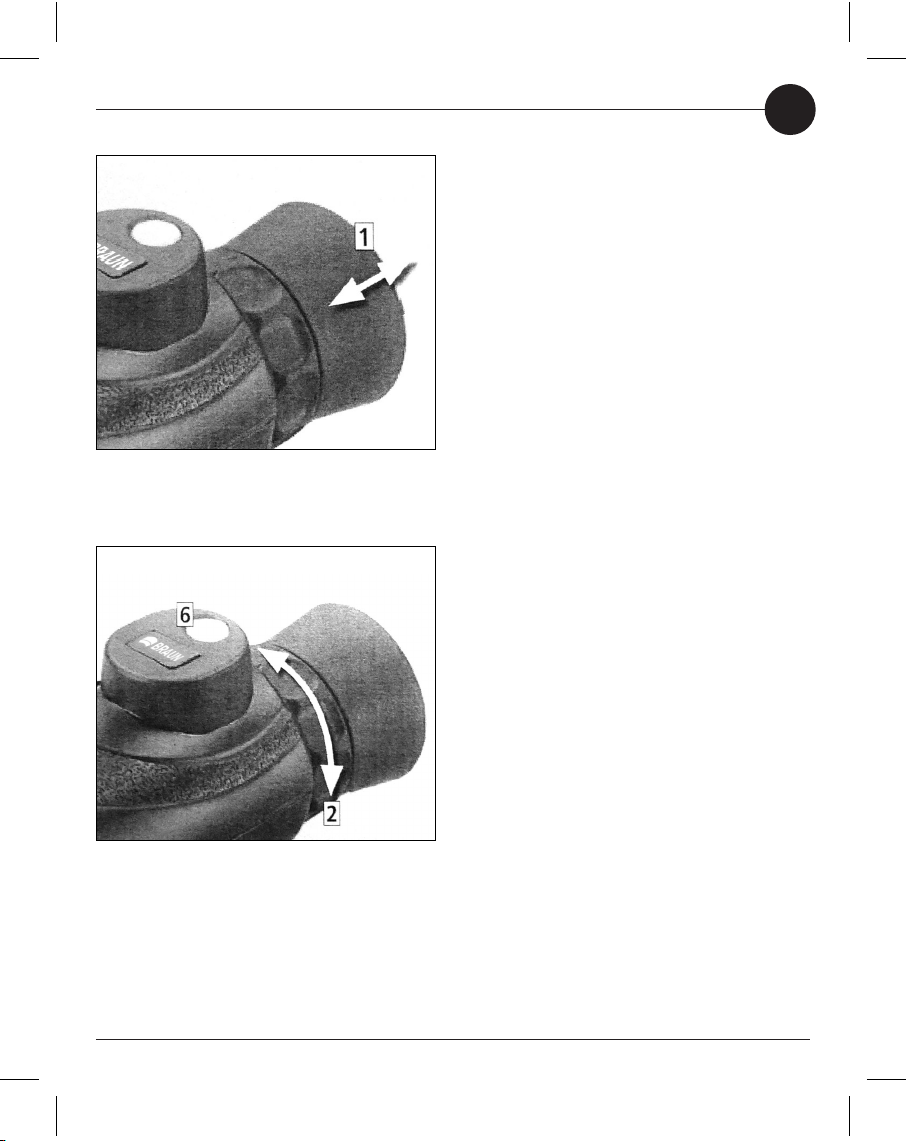
Hinweis für Brillenträger
Das BRAUN Monokular ist für Brillenträger
mit einer Stülp-Augenmuschel (1) ausgestat-
tet. Sie erhalten somit einen besseren Über-
blick über das Bildfeld.
Benutzer ohne Brille lassen die Augenmu-
schel so wie das Glas ausgeliefert wurde. In
dieser Position ist der Abstand des Mono-
kulars zum Auge richtig. So ist eine verwack-
lungsfreie, ruhige Auflage bei gleichzeitiger
Minimierung des Streulichts von der Seite
gewährleistet.
Scharfstellung
Um ein Objekt scharf und optimal vergrößert
zu sehen, müssen Sie den Drehring zur
Scharfeinstellung (2) individuell auf dieses
Objekt einstellen. Dies passiert wie folgt:
(a) Schauen Sie durch das Okular mit einem
Auge. Dabei schließen Sie das andere Auge.
(b) Visieren Sie das Objekt an.
(c) Drehen Sie den Scharfeinstellungsring am
Monokular so lange nach links oder rechts,
bis das Objekt scharf abgebildet wird,
ohne dabei das Monokular abzusetzen.
Ihr BRAUN Monokular ist nun optimal auf
das Objekt scharf gestellt. Sollten Sie oder
das Objekt sich während der Beobachtung
bewegen, müssen Sie eventuell die Schärfe
nachregulieren. Bei jedem neuen Objekt muss
die Schärfe wieder neu angepasst werden.
DE
Hinweis:
Decken Sie den Lichtdurchlass (6) für den
Kompass nicht mit den Fingern ab.

ENTFERNUNGSMESSUNG
3
Bedienung des MIL Fadenkreuzes
für die Telemetrie (Fernmessung)
Entfernungsmessung mit Hilfe einer einfa-
chen Formel, wenn Höhe oder Länge bekannt
sind:
Die Größe (Höhe/Länge) der vermessenen
Objekte ist in der Praxis meist in etwa be-
kannt, da es sich bei den beobachteten
Objekten überwiegend um Menschen, Ge-
bäude oder Fahrzeuge handelt.
1) Elevationswinkel = Vertikalwinkel
2) Azimut = Horizontalwinkel
DE
Höhe des Zielobjekts (m)
Entfernung (in km) = Elevationswinkel1) des Zielobjekts
Länge des Zielobjekts (m)
Entfernung (in km) = Azimut2) des Zielobjekts

ENTFERNUNGSMESSUNG
4
Messen des Elevationswinkels
(Höhenwinkel) mit dem vertikalen
Skalenwert auf dem MIL Faden-
kreuz
Der Elevationswinkel misst den Winkel zwi-
schen einer horizontal gedachten Null-Linie,
beginnend vom Ausgangspunkt des Beob-
achters hin zum beobachteten Objekt, und
der Höhe eines individuell bestimmten Punk-
tes am anvisierten Beobachtungsobjekt (im
Bild z. B. der Fuß des Leuchtturms auf der
horizontal gedachten Null-Linie und die Spit-
ze des Leuchtturms als individuell bestimm-
ter Punkt).
Liegt der Elevationswinkel innerhalb des
Bereichs des vertikalen Skalenwerts von 70
MIL (siehe Abb.), richten Sie bitte zunächst
den im Fadenkreuz vertikal angeordneten
Skalenwert am Fuß des Leuchtturms auf ,0'
aus. Der Elevationswinkel des Leuchtturms
im gezeigten Beispiel lässt sich nun einfach
und direkt ablesen und beträgt im Beispiel 62
MIL, wobei 1 MIL 1/1000 Zoll entspricht.
Liegt der Elevationswinkel des Zielobiekts
außerhalb des vertikalen Skalenwerts von 70
MIL, nehmen Sie die Bestimmung des Eleva-
tionswinkels einfach stufenweise vor.
DE

ENTFERNUNGSMESSUNG
5
Messen des Azimuts (Horizontal-
winkel) mit dem horizontalen
Skalenwert auf dem MIL Faden-
kreuz
Der Azimut entspricht der horizontalen
Abweichung von Norden.
In der Abbildung wird der Azimut des
Objekts mit 68 MIL (40+28) einfach und
direkt mit dem horizontal angeordneten
Skalenwert festgelegt (siehe Messung des
Elevationswinkels).
Bestimmung der Höhe oder
Länge eines Zielobjekts, wenn die
Entfernung bekannt ist
Auf Basis der Messung des Elevationswin-
kels oder Azimuts lässt sich die Höhe bzw.
Länge des Zielobjekts mit folgender einfa-
chen Formel wie folgt bestimmen:
Höhe d. Zielobjekts (m) =
Entfernung (km) x Elevationswinkel
bzw.
Länge d. Zielobjekts (m) =
Entfernung (km) x Azimut
DE

ENTFERNUNGSMESSUNG / KOMPASS
6
Hinweis:
Eine Skalenteilung entspricht 1 Grad.
Bedienung des Kompasses
Bei einem Kompass wird die Richtung in
Grad abgelesen.
Norden hat einen Azimut von 360°,
Osten von 90°,
Süden von 180°und
Westen von 270°.
DE
Blickrichtung: Süden (180°)

PFLEGETIPPS
7
Wenn das Glas verschmutzt ist können diese
Verunreinigungen die Helligkeit Ihres BRAUN
Monoculars verschlechtern. Vermeiden Sie
daher Fingerabdrücke, Staub und andere
Verunreinigungen der Objektiv- und Okular-
oberflächen. Mit einem weichen Haarpinsel
oder einem Optiktuch können Sie solcherlei
Verschmutzungen entfernen. Bitte benutzen
Sie keine scharfen Reinigungsmittel.
DE

TECHNISCHE DATEN
8
Vergrößerung: 8x
Linsendurchmesser: 32 mm
Prisma: BAK - 4
Sehfeld: 7°(112 m / 1000 m)
Wasserdicht: ja
Nitrogengefüllt: ja
Objektiv / Linsensystem: ULTRALIT
Austrittspupille: 5,25 mm
Pupillenschnittweite: 18 mm
Min. Nahdistanz: 13 m
Dioptrienausgleich: -4/+4
Wasserdicht (max. Tiefe/Zeit): ja (0.5 m / 20 min.)
Gewinde für Stativ: nein
Abmessungen: ca. 61x 65 x 143 mm
Gewicht: ca. 340 g
Art.-Nr. 20140
DE

INTRODUCTION / COMPONENTS
9
Dear customer,
Thank you very much for purchasing the
BRAUN Monocular 8x42. You have acquired
a product of high quality. Please read these
instructions carefully and keep them for refe-
rence so that you can look up in case of pos-
sible questions.
We hope you will enjoy this BRAUN product.
Components
1. Eyepiece with foldable eyecup for people
who wear eyeglasses
2. Rotating ring for focusing
3. Protective rubber lid for the lens
4. Lens
5. Lugs for mounting the carrying strap
6. Light aperture for the compass
GB

SETTINGS / FOCUSING
10
Note for people who wear
eyeglasses
The BRAUN monocular features a foldable
eyecup (1) for people who wear eyeglasses,
which will give you a better overview of the
field of view.
If you do not wear eyeglasses, leave the
eyecup in the state the monocular was deli-
vered. In this position, the monocular will
have the correct distance to your eye, en-
suring a shake-free and steady support.
Moreover, it will minimise scattered light
from the side.
Focusing
In order to view an object focused and at
the optimal zoom, you have to adjust the
focusing ring (2) to each individual object.
Perform these steps:
(a) View through the monocular with one eye
and shut the other.
(b) Sight the object.
(c) Turn the focusing ring on the monocular
to the left or right without taking the
monocular down, until the object is well
focused.
Your BRAUN monocular is now perfectly
focused on the object. If you or the object
move during the observation, you might
have to re-adjust the focus. You have to set
the focus with each new object.
GB
Note:
Make sure you do not hide the light aperture
(6) for the compass with your fingers.

MEASURING DISTANCE
11
Using the MIL reticle for telemetry
Measuring the distance with a simple formu-
la when the height or length is known:
In general, the rough dimensions (height/
length) of the measured objects will be
known, as the observed objects will mainly
be persons, buildings or vehicles.
1) Elevation angle = vertical angle
2) Azimuth = horizontal angle
GB
height of object (m)
Distance (in km) = elevation angle1) of object
length of object (m)
Distance (in km) = azimuth2) of object

MEASURING DISTANCE
12
Measuring the elevation angle
(height angle) with vertical scale of
MIL reticle
The elevation angle measures the angle
between an imagined horizontal zero line,
starting from the position of the observer
to the observed object, and the height of
an individually defined point of the sighted
object of observation (in the figure, for
example, the base of the lighthouse on the
imagined horizontal zero line and the tip of
the lighthouse as individually determined
point).
If the elevation angle is within the area of the
vertical scale value of 70 MIL (see figure),
align the vertical scale in the reticle so that
“0” is on the lighthouse base. In the example
shown, the elevation angle of the lighthouse
can be read easily and directly. It amounts to
62 MIL, where 1 MIL corresponds to 1/1000
inch.
If the elevation angle of the object is outside
the vertical scale value of 70 MIL, determine
the elevation angle by repeating the measu-
ring steps.
GB

MEASURING DISTANCE
13
Measuring the azimuth (horizontal
angle) with horizontal scale of MIL
reticle
The azimuth is the horizontal deviation from
North.
In the example shown, the azimuth of the
object can be determined easily and directly
with 68 MIL (40+28) using the horizontal
scale value (see measuring of elevation
angle).
Determining the height or length
of an object when the distance is
known
Based on the measurement of the elevation
angle or azimuth, the height or length of an
object can be determined using the following
simple formula:
Height of object (m) =
distance (km) x elevation angle
or
Length of object (m) =
distance (km) x azimuth
GB

MEASURING DISTANCE / COMPASS
14
Note:
A scale gradation correspond to 1 degree.
Using the compass
On a compass, the direction is read in
degree.
The north has an azimuth of 360°,
the east of 90°,
the south of 180°
and the west of 270°.
GB
Viewing direction: south (180°)

CARE TIPS
15
Dirt and soil on the lens may deteriorate the
brightness of your BRAUN monocular. Plea-
se avoid finger prints, dust or soil on the
lens and eyepiece surfaces. You can wipe off
soil with a soft hair pencil or an optical cloth.
Do not use harsh detergents.
GB

TECHNICAL DATA
16
Magnification: 8x
Lens diameter: 32 mm
Prism: BAK - 4
Field of view: 7°(112 m / 1000 m)
Waterproof: yes
Nitrogen filled: yes
Lens system: ULTRALIT
Exit pupil: 5.25 mm
Eye relief: 18 mm
Close focus distance: 13 m
Dioptre adjustment: -4/+4
Waterproof (max. depth/time): yes (0.5 m / 20 min.)
Thread for tripod: no
Dimensions: approx. 61 x 65 x 143 mm
Weight: approx. 340 g
Item no. 20140
GB

INTRODUCTION / COMPOSANTS
17
Cher client :
Vous venez d'acheter ce monoculaire 8x42
de BRAUN, merci beaucoup. Vous avez
acquis un produit de haute qualité. Nous
vous invitons à lire attentivement le présent
mode d'utilisation et à le conserver pour le
consulter en cas de questions éventuelles.
Nous vous souhaitons beaucoup de plaisir
avec ce produit de BRAUN.
Composants
1.Oculaire avec bonnette coulissante pour
porteurs de lunettes
2. Bague pour la mise au point
3. Couvercle de protection de caoutchouc
pour l’objectif
4. Objectif
5. Œillets pour la courroie de port à main
6. Aperture de lumière pour le compas
FR

CONFIGURATIONS / MISE AU POINT
18
Remarque pour porteurs de
lunettes
Le monoculaire de BRAUN dispose d’une
bonnette coulissante (1) pour porteurs de
lunettes. Elle vous permet d'avoir une meil-
leure vue sur le champ d'image.
Si vous ne portez pas de lunettes, laissez la
bonnette dans l’état de la fourniture du
monoculaire. Cette position vous garantit la
distance correcte du monoculaire par rapport
à l'œil. Vous pouvez ainsi poser le monocu-
laire sans risque de flou d'image et d'instabi-
lité tout en minimisant la lumière parasite
arrivant du côté.
Mise au point
Pour voir un objet au point et à l’agrandisse-
ment optimal, vous devez ajuster la bague de
mise au point (2) exactement sur cet objet.
Voici comment procéder :
(a) Voyez avec un œil à travers l’oculaire.
Fermez l’autre œil.
(b) Visez l’objet.
(c) Tournez la bague de mise au point du
monoculaire vers la droite ou la gauche jus-
qu'à ce que l’image de l’objet soit nette sans
ôter le monoculaire.Maintenant, votre mono-
culaire de BRAUN est parfaitement mis au
point pour l’objet. Si vous bougez ou l'objet
bouge pendant que vous observez avec le
monoculaire, vous devez probablement réaju-
ster le monoculaire pour le remettre au point.
Vous devez remettre le monoculaire au point
pour chaque nouvel objet.
DE
Remarque :
Ne recouvrez pas l’aperture de lumière (6)
pour le compas avec les doigts.

MESURE DE DISTANCE
19
Utilisation de la réticule à croisée
MIL pour la télémétrie
Mesure de la distance à l'aide d'une formule
simple à condition de savoir la hauteur et la
longueur :
Dans la pratique, la taille (hauteur/longueur)
des objets mesurés est normalement connue
étant donné que les objets observés sont
surtout des personnes, des bâtiments ou des
véhicules.
1) Angle d’élévation = angle vertical
2) Azimut = angle horizontal
FR
hauteur de l’objet (m)
Distance (en km) = angle d’élévation1) de l’objet
longueur de l’objet (m)
Distance (en km) = azimut2) de l’objet

MESURE DE DISTANCE
20
Prise de mesure de l'angle d'élé-
vation (angle de hauteur) avec la
valeur d'échelle verticale indiquée
sur la réticule à croisée MIL
L'angle d'élévation mesure l'angle entre une
ligne zéro imaginaire horizontale, partant
du point de départ de l'observateur jusqu'à
l'objet observé, et la hauteur d'un point spé-
cifique individuel sur l'objet observé (dans
l'image par ex. le pied du phare sur la ligne
zéro imaginaire horizontale et la pointe du
phare servant de point spécifique individuel).
Si l'angle d'élévation est inférieur à la valeur
d'échelle verticale de 70 MIL (voir illustra-
tion), vous devez d'abord aligner la valeur
d'échelle verticale de la réticule à croisée
au pied du phare à la valeur de '0'. Dans l'ex-
emple donné, il est facile de lire directement
l'angle d'élévation, il s'élève à 62 MIL, avec
1 MIL correspondant à 1/1000 pouce.
Si l'angle d'élévation de l'objet est supéri-
eure à la valeur d'échelle verticale de 70 MIL,
vous pouvez déterminer l'angle d'élévation
en plusieurs étapes.
FR
This manual suits for next models
1
Table of contents
Languages:
Other Braun Binoculars manuals
Popular Binoculars manuals by other brands

Harbor Freight Tools
Harbor Freight Tools 41491 operating instructions

Zhumell
Zhumell MEZZO OPERA GLASSES owner's manual

AGM Global Vision
AGM Global Vision 10x42 BINOCULARS user manual

Bushnell
Bushnell ImageView 110833 Brochure & specs

Opticron
Opticron 8x42 User instructions

DÖRR
DÖRR IR-QHD instruction manual