Breath Buddy 700 Series Manual
INSTRUCTION
GUIDE
INTRODUCTION
GETTING STARTED
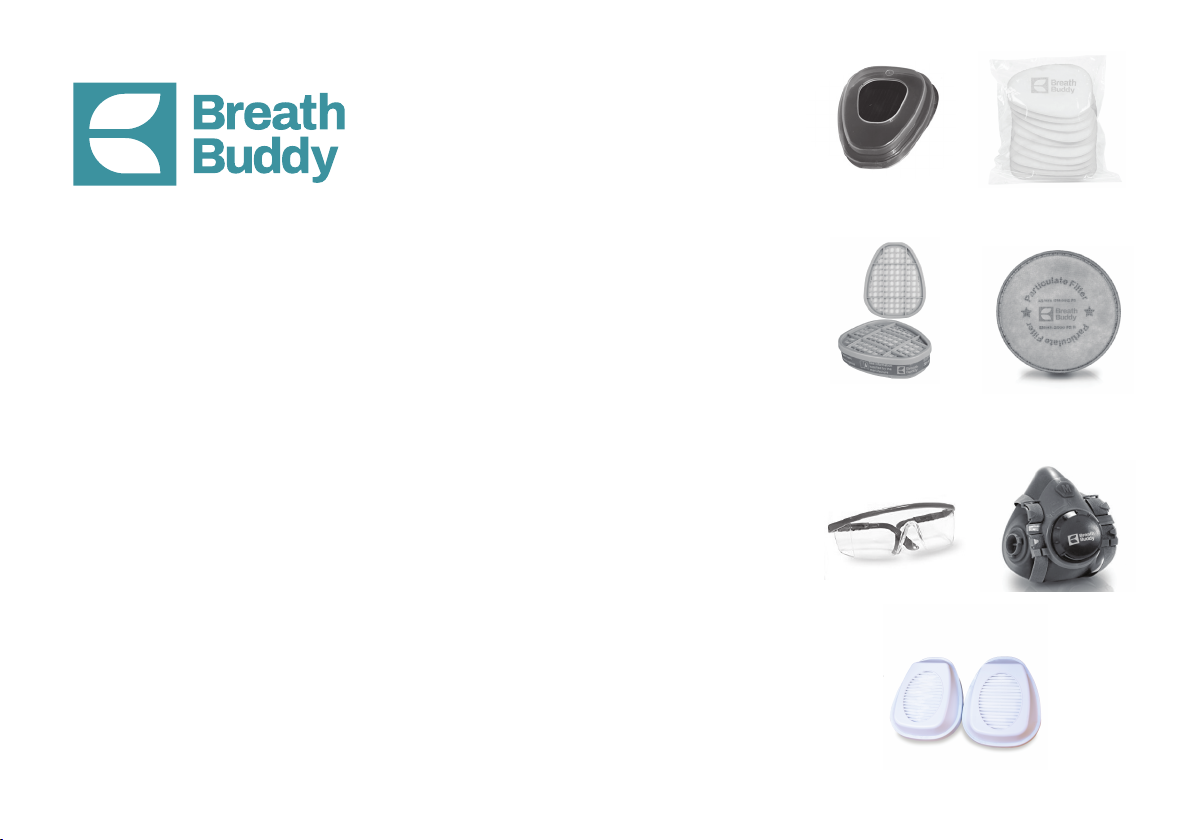
Item Checklist
•
•
•
•
•
•
•
Plastic Holder
901 Cartridges
Safety Glasses
903P3R Cartridges
Respirator Mask
803P3 Filters
802P2 Filters
This instruction guide will explain how to use
the Breath Buddy Respiratory Mask correctly
and how to take care of the entire protection
set including the filters and cartridges.
Breath Buddy Half Respiratory Mask is a
professional breathing protection set that
eliminates any hint of airborne contaminants
from your lungs without aecting your breath-
ing. These contaminants include dust, mold,
EVA foam, paint/varnish fumes, galvanized
fumes, ammonia, organic gases, volcanic
ashes, petroleum-based vapor, fiber dust
etc. The Breath Buddy Respirator is reusable
and it is perfect for all your woodworking,
construction work, brazing, cleaning, metal
pouring, painting, pesticide application,
remediation, soldering, torch cutting and
welding.
The mask serves as an excellent filter
against these harmful particles based on the
approval and limitations of the Occupational
Safety and Health Administration.
Be sure to check that all the following items
have been included in the Breath Buddy
Protection Set. If anything is missing, kindly
contact your supplier.
2 Plastic Holders (Included with Model 750P2)
2 802P2 Filters (Included with Model 750P2)
2 901 Cartridges (Included with Model 750P2)
2 803P3 Filters (Included with Model 750P3)
2 903P3R Cartridges (Included with Model 750P3R)
1 Pair of Safety Glasses
1 Respirator Mask
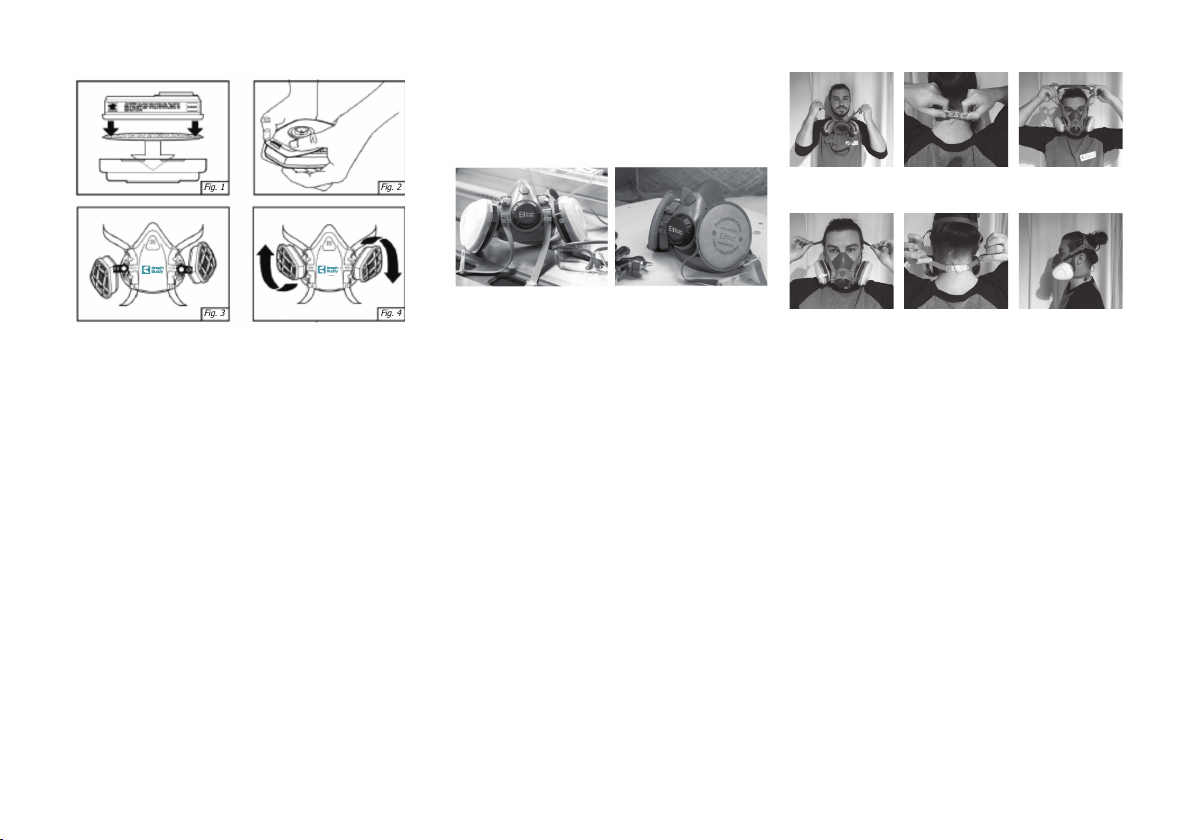
HOW TO ASSEMBLE
1.
2.
3.
4.
BEFORE YOU USE FITTING YOUR
RESPIRATORY MASK
CORRECTLY
(Fig 6) (Fig 7) (Fig 8)
(Fig 9) (Fig 10) (Fig 11)
MODEL 750P2 MODEL 750P3
Place the white filter inside the plastic filter
holder. (Fig 1)
Press the cartridge into the filter holder by
placing the thumbs of both hands on the filter
holder and fingers along the lower sides of
the cartridge (Fig 2). You should hear a click
as the snap engages. If properly installed,
the filter must completely cover the face of
the cartridge and stay fixed.
Align the notch on the cartridge with the
arrow on the facepiece as shown and push
them together (Fig 3).
Turn the cartridge clockwise until it stops (Fig
4). Use the same method for the
P3 pink filters. Align the notch and turn
clockwise.
Congratulations, your respirator mask is
now assembled.
5.
It is important that you check the respirator
before each use to ensure it is in good
operating condition.
Check the following before you use:
Check the facepiece for cracks, scratch-
es and dust. Ensure that no inhalation
valves are distorted, cracked or torn. If
any part is damage, replace before use.
Check that the headbands are intact and
have strong elasticity.
Check that all plastic parts and gaskets
are not cracked or have loosened;
replace if necessary.
•
•
•
Many users fail to fix the respiratory mask
properly to the face and this often leads to
complaints of poor breathing or inhalations of
the contaminants the mask was supposed to
protect them from.
Be sure to follow the steps below when fixing
your mask.
Warning: Do NOT enter a contaminated area
if you cannot wear the mask properly

HOW TO TELL WHEN
YOUR RESPIRATOR
NEEDS TO BE
ADJUSTED
CLEANING AND
MAINTENANCE
Cleaning the respirator
How to clean your respirator
1. Wash your hands to prevent the paint or
(Fig 13)(Fig 12)
Take the lower bands of the mask, place
them at the back of the neck (Fig 6) and
hook them together (Fig 7)
Place the respirator over your mouth and
nose. After fixing the respirator to your
face, place the head harness on the back
of the head (Fig 8). Ensure you set the
size of the head harness as necessary,
once it fits comfortably on the head, stop.
(Fig 9)
Put the ends of the strips to adjust the
tightness of these (Fig 10). Do not
over-tighten.
Perfect, You are good to go (Fig 11)
1.
2.
3.
4.
The eectiveness of a respirator can be
reduced if the correct adjustment is not
achieved. Each time the respirator is worn,
you can perform a review of negative and
positive pressure to check for correct adjust-
ment. To review positive pressure, cover the
exhalation valve by hand and gently exhale
(Fig 12). There will be a proper seal if the
face piece
bulges slightly and no air leaks are detected
between the face and the face piece. If you
detect an air leak in the face seal, reposition
the respirator on the face and readjust the
tension of the elastic bands to eliminate the
leakage. On the other hand, if you want to
check for negative pressure, restrict airflow
and cover the open area of the filter holder
with your palms, when the support is
attached to the cartridge (Fig 13).
Cleaning the respirator is important because
contaminants may clog the filter making it
unfit for use. It is recommended that you
clean your respirator after each use.
chemicals you may have been working with
from soiling your mask.
Disassemble the respirator and clean. If you
do not know how to disassemble the mask,
check the instruction manual that came with
it. Do not clean the respirator with solvent;
cleaning with solvent may degrade the
component reducing its eectiveness.
Clean the cartridges. When cleaning the
cartridges, make sure you keep the seals
and washers safe.
Hand-wash the respirator face piece in warm
water using a disinfectant soap or use a
cleaning cloth.
Air-dry the respirator and all the other part
before you reassemble.
2.
3.
4.
5.
Apart from cleaning, you should also remem-
ber to store your respirator properly when not
in use. Do NOT store in places that are often
exposed to dust, sunlight and extremes of
both heat and cold. The best thing to do is to
remove the cartridges after each use and put
in a zip-lock bag for storage. If you have a
half-face mask, it will fit into a gallon-sized
bag without having to take the cartridges o.
It is also important to always store your mask
away from your work site or chemicals.
HOW TO TELL WHEN
YOUR FILTER NEEDS
REPLACING
PRECAUTIONS
1.
2.
3.
THANK YOU FOR YOUR
PURCHASE
4.
5.
6.
7.
8.
WARNING
The Breath Buddy filter provides an exceptional
99.95% filter eciency and has been tested
and approved to meet the necessary CE
standards. If you are using the respiratory mask
as part of your daily chores, it is expected that
the filter should last a long time. However, it is
easy to tell when your filter needs replacing.
When it becomes dicult to breathe while using
your respirator as a result of the smell from
contaminants, then it is time to replace
your filter.
Generally, you should replace your filter after
40 hours of use.
Do not use the respiratory mask with
beards, facial hair or other conditions that
may prevent a good seal between the face
and the respiratory seal surface.
Do not use the mask when the concentra-
tion of the contaminant in the work area is
unknown.
Leave contaminated area immediately if the
respirator becomes damaged.
Follow the manufacturer’s instruction for
changing the cartridges and filters.
Only use the exact replacement parts, do
not substitute, modify or omit.
Use gas-resistant lenses with this respirator
when used against formaldehyde.
Refer to the instruction and maintenance
sections of the guide for information on how
to use and maintain the respirator.
If contaminants are detected by taste and
smell or if you experience dizziness,
irritation or discomfort, leave the contami-
nated area immediately.
Inadequate disposal of cartridges or filters
may cause environmental contamination.
Handling, transportation and disposal of the
cartridges or filters must be done in
accordance with federal, state and local
regulations.
Your LIFETIME WARRANTY on this product is
available at www.mybreathbuddy.com.
For more information about the product, visit our
website or contact our local representative
This manual suits for next models
3


