Brevi 381 User manual

BREVI srl - Via Lombardia, 15/17 - 24060 Telgate (BG) - Italy - Tel. +39 035 8359311 - Fax +39 035 4491129
Digital Baby Monitor
cod. 381
381-01-00-0-000-00 4-06-2008
IMPORTANT: Read instructions
carefully before use and keep
them for future reference.
The child may be hurt if you do
not follow these instructions.
Istruzioni d’uso
Instructions for use
Gebrauchsanleitung
Notice d'emploi
Instrucciones de uso
Instruções de utilização
Gebruiksaanwijzing
Bruksanvisning
Navodila za uporabo
Instrukcja obslugi
Uputstvo za upotrebu
Οδηγίες χρήσεως
Инструкция по применению
I
GB
D
F
E
P
NL
S
SLO
PL
HR
GR
RUS
RUS
АППАРАТ СООТВЕТСТВУЕТ БАЗОВЫМ НОРМАМ И ПРЕДПИСАНИЯМ УСТАВНОВЛЕННЫМ
РАСПОРЯЖЕНИЕМ R&TTE 1999/05/EC
ВАЖНО! Избавляйтесь от использованных батареек в соответствии с действующими
правилами по их уничтожению, а именно, рекомендуем Вам выбрасывать использованные
батарейки в специально предназначенные контейнеры – для того, чтобы гарантировать
безопасную их переработку и не загрязнять окружающую среду.
ПРЕДУПРЕЖДЕНИЯ О ПРАВИЛЬНОЙ СДАЧЕ ИЗДЕЛИЯ В УТИЛЬ НА ОСНОВАНИИ
ЕВРОПЕЙСКОЙ ДЕРЕКТИВЫ 2002/95CE - 2002/96CE - 2003/108CE
Символ перечеркнутого мусорного бачка, нарисованный на приборе означает, что
изделие не может быть классифицировано как бытовой мусор по окончании его
срока службы. Отслуживший стерилизатор необходимо отвезти в соответствующий
центр по сбору электротехнических и электронных отходов. В случае покупки нового
изделия пользователь может попросить дилера забрать старое изделие из расчета
один к одному. Дифференцированная сдача отслуживших изделий в утиль с целью
их дальнейшей переработки, рекуперации и утилизации, совместимых с окружающей
средой, позволяет избежать негативного воздействия компонентов как на
окружающую среду, так и на здоровье населения. Она способствует вторичному
использованию в промышленности материалов, из которых сделан прибор.
Нарушение нормативов влечет за собой специфические административные санкции,
установленные 22/1997” (Ст. 50 и последующие из 22/1997).
Производитель оставляет за собой право вносить изменения в конструкцию модели, описанной в данной инструкции, в
любое время
Индикатор соединения горит красным:
• Соединение между приборами нарушено. Вы также услышите тревожный сигнал для
оповещения вас, что связи между приборами нет. Если это произошло, то проверьте чтобы
питание (или батарейки) были правильно подключены, и чтобы приборы были в зоне
досягаемости друг друга.
Прибор для родителей не издает звуков или очень тихий:
• Громкость может быть настроена на очень низкий уровень.
• Мы могли нажать кнопку “Mute”
Вы можете слышать звук высокой тональности:
• Приборы расположены слишком близко друг к другу или настроена слишком высокая
громкость.
• Переместите прибор для родителей на расстояние от прибора для детей (как минимум 1
метр / 3 фута).
• Убавьте громкость на приборе для родителей.
ISTRUZIONI DIGITAL BABY MONITOR 381:ISTRUZIONI DIGITAL BABY MONITOR 381 19-06-2008 10:18 Pagina 1

IMPORTANTE: Leggere le istruzioni attentamente
prima dell’uso e conservarle con cura per futuro
riferimento. Qualora tali istruzioni venissero disattese,
ne potrebbero derivare lesioni al bambino.
WICHTIG: Die Bedienungsanleitung vor dem
ersten Gebrauch sorgfältig durchlesen und für
zukünftige Konsultationen gut aufbewahren.
Eine Nichtbefolgung dieser Anleitungen kann zu
Verletzungen des Kindes führen.
IMPORTANT: Lire attentivement les instructions
avant toute utilisation et les conserver soigneusement
pour toute ultérieure consultation. Si vous ne
respectez pas ces instructions, la sécurité de votre
enfant pourrait en être affectée.
IMPORTANTE: Leer las instrucciones atentamente
antes del uso y conservarlas con cuidado para futura
referencia. No seguir estas instrucciones podría
provocar lesiones al niño.
IMPORTANTE: Leia atentamente as instruções
antes do uso e conserve-as para futuras consultas.
No caso em que estas instruções não sejam respei-
tadas há perigo de lesões para o bebé.
LET OP: Deze gebruiksaanwijzing aandachtig
lezen en goed bewaren zodat later raadplegen
ervan altijd mogelijk is. Als deze instructies niet
worden opgevolgd, kan het kind letsel oplopen.
I
D
F
E
P
NL
S
HR
VIKTIGT! Läs bruksanvisningen noga och spar den
för framtida bruk.
Att inte följa dessa instruktioner kan innebära en
risk för barnet.
POMEMBNO! Pred uporabo natančno preberite in
upoštevajte navodila ter jih shranite za morebitno
kasnejšo uporabo! Neupoštevanje navodil za uporabo
lahko med uporabo izdelka poškoduje otroka.
WAŻNE: Przeczytaj uważnie tę instrukcję przed
rozpoczęciem użytkowania I zachowaj ja w razie
potrzeby. Dziecko może się zranic jeżeli nie będziesz
przestrzegac zalecen z tej instrukcji.
VA@NO: Pro~itajte upute pa`ljivo prije upotrebe te
ih pohranite za naknadnu upotrebu.
Ukoliko se ne pridržavate uputa, može doči do
ozbiljnih ozljeda dijeteta.
ΣΗΜΑΝΤΙΚΟ: Διαβάστε προσεκτικά τις οδηγίες
και κρατήστε τις για μελλοντική αναφορά.
Η ασφάλεια του παιδιούθα μπορούσε να τεθείσε
κίνδυνο εάν δεν ακολουθήσετε τιςοδηγίεςαυτές.
Важно! Перед использованием внимательно
прочитайте инструкцию и сохраните ее на
будущее. Необходимо следить эти инструции:
их не следить может быть опаздно для
ребенка.
RUS
PL
SLO
GR
23
ISTRUZIONI DIGITAL BABY MONITOR 381:ISTRUZIONI DIGITAL BABY MONITOR 381 19-06-2008 10:18 Pagina 3

Barn enhet (A)
Barn enhetens nät sladd (B)
Föräldrar enhet (C)
Föräldrar enhetens nätsladd (D)
2st uppladdningsbara AAA batterier för
Föräldrar enheten (E)
Batteriladdare till Föräldrar enheten (F)
Bältes spänne till Föräldrar enheten
(G)
Denna bruksanvisning (H)
4
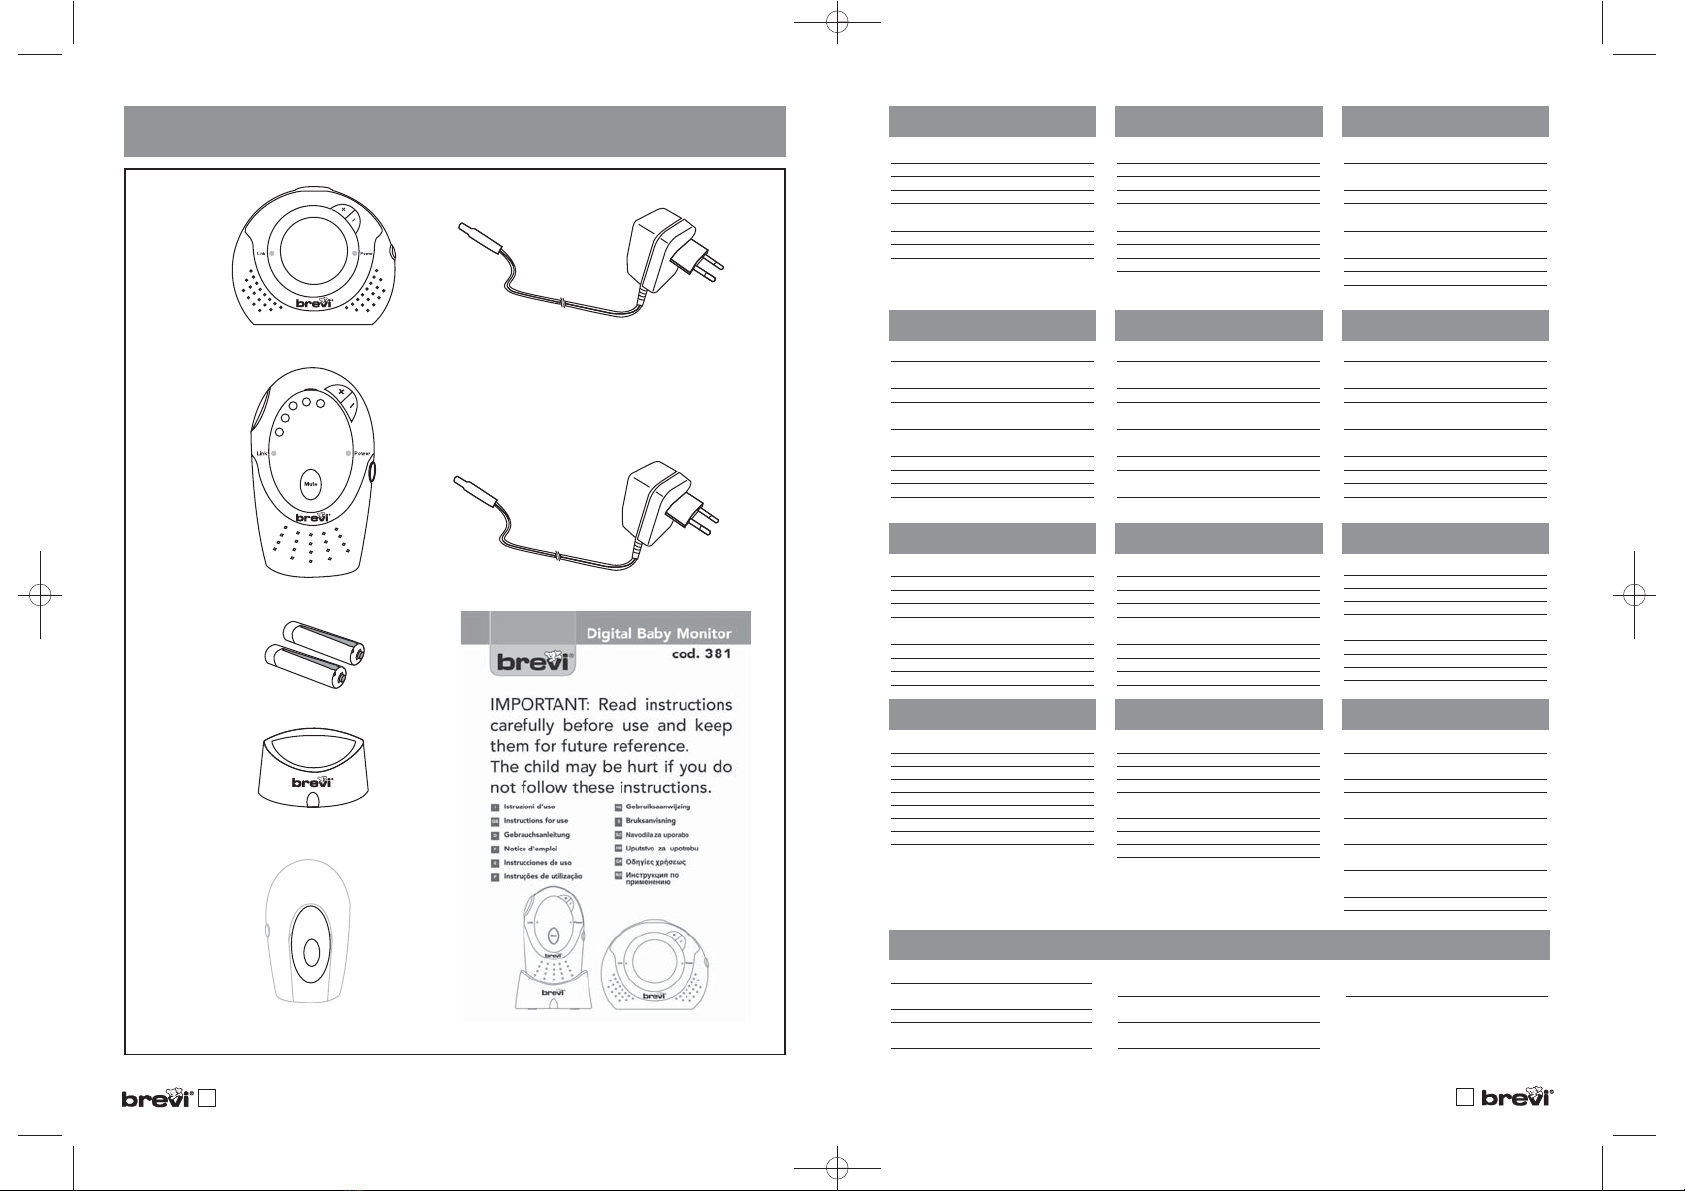
Componenti • Components • Bestandteile • Composantes • Componentes • Componentes •
Bestanddelen • Delar • Części • Sestavni deli • Sastavni dijelovi •
ÍÓÏÔÓÌÂÌÚ˚
• компоненты
ITALIANO
Baby unit (A)
Baby unit mains power adapter (B)
Parent unit (C)
Parent unit mains power adapter (D)
2 x AAA rechargeable batteries for
parent unit (E)
Parent unit charger (F)
Belt clip for parent unit (G)
This user ’s manual (H)
ENGLISH
Baby-Gerät (A)
Stromadapter zum Anschließen des Baby-
Geräts an das Stromnetz (B)
Eltern-Gerät (C)
Stromadapter zum Anschließen des Eltern-
Geräts an das Stromnetz (D)
2 x wiederaufladbare Batterien (AAA) fur das
Eltern-Gerät (E)
Aufladegerät fur das Eltern-Gerät (F)
Gurtelklemme fur das Eltern-Gerät
(G)
Diese Benutzeranleitung (H)
Unité enfant (A)
Adaptateur d’alimentation de l’unité
enfant (B)
Unité parent (C)
Adaptateur d’alimentation de l’unité
parent (D)
2 x Piles AAA rechargeables pour l’unité
parent (E)
Chargeur unité parent (F)
Attache ceinture pour unité parent (G)
Ce manuel d’utilisation (H)
Unidad para el bebé (A)
Adaptador de energía para la unidad del
bebé (B)
Unidad para los padres (C)
Adaptador de energía para la unidad de los
padres (D)
2 baterías regardable AAA para la unidad
para los padres (E)
Cargador de la unidad para los padres(F)
Gancho para cinturón de la unidad para
los padres (G)
Este manual del usuario (H)
Unidade da criança (A)
Adaptador de corrente elétrica para a
unidade da criança (B)
Unidade dos pais (C)
Adaptador de corrente elétrica para a
unidade dos pais (D)
2 pilhas AAA recarregáveis para a unidade
dos pais (E)
Carregador das pilhas da unidade dos pais (F)
Grampo para cinta para a unidade dos pais (G)
Este manual do utilizador (H)
Kindeenheid (A)
Netadapter voor kindeenheid (B)
Oudereenheid (C)
Netadapter voor oudereenheid (D)
2 heroplaadbare AAA batterijen voor
oudereenheid (E)
Oplader voor oudereenheid (F)
Ceintuurclip voor oudereenheid
(G)
Deze handleiding (H)
Otroška enota- oddajnik (A)
Adapter za napajanje otroške enote
(B)
Starševska enota- sprejemnik (C)
Adapter za napajanje starševske enote (D)
2x AAA baterije (možnost polnjenja) za
starševsko enoto (E)
Polnilec za starševsko enoto (F)
Zaponka za starševsko enoto
(G)
Navodila za uporabo (H)
Bebin uređaj (A)
Strujni adapter za bebin uređaj(B)
Uređaj roditelja (C)
Strujni adapter za uređaj roditelja (D)
2 x AAA punjive baterije za uređaj
roditelja (E)
Punjač za uređaj roditelja (F)
Kopča za pojas za uređaj roditelja (G)
Ova korisnička uputstva (H)
Nadajnik dla dziecka (A)
Zasilacz do nadajnika (B)
Odbiornik dla rodzica (C)
Zasilacz do odbiornika (D)
2 x AAA akumulatorki do odbiornika (E)
Ładowarka do odbiornika (F)
Klamra do paska (G)
Instrukcja użytkowania (H)
Μονάδα μωρού (A)
Προσαρμοστής δικτύου για την μονάδα
του μωρού (B)
Μονάδα γονιού (C)
Προσαρμοστής δικτύου για την μονάδα
του γονιού (D)
2 μπαταρίες AAA επαναφορτιζόμενες
για
την μονάδα του γονιού (E)
Φορτιστής μπαταριών για την μονάδα
του γονιού (F)
Κλιπ για την ζώνη για την μονάδα του
γονιού (G)
Αυτό το εγχειρίδιο χρήσης (H)
DEUTSCH
FRANÇAIS ESPAÑOL PORTUGUÊS
NEDERLANDS TAALIG
SVENKA SLOVENSKO
POLSKI
Прибор для детей (A)
Переходник для подключения прибора
для детей к эл. сети (B)
Прибор для родителей (C)
Переходник для подключения прибора
для родителей к эл. сети (D)
Аккумуляторные батареи для прибора
для родителей: 2 x AAA (E)
Зарядное устройство для прибора для
родителей (F)
Зажим для ремней для прибора для
родителей (G)
Данная инструкция по
использованию (H)
Русский язык
HRVATSKI ∂§§∏¡π∫∞
CD
AB
H
F
E
G
5
Unità bimbo (A)
Adattatore di rete per unità bimbo (B)
Unità genitore (C)
Adattatore di rete per unità genitore (D)
2 batterie AAA ricaricabili per unità
genitore (E)
Caricabatterie per unità genitore (F)
Clip per cintura per unità genitore
(G)
Questo manuale utente (H)
ISTRUZIONI DIGITAL BABY MONITOR 381:ISTRUZIONI DIGITAL BABY MONITOR 381 19-06-2008 10:18 Pagina 5

6
Unità genitore • Parent unit • Eltern-Gerät • Unité parent • Unidad para los padres •
Unidade dos pais •
Oudereenheid • Föräldrar enheten • Starševska enota
Legenda delle funzioni
1. Tasto sensore
2. LED indicatore collegamento
3. Pulsante interfono
4. Indicatore del livello sonoro
5. Comando regolazione volume
6. LED indicatore batteria scarica
7. Pulsante ON/OFF
8. Clip per cintura
9. Vano batterie
10. Caricabatterie per unità genitore
11. Indicatore caricabatterie
12. Jack adattatore di rete per
caricabatterie
ITALIANO
Legend of Functions
1. Sensor button
2. Link indicator LED
3. Talk back button
4. Sound level light
5. Volume control
6. Power/battery low indicator LED
7. ON/OFF button
8. Belt clip
9. Battery compartment
10. Parent unit charger
11. Charger light
12. Power adapter jack for the
charger
Liste mit den Funktionen
1. Sensortaste
2. Verbindungsanzeige LED
3. Rucksprache-Taste
4. Licht zum Anzeigen des
Geräuschpegels
5. Lautstärkeregelung
6. LED-Anzeige fur den Betrieb/
niedrige Batterieladung
7. ON/OFF Taste
8. Gurtelklemme
9. Batteriefach
10.
Aufladegerät fur das Eltern-Gerät
11. Licht des Aufladegeräts
12. Netzadapter-Anschlussbuchse
zum Anschließen des
Aufladegerätes
ENGLISH
Légende des fonctions
1. Bouton capteur
2. Témoin LED de lien
3. Bouton de réponse
4. Lumière du niveau sonore
5. Contrôle du volume
6. Témoin LED alimentation/
Batterie basse
7. Bouton allumé/eteint
8. Attache de ceinture
9. Emplacement des piles
10. Chargeur unité parent
11. Lumière du chargeur
12. Connecteur de l’adaptateur
pour le chargeur
Leyenda de las funciones
1. Botón del sensor
2. LED indicador de enlace
3. Botón para contestar
4. Luz de nivel de sonido
5. Control de volumen
6. LED indicador de alimentación/
batería baja
7. Botón de ENCENDIDO/
APAGADO
8. Gancho para cinturón
9. Compartimiento de la batería
10. Cargador de la unidad para
los padres
11. Luz del cargador
12. Ficha del adaptador de energía
para el cargador
Legenda das funções
1. Tecla do sensor
2. LED indicador de ligação
3. Botão do interfone
4. Indicador do nível sonoro
5. Comando para regular o volume
6. LED indicador de pilha
descarregada
7. Botão ON/OFF
8. Grampo para cinta
9. Compartimento das pilhas
10. Carregador das pilhas da
unidade dos pais
11. Indicador carregador
12. Tomada de corrente para
carregador
Legenda van de functies
1. Sensorknop
2. LED controlelampje voor de
verbinding
3. Intercomknop
4. Controlelampje van het
geluidsniveau
5. Bediening volumeregeling
6. LED controlelampje voor lege
batterij
7. ON/OFF knop
8. Ceintuurclip
9. Batterijenvakje
10. Oplader voor oudereenheid
11. Controlelampje oplader
12. Jack adapter voor oplader
Vad medföljer
1. Sensor knapp
2. Kontakt indikator
3. Snabbtelefon knapp
4. Ljud nivå indikator
5. Volym kontroll
6. Batteri nivå indikator
7. På/AV knapp
8. Bältes spänne
9. Batteri fack
10. Laddare till föräldrar enhet
11. Laddnings indikator
12. Nät kabel med eluttag till
laddaren
Funkcije
1. Senzorski gumb
2. LED indikator vklopa
3. Gumb za nagovarjanje malčka
4.
Lučka, ki prikazuje jakost zvoka
5. Gumb za prilagajanje jakosti
zvoka
6. LED lučka, ki prikaže jakost
baterij/ napajanja
7.
Gumb za vklop(ON)/ izklop(OFF)
8. Zaponka
9. Prostor za baterije
10. Polnilec za starševsko enoto
11. Lučka na polnilcu
12. Vtičnica za napajanje prek
adapterja
DEUTSCH
FRANÇAIS ESPAÑOL PORTUGUÊS
NEDERLANDS TAALIG
SVENKA SLOVENSKO
7
ISTRUZIONI DIGITAL BABY MONITOR 381:ISTRUZIONI DIGITAL BABY MONITOR 381 19-06-2008 10:18 Pagina 7

89
Pregled funkcija
1. Senzor tipka
2. Led indikator povezanosti
3. Tipka za odgovaranje
4. Kontrolne lampice za jačinu
zvuka
5. Podešavanje glasnoče
6. power (uključeno) / battery low
(slabe baterije) led indikator
7. ON (uključeno)/OFF(isklučeno)
tipka
8. Kopča za pojas
9. Mjesto za baterije
10. Punjač uređaja za roditelje
11. Kontrolna lampica punjenja
12. Jack strujnog adaptera od
punjača
HRVATSKI
Spis funkcji
1. Przycisk czułości odbioru
2. Dioda wskazująca połączenie
3. Przycisk funkcji odpowiadania
4. Światełka poziomu głośności
5. Regulacja głośności
6. Dioda wskazująca słaby
poziom naładowania baterii
7. Przyciski ON/OFF
8. Klamra do paska
9. Pojemnik na baterie
10. Ładowarka do odbiornika
11. Światełko ładowania
12. Wejście na ładowarkę
POLSKI
Условные обозначения
1. Кнопка регулировки
чувствительности
2. Светодиодный индикатор
соединения
3. Кнопка передачи сообщений
4. Индикаторы уровня звука
5. Регулятор громкости
6. Индикатор питания /
зарядки батарей
7. Кнопка ВКЛ/ВЫКЛ
8. Зажим для ремня
9. Отсек для батареек
10. Зарядное устройство для
прибора для родителей
11. Индикатор зарядки
12. Гнездо адаптера для
зарядного устройства
Русский язык
Λεζάντα των λειτουργιών
1. Πλήκτρο αισθητήρα
2. LED δείκτη σύνδεσης
3. Πλήκτρο ενδοσυνεννόησης
4. Δείκτης επιπέδου της ήχου
5. Έλεγχος ρύθμισης έντασης
6. LED δείκτη μπαταρία άδεια
7. Πλήκτρο ON/OFF
8. Κλιπ για την ζώνη
9. Χώρος μπαταριών
10. Φορτιστής μπαταρίας για
την μονάδα του γονιού
11. Δείκτης φορτιστή μπαταρίας
12. Βύσμα προσαρμοστή δικτύου
για φορτιστή μπαταρίας
∂§§∏¡π∫∞
Odbiornik • Uređaj roditelja • Μονάδα γονιού • Прибор для родителей
ISTRUZIONI DIGITAL BABY MONITOR 381:ISTRUZIONI DIGITAL BABY MONITOR 381 19-06-2008 10:18 Pagina 9

10 11
Unità bimbo • Baby unit • Baby-Gerät • Unité enfant •
Unidad para el bebé • Unidade da criança • Kindeenheid Legenda delle funzioni
1. LED indicatore collegamento
2. Luce notturna
3. Tasto luce notturna on/off
4. Comando regolazione volume
5. LED indicatore alimentazione/
batteria scarica
6. Pulsante ON/OFF
7. Jack adattatore di rete
8. Blocco batterie
9. Vano batterie
Cos’altro occorre
10. 4 batterie AA non ricaricabili
(si consiglia l’uso di batterie
alcaline) non fornite
ITALIANO
Legend of Functions
1. Link indicator LED
2. Night light
3. Night light on/off button
4. Volume control
5.
Power indicator LED/battery low
6. ON/OFF button
7. Power adapter jack
8. Battery lock
9. Battery compartment
What else you need
10. 4 x AA non rechargeable
batteries (Alkaline recommended)
not supplied
ENGLISH
Légende des fonctions
1. Témoin LED de lien
2. Lumière de nuit
3.
Bouton arrêt/marche veilleuse
4. Contrôle du volume
5. Témoin LED alimentation/
batterie basse
6. Bouton allumé/eteint
7. Connecteur de l’adaptateur
8. Verrou des piles
9. Emplacement des piles
Autres accessoires
10. 4 x Piles AA non rechargeables
(alcaline recommandée) non
inclus
Leyenda de las funciones
1. LED indicador de enlace
2. Luz de noche
3. Conmutador de encendido/
apagado de luz de noche
4. Control de volumen
5. LED de indicación de
alimentación/batería baja
6. Botón de ENCENDIDO/
APAGADO
7.
Ficha del adaptador de energía
8. Traba de la batería
9. Compartimiento de las baterías
Qué más necesita
10. 4 baterías no recargables AA
(se recomienda el uso de alcalinas)
no suministradas
Legenda das funções
1. LED indicador de ligação
2. Luz nocturna
3. Tecla de luz nocturna liga/
desliga
4. Comando para regular o
volume
5. LED indicador de alimentação/
pilha descarregada
6. Botão ON/OFF
7. Ficha adaptador de corrente
8. Fecho das pilhas
9. Compartimento das pilhas
O que mais é necessário
10. 4 pilhas AA não recarregáveis
(é aconselhável usar pilhas
alcalinas) (não fornecidas) para
a unidade da criança
DEUTSCH
FRANÇAIS ESPAÑOL
Liste der Funktionen
1.
Verbindungsanzeige (LED)
2. Nachtlicht
3. ON/OFF Nachtlicht taste
4. Lautstärkeregelung
5. Betriebsanzeige (LED)/
Niedrige Batterieladung
6. ON/OFF Taste
7. Anschlussbuchse fur den
Netzadapter
8. Batterieverriegelung
9. Batteriefach
Was sonst noch notwendig ist
10. 4 x nicht wiederaufladbare
Batterien (AA) (Alkali-Batterien
empfohlen). Batterien nicht
mitgeliefert
PORTUGUÊS
10. 4 x AA
1. LED controlelampje voor de
verbinding
2. Nachtlampje
3. on/off knop nachtlampje
4. Bediening volumeregeling
5. LED controlelampje voeding/
lege batterij
6. ON/OFF knop
7. Jack adapter
8. Batterijblok
9. Batterijenvakje
10. 4 niet oplaadbare AA batterijen
(aangeraden wordt alkaline-
batterijen te gebruiken) voor de
kindeenheid (niet bijgeleverd)
Legenda van de functies Legenda van de functies
NEDERLANDS TAALIG
ISTRUZIONI DIGITAL BABY MONITOR 381:ISTRUZIONI DIGITAL BABY MONITOR 381 19-06-2008 10:18 Pagina 11

12 13
Barn enhet • Otroška enota • Nadajnik dla dziecka • Baby uređaj •
Μονάδα μωρού •Прибор для детей Vad medföljer
1. Kontakt indikator
2. Natt lampa
3. Natt lampa på/av knapp
4. Volum kontroll
5. På-indikator/Batteri nivå
indikator
6. På/Av knapp
7. Nätsladd
8. Batteri lås
9. Batteri fack
Vad mer behövs
10. 4st ej uppladdningsbara AA
batterier (alkaline rekomenderas)
för Barn enheten
Περιεχόμενο της συσκευασίας
1. LED δείκτη σύνδεσης
2. Φως νυκτός
3. Πλήκτρο on/off για το φως
νυκτός
4. Έλεγχος ρύθμισης έντασης
5. LED δείκτη τροφοδοσίας /
μπαταρία άδεια
6. Πλήκτρο ON/OFF
7. Βύσμα προσαρμογέα για το
δίκτυο
8. Μπλοκάρισμα μπαταρίας
9. Χώρος μπαταριών
Τι άλλο χρειάζεται
10. 4 μπαταρίες AA μη
επαναφορτιζόμενες (σας
συνιστούμε την χρήση
αλκαλικών μπαταριών) για
την μονάδα του μωρού
(δεν παρέχονται)
Условные обозначения
1. Светодиодный индикатор
соединения
2. Ночник
3. Кнопка ночника вкл/выкл
4. Регулятор громкости
5. Индикатор питания / зарядки
батарей
6. Кнопка ВКЛ/ВЫКЛ
7. Гнездо адаптера для
зарядного устройства
8. Замок отсека для батареек
9. Отсек для батареек
Что еще вам понадобится
10. 4 x AA не перезаряжающиеся
батареи (алкалиновые
рекомендуются) для прибора
для детей (не входят в
комплект поставки)
∂§§∏¡π∫∞
Pregled funkcija
1. Led indikator povezanosti
2. Nočno svijetlo
3. Prekidač za nočno svijetlo
4. Kontrola glasnoće
5. Power (uključeno) / battery low
(slabe baterije) led indikator
6. ON (uključeno)/OFF (isključeno)
tipka
7. Jack strujnog adaptera
8. Brava poklopca pretinca za
baterije
9. Mjesto predviđeno za baterije
Što još trebate
10. 4 x aa ne punjive baterije
(preporučamo alkalne) za
bebin uređaj (nisu sastavni dio)
HRVATSKI
Funkcije
1. LED indikator vklopa
2. nočna lučka
3. Gumb za vklop (ON)/ izklop
(OFF) nočne lučke
4. Gumb za prilagajanje jakosti
zvoka
5.
indikator ˝power˝/LED lučka
6. Gumb za vklop (ON)/ izklop
(OFF)
7. Vtičnica za napajanje
8. Zapiralo pokrova za baterije
9. Prostor za baterije
Potrebujete še…
10. 4x AA baterije za otroško
enoto, ki jih ni moč ponovno
polniti (priporočamo alkalne)
(niso priložene)
SVENKA SLOVENSKO
Spis funkcji
1. Dioda wskazująca połączenie
2. Nocna lampka
3. Włącznik/wyłącznik nocnej
lampki
4. Regulacja głośności
5. Dioda wskazująca słaby
poziom naładowania baterii
6. Przycisk ON/OFF
7. Wejście na zasilacz
8. Zamknięcie przegrody na baterie
9. Przegroda na baterie
Czy potrzebujesz czegoś więcej
10. 4 x AA zwykłe baterie (zalecane
są alkaiczne) do nadajnika (nie
są w zestawie)
POLSKI
Русский язык
10. 4 x AA
ISTRUZIONI DIGITAL BABY MONITOR 381:ISTRUZIONI DIGITAL BABY MONITOR 381 19-06-2008 10:18 Pagina 13

14 15
1 2
3 4
5 6
7a 7b
8a
8
9
8b
8c 8e
9a 9b
2 x AAA Ric.
AC: DC
9V/300mA
4 x AA
4 x AA
2 x AAA
AC
8d
ISTRUZIONI DIGITAL BABY MONITOR 381:ISTRUZIONI DIGITAL BABY MONITOR 381 19-06-2008 10:18 Pagina 15

16 17
9c 9d
10a 10b
10c 10d 10e
11g
11a 11b 11c
11e 11f11d
12
9e
9f
0%
10
2 x AAA Ric.
11h
0%
ISTRUZIONI DIGITAL BABY MONITOR 381:ISTRUZIONI DIGITAL BABY MONITOR 381 19-06-2008 10:18 Pagina 17

13a LINK ok!
13b NO LINK!
”ł
14a 14b
15a 15b
Talk
16a
Talk
16b
17a 1817b
18 19
max
ISTRUZIONI DIGITAL BABY MONITOR 381:ISTRUZIONI DIGITAL BABY MONITOR 381 19-06-2008 10:18 Pagina 19

INFORMAZIONI IMPORTANTI
Si prega di leggere attentamente il presente manuale utente prima di usare il vostro Digital Baby
Monitor Brevi e di conservarlo per riferimento futuro. Digital Baby Monitor Brevi è progettato
come dispositivo di ausilio per gli adulti e non deve essere utilizzato in sostituzione di una super-
visione adeguata e responsabile.
Assicuratevi che l’unità bimbo e il cavo dell’adattatore siano sempre fuori della portata del bambino (ad
almeno 1 metro di distanza) (fig. 1)
Non posizionate mai l’unità bimbo all’interno del lettino, della culla o del box (fig. 2)
Evitate di coprire Digital Baby Monitor Brevi (ad esempio con indumenti, tovaglie o coperte) (fig. 3)
Non posizionare o utilizzate Digital Baby Monitor Brevi in luoghi umidi o in prossimità di acqua (fig. 4)
Se viaggiate all’estero, assicuratevi che la tensione indicata nell’adattatore di rete corrisponda alla ten-
sione della rete locale prima di collegarlo (fig. 5)
Per evitare scariche elettriche, non aprite la custodia dell’unità bimbo e dell’unità genitore (ad ecce-
zione del vano batterie) (fig. 6)
La sostituzione delle batterie con altre di tipo non corretto comporta il rischio di esplosione
Per l’unità genitore, utilizzate sempre batterie ricaricabili (fig. 7a - 7b)
INSTALLAZIONE
1. INSTALLAZIONE DELL’UNITÀ BIMBO
1.1 Alimentatore
L’unità bimbo utilizza sia tensione di rete AC che batterie alcaline AA (fig. 8-9)
Funzionamento con collegamento alla rete elettrica
a) Inserite il cavo di alimentazione nella presa sul lato dell’unità bimbo (fig. 8a)
b) Collegate l’altra estremità alla presa elettrica di rete (fig. 8b)
c) Una volta collegato alla rete elettrica, la luce notturna centrale si accenderà per 1 secondo (fig. 8c)
d) Premete il tasto “ON-OFF” (fig. 8d); i led “Power” e “Link” si accenderanno (fig. 8e)
AVVERTENZA: utilizzate solo l’adattatore di rete fornito.
L’uso di un adattatore non corretto può danneggiare l’unità bimbo in modo permanente.
Funzionamento a batterie
L’unità bimbo può funzionare anche a batterie, per consentirne l’uso anche quando si è distanti da una
presa di rete o in caso di interruzione di corrente (fig. 9)
a) Togliete il coperchio del vano batterie e inserire 4 batterie alcaline tipo AA dell’unità bimbo e
rimettete in posizione il coperchio (fig. 9a -9b)
b) La luce notturna centrale si accenderà per 1 secondo (fig. 9c)
c) Premete il tasto “ON-OFF” (fig. 9d); i led “Power” e “Link” si accenderanno (fig. 9e)
NOTA 1: si consiglia l’uso di 4 batterie tipo AA alcaline
2: l’unità bimbo funzionerà a batterie solo se scollegata dalla rete elettrica
3: batteria scarica: l’indicatore LED accensione (Power) sull’unità bimbo lampeggia e l’indicatore
LED connessione (Link) sull’unità genitore lampeggia con luce rossa (fig. 9f)
4: spegnete l’unità bimbo prima di scollegare l’unità dall’alimentazione o rimuovere le batterie
2. INSTALLAZIONE DELL’UNITÀ GENITORE
2.1 Alimentatore
L’unità genitore utilizza due batterie ricaricabili tipo AAA (fig. 10)
Funzionamento a batterie
a) Togliete il coperchio del vano batterie e inserite 2 batterie ricaricabili tipo AAA dell’unità genitore
e rimettete in posizione il coperchio. Assicuratevi di avere inserito le batterie nell’unità genitore
(fig. 10a-10b-10c-10d-10e)
AVVERTENZA: non inserite batterie non ricaricabili nell’unità genitore.
Utilizzate unicamente 2 batterie tipo AAA ricaricabili - l’uso di altri tipi di batterie potrebbe
danneggiare permanentemente l’unità (fig 7a-7b).
b) Collegate il caricabatterie dell’unità genitore alla presa di rete (fig. 11a-11b)
AVVERTENZA: utilizzate solo l’adattatore di rete fornito. L’uso di un adattatore non
corretto può danneggiare il caricabatterie in modo permanente.
c) Inserite l’unità genitore nel caricabatterie (fig. 11c); l’indicatore del caricabatterie si accenderà
anche se le batterie sono completamente cariche (fig. 11d)
d) Premete il tasto “ON-OFF” (fig. 11e); i led “Power” e “Link” si accenderanno (fig. 11f)
NOTA 1: caricate l’unità genitore per almeno 8 ore prima di utilizzare il Baby Monitor per la prima
volta (fig. 11g)
2: se l’indicatore del caricabatterie è spento, è necessario inserire o sostituire le batterie
3: è necessario caricare o sostituire le batterie nei seguenti casi:
• Il LED indicatore alimentazione non si accende
• Batteria scarica: Il LED indicatore alimentazione (Power) lampeggia (fig. 11h)
4: l’unità genitore può essere usata anche mentre si trova sotto carica
5: spegnete l’unità genitore prima di rimuovere le batterie
2.2 Clip per cintura
Per una maggiore libertà, usare il gancio per cintura (fig. 12)
ITALIANO
II
20 21
ATTENZIONE! Non ricaricate le batterie. Inserite le batterie o gli accumulatori rispettando la polarità.
Non utilizzate contemporaneamente batterie o accumulatori nuovi e scarichi. Non utilizzate
contemporaneamente diversi tipi di batterie o accumulatori. Utilizzate i tipi di batterie o accumu-
latori raccomandati. Togliete le batterie o gli accumulatori scarichi. Non cortocircuitate i morsetti
delle batterie o degli accumulatori. Laddove possibile togliete gli accumulatori da prodotto prima
di caricarli. Gli accumulatori devono essere ricaricati sotto la supervisione di un adulto.
ATTENZIONE! Non utilizzare le batterie comuni, ma esclusivamente batterie ricaricabili.
Rispettare la polarità delle batterie ricaricabili. Non utilizzare contemporaneamente batterie ricaricabili
nuove e scariche. Non utilizzare contemporaneamente diversi tipi di batterie ricaricabili.
Utilizzare i tipi batterie ricaricabili raccomandati. Non cortocircuitare i morsetti delle batterie
ricaricabili. Le batterie ricaricabili devono essere ricaricate sotto la supervisione di un adulto.
ISTRUZIONI DIGITAL BABY MONITOR 381:ISTRUZIONI DIGITAL BABY MONITOR 381 19-06-2008 10:18 Pagina 21

3. VERIFICARE IL COLLEGAMENTO
Se le due unità sono accese, l’indicatore di collegamento (Link) si accenderà con luce verde su entrambe
le unità (fig. 13a). Se il collegamento tra le unità si interrompe in qualsiasi momento, l’indicatore di col-
legamento (Link) si accenderà con luce rossa. Nell’unità genitore si sentirà anche un segnale di avviso che
indica la mancanza di comunicazione tra le unità. In questo caso, verificate che l’unità bimbo sia colle-
gata alla presa di rete e che sia accesa (fig. 13b).
Verificate inoltre che le unità si trovino entro la portata massima
NOTA In caso di interruzione e successivo ripristino della corrente, tutte le impostazioni delle unità
rimarranno invariate
USO DEL BABY MONITOR
Posizionate entrambe le unità nella stessa stanza per verificare il collegamento. Assicuratevi che l’unità
bimbo si trovi ad almeno 1 metro di distanza dall’unità genitore (fig. 13a).
NOTA Se le due unità si trovano troppo vicine l’una all’altra, si sentirà un suono acuto, questo è normale.
Le unità sono progettate per essere collocate a distanza l’una dall’altra, ad esempio in ambienti
diversi (fig. 13b).
4. USO DEL BABY MONITOR
4.1 Regolazione del volume
Nell’unità genitore o unità bimbo:
• Ciascuna unità dispone di 6 livelli di volume
• Premete +per aumentare o –per ridurre il volume. Variando le impostazioni del volume sull’unità
bimbo si modificherà il volume della funzione Interfono (fig. 14a -14b).
4.2 Tasto disattivazione audio (mute)
La funzione disattivazione audio consente di disattivare il volume dell’unità genitore e si inserisce pre-
mendo il tasto “Mute”(fig. 15a).
Sarà tuttavia possibile monitorare il bambino utilizzando gli indicatori del livello sonoro. Quando il livello
sonoro nelle vicinanze dell’unità bimbo raggiunge una soglia reimpostata (sensibilità), la funzione disat-
tivazione audio verrà automaticamente disabilitata.
4.3 Impostazione livello sensibilità microfono
Per impostare il livello della sensibilità, seguire queste istruzioni:
• Premete “Mute” sull’unità Genitore (fig. 15a).
• Impostate la sensibilità premendo +o–entro 3 secondi per effettuare la selezione del livello
desiderato – livello 1 per sensibilità bassa, o livello 5 per sensibilità alta (l’impostazione predefinita
è 3) (fig. 15b).
4.4 Interfono
È possibile usare la funzione Interfono per confortare e riassicurare il vostro bambino.
Tenete premuto il tasto “Talk” sull’unità genitore per parlare al bambino (fig. 16a).
Rilasciate il tasto “Talk” per sentire di nuovo il bambino (fig. 16b).
4.5 Luce notturna
La luce notturna produce un bagliore debole e confortante per il vostro bambino e vi consente di
controllarlo senza dover accendere la luce principale della stanza (fig.17b).
• Premete il tasto “Light” sull’unità bimbo. Premetelo nuovamente per spegnere la luce (fig. 17a).
4.6 Indicatori del livello sonoro
Gli indicatori del livello sonoro sono spie rosse e verdi situate nella parte superiore dell’unità genitore
che si illuminano a seconda del livello sonoro nella stanza del bambino.
Sono disponibili 8 livelli sonori: (fig. 18)
• Livello 0: 0 luci
• Livello 1: 1 luce verde
• Livello 2: 2 luci verdi
• Livello 3: 3 luci verdi
• Livello 4: 4 luci verdi
• Livello 5: 5 luci verdi
• Livello 6: 5 luci verdi e 1 rossa
• Livello 7: 5 luci verdi e 2 rosse
INDIVIDUAZIONE E RISOLUZIONE DEI PROBLEMI
Gli indicatori di alimentazione non si accendono:
• Se si utilizzano gli adattatori di rete, assicurarsi che siano collegati alla rete elettrica e accesi.
• Se si utilizzano le batterie, verificare che siano installate correttamente e che non siano scariche.
L’indicatore di collegamento non si accende:
• Verificate che entrambe le unità bimbo e genitore siano accese.
• Se si utilizzano le batterie, verificare che siano installate correttamente e che non siano scariche.
L’indicatore di collegamento è rosso:
• Il collegamento tra le unità è interrotto. Si sentirà anche un segnale sonoro a indicare che non vi è
comunicazione tra le unità. In questo caso, verificate che l’unità sia correttamente collegata alla rete
elettrica (o che siano inserite le batterie) e che le unità si trovino entro la portata prevista.
L’unità genitore rimane silenziosa o quasi:
• Il volume impostato potrebbe essere troppo basso.
• Può essere stato premuto il tasto “Mute” (silenziamento).
Si sente un suono acuto:
• Le unità sono troppo vicine una all’altra, oppure il volume impostato è troppo alto.
• Allontanate l’unità genitore dall’unità bimbo (portarla ad almeno 1 metro).
• Riducete il volume sull’unità genitore.
I
22 23
I
ISTRUZIONI DIGITAL BABY MONITOR 381:ISTRUZIONI DIGITAL BABY MONITOR 381 19-06-2008 10:18 Pagina 23

L’APPARECCHIO È CONFORME AI REQUISITI ESSENZIALI ED ALLE ALTRE DISPOSIZIONI
PERTINENTI STABILITE DALLA DIRETTIVA R&TTE 1999/05/EC
IMPORTANTE: per quanto concerne la sostituzione di batterie esauste, vi chiediamo di seguire la
normativa in vigore che ne regolamenta lo smaltimento. Per essere sicuri che vengano smaltite in
modo sicuro e nel rispetto dell’ambiente, depositatele nei contenitori appositamente previsti.
AVVERTENZE PER IL CORRETTO SMALTIMENTO DEL PRODOTTO AI SENSI DELLA DIRETTIVA
EUROPEA 2002/95CE - 2002/96CE - 2003/108CE
Il simbolo del cassonetto barrato riportato sull’apparecchiatura indica che il prodotto deve
essere raccolto separatamente dagli altri rifiuti alla fine della propria vita utile.
L'apparecchio, una volta dimesso, dovrà essere portato agli idonei centri di raccolta diffe-
renziata dei rifiuti elettronici ed elettrotecnici, oppure essere riconsegnato al rivenditore al
momento dell’acquisto di una nuova apparecchiatura di tipo equivalente, in ragione di uno
a uno. Un’adeguata raccolta differenziata per l’avvio successivo dell’apparecchiatura
dismessa al riciclaggio, al trattamento e allo smaltimento ambientalmente compatibile con-
tribuisce ad evitare possibili effetti negativi sull’ambiente e sulla salute e favorisce il riciclo
dei materiali di cui è composta l’apparecchiatura. Lo smaltimento abusivo del prodotto da
parte dell’utente comporta l’applicazione delle sanzioni amministrative di cui al dlgs. n.
22/1997” (art. 50 e seguenti del dlgs. n. 22/1997).
Brevi potrà apportare in qualsiasi momento modifiche ai modelli descritti in questo libretto d’istruzioni d’uso.
I
24 25
GB
IMPORTANT INFORMATION
Please read this user’s manual carefully before using your baby monitor and keep it for future
reference. This baby monitor is designed as an aid and should not be used as a substitute for
responsible and proper adult supervision.
Make sure the baby unit and adapter cable are always out of reach of the baby (at least 1 meter/3 feet
away) (picture 1)
Never place the baby unit inside the baby’s bed, cot or playpen (picture 2)
Never cover the baby monitor (e.g. with clothes, towels or blankets) (picture 3)
Never place or use the baby monitor in moist places or close to water (picture 4)
If traveling abroad, make sure that the voltage shown on the mains power adapter corresponds to the
local mains power before connecting to the power supply (picture 5)
To prevent electric shock, do not open the case of the baby unit and parent unit (except battery com-
partment covers) (picture 6)
Risk of explosion if batteries are replaced by an incorrect type. For the parent unit, always use rechar-
geable batteries. (pictures 7a - 7b)
SETTING UP
1. SET UP THE BABY UNIT
1.1 Power supply
The baby unit uses either household AC current or four AA Alkaline batteries (pictures 8-9)
Main operations
a) Plug the mains power cable into the baby unit (picture 8a)
b) Connect the other end to the main power (picture 8b)
c) Once the main connection is done, the centralized night light will turn on for 1 second (picture 8c)
d) Push the button “ON-OFF” (pic.8d); the “Power” led and “Link” led will turn on (picture 8e)
WARNING: Use only the main power adapter supplied. Using an incorrect adapter may
permanently damage the baby unit.
Battery Operations
The baby unit also works on battery power, so that you can use it even when you are not near to a
mains power socket or during a power cut (picture 9)
a) Remove the battery compartment cover and insert 4 x AA Alkaline batteries into the battery
compartment on the baby unit and replace the battery compartment cover (picture 9a -9b)
b) The centralized night light will turn on for 1 second (picture 9c)
c) Push the button “ON-OFF” (picture 9d); the “Power” led and “Link” led will turn on (picture 9e)
NOTE 1: the recommended batteries are 4 x AA Alkaline
2: the baby unit will only work from the batteries if the mains power is disconnected
3: Battery low: The power indicator LED on baby unit blinks and the link indicator LED on Parent
Unit blinks red (picture 9f)
4: Please power off the baby unit before removing the main power or the batteries.
ENGLISH
ISTRUZIONI DIGITAL BABY MONITOR 381:ISTRUZIONI DIGITAL BABY MONITOR 381 19-06-2008 10:18 Pagina 25

GB
26 27
2. SET UP THE PARENT UNIT
2.1 Power supply
The parent unit uses either two AAA rechargeable batteries (picture 10)
Battery operations
a) Remove the battery compartment cover and insert 2 x AAA rechargeable batteries into the battery
compartment on the parent unit and replace the battery compartment cover as shown.
You should always ensure you have inserted batteries in the parent unit (pictureS 16a-16b-16c)
WARNING: Never use non-rechargeable batteries in your parent unit.
Use only the recommended type 2 x AAA rechargeable batteries – using other types
could permanently damage your unit (pictures 7a-7b).
b) Plug the charger for the parent unit into the main power socket (pictures 11a-11b)
WARNING: Use only the main power adapter supplied. Using an incorrect adapter may
permanently damage the charger.
c) Slot the parent unit into the charger (picture 11c); the charger light will stay red, even when batteries
are fully charged (picture 11d)
d) Push the button “ON-OFF” (picture 11e); the “Power” led and “Link” led will turn on. 11f)
NOTE 1: charge the parent unit for at least 8 hours before using the baby monitor for the first time
2: battery insertion or replacement is necessary if an unlit charger light
3: charging or battery replacement is necessary if the following occurs:
• The power indicator LED does not light.
• Battery low: The power indicator LED blinks (picture 11h)
4: the Parent Unit can still be used when it is in the charger.
5: Please power off the Parent Unit before removing the batteries.
2.2 Belt clip
For added convenience, use the belt clip (picture 12)
3. CHECK THE CONNECTION
When both units are switched on, the link lights on both units will turn green (picture 13a).
If the link between the units is broken at any time, the link lights on both units will turn red.
At the parent unit, you will also hear an alert signal to warn you that there is no communication
between the units. If this happens, check that the mains power is plugged in and switched on at the
baby unit (picture 13b).
Also check that the Units are within range of one another.
NOTE In the event of power failure, when the power is restored all your settings will remain unchanged.
USING THE BABY MONITOR
Position both units in the same room to test the connection. Make sure the baby unit is at least 1 meter /3
feet away from the parent unit (picture 13a).
NOTE If you place the parent and baby units too close together you will hear a high pitched noise, this
is normal. The units are designed to be located at a distance from one an other, e.g. in different
rooms (picture 13b).
4. USING THE BABY MONITOR
4.1 Adjust volume
At the parent or baby unit:
• There are 6 volume levels on each unit.
• Press +to increase or –to decrease the volume. Changing the volume setting on the baby unit
affects the volume when you use the talk back feature (picture 14a -14b).
4.2 Mute (voice operated switch) function
Pressing “Mute“ button you activate mute function that allows you to switch the volume off on the
parent unit (picture 15a).
However, you can still monitor your baby using the sound level lights. When sounds picked up at the
baby unit site reaches the pre-set value (sensitivity), the Mute function will be automatically switched off.
4.3 Microphone sensitivity level setting
To set the sensitivity level, follow these steps:
• Press “Mute“ on the parent unit (picture 15a).
• Set the sensitivity by pressing +or –within 3 seconds to select the sensitivity level required – level
1 for Low sensitivity, or level 5 for High sensitivity (standard setting is level 3) (picture 15b).
GB
WARNING! Batteries should not be recharged. Batteries or rechargeable batteries must be set up by
respecting the polarity. Do not mix new and used batteries or rechargeable batteries. Do not mix
battery types. Use only batteries or rechargeable batteries of the recommended type or similar type.
Remove used batteries or rechargeable batteries from the product. Do not short-circuit battery ter-
minals. Rechargeable batteries must be removed from the product before charging wherever pos-
sible. Rechargeable batteries should only be changed under adult supervision.
WARNING! Do not use common batteries, but use rechargeable batteries only.
Rechargeable batteries must be set up by respecting the polarity. Do not mix new and used rechargeable
batteries. Do not mix rechargeable batteries types. Use only rechargeable batteries of the
recommended type or similar type. Do not short-circuit battery terminals. Rechargeable batteries
should only be changed under adult supervision.
ISTRUZIONI DIGITAL BABY MONITOR 381:ISTRUZIONI DIGITAL BABY MONITOR 381 19-06-2008 10:19 Pagina 27

4.4 Talk Back
You can use the talk back feature to comfort and reassure your baby.
Press and hold “Talk” on the parent unit to speak to the baby (picture 16a).
Release “Talk” to hear your baby again (picture 16b).
4.5 Night light
The night light provides a soft and comforting glow for your baby and allows you to check on baby
without having to turn on the main room light (picture 17b).
• Press the “Light” button on the baby unit. Press again to switch off (picture 17a).
4.6 Sound level lights
The sound level lights are the green and red lights locate at the top of the parent unit which illuminate
according to the level of sound in the baby’s room.
There are 8 sound levels: (picture 18)
• Level 0: 0 lights
• Level 1: 1 green light
• Level 2: 2 green lights
• Level 3: 3 green lights
• Level 4: 4 green lights
• Level 5: 5 green lights
• Level 6: 5 green lights and 1 red
• Level 7: 5 green lights e 2 red
GB
TROUBLE SOLVING QUICKIES
Power lights do not come on:
• If using the mains power adapters make sure they are plugged in and switched on.
• If using batteries, check they are correctly installed and not discharged.
Link light does not come on:
• Check that both the baby unit and parent units are switched on.
• If using batteries, check they are correctly installed and not discharged.
Link light is red:
• The link between your units is broken. You will also hear an alert to let you know there is no
communication between the units, If this happens, check that the main power (or batteries) is
correctly connected and that the units are within range of one another.
Parent unit remains silent or very quiet:
• The volume setting may be too low.
• You may have pressed the Mute button.
You can hear a high pitched noise:
• The units are too close to each other, or the volume setting is too high.
• Move the parent unit away from baby unit (at least 1 meter / 3 feet).
• Decrease volume on the parent unit.
Brevi can make any change whatsoever to this instructions leaflet without any prior notice.
GB
28 29
IN COMPLIANCE WITH THE ESSENTIAL REQUIREMENTS AND OTHER RELEVANT PROVI-
SIONS OF DIRECTIVE R&TTE 1999/5/EC.
IMPORTANT: during the replacement of your used batteries, we request that you follow the current
regulations as to their elimination. We thank you for depositing them in a location foreseen for that
purpose to ensure their elimination in a sure manner and with respect for the environment.
WARNING REGARDING DISPOSAL OF THIS APPLIANCE IN COMPLIANCE WITH THE PROVI-
SIONS OF 2002/95CE – 2002/96CE – 2003/108CE EUROPEAN DIRECTIVES
The crossed-out wheeled bin symbol on this equipment means that this product must be
collected separately from normal wastes at the end of its useful lifespan.
At the end of the appliance useful lifespan, users must therefore take it to an authorised
disposal centre for the recycling of electronic and electro-technical waste or they should
take it back to the retailer upon purchase of a new, similar appliance, on a one-to-one basis.
An adequate separate waste collection system for later recycling, treatment and environ-
mentally-friendly disposal of the appliance avoids a negative impact on the environment
and health, as well as it facilitates the recycling of the product’s different components.
Users who dispose of products in an unauthorised manner shall be liable for administrative
penalties in compliance with Article 50 of the Legislative Decree No. 22/1997 and the follo-
wing articles.
ISTRUZIONI DIGITAL BABY MONITOR 381:ISTRUZIONI DIGITAL BABY MONITOR 381 19-06-2008 10:19 Pagina 29

30 31
WICHTIGE HINWEISE
Lesen Sie diese Benutzeranleitung vor Gebrauch des Baby-Geräts aufmerksam durch und bewa-
hren Sie diese Anleitung fu¨r eine zuku¨nftige Verwendung gut auf. Dieser Baby-Monitor dient
lediglich als eine Hilfe und kann nicht als Ersatz fu¨r eine verantwortungsbewusste und richtige
elterliche Aufsicht angesehen werden.
Stellen Sie sicher, dass das Baby-Gerät und das Adapterkabel immer außer Reichweite des Babys sind
(mindestens 1 Meter (3 Fuß) (Abb. 1)
Legen Sie das Baby-Gerät niemals in das Babybett, Kinderbett oder in das Laufgitter (Abb. 2)
Decken Sie das Baby-Gerät niemals ab (z. B. mit Kleidern, Decken oder Tu¨chern) (Abb. 3)
Stellen oder benutzen Sie das Baby-Gerät nicht an feuchten Orten oder in der Nähe von Wasser (Abb. 4)
Falls Sie die Geräte auf einer Auslandsreise mitnehmen stellen Sie auf dem Etikett mit der Angabe der
Stromversorgungsspannung sicher, dass diese mit der Stromspannung Ihres Ziellandes u¨bereinstimmt,
bevor Sie das Gerät an das dortige Stromnetz anschließen (Abb. 5)
Zur Vermeidung eines elektrischen Schlages, öffnen Sie nicht das Eltern- und Baby-Gerät (mit
Ausnahme des Deckels auf dem Batteriefach) (Abb. 6)
Bei der Verwendung eines ungeeigneten Batterietyps besteht Explosionsgefahr. Fu¨r das Eltern-Gerät
du¨rfen nur wiederaufladbare Batterien verwendet werden (Abb. 7a - 7b)
EINSTELLEN
1. DAS BABY-GERÄT EINRICHTEN
1.1 Stromversorgung
Das Baby-Gerät kann entweder an das AC-Stromnetz (Wechselstrom) angeschlossen werden, oder mit
vier AA-Alkali-Batterien betrieben (Abb. 8-9)
Betrieb mit dem Stromnetz
a) Schließen Sie das Stromkabel an die Anschlussbuchse des Baby-Geräts an (Abb. 8a)
b) Schließen Sie danach das andere Ende an das Stromnetz an (Abb. 8b)
c) Nach dem Herstellen der Verbindung mit dem Stromnetz, wird das zentrale Nachtlicht sich eine
Sekunde lang aufleuchten (Abb. 8c)
d) Die Taste “ON-OFF”(Abb. 8d) drücken; die Leds „Power“ und „Link“ werden sich aufleuchten
(Abb. 8e)
WARNUNG: Verwenden Sie nur den mitgelieferten Netzadapter.
Das Verwenden eines anderen Adapters kann das Aufladegerät dauerhaft beschädigen
Batteriebetrieb
Das Baby-Gerät kann ebenfalls mit Batterien betrieben so dass es auch dann benutzt werden kann,
wenn in der Nähe keine Netzsteckdose verfu¨gbar ist oder während eines Stromausfalls (Abb. 9)
a) Nehmen Sie den Deckel des Batteriefaches ab, setzen 4 AA-Alkali-Batterien in das Batteriefach
des Baby-Geräts ein und bringen danach den Deckel wieder auf das Batteriefach an (Abb. 9a -9b)
b) Das zentrale Nachtlicht wird sich eine Sekunde lang aufleuchten (Abb. 9c)
c) Die Taste “ON-OFF” (Abb. 9d) drücken; die Leds „Power“ und „Link“ werden sich aufleuchten
(Abb. 9e)
HINWEIS 1: Die empfohlenen Batterien sind 4 Alkali-Batterien (AA)
2: Das Baby-Gerät wird nur dann mit den Batterien betrieben, wenn es vom Stromnetz
abgetrennt ist
3: Niedrige Batterieladung: die Betriebsanzeige (LED Power) - am Baby-Gerät blinkt und die
Verbindungsanzeige (LED Link) blinkt rot (Abb. 9f)
4: Bitte schalten Sie das Baby-Gerät aus, bevor Sie es vom Stromnetz trennen oder die
Batterien entfernen
2. DAS ELTERN-GERÄT EINSTELLEN
2.1 Stromversorgung
Das Eltern-Gerät wird mit zwei wiederaufladbaren Batterien (AAA) betrieben (Abb. 10)
Batteriebetrieb
a) Nehmen Sie den Deckel des Batteriefaches ab, setzen die beiden wiederaufladbaren Batterien
(AAA) in das Batteriefach des Eltern-Geräts ein und bringen danach den Deckel wieder auf das
Batteriefach an; siehe Abbildung. Stellen Sie immer sicher, dass die Batterien im Eltern-Gerät
eingesetzt sind (Abb. 10a-10b-10c-10d-10e)
WARNUNG: Setzen Sie niemals nicht wiederaufladbare Batterien in das Eltern-Gerät ein.
Setzen Sie nur die empfohlenen 2 wiederaufladbaren Batterien (AAA)
ein – andere Batterietypen können das Gerät dauerhaft beschädigen (Abb. 7a-7b).
b) Schließen Sie das Aufladegerät fu¨r das Eltern-Gerät an die Netzsteck dose des Stromnetzes an.
(Abb. 11a-11b)
WARNUNG: Verwenden Sie nur den mitgelieferten Netzadapter. Das Verwenden eines
anderen Adapters kann das Aufladegerät dauerhaft beschädigen.
c) Schließen Sie das Eltern-Gerät an das Aufladegerät an (Abb. 11c). Die Aufladeanzeige leuchtet rot,
selbst wenn die Batterien vollständig aufgeladen sind (Abb. 11d)
d) Die Taste “ON-OFF” (Abb. 11e) drücken; die Leds „Power“ und „Link“ werden sich aufleuchten
(Abb. 11f)
HINWEIS 1: Laden Sie vor dem Erstbetrieb des Baby-Geräts das Eltern-Gerät mindestens 8 Stunden
lang auf (Abb. 11g)
2: Beim Aufleuchten einer sonst nicht leuchtenden Aufladeanzeige LED muss die Batterie
eingesetzt oder ausgewechselt werden
3: Unter den folgenden Umständen muss die Batterie wieder aufgeladen oder aus
gewechselt werden:
• Die Betriebsanzeige LED leuchtet nicht
• Niedrige Batterieladung: Die Betriebsanzeige LED POWER blinkt (Abb. 11h)
4: Selbst nach dem Anschließen an das Aufladegerät kann das Eltern-Gerät benutzt werden
5: Bitte schalten Sie das Eltern-Gerät aus, bevor Sie die Batterien entfernen
DEUTSCH
DD
ACHTUNG! Nur aufladbare Akkus verwenden, niemals normale, nichtaufladbare Alkalibatterien
verwenden. Beim Einsetzen der Akkus die richtige Polarität beachten. Nicht gleichzeitig neue und
entladene Akkus benutzen. Nicht gleichzeitig verschiedene Arten von Akkus benutzen.
Nur die empfohlenen Typen von Akkus benutzen. Nicht die Klemmen der Akkus kurzschließen.
Die Akkus müssen unter Aufsicht eines Erwachsenen aufgeladen werden.
ISTRUZIONI DIGITAL BABY MONITOR 381:ISTRUZIONI DIGITAL BABY MONITOR 381 19-06-2008 10:19 Pagina 31

32 33
• Stufe 0: 0 Leuchten
• Stufe 1: 1 gru¨ne Leuchte
• Stufe 2: 2 gru¨nes Leuchten
• Stufe 3: 3 gru¨nes Leuchten
• Stufe 4: 4 gru¨nes Leuchten
• Stufe 5: 5 gru¨nes Leuchten
• Stufe 6: 5 gru¨nes Leuchten und 1 rot Leuchten
• Stufe7:5 gru¨nes Leuchten und 2 rots Leuchten
ACHTUNG! Die Batterien nicht aufladen. Beim Einsetzen der Batterien oder Akkus die Polarität
beachten. Nicht gleichzeitig neue und entladene Batterien oder Akkus benutzen. Nicht gleichzeitig
verschiedene Arten Batterien oder Akkus benutzen. Die empfohlenen Typen von Batterien oder
Akkus benutzen. Die entladenen Batterien oder Akkus entnehmen. Nicht die Klemmen der Batterien
oder Akkus kurzschließen. Die Akkus, wo möglich, vor dem Aufladen aus dem Produkt entfernen.
Die Akkus müssen unter Aufsicht eines Erwachsenen aufgeladen werden.
2.2 Gu¨rtelklemme
Fu¨r eine praktischere Anwendung befestigen Sie die Gu¨rtelklemme (Abb. 12)
3. DIE VERBINDUNG U¨BERPRU¨FEN
Wenn beide Geräte eingeschaltet sind, leucht die Verbindungsanzeige (Link) sich mit einem grünen
Licht auf beiden Geräten auf (Abb. 13a). Wird die Verbindung zwischen den beiden Geräten unter-
brochen oder abgebrochen leuchten diese Dioden an beiden Geräten rot auf. Zudem gibt das
Eltern-Gerät ein Alarmsignal ab, um Sie darauf hinzuweisen, dass die Verbindung zwischen den bei-
den Geräten unterbrochen worden ist. In einem solchen Fall pru¨fen Sie nach, ob der Netzstecker am
Stromnetz angeschlossen und das Baby-Gerät eingeschaltet ist. Prufen Sie ebenfalls nach, ob sich
die beiden Geräte innerhalb der Betriebsreichweite zueinander befinden (Abb. 13b).
HINWEIS: Alle Einstellungen bleiben unverändert, auch wenn nach einem Stromausfall die Stromzufuhr
wieder hergestellt wird.
DAS BABY-GERÄT BENUTZEN
Zum Überpru¨fen der Verbindung stellen Sie beide Geräte im selben Zimmer auf. Stellen Sie dabei
sicher, dass sich das Baby-Gerät mindestens 1 Meter (3 Fuß) vom Eltern-Gerät entfernt befindet.
(Abb. 13a).
HINWEIS: Falls das Eltern-Gerät und das Baby-Gerät zu nahe zueinander aufgestellt werden ertönt ein
sehr hoher Klang, was normal ist. Die beiden Geräte sind so ausgefu¨hrt, dass sie in einem
bestimmten Abstand zueinander aufgestellt werden mu¨ssen, z. B. jeweils einem anderen
Zimmer. (Abb. 13b).
4. DIE LAUTSTÄRKE EINSTELLEN
4.1 Die Lautstärke einstellen
Am Eltern- oder Baby-Gerät:
• Jedes Gerät verfu¨gt u¨ber sechs Lautstärkepegel
•Dru¨cken Sie zum Erhöhen oder Reduzieren der Lautstärke auf +bzw –.
Das Abändern der Lautstärke des Baby-Gerätes beeinträchtigt die Lautstärke bei der Anwendung
der Ru¨cksprachefunktion (Abb. 14a -14b).
DD
4.2 Stumm-Funktion (sprachgesteuerter Schalter “Mute”)
Mit der Mute-Funktion (Stumm-Funktion) kann die Lautstärke des Eltern-Geräts ausgeschaltet werden,
siehe “Mute” taste (Abb. 15a). Sie Könner Ihr Baby jedoch mit den Klanganzeige LED noch immer über-
wachen. Wenn die vom Baby abgegebenen Geräusche einen vorbestimmten Wert (Empfindlichkeit)
erreichen, dann wird die Mute-Funktion (Stumm-Funktion) automatisch deaktiviert.
4.3 Anlage der Lautstärke des Mikrophons
Um das Niveau der Lautstärke anzulegen, diesen Anleitungen bitte folgen:
• Den “Mute” auf des Eltern-Geräts drücken (Abb. 15a).
•+oder –innerhalb 3 Sekunden drücken, um das gewünschte Niveau zu wählen – Niveau 1 für eine
niedrige Empfindlichkeit, oder Niveau 5 für eine hohe Empfindlichkeit (Abb. 15b).
4.4 Ru¨cksprache
Zum Beruhigen und Trösten des Babys benutzen Sie die Ru¨cksprachefunktion.
Zum Sprechen mit dem Baby dru¨cken Sie auf die Talk-Taste (Sprechtaste) auf dem Eltern-Gerät und
halten diese Taste gedru¨ckt (Abb. 16a).
Damit Sie Ihr Baby wieder hören können lassen Sie die Talk-Taste (Sprech taste) los (Abb. 16b).
4.5 Nachtlicht
Das Nachtlicht verbreitet ein sanftes und beruhigendes Licht fu¨r Ihr Baby, damit Sie kein Zimmerlicht
einschalten müssen, um Ihr Baby anzuschawen (Abb. 17b).
•Dru¨cken Sie auf dem Baby-Gerät die Light-Taste (Licht). Zum Ausschalten erneut dru¨cken. (Abb. 17a).
4.6 Geräuschpegel-Anzeigeleuchten
Die Leuchten fu¨r die Geräuschpegel-Anzeige sind gru¨n und rot und befinden sich oben auf dem
Eltern-Gerät, wobei diese je nach den Geräuschen im Baby-Zimmer aufleuchten.
8 Tonpegel stehen zur Verfu¨gung: (Abb. 18)
ISTRUZIONI DIGITAL BABY MONITOR 381:ISTRUZIONI DIGITAL BABY MONITOR 381 19-06-2008 10:19 Pagina 33

34 35
Brevi can make any change whatsoever to this instructions leaflet without any prior notice.
DAS GERÄT ENTSPRICHT DEN NOTWENDIGEN ANFORDERUNG UND DEN GEHÖRIGEN
BESTIMMUNGEN DER RECHTLINIE R&TTE 1999/05/EC
WICHTIG: Für den Austausch von entladenen Batterien muss die gültige Richtlinie für die Entsorgung
derselben befolgt werden. Um sicher zu sein, dass die verbrauchten Batterien ordnungsgemäß und
umweltfreundlich entsorgt werden, sollten sie in die eigens dafür vorgesehenen Behälter geworfen
werden.
HIINWEIS FÜR DIE ENTSORGUNG DES PRODUKTES GEMÄSS DER EUROPÄISCHEN
RICHTLINIEN 2002/95 EG – 2002/96 EG – 2003/108 EG
Das auf der Anlage angebrachte durchgestrichene Containersymbol weist darauf hin, dass
das Produkt am Ende seiner Lebensdauer gesondert entsorgt werden muss. Das heißt, der
Benutzer muss die Anlage am Ende ihrer Nutzungsdauer an einen für elektrische und
elektrotechnische Abfälle befugten Entsorger übergeben, oder sie bei der Anschaffung
einer neuen bzw. ähnlichen Anlage bei dem Händler abgeben. Die für das spätere
Recycling, Behandlung und umweltfreund-liche Entsorgung angemessene selektive
Abfallsammlung der Anlage trägt dazu bei, mögliche negative Auswirkungen auf die
Umwelt und für die Gesundheit zu vermeiden und das Recycling der Materialien der Anlage
zu fördern. Die unbefugte Produktentsorgung seitens des Benutzers führt zur Verhängung
der in der Gesetzverordnung N. 22/1997 (Paragraph 50ff der Gesetzverordnung N. 22/1997)
aufgeführten Verwaltungsstrafen.
STÖRUNGSSUCHE
Die Betriebsanzeige LED leuchtet nicht auf:
• Falls Sie Stromadapter betreiben stellen Sie sicher, dass diese Adapter am Stromnetz angeschlossen
und eingeschaltet sind.
• Falls Sie das Gerät mit den Batterien betreiben, stellen Sie sicher, dass diese richtig eingesetzt und
nicht entladen sind.
Die Verbindungsanzeige LED leuchtet nicht auf:
• Stellen Sie sicher, dass sowohl das Baby-Gerät als auch das Eltern-Gerät eingeschaltet ist.
• Falls Sie das Gerät mit den Batterien betreiben, stellen Sie sicher, dass diese richtig eingesetzt und
nicht entladen sind.
Die Verbindungsanzeige LED leuchtet rot:
• Die Verbindung zwischen Ihren Geräten ist unterbrochen. Es ertönt ebenfalls ein Alarmton, um
Sie daran zu erinnern, dass die Verbindung zwischen den beiden Geräten nicht mehr besteht.
In diesem Fall u¨berpru¨fen Sie, ob das Gerät richtig an die Stromquelle angeschlossen ist (oder
die Batterien richtig eingesetzt wurden) und ob sich die beiden Geräte innerhalb der angege
benen Betriebsreichweite befinden.
Das Eltern-Gerät bleibt still oder die Lautstärke ist sehr schwach:
• Die Lautstärke wurde eventuell zu niedrig eingestellt.
• Sie haben möglicherweise die Mute-Taste (Stumm) gedru¨ckt
Sie höen einen schriller ton:
• Die zwei Geräte liegen zu nahe beieinander oder Lautstärke ist zu hoch
• Eltern-Gerät aus dem Baby-Gerät entfernen (mindestens 1 Meter - 3 Fuß)
• Lautstärke des Eltern-Geräts senken
F
INFORMATIONS IMPORTANTES
Veuillez lire attentivement le manuel d’utilisation avant d’utiliser le moniteur enfant et veuillez le
conserver pour le fututre. Ce moniteur enfant a été conçu comme une aide et ne doit pas être
utilisé en remplacement d’une surveillance responsable et correcte d’un adulte.
Assurez-vous que l’unité unfant et le câble de l’adaptateur sont toujours hors de portée de l’enfant. (au
moins à 1 mètre/3 pieds) (fig. 1)
Ne placez jamais l’unité enfant dans le lit, la chaumine, ou le parc de l’enfant (fig. 2)
Ne couvrez jamais le moniteur enfant (avec des vêtements, des serviettes ou des couvertures par
exemple) (fig. 3)
Ne placez jamais et n’utilisez jamais le moniteur enfant dans des endroits humides ou proche de l’eau
(fig. 4)
Si vous voyagez, assurez-vous que la tension affichée sur l’adaptateur d’alimentation secteur corre-
spond à l’alimentation locale avant de connecter l’alimentation (fig. 5)
Afin d’éviter tout choc électrique, n’ouvrez pas le boîtier de l’unité enfant ou de l’unité parent (mise à
part les couvercles des emplacements des piles) (fig. 6)
Il y a un risque d’explosion si les piles sont remplacées par des piles d’un type incorrect.
Pour l’unité parent, n’utilisez que des piles rechargeables (fig. 7a - 7b)
INSTALLATION
1. INSTALLATION DE L’UNITÉ ENFANT
1.1 Alimentation
L’unité Enfant utilise le courant AC d’une habitation ou quatre piles Alcalines AA (fig. 8-9)
Utilisation principale
a) Branchez le câble d’alimentation secteur dans le connecteur latéral de l’unité enfant (fig. 8a)
b) Connectez l’autre extrémité à l’alimentation secteur (fig. 8b)
c) Une fois la connexion secteur terminée, La lumière nocturne centrale s'allumera pour 1 second (fig. 8c)
d) Appuyer sur ON-OFF (fig. 8d): les leds "Power" et "Link" s'allumeront (fig. 8e)
AVERTISSEMENT: N’utilisez que l’adaptateur d’alimentation secteur inclus. En utilisant un adaptateur
incorrect vous risqueriez d’endommager de manière permanente l’unité enfant.
Utilisation des piles
L’unité enfant peut aussi fonctionner sur piles, de manière à ce que vous puissiez l’utiliser même
lorsque vous n’êtes pas près d’une prise électrique ou lors d’une coupure d’électricité (fig. 9)
a) Retirez le couvercle de l’emplacement des piles et insérez 4 x piles Alcalines AA dans
l’emplacement des piles de l’unité enfant puis replacez le couvercle de l’emplacement des
piles (fig. 9a -9b)
b) Une fois la connexion secteur terminée, La lumière nocturne centrale s'allumera pour 1 second (fig. 9c)
d) Appuyer sur ON-OFF (fig. 9d): les leds "power" et "link" s'allumeront (fig. 9e)
REMARQUE 1: les piles recommandées sont 4 x Alcalines AA
2: L’unité enfant ne fonctionnera que sur piles si l’alimentation secteur est déconnectée
3: Batterie faible: l’indicateur de puissance LED sur l’unité bébé clignote et l’indicateur de
liaison LED sur l’unité parent clignote rouge (fig. 9f)
4: Veuillez éteindre l’unité bébé avant de débrancher la puissance principale ou les batteries.
FRANÇAIS
FD
ISTRUZIONI DIGITAL BABY MONITOR 381:ISTRUZIONI DIGITAL BABY MONITOR 381 19-06-2008 10:19 Pagina 35

36 37
2. INSTALLATION DE L’UNITÉ PARENT
2.1 Alimentation
L’unité parent utilise des piles rechargeables AAA (fig. 10)
Utilisation des piles
a) Retirez le couvercle de l’emplacement des piles et insérez 2 x piles rechargeables AAA dans le com-
partiment des piles de l’unité parent et replacez le couvercle de l’emplacement des piles comme il est
indiqué. Vous devez toujours vous assurer d’avoir inséré des piles dans l’unité parent (fig. 16a-16b-16c)
AVERTISSEMENT: N’utilisez jamais de piles rechargeables dans l’unité parent. N’utilisez
que 2 x piles rechargeables de type AAA – en utilisant d’autres types de piles, vous
risqueriez d’endommager votre unité de manière permanente (fig 7a-7b).
b) Branchez le chargeur de l’unité parent dans une prise électrique (fig. 11a-11b)
AVERTISSEMENT: n’utilisez que l’adaptateur d’alimentation secteur inclus. En utilisant
un adaptateur d’un type incorrect, vous pourriez endommager le chargeur de manière
permanente
c) Placez l’unité parent dans le chargeur (fig. 11c), et la lumière du chargeur s’allume en continu en
rouge, même lorsque les piles sont complètement rechargées (fig. 11d)
d) Appuyer sur ON-OFF (fig. 11e): les leds "power" et "link" s'allumeront (fig. 11f)
REMARQUE 1: chargez l’unité parent pendant au moins 8 heures avant d’utiliser le moniteur enfant
pour la première fois
2: l’insertion ou le remplacement des piles est nécessaire lorsque la lumière du chargeur
s’éteint
3: la recharge ou le remplacement des piles est nécessaire si l’une des situations suivantes
apparaît:
• Le témoin LED d’alimentation est éteint
• Batterie basse: le témoin LED d’alimentation clignote (fig. 11h)
4: L’unité parent peut être utilisée lorsqu’elle est dans le chargeur
5: Veuillez éteindre l’unité parent avant d’enlever les batteries
1.2 Attache de ceinture
Vous pouvez vous servir de l’attache ceinture pour plus de confort (fig. 12)
3. VÉRIFICATION DE LA CONNEXION
Lorsque les deux unités sont allumées, la lumière verte de lien des deux unités s’allume. (fig. 13a).
Si le lien entre les unités est coupé, à tout moment, la lumière de lien des deux unités deviendra rouge.
Sur l’unité parent, vous entendrez aussi un signal d’alerte pour vous indiquer de l’absence de commu-
nication entre les deux unités. Si cela arrive, vérifiez que l’alimentation secteur de l’unité enfant est
branchée et que l’unité est allumée (fig. 13b).
Vérifiez aussi que les unités sont à portée l’une de l’autre.
REMARQUE: En cas de coupure de courant, lorsque l’alimentation est restaurée, votre configuration
ne sera pas modifiée.
UTILISATION DU MONITEUR ENFANT
Positionnez les deux unités dans la même pièce pour tester la connexion. Assurez-vous que l’unité enfant est
à au moins 1 mètre/ 3 pieds de l’unité parent (fig. 13a).
REMARQUE: Si vous placez les unités parent et enfant trop proches l’une de l’autre, vous entendrez un
son très aigu, et c’est normal. Les unités ont été conçues pour être à distance l’une de
l’autre, comme par exemple dans des pièces différentes (fig. 13b).
4. UTILISATION DU MONITEUR ENFANT
4.1 Ajuster le volume
Sur l’unité parent ou enfant:
• Il y a 6 niveaux de volume sur chaque unité.
• Appuyez sur + pour augmenter ou –pour diminuer le volume.
En modifiant le paramètre du volume sur l’unité enfant, vous affectez le volume de la fonction
Réponse. (fig. 14a -14b).
4.2 Fonction silence (Opération vocale “Mute”)
La fonction silence vous permet déteindre le volume de l’unité parent “Mute” (fig. 15a).
Cependant, vous pouvez toujours surveiller votre enfant en utilisant les lumières de niveau sonore.
Lorsque l’acquisition du son de l’unité enfant atteint la valeur prédéfinie (sensibilité), la fonction
Silence sera automatiquement éteinte.
4.3 Réglage niveau sensitivité microphone
Pour régler le niveau de sensitivité, suivez ces étapes:
• Pressez “Mute“ sur l’unité parents (fig. 15a).
• Réglez la sensibilité en pressant + o– dans les 3 secondes pour sélectionner le niveau de
sensibilité recherché - niveau 1 pour sensibilité basse, ou niveau 5 pour sensibilité élevée.
(le réglage par défaut est le niveau 3) (fig. 15b).
AVERTISSEMENT! Ne pas recharger les piles. Les piles ou accumulateurs doivent être mis en place
en respectant la polarité. Ne pas mélanger des piles ou accumulateurs neufs et usagés.
Différents types de piles ou accumulateurs ne doivent pas être mélangés. Utiliser le type de piles ou
accumulateurs recommandé. Les piles ou accumulateurs usagés doivent être enlevés du produit.
Les bornes d'une pile ou d'un accumulateur ne doivent pas être mises en court-circuit.
Les accumulateurs doivent être enlevés du produit avant d'être chargés lorsque cela est possible.
La recharge des accumulateurs doit se faire sous la surveillance d'un adulte.
AVERTISSEMENT! Utiliser seulement des accumulateurs, pas des piles qui ne sont pas rechargeables.
Les accumulateurs doivent être mis en place en respectant la polarité. Ne pas mélanger des piles
ou accumulateurs neufs et usagés. Différents types d’accumulateurs ne doivent pas être mélangés.
Utiliser le type d’accumulateurs recommandé. Les bornes d'un accumulateur ne doivent pas être
mises en court-circuit. La recharge des accumulateurs doit se faire sous la surveillance d'un adulte.
FF
ISTRUZIONI DIGITAL BABY MONITOR 381:ISTRUZIONI DIGITAL BABY MONITOR 381 19-06-2008 10:19 Pagina 37

4.4 Réponse
Vous pouvez utiliser la fonction Réponse pour réconforter et rassurer votre enfant.
Appuyez et maintenez “Talk” sur l’unité parent pour parler à votre enfant (fig. 16a).
Relâchez “Talk” pour entendre de nouveau votre enfant (fig. 16b).
4.5 Lumière de nuit
La lumière de nuit offre une lueur douce et réconfortante pour votre enfant et vous permet de sur-
veiller votre enfant sans avoir à allumer la lumière principale de la pièce (fig. 17b).
• Appuyez sur le bouton “Light” de l’unité enfant. Appuyez de nouveau pour éteindre (fig. 17a).
4.6 Lumières de niveau sonore
Les lumières de niveau sonore sont les lumières rouges et vertes situées sur le dessus de l’unité parent
qui s’allument selon le niveau sonore de la pièce de l’enfant.
Il y a 8 niveaux sonores: (fig. 18)
38 39
• Niveau 0: 0 lumières
• Niveau 1: 1 lumière verte
• Niveau 2: 2 lumières verte
• Niveau 3: 3 lumières verte
• Niveau 4: 4 lumières verte
• Niveau 5: 5 lumières verte
• Niveau 6: 5 lumières verte et 1 lumière rouge
• Niveau 7: 5 lumières verte et 2 lumières rouge
Brevi se réserve le droit de modifier, sans préavis, les modèles décrits dans cette notice d’emploi.
CONFORME AUX EXIGENCES ESSENTIELLES ET AUX AUTRES SPÉCIFICATIONS ÉTABLIES
PAR LA DIRECTIVE R&TTE 1999/5/EC
IMPORTANT: Lors du remplacement de vos piles usagées, nous vous demandons de suivre la
réglementation en vigueur quant à leur élimination. Nous vous remercions de les déposer à un
endroit prévu à cet effet afin d'en assurer leur élimination de façon sûre et dans le respect de
l'environnement.
AVERTISSEMENT CONCERNANT L’ÉLIMINATION CORRECTE DU PRODUIT AUX TERMES DE
LA DIRECTIVE EUROPÉENNE 2002/95CE - 2002/96CE - 2003/108CE
Le symbole d'une poubelle barrée présent sur l’appareil indique que, à la fin de sa vie utile,
il doit être traité séparément des autres déchets. L’utilisateur devra donc remettre l’appareil
usé aux centres de collecte et tri des déchets électroniques et électrotechniques correspon-
dants, ou le rendre au revendeur au moment d’acquérir un nouvel appareil du même type,
à raison d’un par un. La collecte et le tri appropriés de l’appareil rejeté - destiné par la suite
au recyclage, au traitement et à l’élimination compatibles du point de vue écologique -
contribue à éviter de possibles effets négatifs sur l'environnement et sur la santé, et favori-
se le recyclage des matériaux composant l’appareil. L’élimination abusive du produit de la
part de l’utilisateur entraîne l’application des sanctions administratives conformément au
décret législatif nº 22/1997 (art. 50 et successifs)
DÉPANNAGE
Les lumières d’alimentation ne s’allument pas:
• Si vous utilisez les adaptateurs d’alimentation secteur, assurez-vous qu’ils sont branchés et allumés.
• Si vous utilisez les piles, vérifiez qu’elles sont correctement installées et qu’elles ne sont pas déchargées.
La lumière de lien ne s’allume pas:
• Vérifiez que les unités enfant et parent sont allumées.
• Si vous utilisez les piles, vérifiez qu’elles sont correctement installées et qu’elles ne sont pas déchargées.
La lumière de lien est rouge:
• Le lien entre les unités est coupé. Vous entendrez aussi une alerte pour vous avertir de
l’absence de communication entre les unités. Si cela arrivait, vérifiez que l’alimentation secteur (ou
les piles) sont correctement connectées et que les unités sont à portée l’une de l’autre.
L’unité parent reste silencieuse ou avec un son très bas:
• Le paramètre du volume est trop bas
• Vous avez peut-être appuyé sur le bouton “Mute”
Vous entendez un bruit très aigu:
• Les unités sont trop proches l’une de l’autre, ou le paramètre du volume est trop haut.
• Déplacez l’unité parent à distance de l’unité enfant (au moins 1 mètre/ 3 pieds)
• Diminuez le volume sur l’unité parent.
FF
ISTRUZIONI DIGITAL BABY MONITOR 381:ISTRUZIONI DIGITAL BABY MONITOR 381 19-06-2008 10:19 Pagina 39
Table of contents
Languages:
Other Brevi Baby Monitor manuals