Breville the Smart Scoop BCI600 User manual
Instruction Book – BCI

BREVILLE®
RECOMMENDS
SAFETY FIRST
At Breville®we are very
safety conscious. We design
and manufacture consumer
products with the safety of you,
our valued customer, foremost
in mind. In addition we ask
that you exercise a degree of
care when using any electrical
appliance and adhere to the
following precautions.
IMPORTANT
SAFEGUARDS
READ ALL
INSTRUCTIONS BEFORE
USE AND SAVE FOR
FUTURE REFERENCE
• Carefully read all
instructions before
operation and save for
future reference.
• Remove and safely
discard any packaging
material and promotional
labels before using the
Breville®Smart Scoop™
forthe first time.
• To eliminate a choking
hazard for young children,
remove and safely discard
the protective cover fitted
to the power plug of
this appliance.
• Do not place the ice cream
machine near the edge of
the counter top or table
during operation. Ensure
the surface is level, clean
and free of liquid or other
substances. Vibration
during the churning
Breville®Recommends
Safety First
The Smart Scoop
Smart™ Features
Components
Functions
Tips
Care & Cleaning
Troubleshooting
Recipes
Warranty
Contents

process may cause the
machine to move slightly.
• Do not place this appliance
on or near a hot gas or
electric burner, or where it
could touch a heated oven.
• Position the appliance at a
minimum distance of 15cm
away from walls. To ensure
proper ventilation.
• Always operate the ice
cream machine on a
stable surface.
• Do not operate the ice
cream machine on a sink
drain board.
• Always ensure the
ice cream machine is
properly assembled before
connecting to a power
outlet and operating.
Follow the instructions
provided in this book.
• The ice cream machine
is not intended to be
operated by means of an
external timer or separate
remote control system.
• Do not cover the air
vents when the ice cream
machine is in use.
• Do not place any
ingredients directly into
the ice cream chamber.
Place ingredients into the
ice cream bowl only.
• Do not store explosive
substances such as
aerosol cans with a
flammable propellant in
this appliance.
• Ensure ice cream chamber
is clean, dry, and free of
debris before each use.
• Do not place fingers or
hands inside the ice cream
machine during operation.
Avoid contact with
moving parts.
• Ensure the ice cream
machine is switched o
and then unplugged from
the power outlet when not
in use and before cleaning.
• Do not leave the lid o
the ice cream machine for
extended periods of time.
• Keep the inside and
outside of the appliance
clean. Follow the cleaning
instructions provided
in this book.

• Do not use any other
accessories other than
those provided with the
Breville®Smart Scoop.
IMPORTANT
SAFEGUARDS FOR
ALL ELECTRICAL
APPLIANCES
• Unwind the power cord
fully before use.
• To protect against
electrical shock, do not
immerse power cord,
power plug or appliance in
water or any other liquid.
• Do not let the power cord
hang over the edge of
the counter top or table,
touch hot surfaces or
become knotted.
• This appliance can be
used by children aged
from 8 years and above
and persons with reduced
physical, sensory or mental
capabilities or lack of
experience and knowledge
if they have been given
supervision or instruction
concerning use of the
appliance in a safe way and
understand the hazards
involved. Children shall
not play with the appliance.
Cleaning and user
maintenance shall not be
made by children without
supervision.
• It is recommended to
regularly inspect the
appliance. Do not use the
appliance if the power cord,
power plug or appliance
becomes damaged in
anyway. Return the entire
appliance to the nearest
authorised Breville®Service
Centre for examination
and/or repair.
• Any maintenance, other
than cleaning, should be
performed at an authorised
Breville®Service Centre.
• This appliance is for
household use only.
Donot use this appliance
for anything other than
its intended use. Do not
use in moving vehicles or
boats. Do not use outdoors.
Misuse may cause injuries.

• The insulation of a residual
current device (safety
switch) is recommended
to provide additional
safety protection when
using electrical appliances.
It is advisable that a
safety switch with a
rated residual operating
current not exceeding
30mA be installed in the
electrical circuit supplying
the appliance. See your
electrician for advice.
FOR HOUSEHOLD USE ONLY
SAVE THESE INSTRUCTIONS

The Smart Scoop™
Features
AUTOMATIC MODE
Automatic mode churns and freezes
the ingredients to the selected/desired
consistency. Select one of the four
preset functions: Sorbet, frozen yogurt,
gelato or ice cream. Smart Scoop will beep
when ready.
MANUAL MODE
The time to make ice cream can be manually
set for pre timed recipes.
PRESET FUNCTIONS
The Breville®Smart Scoop™has four preset
functions to pick from. Select one of the
following settings; sorbet, frozen yogurt,
gelato, or ice cream.
PRE COOL
It’s good practice to pre-cool the machine
when preparing your dessert base. This
optional function will cool the machine to
approximately -10 to - 30°C and usually take
about 5-10 minutes.
KEEP COOL
Once the consistency of the dessert has
been achieved, KEEP COOL will prevent the
mixture from melting. When the machine is
in this mode, note that the compressor will
operate intermittently to ensure consistency
of the dessert.
CHILD LOCK
The Breville®Smart Scoop™features a child
lock. Press and hold HOLD for 2 seconds
to set the child lock mode. To exit this mode
press and hold for 2 seconds again.
ADD MIXINS
Mix-ins such as chocolate chips, fresh fruit
and flavours can all be added easily through
the flip back lid. The ice cream machine will
beep and ADD MIX-INS will flash to let you
know that it is time to add your favourite
condiments!
SOUND
The ice cream machine features an alert
beeper when your ice cream is ready. This
alert can be set between: loud, soft or mute.

A. Anodised ice cream bowl with handle
for easy removal.
Not dishwasher safe and should not be
stored in the freezer.
B. Paddle used to scrape the sides of the
bowl and churn the ice cream.
Note: not to be stored in the freezer.
C. Lid* can be lifted or folded back into 2
parts.
D. Stainless steel housing
E. POWER button will turn the ice cream
machine on or o.
F. START | PAUSE will start and stop the
dessert making process.
G. MANUAL TIMER use to select time,
from 5 minutes to 180 minutes.
H. PRE-COOL function will PRE-COOL the
machine down to -10°C to -30°C.
I. KEEP COOL will keep dessert chilled
and churned for up to 3 hours.
J. Auto timer/Hardness selection dial will
scroll between the following settings:
sorbet, frozen yogurt, gelato, or ice
cream. Rotate the dial left for softer
textured desserts or right for harder
textured desserts.
K. TEMP/UNITS button allows you to
toggle between Celsius and Fahrenheit.
L. Sound select between loud, soft or mute.
M. Handles for easy lifting.
N. Bowl chamber
A B C G H I
EJ
C
F
K
L
D
N
M
* Dishwasher safe parts.
Components

SMART SCOOP DISPLAY
A. LCD Control Display provides
information on function setting and
cooling progress.
B. Hardness selection bar
C. Progress indicator bar
D. KEEP COOL will keep the frozen dessert
chilled and churned for up to 3 hours.
E. ADD MIX-INS will flash to let you know
when it is time to add your favorite
mix-ins.
W
Y
X
Z
F. PRE-COOLING indicates that the
compressor is on and cooling the
machine.
G. PRESS START flashes when in the PRE-
COOL mode to advise that the machine
is chilled and ready to start churning.
H. REMOVE BLADE indicates that the
dessert is finished and the blade can be
removed from the bowl.
ACCESSORIES
I. Anodised ice cream bowl
J. Spatula use to scrape the bowl
K. Paddle
L. Bottle brush for easy cleaning of the
paddle and bowl
TPQ
R
U
V
S O

Functions
WARNING
The ice cream machine contains a compressor
that MUST remain upright at all times.
Donotstore machine on any other surface
apart from its feet.
BEFORE FIRST USE
Machine preparation
Remove and discard all labelling and
packaging materials attached to your ice
cream machine. Ensure you have removed
all parts and accessories before discarding
the packaging.
Remove the lid, ice cream bowl and paddle
from the machine. Clean these parts and
accessories using warm soapy water and rinse
thoroughly. Ensure all parts are completely
drybefore using the machine.
NOTE
Always place the paddle inside the bowl
before adding ingredients. This ensures
that the ingredients will not spill into the ice
cream chamber.
FIRST USE
Initial start up
• Place paddle inside the bowl.
• Place ingredients inside the bowl in order
of the recipe.
• Place ice cream bowl and paddle inside the
bowl chamber.
• There are 2 grooves in the bowl chamber.
When positioning the bowl, align so that
the bowl handle hinge is positioned within
these grooves.
• Make sure the BOWL CHAMBER and the
exterior of the ice cream bowl is completely
dry before inserting.

NOTE
It is important that the paddle is properly
assembled onto the drive shaft to ensure
ingredients are mixed.
. To lock the lid into position, align the lid
handle to the alignment graphic, rotating
clockwise into the LOCK position.
. Press the POWER button to turn the
machine on.
. Rotate the hardness selection dial
toyour chosen dessert.
Press the START | PAUSE button to
begin the churning process. The elapsed
time will be displayed on the LCD.
4. The Smart Scoop will beep when
your dessert has reached its desired
consistency.
PRECOOL
NOTE
PRE-COOL can only be operated in the stand
by mode, before pressing start cancel button
a) PRE-COOL lowers the temperature
ofthe ice cream machine to reduce the
time it takes to prepare your dessert.
Itisoptional and is ideal to use while
you are preparing your ice cream base
before churning.
To select PRE-COOL function, press
the PRE-COOL button. The light
surrounding the button will turn from
white to red to indicate that the machine
is in PRE-COOL mode.
This mode will PRE-COOL the machine
to approximately -10°C to -30°C,
taking about 5-10 minutes. READY will
illuminate and PRESS START will flash
on the LCD screen when the ice cream
maker has reached optimal temperature.
The paddle will start turning after 15
minutes has passed, but will not start
making the frozen dessert unless the
START | PAUSE button is pressed.
In this function, the LCD screen will
display the temperature, PRE-COOLING
will illuminate and the progress
indicator will scroll, to let you know that
you are in this mode.
b) PRE-COOL will return to standby after
20 minutes or alternatively can be
switched o either by pressing
PRE-COOL button again or pressing
the START | PAUSE button which will
override the pre-cooling mode.
NOTE
START | PAUSE button will have to be
pressed to start the churning process after
PRE-COOLING.
NOTE
Please note that PRE-COOL is not available
after the START | PAUSE button is pressed.
The light surrounding the PRE-COOL button
will turn o.
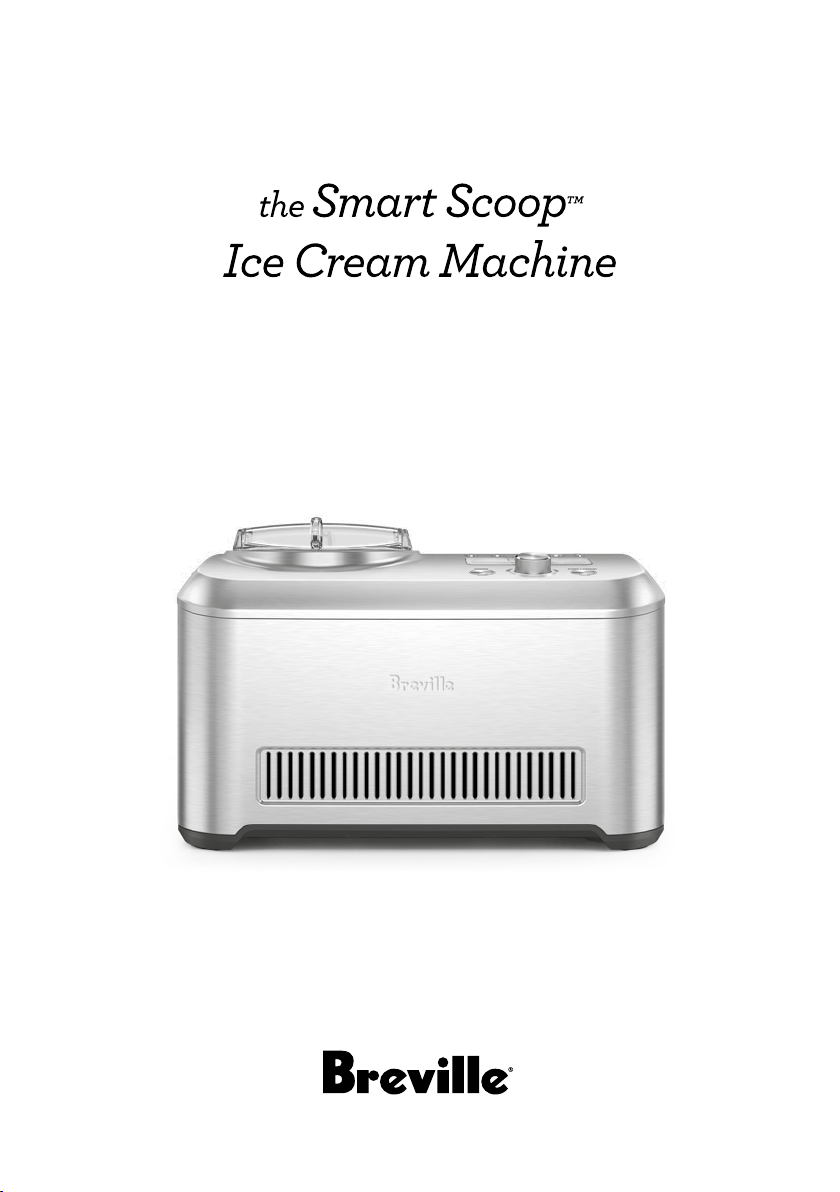
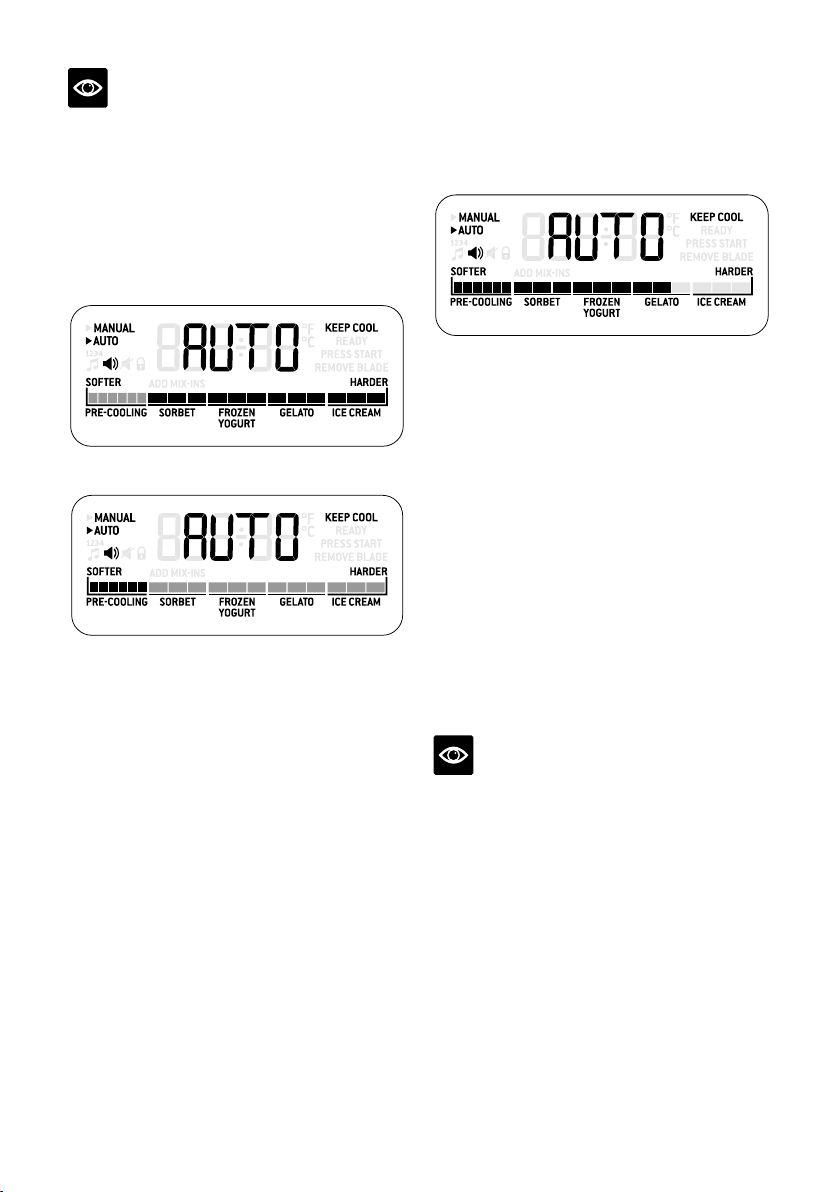
AUTOMATIC MODE
Start up
Progress indicator highlighted
Hardness indicator highlighted
Unwind the power cord completely and
insert the power plug into a 230/240V
outlet.
Press the POWER button to turn the
machine on. The POWER button will
illuminate white. The LCD screen will
display AUTO. The progress and hardness
bar will also be illuminated. The arrow
should be pointed at the AUTO on the
LCD screen to indicate the mode you are
in. Toensure the machine is in auto mode,
turn the hardness dial.
HARDNESS SELECTION
To select the hardness you desire turn the
hardness dial left or right. Left being softer
frozen desserts such as sorbet and right being
harder desserts such as ice cream.
KEEP COOL IN AUTOMATIC MODE
The KEEP COOL function will keep the
frozen dessert chilled and churned for up to
3 hours in total. A red light will illuminate
around the button and the LCD screen will
display KEEP COOL when this feature is
selected. This function works by churning
the mixture to the hardness selected and
once reached the compressor will pulse on
and o in conjunction with the paddle to
maintain this consistency.
The paddle will only operate if the unit
detects that your dessert has melted below
the selected consistency. KEEP COOL can
be toggled on and o at anytime.
NOTE
When the Smart Scoop is in the KEEP COOL
mode the compressor and motor will turn on
incrementally to check the consistency of the
dessert.

ADDING THE INGREDIENTS AND
STARTING OPERATIONS
a) Ensure that the paddle, bowl and bowl
chamber are clean. Insert paddle into
thebowl before adding ingredients.
b) Add ingredients to the ice cream bowl as
specified in the recipes. Wipe any spilled
ingredients from the rim of the bowl.
c) Insert the bowl by lowering into
position, ensuring bowl handle hinges
sit inside grooves on the chamber.
Itisimportant that the ice cream paddle
isproperly assembled onto the drive
shaft to ensure that the paddle operates
correctly.
d) Place the lid onto the ice cream bowl.
It is not recommended to open the lid
during operation unless stated in the
recipe. If mix-ins are required, open the
smaller lid to add ingredients.
e) To start making the dessert press
START | PAUSE. The progress indicator
will scroll to show that the unit is
working. The ice cream machine should
now start cooling and churning to the
desired setting. As the dessert starts to
freeze the indicators on the hardness
selection bar will move up the selection
bar to the chosen dessert. It may take
sometime before indicators illuminate.
The display will toggle between elapsed
time and the current temperature to
which the machine is chilling.
The progress indicator bar will
scroll until the first hardness bar cell
isreached.
The hardness bar will progress towards
the selected dessert setting. This
will finish flashing when the desired
consistency is reached.
f) When the desired setting has been
reached, the compressor and the motor
will stop and READY will illuminate on
the LCD display. The beeper / music will
sound to indicate dessert is ready.

MANUAL MODE
Start up
Unwind the power cord completely and insert
the power plug into a 230/240V outlet.
Press the POWER button to switch the
machine on. The POWER button will
illuminate white. The LCD screen will
default to the AUTO mode and selection
bar. The ice cream machine and LCD screen
will always revert to the last program or
setting that was used.
Ensure the machine is in manual mode by
pressing the manual timer arrow
buttons. The time will be displayed and the
arrow should point to MANUAL on the left
hand side of the screen.
To change the time that you wish to churn
and freeze, press either one of the manual
timer arrow buttons. On average, ice cream
will need about 50 minutes to churn and
freeze.
HARDNESS SELECTION
This is not available in the manual mode.
KEEP COOL IN MANUAL MODE
The KEEP COOL function will keep the
frozen dessert chilled and churned for the
selected duration of the machine operation.
A red light will illuminate around the
button and the LCD screen will display
KEEP COOL when this feature is selected.
The paddle will only operate if the unit
detects that your dessert has melted below
the pre-determined consistency.
ADDING THE INGREDIENTS AND
STARTING OPERATIONS
a) Set the time that you desire by pressing
the MANUAL buttons up or down .
b) Insert bowl and paddle into the chamber.
Add ingredients.
c) Press START | PAUSE button for the
ice cream making process to start. The
light around this button will illuminate
red to indicate that the button has been
selected and the machine has started the
dessert making process.
d) When the desired time has been
reached, the compressor and motor will
stop and READY will illuminate on the
LCD display.
e) If the START | PAUSE button is pressed
during the cycle this will pause the time.
To resume the process press the button
again.
f) If you need to reset the timer press and
hold the START | PAUSE button for 2
seconds and this will reset the timer.
g) The timer can be adjusted at any time.

SMART SCOOP DISPLAY
The LCD screen will toggle between the
count down timer and temperature.
VOLUME FUNCTION
The Breville®Smart Scoop features a beeper
to indicate that your frozen dessert is ready.
Volume function is High, Low or Mute.
TEMP / UNITS
The Breville®Smart Scoop features a
temperature and units function. Press once
to display the temperature and press
again to change the units between Celsius
and Fahrenheit.
FACTORY DEFAULT RESET
To restore the factory specified default
settings, press and hold the KEEP COOL
button for 5 seconds. This can only be done
in the standby mode.

• When storing your frozen dessert in the
freezer, ensure that the container is air tight
and well sealed. This will prevent ice crystals
forming. Putting a piece of baking or grease
proof paper directly over the top of the frozen
dessert will also help with this.
NOTE
Do not place the ice cream bowl in the freezer.
• Frozen desserts are best eaten within 1 week
of churning but can be kept for up to 2 weeks.
• If serving a dessert from the freezer it’s best
to let the dessert sit at room temperature
for5-10 minutes prior to serving.
TIPS FOR MAKING CRÈME
ANGLAISE CUSTARD BASE
• Traditionally creamy textured ice cream
ismade from a crème anglaise, custard
base. Below are tips on achieving the prefect
crème anglaise time after time.
• Make sure all ingredients are fresh.
• Eggs are best at room temperature for
making a custard base. Recipes are based
onmin mass 59g eggs.
• Ensure that you measure all your
ingredients first and have them ready before
you start to cook.
• Either use a wire whisk or electric hand
beater, beat eggs yolks and sugar until they
are pale and thick.
• Use a heavy bottom saucepan when cooking
crème anglaise.
Tips
TIPS FOR BETTER
ICE CREAM MAKING
NOTE
Time taken to make frozen desserts can
vary depending on the ambient room
temperature, temperature of the ingredients
and pre cooling the machine. Note the
cooler the ingredients the faster the ice
cream process. As a general guideline it
takes around 50 minutes to make ice cream.
• When making crème anglaise and recipes
that require heating ingredients, it’s always
a good idea to make this the day before.
Alternatively, cool ingredients for at least
4hours prior to making ice cream.
• Always add ingredients into the bowl before
inserting into the ice cream maker.
• Ice cream recipes stated in this instruction
booklet use ingredients such as cream, milk,
eggs and sugar. These ingredients can be
substituted with similar ingredients to suit
dierent taste or dietary requirements. Note,
taste and texture will vary if using dierent
ingredients.
• Most dessert bases will expand during
the churning and freezing process. All
mixtures in this instruction booklet will
make approximately 1 litre of frozen dessert
unless otherwise specified. If using ice
cream mixtures from other recipes, do not
exceed 700ml of ingredient base to allow
forthe expansion.
• Alcohol inhibits the freezing process.
It’sbestto add alcohol towards the end of the
ice cream making process.
• The consistency of the frozen dessert made
is a spoonable mixture. Please note that if
you are serving in cones or on plates that it’s
best to place the ice cream in the freezer for
2hours prior to serving.

• When heating the cream/milk you don’t
want to boil it. A good guide to know when to
remove the cream/milk from the heat is when
little bubbles start to form around the edge
ofthe cream / milk.
• While the cream/milk mixture is heating
start to beat the sugar and eggs. Waiting
to do this after the cream/milk mixture has
heated may cause the cream/milk to overheat
and separate.
• Ensure that the mixture is constantly stirred
with a wooden spoon until it thickens. A flat
bottom wooden spoon works best. To test
using the back of the spoon, coat the spoon in
the crème anglaise. Run your finger through
the mixture on the back of the spoon. If the
finger mark stays then the mixture is thick
enough. Remove mixture immediately.
• If the mixture separates or curdles then heat
is too high. If the mixture separates you will
need to start again.
• Do not leave crème anglaise unattended
while cooking.
• Crème anglaise will take 5-15 minutes to
thicken depending on quantities etc.
• Always allow the mixture to cool at room
temperature stirring occasionally to release
heat until there is no visible steam coming
from the mix. Once cooled then refrigerate
until well chilled.
• Place a piece of plastic wrap directly on
top of the creme anglaise to prevent a skin
forming on top.
• To cool the mixture quickly it can be put in
a metal bowl and then into an ice bath and
stirred constantly until well chilled.
THE VITAL INGREDIENTS
INGREDIENTS
Home made ice cream is now easy to make
at home and with only kitchen ingredients
required to make a basic vanilla ice cream.
EGGS
All the recipes in this book were tested
using standard min mass 59g eggs. The
egg gives ice cream volume, stabilises and
emulsifies the mixture. The yolk of the egg
contains lecithin, which acts as an emulsifier
to bond with the fat globules.
NOTE
Avoid using older eggs, especially if you are
not cooking the mixture. Pregnant women are
not advised to consume ice cream containing
raw eggs.
SUGAR
Caster sugar was used in all the recipes
as it dissolves easily and to reduce
crystallisation (when large ice crystals
form) from occurring.
Standard white sugar can be substituted but
takes a little longer to dissolve.
As a general rule, when it comes to sugar
in ice cream, more sugar added will lower
the freezing point of the water inside the
mixture, which prevents your frozen dessert
from forming a large hard clump that is
dicult to scoop.

MILK
Full cream milk was used for all milk
based recipes. Lower fat varieties can be
substituted but the same result will not
be achieved. Low fat milk should only be
substituted for recipes that do not require
cooking. Low fat milks have a high chance
of separating during cooking.
CREAM
Pouring cream was used in all the recipes.
The cream gives fattiness and a smoother
texture to the ice cream.
Thickened cream can be substituted.
Creams that are thickened usually have
additives such as gelatine (of animal origin)
to thicken and prolong the creams life.
Reduced fat cream can be substituted but
only for recipes that do not require cooking
as the low fat varieties have a high chance
ofseparating during cooking.

Care & Cleaning
Ensure that the ice cream machine is
turned o by pressing the POWER button.
The ice cream machine is o when the
START | PAUSE button’s LED light is
no longer illuminating red. Remove the
power plug from the power outlet. Allow
the ice cream machine compressor to cool
completely before disassembling and
cleaning.
CLEANING THE STAINLESS
STEEL HOUSING
1. Wipe the exterior of the stainless steel
housing and the LCD screen with a soft
damp cloth. Do not use a dry paper towel
or cloth to clean the LCD screen, or use an
abrasive cleanser or metal scouring pad to
clean any part of the ice cream machine as
these will scratch the surface.
NOTE
Never immerse the stainless steel housing in
water or place in the dishwasher. Take care not
to allow water or cleaning fluids to seep under
the buttons or LCD screen on the control panel.
NOTE
To clean the ice cream chamber ensure that
the unit is at room temperature. Wipe out with
soapy water and a soft damp cloth.
2. If over-spill of cream, milk, chocolate etc.
occurs in the interior chamber, carefully
remove using a soft, damp cloth.
3. Let all surfaces dry thoroughly prior
to inserting the power plug into
apower outlet.
CLEANING THE LID.
The lid can be cleaned in warm soapy water,
using a soft sponge. Do not use an abrasive
cleanser or metal scouring pad as these
will scratch the surface. Let all surfaces dry
thoroughly prior to placing into the ice
cream machine.
CLEANING THE ICE CREAM BOWL
Fill the ice cream bowl up halfway with warm
soapy water. A non-abrasive liquid cleanser
or mild spray solution may be used. Allow to
stand for 10-20 minutes.
NOTE
Ice Cream Bowl is NOT dishwasher safe.

CLEANING THE PADDLE
1. Wash the paddle with warm soapy water.
Using the bottle brush supplied insert this
in the central part of the paddle to clean all
the ice cream out.
2. Let all surfaces dry thoroughly before
reassembling the ice cream machine
NOTE
Paddle and lid are dishwasher safe on the
top rack ONLY.
STORAGE
1. Ensure the ice cream machine is turned
OFF. Remove power plug from the
power outlet.
2. Ensure the ice cream machine and all
accessories are completely clean and dry.
3. Place the ice cream bowl and paddle into
the chamber.
4. Ensure the lid is on.
5. Store the appliance in an upright position
and level on it support legs. Do not store
anything on top of the ice cream machine.

PROBLEM EASY SOLUTION
Ice cream won’t
freeze
• START | PAUSE button needs to be pressed.
• Alcohol in ice cream? Added too much or too soon.
• Ensure that there is adequate ventilation around the ice cream
maker. We recommend leaving at least 15cm between the ice
cream machine and adjacent hard surfaces.
Paddle won’t move • Paddle won’t move if the PRE-COOL function is selected for
the first 5 minutes.
• Check to see if center spindle is inserted correctly into plastic
paddle; if the center spindle is not moving then there maybe
an issue with the machine – Call Breville®customer service.
Lid will not lock
into position
• Paddle and bowl are not positioned properly – make sure
the handle of the bowl sits within the grooves and paddle is
inserted properly.
Frozen dessert not
frozen in allocated
time
• Dessert mixture was too warm when placed in the ice cream
bowl for time allocated in manual setting.
• Dierent ingredients and quantities will eect freezing time.
Allow for more time if using ingredients like eggs/alcohol.
Can’t remove
bowl insert after
churning
• Ingredients may have spilt over the side of the bowl and into
the chamber. Turn the machine o and let stand for 10-20
minutes to defrost the ice cream. Then remove bowl and wipe
the interior chamber of the ice cream machine.
How do I make soft
serve ice cream?
• The frozen desserts on the hardness indicator bar are only there as
a guide. Try making your soft serve on the sorbet setting. You can
turn the hardness back up if the ice cream is not hard enough.
I want my ice
cream even harder!
• Remove ice cream from ice cream bowl, place in another air-
tight container and place in freezer for a further 1-2 hours or
until desired hardness is achieved.
Can I put my mix-
ins into the custard
base?
• Put your mix-ins at the end when prompted.
Note: Often ingredients such as fruits may disintegrate
during the churning process if added to early.
Troubleshooting
Other manuals for the Smart Scoop BCI600
2
This manual suits for next models
2
Table of contents
Other Breville Ice Cream Maker manuals


