Breville BP02 User manual

Vine Mill, Middleton Road, Royton, Oldham, OL2 5LN, U.K.
www.breville.co.uk
Breville is a registered trademark of Pulse Home Products Limited.
© Pulse Home Products Limited.
AFTER SALES SERVICE
These appliances are built to the very highest of standards. There are no user serviceable parts. Follow these
steps if the unit fails to operate:
1. Check instructions have been followed correctly.
2. Check fuse has not blown.
3. Check mains supply is functional.
If the appliance will still not operate return the appliance to the place it was purchased for a replacement.
To return the appliance to Breville Customer Service Department, follow the steps below:
1. Pack it carefully, preferably in the original carton. Ensure unit is clean.
2. Enclose your name and address and quote model number BP02 on all correspondence.
3. Give the reason why you are returning it.
4. If within the guarantee period, state when and where it was purchased and include proof of purchase
(e.g. till receipt).
5. Send it to our Customer Service Department at the address below:
Customer Service Department
Pulse Home Products Limited,
Middleton Road, Royton, Oldham, 0L2 5LN, U.K.
Telephone: 0161 621 6900 Fax: 0161 626 0391
Email: [email protected]
This product is guaranteed for a period of 1 year from the date of purchase against mechanical and electrical
defects.
This guarantee is only valid if the appliance is used solely for domestic purposes in accordance with the
instructions provided, that it is not connected to an unsuitable electricity supply, dismantled or interfered
with in any way or damaged through mis-use. Under this guarantee we undertake to repair or replace free of
charge any parts found to be defective.
Nothing in this guarantee or the instructions relating to the product excludes, restricts or otherwise affects
your statutory rights.
In line with our policy of continuous development, we reserve the right to change this product, packaging and
documentation without notice.
This product is manufactured to comply with the radio interference requirements of EEC directive
93/68 EEC.
GUARANTEE
92233
M/M0304
Instructions for Use
and Guarantee
Commercially designed for professional results
PLEASE RETAIN THESE INSTRUCTIONS FOR FUTURE REFERENCE
These instructions refer to Soft Serve Ice Cream Maker, Model Number BP02
Soft Serve
Ice Cream Maker
32
Congratulations
on the purchase of your
Soft Serve Ice Cream Maker
Please take the time to read the instructions carefully
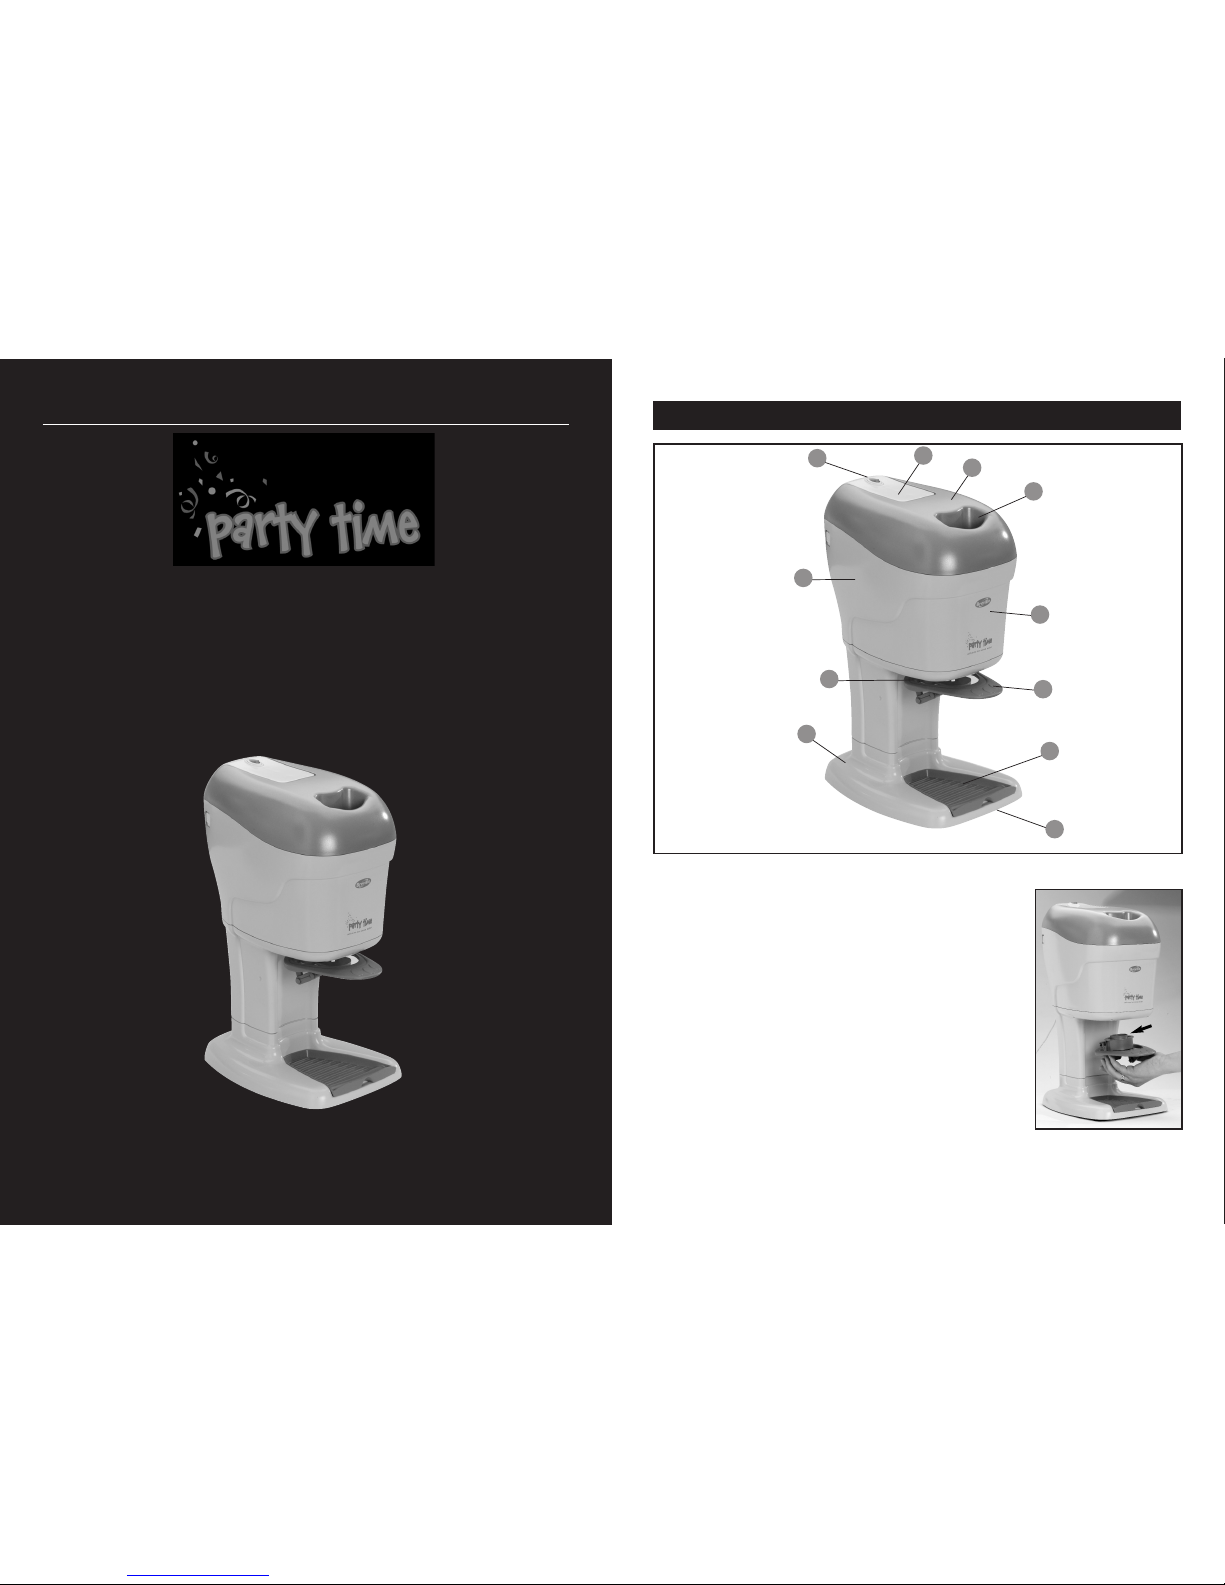
SOFT SERVE ICE CREAM MAKER
1. On/Off Switch
2. Motor unit (with detachable whisk)
3. Removable lid
4. Feeder tube
5. Main body
6. Canister (inside main body)
7. Paddle
8. Tap (connected to paddle)
9. Base
10. Drip tray
11. Feet on base
FEATURES OF YOUR BREVILLE SOFT SERVE ICE CREAM MAKER
1
Tap
2
3
4
5
6
7
8
9
10
11

1. Wash the canister, drip tray, lid, whisk, tap
and paddle in warm soapy water and dry
thoroughly. NOTE: Never immerse the
main body, motor, cord set or plug in
water or any other liquid. No parts of
the unit are dishwasher safe.
2. Assemble the unit by slotting the main body
into the base then fit the tap & paddle to the
main body. See below fig 1 and fig 2.
3. Wrap the canister in a plastic bag and place
upright in the freezer. The colder your
freezer the less time the canister should be
stored in it prior to use, see below table.
4. Prepare the ice cream mixture and chill fully
before use. See page 8 and 9 for the ‘Easy
vanilla ice cream’ recipe, which takes
minutes to make up.
5. When the canister is ready for use, assemble
the rest of the appliance.
• Remove the frozen canister from the freezer
and slot inside the main body of the
appliance. See fig 3.
• Attach the whisk to the motor by slotting the
whisk into location.
• Locate the two pins into the main body and
lower the whisk into the canister. Do not use
if the pins are bent or damaged.
• Fit the lid securely onto the main body. See
fig 4. The lid fits around the motor.
6. Connect the plug into a suitable power
outlet and switch the ON/OFF switch ON.
7. Pour the ice cream mixture down the feeder
tube into the canister while the paddle is
rotating. Leave to mix for 20 minutes, then
return to the unit to dispense the ice cream.
To dispense the ice cream, simply raise the
paddle and the ice cream will be dispensed
from the tap into your cone or bowl. To
stop dispensing lower the lever back to its
original position.
IMPORTANT: Do not leave the ingredients
to mix for longer than the recommended time.
The longer the ingredients are mixed, the
firmer the set of the ice cream. Never over fill
the canister with mixture. Always check the
mixture against the maximum marker inside
the canister.
Never turn off the ice-cream maker during
operation. This may cause the mixture to
freeze and restrict the movement of the whisk.
ICE CREAM TEXTURE TIPS:
For very soft
ice cream dispense after 15-20 minutes for firmer
set ice cream dispense after 20-25 minutes.
QUICK START GUIDE BEFORE USE
54
1. Carefully unpack the appliance, removing all
packaging and labels. Retain all printed
documents somewhere safe ready for future
reference.
2. Wash the canister, lid, whisk, drip tray, tap
& paddle in warm soapy water and dry
thoroughly. No parts of the unit are
dishwasher safe.
NOTE: Never immerse the main body,
motor, cord set or plug in water or any
other liquid.
3. Use a barely damp cloth to wipe over the
main body and base of the appliance. Polish
dry with a soft, clean cloth.
4. Position the appliance on a dry and stable
work surface, away from the edge and other
kitchen appliances. Ensure that the power
supply cord doesn’t overhang the work
surface.
5. Ensure that the ‘o’ ring (fitted to the base of
the canister) is securely in place after
cleaning and before use.
6. Check that your power supply is the same
as the one indicated on the underside of
your appliance.
HOW TO USE YOUR SOFT SERVE ICE CREAM MAKER
STEP 1: Freezing your canister
1.
For best results, wrap the canister in a plastic
bag. This helps to prevent freezer burn.
2. Place the canister upright inside your
freezer. The length of time required to
freeze the bowl depends upon the set
temperature of your freezer. See below
table A for timings.
NOTE:
It’s very important that the canister is
not stored permanently in the freezer, as this
may affect the finished texture of the ice cream.
NOTE: For optimum results the temperature
of the canister should be between -15ºC and -
20ºC.
STEP 2: Preparing the soft serve mixture
The recipes included in this instruction book
are delicious and easy to make. If you haven’t
used the appliance before, try the ‘Easy vanilla
ice cream’ recipe on Page 8. The ‘Easy vanilla
ice cream’ tastes like it’s just from the ice
cream van! All recipes need to be fully chilled
before use. Make up the recipe as soon as you
have put the canister in the freezer, and store
the recipe in the fridge until the canister is
‘frozen’ for the set time.
Freezer Min. Freezing
Temperature Time
-30ºC 8-9 hours
-25ºC 12-14 hours
-18ºC 20-22 hours
-15ºC 24 hours
Table A
Freezer Min. Freezing
Temperature Time
-30ºC 8-9 hours
-25ºC 12-14 hours
-18ºC 20-22 hours
-15ºC 24 hours
fig 1 fig 2
fig 3 fig 4
Lid
Motor
76
HOW TO USE YOUR SOFT SERVE ICE CREAM MAKER
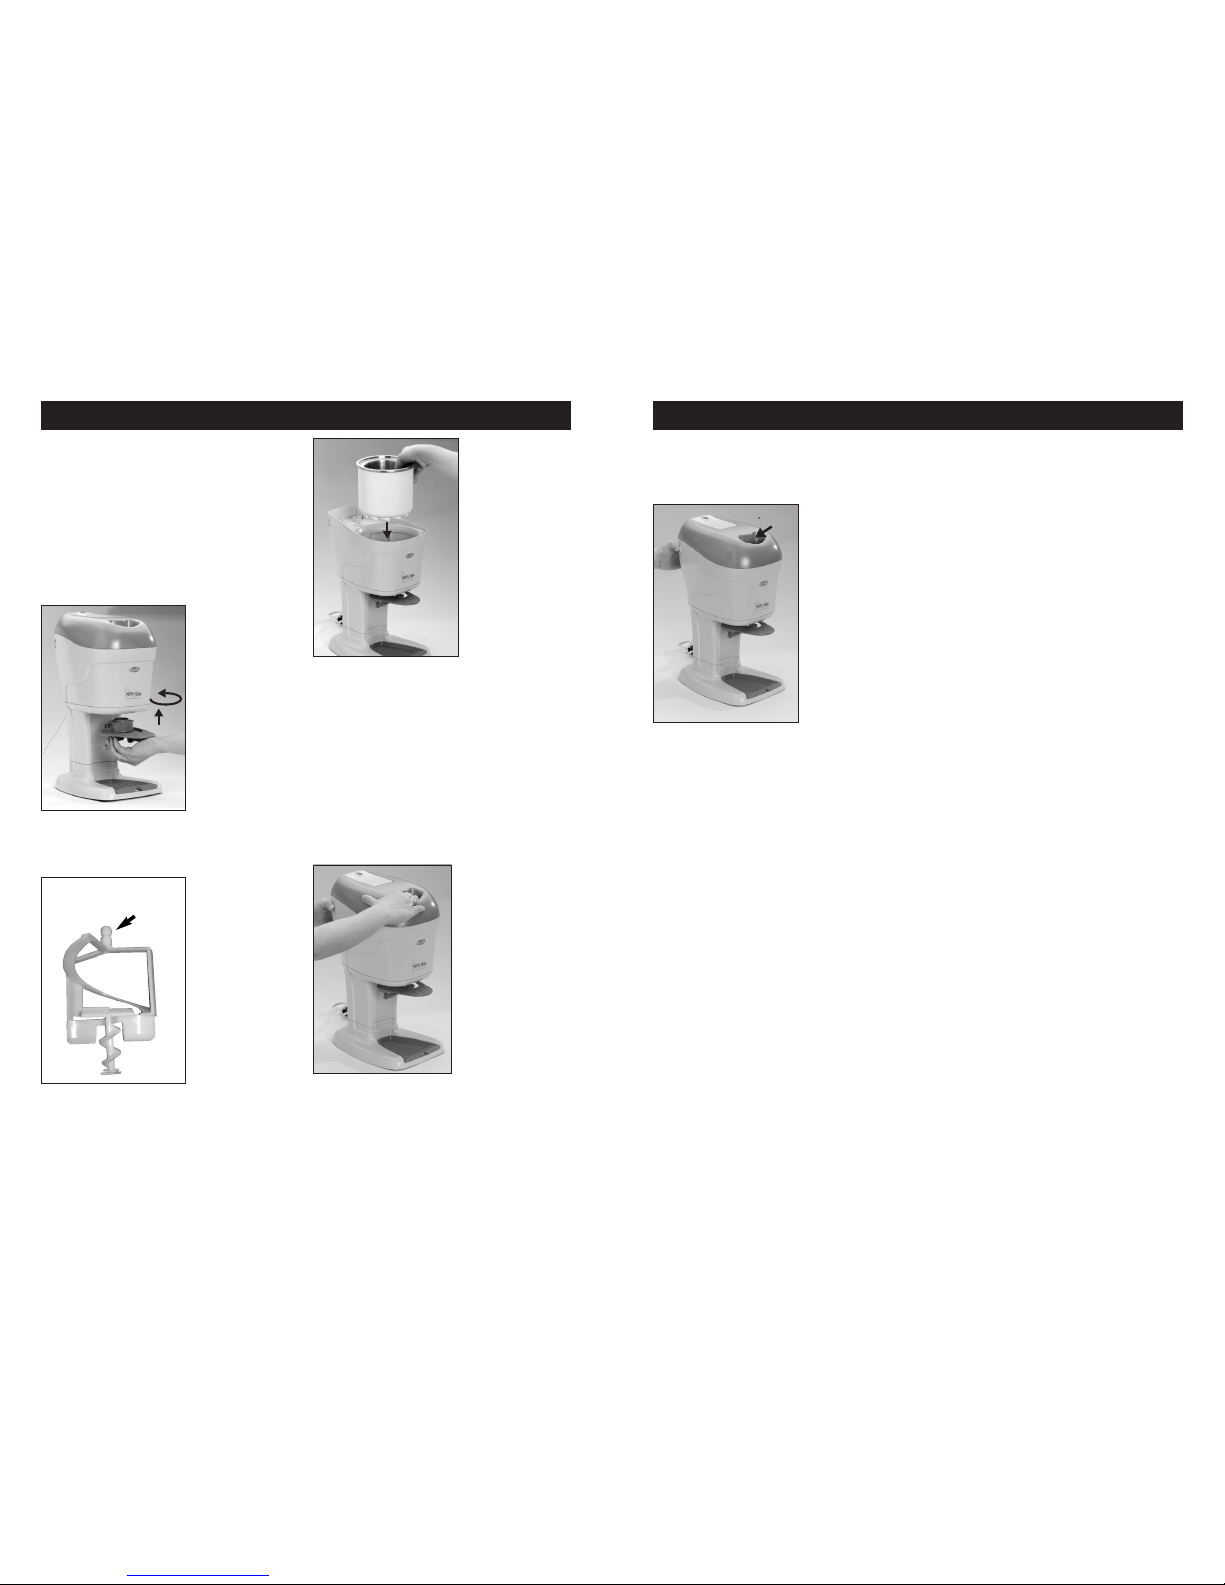
STEP 3:Assembly of your soft serve ice
cream maker
1. Connect the main body to the base: Lower
and slot the main body into the base.
2. Connect the paddle & tap to the main body,
by pushing the tap up into the main body
and twisting it anticlockwise to lock it
securely in place. See fig 5.
3. Attach the whisk to the motor: Slot the end
of the whisk into the location. See Fig 6.
4.
Remove the canister from the freezer. Discard
the plastic bag from the canister and seat the
canister into the main body. See fig 7.
NOTE: The canister must be used
immediately after being removed from the
freezer. Do not leave to warm up.
5. Connect the motor and whisk to the main
body: Slot the two motor pins into the
location slots in the main body and lower
the whisk into the canister.
6. Lock the lid in place: Slot the lid over the
main body. See fig 8.
7. Connect the soft serve maker into a suitable
power outlet and then turn the power on at
the mains outlet. Switch the unit on using
the ON/OFF switch. Ensure that the power
cord doesn’t over hang the work surface.
HOW TO USE YOUR SOFT SERVE ICE CREAM MAKER
8. With the whisk now rotating, slowly pour
the pre-prepared recipe into the canister via
the feeder tube.
CAUTION: Do not place hands or
utensils into the canister while the whisk
is rotating.
9.
The volume of the soft serve ice cream will
increase during the freezing/ churning
process. It is important not to over fill the
canister with ingredients i.e. the level of
ingredients once added to the canister should
be well below the MAX line i.e. maximum
quantity that should be added is 600mls
.
10. Allow the soft serve ice cream maker to
churn the ice cream mixture until the
desired consistency is achieved. The length
of time the ingredients are left to churn
affects the consistency the final ice cream.
• For very soft set ice cream leave the soft
serve ice cream maker to churn the
ingredients for 15 minutes before dispensing.
• For a standard set of soft serve ice cream,
leave the soft serve ice cream maker to
churn the ingredients for 20 minutes before
dispensing.
• For a firm set of the ice cream, leave the soft
serve ice cream maker to churn the
ingredients for 25 minutes before dispensing.
This means that you can tailor make
your perfect soft set ice cream!
Please note, that the set of the ice cream
may affect the speed at which the ice cream is
dispensed. Firmer set ice cream may take
slightly longer to dispense than very soft set ice
cream.
NOTE: Turning the appliance off while in
operation may cause the mixture to
freeze and restrict the movement of the
whisk.
11.
To dispense the ice cream into a cone,
simply lift the paddle into the raised position
and ice cream will be extruded from the
dispensing tap into your cone or bowl. It is
not necessary to hold the paddle in position.
Note: The first few drops of ice cream may
not be frozen. This is normal.
12. When all the ice cream has been dispensed
switch off the appliance using the On/Off
switch.
fig 9
fig 5
fig 6
fig 7
fig 8
Feeder Tube
Slot this end of the
whisk into the motor

98
RECIPES
Old Fashioned Vanilla Ice Cream
300ml milk
Pinch of salt
5cm piece vanilla bean or 1 tsp vanilla essence
1 egg beaten
250ml cream
1. Combine the milk, salt, sugar and vanilla
bean in a saucepan.
2. Cook over a medium heat, stirring
frequently until the mixture nearly boils.
DO NOT allow to boil. Reduce the heat to
low and remove.
3. Gradually stir in about half of the milk
mixture into the egg.
4. Add egg mixture back into the remaining half
of milk.
5. Cook over a low heat, stirring constantly
until mixture slightly thickens. Remove from
the heat and allow cooling.
6. Place in the fridge and chill thoroughly-
preferably over night.
7. Remove the vanilla bean and add cream,
mixing with a wire whisk.
8. Pour into the canister with the whisk
rotating and allow to churn and freeze for
20 minutes.
Creamy Chocolate Ice Cream
120g chocolate drops
1
/2 cup caster sugar
250ml milk
2 egg yolks
250ml cream
1. Place the chocolate, sugar and half the milk
into a saucepan and heat gently until the
chocolate melts.
2. Combine remaining milk and eggs and add to
the chocolate mixture. Bring the mixture
gently to the boil, stirring constantly.
3. Remove from the heat.
4. Place in the fridge and allow to chill
thoroughly, preferably overnight.
5. Add the cream and mix with a wire whisk.
6. Pour into the canister with the whisk
rotating and allow to churn and freeze until
the desired consistency is achieved. Check
after 15 minutes.
Honey Ice Cream
300ml milk
200g honey
2 egg yolks
Pinch of salt
200ml cream
1. Place the milk and honey into a saucepan and
heat gently.
2. Whisk the egg yolks and salt together and
add to the milk mixture.
3. Stir continually over a medium heat until just
boiling, remove immediately and allow to
cool.
4. Place in the fridge and allow to chill
thoroughly- preferably overnight. Add cream
and mix with a wire whisk.
5. Pour into the canister with the whisk
rotating and allow to churn and freeze until
the desired consistency is achieved. Check
after 15 minutes.
Decorate your ice-cream with hundreds and
thousands, flakes, fruit or chocolate topping.
RECIPES
Easy Vanilla Ice Cream
300ml milk
250ml double cream
1
/2 cup caster sugar
Pinch salt
1
/2 tsp vanilla essence
1. Combine the milk, cream and vanilla essence
in one mixing bowl. Slowly add the sugar
while mixing the ingredients until all the
sugar has been added and has dissolved.
2. Place in the fridge until completely chilled-
preferably overnight.
3. Pour into the canister with the whisk
rotating and allow churning and freezing for
20 minutes.
Strawberry Ice Cream
250g fresh strawberries, washed and hulled
3 egg yolks
3/4 cup castor sugar
350ml cream
200ml milk
1. Place all ingredients in a blender or food
processor and process until smooth.
2. Place in the fridge and chill thoroughly-
preferably overnight.
3. Pour into the canister while the whisk is
rotating and allow to churn and freeze until
the desired consistency is achieved. Check
after 15 minutes.
NOTE: Retain 3-4 strawberries from the
pureeing process, chop into small pieces and
add at the final churning stage.
CARE AND CLEANING
1. Switch the appliance off using the On/Off
switch and disconnect the plug from the
power outlet.
2. Remove the lid, motor, and whisk.
3. Remove the paddle and tap by twisting it to
the left and pulling it straight down.
4. Remove the canister by pushing it upwards
from underneath.
5. Wash the paddle and tap, drip tray, lid,
whisk and canister in warm soapy water. Do
not wash any part of the appliance in a
dishwasher. Never immerse the base,
motor, cord set or plug in water or
liquid of any kind.
6. Clean all other parts of the appliance with
damp almost dry cloth. Polish dry with a soft
clean cloth.
7. Ensure that the ‘o’ ring is fitted to the base
of the canister after cleaning and before use.
CAUTION:
• Do not immerse the motor, lid, cord set
or plug in water or any other liquid.
• Do not clean any part of the appliance
in a dishwasher.
• Do not use harsh or abrasive cleaners
on the appliance.
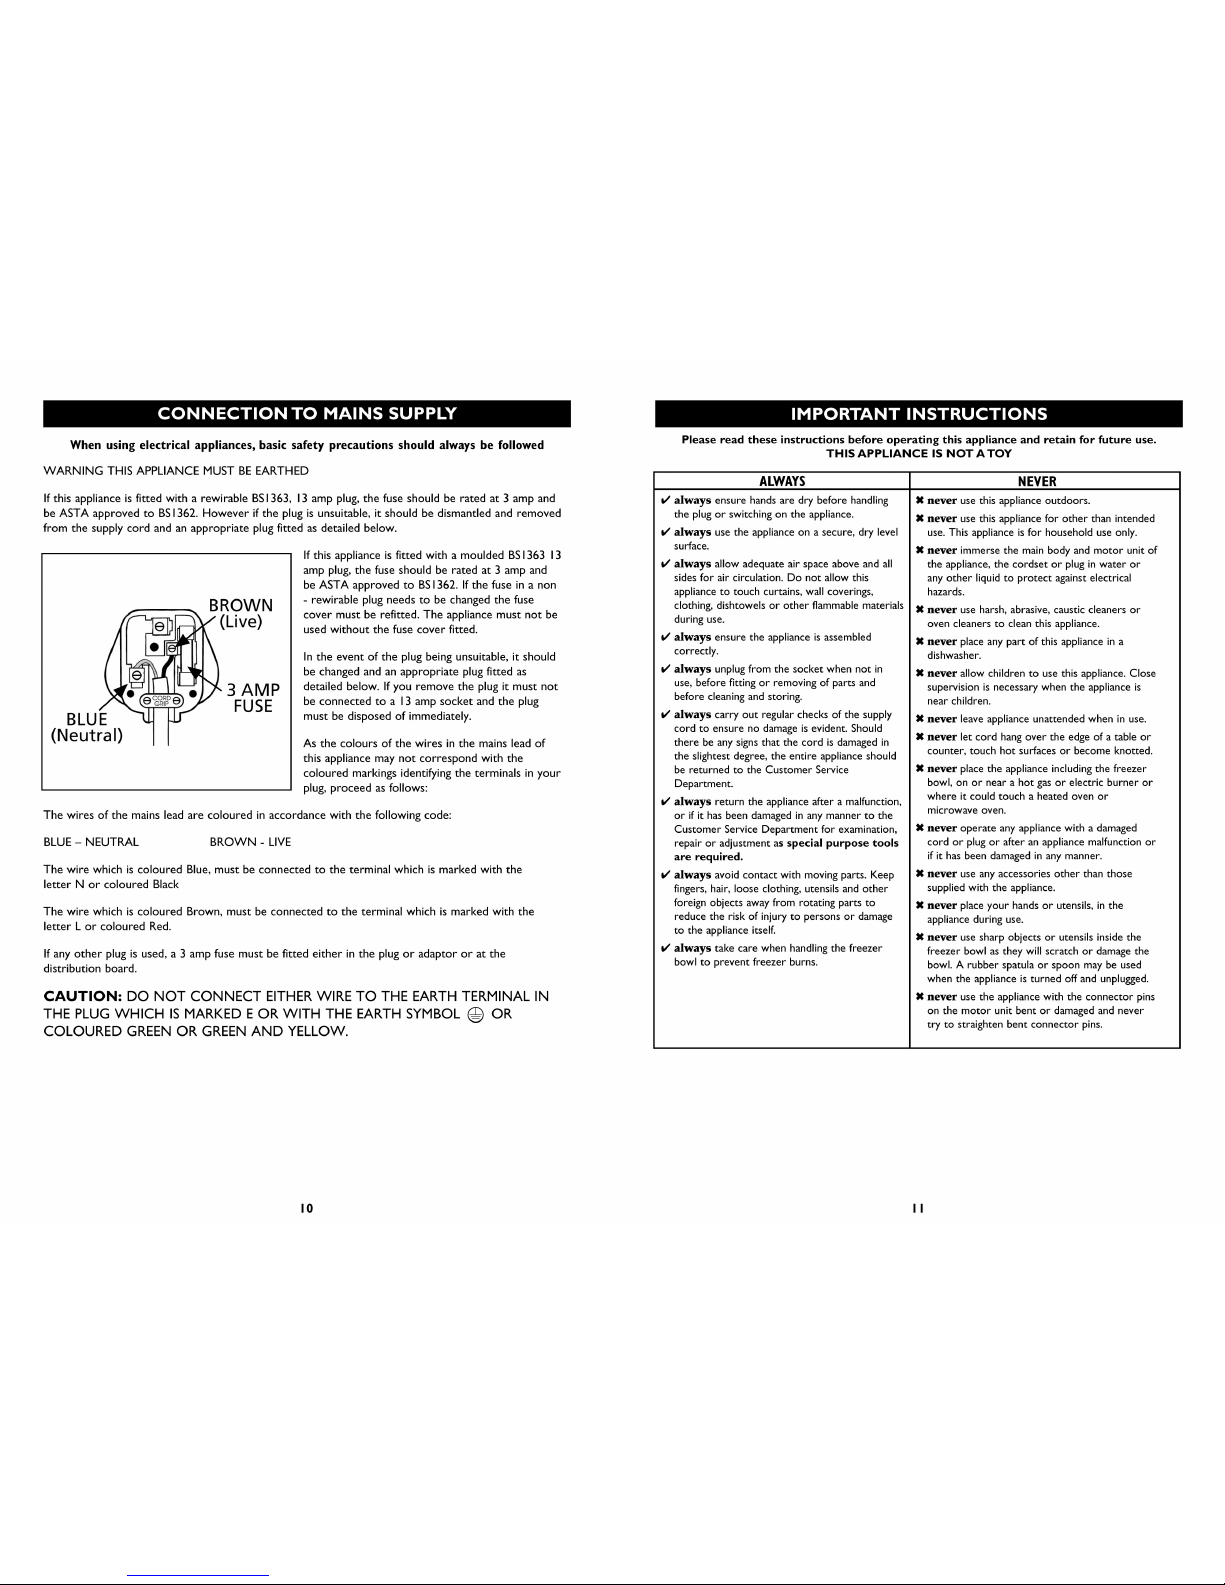
Table of contents
Other Breville Ice Cream Maker manuals


