Brew Express BEC-110 User manual

model no. BEC-110
SET UP / OPERATION GUIDE
IMPORTANT NOTE:
For more information see our instructional video online at www.BrewExpress.com.
Do not return this product to place of purchase without authorization.
For return authorization or service call 866.268.5953

CONTENTS
1. Safety 1-2
2. Specifications & Requirements 3
3. Hardware/Tools/Parts 4
4. Set Up 4 -6
5. Features 7
6. Control Functions 8
7. Start Up 9
8. Operation 10-11
9. Maintenance 12
10. Troubleshooting 13-15
11. Parts & Service 15
12. Warranty Information 16-17

1
SAFETY
IMPORTANT SAFEGUARDS
When using electrical appliances, basic safety precautions should always be followed, including the following:
1. Read all Instructions.
2. Do not touch hot surfaces. Use handles or knobs.
3. The voltage and frequency of the supply connections should conform to those of the rating label.
4. Close supervision is necessary when any appliance is used by or near children.
5. Allow to cool before putting on or taking off parts, and before cleaning the appliance.
6. Do not operate any appliance after the appliance malfunctions, or has been damaged in any manner.
Call and discuss problem with customer service.
7.Theuseofaccessoryattachmentsnotrecommendedbytheappliancemanufacturermayresultinre,
electric shock or injury to persons.
8. Do not use outdoors.
9. Do not place on or near a hot gas or electric burner, or in a heated oven.
10. The appliance should be installed in a place not easily reached by children.
11. Do not use appliance for other than intended use.
12. To reduce the risk of shock, discontinue use of the appliance if water leakage occurs.
13.Toreducetheriskofre,donotplaceanyheatingorcookingappliancebeneaththeappliance.
14.Toreducetheriskofre,donotmountunitoverornearanyportionofaheatingorcookingappliance.
15. To reduce the risk of electric shock, do not mount over a sink.
16.Toreducetheriskofre,donotstoreanythingdirectlyontopoftheappliancesurfacewhentheappliance
is in operation.
SAVE THESE INSTRUCTIONS

2
SAFETY
IMPORTANT:
Please read and follow instructions carefully before starting your BREW EXPRESS COFFEE
SYSTEM.
The BREW EXPRESS dispenses extremely hot water. Hot liquids may cause severe burns if it contacts skin. Use
extreme caution when handling hot liquids dispensed by the BREW EXPRESS. KEEP HANDS AWAY FROM SPRAY
HEAD, BREW BASKET, CARAFE OR MUG DURING BREW CYCLE.
• DONOTusecarafeormugthatiscrackedordamaged.
• DONOTremovethebrewbasketwhilebrewerisinoperation.
• DONOTplacecarafeinmicrowaveorplaceonstovetop.

3
SPECIFICATIONS AND REQUIREMENTS
BEC-110 SPECIFICATIONS:
Read and follow instructions carefully before installing your BREW EXPRESS in-the-wall
COFFEE SYSTEM. For best results, it is advised that you hire a qualified professional.
1. Overall Dimensions 12 1/4” X 13 1/2” X 7 3/4” (see below).
2. Electrical Requirements 120VAC, 60HZ. (1400 watts).
3. Water Requirements 1/4” OD water supply line (copper or poly) 30 psi to 90 psi. Potable COLD water is required.
NOTE: If water is not available, a 5 gallon dispensing jug can be used with a pump (not supplied).
Contact Brew Express for more information.
Please Note: FILTER REQUIREMENTS
1. A filter and shut off valve at water source is strongly recommended and required for hard-water use.
2. The filter, such as an ice maker type filter (for soft-water use) can easily be installed at the source
3. Hard-water designed filter is required if you have hard-water, and must be maintained to ensure product
warranty and to avoid blockage from hard-water particles. (Please see recommended hard-water filters at
www.brewexpressdirect.com .)
4. If water lines are not purged or clear of debris or a filter is not installed, foreign particles (debris) in water may
clog brewer system causing failure, and will void all warranties.

4
HARDWARE/TOOLS/PARTS
4
HARDWARE/TOOLS/PARTS
BREW EXPRESS comes with the following items to ensure a successful setup.
Check to be certain all items have been included with your brewer.
• Brewer
• Carafeandlid(Lidislocatedonsideoffoampackagingorinbrewbasket)
• Brewbaskets(1basketstyle,1conestyle)
• Setup/Operationguide
• Hardwarekit(includesquickconnector)
•10’waterline
•Undersinkfaucetconnection
•“T”connectionforrefrigerator
TOOLS
• tapemeasure
• wrench
• knife(forcuttingpolyethylenetubing)
• drilland3/8”bit(optional)
PARTS RECOMMENDED / REQUIRED
• waterlter(recommended)
HARD-WATER NOTICE:
AlterisrequiredforALLhard-watersuppliedwatersources.Filtermustbesuitableforcalciumcarbonateandlimescale-most
majorbrandsforcommercialcoffeeltersystemsareavailable.BrewExpresshasahard-waterlteravailableat
www.brewexpressdirect.com.
IMPORTANT:
Read and follow instructions carefully before installing your BREW EXPRESS COFFEE SYSTEM.
1. Unpack Product
Carefully remove Brew Express from packaging.
Remove hardware kit from inside brew basket.
RemovecarafeLIDfromoutsideoffoampackaging/insideofbrew-basket.
2. Select Location
Findalocationwithcloseproximitytoapoweroutletandwatersupply.
SET UP

5
SET UP
5
SET UP
!
!
water line to sink
¼” poly water line
to coffee maker
cold water
valve
angle stop
valve
adaptor
Option 1: Cold Water Tap
water line
to ice maker
¼” poly water line
to coffee maker
Option 2: Ice Maker Line
cold water line
!
!
•connectiontowatersupply(supplied)
•removewaterlinefromvalvetofacet
•addvalve
•reconnectfacetlinetoteehardware
•connectnew¼”polylinetovalveconnection
•Valve connection included
•cut existing line from house interior wall where water line starts and runs
torefrigerator.DoNotcutlinelocatedontherefrigerator.Iflineisnot¼”,
then refer to note below for additional information on obtaining parts to
connect. You may also contact us directly at info@brewexpressdirect.com
•add valve
•connectnew¼”polylinetotee
PLEASE NOTE:
Ifyouhavea¼”compressionwaterlineconnectionandyouarenotabletosimplycutandusetheenclosedTpart,youcan
use the supplied 3/8” John Guest Valve with adapter parts (not supplied). Basically by adding the following parts to the 3/8”
JohnGuestvalveitwillallowyoutoconnecttoabraidedstyle¼”compressionlinethatisconnectingtoyourrefrigerator.The
following parts can be found at most home improvement big box stores.
1. Watts:LFA-157-Compressionadapter(3/8”ODx1/4”femaleOD)
2. Watts:LFA-109-Ander-lignCompressionUnion(3/8”ODby1/4”OD)
3. Anderson-Barrows12”Filtersupplyline1/4’compressionto1/4”compression
3. Connect water line to water source.
A. Water source options are typically the cold water tap under the sink or the water line connecting to the refrigerator ice
maker. DO NOT connect directly to ice maker line located on refrigerator.
B. IfconnectingtorefrigeratorsupplyBrewExpressprovidesa¼”Ttoconnecttothe¼”line.Sometimesthissupplylinemay
be a compression braided line. If so, it may require additional parts (not supplied). Please contact Brew Express for advice,
or additional notes below Option #2.
C. Do not connect to dishwasher line.
NOTE – shut off water sources before removing or alternating existing lines.

recess tab
water line
compression nut
quick connector
!
cord recess
!
water filter recomended
(not included)
!
!
SET UP
6
Waterlterrecommended
(not included)
4. Run water line to brewer location.
A. Run water line behind cabinets through the wall to brewer area.
B. Run water line direct from source to counter top (for example along the side of the refrigerator).
5. Waterline connection to brewer
A.Cutwaterlinenearnallocationofbrewer.
B. Attached water line to quick connector (supplied).
•placecompressionnutontowaterline
•slidewaterlineontobarbedfeature
•tightencompressionnut(withwrench)
•note-quickconnectorhasbuiltinvalve,watercannowbeturnedon
C. Turn on water supply and check for leaks.
D.SnapquickconnectorintomatingconnectoronrearofBrewExpressunit.Makesuretolistenfora“click/snap”noise.
This ensures the connection is completed.
•Toreleaseconnection,pressgreytabonconnector.
6. Connect Power
Plug the power cord into an outlet.
Excess cord can be stored in the grey tab on the back of the Brew Express.
grey
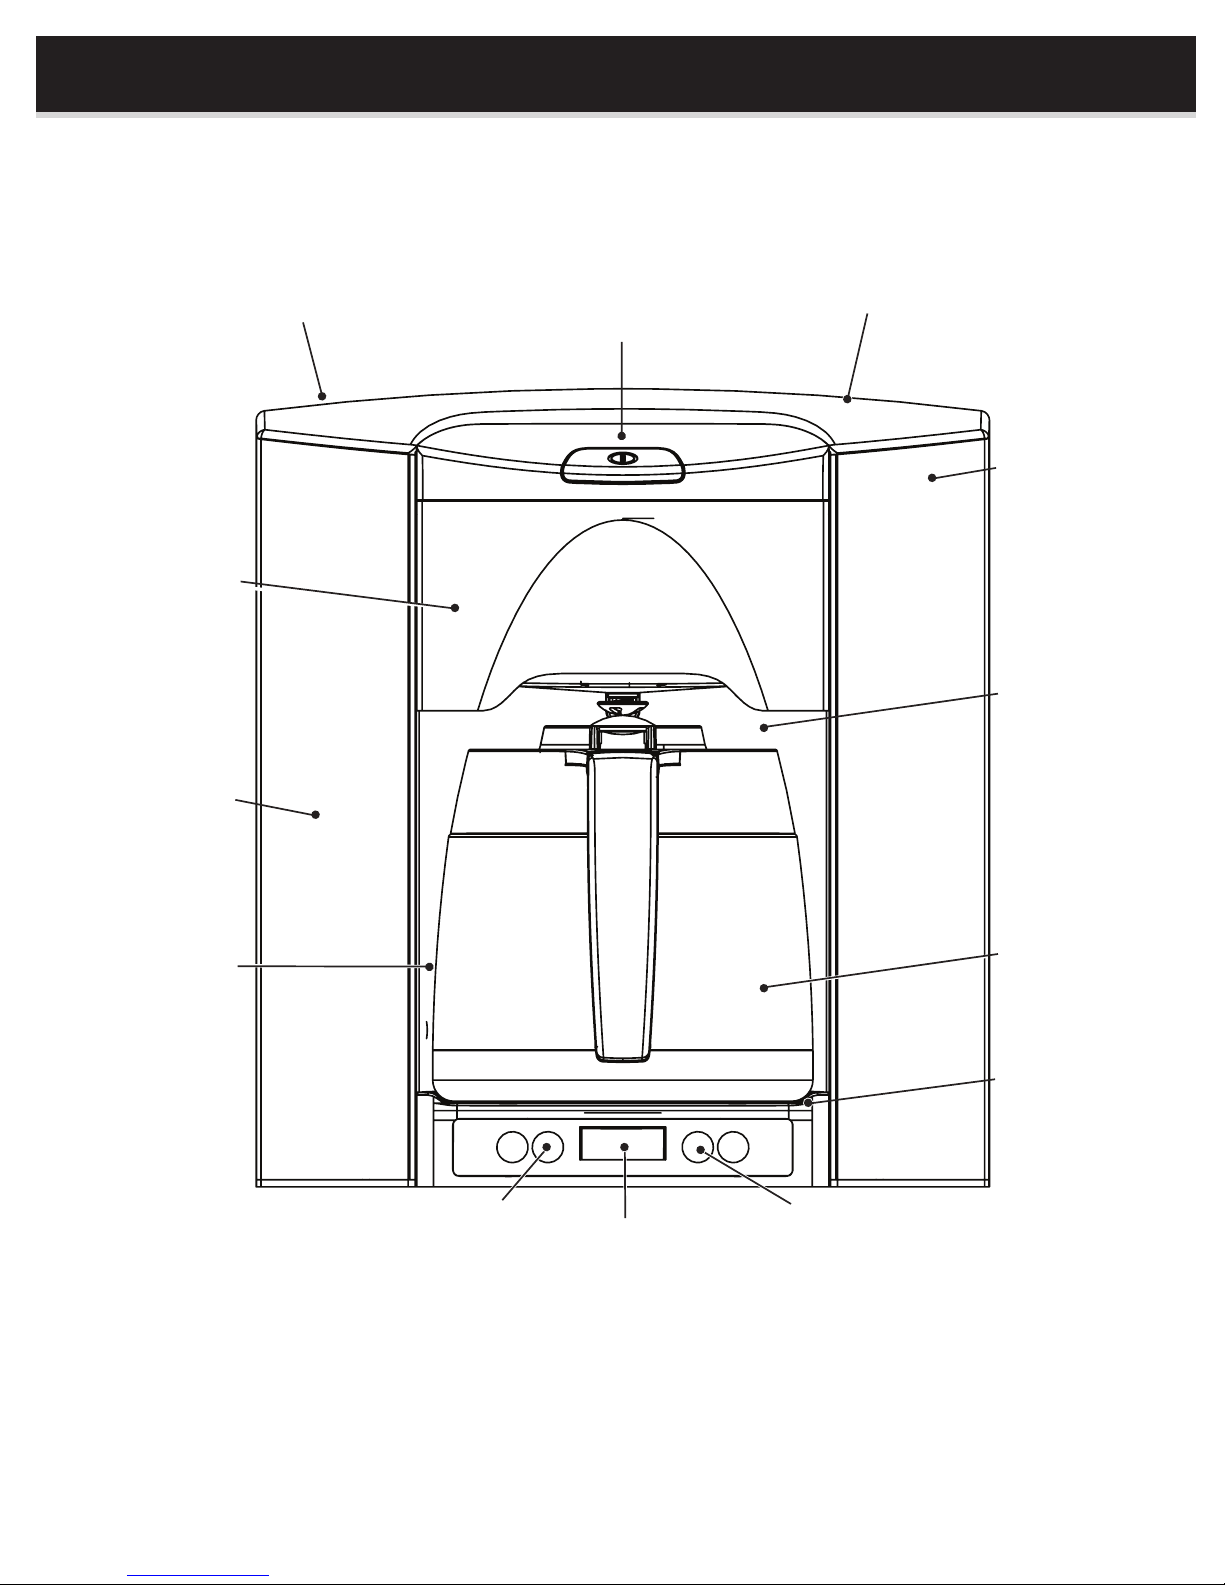
FEATURES
7
Power Switch
Programmable
timer and clock.
Large, bright and easy
to read display.
Adjustable cup selector
for the exact amount of
perfect coffee.
Patented in-the-wall
design saves precious
counter space.
Handsome Euro design
compliments any decor.
Convenient and practical.
Brew Express™ is plumbed into
the wall and fills on command
so you never have to manually
fill with water.
Easy clean carafe is both
functional and beautiful,
keeping beverages hot.
The blue accent light
is an attractive addition
to any room and helpful
nightlight.
Exclusive Pause-N-Brew
detection sensor knows
when carafe is removed
and stops the brew cycle.
Carafe pad never gets
hot so it won't burn
fingers or scorch coffee.
Stylish and sturdy
construction designed
for years of use and
trouble-free maintenance.
Unique brew basket
allows for removal of
carafe without spilling.
8
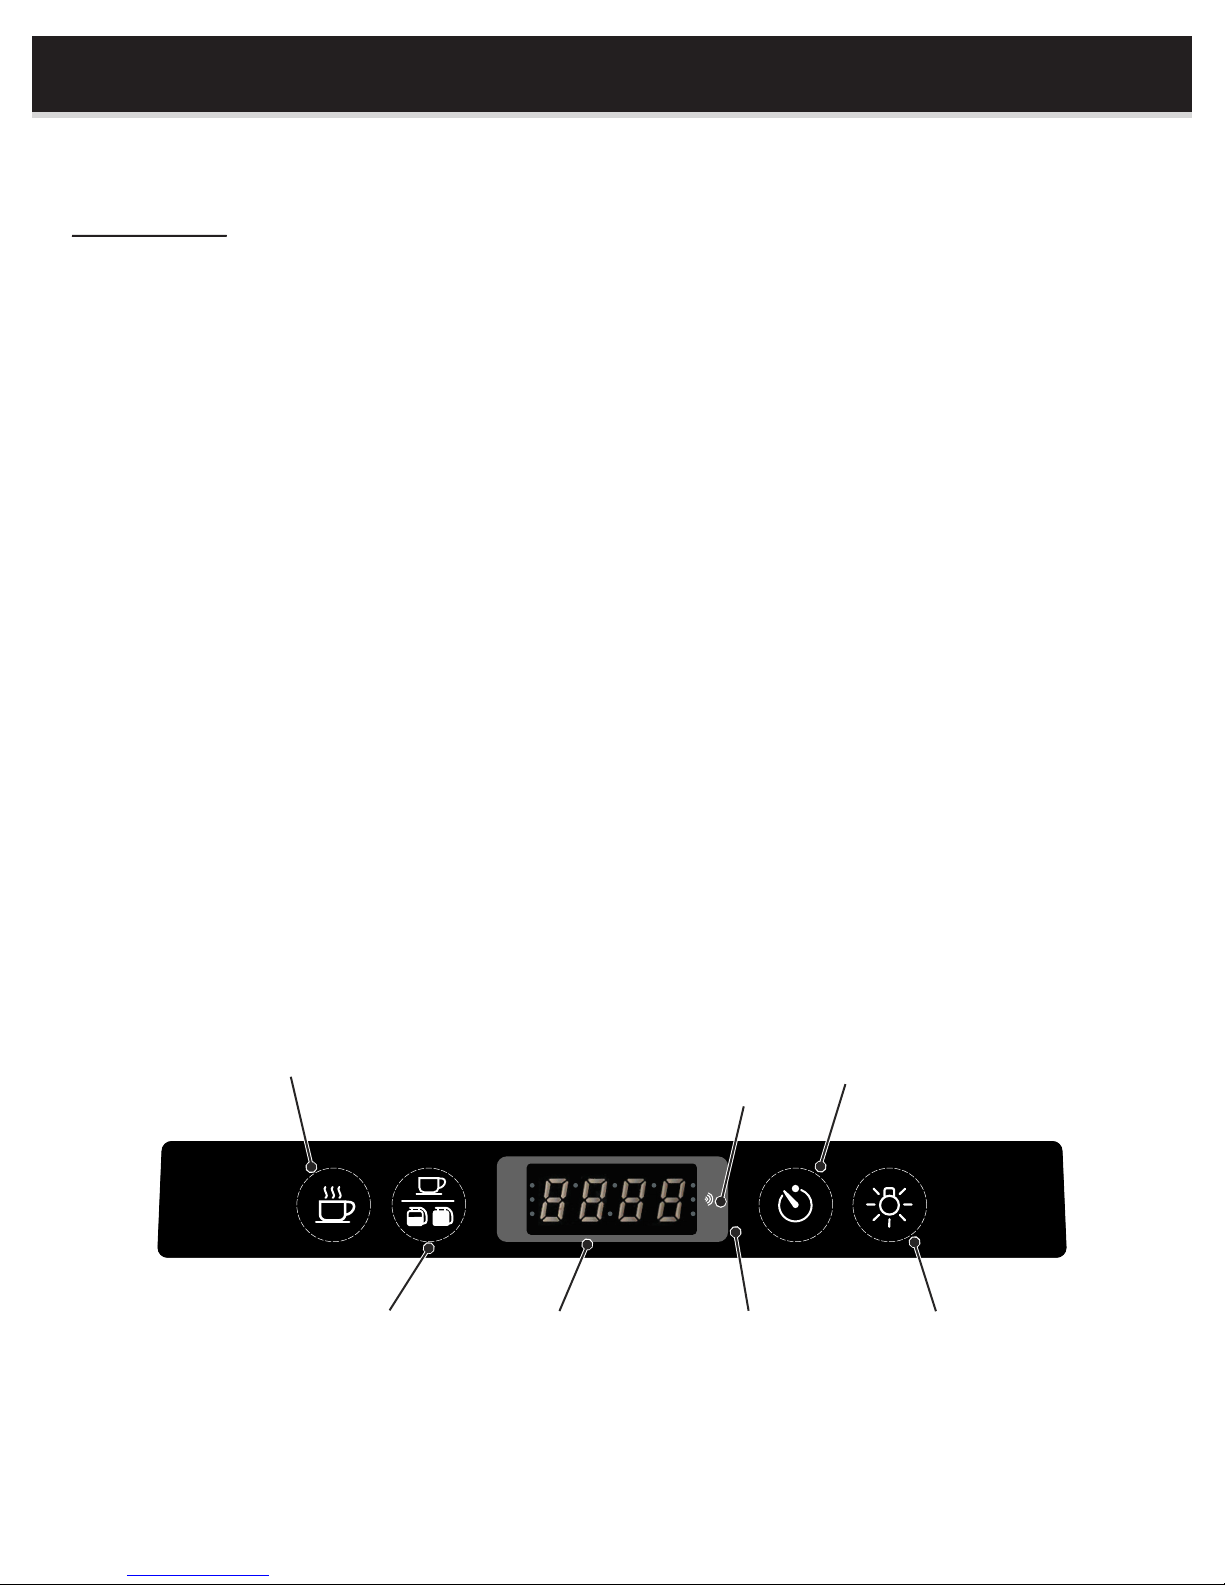
CONTROL FUNCTIONS
Display Panel
Brew Button
Starts brew cycle. Brewing stops automatically or by pressing the brew button again.
Status Light
Green (steady) – wait mode
Red (steady) – brew mode
Red (slow blinking) – carafe or mug not detected
Red (fast blinking) – no water
Adjustable Cup Selector
Selects the amount of water to be used during brew cycle:
2 cup (8 oz), 1/2 carafe (23 oz), full carafe (50 oz)*
* volumes my vary slightly
Clock
Continuously displays current time and is used for setting automatic brew time.
PM Indicator
Indicates PM for clock.
Beeper On/Off Indicator Light
Indicates if brew complete beeper is on or off.
Auto Timer Switch & Indicator Light
Turns on automatic brew cycle at set time.
Accent Lighting Button
Turns on and off accent lighting located behind brew basket.
PROGRAM DISPLAY PANEL
BREW CUP SELECTOR
2
TIMER
AM
PM
LIGHT
Adjustable Cup Selector Clock PM Indicator Accent Lighting
Brew Button
& Status Light Beeper On/Off
Indicator Light
Auto Timer Button
Other manuals for BEC-110
1
Table of contents
Other Brew Express Coffee Maker manuals


