Brickhouse Security 5.8 GHz Wireless Pocket User manual

Page 1 BrickHouse Security User’s Guide
5.8 GHz Wireless Pocket DVR
User’s Guide

Page 3 BrickHouse Security User’s Guide
The 5.8 GHz Wireless Pocket DVR
records video and audio files from 5.8 GHz wireless cameras or
wired cameras connected via A/V component cables. Use the
included remote control for one-touch recording to a micro SD
card, and review files on the integrated LCD screen.
In the Box
Inside your box you will find the
Wireless Pocket DVR with LCD
viewing screen, a remote control,
a USB cable, an A/V cable, a 3.7v
battery, a USB AC power adapter,
a manual, a mini camera, and AC
and battery power adapters for
the camera.

Page 4BrickHouse Security User’s Guide Page 5 BrickHouse Security User’s Guide

Page 6BrickHouse Security User’s Guide Page 7 BrickHouse Security User’s Guide
Getting Started
The first step in getting your DVR working is charging its bat-
tery. You can charge the battery by inserting it into the DVR and
connecting it via USB to a computer or by using the included AC
adapter. The LED on the charger will remain red while the battery
charges, and turn blue once it’s full. To insert the battery, slide
the cover off of the back of the DVR and insert it so the copper
contacts on the battery meet the ones on the device, and replace
the cover. Before first use, it is suggested you charge the device
for at least 6 hours.
The DVR has only 60MB of memory available, which is only
enough for a few photos.
Next, insert the micro SD card into the device. Insert it as shown
in the image next to the memory card slot until you feel it “click”
into place. Plug a wired camera into the AV IN port on the Pocket
DVR or turn on your 5.8 GHz wireless camera.

Page 8BrickHouse Security User’s Guide Page 9 BrickHouse Security User’s Guide
Recording from the DVR
Move the power switch to the ON position to view your camera’s
feed. While the record switch is set to the PLAY position, you will
see a live feed. If you are using a wireless camera, pressing the
CH button will move you through the 8 reception channels, one at
a time. Your current channel will be displayed in the upper-right
corner of the screen.
To power the wireless camera, just supply power to it and it
will automatically transmit video. To power the device, connect
either the included AC adaptor or battery pack. The battery
pack requires 3 AAA batteries and will supply approximately an
hour’s worth of power. Note the channel your camera is set to
broadcast on.
You can choose to transmit video on one of eight preset chan-
nels. Be sure that your camera is set to the same channel the
DVR is set to (the DVR’s default is 1). If you experience fuzziness
or static, try a different channel. When using multiple cameras,
be sure that they are set to different channels.
Operating the Included Camera
Channel Selection Diagram

Page 10BrickHouse Security User’s Guide Page 11 BrickHouse Security User’s Guide
Recording From the Remote Control
The remote control can be used with the DVR power switch in
either the ON or SLEEP position.
1) Power ON
2) Power OFF
3) Take Photo
4) No function on this model
To begin recording, move the record switch to the REC position.
In the bottom left corner of the screen, a timer will display how
much recording time you have remaining. The device will auto-
matically save every 30 minutes and start a new file.
Moving the record switch to the LOCK position will disable the
function buttons and turn off the LCD screen, but it will continue
to record video.
Note that if using multiple wireless cameras, the device can only
record from one at a time.

Page 12BrickHouse Security User’s Guide Page 13 BrickHouse Security User’s Guide
-Delete-- delete a selected file or all files
-Copy to Card-- copy files from the built in memory to a memory
card
-Slide Show-- automatically scroll through photos and the first
frame of video files after viewing each for 3 seconds, 5 seconds,
or 10 seconds. Press OK to view the current file and end the
slideshow
-Protect-- keeps a chosen file or all files from being deleted
through the Delete command
-Thumbnail-- view thumbnails of 9 files at a time on the LCD
Hold down the MODE button to return to the camera view.
Viewing Files on the DVR
To review photos and videos, hold down the MODE button for
approximately 3 seconds. Press the UP and DOWN arrow keys to
move through the list of files. Press the OK button to play a file.
While playing, press the UP button to speed up playback and
press the DOWN arrow to play in reverse.
Press the MODE button to view the playback menu. From this
menu you can choose to:

Page 14BrickHouse Security User’s Guide Page 15 BrickHouse Security User’s Guide
Loop Record - Choose to turn loop recording, or overwrite, On or
Off. When memory is full, it will automatically delete the oldest
30-minute file. Only use this function with an SD card larger than
2 GB.
Time Stamp - Choose to display no time/date stamp, the date
only, or both date and time.
Motion Detect - Turn Motion Detect on and off. When Motion De-
tect is on, the device will automatically record whenever motion
is sensed by the DVR and stop recording if there is no motion
in the frame for five seconds. We suggest using wired cameras
when using motion detection.
Settings
Press the MENU button to reach the main menu. The main menu
has 2 parts, “Video Set” and “Setup”. Press the CH button to
switch between the two. Use the UP and DOWN buttons to move
through options and press OK to select.
Video Set
Size - Set your recording resolution: VGA (640 x 480) or QVGA
(320 x 240)
Tuning - Adjust recording brightness, contrast, and color

Page 16BrickHouse Security User’s Guide Page 17 BrickHouse Security User’s Guide
System Reset: Restores the device to its factory settings.
TV Output: This is used when viewing recordings on a television.
Choose your local format, NTSC (North America) or PAL (most of
Europe and Asia).
Date Input: Choose the date layout and set the correct date and
time.
USB: Choose how the device will behave when connected to a
computer, as a disk drive, so you can view recorded videos, or as
a PC webcam.
Setup
Format: Format the memory card, preparing it to receive re-
corded data. Formatting a memory card deletes all data.
Vibra: Turn vibration alerts on or off. When on, the device will
vibrate when it’s powered on or off, taking a photo, recording
video, the memory card is full, or power is low.
Language: Choose the display language.
Auto Off: If left in standby, the device will power itself down
when inactive. Choose 3 minutes, 10 minutes, 30 minutes, or
turn this feature off.

Page 18BrickHouse Security User’s Guide Page 19 BrickHouse Security User’s Guide
Troubleshooting
Problem: The DVR screen is only showing static.
Solution: If using a wireless camera, check the channel on your camera and cycle
through the channels on the DVR. Though it can support up to 8 cameras, we do
not recommend using more than 4 at a time.
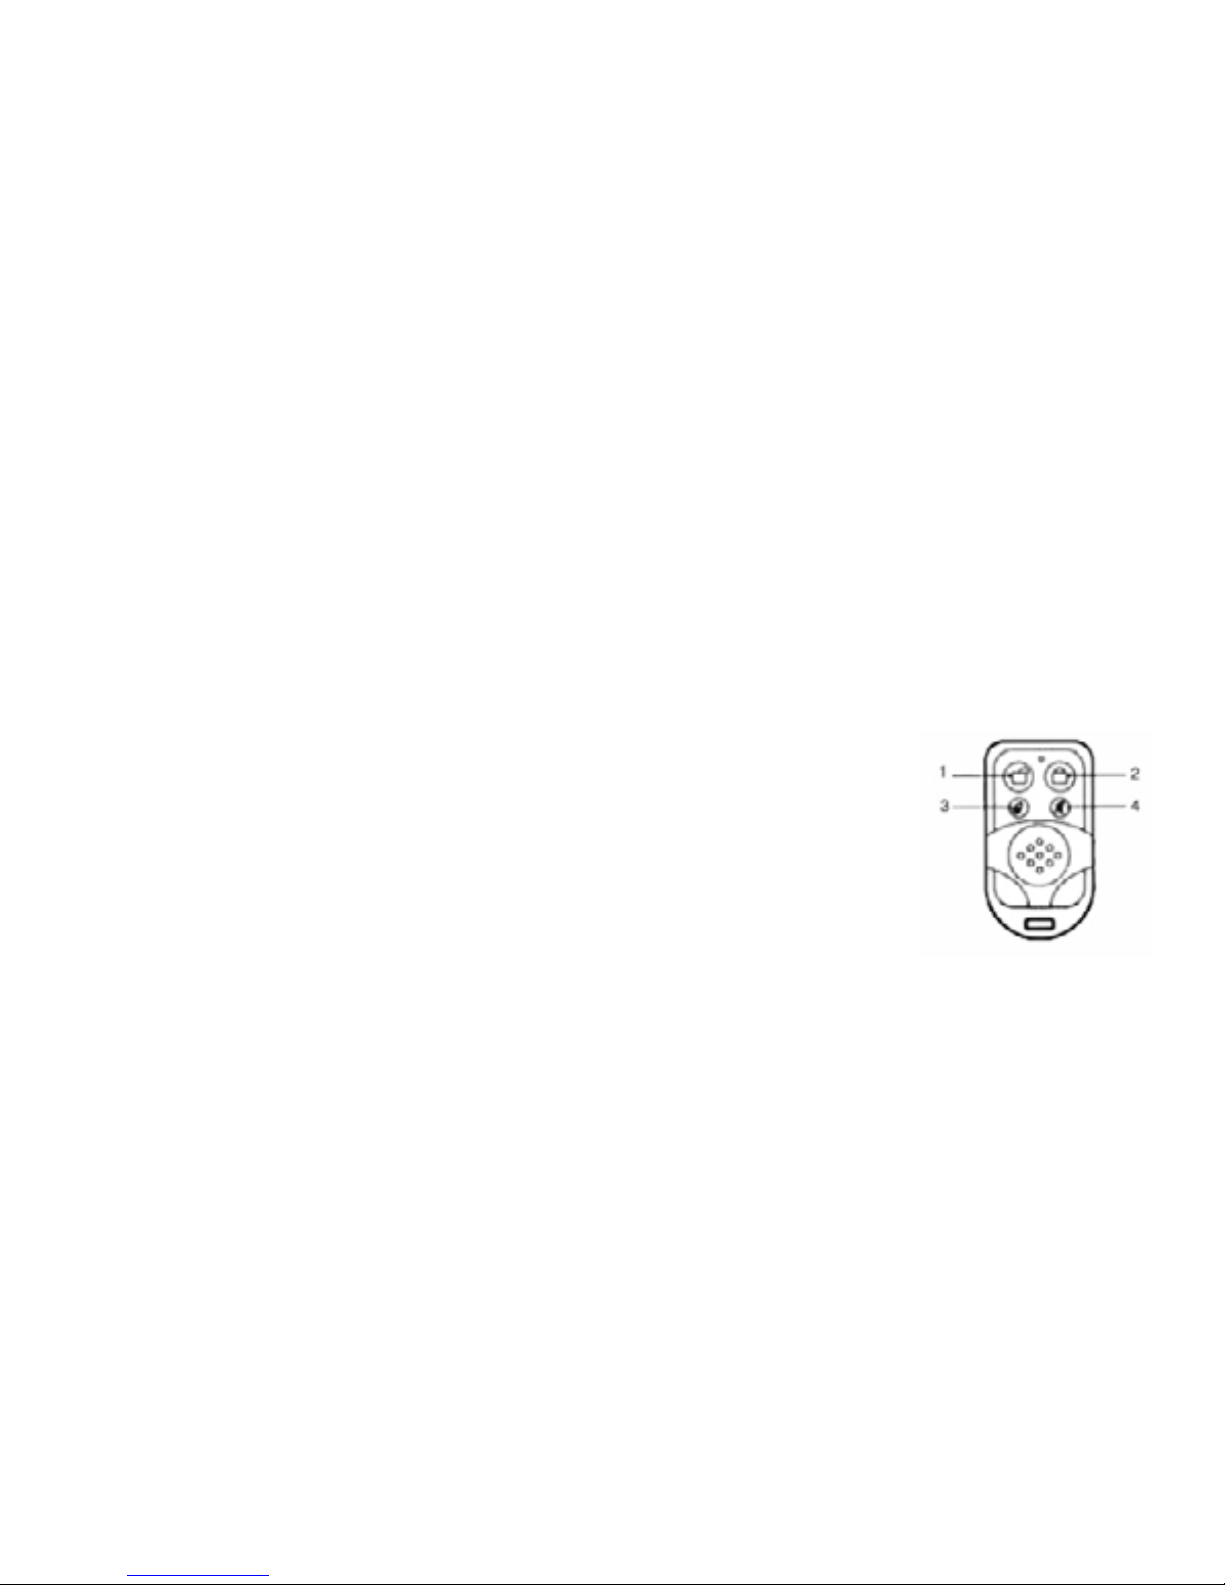
Problem: The remote is not functioning.
Solution: Check that the battery in the remote is not depleted. The remote control uses a
27A 12V battery.
Problem: The motion detection feature doesn’t seem to be working; it’s recording when
nothing is moving.
Solution: If you are using wireless cameras, interference and short bursts of static may
cause the DVR to register this change in the transmitted image as motion and
activate recording.
Viewing Files on a Computer
Connecting the device to your computer requires that the DVR
first be powered on. Connect the device via USB cord and the
DVR will automatically change to PC Connection mode. Your PC
will detect the DVR as removable storage. Open the removable
drive on your PC to view the DCIM folder. The DCIM folder con-
tains 100DSCIM. Open that folder to view your files.
To view video files, we suggest using VLC Player. VLC can be
downloaded for free from the programmers’ site at http://www.
videolan.org.

Page 20BrickHouse Security User’s Guide Page 21 BrickHouse Security User’s Guide
Glossary (cont.)
GB: GB is short for gigabyte, which is a unit used to measure
computer storage capacity and is approximate to 1.07 billion
bytes. 1 Gigabyte of data is almost twice the amount of data
that a CD-ROM can hold. Additionally, 1 Gigabyte could hold the
contents of about 10 yards of books on a shelf.
LCD: Abbreviation of “liquid crystal display.” LCD screens are
thin, flat electronic displays.
LED: An abbreviation for “light emitting diode”; it’s an electronic
device that lights up when electricity passes through it. LEDs are
good for displaying images because they can be relatively small,
and they do not burn out. However, they require more power
than LCDs.
Glossary
Composite Video: Composite video cables carry video signal down
a single line. Composite video RCA plugs are commonly yellow for
video, with red and white wires carrying audio.
DVR: Short for Digital Video Recorder, this abbreviation refers to
any device capable of recording and saving a digital video file.
This is the high-tech equivalent of a VCR.
FPS: FPS stands or frames per second. It is used for measur-
ing the frame speed in a moving image. FPS defines how many
pictures are seen per second.

Page 22BrickHouse Security User’s Guide Page 23 BrickHouse Security User’s Guide
Glossary (cont.)
RCA Connector: A type of electrical connector commonly used to
carry audio and video signals. They have largely replaced BNC
connections on most home entertainment systems. It is used to
connect everything from cameras to video game systems.
USB: Universal Serial Bus. USB is currently the standard method
for connecting devices to a computer.
Glossary (cont.)
Micro SD Card: Micro SD cards, also known as TransFlash, are
smaller versions of SD memory cards. As electronic devices are
becoming smaller, Micro SD cards are becoming more and more
common in the marketplace. Currently, the highest capacity of
micro SD card is 32 GB.
NTSC: The standard analog video format used throughout North
America and much of South America. Some other areas of the
world use formats called PAL or SECAM.
PAL: The standard analog video format used in much of Europe,
Asia, and other parts of the world. Some other areas use formats
called NTSC or SECAM.

Page 24BrickHouse Security User’s Guide
WWW.BRICKHOUSESECURITY.COM
Table of contents
Other Brickhouse Security DVR manuals

Brickhouse Security
Brickhouse Security Speaker DVR User manual

Brickhouse Security
Brickhouse Security HD Video Spy Pen User manual

Brickhouse Security
Brickhouse Security Tilt Mini User manual

Brickhouse Security
Brickhouse Security DT08 User manual

Brickhouse Security
Brickhouse Security Black Box Micro User manual

Brickhouse Security
Brickhouse Security Angel Eye 2.0 User manual