Brickhouse Security HD Video Spy Pen User manual

Page 1 BrickHouse Security User’s Guide
HD Video Spy Pen
User’s Guide

Page 2BrickHouse Security User’s Guide Page 3 BrickHouse Security User’s Guide
The HD Video Spy Pen
is a simple, multifunctional recording device built into a working
ballpoint pen. Take photos, record audio, or capture HD video with
the touch of a button.
In the Box
In the box you will nd the HD Video Spy
Pen, a USB cable, an AC power adapter,
and a mini disc that contains a driver
that allows the device to be used as a
webcam (32-bit Windows computers
only).

Page 4BrickHouse Security User’s Guide Page 5 BrickHouse Security User’s Guide

Page 6BrickHouse Security User’s Guide Page 7 BrickHouse Security User’s Guide
Getting Started
The rst step in using your device is charging it. Connect the device to a USB port on your PC or plug it into
AC power with the included adapter. While charging, the LED indicator will blink red and will become solid
when the battery is full. Before rst use, we suggest charging the device for 4 hours.
This device records to internal ash memory. Depending on which version you purchased, it will either have 4
or 8 GBs of storage space.
If you plan on viewing your les on your computer, we suggest using VLC Player. The most recent version can
be downloaded at no cost from http://www.videolan.org.
To power the device on, hold down the Record button for 2-3 seconds. The LED indicator will be green while
the device is booting, and then blink red once. It will then glow to indicate what mode it is in. To power the
device off, hold down the Record button for 2-3 seconds, and the LED light will turn off.
Recording Video
To record video, move the Mode switch to the 1 position. While in video standby, the LED indicator will be
solid red. Press the Record button to begin recording video. The LED will blink while recording. Press the
Record button again to save your current le and stop recording.
Taking Photos
To take photos move the Mode switch to the 2 position. While in photo standby mode, the LED indicator will
be steady green. Press the Record button. The LED will blink to indicate it is capturing and storing your photo,
and will return to solid green.

Page 8BrickHouse Security User’s Guide Page 9 BrickHouse Security User’s Guide
Recording Audio
To record audio, move the Mode switch to the 3 position. In audio standby the LED will glow blue. Press the
Record button to begin recording. During recording, the LED will blink blue. To stop recording and save a le,
press the Record button again, and the device will return to audio standby mode.
Reviewing Files on a Computer
To view your les on a computer, simply connect the device via the supplied USB cord or by inserting the
device directly into a USB port, making sure the device is powered Off. It will connect as a removable drive,
and depending on the settings on your PC, it may automatically notify you that new hardware has been
detected. If so, select Open Folder to View Files.
If it is not automatically detected, click Start on your desktop. Select My Computer if you are using Windows
XP, or Computer if using Windows Vista or Windows 7. The device should be listed as a Removable Disk
named MINIDV under the Devices With Removable Storage section. Open that drive, which will contain a
folder called _REC. Within the _REC folder will be another folder named 100MEDIA. This folder will contain all
your recorded les.
As mentioned earlier, we suggest using VLC Player to play back video les.
Using Your Device as a Webcam
This device can only be used as a webcam on 32-bit Windows operating systems. If you are not using a
Windows computer, or are using a 64-bit Windows computer, this function will not work.

Page 10BrickHouse Security User’s Guide Page 11 BrickHouse Security User’s Guide
To turn the time and date stamp off, enter N instead of Y.
There is also a sample .txt le on the included CD.
Once you’ve created the le, connect the device to your computer via USB and save the .txt le to the device’s
root directory. When you connect the device to your computer, it will be assigned a drive letter (ex. C:, D:, E:).
When you open that drive, you are in the root directory, or topmost level of the drive.
After you have loaded the le, safely disconnect the device from your computer, turn the device on and off,
and the time and date you loaded should now appear on any new videos and photos you record.
To use your device as a webcam, you will rst need to install the driver from the included CD. Run the
executable le named PcCamera_Driver to install it. Follow the prompts on your screen and then reboot your
computer.
To access the webcam fuctionality of the device, with power off, hold down the RECORD button and connect
the device to your computer via USB. This should mount the device on your PC in webcam mode.
Setting Time and Date
Setting the time and date stamp on your device is easy. Simply create a .txt le on your computer and name it
“time”. In that le you will enter the date and time in the following format: year.month.day hour:minute:second.
(Ex. 2011.01.31 12.00.00 Y)Setting Time and Date

Page 12BrickHouse Security User’s Guide Page 13 BrickHouse Security User’s Guide
Basic Specications
Format Resolution Recording Time Battery Life
Audio WAV X 1,000 mins. per GB 75 mins.
Video AVI 1280 x 720 20 mins. per GB 75 mins.
Photo JPEG 4032 x 3024 X X
Troubleshooting
Problem: The device seems to have frozen and isn’t reacting when any buttons are pressed.
Solution: This usually occurs if the device receives too many commands in too short a time. To reset
the device, move the the Mode Switch to the 2 position. Hold down the Record button and
move the Mode Switch to the 1 position, and it will reset.
Problem: When playing back my video, I can hear audio, but have no video.
Solution: This most often occurs if your computer’s media player is having trouble with your les. Try
using VLC player, which can be downloaded for free at http://www.videolan.org.
Problem: My video playback is “choppy” or “stuttering.”
Solution: If this is occurring, try copying the video les to your PC. This happens when the le is too
large to be played back using your USB connection.

Page 14BrickHouse Security User’s Guide Page 15 BrickHouse Security User’s Guide
Glossary
DVR: Short for Digital Video Recorder, this abbreviation refers to any device capable of recording and saving a digital video
le. This is the high-tech equivalent of a VCR.
GB: GB is short for gigabyte which is a unit used to measure computer storage capacity and is approximate to 1.07 billion
bytes. 1 Gigabyte of data is almost twice the amount of data that a CD-ROM can hold. Additionally, 1 Gigabyte could hold the
contents of about 10 yards of books on a shelf.
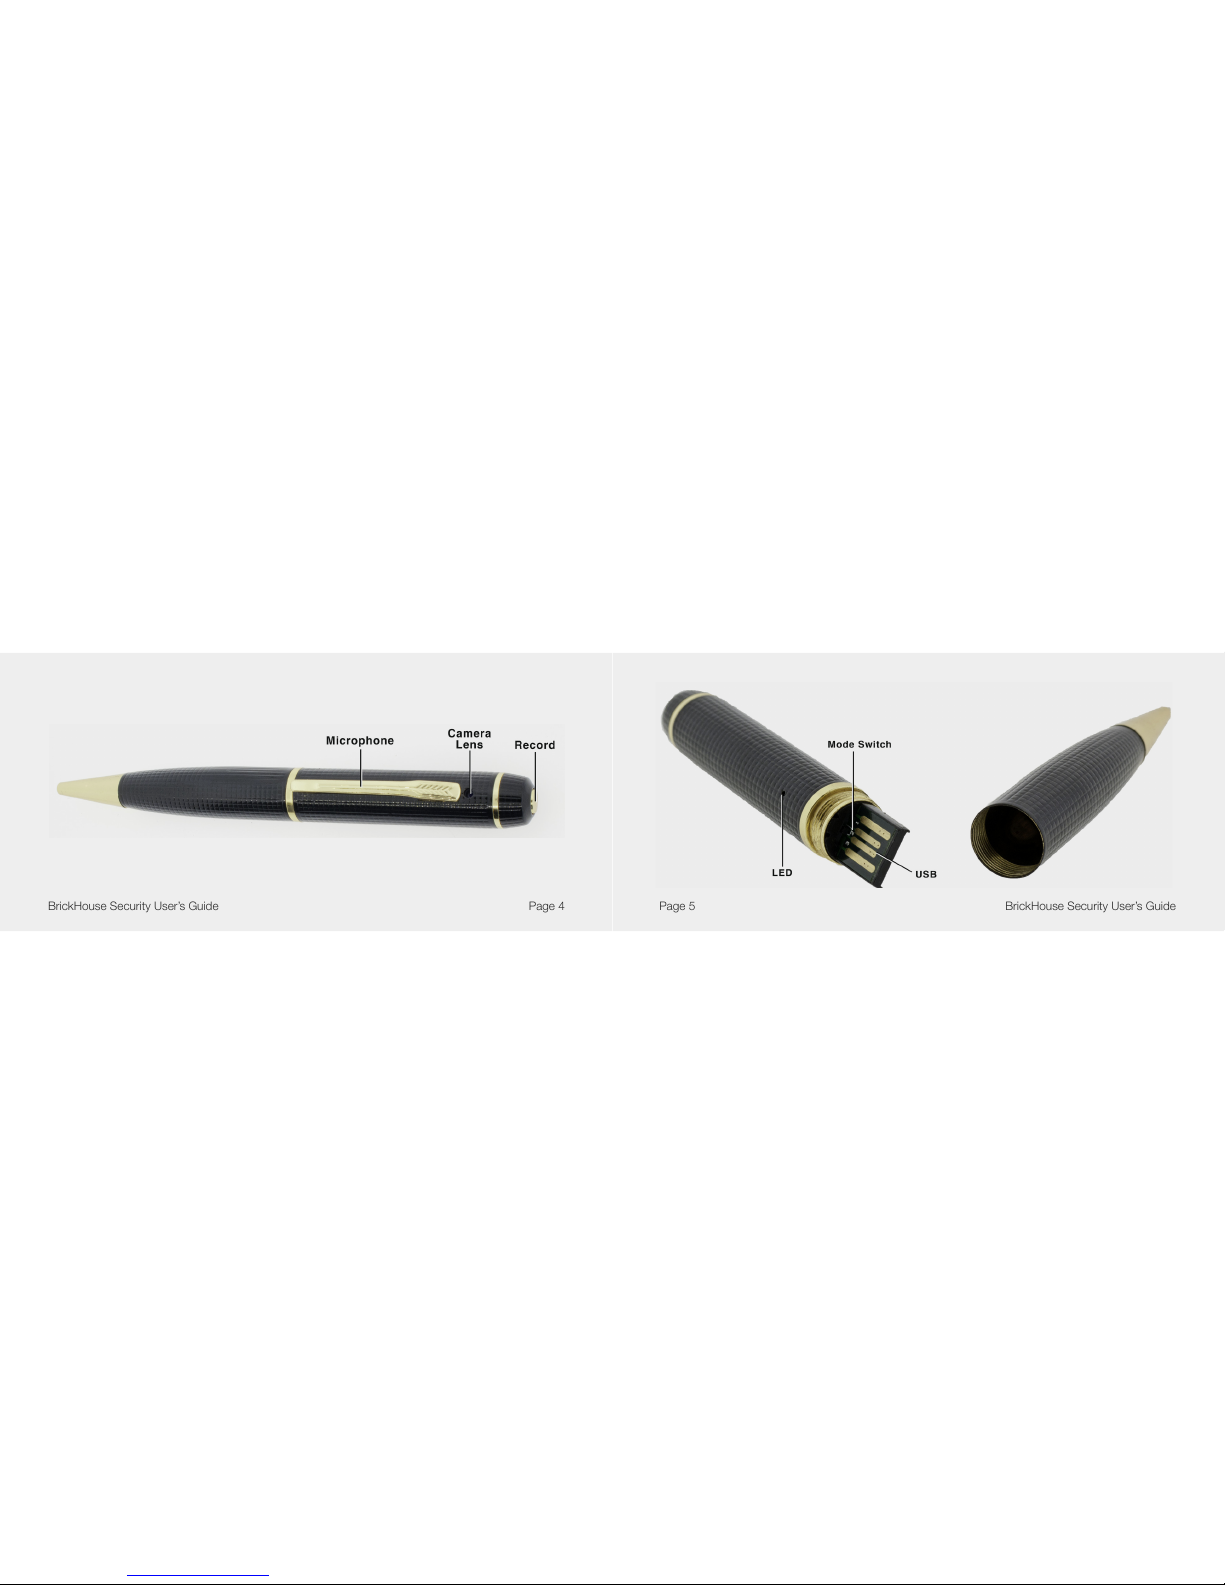
LED: An abbreviation for “light emitting diode,” it’s an electronic device that lights up when electricity passes through it. LEDs
are good for displaying images because they can be relatively small, and they do not burn out. However, they require more
power than LCDs.
Glossary (cont.)
Micro SD Card: Micro SD cards, also known as TransFlash, are smaller versions of SD memory cards. As electronic devices
are becoming smaller, Micro SD cards are becoming more and more common in the marketplace. Currently, the highest
capacity of micro SD card is 32 GB.
Root Directory: A root directory is the rst directory on a drive or disk. For example, when connecting a removable drive to
a Windows computer, it will be assigned a drive letter (ex. C:, D:, E:). When opening that drive, the rst window listing the
contents of the drive is the root directory.
USB Port: A USB port is a standard cable connection interface on personal computers and consumer electronics. USB ports
allow standalone electronic devices to be connected via cables to a computer. USB can connect computer peripherals such
as mice, keyboards, PDAs, gamepads and joysticks, scanners, digital cameras, printers, personal media players, ash drives,
and external hard drives.

WWW.BRICKHOUSESECURITY.COM
Table of contents
Other Brickhouse Security DVR manuals

Brickhouse Security
Brickhouse Security 5.8 GHz Wireless Pocket User manual

Brickhouse Security
Brickhouse Security Black Box Micro User manual

Brickhouse Security
Brickhouse Security Tilt Mini User manual

Brickhouse Security
Brickhouse Security Speaker DVR User manual

Brickhouse Security
Brickhouse Security DT08 User manual

Brickhouse Security
Brickhouse Security Angel Eye 2.0 User manual