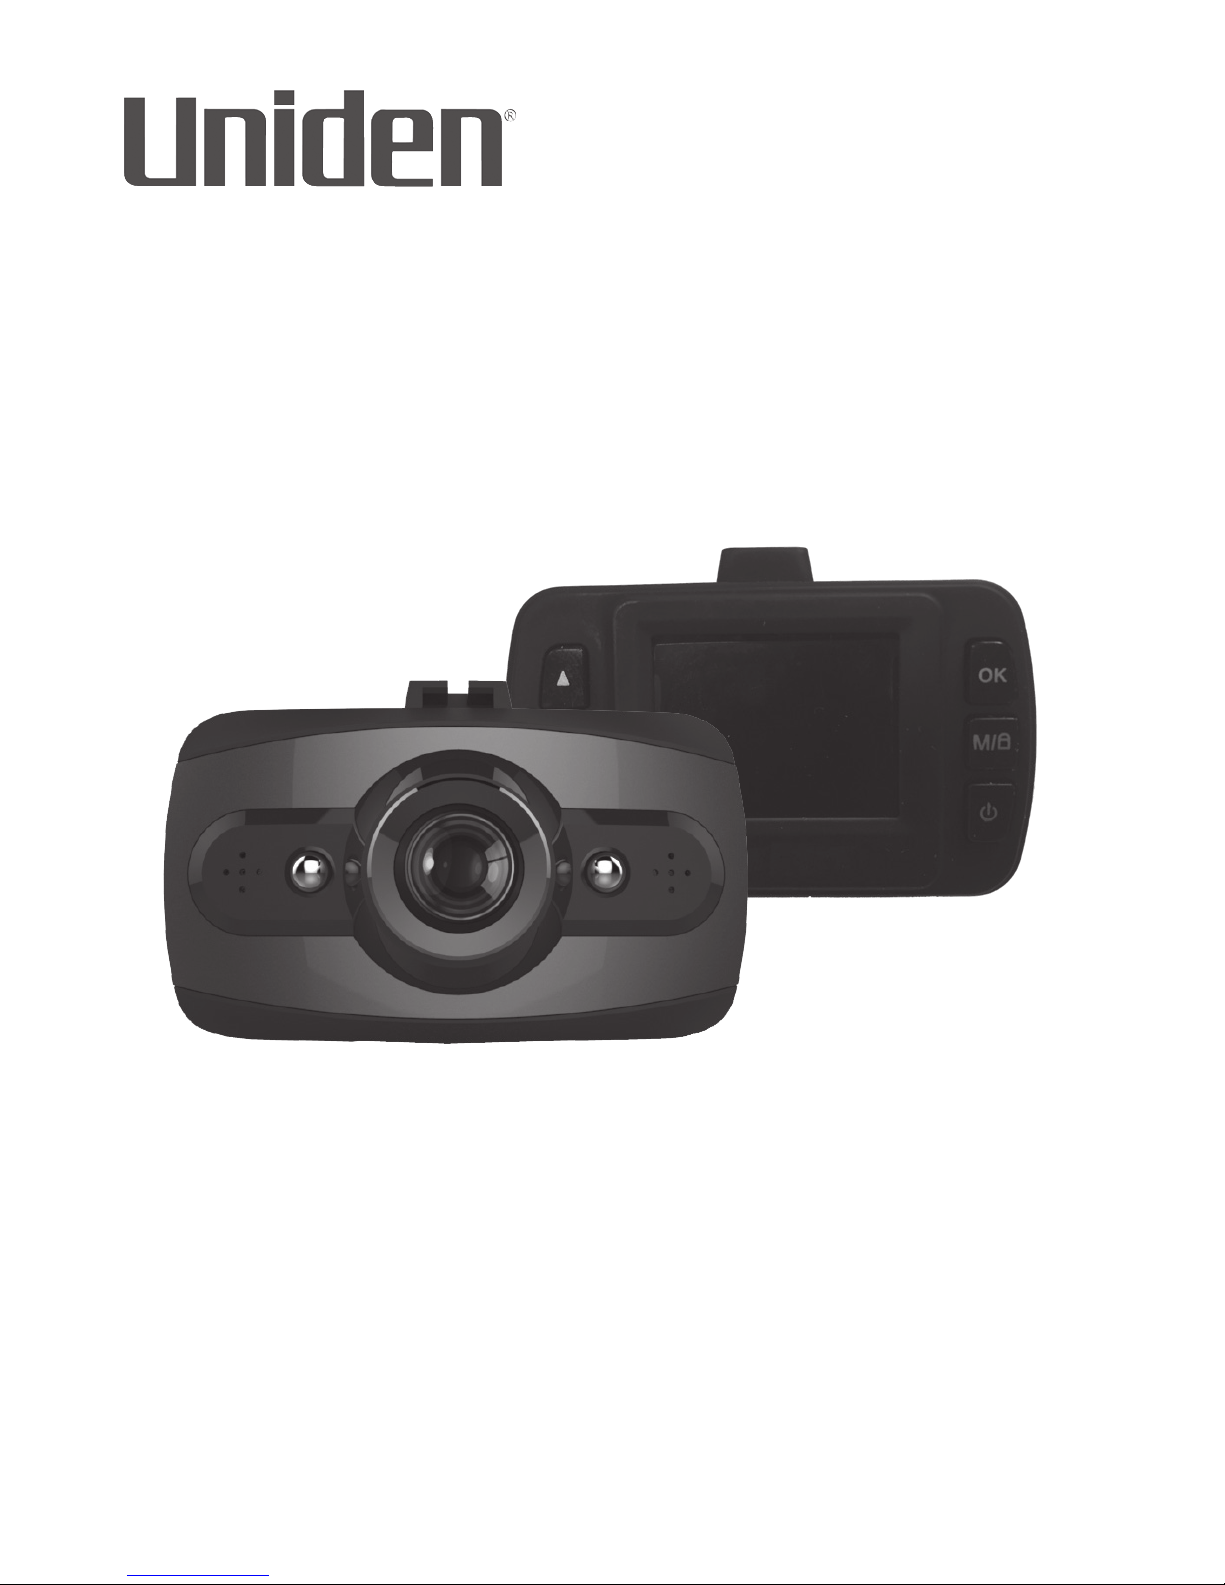
Uniden DCAM User manual

DCAM
Issue 1, May 2016
Printed in China
© 2016 Uniden America Corporation
Irving, Texas
OWNER’S MANUAL
AUTOMOTIVE VIDEO RECORDER

IMPORTANT SAFETY INSTRUCTIONS
• Unidendoesnotrepresentthisproducttobe
waterproof.Donotexposethisproducttorainor
moisture.
• Thisproductisintendedforuseinamotorvehicle.
Don’tinstallthedevicewhereitwillblockthedriver’s
viewoftheroad(includingthemirrors)orthe
deploymentoftheairbag.
• Keepyourattentionontheroad!Don’ttrytooperate
orfocusonanydevicewhiledriving.Ifyouhaveto
concentrateonthedevice,pullofftheroadforafew
minutes.
• Ensurethatthecameralensiskeptcleanandthereis
nothingblockingthelens.
• Don’tleavethedeviceindirectsunlightforalong
periodoftimeorwherethetemperaturecouldgoabove
140°F(60°C).

CONTENTS
IMPORTANT SAFETY INSTRUCTIONS ..................... 2
OVERVIEW .................................................................. 5
FEATURES..................................................................................... 5
WHAT’S IN THE BOX? .................................................................. 6
CONTROLS AND INDICATORS.................................. 7
INSTALLATION AND POWER UP .............................. 9
ATTACHING THE WINDSHIELD MOUNT..................................... 9
INSTALLING THE MICROSD CARD........................................... 10
POWERING UP THE DCAM........................................................ 10
OPERATING THE DCAM .......................................... 11
RECORD MODE .......................................................................... 12
Recording ................................................................................. 12
Save Current Recording.......................................................... 13
Record Mode Menu .................................................................. 13
PHOTO MODE ............................................................................. 15
Photo Mode Menu .................................................................... 15
PLAYBACK MODE ...................................................................... 17
Playback Mode Menu............................................................... 17
SETUP MENU .............................................................................. 18
USING THE DCAM .................................................... 20
CONNECTING TO A PC ............................................ 21

MASS STORAGE......................................................................... 21
TROUBLESHOOTING............................................... 22
SPECIFICATIONS...................................................... 23
ONE-YEAR LIMITED WARRANTY ........................... 26

5
DCAM
AUTOMOTIVE VIDEO RECORDER
OVERVIEW
TheUnidenDCamisanultra-compactrecorderthatcan
besetuptocontinuouslycapturehighqualityvideoeven
inlowlightconditions.Thebuilt-inG-Sensorsystem
triggersthecameratoinstantlybeginrecordingifthe
vehicleisbumpedorscraped.TheDCamcaneven
recordoutsidethevehicleforthedurationoftheinternal
battery’spower.
FEATURES
• 1.5”colorscreen
• HighDenitionRecording
• InfraredNightVision
• G-Sensor
• LoopRecording
• AutoPowerOff
• DateandTimeStamp
• RecordsontomicroSDCard(8GBincluded);Supports
upto32GB
• InternalRechargeableBattery(upto10minutes)
• Built-inMicrophone

6
WHAT’S IN THE BOX?
UnidenDCam Windshield
Mount
8GBMicroSD
card
Notshown:
Printedmaterials
DC(CAR)
Adapter
USBCable
If any items are missing or damaged, get answers
24/7 at our website: www.uniden.com.

7
CONTROLS AND INDICATORS
NOTE: Your unit may appear slightly
dierent from the one shown.
2
11
6
9
8
7
5
3
1
4
10
12
15
13 14
MIC RESET
17
16
No. Item Description
1Lens
2USBPort ConnectExternalPower&charge
battery.
ConnecttoPCfordata(microSD
card)transfer.

8
No. Item Description
3UP▲ InRecordmode,zoomin.
InMenulist,movethecursoroneline
up.
InPlaybackmode,increasevolume.
4LED BLUE-(Solid)NotRecording
BLUE-(Flashing)Recording
5MENU Whennotrecording,openstheMenu.
6LED RED-Indicatescharging
7DOWN
▼
InRecordmode,zoomout.
InMenulist,movethecursoroneline
down.
InPlaybackmode,decreasevolume.
8LCDScreen
9OK InRecordmode,pressthisbuttonto
start/stopvideorecording.
InPhotomode,usethisbuttontotake
asnapshot.
InMenus,presstoconrmamenu
selectionandconrmchangesinthe
settings.
10 M/ Whilerecording,presstolock(save
fromoverwrite)thecurrentrecording.
Whennotrecording,presstoshift
betweenRecord,Photo,andPlayback
mode.

9
No. Item Description
11 POWER Presstoturnpoweron.
Press&holdtoturnpoweroff.
InRecordmode,presstoturnInfrared
LEDs(nightvision)on/off.
12 CardSlot microSDcardslot
13 Reset Ifthedevicefailstooperate,try
resettingthedevice.Pressthe
resetbuttonusingapinorunfolded
paperclip.
14 MIC Recordssound
15 Bracket
Slot
Slidethewindshieldmountbracket
hookintothisslottosecuretheunit.
16 Infrared
LED
LEDfornightvision
17 Speaker
INSTALLATION AND POWER UP
ATTACHING THE WINDSHIELD MOUNT
1. Insertthewindshieldmountbrackethookintothe
bracketslotonthetopoftheDCam.
2. Afterinsertingthehook,slideitdownuntilitlocksin
position.
3. Pressthesuctioncupatagainstthewindshield.
4. Pushthesuctionlockupuntilitsnapsintoplaceand
tightenthelockingcollartosecure.

10
5. Gentlypullonthemounttomakesureitissecure.
INSTALLING THE MICROSD CARD
A compatible microSD card (8GB supplied) is
required to record and store videos and photos.
TheunitcansupportmicroSDHCcards(HighCapacity
microSD)upto32GBincapacity.Unidenrecommends
usingagoodqualitymicroSDHCcardofatleast8GB
capacityandminimumClass10speed.
InsertaformattedmicroSDcardgentlyintheslotonthe
sideoftheunit.Toremovethecardfromtheslot,press
theedgeofthemicroSDcardinwardsforittopopout
andthenpullitoutoftheslot.
IfthemicroSDcardisnotformatted,refertopage19
toreformatthecard.
POWERING UP THE DCAM
Only use the DC car adapter that comes with your
device. Any other adapter might damage the device.
1. Refertoyourcar’sowner’smanualtoverifywhere
thepoweroutletsareonandaroundthedashboard.
Locateanoutletthatsupplies12Velectricpower
whenthekeyisintheONorACCposition.
2. Connectthecaradaptertothecameraandtothe
thatpoweroutlet.
3. Startthecar.Thecameraturnsonautomaticallyand
beginsrecording.Whenthecar’sengineisturned

11
off,thecamerawillautomaticallyturnoffinafew
seconds.
Charge the camera for at least 15 minutes after it is
turned on for the rst time or after it has been turned
off for more than three weeks.
4. Atothertimes,pressthe buttontoturniton.
Pressandholdthe buttontoturnitoff.
Theunitchargestheinternalbatterywheneverpoweris
detectedthroughtheUSBport.Whentheunitisbeing
charged,theredLEDison.Itwillautomaticallyturnoff
whentheunithasbeenchargedcompletely.Theunitwill
takeabout90minutestochargecompletely.TheBattery
Statusicontellsyouhowfullthebatteryis.
Empty Low Half Full Full
OPERATING THE DCAM
TheDCamoperatesinthreemodes:Recordmode,
Photomode,andPlaybackmode.Thesemodesalso
havemenustohelpyoucongurerecordingandtaking
photos.PressM/ untilyouaccessthemodeyouwant.
Aniconappearsintheupperleftcornerofthescreenfor
eachmode.

12
RecordMode PhotoMode PlaybackMode
InRecord,Photo,orPlaybackmode,presstheMenukey
( )oncetoaccessthemenusettingsforthatparticular
mode.PressittwicetodisplaytheSetupmenu.
TheSetupmenuiscommontoallmodes.Seepage
18.
RECORD MODE
Torecordvideo,verifythatavalidmicroSDcard(8GB
supplied)isinsertedinthemicroSDslot.
Inserting or removing the microSD card when the
unit is recording causes the device to shut down.
Recording
Whenconnectedtoacarcharger,theunitautomatically
goesintoRecordmodeandstartsrecording.The
icondisplaysonthescreen,withaashingreddot
besideittoindicaterecordingisinprogress.Aredtimer
alsodisplaysintheupperrightcorner.
Iftheunitisnotrecording,pressOKtostartrecording.A
ashingreddotappearsnexttothe iconandared
timerdisplaysintheupperrightcorner.Tostoprecording,
pressOKandthereddotandtimerdisappear,indicating
thattherecordinghasstopped.

13
The DCam must be connected to power to record
automatically when powered on.
Save Current Recording
Youcansavethelethatiscurrentlyrecordingso
thatitwillnotbeoverwrittenifspaceisneeded.While
recording,pressM/ ;the iconappearsonthe
screen.Thisindicatesthattherecordinghasbeenlocked
andwillnotbeoverwrittenbynewvideoclips.
PressOK tostoprecording.The icondisappears
fromthescreen.
Record Mode Menu
You cannot access menus when the the unit is
recording. To access the Record menus, stop
recording by pressing OK.
InRecordmode,presstheMenukey( )onceto
accesstheRecordmodemenu.Press▲and▼toscroll
throughthevariousoptionsandthenpressOKtoselect.
Press untilyouexittheMenuandreturntotheRecord
modescreen.
Option Description
Resolution Setsthevideoresolution.(Maximum
resolution=1080FHD)

14
Option Description
Loop
Recording
Looprecordingallowsyoutosetvideo
lelength(Off,1,2,or3minutes).
Selectingalelengthactivatesloop
recording.WhenthemicroSDcardlls
up,itloopsbacktotheoldestleand
recordsoverit.
IfyouselectOFF,videorecordsin10
minuteblocks.WhenthemicroSDcard
llsup,aCardFullmessagedisplays
andrecordingstops.
Exposure
Setsthebrightnesssensitivity.
Motion
Detection
Enablethissettingtoallowtherecorder
tostartrecordingwhenitdetects
movement.
Record
Audio
Turnsaudiorecordingon/off.
DateStamp Enables/disablesthedateandtimeon
theimageles.
G-Sensor Detectssignicantorsuddenmovement;
automaticallylocksthecurrentrecording.

15
Option Description
BeepSound Turnsonsoundswhenyoupresskeys.
PHOTO MODE
TheDCamletsyoutakesnapshotsoflivevideothatis
notrecording.Youcannottakeasnapshotoflivevideo
whileitisrecording.Youalsocannottakeasnapshotof
recordedvideoplayingback.
Totakeasnapshot:
1. VerifythatavalidmicroSDcardisinsertedinthe
microSDslot.
2. PressM/ toselectPhotomode; displaysin
theupperleftcorner.
3. PressOK.Theunittakesasnapshotoflivevideo.
Photo Mode Menu
LiketheRecordmodemenu,presstheMenukey( )
oncetoaccessthemenusettingsforthePhotomode.
PressittwicetodisplaytheSetupmenu.
TheSetupmenuiscommontoallmodes.See
page18.

16
Option Description
Capture
Mode
Setsthetimegapforcapturinganimage.
Forexample,ifyouselect2sTimer,then
2secondswillbethedelaybetweenthe
OKbuttonbeingpressedandtheimage
beingcaptured.(Optionsare:Single,2S
Timer,5STimer,and10STimer)
Resolution Denestheimageresolution.
Sequence
Activatescontinuousshootingmode;you
getupto5shotsinoneclick.
Quality Denesthequalityoftheimagesyou
capture.(Optionsare:Fine,Normal,and
Economy)
Sharpness Denestheclarityofdetailintheimages
youcapture.(Optionsare:Strong,
Normal,andSoft)
White
Balance
Establishestheconditionstocapture
animagebasedontheoptionsgiven.
(Optionsare:Auto,Daylight,Cloudy,
Tungsten,andFlourscent)
Color Selectacolorstyle.(Optionsare:
Standard,Black&White,orSepia)
ISO Increasesordecreasesthecamera’s
lightsensitivity.(Optionsare:Auto,100,
200,and400)

17
Option Description
Exposure Setsthebrightnesssensitivity.(Options
are-2to+2in1/3increments)
Anti-
Shaking
Reducesthecamerashakeandcaptures
abetterqualityimage.(Optionsareon,
off)
Quick
Review
Setsthetimedurationtheimagedisplays
onthescreenafterithasbeencaptured.
(OptionsareOff,2sec,and5sec)
PLAYBACK MODE
Thismodeletsyouplaybackrecordedvideoorview
snapshots.
1. PressM/ untileither (Playback)or►(Snap-
shot)displaysintheupperleftcornerofthescreen.
Thelasttypeoflesaved(recordedvideoorsnap-
shot)determinestheicondisplayed.
2. PressOKtoviewtherecordedle/snapshotor▲
(viewfullscreen)/▼(viewthumbnails)toscroll
throughtherecordedles/snapshots.
Playback Mode Menu
PresstheMenukey( )oncetoaccessthePlayback
modeoptions.ScrollupordownandthenpressOK
toselectanoptionforthesnapshot/videocurrently

18
displaying.
• Delete.Deletethecurrentledisplayedordeleteall
les.
• Protect.Lock/unlockthecurrentledisplayedorlock/
unlockallles.
SETUP MENU
PressMenukey( )twicetoaccesstheSetupmenuin
anymode.The iconishighlightedintheupperleft
corner.
Option Description
Date/Time Changesthedate,time,anddate/time
displayformatbyusingtherelevant
▲and▼keys,andthenpressOKto
conrm.
AutoPower
Off
Setsthetimedurationtoautomatically
powerofftheunitwhenidle.(Optionsare
Off,1minute,and3minutes)
Language
SelectEnglish(default),Français,
Español,orPortuguês.
Frequency Select50Hzor60Hz(default)andpress
OK.

19
Option Description
Screen
Saver
Setsthetimetoautomaticallyturnoffthe
LCDaftertherecordingstarts.(Options
areOff,3minutes,5minutes,and10
minutes)
Image
Rotation
Rotatestheimage.
Format FormatsthemicroSDcard.
Default
Setting
Returnsallthesettingsbacktothe
factorydefaults.
Version FirmwareVersion

20
USING THE DCAM
How do I . . . Do This . . .
RecordLive
video
InRecordmode,pressOK.Ared
dotandaredtimerdisplayonthe
screen.
PressOKagaintostoprecording.
Playback
recordedvideo
GotoPlaybackmode.Press▼
toviewthumbnailimagesofthe
recordedlesor▲toviewtheles
oneatatimeinfullscreen.
Note: Pressing ▲ while in
thumbnail mode selects the
previous thumbnail.
PressOKtoviewthele.
Takeasnapshot InPhotomode,pressOK.
Review
snapshots
GotoPlaybackmodeandpress
▼todisplayallrecordedles.If
thethumbnaildoesnothavea
onit,theleisasnapshot.Select
thatleandpressOKtoviewitfull
screen.►displaysinthetopleftof
thefullscreensnapshot.
Table of contents
Other Uniden DVR manuals

Uniden
Uniden Pro7400H1 User manual

Uniden
Uniden PRO Series User manual

Uniden
Uniden igo cam 325 User manual

Uniden
Uniden Pro7800N1 User manual

Uniden
Uniden CAM250 User manual

Uniden
Uniden Pro12800N0-4K User manual

Uniden
Uniden UDVR46-4 User manual

Uniden
Uniden Pro12800N0-4K User manual

Uniden
Uniden Pro71600N3 User manual

Uniden
Uniden UNVR85-4 User manual