Brill GLORIA SOX 5 User manual

DE Gebrauchsanleitung . . . . . . . . . . . . . . . . . . . . . . . . . . . . . . . . . . . . . 4-9
SOX 5 / SOX 8*
Spezial-Drucksprühgerät
Special compression sprayer
Pulvérisateur spécial a pression
Speciale drukspuiten
Aparatos de pulverización a presión especiales
Special-tryksprøjteapparater
Special-trycksprutor
Spesial-trykksprøyteapparat
Erikoispaineruiskut
976 793-01 2098
GB
Instructions for use . . . . . . . . . . . . . . . . . . . . . . . . . . . . . . . . . . . 10-15
FR
Mode d’emploi . . . . . . . . . . . . . . . . . . . . . . . . . . . . . . . . . . . . . . 16-21
NL
ES
Gebruiksaanwijzing . . . . . . . . . . . . . . . . . . . . . . . . . . . . . . . . . . . 22-27
Instrucciones de uso . . . . . . . . . . . . . . . . . . . . . . . . . . . . . . . . . . 28-33
DK
Betjenningsvejledning . . . . . . . . . . . . . . . . . . . . . . . . . . . . . . . . . . 34-39
SV
NO
FI
Bruksanvisning . . . . . . . . . . . . . . . . . . . . . . . . . . . . . . . . . . . . . . 40-45
Bruksanvisning . . . . . . . . . . . . . . . . . . . . . . . . . . . . . . . . . . . . . . 46-51
Käyttöohje . . . . . . . . . . . . . . . . . . . . . . . . . . . . . . . . . . . . . . . . . 52-57
QS 9000 · VDA 6.
1
DIN EN ISO 9001
Brill Gloria Haus- und Gartengeräte GmbH ●Postfach 31 61 ●D-58422 Witten
www.brill.de / www.gloriagarten.de
Geräte für Haus und Garten,
Industrie und Handwerk
Gloria Service Center
www.gloriaindustrialsprayers.com
1
2
6
7
8
511
10
9
3
4
A
B
C
D
E
F
G
7
*
SOX_5_SOX_8_Cover 24.09.2008 15:30 Uhr Seite 1

Technische Daten
Typ SOX 5 SOX 8
Max. Einfüllmenge: 5 l 8 l
Gesamtinhalt ca.: 7 l 12,2 l
Leergewicht ca.: 1,8 kg 2,0 kg
Max. Betriebsüberdruck: 3 bar 3 bar
Max. Betriebstemperatur: 30 °C 30 °C
Behälterwerkstoff: Polyethylen Polyethylen
Pumpenwerkstoff: Polypropylen Polypropylen
Werkstoff der O-Ringe: EPDM EPDM
Im Flüssigkeitsstrom
liegende Federn: Chromnickelstahl Chromnickelstahl
Düse: Flachstrahl Flachstrahl
DE
Inhaltsverzeichnis
Technische Daten . . . . . . . . . . . . .4
Wichtige Sicherheitshinweise . . . . . .5
Ausrüstung . . . . . . . . . . . . . . . . . .6
Verwendung . . . . . . . . . . . . . . . . .6
Montage . . . . . . . . . . . . . . . . . . . .7
Inbetriebnahme . . . . . . . . . . . . . . .7
Entleerung und Wartung . . . . . . . . .8
Konformitätserklärung . . . . . . . . . .9
Wichtige
Sicherheitshinweise
Reparaturen an Brill GLORIA Spe-
zial-Drucksprühgeräten sind nur
durch die Brill GLORIA Servicestellen
durchzuführen. Ersatzteile sollten
Sie bei Ihrem Brill GLORIA Fach-
händler bestellen.
Soweit nicht vorrätig, besorgt er
diese schnellstens.
Bitte lesen Sie vor Gebrauch die
gesamte Gebrauchsanweisung
und beachten Sie vor allem den
Abschnitt „Verwendung“.
●Das Gerät ist nicht zur Aufbe-
wahrung von Flüssigkeiten be-
stimmt, täglich nach jedem Ge-
brauch entleeren und durchspülen.
●Beim Versprühen von Flüssigkeiten
entstehen feine Tröpfchen. Deshalb
beim Umgang mit gefährlichen Stof-
fen geeignete Schutzkleidung ein-
schließlich Schutzhandschuhen und
Atemschutz tragen. Bei der Zerstäu-
bung von brennbaren Flüssigkeiten
(zulässig sind nur solche mit Flamm-
punkt über 55 °C!) Zündquellen in
der Umgebung vermeiden, für gute
Belüftung des Arbeitsplatzes sorgen.
4
1
2
D
BC
E
A
SOX 8SOX 5
SOX 5/8
3
SOX_5_SOX_8_Cover 24.09.2008 15:30 Uhr Seite 2

●Abtrift von Sprühtröpfchen auf nicht zu
behandelnde Flächen vermeiden. Im
Freien nicht gegen den Wind sprühen.
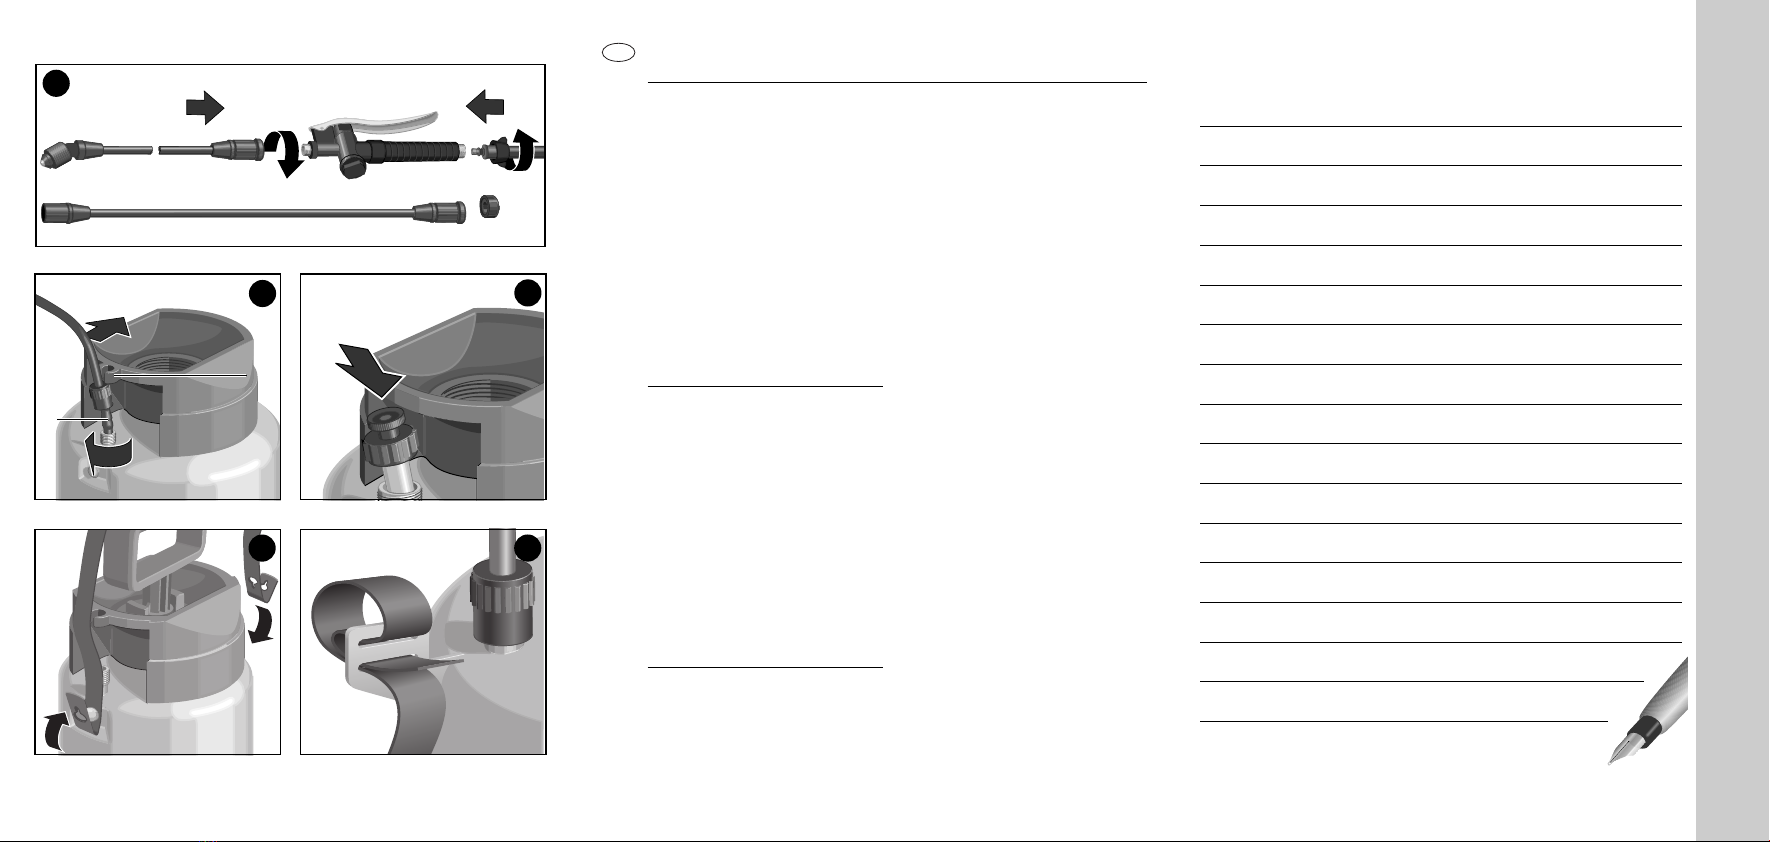
●Beim Pumpen stets Kolben-
manometer (A) beobachten und
zulässigen Überdruck von 3 bar nicht
überschreiten.
●Beschädigte Geräteteile unverzüglich
ersetzen. Dafür nur Originalteile
verwenden. Bei allen Reparatur- und
Wartungsarbeiten muß das Gerät
leer und drucklos sein.
●Vor jeder Inbetriebnahme des Sprüh-
gerätes Funktion überprüfen, und
besonders auf Dichtheit von Schrau-
banschluss und Schraubverbindun-
gen achten. Material auf Rißbildung,
Sprödheit und Korrosion prüfen.
●Sprühmittelbehälter befüllt nicht län-
gere Zeit starker Sonneneinstrahlung
aussetzen. Betriebstemperaturen
dürfen 30 °C nicht überschreiten.
Gerät vor Frost schützen.
●Drucktragende, flüssigkeitsführende
und Bedienteile sowie Kolbenmano-
meter mit integriertem Sicherheits-
ventil regelmäßig auf einwandfreien
Zustand und Funktion prüfen. Bei
Verdacht auf Schäden Gerät sofort
außer Betrieb setzen.
●Gerät nur senkrecht stehend oder
steil aufrecht hängend betreiben und
bewegen. Nicht längere Zeit unter
Druck stehen lassen.
●Bei Reparaturen nur Original-Ersatz-
teile verwenden.
●Wir empfehlen nach 2jähriger Be-
nutzung die Drucksprühgeräte vor
sichtshalber einer besonderen ein-
gehenden Prüfung - am besten
durch den Hersteller - zu unterzie-
hen. Es ist verboten, am Behälter
Ausbesserungen vorzunehmen.
●Reparaturen nur durch Brill GLORIA
Servicestationen durchführen lassen.
●Nach Gebrauch Behälter sofort und
gründlich reinigen; anschließend gut
austrocknen.
●Fordern Sie immer ein Sicherheits-
datenblatt gemäß EWG 91/155 vom
Sprühmittelhersteller an.
●Beachten Sie die Unfallverhütungs-
vorschrift „Arbeiten mit Flüssigkeits-
strahlern VBG 87“. Bezugsquellen:
Berufsgenossenschaft oder Carl
Heymanns Verlag Kg, Luxemburger
Straße 449, 50939 Köln.
●Achtung!
Wir weisen ausdrücklich darauf hin,
dass wir nach dem Produkthaf-
tungsgesetz nicht für durch unser
Gerät hervorgerufene Schäden ein-
zustehen haben, sofern diese durch
unsachgemäße Reparatur verur-
sacht oder bei einem Teileaustausch
nicht Brill GLORIA Original-Teile ver
wendet werden und die Reparatur
nicht vom Kundenservice oder dem
autorisierten Fachmann durchge-
führt worden sind. Dies gilt auch für
Zubehörteile.
5
SOX_5_SOX_8_DE.qxd 24.09.2008 15:38 Uhr Seite 5

6
Ausrüstung
●Druckschlauch (B), gewebever-
stärkt, freie Länge 130 cm.
●Schnellschlußventil (C),
Spritzrohr (D) 80 cm lang.
●Flachstrahldüse, Spritzwinkel 80°,
Volumenstrom 0,68 l min bei 2 bar,
optimaler Spritzdruck zwischen 1,5
und 3 bar (Werte auf Wasser bezo-
gen).
●Kolbenmanometer (A) mit
integriertem Sicherheitsventil.
Verwendung
●Das Industriegerät SOX 5/8 ist zum
Versprühen von dünnflüssigen Rei-
nigungsmitteln bestimmt, soweit
diese die verwendeten Werkstoffe
nicht angreifen. Die maximale Tem-
peratur ist 30 °C.
●Sprühflüssigkeiten sind in der Praxis
Gemische aus verschiedenen Stof-
fen, deren Zusammensetzung nur
der Mittelhersteller kennt. Die Eig-
nung des Gerätes für eine be-
stimmte Flüssigkeit ist deshalb
durch den Betreiber im Benehmen
mit dem Mittelhersteller vor dem
Einsatz zu prüfen. Orientierungshilfe
für die genauere Prüfung bei sauren
oder alkalischen Mitteln sind fol-
gende Obergrenzen:
- Salpeter-, Essig- und Propionsäure
bis 10 %
- Salzsäure bis 10 %, beschränkt
auf kurzzeitige Belastung
- Phospor- und Schwefelsäure bis
30 %
- Kali- und Natronlauge bis 20 %
●Insbesondere ist das Gerät nicht
geeignet für:
- Ameisen- und Flußsäure in jeder
Konzentration.
- Säuren und Laugen der unter Ver-
wendung angegebenen Arten in
höherer Konzentration oder als Ge-
misch.
- Öle und Treibstoffe.
-
Netzmittel (Tenside), die an den ver-
wendeten Kunststoffen Rissbildung
auslösen oder fördern können.
- Flüssigkeiten mit Temperaturen
über 30 °C.
- brennbare Flüssigkeiten mit Flam-
mpunkt unter 55 °C.
-
sehr zähe, klebrige oder rückstands-
bildende Flüssigkeiten, die sich aus
dem Gerät nicht restlos ausschütten
oder ausspülen lassen (Öle und öl-
haltige Flüssigkeiten).
●Auf Anforderung stellt der Geräte-
hersteller eine detaillierte Werkstoff-
stückliste des Gerätes für genauere
Prüfung zur Verfügung.
●Eigenmächtige Veränderungen am
Gerät oder nicht bestimmungs-
gemäße Verwendung schließen eine
Haftung des Herstellers für daraus
resultierende Schäden aus.
SOX_5_SOX_8_DE.qxd 24.09.2008 15:38 Uhr Seite 6

7
Montage
●Abb. A: Sprührohr an das Schnell-
schlussventil montieren.
●Abb. A: Schlauchleitung mit dem
Schnellschlussventil verschrauben.
●Abb. B: Schräg geschnittenes
Steigrohr 1in die kleine Stutzenboh-
rung am Behälterdeckel einführen
und stramm nach unten drücken.
Schlauchanschlussmutter bis zum
1.Gewindegang auf den Stutzen
schieben und fest verschrauben.
Anschließend den Schlauch in die
Schlauchhalterung 2am Einfüll-
trichter eindrücken.
●Abb. C: SOX 5/8
Kolbenmanometer in die große
Stutzenbohrung am Behälterdeckel
einstecken und fest verschrauben.
Tragriemenmontage: SOX 5
●Abb. D
Tragriemen an den jeweils zur Mitte
hin liegenden Lochungen an den Auf-
hängezapfungen des Behälters befe-
stigen und zur weiteren Absicherung
das freie Ende umlegen und über die
Außenlochungen befestigen.
Tragriemenmontage: SOX 8
●Abb. E
Inbetriebnahme
●Vor jedem Gebrauch Gerät auf ein-
wandfreien Zustand und Dichtigkeit
überprüfen. Kolbenmanometer am
roten Knopf von Hand hochziehen
und kontrollieren, ob er in seine
Ausgangslage zurückkehrt.
●Pumpe durch Linksdrehung heraus-
schrauben – hierzu vorab Pumpen-
gestänge entriegeln, um 180°
drehen und über den Rücken der
Verriegelungszapfen am Pumpen-
gehäuse die Schraubkraft übertra-
gen.
●Behälter füllen. Achtung! Max. Füll-
menge (s. Technische Daten) und
richtige Dosierung des Sprühmittel-
herstellers beachten.
●Pumpe einsetzen und verschrauben.
●Gerät aufpumpen. Dabei Kolbenma-
nometer beobachten. Der Höchst-
druck ist rot markiert.
Etwaiger Überdruck entweicht durch
das Kolbenmanometer.
●Durch Niederdrücken des Betäti-
gungshebels am Schnellschluss-
ventil wird der Spritzvorgang aus-
gelöst.
SOX_5_SOX_8_DE.qxd 24.09.2008 15:38 Uhr Seite 7

●Wenn der Behälterdruck auf etwa
1,5 bar abgesunken ist, Druck
nachpumpen, um gleichmäßige
Flüssigkeitsverteilung zu gewährlei-
sten.
Entleerung und
Wartung
●Durch Anheben des Knopfes am
Sicherheitsventil wird der eventuelle
Restdruck im Behälter abgeblasen.
●Die Pumpe wird vorsichtig, zunächst
nur einige Gewindegänge durch
Linksdrehung losgeschraubt, damit
evtl. im Behälter verbliebene Druck-
luft entweichen kann. Erst dann die
Pumpe ganz herausschrauben und
aus dem Behälter nehmen.
●Gerät nach Gebrauch entleeren und
durchspülen. Über die Einfüllöffnung
kann ein Flüssigkeitsrest im Behälter
restlos ausgeschüttet werden. Wahl
und Entsorgung der Spülflüssigkeit
richten sich nach den Vorgaben des
Mittelherstellers. Auch beim Spülen
die Beständigkeit der Gerätewerk-
stoffe beachten.
●Die Lebensdauer der Pumpe wird
erheblich verlängert wenn ab und zu
der Pumpen-O-Ring (E) mit harz-
und säurefreiem Fett geschmiert
wird.
●Zum Ausbau der Kolbenstange mit
dem O-Ring (E), den Pumpengriff
(F) ganz nach oben ziehen, in den
Führungstopfen (G) einrasten und
etwa 1/8 Umdrehung im Gegenuhr-
zeigersinn drehen.
●Wichtiger Hinweis: Starke Bean-
spruchung aufgrund der Betriebs-
weise (einschl. des Transports zum
Einsatzort und der Aufbewahrung
bei Nichtbenutzung), Umgebungs-
einflüsse (des Einsatzortes und des
Aufbewahrungsortes bei Nichtbe-
nutzung), mangelhafte Wartung und
Pflege können zu vorzeitigem Ver-
schleiß des Gerätes führen. Es sollte
daher vor jeder Benutzung auf si-
cheren und betriebsfähigen Zu-
stand, zumindest jedoch auf äußer-
lich erkennbare Schäden, geprüft
werden. Insbesondere bei Auftreten
sicherheitsbedenklicher Mängel, je-
doch mindestens alle 2 Jahre haben
Sachkundige, am besten der War-
tungsdienst des Herstellers, zu prü-
fen, ob ein gefahrloser Betrieb wei-
terhin möglich ist.
8
SOX_5_SOX_8_DE.qxd 24.09.2008 15:38 Uhr Seite 8

Art.-Nr.
Pos. Best.-Nr. Bezeichnung
1 728 001.0000 Spritzleitung kpl.
2 728 002.0000 Schnellschlussventil kpl.
3 728 003.0000 Spritzrohr kpl. mit Düse
4 728 004.0000 Düse kpl.
5 728 005.0000 Pumpe kpl.
6 728 006.0000 Kolbenmanometer kpl.
7 509 280.0000 Tragriemen kpl. SOX 5
520 260.0000 Tragriemen kpl. SOX 8
8 540 298.0000 Einfülltrichter SOX 5
540 521.0000 Einfülltrichter SOX 8
9 728 007.0000 Behälter kpl. SOX 5 mit Pos. 6, 8, 10
540 551.0000 Behälter kpl. SOX 8 mit Pos. 6, 8, 10
10 518 280.0000 Fußring SOX 5
540 530.0000 Fußring SOX 8
11 727 999.0000 Verlängerungsrohr
728 008.0000 Satz Dichtungen
Konformitätserklärung / -bewer-
tung für eine Baugruppe im Sinne
von Artikel 3, Absatz 2 der Richtli-
nie über Druckgeräte 97/23/EG
Brill Gloria
Haus- und Gartengeräte GmbH
Postfach 31 61
D-58422 Witten
Hiermit bestätigen wir, dass die Druck
tragenden Bauteile des 5 Liter Druck-
sprühgerätes
Typ SOX 5 Art.-Nr. 85....
mit der Richtlinie 97/23/EG,
Artikel 3, Absatz 3 übereinstimmen.
Das 8 Liter Drucksprühgerät entspricht
der Richtlinie 97/23/EG, Kategorie I –
Modul A.
Typ SOX 8 Art.-Nr. 84....
Wadersloh, 02.04.08
Hans-Georg Wellerdiek
Konstruktionsleiter
9
SOX_5_SOX_8_DE.qxd 24.09.2008 15:38 Uhr Seite 9

GB
10
Technical Data
Type SOX 5 SOX 8
Max. filling capacity: 5 l 8 l
Total tank contents approx.: 7 l 12,2 l
Empty weight approx.: 1,8 kg 2,0 kg
Max. working pressure: 3 bar 3 bar
Max. working temperature: 30 °C 30 °C
Tank material: Polyethylene Polyethylene
Pump material: Polypropylene Polypropylene
O-ring material: EPDM EPDM
Springs in the flow
of liquid: Chrome-nickel steel Chrome-nickel steel
Nozzle: Flat jet Flat jet
Table of Contents
Technical data . . . . . . . . . . . . . . .10
Important Safety Instruction . . . . . .10
Equipment . . . . . . . . . . . . . . . . .12
Use . . . . . . . . . . . . . . . . . . . . . .12
Assembling instructions . . . . . . . .13
Operation . . . . . . . . . . . . . . . . . .13
Emptying and Service . . . . . . . . . .14
Declaration of conformity . . . . . . . .15
Important Safety
Instruction
Repairs of Brill GLORIA house and
gardening equipment are only to be
done by Brill GLORIA after-sales-
services.
Spare parts should be ordered by
Brill GLORIA special trade. If parts
are out of stock, the special trade
will get them as quick as possible.
Please read through the entire in-
structions before use and make a
particular note of the ”Use” section.
●The unit is not intended to store
liquids, it must be emptied out after
each time it has been used and
washed out thoroughly.
●Fine droplets are produced when liq-
uids are being sprayed. You should
therefore wear suitable protective
clothing, including protective gloves
and respiratory protection, when
handling hazardous substances.
SOX_5_SOX_8_GB.qxd 24.09.2008 15:35 Uhr Seite 10

11
If atomising inflammable liquids (only
permissible if they have a flash point
above 55 °C!), avoid any sources of
ignition in the vicinity and ensure that
the work place is well ventilated.
●Prevent sprayed droplets from drift-
ing onto areas that are not to be
treated. If working outdoors, do not
spray into the wind.
●Always check the piston-type pres-
sure gauge (A) when pumping up
the unit and do not exceed the maxi-
mum permissible pressure of 3 bar.
●Immediately replace any parts of the
unit if they are damaged. Only use
original spare parts for this purpose.
The unit must be empty and fully de-
pressurised for all repair and mainte-
nance work.
●Check that spray unit functions prop-
erly before each use, especially that
the screw terminal and screwed
connections are tight. Check mater-
ial for cracks, brittleness and corro-
sion.
●Do not expose the filled tank to
strong sunshine for any long period
of time. Operating temperatures
must not exceed 30 °C.
Protect unit against frost.
●All parts that are under pressure or
conduct the liquid or operating parts
and the piston-type pressure gauge
with the built-in safety valve must be
checked regularly to ensure that they
are in perfect condition and function
properly. Stop using the unit at once if
any damage is suspected.
●Only operate or move the unit when
it is standing vertically or hanging
upright. Do not allow it to remain
pressurised for an extended period.
●Only use original spare parts for re-
pairs.
●As a precautionary measure, we
recommend that the pump spray
unit be subjected to a particularly
thorough inspection every two years,
preferably by the manufacturer. Re-
pairs to the tank are not permitted.
●Repairs should only be carried out by
Brill GLORIA Service Stations.
●Clean tank thoroughly immediately
after use and then dry completely.
●
Always request a safety data sheet as
per EWG 91/155 from the manufac-
turer of the medium to be sprayed.
●Follow any national regulations that
may apply concerning accident pre-
vention when working with jet
stream units.
SOX_5_SOX_8_GB.qxd 24.09.2008 15:35 Uhr Seite 11

12
●Attention!
Regarding the law of product liability,
we particularly point out that we are
not liable for damages caused by our
device as far as these damages have
been caused by improper repair or
by a part replacement when Brill
GLORIA original parts are not used,
and when the repair has not been
carried out by the after-sales-service
or by an authorized expert. This con-
cerns the accessories, too.
Equipment
●Pressure hose (B), fabricreinforced,
free length 130 cm.
●Quick-action valve (C),
spray tube (D) 80 cm long.
●Flat spray nozzle, spray angle 80°,
volume throughput 0.68 l per minute
at 2 bar, optimum spray pressure
between 1.5 and 3 bar (values relat-
ing to water).
●Piston-type pressure gauge (A) with
built-in safety valve.
Use
●The SOX 5 / 8 industrial unit is intended
to spray liquid cleaning agents that do
not attack the materials it is made of.
The maximum temperature is 30 °C.
●In practice, sprayed liquids are a
mixture of various substances whose
composition is only known to the
manufacturer. The suitability of the
unit for a specific liquid must there-
fore be determined before use by the
user in conjunction with the manu-
facturer of the substance.
The following is a basic guide for the
upper limits for more detailed testing
of acids or alkalis:
- nitric acid, acetic acid and propi-
onic acid up to 10%
- hydrochloric acid up to 10%,
limited to brief use only
- phosphoric and sulphuric acid up to
30%
- caustie potash and caustie soda up
to 20%
●The unit is not suitable for use with the
following in particular:
- formic and hydrofluoric acid in any
concentration.
- acids and alkalis at concentrations
greater than the amounts quoted or
as mixtures.
- oils and fuels.
- wetting agents (surfactants) that
cause or could promote the forma-
tion of cracks in the plastics used.
- liquids at temperatures over 30 °C.
- inflammable liquids with a flash point
below 55 °C.
SOX_5_SOX_8_GB.qxd 24.09.2008 15:35 Uhr Seite 12

13
- very tenacious or sticky liquids, or liq-
uids that leave residues, which can-
not be completely poured or flushed
out of the unit (oils and oil-bearing
liquids).
●On request, the manufacturer of the
unit can make available a detailed
list of the materials used in the parts
of the unit for more detailed exami-
nation.
●Unauthorised changes to the unit
made by the user or inappropriate
use shall render null and void the lia-
bility of the manufacturer for any da-
mage caused as a result.
Assembling instructions
●Fig. A: Install the spray tube into the
quick-action valve.
●Fig. A: Screw the hose into the
quick-action valve.
●Fig. B: Guide the diagonally-cut riser
tube 1into the small connecting hole
in the cover of the tank and press it
down firmly. Push the hose connect-
ing nut up to the first thread of the
connector and tighten it up carefully.
Finally, press the hose into the hose
holder 2in the filler funnel.
●Fig. C: SOX 5/8 spray units
Insert the pressure gauge into the
large connecting hole in the cover of
the tank and tighten it up carefully.
Assembly of carrying strap: SOX 5
●Fig. D
Carrying strap to be fixed onto sus-
pension hooks of the tank with the
inside punchings. In order to secure
the hold, the excess end is to be
bended and fixed with the outside
punchings.
Assembly of carrying strap SOX 8
●Fig. E
Operation
●Check that the unit is in perfect con-
dition and properly sealed each time
before use. Pull up the piston-type
pressure gauge by hand at the red
knob and check that it returns to the
starting position.
●Remove the pump by turning it to the
left. Before doing this release pump
rods, turn them 180° and transmit
the srew force via the back of the
zwistlocks on the pump housing.
●Filling of the container. Attention!
Max. liquid capacity (see technical
data) and the correct dosage of the
chemicals manufacturer have to be
observed.
SOX_5_SOX_8_GB.qxd 24.09.2008 15:35 Uhr Seite 13

14
●Re-insert pump and tighten.
●Pump up the unit. Watch the pres-
sure gauge as you do so. The maxi-
mum pressure is marked in red.
Any overpressure will be dissipated
by the pressure gauge.
●Press down the lever of the quick-
action valve to spray.
●Pump up the unit again once the
pressure has dropped to around 1.5
bar so as to ensure a consistent dis-
tribution of the sprayed liquid.
Emptying and Service
●Any residual pressure in the tank
can be vented by lifting up the knob
on the safety valve.
●The pomp will be carefully, at first
only a few turns by lefthand rotation
screwed off, so that the compressed
air being still in the tank can deflate.
●Empty and wash out the unit after
use. Any remaining liquid in the tank
can be emptied out completely
through the filler opening. The type
of flushing liquid to be used and how
it is to be disposed of will depend on
the details given by the manufac-
turer of the liquid to be sprayed. Also
consider whether the tank is resis-
tant to the flushing liquid.
●The pump will last much longer if
the pump O-ring is lubricated from
time to time. Only use resin- and
acid-free grease.
●Dismantle by pulling the piston rod
with the O-ring (E) and the pump
handle (F) fully upwards, clicking it
into the guide stopper (G), and turn-
ing it about 1/8th of a turn anti-
clockwise.
●Important! Above-average use due
to manner of operating (including
the tranport to the place of operation
and the storage when not using the
sprayer), influences of the surround
ings (of the place of operation and
the storage place), inadequate
maintenance and care may lead to
an early wear of the sprayer. There-
fore, the sprayer should be checked
for secure and serviceable state be-
fore use. It should at least be
checked for externally visible dam-
ages.
Expecially when there occure dam-
ages which endager the security, at
least however after 2 years, the
sprayer should specially be exam-
ined by one of the manufacturer’s
service stations.
SOX_5_SOX_8_GB.qxd 24.09.2008 15:35 Uhr Seite 14

Declaration / evaluation of confor-
mity for one group of components
in the sense of Art. 3, § 2 of the
guide line for pressure sprayers
97/23/EG
Brill Gloria
Haus- und Gartengeräte GmbH
Postfach 31 61
D-58422 Witten
We herewith confirm that those parts of
the 5 l pump spray unit exposed to
pressure
Type SOX 5 art.-no. 85....
comply with the directive 97/23/EG,
Art. 3, § 3.
The 8 l pump spray unit comply with
the directive 97/23/EG, Category I –
Module A.
Type SOX 8 art.-no. 84....
Wadersloh, 02.04.08
Hans-Georg Wellerdiek
Design Manager
15
Art. No.
Item Order No. Description
1 728 001.0000 Spray line, complete
2 728 002.0000 Quick-action valve, compete
3 728 003.0000 Spray tube, complete, with jet
4 728 004.0000 Jet, complete
5 728 005.0000 Pump, complete
6 728 006.0000 Piston pressure gauge, complete
7 509 280.0000 Carrying straps, complete SOX 5
520 260.0000 Carrying straps, complete SOX 8
8 540 298.0000 Filler funnel SOX 5
540 521.0000 Filler funnel SOX 8
9 728 007.0000 Tank SOX 5 complete with items 6, 8, 10
540 551.0000 Tank SOX 8 complete with items 6, 8, 10
10 518 280.0000 Base ring SOX 5
540 530.0000 Base ring SOX 8
11 727 999.0000 Extension tube
728 008.0000 Set of seals
SOX_5_SOX_8_GB.qxd 24.09.2008 15:35 Uhr Seite 15

FR
16
Caractéristique techniques
Type SOX 5 SOX 8
Volume maxi. de remplissage : 5 l 8 l
Volume total env. : 7 l 12,2 l
Poids à vide env. : 1,8 kg 2,0 kg
Surpression maxi. de service : 3 bar 3 bar
Température maxi. de service : 30 °C 30 °C
Matériau du réservoir : Polyéthylène Polyéthylène
Matériau de la pompe : Polypropylène Polypropylène
Matériau des joints toriques : EPDM EPDM
Ressorts dans le flux
de liquide: Acier au chrome-nickel Acier au chrome-nickel
Buse: jet plat jet plat
Table of Contents
Caractéristiques techniques . . . . . .16
Consignes de sécurité importantes .16
Equipement . . . . . . . . . . . . . . . .18
Utilisation . . . . . . . . . . . . . . . . . .18
Mode d’emploi pour le montage . . .19
Emploi . . . . . . . . . . . . . . . . . . . .19
Vidange et entretien . . . . . . . . . . .20
Déclaration de conformité . . . . . . .21
Consignes de
sécurité importantes
Les réparations sur les pulvérisa-
teur sous pression spéciaux de
Brill GLORIA ne doivent être réali-
sées que par les services d'entre-
tien de Brill GLORIA.
Commandez les pièces de re-
change chez votre concession-
naire Brill GLORIA. S'il ne les a pas
en réserve, il pourra vous les four-
nir très rapidement.
Avant l'emploi, lisez toutes les
instructions d'utilisation et obser-
vez surtout le paragraphe
"Utilisation".
●L'appareil n'est pas destiné à
conserver des liquides, le vider et le
rincer tous les jours après utilisation.
●La pulvérisation de liquides entraîne
de petites gouttes fines. C'est pour-
quoi lors de la manipulation de sub-
stances dangereuses, porter des vê-
tements de protection appropriés y
compris des gants et une protection
des voies respiratoires.
SOX_5_SOX_8_FR.qxd 24.09.2008 15:33 Uhr Seite 16

Lors de la pulvérisation de liquides com-
bustibles (admis uniquement avec un
point d'inflammation supérieur à 55°C)
éviter les sources d'inflammation dans
les environs, assurer une bonne ventila-
tion du lieu de travail.
●
Eviter que les gouttelettes pulvérisées
n'atteignent des surfaces qui ne doi-
vent pas être traitées. A l'air libre, ne
pas pulvériser contre le vent.
●En pompant, observer toujours le
manomètre à piston (A) et ne pas
dépasser la surpression autorisée de
3 bars.
●Remplacer immédiatement les
pièces endommagées de l'appareil.
N'utiliser pour cela que des pièces
d'origine. Pour tous les travaux de
réparation et d'entretien, l'appareil
doit être vide et décompressé.
●
Avant chaque mise en service du vapori-
sateur, en contrôler le fonctionnement et
s’assurer en particulier de l’étanchéité
du raccord vissé et des connexions à vis.
Inspecter le matériel pour s’assurer qu’il
ne comporte pas de fissures, de ger-
çures et de corrosion.
●Ne pas exposer trop longtemps le ré-
servoir du vaporisateur rempli aux forts
rayons solaires. Les températures de
service ne doivent pas dépasser 30°C.
Protéger l’appareil contre le gel.
●Contrôler régulièrement l'état et le
fonctionnement des pièces sous
pression, de passage de liquide et
de manipulation ainsi que du mano-
mètre à piston avec vanne de sécu-
rité intégrée. Si l'appareil paraît en-
dommagé, l'arrêter immédiatement.
●N'utiliser et ne déplacer l'appareil
qu'à la verticale debout ou accroché.
Ne pas le laisser sous pression pen-
dant une période prolongée.
●Lors des réparations, n’employer
que des pièces de rechange garan-
ties d’origine.
●Par précaution, nous conseillons de
faire contrôler de façon approfondie
les vaporisateurs sous pression de
préférence par le constructeur au
bout de 2 années d’utilisation. Il est
interdit de procéder à des
transformations du réservoir.
●N’envoyer jamais que les appareils
aux agences de service après-vente
Brill GLORIA.
●Après utilisation, nettoyer soigneu-
sement et immédiatement le réser-
voir et bien le sécher.
●Exigez toujours une fiche technique
de sécurité suivant CEE 91/155 de
la part du fabricant du produit de
pulvérisation.
●Tenez compte des réglementations
nationales éventuellement en vi-
gueur pour la prévention des acci-
dents au cours de la manipulation
des appareils à jet de liquide.
17
SOX_5_SOX_8_FR.qxd 24.09.2008 15:33 Uhr Seite 17

●L’attention ! Concerne la garantie
Nous attirons particulièrement votre
attention sur le fait que la garantie ne
joue pas lorsque les appareils sont
endommages par une mauvaise re-
paration effectuée avec des pièces
de rechange ne provenant pas du
service après vente Brill GLORIA -
cela concerne également les acces-
soires.
Equipement
●Flexible à pression (B), souple ren-
forcé, longueur libre 130 cm.
●Vanne à fermeture rapide (C), lance
(D) 80 cm de longueur.
●Buse à jet plat, angle de pulvérisa-
tion 80°, débit volumétrique 0,68 l
min. à 2 bars, pression optimale de
pulvérisation entre 1,5 et 3 bars (va-
leurs relatives à l'eau).
●Manomètre à piston (A) avec vanne
de sécurité intégrée.
Utilisation
●
L'appareil industriel SOX 5 / 8 est des-
tiné à pulvériser des détergents fluides
dans la mesure où ceux-ci n'attaquent
par les matériaux utilisés. La tempéra-
ture maximale est de 30°C.
●
Les liquides pulvérisées sont en pra-
tique des mélanges de différentes sub-
stances, dont la composition n'est
connue que du fabricant. L'aptitude de
l'appareil pour un liquide déterminé doit
donc être contrôlée par l'utilisateur en
prenant contact avec le fabricant du
produit avant l'emploi. Pour vous aider
à faire un contrôle plus exact avec les
liquides acides ou alcalins, nous vous
indiquons les limites maximum :
- Acide nitrique, acétique et propio-
nique jusqu'à 10%.
- Acide chlorhydrique jusqu'à 10%,
limité à une sollicitation brève.
- Acide phosphorique et sulfurique
jusqu'à 30%.
- Lessive de potassium et de soude
jusqu'à 20%
●En particulier l'appareil n'est pas
approprié pour:
- Toute concentration d'acide formique
et fluorhydrique.
- Acides et lessives des types indiqués
à Utilisation, en concentration plus
élevée ou sous forme de mélanges.
- Huiles et carburants.
- Agents mouillants (tensioactifs) qui
peuvent provoquer ou favoriser la for-
mation de fissures dans les matières
plastiques utilisée.
- Liquides à des températures supé-
rieures à 30°C.
- Liquides combustibles avec un point
d'inflammation inférieure à 55°C.
- Liquides très visqueux, collants ou
formant des résidus, qui ne peu-
vent pas être déversés ou rincés
18
SOX_5_SOX_8_FR.qxd 24.09.2008 15:33 Uhr Seite 18

complètement de l'appareil (huiles
et liquides huileux).
●
Sur demande, le fabricant de l'appa-
reil fournit une liste détaillée des ma-
tériaux de l'appareil pour un contrôle
plus exact.
●
Les propres modifications de l'appa-
reil ou l'utilisation non conforme à
l'emploi prévu excluent la responsabi-
lité du fabricant pour les dommages
qui en résultent.
Mode d’emploi pour le
montage
●Fig. A: Raccorder la lance de pulvé-
risation à la soupape de fermeture
rapide.
●Fig. A: Visser le flexible avec la sou-
pape de fermeture rapide.
●Fig. B: Introduire le tube de montée
coupé en biais 1dans le petit trou
du raccord sur le couvercle du ré-
servoir et appuyer fermement vers
en bas. Pousser l'écrou de raccor-
dement du flexible jusqu'au 1er pas
du filetage sur le raccord et le visser
à fond. Ensuite enfoncer le flexible
dans la fixation 2sur la trémie.
●Fig. C: appareils SOX 5/8
Enfoncer la
manomètre à piston
dans
le grand trou du raccord sur le cou-
vercle du réservoir et le visser à fond.
Montage de la bretelle : SOX 5
●Fig. D
Introduire la bretelle dans le en-
coches situées en haut de la cuve-
afin d’avoir une sécurité supplé-
mentaire rabattre les deux extrémi-
tés de la bretelle.
Montage de la bretelle: SOX 8
●Fig. E
Emploi
●Avant toute utilisation, contrôler si
l'appareil est en parfait état et s'il est
étanche. Tirer à la main vers le haut
le bouton rouge du manomètre à
piston et contrôler s'il revient en po-
sition initiale.
●Dévisser la pompe en tournant vers
la gauche - pour ce faire, déver-
rouiller la tige de pompe, la tourner à
180° et transmettre l’effort de ser-
rage sur le carter de pompe par le
biais du dos du pivot de verrouillage.
●
Verser le liquide à pulvériser -
L’attention ! Pour volume maximum
cf. « Caractéristiques techniques » et
pour le dosage suivre les instructions
figurant sur la notice du fabricant.
●Remettre la pompe et visser.
19
SOX_5_SOX_8_FR.qxd 24.09.2008 15:33 Uhr Seite 19

●Pomper l’appareil tout en observant
le manomètre à piston. La pression
maximum est indiquée en rouge.
La surpression éventuelle s'échappe
par la manomètre à piston.
●L’abaissement du levier d’actionne-
ment sur la soupape à fermeture ra-
pide déclenche le processus de pul-
vérisation.
●Lorsque la pression du réservoir est
redescendue à environ 1,5 bar, re-
pomper de la pression pour assurer
une répartition homogène du liquide.
Vidange et entretien
●En tirant sur le bouton rouge de la
vanne de sécurité, cela permet de
faire échapper la pression restée
éventuellement dans le réservoir.
●En premier la pompe doit être dévis-
sée de quelques tours en tournant
vers la gauche. Le reste de pression
qui peut se trouver dans la cuve
s’échappe. Ensuite dévisser complè-
tement la pompe.
●Après utilisation, vider et rincer l'ap-
pareil. Par l'ouverture de remplis-
sage, il est possible de déverser
complètement le reste de liquide.
Le choix et l'évacuation du liquide de
rinçage dépendent des prescriptions
du fabricant du produit. Même pour
le rinçage, tenir compte de la résis-
tance des matériaux de l'appareil.
●La durée de vie de la pompe peut
être nettement prolongé, si de temps
en temps le joint torique de la pompe
(E) est graissée avec un peu de
graisse sans résine et sans acide.
●Pour démonter la tige du piston avec
le joint torique (E), tirer la poignée de
la pompe (F) complètement vers le
haut, l'enclencher dans le tampon
de guidage (G) et tourner d'environ
1/8 de tour dans le sens inverse des
aiguilles d'une montre.
●Indication important: L’utilisation
intensive de l’appareil, l’endroit de
stockage, le mauvais entretien pour-
raient avoir des consé-quences sur
l’usure anticipée - il est conseille de
verifier le pulvérisateur avant son uti-
lisation en tout état de cause lorsque
l’on a des doutes sur la sécurité ou
après deux ans d’utilisation il est
préférable de faire faire une révision
auprès du service après vente Brill
GLORIA. Dans le cas d’utilisation
dans l’industrie il est indispensable
que le pulvérisateur soit examiné par
un expert selon la loi 10 article 2 de
la dispositon de réservoirs a pres-
sion.
20
SOX_5_SOX_8_FR.qxd 24.09.2008 15:33 Uhr Seite 20

Déclaration / Évaluation de confor-
mité d’un group de composants au
sens de l’art. 3, § 2 de la directive
pour les pulvérisateurs à pression
97/23/CE
Brill Gloria
Haus- und Gartengeräte GmbH
Postfach 31 61
D-58422 Witten
Par la présente nous confirmons que
tous les composants sous pression
pour les pulvérisateurs à pression 5 l
Type SOX 5 N° d’art. 85....
sont conformes à la directive 97/23/CE,
art. 3, § 3.
Ce pulvérisateur à pression de 8 litres
se conforme à la directive 97/23/CE,
catégorie 1, module A.
Type SOX 8 N° d’art. 84....
Wadersloh, 02.04.08
Hans-Georg Wellerdiek; Chef de l'étude
21
N° d’article
Rep. N° de référence Description
1 728 001.0000 Conduite de pulvérisation compl.
2 728 002.0000 Vanne de fermeture rapide compl.
3 728 003.0000 Lance compl. avec buse
4 728 004.0000 Buse compl.
5 728 005.0000 Pompe compl.
6 728 006.0000 Manomètre à piston compl.
7 509 280.0000 Bretelle de portage compl. SOX 5
520 260.0000 Bretelle de portage compl. SOX 8
8 540 298.0000 Entonnoir de remplissage SOX 5
540 521.0000 Entonnoir de remplissage SOX 8
9 728 007.0000 Réservoir compl. SOX 5 avec rep. 6, 8, 10
540 551.0000 Réservoir compl. SOX 8 avec rep. 6, 8, 10
10 518 280.0000 Anneau du pied SOX 5
540 530.0000 Anneau du pied SOX 8
11 727 999.0000 Tube de rallonge
728 008.0000 Jeu de joints
SOX_5_SOX_8_FR.qxd 24.09.2008 15:33 Uhr Seite 21

NL
22
Technische gegevens
Type SOX 5 SOX 8
Maximale vulvolume: 5 l 8 l
Totaalinhoud ca.: 7 l 12,2 l
Leeggewichtca.: 1,8 kg 2,0 kg
Max. bedrijfsoverdruk: 3 bar 3 bar
Max. bedrijfstemperatuur: 30 °C 30 °C
Materiaal tank: polyethyleen polyethyleen
Materiaal pomp: polypropyleen polypropyleen
Materiaal O-ringen: EPDM EPDM
In de vloeistofstroom
liggende veren: chroomnikkelstaal chroomnikkelstaal
Sproeidop: Vlakstraler Vlakstraler
Inhoudsopgave
Technische gegevens . . . . . . . . . .22
Belangrijke veiligheidsvoorschriften .22
Uitvoering . . . . . . . . . . . . . . . . . .24
Toepassingen . . . . . . . . . . . . . . .24
Handeleiding voor de montage . . . .25
Het in gebruik van de spuit . . . . . . .25
Het leegmaken en het reinigen . . . .26
Verklaring van overeenstemmung .27
Belangrijke
veiligheidsvoorschriften
Reparaties aan speciale drukspui-
ten van Brill GLORIA mogen alleen
in een Brill GLORIA servicewerk-
plaats worden uitgevoerd.
Reserveonderdelen moet u bij uw
vakhandelaar bestellen. Hij levert
deze zo spoedig mogelijk, indien
ze niet voorradig zijn.
Lees voor het gebruik de gehele
gebruiksaanwijzing door en neem
vooral het onderdeel "Toepassin-
gen" in acht.
●Het apparaat is niet bestemd voor de
opslag van vloeistoffen. Dagelijks na
ieder gebruik legen en goed schoon-
spoelen.
●Bij het versproeien van vloeistoffen
ontstaan fijne druppeltjes. Draag
daarom bij het gebruik van gevaar-
lijke stoffen geschikte veiligheidskle-
ding zoals handschoenen, veilig-
heidsbril en een mondmasker. Bij
het verstuiven van brandbare vloei-
stoffen (alleen vloeistoffen met een
SOX_5_SOX_8_NL.qxd 24.09.2008 15:36 Uhr Seite 22
This manual suits for next models
1
Table of contents
Languages: