Briteq PowerPixel8-RGB User manual


ENGLISH OPERATION MANUAL
BRITEQ®1/64 POWERPIXEL4+8-RGB
OPERATION MANUAL
Thank you for buying this Briteq®product. To take full advantage of all possibilities and for your own safety,
please read these operating instructions very carefully before you start using this unit.
FEATURES
This unit is radio-interference suppressed. This product meets the requirements of the current European and
national guidelines. Conformity has been established and the relevant statements and documents have been
deposited by the manufacturer.
This device was designed to produce decorative effect lighting and is used in light show systems.
Powerful indoor LED projector equipped with 4pcs or 8pcs 30W COB RGB-leds.
Thanks to the very wide 60° beam angle, this projector is the perfect solution for “close range” applications
like wall washing but also great on concert stages, in theaters, discotheques, exhibition booths, …
Thanks to the RGB point sources there are absolutely no color shadows
Absolutely perfect color mixing, even at very close range
Excellent built-in programs for wonderful, ever changing, light shows.
Excellent 16bit RGB color mixing and dimming down to 0%
Completely silent operation, thanks to natural convection cooling system.
Shows work in standalone, master/slave or can be selected by DMX:
Static colors
Fading colors
Different static chases
Different sound activated chases
Full DMX control with different channel modes, ranging from simple 3CH-mode to 16CH/32CH mode for
full RGB+DIM control of every single pixel.
RDM-functionality for easy remote setup: DMX addressing, channel mode, …
Backlit alphanumeric 2x 16character LCD-display for easy menu navigation
Neutrik PowerCON in/outputs: easy daisy chaining of several units.
Both 3pin & 5pin DMX in/outputs for maximum compatibility
High efficiency and low power consumption!
Multifunctional bracket, designed for both floor and truss mounting.
BEFORE USE
Before you start using this unit, please check if there’s no transportation damage. Should there be any, do
not use the device and consult your dealer first.
Important: This device left our factory in perfect condition and well packaged. It is absolutely necessary
for the user to strictly follow the safety instructions and warnings in this user manual. Any damage caused
by mishandling is not subject to warranty. The dealer will not accept responsibility for any resulting defects
or problems caused by disregarding this user manual.
Keep this booklet in a safe place for future consultation. If you sell the fixture, be sure to add this user
manual.
Check the contents:
Check that the carton contains the following items:
Operating instructions
POWERPIXEL-RGB
PowerCON mains cable

ENGLISH OPERATION MANUAL
BRITEQ®2/64 POWERPIXEL4+8-RGB
SAFETY INSTRUCTIONS:
To protect the environment, please try to recycle the packing material as much as possible.
To prevent fire or shock hazard, do not expose this appliance to rain or moisture.
To avoid condensation to be formed inside, allow the unit to adapt to the surrounding temperatures when
bringing it into a warm room after transport. Condense sometimes prevents the unit from working at full
performance or may even cause damages.
This unit is for indoor use only.
Don’t place metal objects or spill liquid inside the unit. Electric shock or malfunction may result. If a foreign
object enters the unit, immediately disconnect the mains power.
Locate the fixture in a well ventilated spot, away from any flammable materials and/or liquids. The fixture
must be fixed at least 50cm from surrounding walls.
Don’t cover any ventilation openings as this may result in overheating.
Prevent use in dusty environments and clean the unit regularly.
Keep the unit away from children.
Inexperienced persons should not operate this device.
Maximum safe ambient temperature is 40°C. Don’t use this unit at higher ambient temperatures.
Make sure the area below the installation place is free from unwanted persons during rigging, de-rigging
and servicing.
Allow the device about 10 minutes to cool down before to start servicing.
Always unplug the unit when it is not used for a longer time or before to start servicing.
The electrical installation should be carried out by qualified personal only, according to the regulations for
electrical and mechanical safety in your country.
Check that the available voltage is not higher than the one stated on the unit.
The power cord should always be in perfect condition. Switch the unit immediately off when the power cord
is squashed or damaged. It must be replaced by the manufacturer, its service agent or similarly qualified
persons in order to avoid a hazard.
Never let the power-cord come into contact with other cables!
This fixture must be earthed in order to comply with safety regulations.
Don’t connect the unit to any dimmer pack.
Always use an appropriate and certified safety cable when installing the unit.
In order to prevent electric shock, do not open the cover. Apart from the mains fuse there are no user
serviceable parts inside.
Never repair a fuse or bypass the fuse holder. Always replace a damaged fuse with a fuse of the same
type and electrical specifications!
In the event of serious operating problems, stop using the fixture and contact your dealer immediately.
The housing and the lenses must be replaced if they are visibly damaged.
Please use the original packing when the device is to be transported.
Due to safety reasons it is prohibited to make unauthorized modifications to the unit.
CAUTION: To reduce the risk of electric shock, do not remove
the top cover. No user-serviceable parts inside. Refer servicing
to qualified service personnel only.
The lightning flash with arrowhead symbol within the equilateral triangle is intended to alert the
use or the presence of un-insulated “dangerous voltage” within the product’s enclosure that may
be of sufficient magnitude to constitute a risk of electric shock.
The exclamation point within the equilateral triangle is intended to alert the user to the presence
of important operation and maintenance (servicing) instructions in the literature accompanying
this appliance.
This symbol means: indoor use only
This symbol means: Read instructions
This symbol determines: the minimum distance from lighted objects. The minimum distance
between light-output and the illuminated surface must be more than 1 meters
The device is not suitable for direct mounting on normally flammable surfaces. (suitable only for
mounting on non-combustible surfaces)
CAUTION: Do not stare at operating lamp.
May be harmful to the eyes.

ENGLISH OPERATION MANUAL
BRITEQ®3/64 POWERPIXEL4+8-RGB
Important: Never look directly into the light source! Don’t use the effect in the presence of persons suffering
from epilepsy.
DESCRIPTION:
Note: POWERPIXEL4-RGB shown, POWERPIXEL8-RGB has identical controls & connections.
1. MAINS INPUT: equipped with original Neutrik PowerCON®. Connect the supplied mains cable or any
PowerCon® extension cable here.
2. MAINS OUTPUT: used to daisy chain the power to several other projectors. Always pay attention to the
maximum load while adding projectors! Special Multi cables (PowerCON® + DMX XLR-cables are
optionally available: see our website!)
3. MAINS FUSE: protects the unit in case of electrical problems, always use the prescribed fuse!
4. DMX IN/OUT: both 3pin and 5pin in/outputs are available to daisy chain the projector with other units that
will be controlled by a DMX-controller.
5. MODE Button: used to browse the different options of the setup menu.
6. ENTER Button: used to jump between different parameters of the selected option. Also confirms the
selected values of the parameters.
7. UP/DOWN Buttons: used to increase/decrease the value of the selected parameter.
8. LCD DISPLAY: backlit 2x 16character LCD-display for easy navigation. The backlight lights up as soon
as one of the buttons is pressed. Shows the model + software version at startup.
9. MIC: used to trigger the programs in music mode.
10.BRACKET: multifunctional and very stable design for both floor and truss mounting. The projector can be
directed in any direction.
11.SAFETY EYEBOLT: used to attach a safety cable when the unit is rigged (see paragraph “overhead
rigging”
OVERHEAD RIGGING
Important: The installation must be carried out by qualified service personal only. Improper
installation can result in serious injuries and/or damage to property. Overhead rigging requires
extensive experience! Working load limits should be respected, certified installation materials
should be used, the installed device should be inspected regularly for safety.
Make sure the area below the installation place is free from unwanted persons during rigging, de-rigging
and servicing.
Locate the fixture in a well ventilated spot, far away from any flammable materials and/or liquids. The
fixture must be fixed at least 50cm from surrounding walls.
The device should be installed out of reach of people and outside areas where persons may walk by or be
seated.
Before rigging make sure that the installation area can hold a minimum point load of 10times the device’s
weight.

ENGLISH OPERATION MANUAL
BRITEQ®4/64 POWERPIXEL4+8-RGB
Always use a certified safety cable that can hold 12times the weight of the device
when installing the unit. This secondary safety attachment should be installed in a way
that no part of the installation can drop more than 20cm if the main attachment fails.
The device should be well fixed; a free-swinging mounting is dangerous and may not
be considered!
Don’t cover any ventilation openings as this may result in overheating.
The operator has to make sure that the safety-relating and machine-technical
installations are approved by an expert before using them for the first time. The installations should be
inspected every year by a skilled person to be sure that safety is still optimal.
SETUP MENU
With the setup menu you can fully configure the projector. All settings are preserved when the unit is
disconnected from the mains.
Browsing the setup menu:
General instructions for setup.
Press the MODE button to browse the
different functions of the setup menu
until the required function is shown on
the display.
Press the ENTER button to access
the function and change its
parameters.
The cursor of the value to change
starts blinking. Use DOWN and UP
button to change the value.
Press the ENTER button again
confirm and select the next parameter
to adjust.
DMX MODE + ADDRESS
Used to set the DMX channel mode
and start address.
Press the MODE button until “DMX
MODE” is shown on the display.
Press the ENTER button: the channel mode (number of channels used) can be set.
Use DOWN and UP buttons to change the value to the desired channel mode:
POWERPIXEL4-RGB modes:
03CH: all 4 projectors together RGB
04CH: all 4 projectors together RGB + master dim/audio/strobe channel
05CH: all 4 projectors together RGB + master dim + audio/strobe channel
06CH: 2 groups of 2 projectors RGB + RGB
12CH: all projectors individually RGB
15CH: all projectors individually RGB + 3 channels for special functions.
16CH: all projectors individually RGB + master dim
POWERPIXEL8-RGB modes:
03CH: all 4 projectors together RGB
04CH: all 4 projectors together RGB + master dim/audio/strobe channel
05CH: all 4 projectors together RGB + master dim + audio/strobe channel
06CH: 2 groups of 4 projectors RGB + RGB
12CH: 4 groups of 2 projectors RGB + RGB + RGB + RGB
24CH: all projectors individually RGB
27CH: all projectors individually RGB + 3 channels for special functions.
32CH: all projectors individually RGB + master dim
Press the ENTER button: the start address can be set, the display shows start + end address: “xxx-yyy”.
Use DOWN and UP buttons to adjust the start address (xxx).
Note: Depending on the channel mode, the end address (yyy) of the projector changes automatically. This
makes it easy for you to set the start address of the next projector in the DMX-line.

ENGLISH OPERATION MANUAL
BRITEQ®5/64 POWERPIXEL4+8-RGB
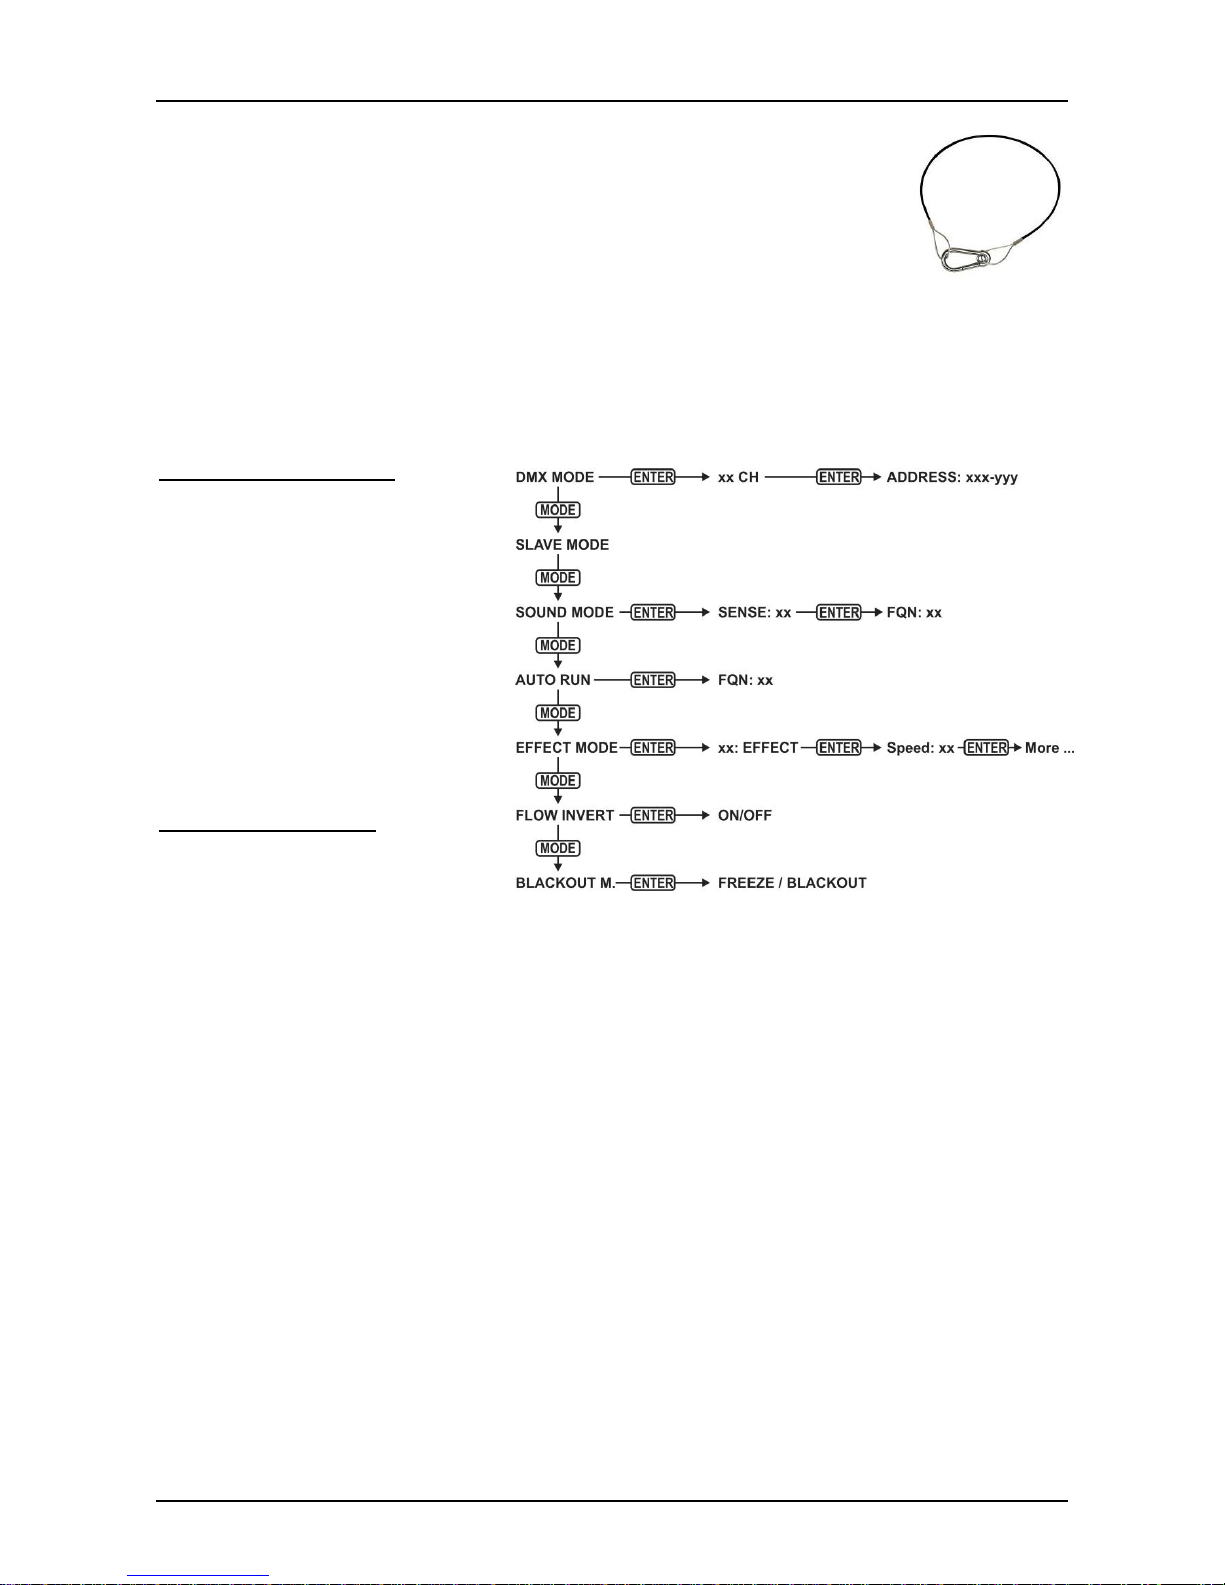
SLAVE MODE
Used to set the projector in slave mode: the projector copies the output of the master in the line.
Press the MODE button until “SLAVE MODE” is shown on the display.
Connect the projector to a master.
Note: POWERPIXEL4-RGB and POWERPIXEL8-RGB can be mixed in one line, master should be a
POWERPIXEL8-RGB!
SOUND MODE
Used to set the projector to standalone sound mode with different chases playing in endless loops.
Press the MODE button until “SOUND MODE” is shown on the display.
Press the ENTER button: the sensitivity of the microphone (SENS) can be set from 00 to 31.
Use DOWN and UP buttons to change the value.
Press the ENTER button: the repetition rate (FQN) of the chases can be set from 00 to 99.
Use DOWN and UP buttons to change the value.
SIMPLE AUTO MODE
Used to set the projector to standalone auto mode with different chases playing in endless loops.
Press the MODE button until “AUTO RUN” is shown on the display.
Press the ENTER button: the repetition rate (FQN) of the chases can be set from 00 to 99.
Use DOWN and UP buttons to change the value.
STANDALONE MODE
Used to set the projector to standalone auto mode with user adjustable options or chases.
Press the MODE button until a number ranging from “01.” to “14.” is shown on line1 of the display.
Press the ENTER button: use the UP/DOWN buttons to select one of the 14 available options/chases.
Depending on the option/chase selected you have different settings:
01.STATIC: (7static colors can be selected.)
Press the ENTER button: one of the 7 static colors (CL) can be selected.
Use DOWN and UP buttons to change the color.
Press the ENTER button: strobe rate (Flash) can be set from 00 (no strobe) to 99 (fast).
Use DOWN and UP buttons to change the value.
01. to 12.XXXXX: (different chases, including color fade, color change, meteor effect, …)
Press the ENTER button: Speed can be set from 01 to 99.
Use DOWN and UP buttons to change the value.
Press the ENTER button: strobe rate (Flash) can be set from 00 (no strobe) to 99 (fast).
Use DOWN and UP buttons to change the value.
13.FLOW8 and 14.FLOW9: (chases in 1 or 2 directions with choice of chase colors)
Press the ENTER button: Speed can be set from 01 to 99.
Use DOWN and UP buttons to change the value.
Press the ENTER button: strobe rate (Flash) can be set from 00 (no strobe) to 99 (fast).
Use DOWN and UP buttons to change the value.
Press the ENTER button: Basic color of the chase (C1) can be selected.
Use DOWN and UP buttons to change the color. (or blackout)
Press the ENTER button: Running color of the chase (C2) can be selected.
Use DOWN and UP buttons to change the color. (or blackout)
FLOW INVERT MODE
Used to change the running direction of the chases.
Press the MODE button until “FLOW INVERT” is shown on the display.
Use DOWN and UP buttons to toggle between ON and OFF.
BLACKOUT MODE
Used to select the behavior of the projector when DMX fails (no DMX detected).
Press the MODE button until “BLACKOUT MODE” is shown on the display.
Use DOWN and UP buttons to toggle between:
BLACKOUT: output turns black while no DMX is detected.
FREEZE: output based on the last valid DMX-signal is kept on the projector.
Note: as soon as the input detects a DMX-signal, blackout or freeze mode will be cancelled.

ENGLISH OPERATION MANUAL
BRITEQ®6/64 POWERPIXEL4+8-RGB
ELECTRICAL INSTALLATION
Important: The electrical installation should be carried out by qualified personal only,
according to the regulations for electrical and mechanical safety in your country.
STANDALONE WITH BUILT-IN CHASES:
Use this function when you want an instant show on only 1 projector.
Connect the projector to the mains and turn it on.
Select one of the following modes in the setup menu:
SOUND mode:if you want chase programs running to the rhythm of the beat. See the section “setup
menu” for more information on the settings.
STANDALONE mode:if you want chase programs running automatically but you want a certain
control over the selected chase. See the section “setup menu” for more information on the settings.
AUTO RUN mode:if you want chase programs running automatically. See the section “setup menu”
for more information on the settings.
STANDALONE MASTER/SLAVE WITH BUILT-IN CHASES:
Use this function when you want an instant show on only 1 projector.
By linking the units in master/slave connection, the first unit will control the other units to show a
synchronized automatic or sound activated light show.
Connect the projectors as shown in the drawing below
Setup of the master: exactly the same procedure as the “STANDALONE” setup.
Setup of the slaves: all slaves should be set to “SLAVE MODE”, See the section “setup menu” for more
information on the settings.
ELECTRICAL INSTALLATION FOR TWO OR MORE UNITS IN DMX-MODE:
Use this function when you want to control the projectors by any DMX controller.
Connect the projectors as shown in the drawing below.
First put the projectors in the desired DMX-mode: see the different DMX-charts and choose the one that
suits you best.
Give all projectors a start address: each projector shows its start + end address, make sure that the
addresses do not overlap!
Some general information on DMX:
The DMX-protocol is a widely used high speed signal to control intelligent light equipment. You need to
“daisy chain” your DMX controller and all the connected units with a balanced cable of good quality.
Both XLR-3pin and XLR-5pin connectors are used, however XLR-3pin is more popular because these
cables are compatible with balanced audio cables.
Pin layout XLR-3pin: Pin1 = GND ~ Pin2 = Negative signal (-) ~ Pin3 = Positive
signal (+)
Pin layout XLR-5pin: Pin1 = GND ~ Pin2 = Negative signal (-) ~ Pin3 = Positive
signal (+) ~ Pins4+5 not used.
To prevent strange behavior of the light effects, due to interferences, you must use
a 90Ω to 120Ω terminator at the end of the chain. Never use Y-splitter cables, this simply won’t work!

ENGLISH OPERATION MANUAL
BRITEQ®7/64 POWERPIXEL4+8-RGB
Make sure that all units are connected to the mains.
Each light effect in the chain needs to have its proper starting address so it knows which commands
from the controller it has to decode.
RDM FUNCTIONS / REMOTE SETUP
RDM means “Remote Device Management”. This projector works with a brief set of RDM-functions which
means that it can setup a bi-directional communication with an RDM-compatible DMX-controller. Some of
these functions are briefly explained below, others will be added in the future.
The DMX-controller sends out a “discovery command”, all RDM devices respond and send their unique
device ID.
The DMX-controller asks each RDM device for some basic data so it knows which devices are connected.
The POWERPIXEL projector will respond:
Device name: PIXEL4-RGB or PIXEL8-RGB
Manufacturer: Briteq®
Category: LED Dimmer
Firmware: x.x.x.x (firmware version of the projector)
DMX address: xxx (current DMX start address of the projector)
DMX footprint: xx (number of DMX-channels used by the projector)
Personality: xx (current personality [or DMX-working mode] used by the projectors)
The DMX-controller can send certain commands to each RDM device which allow remote setup of the
units. Thanks to this the POWERPIXEL can be setup remotely.
The following functions can be managed remotely:
No more need to take a ladder and set all units one by one!
DMX START ADDRESS: The start address can be set remotely from 001 to xxx.
PERSONALITY: The DMX working mode (DMX-chart) can be set remotely.
These 2 functions make it possible to prepare a complete DMX-patch of all projectors on the DMX-
controller and send these data to all projectors at once. More functions will be added later.
DMX CHARTS
For maximum compatibility both POWERPIXEL4-RGB and POWERPIXEL8-RGB have the same DMX-
charts so they can easily work together. More advance DMX-charts are specific for each model. Below you
will 3 parts: Combined charts, specific charts for POWERPIXEL4-RGB and specific charts for
POWERPIXEL8-RGB.
A/ DMX CHARTS FOR BOTH POWERPIXEL4-RGB + POWERPIXEL8-RGB
3 channel DMX-Mode: all pixels working together in RGB
Channel:
Value:
Function:
Remarks
1
000-255
Red (0-100%)
2
000-255
Green (0-100%)
3
000-255
Blue (0-100%)
4 channel DMX-Mode: all pixels working together in RGB + MASTER DIM/SOUND/STROBE
Channel:
Value:
Function:
Remarks
1
000-255
Red (0-100%)
2
000-255
Green (0-100%)
3
000-255
Blue (0-100%)
4
000-190
Master dimmer
000=0% ~ 190=100% (full open)
191-200
Sound control (7 colors)
Audio sensitivity: 191=low ~ 200=high
201-247
Strobe
Increasing speed: 201=slow ~ 247=fast
248-255
Master dimmer @ 100%
Master dimmer is full open
5 channel DMX-Mode: all pixels working together in RGB + MASTER DIM + SOUND/STROBE
Channel:
Value:
Function:
Remarks
1
000-255
Red (0-100%)
2
000-255
Green (0-100%)
3
000-255
Blue (0-100%)

ENGLISH OPERATION MANUAL
BRITEQ®8/64 POWERPIXEL4+8-RGB
4
000-255
Master dimmer (0-100%)
5
000-004
ON
005-024
Sound control (7 colors)
Audio sensitivity: 191=low ~ 200=high
025-034
ON
035-255
Strobe
Increasing speed: 201=slow ~ 247=fast
15 / 27 channel DMX-Mode: all projectors individually + 3ch for special functions)
Channels 1 to 15 are identical for both projectors, for POWERPIXEL8-RGB channels 16 to 27 are additional
individual RGB pixel controls.
CH1 value
CH1 Function
CH2
CH3
CH4
CH5
CH6
… CH15
… CH27
000-015
RGB-control on CH4-15
Master
dimmer
STROBE
000 NO
STROBE
001-255
SLOW
TO FAST
R1
000-255
R1
000-255
B1
000-255
…
016-023
Red on all pixels
dimmer
024-031
Green on all pixels
dimmer
032-039
Blue on all pixels
dimmer
040-047
Red/Green on all pixels
dimmer
048-055
Green/Blue on all pixels
dimmer
056-063
Red/Blue on all pixels
dimmer
064-071
RGB on all pixels
dimmer
072-079
Color 1
dimmer
080-087
Color 2
dimmer
088-095
Color 3
dimmer
096-103
Color 4
dimmer
104-111
Color 5
dimmer
112-119
Color 6
dimmer
120-127
Color 7
dimmer
128-135
Color 8
dimmer
136-143
CFADE
SPEED
000-255
SLOW
TO FAST
144-151
METEOR
152-159
FADE
160-167
CHANGE
168-175
FLOW1
176-183
FLOW2
184-191
FLOW3
192-199
FLOW4
200-207
FLOW5
208-215
FLOW6
216-223
FLOW7
224-231
FLOW8
CH4
Select Color 1
000-035 RGB
036-071 RB
072-107 GB
108-143 RG
144-179 B
180-215 G
216-251 R
252-255 OFF
CH5
Select Color 2
000-035 OFF
036-071 R
072-107 G
108-143 B
144-179 RG
180-215 GB
216-251 RB
252-255 RGB
232-239
FLOW9
240-255
SOUND MODE
SENS
000-255
LOW
TO HIGH

ENGLISH OPERATION MANUAL
BRITEQ®9/64 POWERPIXEL4+8-RGB
B/ DMX CHARTS FOR POWERPIXEL4-RGB ONLY
6 channel DMX-Mode: 2 groups of 2 projectors, RGB control
Channel:
Value:
Function:
Remarks
1
000-255
Red (0-100%)
Control for pixels 1+2
2
000-255
Green (0-100%)
Control for pixels 1+2
3
000-255
Blue (0-100%)
Control for pixels 1+2
4
000-255
Red (0-100%)
Control for pixels 3+4
5
000-255
Green (0-100%)
Control for pixels 3+4
6
000-255
Blue (0-100%)
Control for pixels 3+4
12 channel DMX-Mode: all projectors individually RGB controlled
Channel:
Value:
Function:
Remarks
1
000-255
Red (0-100%)
Control for pixel 1
2
000-255
Green (0-100%)
Control for pixel 1
3
000-255
Blue (0-100%)
Control for pixel 1
4
000-255
Red (0-100%)
Control for pixel 2
5
000-255
Green (0-100%)
Control for pixel 2
6
000-255
Blue (0-100%)
Control for pixel 2
7
000-255
Red (0-100%)
Control for pixel 3
8
000-255
Green (0-100%)
Control for pixel 3
9
000-255
Blue (0-100%)
Control for pixel 3
10
000-255
Red (0-100%)
Control for pixel 4
11
000-255
Green (0-100%)
Control for pixel 4
12
000-255
Blue (0-100%)
Control for pixel 4
16 channel DMX-Mode: all projectors individually RGB+DIM controlled
Channel:
Value:
Function:
Remarks
1
000-255
Red (0-100%)
Control for pixel 1
2
000-255
Green (0-100%)
Control for pixel 1
3
000-255
Blue (0-100%)
Control for pixel 1
4
000-255
Master Dimmer (0-100%)
Control for pixel 1
5
000-255
Red (0-100%)
Control for pixel 2
6
000-255
Green (0-100%)
Control for pixel 2
7
000-255
Blue (0-100%)
Control for pixel 2
8
000-255
Master Dimmer (0-100%)
Control for pixel 2
9
000-255
Red (0-100%)
Control for pixel 3
10
000-255
Green (0-100%)
Control for pixel 3
11
000-255
Blue (0-100%)
Control for pixel 3
12
000-255
Master Dimmer (0-100%)
Control for pixel 3
13
000-255
Red (0-100%)
Control for pixel 4
14
000-255
Green (0-100%)
Control for pixel 4
15
000-255
Blue (0-100%)
Control for pixel 4
16
000-255
Master Dimmer (0-100%)
Control for pixel 4

ENGLISH OPERATION MANUAL
BRITEQ®10/64 POWERPIXEL4+8-RGB
C/ DMX CHARTS FOR POWERPIXEL8-RGB ONLY
6 channel DMX-Mode: 2 groups of 4 projectors, RGB controlled
Channel:
Value:
Function:
Remarks
1
000-255
Red (0-100%)
Control for pixels 1+2+3+4
2
000-255
Green (0-100%)
Control for pixels 1+2+3+4
3
000-255
Blue (0-100%)
Control for pixels 1+2+3+4
4
000-255
Red (0-100%)
Control for pixels 5+6+7+8
5
000-255
Green (0-100%)
Control for pixels 5+6+7+8
6
000-255
Blue (0-100%)
Control for pixels 5+6+7+8
12 channel DMX-Mode: 4 groups of 2 projectors, RGB controlled
Channel:
Value:
Function:
Remarks
1
000-255
Red (0-100%)
Control for pixels 1+2
2
000-255
Green (0-100%)
Control for pixels 1+2
3
000-255
Blue (0-100%)
Control for pixels 1+2
4
000-255
Red (0-100%)
Control for pixels 3+4
5
000-255
Green (0-100%)
Control for pixels 3+4
6
000-255
Blue (0-100%)
Control for pixels 3+4
7
000-255
Red (0-100%)
Control for pixels 5+6
8
000-255
Green (0-100%)
Control for pixels 5+6
9
000-255
Blue (0-100%)
Control for pixels 5+6
10
000-255
Red (0-100%)
Control for pixels 7+8
11
000-255
Green (0-100%)
Control for pixels 7+8
12
000-255
Blue (0-100%)
Control for pixels 7+8
24 channel DMX-Mode: all projectors individually RGB controlled
Channel:
Value:
Function:
Remarks
1
000-255
Red (0-100%)
Control for pixel 1
2
000-255
Green (0-100%)
Control for pixel 1
3
000-255
Blue (0-100%)
Control for pixel 1
4
000-255
Red (0-100%)
Control for pixel 2
5
000-255
Green (0-100%)
Control for pixel 2
6
000-255
Blue (0-100%)
Control for pixel 2
7 … 21
000-255
…
Control for pixels 3 to 7
22
000-255
Red (0-100%)
Control for pixel 8
23
000-255
Green (0-100%)
Control for pixel 8
24
000-255
Blue (0-100%)
Control for pixel 8
32 channel DMX-Mode: all projectors individually RGB+DIM controlled
Channel:
Value:
Function:
Remarks
1
000-255
Red (0-100%)
Control for pixel 1
2
000-255
Green (0-100%)
Control for pixel 1
3
000-255
Blue (0-100%)
Control for pixel 1
4
000-255
Master Dimmer (0-100%)
Control for pixel 1
5
000-255
Red (0-100%)
Control for pixel 2
6
000-255
Green (0-100%)
Control for pixel 2
7
000-255
Blue (0-100%)
Control for pixel 2
8
000-255
Master Dimmer (0-100%)
Control for pixel 2
9 … 28
000-255
…
Control for pixels 3 to 7
29
000-255
Red (0-100%)
Control for pixel 8
30
000-255
Green (0-100%)
Control for pixel 8
31
000-255
Blue (0-100%)
Control for pixel 8
32
000-255
Master Dimmer (0-100%)
Control for pixel 8

ENGLISH OPERATION MANUAL
BRITEQ®11/64 POWERPIXEL4+8-RGB
RDM FUNCTIONS / REMOTE SETUP
RDM means “Remote Device Management”. This projector works with a brief set of RDM-functions which
means that it can setup a bi-directional communication with an RDM-compatible DMX-controller. Some of
these functions are briefly explained below, others will be added in the future.
The DMX-controller sends out a “discovery command”, all RDM devices respond and send their unique
device ID.
The DMX-controller asks each RDM device for some basic data so it knows which devices are connected.
The POWERPIXEL projector will respond:
Device name: PIXEL4-RGB or PIXEL8-RGB
Manufacturer: Briteq®
Category: LED Dimmer
Firmware: x.x.x.x (firmware version of the projector)
DMX address: xxx (current DMX start address of the projector)
DMX footprint: xx (number of DMX-channels used by the projector)
Personality: xx (current personality [or DMX-working mode] used by the projectors)
The DMX-controller can send certain commands to each RDM device which allow remote setup of the
units. Thanks to this the POWERPIXEL can be setup remotely.
The following functions can be managed remotely:
No more need to take a ladder and set all units one by one!
DMX START ADDRESS: The start address can be set remotely from 001 to xxx.
PERSONALITY: The DMX working mode (DMX-chart) can be set remotely.
These 2 functions make it possible to prepare a complete DMX-patch of all projectors on the DMX-
controller and send these data to all projectors at once. More functions will be added later.
MAINTENANCE
Make sure the area below the installation place is free from unwanted persons during servicing.
Switch off the unit, unplug the mains cable and wait until the unit has been cooled down.
During inspection the following points should be checked:
All screws used for installing the device and any of its parts should be tightly fastened and may not be
corroded.
Housings, fixations and installations spots (ceiling, truss, suspensions) should be totally free from any
deformation.
When an optical lens is visibly damaged due to cracks or deep scratches, it must be replaced.
The mains cables must be in impeccable condition and should be replaced immediately when even a
small problem is detected.
In order to protect the device from overheat the cooling fans (if any) and ventilation openings should be
cleaned monthly.
The interior of the device should be cleaned annually using a vacuum cleaner or air-jet.
The cleaning of internal and external optical lenses and/or mirrors must be carried out periodically to
optimize light output. Cleaning frequency depends on the environment in which the fixture operates: damp,
smoky or particularly dirty surroundings can cause greater accumulation of dirt on the unit’s optics.
Clean with a soft cloth using normal glass cleaning products.
Always dry the parts carefully.
Attention: We strongly recommend internal cleaning to be carried out by qualified personnel!

ENGLISH OPERATION MANUAL
BRITEQ®12/64 POWERPIXEL4+8-RGB
SPECIFICATIONS
POWERPIXEL4-RGB
Mains Input: AC 110V - 240V, 50/60Hz
Power consumption: 160 Watt max.
Fuse: 250V T2A (20mm glass)
Sound Control: Internal microphone
DMX connections: 3pin + 5pin XLR male / female
DMX channels used: 3+4+5+6+12+15+16 channels
Lamp: 4x RGB 30W COB
LED Refresh rate: 1200 Hz
Beam Angle: 60°
Size: 440 x 172,5 x 154,4 mm
Weight: 5,20 kg
POWERPIXEL8-RGB
Mains Input: AC 110V - 240V, 50/60Hz
Power consumption: 290 Watt max.
Fuse: 250V T2A (20mm glass)
Sound Control: Internal microphone
DMX connections: 3pin + 5pin XLR male / female
DMX channels used: 3+4+5+6+12+24+27+32 channels
Lamp: 8x RGB 30W COB
LED Refresh rate: 1200 Hz
Beam Angle: 60°
Size: 880 x 172,5 x 154,4 mm
Weight: 8,16 kg
The information might be modified without prior notice
You can download the latest version of this user manual on our website: www.briteq-lighting.com

FRANÇAIS GUIDE D'UTILISATION
BRITEQ®13/64 POWERPIXEL4+8-RGB
GUIDE D'UTILISATION
Nous vous remercions d'avoir acheté ce produit Briteq®. Pour tirer pleinement profit de toutes les possibilités
et pour votre propre sécurité, lisez ces instructions très attentivement avant d'utiliser cet appareil.
CARACTÉRISTIQUES
Cet appareil ne produit pas d'interférences radio. Ce produit répond aux exigences des directives
européennes et nationales actuelles. La conformité a été établie et les déclarations et documents
correspondants ont été déposés par le fabricant.
Ce dispositif a été conçu pour produire un effet d'éclairage décoratif et est utilisé dans les systèmes de jeu
de lumière.
Puissant projecteur LED d'intérieur équipé de 4 ou 8 LED RGB 30W COB.
Grâce au très large angle du faisceau de 60°, ce projecteur constitue une solution parfaite pour des
applications « à courte distance » telles que “wall wash”, mais également peut être bien adapté à des
scènes de concert, théâtres, discothèques, stands d'exposition etc.
Grâce aux sources RGB ponctuelles Il n'y a absolument aucune ombre de couleur.
Absolument parfait pour le mélange de couleurs, même à très courte distance.
D'excellents programmes intégrés offrant de fabuleux jeux de lumière en perpétuels changements.
Excellent mélange de couleurs RGB 16 bits et gradation à 0%.
Fonctionnement complètement silencieux, grâce au système de refroidissement par convection naturelle.
Jeux de lumière en mode autonome, maître/esclave ou sélectionné par DMX :
Couleurs statiques
Fondus de couleurs
Différents chenillards statiques
Différents chenillards activés par le son
Contrôle DMX total avec différents modes canaux, allant du simple mode 3 CH aux modes 16/32 CH pour
le contrôle total RGB + GRADATION de chaque pixel.
Fonctionnalité RDM pour faciliter la configuration à distance : Adressage DMX, mode canal,...
Ecran LCD rétroéclairé, 2x 16 caractères alphanumérique pour la navigation dans les menus.
Entrées/sorties Neutrik PowerCon : chaînage facile de plusieurs unités.
Entrées/sorties DMX 3 et 5 broches pour une compatibilité maximale.
Haute efficacité et faible consommation d'énergie !
Support multifonction pour plancher et montage sur structure.
AVANT UTILISATION
Avant d'utiliser cet appareil, vérifiez s'il n'a pas été endommagé durant le transport. En cas de dommages,
n'utilisez pas l'appareil et consultez immédiatement votre revendeur.
Important : Cet appareil est expédié de notre usine en parfait état et bien emballé. Il est absolument
nécessaire que l'utilisateur suive strictement les instructions et les avertissements de sécurité se trouvant
dans ce manuel. Tout dommage dû à une mauvaise manipulation n'est pas garanti. Le revendeur
n'accepte aucune responsabilité pour tous les défauts et problèmes dus au non-respect de ce manuel.
Conservez ce manuel dans un endroit sûr pour toute consultation future. Si vous vendez l'appareil, veillez
à joindre ce manuel.
Vérifiez le contenu :
Vérifiez que le carton contient les éléments suivants :
Instructions d'utilisation
POWERPIXEL-RGB
Câble d'alimentation PowerCON

FRANÇAIS GUIDE D'UTILISATION
BRITEQ®14/64 POWERPIXEL4+8-RGB
INSTRUCTIONS DE SÉCURITÉ :
Pour protéger l'environnement, essayer de recycler autant que possible les matériaux d'emballage.
Pour éviter tout incendie ou électrocution, n'exposez pas cet appareil à la pluie ou l'humidité.
Pour éviter une formation de condensation interne, laissez l'appareil s'adapter à la température ambiante
quand vous la mettez dans une pièce chauffée après le transport. La condensation empêche parfois
l'appareil de fonctionner à plein rendement ou peut même causer des dommages.
Cet appareil est destiné à un usage intérieur seulement.
Ne placez pas d'objets métalliques et ne renversez pas de liquides à l'intérieur de l'appareil. Un choc
électrique ou un dysfonctionnement peut en résulter. Si un corps étranger pénètre dans l'appareil,
débranchez immédiatement l'alimentation secteur.
Fixez l'appareil dans un endroit bien aéré, loin de tout matériau et/ou liquide inflammable. Le luminaire doit
être fixé à au moins 50cm des murs environnants.
Ne couvrez pas les ouvertures de ventilation, cela pourrait entraîner une surchauffe.
Evitez une utilisation dans des environnements poussiéreux et nettoyez l'appareil régulièrement.
Gardez l'appareil loin de la portée des enfants.
Les personnes inexpérimentées ne doivent pas utiliser cet appareil.
La température ambiante de fonctionnement maximale est de 40°C. N'utilisez pas cet appareil à des
températures ambiantes plus élevées.
Assurez-vous qu'aucune personne étrangère ne se trouve dans la zone en dessous de l'emplacement
d'installation durant le montage, le démontage et l'entretien.
Laissez environ 10 minutes à l'appareil pour refroidir avant de commencer l'entretien.
Débranchez toujours l'appareil lorsqu'il ne va pas être utilisé pendant une longue période ou avant de
commencer l'entretien.
L'installation électrique doit être effectuée par du personnel qualifié, conformément à la réglementation en
matière de sécurité électrique et mécanique dans votre pays.
Vérifiez que la tension secteur n'est pas supérieure à celle indiquée sur l'appareil.
Le cordon d'alimentation doit toujours être en parfait état. Eteignez immédiatement l'appareil dès le cordon
d'alimentation est écrasé ou endommagé. Il doit être remplacé par le fabricant, son agent de service ou
une personne de même qualification afin d'éviter tout danger.
Ne laissez jamais le cordon d'alimentation ENTER en contact avec d'autres câbles !
Ce luminaire doit être mis à la terre pour être conforme réglementation en matière de sécurité.
Ne connectez pas l'appareil à aucun variateur de lumière.
Utilisez toujours un câble de sécurité approprié et certifié lors de l'installation de l'appareil.
Afin d'éviter un choc électrique, n'ouvrez aucun panneau. Aucune pièce interne n'est remplaçable par
l'utilisateur à part le fusible secteur.
Ne réparez jamais un fusible et ne court-circuitez jamais le porte-fusible. Remplacez toujours un fusible
endommagé par un fusible du même type ayant les mêmes spécifications électriques !
ATTENTION : Pour réduire le risque de choc électrique, ne
retirez pas le panneau supérieur. L'appareil ne contient aucun
composant réparable par l'utilisateur. Confiez toute réparation à
un personnel qualifié uniquement.
Le symbole de l'éclair à l'intérieur d'un triangle équilatéral, est destiné à alerter l'utilisateur de la
présence de pièces sous tension non isolées dans le boîtier de l'appareil, d'une magnitude
pouvant constituer un risque d'électrocution.
Le symbole du point d'exclamation dans un triangle équilatéral sert à avertir l'utilisateur que
d'importants conseils d'utilisation et de maintenance sont fournis dans la documentation
accompagnant l'appareil.
Ce symbole signifie : pour usage intérieur uniquement
Ce symbole signifie : Lisez les instructions
Ce symbole détermine : la distance minimale des objets éclairés. La distance minimale entre la
sortie de lumière et la surface éclairée doit être supérieure à un 1 mètre.
Cet appareil n'est pas adapté pour un montage direct sur des surfaces normalement
inflammables. (ne convient que pour le montage sur surfaces non combustibles)
ATTENTION : Ne fixez pas votre regard sur une lampe allumée.
Peut être nocif pour les yeux.

FRANÇAIS GUIDE D'UTILISATION
BRITEQ®15/64 POWERPIXEL4+8-RGB
En cas de sérieux problèmes de fonctionnement, cessez d'utiliser l'appareil et contactez immédiatement
votre revendeur.
Le boîtier et la lentille doivent être remplacés s'ils sont visiblement endommagés.
Utilisez l'emballage d'origine pour transporter l'appareil.
Pour des raisons de sécurité, il est interdit d'apporter des modifications non autorisées à l'appareil.
Important : Ne regardez jamais directement dans la source de lumière ! N'utilisez pas le jeu de lumière en
présence de personnes souffrant d'épilepsie.
DESCRIPTION :
Remarque : C'est l'image de POWERPIXEL4-RGB, mais POWERPIXEL8-RGB dispose de touches de
commande et connecteurs identiques.
1. TENSION D'ENTREE : équipé de pièces d'origine Neutrik PowerCON®. Branchez le câble
d'alimentation fourni ou tout câble de rallonge PowerCon®ici.
2. SORTIE SECTEUR : utilisé pour connecter en série l'alimentation de plusieurs autres projecteurs. Faites
toujours attention à la charge maximale, lors de l'ajout d'autres projecteurs ! Des câbles multiples
(PowerCON®+ DMX XLR, sont disponibles en option : reportez-vous à notre site internet !)
3. FUSIBLE SECTEUR : protège l'appareil en cas de problèmes électriques, utilisez toujours un fusible du
type recommandé !
4. ENTREE/SORTIE DMX PROJECTEUR : des entrées/sorties 3 et 5 broches sont disponibles pour la
connexion en série du projecteur avec d'autres unités qui seront contrôlées par un contrôleur DMX.
5. Touche MODE : Permet de parcourir les différentes options du menu configuration.
6. Touche ENTER : Permet de parcourir les différents paramètres de l'option choisie. Permet également de
confirmer les valeurs sélectionnées des paramètres.
7. Touches Haut/Bas : permettent d'augmenter/diminuer la valeur du paramètre sélectionné.
8. ECRAN LCD : Ecran LCD rétroéclairé, 2x 16 caractères pour la navigation dans les menus. L'écran
rétroéclairé dès que l'une des touches est appuyée. Affiche le modèle + version du logiciel au démarrage.
9. MIC : Permet de déclencher les programmes en mode musique.
10.SUPPORT : Un support multifonction très stable pour plancher et montage sur structure. Le projecteur
peut être dirigé dans toute direction.
11.BOULON A ŒILLET DE SECURITE : utilisé pour attacher un câble de sécurité au cours du levage de
l'appareil (reportez-vous au paragraphe « Montage au plafond »).

FRANÇAIS GUIDE D'UTILISATION
BRITEQ®16/64 POWERPIXEL4+8-RGB
MONTAGE AU PLAFOND
Important : L'installation ne doit être effectuée que par un personnel qualifié. Une mauvaise
installation peut entraîner des blessures et/ou dommages graves. Un montage au plafond exige
une grande expérience ! Les limites de charge de fonctionnement doivent être respectées, des
matériels d'installation certifiés doivent être utilisés, l'appareil installé doit être inspecté
régulièrement pour vérifier les conditions de sécurité.
Assurez-vous qu'aucune personne étrangère ne se trouve dans la zone en dessous de l'emplacement
d'installation durant le montage, le démontage et l'entretien.
Fixez l'appareil dans un endroit bien aéré, loin de tout matériau et/ou liquide inflammable. Le luminaire doit
être fixé à au moins 50cm des murs environnants.
L'appareil doit être installé hors de la portée des gens, loin des passages et des endroits où des
personnes peuvent s'asseoir.
Avant de soulever l'appareil, assurez-vous que le point de suspension peut supporter une charge d'au
moins 10 fois le poids de l'appareil.
Lors de l'installation de l'appareil, utilisez toujours un câble de sécurité certifié qui peut
supporter 12 fois le poids de l'appareil. Ce support de suspension de sécurité
secondaire doit être installé de manière à ce qu'aucune partie de l'installation ne
puisse tomber de plus de 20cm si le support principal lâche.
L'appareil doit être bien fixé, un montage balançant est dangereux et ne doit pas être
entrepris !
Ne couvrez pas les ouvertures de ventilation, cela pourrait entraîner une surchauffe.
L'opérateur doit s'assurer que la sécurité relative à l'installation et les conditions techniques sont
approuvées par un expert avant d'utiliser l'appareil pour la première fois. Les installations doivent être
inspectées chaque année par une personne qualifiée pour être sûr que la sécurité est toujours optimale.
MENU DE CONFIGURATION
Le menu de configuration vous permet de configurer entièrement le projecteur. Tous les paramètres sont
mémorisés même lorsque l'appareil est débranché du secteur.
Parcourir le menu de configuration :
Instructions générales pour la
configuration.
Appuyez sur la touche MODE pour
parcourir les différentes fonctions du
menu configuration jusqu'à ce que la
fonction souhaitée s'affiche à l'écran.
Appuyez sur la touche ENTER pour
accéder à la fonction et modifier ses
paramètres.
Le curseur de la valeur à modifier se
met à clignoter. Utilisez les touches
Haut/Bas pour modifier la valeur.
Appuyez à nouveau sur la touche
ENTER pour confirmer et sélectionner
le paramètre suivant à régler.
MODE + ADRESSE DMX
Permet de définir le mode canal DMX
et l'adresse de début.
Appuyez sur la touche MODE jusqu'à ce que « DMX MODE » s'affiche à l'écran.
Appuyez sur la touche ENTER : le mode canal (nombre de canaux utilisés) peut être réglé.
Utilisez les touches Haut/Bas pour changer la valeur du mode canal :
Modes de POWERPIXEL4-RGB :
03 CH : les 4 projecteurs en RGB.
04 CH : les 4 projecteurs en canaux RGB + gradateur maître/audio/effet stroboscopique.
05 CH : les 4 projecteurs en canaux RGB + gradateur maître + audio + effet stroboscopique.
06 CH : 2 groupes de 2 projecteurs RGB + RGB.
12 CH : tous les projecteurs individuellement en RGB.

FRANÇAIS GUIDE D'UTILISATION
BRITEQ®17/64 POWERPIXEL4+8-RGB
15 CH : tous les projecteurs individuellement EN RGB + 3 canaux pour des fonctions spéciales.
16 CH : tous les projecteurs individuellement en RGB + gradateur maître.
Modes de POWERPIXEL8-RGB :
03 CH : les 4 projecteurs en RGB.
04 CH : les 4 projecteurs en canaux RGB + gradateur maître/audio/effet stroboscopique.
05 CH : les 4 projecteurs en canaux RGB + gradateur maître + audio + effet stroboscopique.
06 CH : 2 groupes de 4 projecteurs RGB + RGB.
12 CH : 4 groupes de 2 projecteurs RGB + RGB + RGB + RGB.
24 CH : tous les projecteurs individuellement en RGB.
27 CH : tous les projecteurs individuellement en RGB + 3 canaux pour des fonctions spéciales.
32 CH : tous les projecteurs individuellement en RGB + gradateur maître.
Appuyez sur la touche ENTER : l'adresse de début peut être fixée, l'écran affiche l'adresses de début et
l'adresses de fin : « xxx-yyy ».
Utilisez les touches Haut/Bas pour changer l'adresse de début (xxx).
Remarque : Selon le mode canal, l'adresse de fin (yyy) du projecteur change automatiquement. Cela vous
facilite la définition de l'adresse de début du prochain projecteur dans la chaîne DMX.
MODE SLAVE
Permet de mettre le projecteur en mode SLAVE (esclave) :le projecteur reproduit la sortie du maître
dans la chaîne.
Appuyez sur la touche MODE jusqu'à ce que « SLAVE MODE » s'affiche à l'écran.
Connectez le projecteur à un maître.
Remarque : POWERPIXEL4-RGB et POWERPIXEL8-RGB peuvent être combinés sur une ligne,
POWERPIXEL8-RGB doit être le maître !
MODE SONORE
Permet de mettre le projecteur en mode sonore autonome avec différents chenillards en boucle
continue.
Appuyez sur la touche MODE jusqu'à ce que « SOUND MODE » s'affiche à l'écran.
Appuyez sur la touche ENTER : la sensibilité du microphone (SENS) peut être fixée entre 00 et 31.
Utilisez les touches Haut/Bas pour modifier la valeur.
Appuyez sur la touche ENTER : la fréquence de répétition (FQN) des chenillards peut être fixée entre 00
et 99.
Utilisez les touches Haut/Bas pour modifier la valeur.
MODE AUTOMATIQUE SIMPLE
Permet de mettre le projecteur en mode autonome automatique avec différents chenillards en boucle
continue.
Appuyez sur la touche MODE jusqu'à ce que « AUTO RUN » s'affiche à l'écran.
Appuyez sur la touche ENTER : la fréquence de répétition (FQN) des chenillards peut être fixée entre 00
et 99.
Utilisez les touches Haut/Bas pour modifier la valeur.
MODE STANDALONE
Permet de mettre le projecteur en mode autonome automatique avec différentes options et
chenillards personnalisés.
Appuyez sur la touche MODE jusqu'à un nombre compris entre 01. et 14. s'affiche à l'écran.
Appuyez sur la touche ENTER : Utilisez les touches Haut/Bas pour sélectionner l'une des
14 options/chenillards disponibles.
Selon l'option/chenillard sélectionné, plusieurs paramètres sont disponibles :
01. STATIC : (7 couleurs statiques peuvent être sélectionnées.)
Appuyez sur la touche ENTER : l'une des 7 couleurs statiques (CL) peut être sélectionnée.
Utilisez les touches Haut/Bas pour changer la couleur.
Appuyez sur la touche ENTER : la vitesse stroboscopique (Flash) peut être réglée de 00 (pas de
flash) à 99 (rapide).
Utilisez les touches Haut/Bas pour modifier la valeur.
01. à 12. XXXXX : (Différents chenillards, y compris le fondu de couleur, changement de couleur,
effets météoritiques,...)
Appuyez sur la touche ENTER : La vitesse peut être fixée de 01 à 99.

FRANÇAIS GUIDE D'UTILISATION
BRITEQ®18/64 POWERPIXEL4+8-RGB
Utilisez les touches Haut/Bas pour modifier la valeur.
Appuyez sur la touche ENTER : la vitesse stroboscopique (Flash) peut être réglée de 00 (pas de
flash) à 99 (rapide).
Utilisez les touches Haut/Bas pour modifier la valeur.
13. FLOW8 et 14. FLOW9 : (chenillards dans les directions 1 ou 2 avec choix des couleurs).
Appuyez sur la touche ENTER : La vitesse peut être fixée de 01 à 99.
Utilisez les touches Haut/Bas pour modifier la valeur.
Appuyez sur la touche ENTER : la vitesse stroboscopique (Flash) peut être réglée de 00 (pas de
flash) à 99 (rapide).
Utilisez les touches Haut/Bas pour modifier la valeur.
Appuyez sur la touche ENTER : La couleur de base du chenillard (C1) peut être sélectionnée.
Utilisez les touches Haut/Bas pour changer la couleur. (Ou panne)
Appuyez sur la touche ENTER : La couleur d'exécution du chenillard (C2) peut être sélectionnée.
Utilisez les touches Haut/Bas pour changer la couleur. (Ou panne)
MODE FLOW INVERT (INVERSION DU FLUX)
Permet de changer le sens de rotation des chenillards.
Appuyez sur la touche MODE jusqu'à ce que « FLOW INVERT » s'affiche à l'écran.
Utilisez les touches Haut/Bas pour basculer entre ON (activé) et OFF (désactivé).
MODE BLACKOUT (panne)
Permet de choisir un fonctionnement du projecteur en cas de défaillance du DMX (aucun DMX
détecté).
Appuyez sur la touche MODE jusqu'à ce que « BLACKOUT MODE » s'affiche à l'écran.
Utilisez les touches Haut/Bas pour basculer entre :
BLACKOUT : obscurité si aucun DMX n'est détecté.
FREEZE : le projecteur utilise le dernier signal DMX valide.
Remarque : dès l'entrée détecte un signal DMX, le mode blackout ou freeze sera annulé.
INSTALLATION ELECTRIQUE
Important : L'installation électrique doit être effectuée par du personnel qualifié,
conformément à la réglementation en matière de sécurité électrique et mécanique dans votre
pays.
AUTONOME AVEC CHENILLARDS INTÉGRÉS :
Utilisez cette fonction lorsque vous voulez un jeu de lumière instantané avec 1 seul projecteur.
Branchez le projecteur au secteur et l'allumer.
Sélectionnez l'un des modes suivants dans le menu configuration :
Mode SOUND (sonore) : Permet d'exécuter des programmes chenillards au rythme de la musique.
Reportez-vous à la section « menu de configuration » pour plus d'informations sur les réglages.
Mode STANDALONE (autonome) : avec un certain contrôle sur le chenillard sélectionné. Reportez-
vous à la section « Menu de configuration » pour plus d'informations sur les réglages.
Mode AUTO RUN (exécution automatique) : Permet d'exécuter des programmes chenillards
automatiquement. Reportez-vous à la section « menu de configuration » pour plus d'informations sur
les réglages.
STANDALONE MASTER/SLAVE (AUTONOME MAÎTRE/ESCLAVE) AVEC CHENILLARDS INTÉGRÉS :
Utilisez cette fonction lorsque vous voulez un jeu de lumière instantané avec 1 seul projecteur.
En connectant les unités en maître/esclave, la première unité contrôlera les autres unités pour donner un jeu
de lumière automatique synchronisé ou activé par le son.
Connectez les projecteurs comme illustré dans le dessin ci-dessous.
This manual suits for next models
1
Table of contents
Languages:
Other Briteq Floodlight manuals

Briteq
Briteq COB SLIM IOO-RGB User manual

Briteq
Briteq COB SLIM 100-RGB User manual

Briteq
Briteq Powerpixel8 User manual

Briteq
Briteq BT-W36L3 User manual

Briteq
Briteq BTX Titan User manual

Briteq
Briteq LED Power Beam User manual

Briteq
Briteq STAGE BEAMERRGB MK2 User manual

Briteq
Briteq BT-Meteor User manual
Popular Floodlight manuals by other brands

LumX
LumX LM 34500 instruction manual

Robe
Robe DT Series user manual

Colight
Colight 5149 Instruction guide

Sealey
Sealey LED1000PB quick start guide

Francis Searchlights
Francis Searchlights L300 User instruction & installation manual

Whelen Engineering Company
Whelen Engineering Company Continuum 3 installation guide