Brompton Brompton Electric Mk.1 User manual

EN15194:2017
OWNERS
MANUAL

COMPONENT NAMES
SADDLE
PENTACLIP
SEATPOST
SEAT CLAMP
SUSPENSION BLOCK
LOWER STOP DISC
REAR FRAME
CHAIN
REAR WHEEL NON FOLDING PEDAL
CRANKSET
FRONT WHEEL
FORK
HANDLEBAR CATCH
HANDLEBAR STEM
HANDLEBAR CATCH NIPPLE
GRIP
BRAKE LEVER
HINGE CLAMP
CABLES
HANDLEBAR
FOLDING
PEDAL
MAINFRAME HINGE
MAINFRAME
FRONT HUB MOTOR
FRONT CARRIER BLOCK

CONTENTS
INTRODUCTION 4
SAFETY 5
REPLACEMENT PARTS 6
DECLARATION OF CONFORMITY 8
ITEMS SUPPLIED WITH THE BIKE 9
THE ELECTRIC ASSIST SYSTEM 10
USING THE LIGHTING 15
BATTERY CARE 16
UNFOLDING 18
FOLDING 22
USING THE BROMPTON ELECTRIC 25
GEARS 26
BRAKES 32
FRONT LUGGAGE 35
REAR LUGGAGE 36
CLEANING & LUBRICATION 37
ADJUSTING THE SADDLE POSITION 40
SADDLE HEIGHT INSERT FITTING 41
REAR WHEEL - REMOVAL AND FITTING 44
FRONT WHEEL - REMOVAL AND FITTING 46
ROUTINE REPLACEMENTS 48
WARRANTY 50

INTRODUCTION
Before using your Brompton Electric, please read this manual noting the
sections on safety and folding in particular. While this manual is intended
as a guide, it is not a comprehensive guide to cycling or bicycle maintenance.
After purchasing your Brompton Electric bicycle, it is important to register your bike & battery in the My
Brompton section of our website to record the details of your bike(s); that way, if your bike is stolen or we
have any need to contact you, we will have a record to refer to. You will be asked to enter your serial and
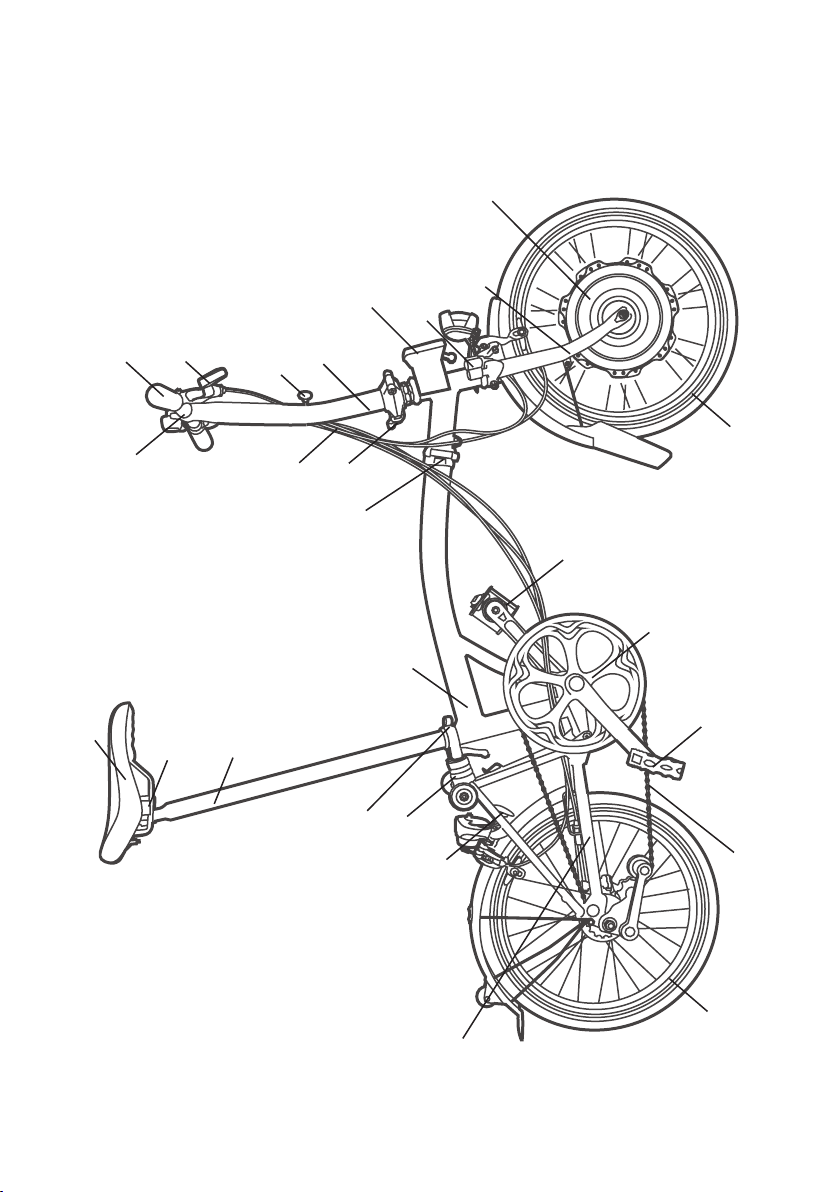
frame numbers: the serial number is located on a plate at the back of the main frame; the frame number is
stamped on the main frame near the bottom bracket. The information remains on the Brompton database and
will not be passed on to third parties https://www.brompton.com/login
If you carry out any adjustments or maintenance work yourself, please read the relevant sections of this
manual first, as it’s quite easy to get things wrong, and to impair the folding process or damage the bike and
possibly make it unsafe to use. This manual contains some tips and advice for using your Brompton Electric
but if you are ever unsure of how to maintain your bike, visit an authorised Brompton Electric dealer for expert
advice. For a list of dealers, please visit our website: https://www.brompton.com/Find-a-Store
We recommend having your bike inspected and serviced by a Brompton Electric dealer regularly.
This manual conforms to EN15194:2017
CARRYING & WHEELING THE FOLDED BIKE
• Owners are responsible for assessing the way they use the bike at all times, and should ensure that
they take due care of their safety and welfare when riding, moving or carrying their bike
• Brompton accept no responsibility for any injury caused when lifting and handling a folded bike
• A Brompton Electric bike weighs between 13.7 and 14.4kg, depending on the equipment fitted
• Luggage fitted to the mount on the front of the bike can also weigh up to 10kg, including the battery
• Luggage mounted to bikes equipped with a rear rack can weigh up to 10kg
• Owners must take due consideration of the weight of their bike, battery and any luggage they plan to
lift or carry, and balance this against their particular physical capabilities; the circumstances i.e. route,
under-foot conditions etc must also be considered before each lift and/or carry of the bike & luggage
• Owners should always remove the battery and luggage from the bike before folding
• Unfold the bike fully before refitting the battery and luggage; do not attempt to lift or carry the
combined weight of the bike and luggage
• Whenever you are no longer able to ride your Brompton Electric, inside a train station for example,
you should first push it as far as possible, then remove the luggage and battery, fold the bike and
roll it on the rear rollers before carrying it for the shortest distance
• It is recommended that the folded bike is carried one-handed, most comfortably with your arm
straight and the bike to your side. The bike should be held either by the saddle, or the main frame
below the saddle, whichever is most suitable for you
• Carry the luggage and battery with the other arm, by the carry handle on the bag or shoulder strap
• If you have to carry the bike for any distance, then it may be appropriate to swap the bike and luggage
between each hand at suitable intervals, depending on your capabilities
• Carrying the folded bike two-handed is only advisable over a very short distance, as it can only be
done by holding the bike at chest/stomach level in order to avoid knocking your legs or knees
against the bike; this requires both arms to be bent with an approx 90degree bend, which will place
extra strain on your arms.
The small rollers fitted as standard on a Brompton Electric are useful for pushing the folded bike into tight
spaces. Using the raised handlebar as a handle, the folded bike may also be pulled around on these rollers,
though this only works over short distances on a smooth surface, the front luggage must not be attached to
the bike when doing this. Remember to raise the seatpost slightly from the fully-down position so that it does
not hinder the bike from rolling along, but not so high that the bike unfolds. The folded bike is not designed
to be used as a stool, do not sit on the bike when folded.
NOTE: The Brompton Electric Bicycle (Pedelec or electric bicycle) is referred to in this Manual as a bike,
bicycle or Brompton, unless otherwise noted.

INTENDED USE
The Brompton Electric is designed for use on roads and well-made paths, carrying a maximum load not
exceeding 110kg (rider, luggage and battery weight included). A Brompton Electric is not intended for
stunts, cross-country riding or extreme sports. Your Brompton Electric should be used for its intended
purpose. Misuse may lead to failure of some components and void your Brompton Electric warranty. We do
not recommend fitting a child seat or trailer to the Brompton Electric, doing so will invalidate the Brompton
Electric warranty. The Brompton Electric is not compatible with indoor trainers or rollers, do not attempt to
use the Brompton Electric in conjunction with these.
SPECIFICATION
This Brompton Electric bike complies with EN 15194 The motor assistance is limited to a maximum
continuous power rating of 0.25 kW (250 W) and a maximum speed of 25km/h, (15.5 mph). The A-weighted
emisson sound pressure level at the driver ears is less than 70dB(A).
LUGGAGE WEIGHTS
Brompton has a selection of front luggage compatible with the Brompton Electric. Standard front luggage is
not compatible with the Brompton Electric.
The front luggage capacity of the Brompton Electric is 6.2kg, the bag and battery weigh up to 3.8kg.
This gives a maximum total load of 10kg for the front luggage.
The capacity of the rear rack (R-Version bikes only) is10kg.
Ensure that when carrying luggage you do not exceed the maximum load for the bicycle (including luggage
battery and rider) of 110kg.
Using incorrect luggage may interfere with steering and could be dangerous.
SERVICING & SOFTWARE UPDATES
Your Brompton Electric should be serviced regularly by an authorised dealer.
100 miles or 1-month (whichever comes sooner) after purchase, you should return the bike to the dealer for
a free checkup; please contact the dealer in advance to book this service in. If this service is not carried out
within 3 months of receiving the bike you will be liable to pay for the service.
Occasionally the software on your Brompton Electric will need updating, during regular servicing your
Brompton Electric dealer will check for software updates and run diagnostics on the bike to ensure the
electric assist system is working correctly. We may also contact you from time to time to let you know about
any important updates.
You should ensure the bike is given a thorough service by an authorised Brompton Electric dealer at least
once a year; you may need to increase the frequency of servicing depending on use and environmental
conditions. Regular checks and maintenance will keep the bike working properly and increase the service
life of components.
Failure to keep the Brompton Electric properly maintained will invalidate your warranty.
5

SAFETY
Before riding your Brompton Electric for the first time, and periodically thereafter, please pay close attention
to the following:
• We recommend the use of an approved cycling helmet, even in countries where their use is not
mandatory
• Before riding your Brompton Electric on open roads, please take time to familiarize yourself with the
operation of the bicycle and electric assist system in a quiet place, away from traffic or hazards
• Ensure you do not drop the battery as it could cause injury or damage to the battery itself
• Please fully charge the battery before the first use
• Ensure that the battery, front bag and bag strap are properly secured before using the bike
• Do not try to operate the user interface on the battery when riding
• Read and follow the national legal requirements of the country where you are riding in relation to
cycling, bicycles and electric assist bicycles, and comply with all applicable traffic laws
• Make sure the wheel rims are clean and undamaged along the braking surface,
and check for excess rim wear; if you doubt the safety of your rims, have them
inspected by an authorised Brompton Electric dealer
• Check brakes, tyres (including tyre pressure) and steering regularly
• Keep brakes and gears properly adjusted and operating cables in good condition
• In rain, the brakes may be less effective and roads more slippery so brake sooner
• In rain, the road surface will offer less grip, use caution, reduce speed and stop pedalling when riding
over drain covers around corners etc.
• Check that all wheel nuts are properly tightened (see torque table, page 13)
• In the UK, the left hand brake lever operates the rear brake and the right hand lever operates the front
brake, the orientation for other countries is shown below before riding ensure you know which way
the brakes are orientated.
• When riding in the dark, wear reflective clothing and use lights (front and rear); check to ensure that
your lights comply with local laws
• Once you have read the manual, please consult your Brompton Electric dealer who will be able to
assist with any further questions you may have
• Do not use the Brompton Electric if there is any problem with the power assist system, take the bike
to an authorised Brompton Electric Dealer for inspection
• When stopped do not apply pressure to the pedals, this could engage the power assist function
• It is also advisable to apply the brakes when stationary as well as to turn off the power assist system
Before or after each ride, pay close attention to the following:
• Ensure that the quick release seatpost clamp is secured and the saddle is at the correct height
• The hinge clamps are in place, with levers firmly tightened
• During folding and unfolding, as well as during use and maintenance, avoid putting your hands or
fingers anywhere they may be caught or trapped
• Remove the battery and front bag from the bike when carrying out any maintenance on the bike
• Ensure the bike is correctly folded or unfolded to avoid possible injury
• Ensure the battery and luggage are properly secured to the front of the bike and that the connector
block is properly fastened to the bike before use
• Ensure the front luggage strap is properly secured so that it is not able to come loose, a loose
luggage strap could obscure the lighting system or become caught in the wheel
• Ensure the battery and luggage are removed from the bike before folding
• Never try to alter the height of the handlebar stem where it enters the front forks,
• Do not alter the angle and position of the handlebars where they attach to the handlebar stem, this
will compromise the folding function of the bike and the handling
During use the casing of the electric motor will become warm, do not touch the motor casing
when the bike is in use; if you need to remove the wheel to fix a puncture or similar, hold the
wheel by the tyre and wheel rim. A warning label (shown opposite) is affixed to the hub motor,
to signal the motor casing may be hot to touch.
UNITED KINGDOM LEFT - REAR / RIGHT - FRONT
FRANCE, ITALY, SPAIN, PORTUGAL, GERMANY, NETHERLANDS RIGHT - REAR / LEFT - FRONT

WARNING
Many components on a bike are highly stressed, and with high mileage, heavy loads or hard riding, will
eventually reach the end of their design life; in particular, aluminium alloy has a limited fatigue life. Failure in
use can cause injury. You should check all load-bearing parts for any signs of damage, corrosion, or cracking,
and replace if necessary. Please visit an authorised Brompton Electric dealer for expert advice if you are
uncertain. Regular servicing and inspection of the bike by a Brompton Electric dealer is advised.
As with mechanical components, the electrical assist system including the battery and motor, is subject
to stress and wear. Different materials will react to stress fatigue and wear in different ways. If the design
life of the component has been exceeded it may not function correctly or fail suddenly. Any changes to the
appearance of colour of a part, or signs of cracking etc. could indicate the lifespan of the part has been
exceeded and it should be inspected and replaced by an authorised Brompton Electric Dealer.
The bike must not be subject to any modification, repair or replacement other than as authorised by Brompton
Bicycle Ltd, this includes but is not limited to the components listed below in the ‘replacement parts’ section.
The electrical system including the software should not be modified or tampered with, the hub-motor, control
module and battery should not be opened, tampered with or modified in any way.
The bike must be serviced at regular intervals by an authorised Brompton Electric Dealer. If the bike has
been subject to a crash or impact you should stop using the bike immediately and have the bike inspected
by a Brompton Electric dealer. Damaged components should be replaced and the bike thoroughly checked
before the bike is ridden again. Any deep scratches or gouges in the aluminium parts can severely weaken
the component and cause premature failure of the part.
We recommend that genuine Brompton parts are used for safety-critical components
REPLACEMENT PARTS
The following parts of your Brompton Electric bike should only be replaced with genuine Brompton Electric
parts, by an authorised Brompton Electric dealer:
• Front wheel/motor
• Bottom bracket
• Front battery connector/mount
• Charger
• Electric system cabling
• Battery pack
• Brake pads
• Braking system components
• Luggage frame
• Suspension block
• Fork
• Mainframe
• Handlebar stem
• Rear frame
• Cranks
• Chainring
• Pedals
• Hinge clamp plates
Only Genuine Brompton Electric parts should be used for safety-critical components. Using replacement
parts other than those specified as original equipment on the bike may cause problems with the function of
the bike or make the electric bike unsafe to use.
Changing the Drivetrain components, including the cranks, chainring and pedals will affect the performance
of the electrical assist system, such changes should only be made by an authorised Brompton Electric dealer.
If the Brompton Electric is modified in any way it may not then conform to the relevant safety standards.
Using the bike in a modified state may be dangerous and could cause injury and damage to property. 7

EC DECLARATION OF CONFORMITY
The Manufacturer:
Brompton Bicycle Ltd.
Unit 1, Greenford Park,
Ockham Drive, Greenford, U.K
Middlesex, UB6 0FD
Herby confirms that the following product:
Product Description:
Foldable E-Bike
Model Designation:
Brompton Electric Mk.1
Year of Manufacture:
2018
Conforms with the following directives:
Machinery - 2006/42/EC
Electromagnetic Compatibility- 2014/30/EU
The following harmonising norms were applied to the product
Cycles - Electrically power assisted cycles – EPAC Bicycles- EN15194:2017
Technical documentation filed at address above
Will Butler-Adams OBE
Chief Executive Officer
Brompton Bicycle Ltd.
26th April 2018
NOTE: This Declaration of Conformity applies only to countries following the CE marking directives

ITEMS SUPPLIED WITH YOUR BROMPTON ELECTRIC
In addition to the bicycle and this manual you will recieve the following items, if any of these are missing,
please contact your Brompton Electric dealer.
BATTERY - This will come partially charged and you may wish to fully charge this before using the bike.
BAG - This bag is designed to house the battery and fits to the mounting block on the front of the bike.
CHARGER & MAINS ADAPTOR - The standard 2A charger is supplied with each Brompton Electric,
along with the appropriate mains adaptor for the region the bike is sold in.
9
CHARGER
MAINS ADAPTOR
BAG
BATTERY

TURNING THE SYSTEM ON & SELECTING A POWER MODE
The electric assist system is controlled using the panel on the top of the battery (fig. 1) and this can be used
to set the power and lighting modes, as well as showing the battery level. You should only operate the system
when stationary, do not attempt to use the controls when riding.
• To turn on the system, press and hold the power button until the battery level display lights-up
• To turn the system off, press and hold the power button until the lights on the display are no longer
illuminated
• The system will automatically switch-on when the battery/bag is fitted onto the connector block on the
front of the bike
• When you turn the system on, or it powers-up when fitted onto the bike; it will default to the last
assistance mode used
• After the bike has been stationary for 5 minutes (without the wheels or pedals moving) the system will
turn itself off
The assistance can be set by selecting one of the four available modes from zero to three. You can cycle
through the assistance modes when the system is turned on, by pressing the power button repeatedly.
The higher the assistance mode the more quickly the battery power will be used.
0: No assistance
1: Low assistance, high range
2: Medium assistance, medium range
3: High assistance, lower range
*Cadence is the number of revolutions of the pedals per minute
POWER BUTTONLIGHTING BUTTON
ASSISTANCE MODES
LIGHTS ON
LIGHTS AUTO ON
BATTERY LEVEL Fig. 1
THE ELECTRIC ASSIST SYSTEM
The Brompton Electric gives motor assistance to support the pedaling input from the rider.
A sensor in the bottom bracket measures the rider’s cadence* and power, a sensor within the hub motor
measures the speed of the bike. The system analyses this data to determine how much assistance the
hub motor gives. The system is constantly checking the rider input and matching the power assistance
accordingly. The maximum continuous power output from the motor is 250W and the motor is restricted so
that it will not give assistance beyond 25km/h.
10

Do not attempt to operate the battery user interface while riding
BATTERY RANGE
The battery range is typically 30km to 70km (~20mi to ~45mi), this can be affected by a number of factors.
Take these into account to maximize the range. Information on battery care can be found on page 12.
ASSISTANCE MODE
The higher the assistance mode the more battery power is used; to improve the battery range, lower the
assistance mode where possible.
TYRE PRESSURE
Keeping your tyres properly inflated will reduce the rolling resistance of the bike and mean that both the rider
and the electric assist need to use less energy, this will improve the battery range in comparison to under
inflated tyres. For more information on tyre pressures please see page 21.
STARTING AND STOPPING
Routes which require you to start and stop often (such as city riding with lots of junctions) will use more
battery power than routes with more continuous riding.
WIND CONDITIONS
If riding into a headwind, a greater amount of power will be needed to maintain the same speed. Similarly a
tailwind will reduce the amount of power used.
CADENCE
The system will work with a wide cadence range, very low cadences will force the motor to work harder and
use more power; try using different gears to alter your cadence and find what works best for you.
TEMPERATURE
The efficiency of the battery will reduce at low temperatures, so you might experience improved range in the
summer compared to the winter. The optimum operating temperature is around 20 degrees Celsius.
HILLS
Riding up hill will use more power and reduce the range, riding downhill will use less power.
BATTERY LEVEL
The battery level indicator has 5 lights which show the level of charge (fig. 2). When the battery is
switched on and connected to the bike the battery indicator will be illuminated.
Fig. 2
10% or less
10-27%
28-47%
48-66%
67-85%
86-100%
1
2
3
4
5
1 Flashing
11

CHARGING THE BATTERY
MAINS ADAPTOR MAINS ADAPTOR PORT
KEYWAY
BATTERY CONNECTOR CABLE
CHARGER DISPLAY
It is possible to charge the battery when mounted onto the bike or with the bag when removed from the
bike, or with the battery on its own, removed from the bag. If the bike is stored in a cold place, its best to
bring the battery into a warm room to charge.
Place the battery and charger onto a level surface, where they cannot be knocked or damaged and which
is non-flammable. Connect the mains adaptor to the port on the charger (fig. 3) you should use a mains
adaptor appropriate to the country you are in.
The charging port on the battery (fig. 5, 6) is located on the rear bottom left hand corner of the battery
pack behind a protective rubber cover. Lift the cover upwards, from the bottom edge to expose the battery
connector port. Once you have finished charging, remove the charger and ensure the port cover is properly
closed.
The battery connector cable has a keyway (fig. 3) which must be lined up to the corresponding feature at
the bottom of the connector port on the battery. Gently twist the connector until the keyway lines up and
firmly but carefully push the connector onto the battery.
CHARGER
CHARGING STATUS LIGHT
WARNING LIGHT
Fig. 3
Fig. 4
WEIGHT
The weight of the rider and luggage will have an effect on the battery range, decreasing the load by carrying
less nonessential items of luggage will allow you to improve the battery range.
USING THE CHARGER
It is important to use the charger and battery together in the correct order.
1. plug mains adaptor into the charger (fig. 3)
2. plug mains adaptor into wall socket (fig. 3)
3. plug charger into battery port (fig. 5)

CHARGING LEVEL
The battery level indicator (fig. 7) has 5 lights, when charging this will indicate the level of charge as shown
below.
Fig. 7
10% or less
10-27%
28-47%
48-66%
67-85%
86-100%
0-1
1-2
2-3
3-4
4-5
5
13
CHARGING PORT COVER
CHARGER
BATTERY CONNECTOR CHARGING
PORT COVER
CHARGER
BATTERY
CONNECTOR
Fig. 5 Fig. 6
CHARGER STATUS
• When the charger is first plugged in/turned on, both the red and green lights on the display (fig. 4) will
be illuminated for a short period
• The green charging status light will then flash slowly
• When connected to the battery and mains the light will flash rapidly, to show the battery is charging
• When the light is permanently on, the battery is fully charged
• If the red warning light is flashing, there may be a problem with the charger, try turning off the mains
power, unplug the charger and then plug the charger in and turn on the mains
• If the red warning light continues to flash, unplug the charger and stop using it, contact your Brompton
Electric dealer for further assistance
• The charger has an overload, short circuit, over voltage and wrong polarity protection; this will be indi
cated by the charger flashing red and green alternately

When the battery is fully charged the display will show all five battery level lights fully illuminated and after
a short time the battery display will turn itself off. Once the battery is fully charged, or you have finished
charging the battery; unplug the charger from the mains socket and the battery. Ensure the rubber cover on
the battery connector is pushed back into place.
The battery and charger may become warm when charging, take care when handling them. If the charger
or charging cable becomes damaged, do not use the charger and have it inspected by an authorised
Brompton Electric dealer.
CHARGING TIME
It takes around 3.5 hours to charge the battery to 80% charge, from fully discharged. It takes around 5 hours
to charge to 100% from fully discharged.
When the battery is connected to the charger and fitted to the bike, do not move the bicycle. this could result
in the charger, cable or connector becoming tangled in the bike, pinched or damaged in some way. When
stopped do not apply pressure to the pedals, this could engage the power assist function. It is also advisable
to apply the brakes when stationary as well as to turn off the power assist system.
LOW BATTERY
RESET
ERROR A (MOTOR)
ERROR B (BATTERY)
ERROR C
(CONTROLLER)
ERROR CODES
In some cases, if there is a problem with the electric assist system, an error code (fig. 8) will be displayed on
the battery level indicator. If the display is showing an error code it means the system will not be powering
the motor or giving any assistance. Depending on the error code you may be able to take steps to remedy
the problem; otherwise the bike will need to be returned to your Brompton Electric dealer for diagnosis.
If the battery is too low to power the motor, you will need to recharge the battery. This will be shown by the
left hand light flashing.
If the right hand light is flashing, reset the system by turning it off and back on with the power button. If this
does not clear the error, contact your Brompton Electric Dealer.
Error A indicates a motor problem and is shown by the two lights on the right flashing. The motor is not user
serviceable and you should contact your Brompton Electric dealer who will be able to diagnose the problem
and rectify it.
Error B indicates a battery issue and is shown by the centre and right hand lights flashing. The battery is not
user serviceable and you should take the bike to your Brompton Electric dealer for diagnosis.
Error C shows an issue with the controller, again this is non user serviceable and you should take the bike to
your Brompton Electric dealer for diagnosis.
Fig. 8
14

• Pressing the lighting button (fig. 9) will turn the lighting system on in the last selected mode, shown by
the blue light above either the ON or Automatic position on the display
• To cycle between the ON and Automatic lighting modes, press the lighting button
• When turning the system on with the power button, the lighting will default to the last setting used
before the system was switched off
• The Automatic light mode uses a sensor on the top of the battery; if the bag strap is not properly
secured in position it could obscure the sensor and stop the lighting from automatically switching off in
daylight
• Before riding at night be sure to check the battery power level, to ensure there is sufficient charge to
power the lighting system for the duration of your ride. Do not ride at night without lighting
Do not attempt to operate the battery user interface while riding
USING THE LIGHTING
LIGHTING BUTTON
LIGHTS AUTO ON
LIGHTS
Fig. 9

STORAGE
If you intend to store the battery without use for an extended period of time, we recommend first charging
it to 28-47%, this is shown by 2 lights on the indicator. This will reduce the amount the battery discharges
over time. Do not store the battery for long periods when fully charged or fully discharged. The battery should
be stored in a dry location, in a temperature range above 0 °C and below 20 °C, the optimum storage
temperature is 10 °C. It is recommended to charge the battery to full at the beginning of using the battery
after a long period of storage and to then drain it completely.
CLEANING & CARE
Remove the battery before cleaning & maintaining the bike. Do not use a jetwash or hose to clean the bike
or the battery. This can force water into the motor, battery and electrical components; damaging them and
causing them to function incorrectly. Do not use solvents, aerosol cleaners or degreasers to clean the bike.
For best results clean the bike with warm soapy water and a sponge. Keep the battery dry, wipe the battery
down with a dry cloth to clean it.
Do not submerge the bike, hub motor or battery in water; this can allow water to enter the motor, battery and
electrical systems. This could cause overheating bursting or ignition. Do not place the battery or bag down
on a wet floor, this could allow water onto the battery connector.
Exposure to humid conditions, marine environments or salinity of any kind can cause corrosion of the bicycles
components, frame parts and fasteners. This can cause cosmetic damage and also shorten the lifespan of
the parts. Clean the product regularly and store in a dry environment to avoid corrosion of the parts.
TEMPERATURE
During cold weather we recommend charging/storing the battery indoors at room temperature before
attaching the battery to the bike for riding. Do not charge the battery in a temperature below 0 °C or above
45 °C. After the bike has been used in cold weather, ensure the battery has been indoors for at least an hour
before charging; this will allow it to reach room temperature. Do not charge when the battery is cold. The
battery should always be used in conjunction with a compatible Brompton Electric bag, do not attempt to
use the Brompton Electric without the front luggage. The bicycle is designed to work in a temperature range
of 0-40 °C, outside of this temperature range the product may not function correctly.
BATTERY CARE
In order to get the maximum life from your battery you should take care to use, store and recharge it correctly.
We do not recommend completely discharging the battery on a regular basis; this will reduce the capacity
and lifespan of the battery. If the battery becomes fully discharged, recharge as soon as possible. We
recommend charging the battery at least once a month.
Over time the capacity of the battery will reduce, eventually the battery may need
replacing. The service life of the battery will vary according with usage. The old
battery should be disposed of responsibly, in accordance with local regulations.
Please take the old battery to an authorised Brompton Electric dealer, who
will be able to assist you in disposal and obtaining a replacement.
The battery should always be used in conjunction with a compatible Brompton Electric bag, do
not attempt to use the Brompton Electric battery without the front luggage.
CHARGING
The battery should be charged indoors in dry conditions and at room temperature. This can be done with the
battery and bag attached to the bike, in the bag separately from the bike, or the battery on its own. Follow the
instructions contained on the label affixed to the Battery and battery charger. Once the battery is charged
and the charger cable removed, ensure the rubber charging port cover on the battery is properly closed and
unplug the charger from the mains electricity supply. Keep the battery and charger out of direct sunlight
when charging.

TRANSPORT
If transporting the bike in a car or on public transport, remove the battery/bag from the bike. The battery
should be kept away from moisture and direct sunlight. If you need to take your Brompton Electric on a
train or other forms of transport; please check with the service provider before you travel for advice on any
restrictions on the transportation of lithium batteries. It is not permissible to take the battery on a commercial
aircraft. Always disconnect the battery and bag from the bike when transporting your Brompton Electric.
Batteries must not be shipped without special packaging and labelling by a forwarding agency or package
service.
HANDLING THE BATTERY
Do not open the battery case, modify or deform the case; do not attempt to modify the battery connector in
any way. Doing so may cause leaking, overheating ignition or bursting of the battery, which could result in
serious injury or damage to property.
If the battery is damaged in any way, do not attempt to use or charge the battery, contact your Brompton
Electric dealer immediately.
Do not leave the battery near heat sources or fire, or apply heat or flames to the battery. This could cause
bursting or ignition of the battery, which could result in serious injury or damage to property.
Do not leave the battery in direct sunlight or in an area that is likely to become hot when exposed to direct
sunlight, such as in a parked car etc.
Do not subject the battery to impact, throw or shock the battery, this could cause overheating bursting or
ignition of the battery, which could result in serious injury or damage to property.
Do not submerge the battery in water and do not allow the battery terminals to become wet, this could cause
overheating bursting or ignition of the battery, which could result in serious injury or damage to property.
Only use the supplied charger or chargers authorized for use by Brompton Bicycle Ltd. to charge the battery,
using an unauthorized charger could cause overheating bursting or ignition of the battery, which could result
in serious injury or damage to property. Follow the charging instructions and take notice of the charging
instructions.
If the charger or charging cable becomes damaged, do not use the charger and have it inspected by an
authorised Brompton Electric dealer.
17

• To release the handlebar, firmly push down on the end of the grip nearest you
with the flat of your left hand
UNFOLDING THE BIKE
Take some time to look at the bike folded; it helps when you come to fold it again.
Stand on the left (non-driveside) of the bike. Unfold the left-hand pedal by pulling the
toothed metal cage towards you. As you do this note how the black catch operates
as this will help you when folding.
• Swing the handlebar up until the hinge closes, align the clamp plate with
the hinge and tighten the black clamp lever tightly
18

• Undo the seat clamp lever, pull the seatpost up and re-clamp
• Place your right hand on the saddle & hold the handlebar stem with your left
hand, near the hinge
• Look down where the chain runs between the two wheels and you will see the
black hook holding the front wheel to the rest of the bike
• Lift the handlebar stem with your left hand, to lift the hook above the tube it is
resting on
19

• Swing your left hand away from you in an
arc to push the fork and front wheel away
from you, push until the hinge on the main
frame is closed
• When doing this do not twist your wrist;
make sure to keep the front wheel pointing
in the same direction, the hook must
remain on your side of the bike and the
front wheel pointing forward at a slight
angle, (not parallel with the rear wheel)
The bike is now in its “parked” position – it will stand by itself.
• The hinge on the main frame should now be closed
• Align the hinge clamp plate and tighten the
black clamp lever firmly
20
Table of contents
Other Brompton Bicycle manuals