Brother HL-1112 User manual

User’s Guide
Brother Laser Printer
HL-1112
HL-1212W
For visually-impaired users
You can read this manual with Screen Reader ‘text-to-speech’ software.
You must set up the hardware and install the driver before you can use the machine.
Please use the Quick Setup Guide to set up the machine. You can find a printed copy in the box.
Please read this User’s Guide thoroughly before you use the machine.
Please visit us at http://support.brother.com where you can get product support, the latest driver updates and utilities,
and answers to frequently asked questions (FAQs) and technical questions.
Note: Not all models are available in all countries.
Version 0
CAN-ENG

i
Brother numbers
IMPORTANT
For technical and operational help, you must call the country where you bought the machine. Calls must
be made from within that country.
Register your product
By registering your product with Brother International Corporation, you will be recorded as the original owner
of the product.
Your registration with Brother:
may serve as a confirmation of the purchase date of your product should you lose your receipt;
may support an insurance claim by you in the event of product loss covered by insurance; and,
will help us notify you of enhancements to your product and special offers.
Complete the Brother Warranty Registration or, for your convenience and most efficient way to register your
new product, register on-line at
http://www.brother.com/registration
FAQs (frequently asked questions)
The Brother Solutions Center is our one-stop resource for all your machine needs. Download the latest
software and utilities and read FAQs and troubleshooting tips to learn how to get the most from your Brother
product.
http://support.brother.com
Check here for Brother driver updates.

ii
Customer Service
If you have comments or suggestions, write us at:
Service Center locations (Canada only)
For the location of a Brother authorized service center, visit www.brother.ca/support
Ordering supplies
For best quality results use only genuine Brother supplies, which are available at most Brother retailers. If you
cannot find the supply you need and have a Visa, MasterCard, Discover, or American Express credit card, or
PayPal account, you can order directly from Brother. Visit us online for a complete selection of the Brother
accessories and supplies that are available for purchase.
NOTE
In Canada, only Visa and MasterCard are accepted.
1Letter or A4 size single-sided pages.
2Approx. cartridge yield is declared in accordance with ISO/IEC 19752.
3Life is approximate and may vary by type of use.
In Canada: www.brother.ca/support
(Self-Service, Videos, Email, Chat, Facebook and Twitter Help)
In Canada: Brother International Corporation (Canada), Ltd.
Customer Experience Team
1, rue Hotel de Ville Dollard-des-Ormeaux, PQ, Canada H9B 3H6
Internet Addresses
Brother Global Web Site: http://www.brother.com
For Frequently Asked Questions (FAQs), Product Support and Technical Questions, and Driver Updates and Utilities:
http://support.brother.com
For Brother Accessories & Supplies:
In Canada: http://www.brother.ca
Description Item
Toner Cartridge TN-1030 (Standard, Approx. 1,000 pages) 12
Drum Unit DR-1030 (Approx. 10,000 pages) 13

iii
User’s Guides and where to find them?
Which manual? What's in it? Where is it?
Windows users Macintosh users
Product Safety Guide Read this Guide first.
Please read the Safety
Instructions before you set
up your machine. See this
Guide for trademarks and
legal limitations.
http://support.brother.com
Quick Setup Guide Follow the instructions for
setting up your machine
and installing the drivers
and software for the
operating system and
connection type you are
using.
http://support.brother.com
User’s Guide Learn the print operations,
how to replace
consumables, and
performing routine
maintenance. See
troubleshooting tips.
http://support.brother.com
Network User’s
Guide
(HL-1212W)
This Guide provides useful
information about wireless
network settings and
security settings using the
Brother machine. You can
also find supported
protocol information for
your machine and detailed
troubleshooting tips.
http://support.brother.com
Mobile Print/Scan
Guide for Brother
iPrint&Scan
(HL-1212W)
This Guide provides useful
information about printing
from your mobile device
and scanning from your
Brother machine to your
mobile device when
connected on a Wi-Fi®
network.
http://support.brother.com

iv
Using the documentation
Thank you for buying a Brother machine! Reading the documentation will help you make the most of your
machine.
Symbols and conventions used in the documentation
The following symbols and conventions are used throughout the documentation.
WARNING indicates a potentially hazardous situation which, if not avoided,
could result in death or serious injuries.
IMPORTANT IMPORTANT indicates a potentially hazardous situation which, if not avoided,
may result in damage to property or loss of product functionality.
NOTE NOTE specifies the operating environment, conditions for installation, or
special conditions of use.
Prohibition icons indicate actions that must not be performed.
Electrical Hazard icons alert you to possible electrical shock.
Fire Hazard icons alert you to the possibility of fire.
Hot Surface icons warn you not to touch machine parts that are hot.
Bold Bold style identifies keys on the machine control panel or computer screen.
Italics Italicized style emphasizes an important point or refers you to a related topic.
WARNING

v
Accessing Brother Utilities (Windows®)
Brother Utilities is an application launcher that offers convenient access to all Brother applications
installed on your device.
a(Windows®XP, Windows Vista®, Windows®7, Windows Server®2003, Windows Server®2008 and
Windows Server®2008 R2)
Click (Start) > All Programs > Brother > Brother Utilities.
(Windows®8 and Windows Server®2012)
Tap or double-click (Brother Utilities) either on the Start screen or the desktop.
(Windows®8.1 and Windows Server®2012 R2)
Move your mouse to the lower left corner of the Start screen and click (if you are using a touch-
based device, swipe up from the bottom of the Start screen to display the Apps screen). When the Apps
screen appears, tap or click (Brother Utilities).
bSelect your machine.
cChoose the operation you want to use.

vi
Table of Contents
1 Printing Methods 1
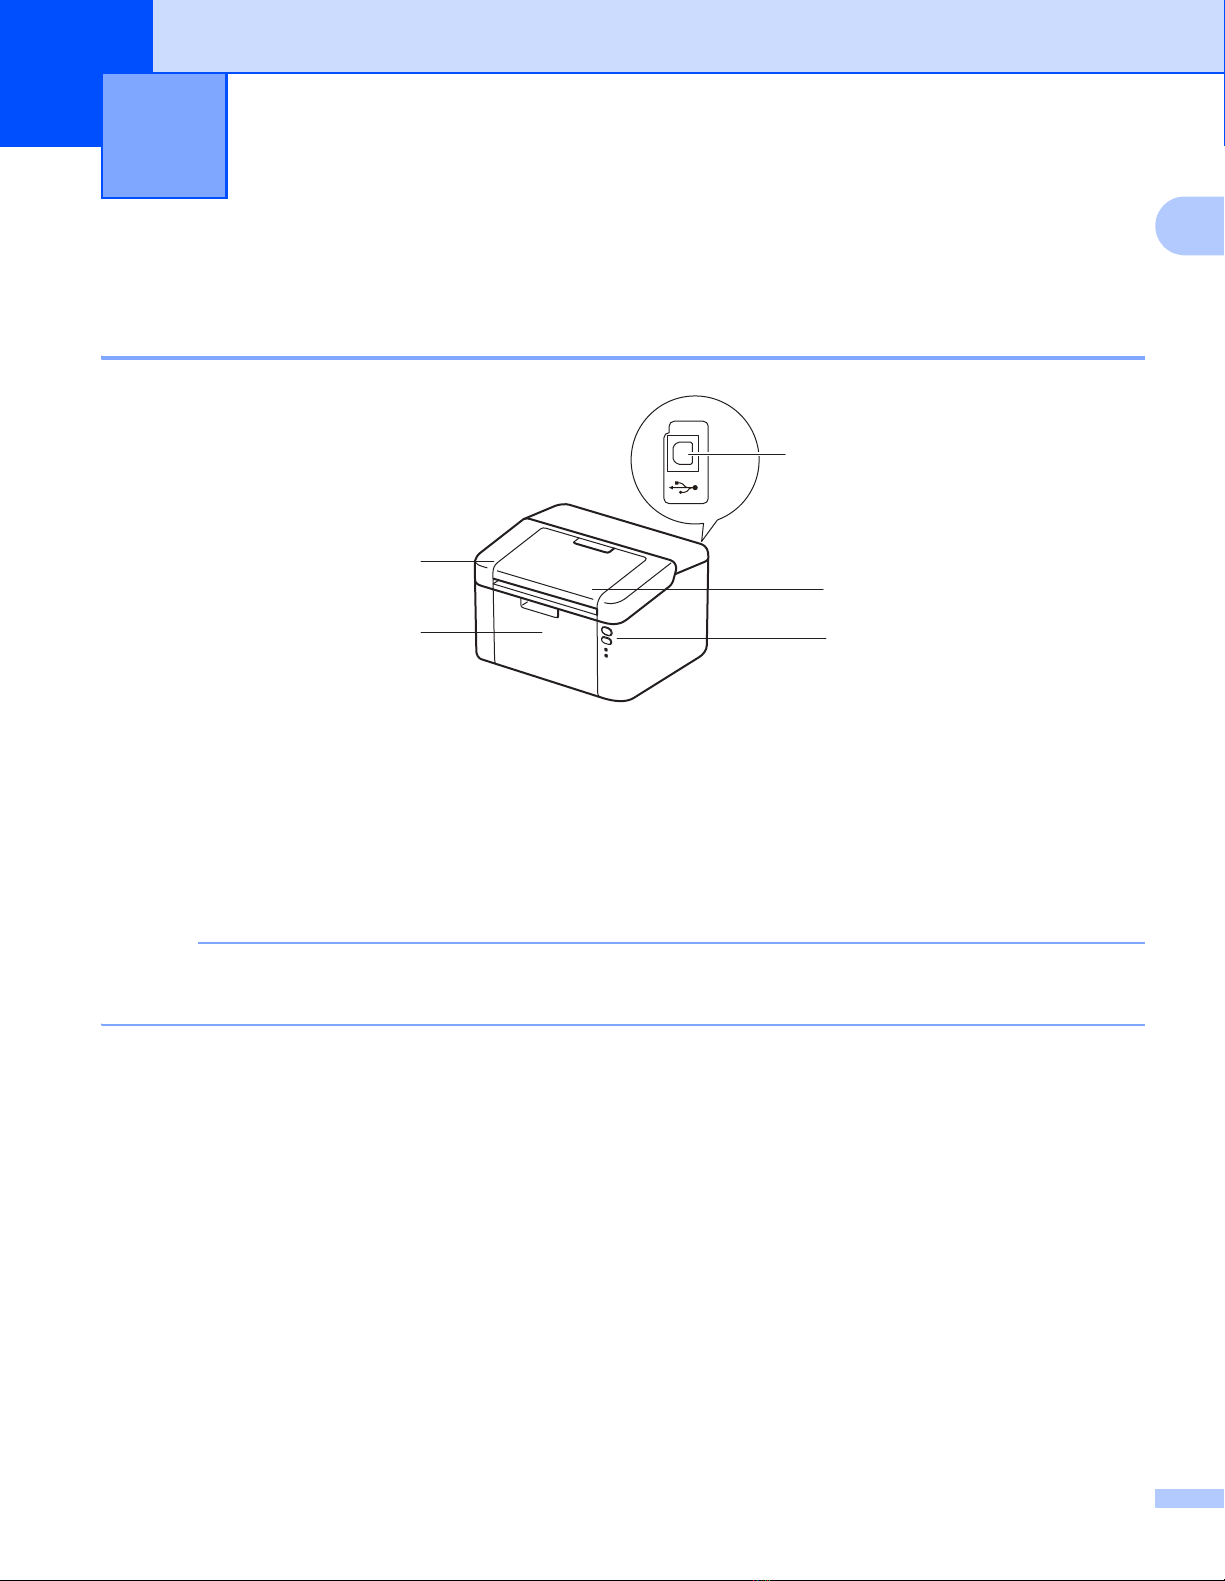
About this Machine ....................................................................................................................................1
Machine overview................................................................................................................................1
Acceptable paper.......................................................................................................................................2
Recommended paper and print media ................................................................................................2
Paper tray capacity.............................................................................................................................2
2-sided printing ..........................................................................................................................................3
Guidelines for printing on both sides of the paper ...............................................................................3
Manual 2-sided printing .......................................................................................................................4
2 Driver and Software 5
Printer driver ..............................................................................................................................................5
Printing a document.............................................................................................................................5
Printer driver settings...........................................................................................................................6
Windows®..................................................................................................................................................7
Accessing the printer driver settings....................................................................................................7
Features in the Windows®printer driver..............................................................................................7
Basic tab..............................................................................................................................................8
Advanced tab.....................................................................................................................................14
Print Profiles tab ................................................................................................................................20
Device Settings tab............................................................................................................................22
Support ..............................................................................................................................................23
Uninstalling the printer driver.............................................................................................................24
Status Monitor ...................................................................................................................................25
Macintosh ................................................................................................................................................27
Features in the printer driver (Macintosh)..........................................................................................27
Choosing page setup options ............................................................................................................27
Removing the printer driver ...............................................................................................................34
Status Monitor ...................................................................................................................................34
Software ..................................................................................................................................................36
Software for networks (HL-1212W only)............................................................................................36
3 General Information 37
Control panel ...........................................................................................................................................37
LEDs (Light Emitting Diodes) ............................................................................................................37
Service call indications ......................................................................................................................42
Power On/Off key ..............................................................................................................................43
Print a Printer Settings page....................................................................................................................44
Using the Power On/Off key ..............................................................................................................44
Using the printer driver ......................................................................................................................44
Ecology features ......................................................................................................................................45
Toner Save ........................................................................................................................................45
Sleep Time ........................................................................................................................................45
Deep Sleep mode..............................................................................................................................45
Auto Power Off ..................................................................................................................................46

vii
A Troubleshooting and other information 47
Consumable items...................................................................................................................................47
Toner Setting ...........................................................................................................................................48
Identifying your problem ..........................................................................................................................49
Error messages in the Status Monitor .....................................................................................................50
Improving the print quality........................................................................................................................51
Paper jams...............................................................................................................................................55
If you are having difficulty with your machine ..........................................................................................59
Cleaning and checking the machine........................................................................................................61
Machine Information ................................................................................................................................62
Default settings..................................................................................................................................62
B Specifications 64
General....................................................................................................................................................64
Print media...............................................................................................................................................66
Important information for choosing your paper ........................................................................................67
Printer ......................................................................................................................................................68
Network (LAN) (HL-1212W only) .............................................................................................................69
C Index 70

1
1
1
About this Machine 1
Machine overview 1
1 Top cover
2 Control panel
3 Face-down output tray support flap (support flap)
4 Paper tray
5 USB port
NOTE
For details about how the LEDs show the machine’s status, see LEDs (Light Emitting Diodes) on page 37.
For the Power On/Off key functions, see Power On/Off key on page 43.
Printing Methods 1
1
3
5
2
4

Printing Methods
2
1
Acceptable paper 1
Print quality may vary according to the type of paper you are using.
For best results, follow the instructions below:
DO NOT put different types of paper in the paper tray at the same time because it may cause paper jams
or misfeeds.
For correct printing, you must choose the same paper size from your software application as the paper in
the tray.
Avoid touching the printed surface of the paper immediately after printing.
Before you buy a lot of paper, test a small quantity to make sure that the paper is suitable.
Recommended paper and print media 1
Paper tray capacity 1
1Folio size is 8.5 in. x 13 in. (215.9 mm x 330.2 mm).
Paper Type Item
Plain paper Xerox 4200 20 lb
Hammermill Laser Print 24 lb (90 g/m2)
Recycled paper (No specific brand recommended)
Paper size Paper types No. of sheets Paper weight
(HL-1112)
A4, Letter, Legal, Folio 1
(HL-1212W)
A4, Letter, Legal, Folio 1,
A5, A5(Long Edge), B5,
Executive
Plain paper and
Recycled paper
up to 150 sheets (20 lb
(80 g/m2))
17lb - 28 lb (65 - 105 g/m2)

Printing Methods
3
1
2-sided printing 1
The supplied printer drivers enable 2-sided printing. For more information about how to choose the settings,
see 2-sided / Booklet on page 11 for Windows®and 2-sided Printing on page 33 for Macintosh.
Guidelines for printing on both sides of the paper 1
If the paper is thin, it may wrinkle.
If paper is curled, straighten it and put it back in the paper tray. If the paper continues to curl, replace the
paper.
If the paper is not feeding correctly, it may be curled. Remove the paper and straighten it. If the paper
continues to curl, replace the paper.
When you use the manual 2-sided function, it is possible that there may be paper jams or poor print quality.
(If there is a paper jam, see Paper jams on page 55. If you have a print quality problem, see Improving the
print quality on page 51.)

Printing Methods
4
1
Manual 2-sided printing 1
If you are using the Macintosh Printer Driver, see Manual 2-sided Printing on page 33.
Manual 2-sided printing with the Windows®printer driver 1
aChoose the following settings from each drop-down list of the printer driver.
Paper Size
You can use all the paper sizes specified for the tray you are using.
Media Type
You can use all the media types that are specified for the tray you are using.
2-sided / Booklet
Choose 2-sided (Manual).
2-sided Type in 2-sided Settings
There are four options for each orientation. (See 2-sided / Booklet on page 11.)
Binding Offset in 2-sided Settings
You can specify the offset for binding. (See 2-sided / Booklet on page 11.)
For any other settings, see Driver and Software in Chapter 2.
bSend the print data to the machine. The machine will print all the even-numbered pages on one side of
the paper first. Then, the Windows®driver instructs you (with a pop-up message) to reinsert the paper
to print the odd-numbered pages.
NOTE
Before reinserting the paper, straighten it well, or you may get a paper jam. Very thin or thick paper is not
recommended.

5
2
2
Printer driver 2
A printer driver is software that translates data from the format used by a computer to the format that a
particular printer needs. Typically, this format is page description language (PDL).
The printer drivers for the supported versions of Windows®is on the CD-ROM we have supplied and for
Macintosh it is on the Brother Solutions Center website at http://support.brother.com. Install the drivers by
following the steps in the Quick Setup Guide. The latest printer drivers for Windows®and Macintosh can be
downloaded from the Brother Solutions Center website at:
http://support.brother.com
For Windows®
2
Windows®printer driver (the most suitable printer driver for this product)
For Macintosh 2
Macintosh printer driver (the most suitable printer driver for this product)
For Linux®12
2
LPR printer driver
CUPS printer driver
1For more information and to download the printer driver for Linux please visit your model page at http://support.brother.com or use the link on the
CD-ROM we have supplied.
2Depending on Linux distributions, the driver may not be available or it may be released after the initial release of your model.
Printing a document 2
When the machine receives data from your computer, it begins printing by picking up paper from the paper
tray. The paper tray can feed plain paper and recycled paper to the machine. (See Paper tray capacity
on page 2.)
aFrom your application, choose the Print command.
If any other printer drivers are installed on your computer, choose Brother HL-XXXX (Where XXXX is
your model name.) as your printer driver from the Print or Print Settings menu in your software
application, and then click OK or Print to begin printing.
bYour computer sends the data to the machine. The Ready LED ( ) will blink.
cWhen the machine finishes printing all the data, the Ready LED ( ) finishes blinking.
Driver and Software 2

Driver and Software
6
2
NOTE
• You can choose the paper size and orientation in your application software.
• If your application software does not support your custom paper size, choose the next largest paper size.
• Then adjust the print area by changing the right and left margins in your application software.
Printer driver settings 2
You can change the following printer settings when you print from your computer:
Paper Size
Orientation
Copies
Media Type
Print Quality (For HL-1112)
Resolution (For HL-1212W)
Print Settings
Multiple Page
2-sided / Booklet
Print Preview
Scaling
Reverse Print
Use Watermark
Header-Footer Print
Toner Save Mode
Administrator
Density Adjustment
Improve Print Output
Skip Blank Page
PrintTextinBlack
Print Archive (For HL-1212W)
Print Profile

Driver and Software
7
2
Windows®
2
Accessing the printer driver settings 2
a(For Windows®XP and Windows Server®2003)
Click Start, and then Printers and Faxes.
(For Windows Vista®and Windows Server®2008)
Click the (Start) button, Control Panel, Hardware and Sound, and then Printers.
(For Windows®7 and Windows Server®2008 R2)
Click the (Start) button, and then click Devices and Printers.
(For Windows®8)
Move your mouse to the lower right corner of your desktop. When the menu bar appears, click Settings,
and then click Control Panel. In the Hardware and Sound group, click View devices and printers.
(For Windows Server®2012 and Windows Server®2012 R2)
Move your mouse to the lower right corner of your desktop. When the menu bar appears, click Settings,
and then click Control Panel. In the Hardware group, click View devices and printers.
bRight-click the Brother HL-XXXX icon (where XXXX is your model name) and select Printer properties
(Properties), and Brother HL-XXXX if necessary. The printer properties dialog box appears.
cChoose the General tab and then click Preferences... (Printing Preferences...).
Features in the Windows®printer driver 2
For more information, see the Help text in the printer driver.
NOTE
• The screens in this section are from Windows®7. The screens on your PC will vary depending on your
operating system.
• To access the printer driver settings, see Accessing the printer driver settings on page 7.

Driver and Software
8
2
Basic tab 2
Change the Page Layout settings by clicking the illustration on the left side of the Basic tab.
aChoose the Paper Size, Orientation, Copies, Media Type, Print Quality 1or Resolution 2and
Print Settings (1).
bChoose Multiple Page and 2-sided / Booklet (2).
cConfirm your current settings in the window (3).
dClick OK to apply your chosen settings.
To return to the default settings, click Default, then OK.
1For HL-1112
2For HL-1212W
NOTE
If you want to preview your document before printing, check the Print Preview check box (4).
Paper Size 2
From the drop-down list choose the Paper Size you are using.
4
1
2
3

Driver and Software
9
2
Orientation 2
Orientation selects the position of how your document will be printed (Portrait or Landscape).
Copies 2
The Copies selection sets the number of copies that will be printed.
Collate
With the Collate check box selected, one complete copy of your document will be printed and then
repeated for the number of copies you selected. If the Collate check box is not selected, then each page
will be printed for all the copies selected before the next page of the document is printed.
Media Type 2
You can use the following types of media in your machine. For the best print quality, select the type of media
that you wish to use.
Plain Paper
Recycled Paper
Portrait (Vertical) Landscape (Horizontal)
Collate checked
Collate non-checked

Driver and Software
10
2
Print Quality (For HL-1112) 2
You can change the print quality as follows:
Draft
Normal
Fine
Resolution (For HL-1212W) 2
You can change the resolution as follows:
300 dpi
600 dpi
HQ 1200
Print Settings 2
You can change the print settings as follows:
Graphics
This is the best mode for printing documents that contain graphics.
Text
This is the best mode for printing text documents.
Manual
You can change the settings manually by choosing Manual and clicking the Manual Settings... button.
You can set brightness, contrast and other settings.
Multiple Page 2
The Multiple Page selection can reduce the image size of a page allowing multiple pages to be printed on
one sheet of paper or enlarge the image size for printing one page on multiple sheets of paper.
Page Order
When Nin1option is selected, the page order can be selected from the drop-down list.
Border Line
When printing multiple pages onto one sheet, with the Multiple Page feature, you can choose to have a
solid border, dash border or no border around each page on the sheet.
Print cut-out line
When 1 in NxN Pages option is selected, the Print cut-out line option can be selected. This option allows
you to print a faint cut-out line around the printable area.

Driver and Software
11
2
2-sided / Booklet 2
When you want to print a booklet or do 2-sided printing, use this function.
None
This disables 2-sided printing.
2-sided (Manual)
When you want to do 2-sided printing, use this option.
•2-sided (Manual)
The machine prints all the even numbered pages first. Then the printer driver will stop and show the
instructions required to reinsert the paper. When you click OK the odd numbered pages will be printed.
When you choose 2-sided (Manual), the 2-sided Settings... button becomes available to choose. You
can set the following settings in the 2-sided Settings dialog box.
•2-sided Type
There are four types of 2-sided binding directions available for each orientation.
•Binding Offset
When you check Binding Offset, you can also specify the offset for binding in inches or millimetres.
Portrait
Long Edge (Left)
Long Edge (Right)
Short Edge (Top)
Short Edge (Bottom)
Landscape
Long Edge (Top)
Long Edge (Bottom)
Short Edge (Right)
Short Edge (Left)

Driver and Software
12
2
Booklet (Manual)
Use this option to print a document in booklet format using 2-sided printing; it will arrange the document
according to the correct page number and allows you to fold at the center of the print output without having
to change the order of the page number.
•Booklet (Manual)
The machine prints all the even numbered sides first. Then the printer driver will stop and show the
instructions required to re-install the paper. When you click OK the odd numbered sides will be printed.
When you choose Booklet (Manual), the 2-sided Settings... button becomes available to choose. You
can set the following settings in the 2-sided Settings dialog box.
•2-sided Type
There are two types of 2-sided binding directions available for each orientation.
•Booklet Printing Method
When Divide into Sets is selected:
This option allows you to print the whole booklet into smaller individual booklet sets, it still allows you
to fold at the center of the smaller individual booklet sets without having to change the order of the page
number. You can specify the number of sheets in each smaller booklet set, from 1 to 15. This option
can help when folding the printed booklet that has a large number of pages.
•Binding Offset
When you check Binding Offset, you can also specify the offset for binding in inches or millimetres.
Portrait Landscape
Left Binding
Right Binding
Top Binding
Bottom Binding
This manual suits for next models
1
Table of contents
Other Brother Laser Printer manuals

Brother
Brother HL-1030 User manual

Brother
Brother HL-2130 User manual

Brother
Brother HL-2130 User manual

Brother
Brother MFC-7360 User manual

Brother
Brother HL-L6250DW Technical manual

Brother
Brother DCP-J152W Operating manual

Brother
Brother MFC-J2510 User manual

Brother
Brother DCP-L8450CDW User manual

Brother
Brother MFC-L8600CDW Instruction Manual