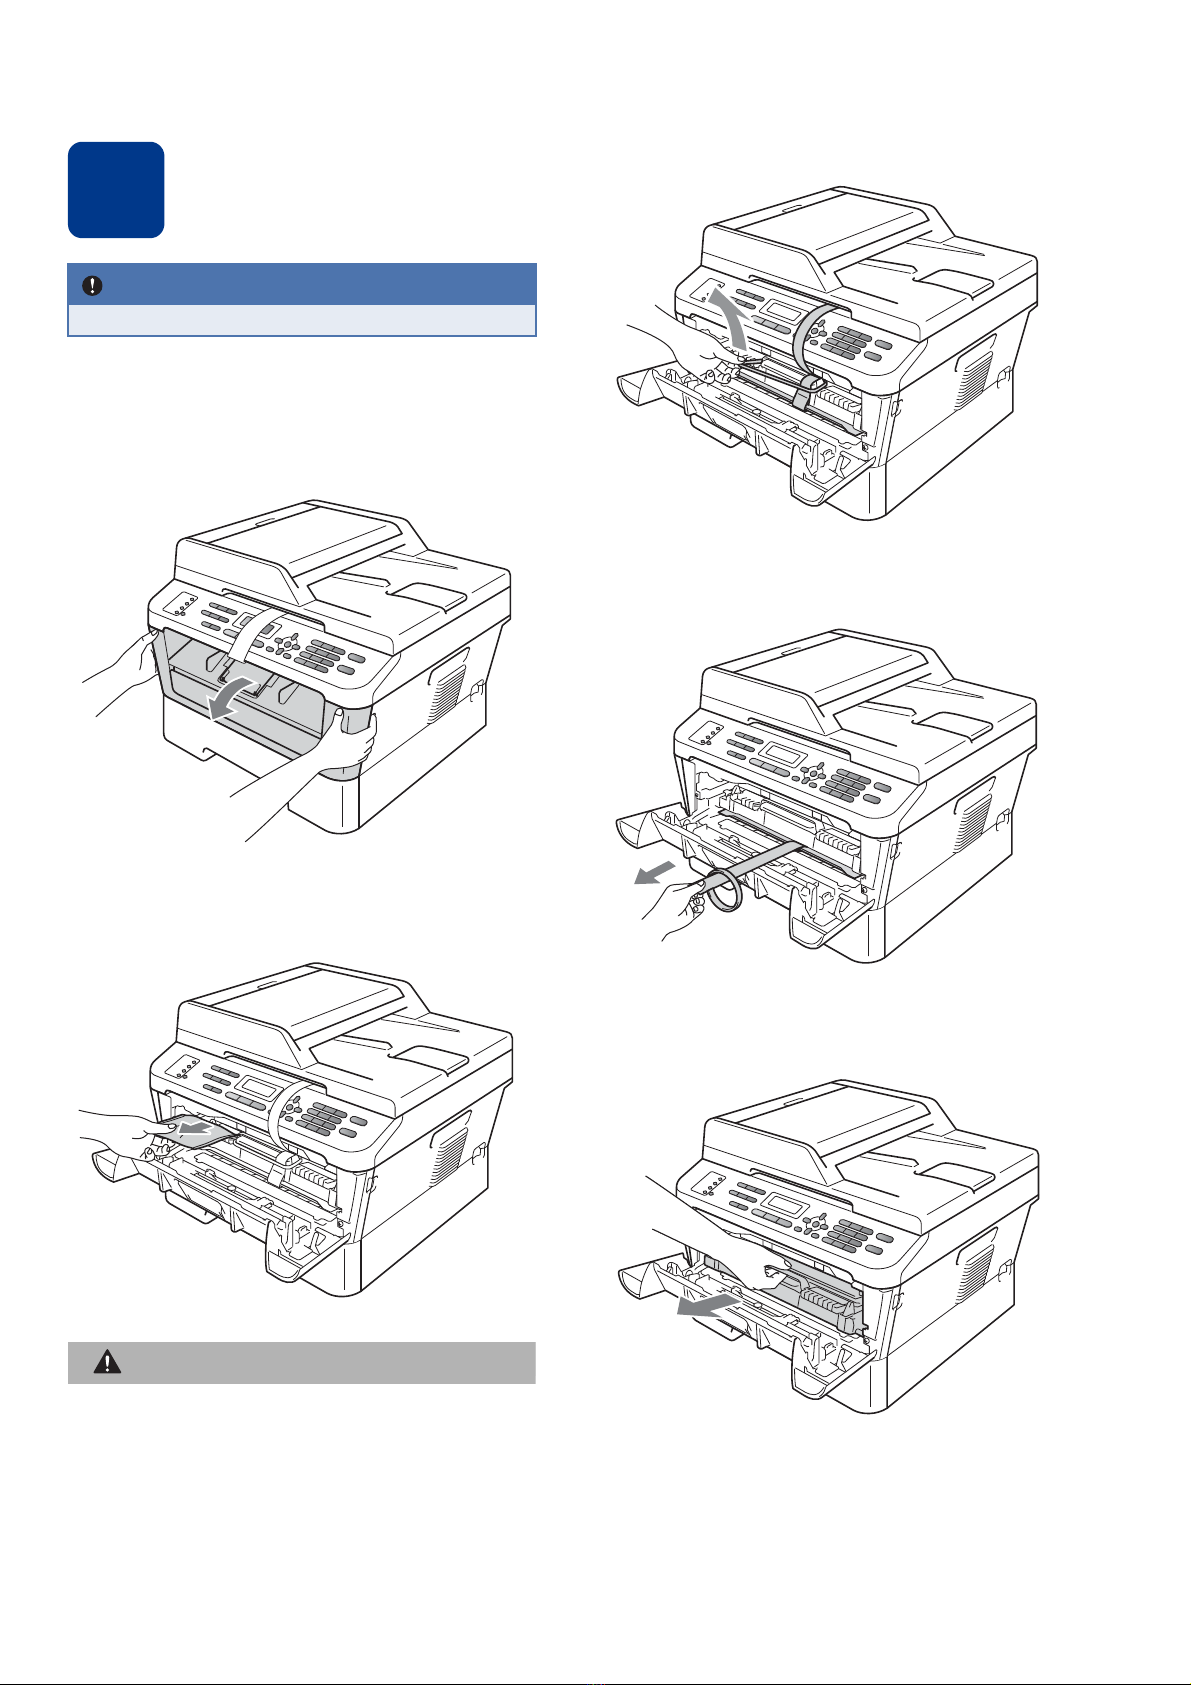
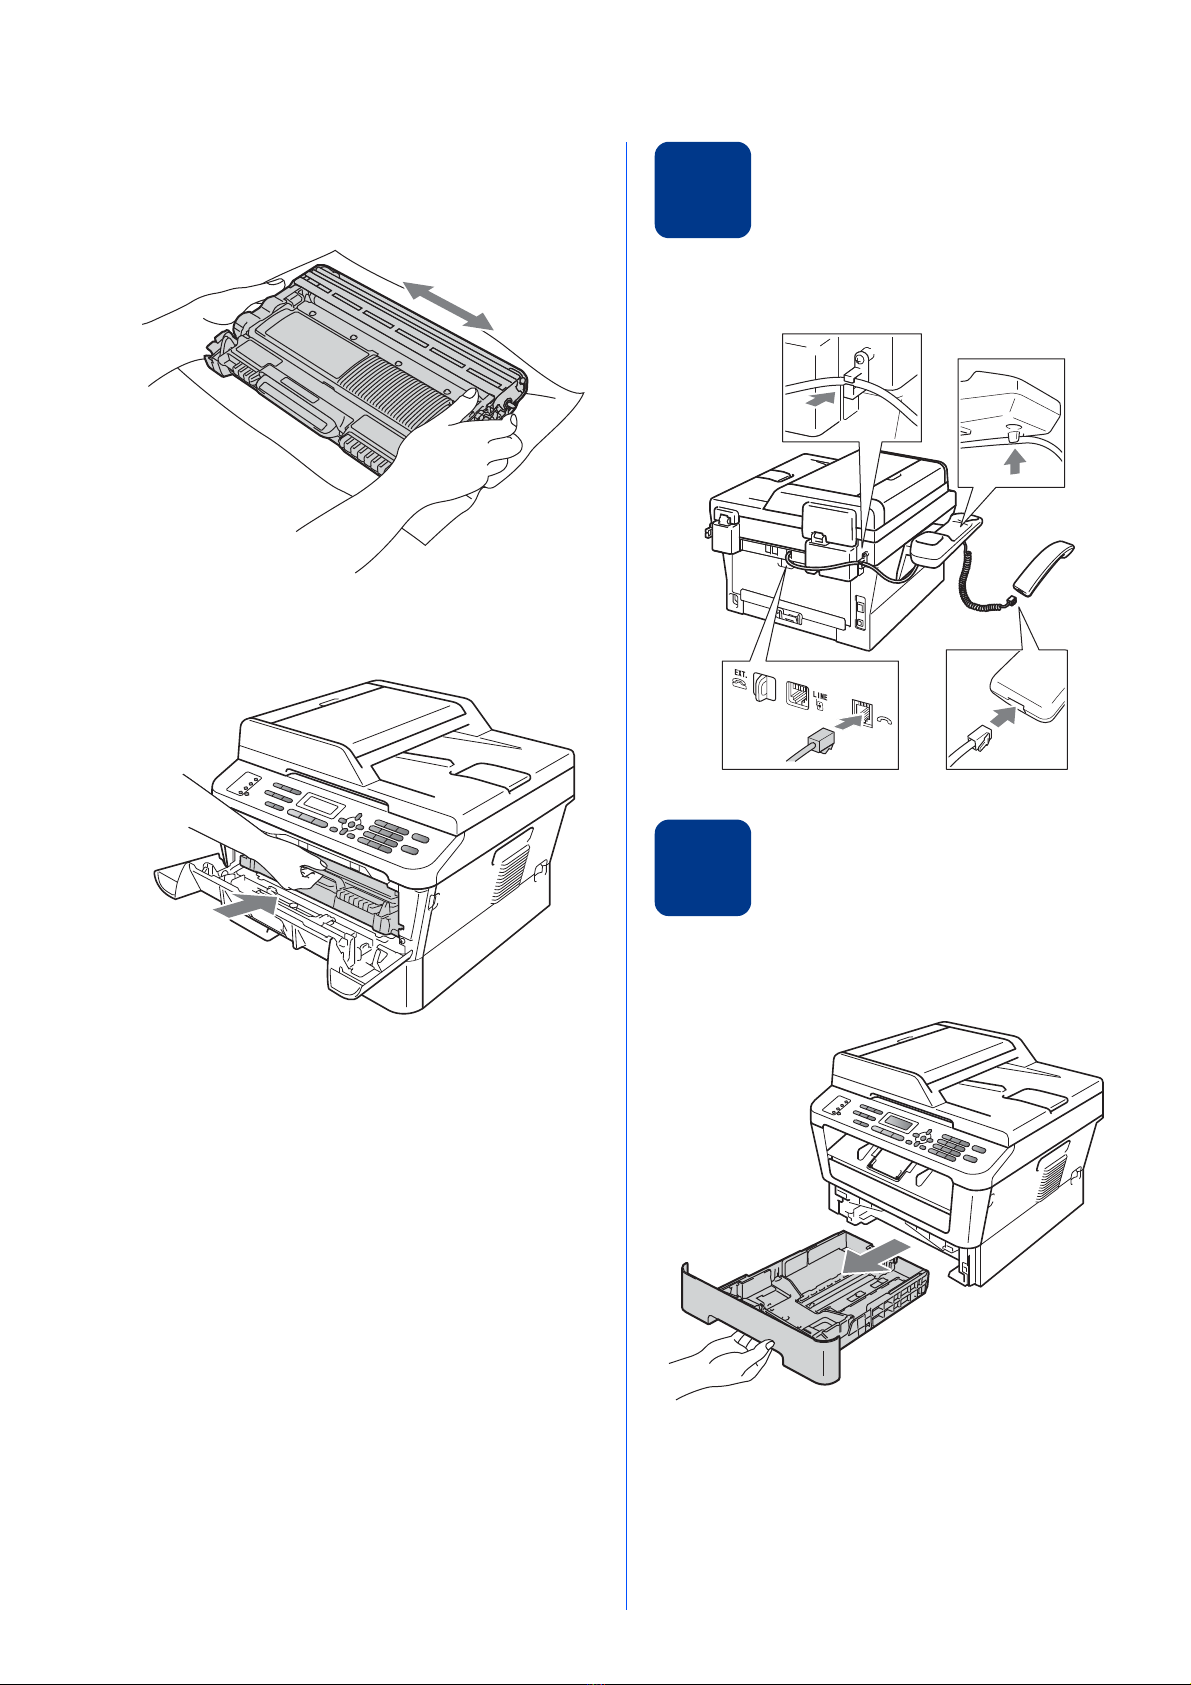
Brother MFC-7360 User manual

1
Start Here MFC-7360 / MFC-7470D /
MFC-7860DN
Quick Setup Guide
CHN-ENG Version 0
Please read the Safety and Legal booklet first before you set up your machine. Then, please read this Quick Setup
Guide for the correct setup and installation.
To view the Quick Setup Guide in other languages, please visit http://solutions.brother.com/.
1
Unpack the machine and check the components
WARNING
Plastic bags are used in the packaging of your machine. Plastic bags are not toys. To avoid danger of
suffocation, please keep these bags away from babies and children and dispose of them correctly.
CAUTION
CAUTION
When you move the machine, grasp the handset holder and the side handhold that are under the scanner. DO
NOT carry the machine by holding it at the bottom.
WARNING indicates a potentially hazardous situation which, if not avoided,
could result in death or serious injuries.
CAUTION indicates a potentially hazardous situation which, if not avoided, may
result in minor or moderate injuries.
Drum Unit and Toner
Cartridge Assembly
(pre-installed)
AC Power Cord Installation CD-ROM,
Documentation CD-ROM
Safety and Legal
booklet Quick Setup Guide Basic User’s Guide
Telephone Line Cord
Telephone Handset
Curled Handset Cord USB Interface Cable
WARNING
CAUTION

2
Note
• Keep a minimum gap around the machine as shown in the illustration.
• The components included in the box may differ depending on your country.
• Please save the original packaging should you need to ship the machine in future.
• If for any reason you must ship your machine, carefully repack the machine in the original packaging to avoid
any damage during transit. The machine should be adequately insured with the carrier. For how to repack
the machine, see Packing and shipping the machine in the Advanced User's Guide.
• The interface cable is not a standard accessory. Buy the appropriate interface cable for the interface you
want to use (Network).
• To ensure safe operation the supplied plug must be inserted only into a standard power outlet that is properly
grounded through the standard electrical wiring. Non grounded equipment may cause an electrical shock
hazard, and may cause excessive electrical noise radiation.
USB cable
• It is recommended to use a USB 2.0 cable (Type A/B) that is no longer than 2 metres.
Network cable
Use a straight-through Category5 (or greater) twisted-pair cable for 10BASE-T or 100BASE-TX Fast Ethernet
Network.
100 mm 100 mm
90 mm
250 mm

3
2
Remove the packing
material from the
machine
aRemove the packing tape from the outside of
the machine and the film covering the scanner
glass.
bOpen the front cover.
cRemove the Silica Pack from the inside of the
machine.
CAUTION
CAUTION
DO NOT eat the Silica Pack. Please discard.
If ingested seek medical attention immediately.
dLift the elastic band off the drum.
ePull the paper strip to remove the protective
material as shown in the illustration.
fTake out the drum unit and toner cartridge
assembly.
IMPORTANT
DO NOT connect the AC power cord yet.

4
gGently shake it from side to side several times
to distribute the toner evenly inside the
assembly.
hPut the drum unit and toner cartridge assembly
back in the machine.
iClose the front cover of the machine.
3
Install the Handset
Connect the curled handset cord to the machine and
the other end to the handset.
4
Load paper in the paper
tray
aPull the paper tray completely out of the
machine.

5
bWhile pressing the green paper-guide release
lever a, slide the paper guides to fit the paper
size you are loading in the tray. Make sure that
the guides are firmly in the slots.
cFan the stack of paper well to avoid paper jams
and misfeeds.
dPut paper in the tray and make sure:
The paper is below the maximum paper
mark (bbb)a.
Over filling the paper tray will cause paper
jams.
The side to be printed on must be face down.
The paper guides touch the sides of the
paper so it will feed correctly.
ePut the paper tray firmly back in the machine.
Make sure that it is completely inserted into the
machine.
5
Connect the power cord
and telephone line
aConnect the AC power cord to the machine,
and then plug it into an electrical socket.
bTurn on the machine’s power switch.
cConnect the telephone line cord. Connect one
end of the telephone line cord to the socket on
the machine marked LINE and the other end to
a telephone wall socket.
1
1
1

6
WARNING
The machine must be grounded using an
earthed plug.
Since the machine is grounded through the
electrical socket, you can protect yourself
from potentially hazardous electrical
conditions on the telephone network by
keeping the power cord connected to your
machine when you connect it to a telephone
line. Similarly, you can protect yourself when
you want to move your machine by
disconnecting the telephone line first and then
the power cord.
6
Choose your language
(If needed)
aPress Menu, 0, 0.
bPress aor bto choose your language.
Press OK.
cPress Stop/Exit.
IMPORTANT
The telephone line cord MUST be connected
to the socket on the machine marked LINE.
Note
If you are sharing one telephone line with an
external telephone, connect it as shown below.
Before you connect the external telephone,
remove the protective cap afrom the EXT. jack
on the machine.
1Extension telephone
2External telephone
1
2
1
Note
If you are sharing one telephone line with an
external telephone answering machine, connect it
as shown below.
Before you connect the external telephone
answering machine, remove the protective cap a
from the EXT. jack on the machine.
Set the receive mode to External TAD if
you have an external answering machine.
See Choose a Receive Mode on page 7. For
additional details, see Connecting an
external TAD in the Basic User’s Guide.
1

7
7
Choose a Receive Mode
Receive Mode
By factory default, the factory setting of Receive Mode is “Fax Only”. Your machine will automatically receive
any faxes that are sent to it. There are four receive modes of this machine as below.
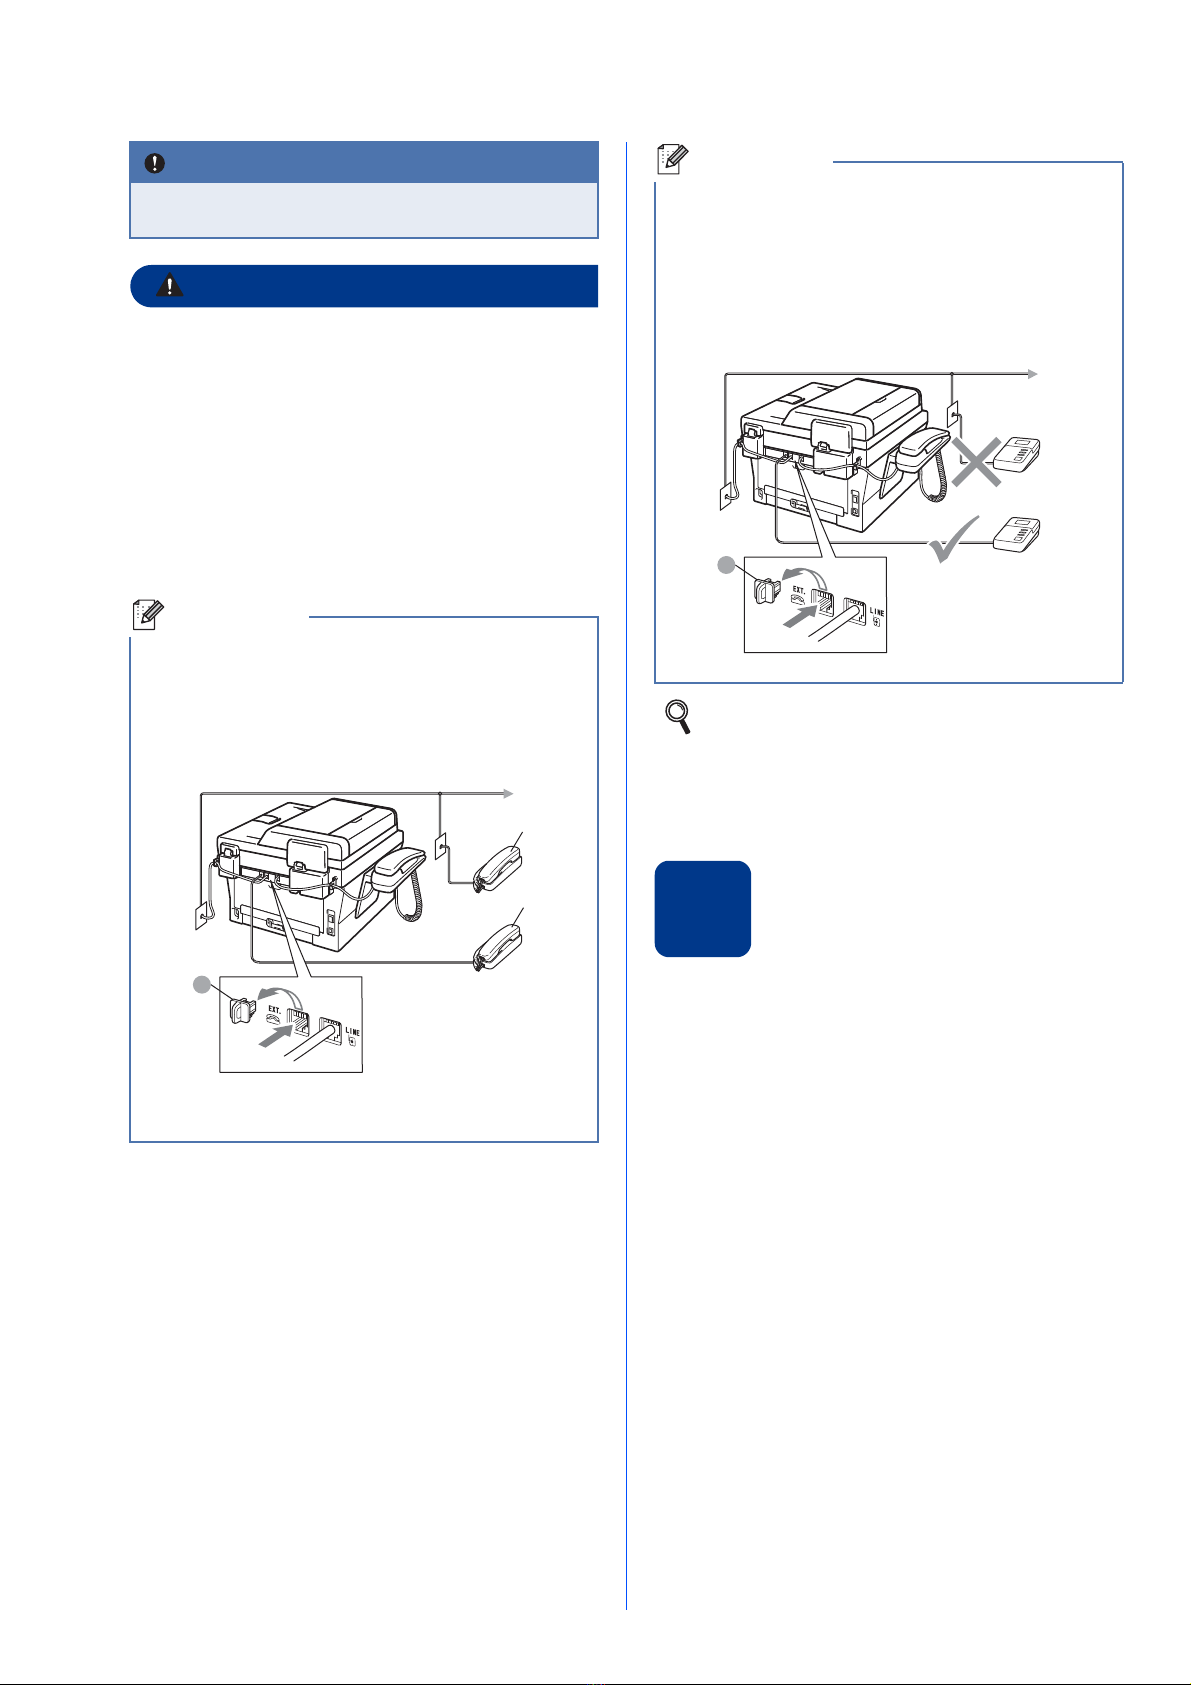
1If the caller wants to send a fax during a call or the caller sends you a fax call, please press Start button (under easy mode) on the control
panel of the machine or press l5 1 keys on the external answering phone device (you have to turn on the remote codes first, please see
Using remote code in the Basic User's Guide) to give fax receiving signals.
To set a receive mode follow the instructions below:
aPress Menu, 0, 1.
bPress aor bto choose the receive mode.
Press OK.
cPress Stop/Exit.
LCD Display Factory Default Ring Delay
Fax Only Ring Delay: 4 times
Fax detection: on
Fax/Tel Ring Delay: 4 times
Time: 30 seconds
Manual
External TAD
Mode Function Description
Fax Only Each call recognized as
fax and send fax signal.
However, you can
answer the call within
the number of rings.
Factory setting of Ring Delay is 4 (0-10 times available, please see
Ring Delay in the Basic User’s Guide). After ringing 4 times, the fax
machine send fax-receiving signals automatically;
Tip: If your machine is connecting an external answering phone
device, and often use it to answer incoming calls, you could set the
ring time through 4 to 6 times.
Within the recommended ringing times, you can use the external
answering phone device to answer and talk. 1
Fax/Tel Automatically
determine whether the
incoming call is
telephone or fax calls.
Non-Fax call will make
a fast doublering to
inform you answer the
phone.
Factory setting of Ring Delay is 4 (0-10 times available, please see
Ring Delay in the Basic User’s Guide). Factory setting of F/T ring
time (a fast double-ring) is 30 seconds (20, 30, 40, 70 seconds
available, please see F/T Ring Time in the Basic User’s Guide).
According to incoming call after the fax machine rings 4 times:
1) For the fax call, send fax received signal;
2) For the telephone call, make a fast double-ring,waiting for you
answer the phone.
Tip: If your machine is connecting an external answering phone device,
you could set the ringing time through 4 to 6 times to answer the call.
1
Manual Machine doesn’t
recognize each call,
only as a common
phone call that you
need to determine after
answering the phone.
Answering the call, or if the caller wants to send you a fax, press
Start button (under easy mode) to receive faxes.
Tip: If your machine is connecting an external answering phone
device, you can use the external answering phone device to
answer and talk. 1
External TAD The external answering
machine (TAD)
automactically answers
every call. Voice
messages are stored on
the external TAD. Fax
messages are printed.
Use this mode if you have connected an external answering
machine to your machine. The TAD setting works only with an
external answering machine.
Note: Ring Delay and F/T Ring Time do not work in this setting.
For more details, see Using receive modes in the Basic User's Guide.

8
8
Set the LCD contrast
(if needed)
If you are having difficulty reading the LCD, try
changing the contrast setting.
aPress Menu, 1, 5.
bPress cto increase the contrast.
—OR—
Press dto decrease the contrast.
Press OK.
cPress Stop/Exit.
9
Set the date and time
The machine displays the time, and if you set up the
station ID the date and time will be added to each fax
you send.
aPress Menu, 0, 2, 1.
bEnter the last two digits of the year on the dial
pad, and then press OK.
Date&Time
Year:2011
(e.g. Enter 1, 1for 2011.)
cEnter the two digits for the month on the dial
pad, and then press OK.
Date&Time
Month:03
(e.g. Enter 0, 3for March.)
dEnter the two digits for the day on the dial pad,
and then press OK.
Date&Time
Day:25
(e.g. Enter 2, 5for 25th.)
eEnter the time in 24-hour format on the dial
pad, and then press OK.
Date&Time
Time:15:25
(e.g. Enter 1, 5, 2, 5for 3:25 P.M.)
fPress Stop/Exit.

9
10
Enter personal
information (station ID)
The machine displays the date and time, and if you
set up the station ID, it will add it to each fax you send.
aPress Menu, 0, 3.
bEnter your fax number (up to 20 digits) on the
dial pad, and then press OK.
Station ID
Fax:
cEnter your telephone number (up to 20 digits)
on the dial pad, and then press OK. If your
telephone number and fax number are the
same, enter the same number again.
Station ID
Tel:
dUse the dial pad to enter your name (up to 10
characters for Chinese or 20 characters for
alphanumeric), and then press OK.
Name:
Enter & OK Key
ePress Stop/Exit.
11
Fax Transmission Report
Your Brother machine is equipped with a
Transmission Verification Report that can be used as
confirmation that you sent a fax. This report lists the
name or fax number of the receiving party, the date,
time, and duration of the transmission, the number of
pages transmitted, and whether or not the
transmission was successful. If you want to use the
Fax Transmission Report feature see Printing reports
in the Advanced User's Guide.
12
Set tone or pulse dialling
mode
Your machine comes set for Tone dialling service. If
you have Pulse dialling service (rotary), you need to
change the dialling mode.
aPress Menu, 0, 4.
bPress aor bto choose Pulse (or Tone).
Press OK.
cPress Stop/Exit.
Note
• You can register your name in Chinese or
English in this machine, you can switch
between the alphabet input mode and the
Chinese-entry mode by pressing a button, the
current input mode will appear in the lower right
corner of LCD. Simplified Chinese can be
converted from Pinyin entry.
• See the following chart for entering your name.
• If you need to enter a character that is on the
same key as the last character, press cto move
the cursor to the right.
• If you entered a letter incorrectly and want to
change it, press dor cto move the cursor to the
incorrect character, press Clear.
Press
key
One
time
Two
times
Three
times
Four
times
Five
times
Six
times
Seven
times
Eight
times
Nine
times
2abcABC2ab
3de fDEF3de
4ghiGHI4gh
5jklJKL5jk
6mn oMNO6mn
7pq r sPQRS7
8tuvTUV8tu
9wxyzWXYZ9
For more details, see Entering text in the
Basic User’s Guide.
Note
If you make a mistake and want to start again,
press Stop/Exit and go back to step a.

10
13
Set the telephone line
compatibility
If you are connecting the machine to a VoIP service
(over the Internet) you need to change the
compatibility setting.
aPress Menu, 2, 0, 1.
bPress aor bto choose Basic(for VoIP).
Press OK.
cPress Stop/Exit.
.
14
Dial Prefix
The dial prefix setting will automatically dial a
predefined number before every fax number you dial.
For example: If your phone system requires a 9 to dial
an outside number this setting will automatically dial 9
for every fax you send.
aPress Menu, 0, 6.
bEnter the prefix number (up to 5 digits) on the
dial pad, and then press OK.
cPress Stop/Exit.
Note
If you are using an analogue telephone line you
can skip this step.
Note
• You can use the number 0 to 9, #, land !.
(PressHook/Hold to display “!”.)
• You cannot use ! with any other numbers or
characters.
• If your telephone system requires a timed break
recall (hookflash), press Hook/Hold to enter the
break.
• If the pulse dialing mode is on, # and ! are not
available to use.

11
Windows®
USB
Macintosh
Windows®Macintosh
Wired Network
15
Choose your connection type
These installation instructions are for Windows®2000 Professional, Windows®XP Home/Windows®XP
Professional, Windows®XP Professional x64 Edition, Windows Vista®, Windows®7, and Mac OS X (versions
10.4.11, 10.5.x and 10.6.x).
Note
For Windows Server®2003/2003 x64 Edition/2008/2008 R2, visit your model page at
http://solutions.brother.com/.
For USB Interface Users
Windows
®
, go to page 12
Macintosh, go to page 14
For Wired Network
Windows
®
, go to page 16
Macintosh, go to page 18
Note
You can download the latest drivers and utilities for your machine from the Brother Solutions Center at
http://solutions.brother.com/.

12
Windows®
USB
For USB Interface Users
(Windows®2000 Professional/XP/XP Professional x64 Edition/Windows Vista®/Windows®7)
16
Before you install
aMake sure that your computer is ON and you
are logged on with Administrator rights.
17
Install MFL-Pro Suite
aPut the installation CD-ROM into your
CD-ROM drive. If the model name screen
appears, choose your machine. If the language
screen appears, choose your language.
bClick Initial Installation and then Install
MFL-Pro Suite.
cClick Yes if you accept the license agreements.
dFollow the on-screen instructions until this
screen appears.
IMPORTANT
• If there are any programs running, close
them.
• The screens may differ depending on your
operating system.
Note
• The installation CD-ROM includes Presto!
PageManager. This software supports
Windows®2000, Windows®XP, XP
Professional x64 Edition, Windows Vista®and
Windows®7. Update to the latest Windows®
Service Pack before installing MFL-Pro Suite.
• Before installation, if the USB cable is
connected to the computer, the “Found New
Hardware Wizard” dialog box will automatically
show, please cancel it to close the screen.
Note
If the Brother screen does not appear
automatically, go to My Computer (Computer),
double-click the CD-ROM icon, and then
double-click start.exe.
Note
• If the installation does not continue
automatically, open the top menu again by
ejecting and then reinserting the CD-ROM or
double-click the start.exe program from the
root folder, and continue from step bto install
MFL-Pro Suite.
• For Windows Vista®and Windows®7 users,
when the User Account Control screen
appears, click Allow or Yes.
• (MFC-7470D / MFC-7860DN only) If you want
to install the PS driver (BR-Script3 printer
driver), choose Custom Install and then follow
the on-screen instructions.

13
Windows®
USB
Windows®
USB
Macintosh
eConnect the USB cable to the USB connector
marked with the symbol on your machine
and then connect the cable to your computer.
fTurn the machine on, and follow the on-screen
instructions to complete setup.
IMPORTANT
DO NOT cancel any of the screens during the
installation. It may take a few seconds for all
screens to appear.
Note
• For Windows Vista®and Windows®7 users,
when the Windows Security screen appears,
select the check box and click Install to
complete the installation correctly.
• If an error message appears during the
software installation, run the
Installation Diagnostics located in
Start/All Programs/Brother/MFC-XXXX
(where MFC-XXXX is your model name).
Finish
The installation is now
complete.
Note
• Depending on your security settings, a
Windows Security or antivirus software window
may appear when using the machine or its
software. Please allow or permit the window to
continue.
•XML Paper Specification Printer Driver
The XML Paper Specification Printer Driver is
the most suitable driver for Windows Vista®and
Windows®7 when printing from applications
that use the XML Paper Specification
documents. Please download the latest driver
by accessing the Brother Solutions Center at
http://solutions.brother.com/.

14
Macintosh
USB
For USB Interface Users
(Mac OS X 10.4.11 - 10.6.x)
16
Before you install
aMake sure your machine is connected to the
power and your Macintosh is ON. You must be
logged on with Administrator rights.
bConnect the USB cable to the USB connector
marked with the symbol on your machine
and then connect the cable to your Macintosh.
cMake sure your machine’s power switch is on.
17
Install MFL-Pro Suite
aPut the installation CD-ROM into your
CD-ROM drive.
bDouble-click the Start Here OSX icon. Follow
the on-screen instructions.
cFollow the on-screen instructions until this
screen appears. Choose your machine from
the list, and then click OK.
dWhen this screen appears, click Next.
IMPORTANT
For Mac OS X 10.4.10 users, upgrade to
Mac OS X 10.4.11 - 10.6.x. (For the latest
drivers and information on the Mac OS X you
are using, visit http://solutions.brother.com/.)
Note
(MFC-7470D / MFC-7860DN only) If you want to
install the PS driver (BR-Script3 printer driver),
please go to the Brother Solutions Center at
http://solutions.brother.com/, click Downloads on
your model page and visit FAQ's for setup
instructions.
Note
It may take a few minutes for installation to
complete.
The installation of MFL-Pro Suite is now
complete.
Go to step 18 on page 15.

15
Macintosh
USB
Windows®
USB
Macintosh
18
Download and install
Presto! PageManager
When Presto! PageManager is installed OCR
capability is added to Brother ControlCenter2. You
can easily scan, share and organize photos and
documents using Presto! PageManager.
On the Brother Support screen, click
Presto! PageManager and follow the on-screen
instructions.
Finish
The installation is now
complete.

16
Windows®
Wired Network
For Wired Network Interface Users (MFC-7860DN only)
(Windows®2000 Professional/XP/XP Professional x64 Edition/Windows Vista®/Windows®7)
16
Before you install
aMake sure that your computer is ON and you
are logged on with Administrator rights.
bRemove the protective cap from the LAN
connector marked with a symbol.
cConnect the network interface cable to the LAN
connector and then connect it to a free port on
your hub.
dMake sure your machine’s power switch is on.
17
Install MFL-Pro Suite
aPut the installation CD-ROM into your
CD-ROM drive. If the model name screen
appears, choose your machine. If the language
screen appears, choose your language.
bClick Initial Installation and then Install
MFL-Pro Suite.
cClick Yes if you accept the license agreements.
IMPORTANT
• If there are any programs running, close
them.
• The screens may differ depending on your
operating system.
Note
• The installation CD-ROM includes Presto!
PageManager. This software supports
Windows®2000, Windows®XP, XP
Professional x64 Edition, Windows Vista®and
Windows®7. Update to the latest Windows®
Service Pack before installing MFL-Pro Suite.
• Disable all personal firewall software (other
than Windows®Firewall), anti-spyware or
antivirus applications for the duration of the
installation.
Note
If the Brother screen does not appear
automatically, go to My Computer (Computer),
double-click the CD-ROM icon, and then
double-click start.exe.
Note
• If the installation does not continue
automatically, open the top menu again by
ejecting and then reinserting the CD-ROM or
double-click the start.exe program from the
root folder, and continue from step bto install
MFL-Pro Suite.
• For Windows Vista®and Windows®7 users,
when the User Account Control screen
appears, click Allow or Yes.
• (MFC-7470D / MFC-7860DN only) If you want
to install the PS driver (BR-Script3 printer
driver), choose Custom Install and then follow
the on-screen instructions.

17
Windows®
Wired Network
Windows®Macintosh
Wired Network
dWhen the Firewall/AntiVirus detected screen
appears, choose Change the Firewall port
settings to enable network connection and
continue with the installation.
(Recommended) and click Next.
(Not for Windows®2000 users)
If you are not using the Windows®Firewall, see
the user's guide of your firewall or antivirus
software for information on how to add the
following network ports.
For network scanning, add UDP port 54925.
For network PC-Fax receiving, add UDP port
54926.
If you still have trouble with your network
connection, add UDP port 137.
eFollow the on-screen instructions to complete
setup.
18
Install MFL-Pro Suite on
additional computers
(if needed)
If you want to use your machine with multiple
computers on the network, install MFL-Pro Suite on
each computer. Go to step 17 on page 16.
IMPORTANT
DO NOT cancel any of the screens during the
installation. It may take a few seconds for all
screens to appear.
Note
• If your machine is not found over the network,
confirm your settings by following the on-screen
instructions.
• You can find your machine’s IP address and the
node name by printing out the Network
Configuration Report. See Print the Network
Configuration Report on page 20.
• For Windows Vista®and Windows®7 users,
when the Windows Security screen appears,
select the check box and click Install to
complete the installation correctly.
• If an error message appears during the
software installation, run the
Installation Diagnostics located in
Start/All Programs/Brother/MFC-XXXX LAN
(where MFC-XXXX is your model name).
Finish
The installation is now
complete.
Note
• If you use a specified IP Address for the
machine, you must set the Boot Method to
Static by using the control panel. For more
information, see Network menu in the Network
User's Guide.
• Depending on your security settings, a
Windows Security or antivirus software window
may appear when using the machine or its
software. Please allow or permit the window to
continue.
•XML Paper Specification Printer Driver
The XML Paper Specification Printer Driver is
the most suitable driver for Windows Vista®and
Windows®7 when printing from applications
that use the XML Paper Specification
documents. Please download the latest driver
by accessing the Brother Solutions Center at
http://solutions.brother.com/.

18
Macintosh
Wired Network
For Wired Network Interface Users (MFC-7860DN only)
(Mac OS X 10.4.11 - 10.6.x)
16
Before you install
aMake sure your machine is connected to the
power and your Macintosh is ON. You must be
logged on with Administrator rights.
bRemove the protective cap from the LAN
connector marked with a symbol.
cConnect the network interface cable to the LAN
connector and then connect it to a free port on
your hub.
dMake sure your machine’s power switch is on.
17
Install MFL-Pro Suite
aPut the installation CD-ROM into your
CD-ROM drive.
bDouble-click the Start Here OSX icon. Follow
the on-screen instructions.
cFollow the on-screen instructions until this
screen appears. Choose your machine from
the list, and then click OK.
IMPORTANT
For Mac OS X 10.4.10 users, upgrade to
Mac OS X 10.4.11 - 10.6.x. (For the latest
drivers and information on the Mac OS X you
are using, visit http://solutions.brother.com/.)
Note
(MFC-7470D / MFC-7860DN only) If you want to
install the PS driver (BR-Script3 printer driver),
please go to the Brother Solutions Center at
http://solutions.brother.com/, click Downloads on
your model page and visit FAQ's for setup
instructions.
Note
It may take a few minutes for installation to
complete.
Note
If your machine is not found over the network,
confirm your network settings.

19
Macintosh
Wired Network
Windows®Macintosh
Wired Network
dWhen this screen appears, click Next.
18
Download and install
Presto! PageManager
When Presto! PageManager is installed OCR
capability is added to Brother ControlCenter2. You
can easily scan, share and organize photos and
documents using Presto! PageManager.
On the Brother Support screen, click
Presto! PageManager and follow the on-screen
instructions.
19
Install MFL-Pro Suite on
additional computers
(if needed)
If you want to use your machine with multiple
computers on the network, install MFL-Pro Suite on
each computer. Go to step 17 on page 18.
Note
• You can find your machine’s MAC Address
(Ethernet Address) and IP Address by printing
out the Network Configuration Report. See Print
the Network Configuration Report on page 20.
• If this screen appears click OK.
Enter a name for your Macintosh in
Display Name up to 15 characters long and
click OK. Go to d.
• If you want to use the machine’s SCAN key to
scan over the network, you must check the
Register your computer with the "Scan To"
function on the machine box.
• The name you enter will appear on the
machine’s LCD when you press (SCAN)
and choose a scan option. (For more
information, see Network Scanning in the
Software User's Guide.)
The installation of MFL-Pro Suite is now
complete.
Go to step 18 on page 19.
Finish
The installation is now
complete.
Note
If you use a specified IP Address for the machine,
you must set the Boot Method to Static by using
the control panel. For more information, see
Network menu in the Network User's Guide.

20
For Network Users (MFC-7860DN only)
Web Based Management
(web browser)
The Brother print server is equipped with a web server
that allows you to monitor its status or change some
of its configuration settings, using HTTP (Hyper Text
Transfer Protocol).
aOpen your browser.
bType “http://machine’s IP address/” into your
browser’s address bar (where “machine’s IP
address” is the IP address of the printer or the
print server name).
For example http://192.168.1.2/
Print the Network Configuration
Report
You can print the Network Configuration Report to
confirm the current network settings.
aTurn the machine on and wait until it is in the
Ready state.
bPress Menu, 5, 6.
cPress Start.
The machine will print the current network
settings.
dPress Stop/Exit.
Restore the network settings to
factory default
To restore all network settings of the internal
Print/Scan server to factory default, please follow the
steps below.
aMake sure the machine is not operating, then
disconnect all the cables from the machine
(except the power cord).
bPress Menu, 6, 0.
cPress 1to choose Reset.
dPress 1to choose Yes.
The machine will restart, re-connect cables
once this is complete.
Note
• The default User Name is ‘admin’ and the
default password is ‘access’. You can use a
web browser to change this password.
• We recommend Microsoft®Internet
Explorer®6.0 (or greater) or Firefox 3.0 (or
greater) for Windows®and Safari 3.0 (or
greater) for Macintosh. Please also make sure
that JavaScript and cookies are always enabled
in whichever browser you use. To use a web
browser, you will need to know the IP address
of the print server. The IP address of the print
server is listed on the Network Configuration
Report.
See Web Based Management in the Network
User's Guide.
Other manuals for MFC-7360
3
This manual suits for next models
2
Table of contents
Other Brother Laser Printer manuals

Brother
Brother HL-2130 User manual

Brother
Brother DCP-L8450CDW User manual

Brother
Brother HL-L6250DW Technical manual

Brother
Brother HL-1030 User manual

Brother
Brother DCP-J152W Operating manual

Brother
Brother MFC-J2510 User manual

Brother
Brother HL-2130 User manual

Brother
Brother MFC-L8600CDW Instruction Manual

Brother
Brother HL-1112 User manual