Brouwland Vinoferm DO-600 User manual

Vinoferm®by Brouwland
Korspelsesteenweg 86 • B-3581 Beverlo - Belgium
Tel. +32-(0)11-40.14.08 • Fax +32-(0)11-34.73.59
[email protected] • www.brouwland.com
31-05-2012 / 013.135.9 / VINOFERM
1/8
Introduction
Congratulations on your purchase of the ExStik® DO600
dissolved oxygen / temperature meter which simultane-
ously displays dissolved oxygen and temperature. Units
of measure are % saturation, mg/l or ppm for dissolved
oxygen, and °C or °F for temperature. Advanced features
include Data Hold, 25 points memory, auto power off,
automatic temperature compensation, salinity and altitude
compensation. This meter is shipped fully tested and cali-
brated and, with proper use, will provide years of reliable
service.
Meter Description
Front Panel Description
1. Battery compartment cover
2. LCD Display
3. MODE/HOLD button
4. CAL/RECALL button
5. ON/OFF button
6. Electrode Retaining Collar
7. Dissolved Oxygen Sensor
8. Bonded Membrane Cap assembly
9. Membrane & Cathode
(Note: The Electrode storage cap is not shown)
Electrode Bottom View
1. Membrane
2. Cathode
LCD Display
1. Bar graph display
2. Measurement units
3. Main display
4. Low Battery indicator
5. Temperature display
6. Reading hold indicator
DO600-EU-NL-V7.0-8/10
2
Dissolved Oxygen
DO600
II
RECALL
1
2
3
4
5
6
7
8
9
Inleiding
Gefeliciteerd met de aankoop van de ExStik®DO600, de opgeloste
zuurstofmeter/temperatuurmeter die tegelijk de opgeloste zuurstof en de temperatuur
weergeeft. De meeteenheden zijn % verzadiging, mg/l of ppm voor de opgeloste
zuurstof en °C of °F voor de temperatuur. De gevorderde kenmerken omvatten Data
Hold (databewaring), een geheugen van 25 punten, automatische uitschakeling,
automatische temperatuurcompensatie, zoutgehalte en hoogtecompensatie. Als u deze
meter voorzichtig gebruikt en onderhoudt, zal hij u jarenlang trouwe diensten bewijzen.
Beschrijving van de meter
Beschrijving frontpaneel
1. Deksel batterijvak
2. LCD-display
3. MODE/HOLD-toets
4. CAL/RECALL-toets
5. AAN/UIT-toets
6. Elektrodekraag
7. Opgeloste zuurstofsensor
8. Borgkapconstructie voor het membraan
9. Membraan & kathode
(Nota: De elektrodekap is niet afgebeeld)
Benedenaanzicht elektrode
1. Membraan
2. Kathode
LCD-display
1. Display balkgrafiek
2. Meeteenheden
3. Hoofdscherm
4. Indicator lage batterijstand
5. Temperatuurdisplay
6. Aflezing hold-indicator
1
2
Dissolved Oxygen
DO600
II
RECALL
Gebruiksaanwijzing
ExStik®DO600
Opgeloste zuurstofmeter
1
2
3
4
5
6
7
8
9
DO600-EU-NL-V7.0-8/10
2
Dissolved Oxygen
DO600
II
RECALL
1
2
3
4
5
6
7
8
9
Inleiding
Gefeliciteerd met de aankoop van de ExStik®DO600, de opgeloste
zuurstofmeter/temperatuurmeter die tegelijk de opgeloste zuurstof en de temperatuur
weergeeft. De meeteenheden zijn % verzadiging, mg/l of ppm voor de opgeloste
zuurstof en °C of °F voor de temperatuur. De gevorderde kenmerken omvatten Data
Hold (databewaring), een geheugen van 25 punten, automatische uitschakeling,
automatische temperatuurcompensatie, zoutgehalte en hoogtecompensatie. Als u deze
meter voorzichtig gebruikt en onderhoudt, zal hij u jarenlang trouwe diensten bewijzen.
Beschrijving van de meter
Beschrijving frontpaneel
1. Deksel batterijvak
2. LCD-display
3. MODE/HOLD-toets
4. CAL/RECALL-toets
5. AAN/UIT-toets
6. Elektrodekraag
7. Opgeloste zuurstofsensor
8. Borgkapconstructie voor het membraan
9. Membraan & kathode
(Nota: De elektrodekap is niet afgebeeld)
Benedenaanzicht elektrode
1. Membraan
2. Kathode
LCD-display
1. Display balkgrafiek
2. Meeteenheden
3. Hoofdscherm
4. Indicator lage batterijstand
5. Temperatuurdisplay
6. Aflezing hold-indicator
1
2
Dissolved Oxygen Meter DO-600
Manual

Vinoferm®by Brouwland
Korspelsesteenweg 86 • B-3581 Beverlo - Belgium
Tel. +32-(0)11-40.14.08 • Fax +32-(0)11-34.73.59
[email protected] • www.brouwland.com
2/8
Operation
Prepare the Electrode
The electrode is shipped “dry” and requires lling with the
supplied electrolyte solution before use. The membrane
should be in place and does not need replacement.
Follow the procedure at the end of this guide for lling the
bonded cap.
Powering the ExStik®
The ExStik® uses four (4) CR2032 Lithium Ion Batteries.
Press the ON/OFF button to turn the meter on or off. If the
batteries are weak, the ‘BAT’ indicator appears on the LCD.
The auto power off feature shuts the ExStik® off automati-
cally after approximately 10 minutes of inactivity. The auto
power off feature may be temporarily disabled for conve-
nience or for extended polarization time.
Startup Polarization Period
When the ExStik® is powered up for the rst time, the
electrode requires polarization. In order for this to occur
a three minute (approx.) polarization period must elapse
before measurements can be made. A special circuit is
included in this meter which, upon turn-on, maintains a
very small biasing current to the electrode for a period of
seven days. This keeps the electrode polarized and enables
the user to make immediate measurements (within a 7
day period) without waiting for the electrode to re-pola-
rize. Each time the ExStik® is turned on, the polarization
timer is reset and the 7 day polarization period is initiated.
A small asterisk at the bottom right corner of the display
is used to indicate that the polarization timer circuit is
active. If the ExStik is not used for more than seven day, a
3 minute waiting period is required before a measurement
can be made.
Turn-On Diagnostics
1. When the meter is turned ON the LCD displays “SELF”
and “CAL” while the meter runs a diagnostic routine.
2. During this time the meter is recalling the User Calibra-
tion data, performing self diagnostics & initializing the
ci rc ui tr y.
3. After this function is complete, the meter proceeds to
the normal measurement mode.
Measurements
1. Cover the electrode with the electrode cap. The sponge
contained in the cap should be moistened (not soaked)
with DI (distilled water) or clean tap water.
2. Pressing the ON/OFF button turns the meter ON or OFF.
When turned ON, the meter’s display switches on and
the Self Calibration utility runs (see above). The unit of
measure selected when the meter was last turned OFF
will remain on the display.
3. If this is the rst time the meter is powered up, wait ap-
prox. 3 minutes for the probe to polarize (please disable
auto-power off; Instructions for disabling auto-power off
are provided in a later section). For more details, please
read the Startup Polarization Period paragraph earlier in
this manual before continuing.
4. Select the desired units of measure by pressing and hol-
ding the MODE/HOLD button until the proper units are
shown in the display. Remove the electrode cover and
place the electrode in the sample to be measured. Stir
the electrode in the sample to remove any trapped air
bubbles from the membrane surface. Do not submerse
the electrode to the point that the sample liquid reaches
the meter’s electrode collar.
5. Allow the meter time to settle to the nal measurement
value.
Note: The larger the difference in temperature between
the electrode and the solution the longer it will take for
the reading to stabilize. Stabilization time can vary from
ten (10) seconds to ve (5) minutes.
Calibration
1. Calibration should be performed on a daily basis.
2. Turn the meter ON
3. Press and hold the MODE/HOLD button until % is dis-
played on the LCD.
4. If the meter has not been used for seven (7) days or
longer, allow the electrode to fully polarize. This may
take 2-3 minutes.
5. Place the electrode cap onto the electrode. The sponge
contained in the cap should be moistened (not soaked)
with DI (distilled water) or clean tap water. Be sure that
the electrode membrane is clean and dry or the cali-
bration will be incorrect. Never touch the membrane, as
skin oil will affect the electrode response.
6. Wait until the reading stabilizes then press and hold the
CAL/RECALL button until CAL is shown in the lower dis-
play. The readings will blink “101.7” and “SA” will appear.
7. When the calibration is complete “End” will appear and
then the meter will return to the normal measurement
mode.
Note: The “SA” will not appear if the calibration fails.
8. Optional ’zero oxygen’ calibration (improves measure-
ment accuracy for very low or very high DO measure-
ments): Place the electrode in a zero oxygen calibration
solution, such as 5% sodium sulte, wait for stability
and press the CAL/RECALL button until CAL is shown in
the in the lower display. Stability in a zero solution may
take many minutes, depending on electrode history.
Note: Sodium Sulte can become deposited on the
electrode and on the “coined” surface of the electrode
retaining collar. The presence of the Sodium Sulte will
negatively affect future DO measurements until such a
time where ALL of it is removed from the electrode.

Vinoferm®by Brouwland
Korspelsesteenweg 86 • B-3581 Beverlo - Belgium
Tel. +32-(0)11-40.14.08 • Fax +32-(0)11-34.73.59
[email protected] • www.brouwland.com
3/8
Measurement Units
The meter can be set to measure % saturation, dissolved
oxygen in mg/l, and dissolved oxygen in parts per million
(ppm). To change the mode:
1. Press and hold the MODE/HOLD button for 2 seconds
and the display will begin to scroll through the different
units of measure : % saturation; D.O. in mg/l; D.O. in
ppm (parts per million)
2. When the desired units are displayed, release the
MODE/HOLD button and the unit will return to normal
operating mode.
Note: The “HOLD” function cannot be on when changing
the measurement function. If “HOLD” is displayed in the
lower left corner of the display, briey press the MODE/
HOLD button to turn it off.
Temperature Units (ºF/ºC)
1. With the unit OFF, press and hold the CAL/RECALL
button.
2. With the CAL/RECALL button depressed, momentarily
press the ON/OFF button to turn the unit ON.
3. The CAL/RECALL button can be released when ‘Self Cal’
is shown in the display.
Salinity Compensation
1. With the unit ON, momentarily press the CAL/RECALL
button twice in quick succession (‘SAL’ is shown in the
lower temperature display).
2. Momentary press the MODE/HOLD button. Each press
of the MODE/HOLD button increases the compensation
by 1ppt (part per thousand); the available range is 0 to
50ppt.
3. Momentarily press the CAL/RECALL button to save the
compensation setting and return to the normal mea-
surement mode.
Altitude Compensation
1. With the unit ON, momentarily press the CAL/RECALL
button twice in quick succession (‘SAL’ is shown in the
lower temperature display.
2. Press and hold CAL/RECALL again for 2 seconds to enter
the Altitude Mode (‘Ald’ will be shown in the lower tem-
perature display).
3. The factory default value is sea level. Each press of
the MODE/HOLD button increases the compensation
by 1000ft. The maximum value is 20 presses (20,000ft
above sea level).
4. Momentarily press the CAL/RECALL button to save the
compensation setting and return to the normal mea-
surement mode.
Auto-Power OFF Feature
The auto power off feature automatically shuts the meter
off 10 minutes after the most recent button press.
To disable this feature, refer to the Disable Auto-Power
OFF section.
Disable Auto-Power OFF Feature
With the unit ON, momentarily press the CAL/RECALL but-
ton, then quickly press and hold both the MODE/HOLD and
ON/OFF buttons until ‘off’ is displayed. To restore the Auto
Power Off Feature (auto power OFF enable) simply turn the
meter off and on again using the ON/OFF button.
Low Battery Indication
When the battery voltage falls below the operating thres-
hold, ‘BAT’ will appear on the display. Refer to the Mainte-
nance section for battery replacement information.
Storing Readings
1. Press the MODE/HOLD button to store a reading. The
storage location number will be displayed on the lower
display, while the main display shows the stored rea-
ding. The meter will enter the HOLD mode and the
“HOLD” indicator will appear on the LCD.
2. Press the MODE/HOLD button again to exit the HOLD
mode and return to normal operation. The next time
MODE/HOLD is momentarily pressed another reading is
stored and so on.
3. If more than 25 readings are stored, previously stored
readings (starting with reading number 1) are overwrit-
ten.
Recalling Stored Readings
1. Momentarily press the CAL/RECALL button and then
with in 4 seconds momentarily press the MODE/HOLD.
The last stored data point location will be displayed (1 to
25). Each time the MODE/HOLD button is momentarily
pressed the next most recently stored data point will be
displayed.
2. After the last data point stored is displayed, pressing
the MODE/HOLD button again returns the display to the
beginning of the list.
3. Pressing the CAL/RECALL button at anytime stops the
data retrieval process and returns the meter to the nor-
mal measurement mode.
Clearing Stored Readings
1. With the unit ON press and hold the ON/OFF button for
4 seconds
2. When “clr” is shown in the main display the memory is
cleared.

Vinoferm®by Brouwland
Korspelsesteenweg 86 • B-3581 Beverlo - Belgium
Tel. +32-(0)11-40.14.08 • Fax +32-(0)11-34.73.59
[email protected] • www.brouwland.com
4/8
Measurement and Display Considerations
• The DO600 uses a polarographic sensor, which consumes
oxygen at the sensing surface. This requires a con-
stant movement of the sample across the membrane to
maintain a constant dissolved oxygen level. It is recom-
mended that the probe be moved in the sample as the
measurement is made, or if in a laboratory environment,
the sample be stirred using a stir plate.
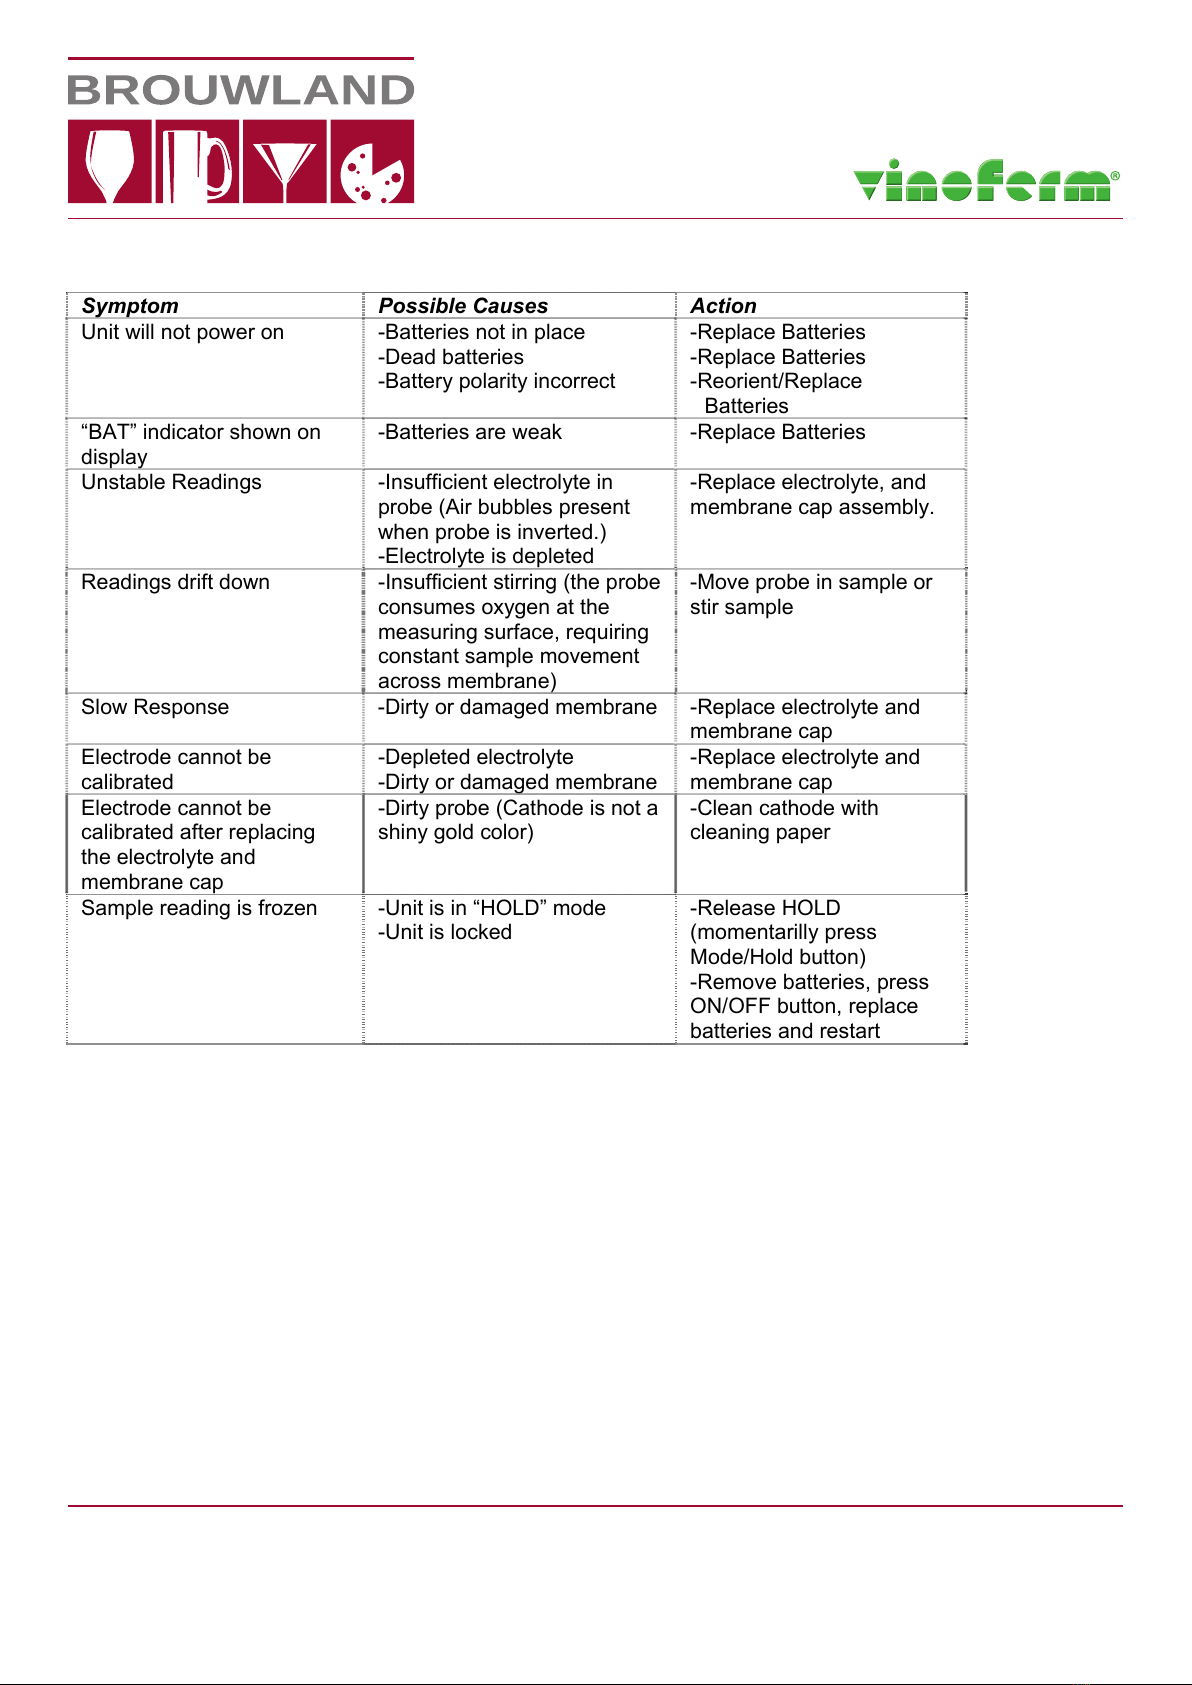
• If the unit appears to be locked (display frozen). It is
possible that the Data Hold mode has been inadvertently
accessed by a press of the MODE/HOLD button (HOLD
will be displayed in the bottom left of the LCD). Simply
press the MODE/HOLD button again or turn the meter off
and back on again.
• If the meter does latch up and no button presses revive
it, remove the batteries and restart.
• For maximum accuracy, allow sufcient time for the tem-
perature of the probe to reach the temperature of the
sample before taking a reading. This will be indicated by
a stable temperature reading on the display.
Maintenance
Battery Replacement
1. Twist off the battery compartment cover.
2. Holding the battery housing in place with a nger, pull
out the battery carrier using the two small tabs.
3. Replace the four (4) CR2032 batteries observing proper
polarit y.
4. Replace the battery carrier, reattach the battery com-
partment cap and tighten securely.
You, as the end user, are legally bound (EU
Battery ordinance) to return all used batteries,
disposal in the household garbage is prohi-
bited! You can hand over your used batteries /
accumulators at collection points in your com-
munity or wherever batteries / accumulators are sold!
Disposal: Follow the valid legal stipulations in respect of
the disposal of the device at the end of its lifecycle
DO600-EU-NL-V7.0-8/10
7
Onderhoud
Vervanging van de batterij
1. Verwijder het deksel van het batterijvak.
2. Houd de batterijbehuizing met een vinger op haar plaats en trek de batterijdrager er
met behulp van de twee kleine lipjes uit.
3. Vervang de vier (4) CR2032 batterijen en let daarbij op de polariteiten.
4. Vervang de batterijdrager, breng het deksel van het batterijvak terug aan en maak het
goed vast.
Sie, als der Endverbraucher, sind gesetzlich (EU Batterie Verordnung) gebunden,
alle gebrauchten Batterien zurückzukehren, ist Verfügung im Haushaltmüll
verboten! Sie können Ihre gebrauchten Batterien / Speicher an
Sammlungspunkten in Ihrer Gemeinschaft übergeben oder wohin auch immer
Batterien / Speicher sind verkauft!
Verfügung: Folgen Sie den gültigen gesetzlichen Bedingungen in Rücksicht der
Verfügung der Vorrichtung am Ende seines Lebenszyklus
Vervanging van de elektrode
1. Om de elektrode te verwijderen, het instrument eerst uitschakelen (OFF) en
vervolgens de elektrodekraag losschroeven en verwijderen. (de kraag naar links
draaien om ze te verwijderen).
2. Schud de elektrode zachtjes heen en weer en trek ze naar beneden tot ze van de
meter loskomt.
3. Om een elektrode te bevestigen, de positionerende "sleutels" op de elektrode en de
behuizing van het hoofdlichaam in lijn brengen en de elektrode vervolgens zachtjes in
de meteraansluiting duwen tot ze goed vast zit.
4. De elektrodekraag voldoende vastmaken, zodat de elektrode goed op de meter
aangesloten is.
Electrode Replacement
1. To remove the electrode, rst turn the instrument OFF
and then unscrew and remove the electrode retaining
collar. (turn the collar counter-clockwise to remove).
2. Gently rock the electrode from side to side, pulling it
away from the meter until it disconnects.
3. To attach an electrode, align the positioning “keys” on
the electrode and the main body housing and then care-
fully push the electrode into the meter socket until it is
fully seated.
4. Tighten the electrode retaining collar rmly enough to
seal the electrode with the meter.
DO Bonded Membrane Cap replacement
Important Note : Do not touch the membrane as skin
oils will interfere with the oxygen permeability rate of the
membrane. Use caution when replacing the bonded cap.
1. It is recommended that the electrode remain attached
to the meter during this replacement process.
2. To remove the bonded cap from the electrode, unscrew
the cap rmly and carefully counter-clockwise from the
electrode (see diagram below).
3. Discard the used cap. Please Note: The installation of a
bonded cap causes the membrane to be tightly streched
over the cathode. Once a bonded cap is removed rein-
stallation is not possible as the membrane will no longer
be properly streched over the cathode.
4. Rinse the old electrolyte solution from the Cathode and
Anode before continuing.
5. Use the supplied Polishing Strips to clean, polish, shine,
and/or remove scratches from the cathode. Be sure to
moisten the cloth before polishing the cathode. Do not
over-polish the sensitive gold cathode.
6. Set the new replacement bonded cap on a at surface.
Leave the cap in this position throughout the replace-
ment process.
7. Fill the bonded cap with the electrolyte solution up to
the bottom of the threads on the inside of the cap.
8. Tap the side of the bonded cap to help jar free any
trapped air bubbles from the electrolyte solution.
9. Keeping the cap in a xed position on a at surface,
carefully insert the electrode into the new bonded cap
by rst dipping and removing the electrode several
times from the cap. With each dip, push the electrode
progressively deeper into the bonded cap. Finally, screw
the electrode slowly onto the bonded cap (clockwise)
until fully tightened. The dipping and removal tech-
nique minimizes the introduction of air bubbles into the
electrolyte solution. Air bubbles in the electrolyte can
compromise measurements.
10. During the tightening of the bonded cap, excess elec-
trolyte solution will leak out, this is normal and desire-
able since it minimizes the introduction of air pockets.
Clean off the excess electrolyte before use.
DO600-EU-NL-V7.0-8/10
7
Onderhoud
Vervanging van de batterij
1. Verwijder het deksel van het batterijvak.
2. Houd de batterijbehuizing met een vinger op haar plaats en trek de batterijdrager er
met behulp van de twee kleine lipjes uit.
3. Vervang de vier (4) CR2032 batterijen en let daarbij op de polariteiten.
4. Vervang de batterijdrager, breng het deksel van het batterijvak terug aan en maak het
goed vast.
Sie, als der Endverbraucher, sind gesetzlich (EU Batterie Verordnung) gebunden,
alle gebrauchten Batterien zurückzukehren, ist Verfügung im Haushaltmüll
verboten! Sie können Ihre gebrauchten Batterien / Speicher an
Sammlungspunkten in Ihrer Gemeinschaft übergeben oder wohin auch immer
Batterien / Speicher sind verkauft!
Verfügung: Folgen Sie den gültigen gesetzlichen Bedingungen in Rücksicht der
Verfügung der Vorrichtung am Ende seines Lebenszyklus
Vervanging van de elektrode
1. Om de elektrode te verwijderen, het instrument eerst uitschakelen (OFF) en
vervolgens de elektrodekraag losschroeven en verwijderen. (de kraag naar links
draaien om ze te verwijderen).
2. Schud de elektrode zachtjes heen en weer en trek ze naar beneden tot ze van de
meter loskomt.
3. Om een elektrode te bevestigen, de positionerende "sleutels" op de elektrode en de
behuizing van het hoofdlichaam in lijn brengen en de elektrode vervolgens zachtjes in
de meteraansluiting duwen tot ze goed vast zit.
4. De elektrodekraag voldoende vastmaken, zodat de elektrode goed op de meter
aangesloten is.

Vinoferm®by Brouwland
Korspelsesteenweg 86 • B-3581 Beverlo - Belgium
Tel. +32-(0)11-40.14.08 • Fax +32-(0)11-34.73.59
[email protected] • www.brouwland.com
5/8
DO600-EU-EN-V7.0- 8/10
7
DO Bonded Membrane Cap replacement
Important Note : Do not touch the membrane as skin oils will interfere with the oxygen
permeability rate of the membrane. Use caution when replacing the bonded cap.
1. It is recommended that the electrode remain attached to the meter during this
replacement process.
2. To remove the bonded cap from the electrode, unscrew the cap firmly and carefully
counter-clockwise from the electrode (see diagram below).
3. Discard the used cap. Please Note: The installation of a bonded cap causes the
membrane to be tightly streched over the cathode. Once a bonded cap is removed
reinstallation is not possible as the membrane will no longer be properly streched
over the cathode.
4. Rinse the old electrolyte solution from the Cathode and Anode before continuing.
5. Use the supplied Polishing Strips to clean, polish, shine, and/or remove scratches
from the cathode. Be sure to moisten the cloth before polishing the cathode. Do not
over-polish the sensitive gold cathode.
6. Set the new replacement bonded cap on a flat surface. Leave the cap in this position
throughout the replacement process.
7. Fill the bonded cap with the electrolyte solution up to the bottom of the threads on the
inside of the cap.
8. Tap the side of the bonded cap to help jar free any trapped air bubbles from the
electrolyte solution.
9. Keeping the cap in a fixed position on a flat surface, carefully insert the electrode into
the new bonded cap by first dipping and removing the electrode several times from
the cap. With each dip, push the electrode progressively deeper into the bonded cap.
Finally, screw the electrode slowly onto the bonded cap (clockwise) until fully
tightened. The dipping and removal technique minimizes the introduction of air
bubbles into the electrolyte solution. Air bubbles in the electrolyte can compromise
measurements.
10. During the tightening of the bonded cap, excess electrolyte solution will leak out, this
is normal and desireable since it minimizes the introduction of air pockets. Clean off
the excess electrolyte before use.
Cathode
Electrode
Bonded Cap
Anode
Air Vents
BONDED CAP
Clockwise to tighten
Counter-clockwise to loosen
Specications
Display 2000 count, Dual function 3 ½ digit LCD with Bargraph,
Display size: 24 mm x 20 mm
Sensor Polarographic type
Membrane Bonded membrane cap with threaded tting
Operating Temp. Range 0 to 50°C (32 to 122°F)
ATC Range 0 to 50°C (32 to 122°F)
Salinity Compensation 0 to 50 ppt in 1 ppt (part per thousand) increments
Altitude compensation 0 to 20,000 ft (in 1000 ft increments)
Measurement Storage 25 tagged (numbered) data sets with recall
Battery Power Four (4) CR2032 button batteries
Low Battery Indication ‘BAT’ appears on the LCD
Auto Power Off After 10 minutes of inactivity (APO override available)
Dimensions/Weight 36 x 173 x 41mm (1.4 x 6.8 x 1.6”); 110g (3.8 oz)
DO600-EU-EN-V7.0- 8/10
8
Specifications
Display 2000 count, Dual function 3 ½ digit LCD with
Bargraph,
Display size: 24 mm x 20 mm
Sensor Polarographic type
Membrane Bonded membrane cap with threaded fitting
Operating Temp. Range 0 to 50°C (32 to 122°F)
ATC Range 0 to 50°C (32 to 122°F)
Salinity Compensation 0 to 50 ppt in 1 ppt (part per thousand) increments
Altitude compensation 0 to 20,000 ft (in 1000 ft increments)
Measurement Storage 25 tagged (numbered) data sets with recall
Battery Power Four (4) CR2032 button batteries
Low Battery Indication ‘BAT’ appears on the LCD
Auto Power Off After 10 minutes of inactivity (APO override available)
Dimensions/Weight 36 x 173 x 41mm (1.4 x 6.8 x 1.6”); 110g (3.8 oz)
Measurement Range Resolution Accuracy
% Saturation 0 to 200.0% 0.1% ±2.0% FS (full
scale)
Dissolved Oxygen
Concentration
0 to 20.00 mg/l 0.01 mg/l ±2% FS
0 to 20.00 ppm 0.01 ppm ±2% FS
Temperature 0 to 50 °C 0.1 °C ±1.0 °C
32 to 122°F 0.1 °F (0 to 99ºF);
1.0 °F (>100°F)
±1.8°F

Vinoferm®by Brouwland
Korspelsesteenweg 86 • B-3581 Beverlo - Belgium
Tel. +32-(0)11-40.14.08 • Fax +32-(0)11-34.73.59
[email protected] • www.brouwland.com
6/8
DO600-EU-EN-V7.0- 8/10
9
Appendices
Troubleshooting Guide
Symptom Possible Causes Action
Unit will not power on -Batteries not in place
-Dead batteries
-Battery polarity incorrect
-Replace Batteries
-Replace Batteries
-Reorient/Replace
Batteries
“BAT” indicator shown on
display
-Batteries are weak -Replace Batteries
Unstable Readings -Insufficient electrolyte in
probe (Air bubbles present
when probe is inverted.)
-Electrolyte is depleted
-Replace electrolyte, and
membrane cap assembly.
Readings drift down -Insufficient stirring (the probe
consumes oxygen at the
measuring surface, requiring
constant sample movement
across membrane)
-Move probe in sample or
stir sample
Slow Response -Dirty or damaged membrane -Replace electrolyte and
membrane cap
Electrode cannot be
calibrated
-Depleted electrolyte
-Dirty or damaged membrane
-Replace electrolyte and
membrane cap
Electrode cannot be
calibrated after replacing
the electrolyte and
membrane cap
-Dirty probe (Cathode is not a
shiny gold color)
-Clean cathode with
cleaning paper
Sample reading is frozen -Unit is in “HOLD” mode
-Unit is locked
-Release HOLD
(momentarilly press
Mode/Hold button)
-Remove batteries, press
ON/OFF button, replace
batteries and restart

Vinoferm®by Brouwland
Korspelsesteenweg 86 • B-3581 Beverlo - Belgium
Tel. +32-(0)11-40.14.08 • Fax +32-(0)11-34.73.59
[email protected] • www.brouwland.com
7/8
DO600-EU-EN-V7.0- 8/10
10
Operational Matrix for the Model DO600
Function /
Resulting Action Power
Status Mode
Setting Required Button Press Sequence Comments
On/Off Any Any Momentary press of the ON/OFF button
Water Saturated
Air Calibration
On Any Place Electrode in Calibration Cap
Press & hold CAL/RECALL button for 2 seconds
Zero Calibration
On Any
Place Electrode in Zero Solution, wait for stability
Press & hold CAL/RECALL button for 2 seconds
Also works with probe
removed
(Cal at zero current)
Store Reading
On Any Momentary press of the MODE/HOLD button
Stores and holds
reading “HOLD”
displayed
Hold Release On While In
Hold Mode Momentary press of the MODE/HOLD button
Enter Memory
Retrieval
On Any
Momentary press of the Cal button followed by a
momentary press of the MODE/HOLD button (w/in 4
seconds)
If no data is stored in
memory, “End” is
displayed briefly, and
then returns to last
mode.
Scroll Stored
Readings On Memory
Recall Momentary press of the MODE/HOLD button
Exit Memory
Retrieval On Memory
Recall Momentary press of the CAL/RECALL
Clear Stored
Memory On
Any
Measure-
ment Mode
Press and hold the ON/OFF button for 4 seconds “clr” is displayed.
Change
Measurement
Mode
On Any
Press and hold the MODE/HOLD button for at least
two seconds (the modes will scroll until the button is
released)
Enter Salinity
Compensation On Any
Press and release the CAL/RECALL button twice
(momentary) in succession (Displays SAL)
Changing Salinity
Compensation On SAL
Momentary press of the MODE/HOLD button (each
button press increases the ratio by 1 ppt (part per
thousand), the value cycles from 0 to 50)
Exit Salinity
Compensation
On SAL
Press and release CAL/RECALL button for 2 seconds
to enter Altitude Compensation, Or
Press and release Cal Button one more time to enter
measurement mode
It is necessary to
press the
CAL/RECALL button
to save changes. If
the unit times out, no
changes are saved.
Enter Altitude
Compensation On Any or SAL
Press CAL/RECALL twice (momentary). Unit enters
Salinity Mode. Press CAL/RECALL for 2 seconds to
enter Altitude Compensation Mode. (Displays Ald)
Unit times out in 5
seconds if no button
is pressed, reverts to
previous mode.
Changing Altitude
Compensation On Ald
Momentary press of the MODE/HOLD button(each
button-press increases altitude by 1,000ft, the value
cycles from 0 to 20)
Exit Altitude
Compensation
On Ald
Momentary press CAL/RECALL button to exit and
save changes.
It is necessary to
press the
CAL/RECALL button
to save changes. If
the unit times out, no
changes are saved.
Change
Temperature
Units
Off n/a (off
mode)
Press and hold the CAL/RECALL button then
momentarily press the ON/OFF button. Release the
CAL/RECALL button after the "SELF CAL" lights
Override
Autopower Off On Any
Press CAL/RECALL button (momentary) then
simultaneously press and hold the MODE/HOLD and
ON/OFF buttons for for 2 seconds.
Default Reset Off n/a (off
mode)
Simultaneously press ON/OFF, CAL/RECALL and
MODE/HOLD momentarily. “dFLt” will be displayed.

Vinoferm®by Brouwland
Korspelsesteenweg 86 • B-3581 Beverlo - Belgium
Tel. +32-(0)11-40.14.08 • Fax +32-(0)11-34.73.59
[email protected] • www.brouwland.com
8/8
DO600-EU-EN-V7.0- 8/10
10
Operational Matrix for the Model DO600
Function /
Resulting Action Power
Status Mode
Setting Required Button Press Sequence Comments
On/Off Any Any Momentary press of the ON/OFF button
Water Saturated
Air Calibration
On Any Place Electrode in Calibration Cap
Press & hold CAL/RECALL button for 2 seconds
Zero Calibration
On Any
Place Electrode in Zero Solution, wait for stability
Press & hold CAL/RECALL button for 2 seconds
Also works with probe
removed
(Cal at zero current)
Store Reading
On Any Momentary press of the MODE/HOLD button
Stores and holds
reading “HOLD”
displayed
Hold Release On While In
Hold Mode Momentary press of the MODE/HOLD button
Enter Memory
Retrieval
On Any
Momentary press of the Cal button followed by a
momentary press of the MODE/HOLD button (w/in 4
seconds)
If no data is stored in
memory, “End” is
displayed briefly, and
then returns to last
mode.
Scroll Stored
Readings On Memory
Recall Momentary press of the MODE/HOLD button
Exit Memory
Retrieval On Memory
Recall Momentary press of the CAL/RECALL
Clear Stored
Memory On
Any
Measure-
ment Mode
Press and hold the ON/OFF button for 4 seconds “clr” is displayed.
Change
Measurement
Mode
On Any
Press and hold the MODE/HOLD button for at least
two seconds (the modes will scroll until the button is
released)
Enter Salinity
Compensation On Any
Press and release the CAL/RECALL button twice
(momentary) in succession (Displays SAL)
Changing Salinity
Compensation On SAL
Momentary press of the MODE/HOLD button (each
button press increases the ratio by 1 ppt (part per
thousand), the value cycles from 0 to 50)
Exit Salinity
Compensation
On SAL
Press and release CAL/RECALL button for 2 seconds
to enter Altitude Compensation, Or
Press and release Cal Button one more time to enter
measurement mode
It is necessary to
press the
CAL/RECALL button
to save changes. If
the unit times out, no
changes are saved.
Enter Altitude
Compensation On Any or SAL
Press CAL/RECALL twice (momentary). Unit enters
Salinity Mode. Press CAL/RECALL for 2 seconds to
enter Altitude Compensation Mode. (Displays Ald)
Unit times out in 5
seconds if no button
is pressed, reverts to
previous mode.
Changing Altitude
Compensation On Ald
Momentary press of the MODE/HOLD button(each
button-press increases altitude by 1,000ft, the value
cycles from 0 to 20)
Exit Altitude
Compensation
On Ald
Momentary press CAL/RECALL button to exit and
save changes.
It is necessary to
press the
CAL/RECALL button
to save changes. If
the unit times out, no
changes are saved.
Change
Temperature
Units
Off n/a (off
mode)
Press and hold the CAL/RECALL button then
momentarily press the ON/OFF button. Release the
CAL/RECALL button after the "SELF CAL" lights
Override
Autopower Off On Any
Press CAL/RECALL button (momentary) then
simultaneously press and hold the MODE/HOLD and
ON/OFF buttons for for 2 seconds.
Default Reset Off n/a (off
mode)
Simultaneously press ON/OFF, CAL/RECALL and
MODE/HOLD momentarily. “dFLt” will be displayed.
DO600-EU-EN-V7.0- 8/10
11
Re-order and Accessory Information
Part Number Description
DO600 ExStik II Dissolved Oxygen Meter
DO605 Replacement Probe, ExStik II Dissolved Oxygen Meter
DO603 Membrane Kit for DO600
Contains: 6 Membrane Caps, 15 mL Filling Solution, Polishing Paper
EX010 Extension Cable 3 feet (1 Meter) & Probe Weight
EX050 Extension Cable 16 feet (5 Meter) & Probe Weight
DO610 ExStik II DO/pH/Conductivity Meter Kit
Contains: EC500 pH/Conductivity/Salinity/TDS ExStik II Meter, DO600
Dissolved Oxygen ExStik II Meter, Single use pH buffer pouches 4, 7,
and 10pH, Sample Cups with Cap, Weighted Base for Sample Cups, and
Batteries, all packed in a Carrying Case
CA895 Small Soft Vinyl Pouch with Belt Loop for ExStik and ExStik II
Copyright © 2010 Extech Instruments Corporation.
All rights reserved including the right of reproduction in whole or in part in any form.
Table of contents
Other Brouwland Measuring Instrument manuals
Popular Measuring Instrument manuals by other brands

Spot-on
Spot-on TDR instructions

Blue Technix
Blue Technix Argos3D-P220 Hardware user manual

B+K precision
B+K precision 8550 Series user manual

Blackmagicdesign
Blackmagicdesign HyperDeck Extreme Control Installation and operation manual

Promax
Promax MR-275 user manual

Procom
Procom REX Series installation guide