Bruce Goldsmith Design SNUG User manual

1
SNUG-manual-EN-1-6 July 2019Version 1.6 July 2019

3
SNUG-manual-EN-1-6 July 2019
SNUG Owner’s Manual
RECREATIONAL HARNESS
Welcome to BGD
Thank you for choosing BGD. We hope you will enjoy your new SNUG harness as much as we do. Our mission is to build
paraglidingproductswithpersonality:exceptionalequipmentwiththerenedhandlingandinnovativequalitiesthat
BGD has become renowned for. We love the feeling of being connected to the air through our wings, and our products
aredesignedwiththatinmind.Ourgoalistomakeproductsthatpilotslovetoy.
Safety
Please read this manual from beginning to end before using your SNUG harness. Paragliding is a potentially dangerous
sport that can cause serious injury including bodily harm, paralysis and even death. Inappropriate use or abuse of your
equipmentwillincreasetheserisks,andanykindofmodicationtotheharnessinvalidatesthecertication.
The SNUG harness and its back protector conform to the testing criteria of the EN 1651:199 & LTF 2.
Please note that no protector can offer 100% protection against injuries, and in particular, the back protector can not
be guaranteed to prevent injuries to the spine. The SNUG’s protector is removable. It can only offer protection if it is
correctlypositionedandxedwiththeVelcro.Theprotectorshouldnotbeusedintemperaturesexceeding40°Cor
below-20°C.
You take exclusive responsibility for all risks associated with the use of the harness. Any liability claims resulting from
use of this product towards the manufacturer, distributor or dealers is excluded.
Itisimportanttocompleteathoroughdailyandpre-ightinspectionofallofyourequipment.Neverattempttoy
with unsuitable or damaged equipment. Always use the appropriate safety equipment including a reserve, helmet,
Welcome

4
SNUG-manual-EN-1-6 July 2019
glovesandboots.Besuretohavetheappropriatequalicationforyouractivityintherespectivecountry,andthird
party insurance. Fly safely, don’t take unnecessary risks and most importantly, have fun!
Welcome

5
SNUG-manual-EN-1-6 July 2019
Description
The SNUG is a high-quality recreational harness suitable for all genres of paragliding. It is optimised for versatility and
comfort, and has a semi cross-brace system that allows the pilot to adjust feedback and wing authority by tightening
or loosening the chest strap.
The SNUG has an 18cm foam back protector, and our reliable EASY EXIT underseat reserve deployment system. A
Cordura 500D reinforced skid guard protects the base of the harness in the event of a skid landing, and the Elastic
Speed Keeper keeps the speed bar neatly stowed when you are not using it. The SNUG is available in three sizes.
Bruce’s notes
I always wanted a harness that I don’t feel. In the beginning, harnesses were divided into two categories: standard
harnesses and ABS or cross-braced harnesses. The standard harnesses connected the pilot almost directly to the
risers making them very unstable. It was too radical for occasional pilots. The fully cross-braced harnesses were too
restrictive – pilots couldn’t feel an imminent collapse coming. The SNUG is my perfect balance. With the semi cross-
brace system I feel seamlessly connected to my wing, yet stable enough to relax.
Target
XC, training, acrobatics, soaring, wagga, vol-biv, sledge rides, tandem passengers – the SNUG harness is built to
takeonthefullspectrumofaerialfree-yingdisciplines.Takenthroughthewringerbyourtestjunkies,theSNUGis
adurable,comfortableandverysafeharness.BrucelovesyingitXC,Anttakesittumbling,andTyrgrabsitfora
gentle sled ride down to the beach. If you only want one harness in your kit, this should be it.
Introduction
Introduction

6
SNUG-manual-EN-1-6 July 2019
Water safety
We do not recommend using the SNUG over open bodies of water without proper safety equipment including but
not limited to a life jacket (with collar), a safety boat and driver (engine running and in communication), and an SIV
instructor.
After a water landing you should remove the reserve parachute and back protection and allow everything to dry. If
you land in salt water it is necessary to thoroughly clean the harness and all parts with fresh clean water ensuring that
all traces of salt are removed. Before reassembly make sure that the harness and all components are completely dry.
IMPORTANT: In the case of a water landing, the natural buoyancy of the back protection can cause the pilot to be
turned face down in the water. It is recommended to immediately undo all straps and swim away from the harness
taking care to not become entangled within the lines.
Towing
The SNUG is suitable for towing. The tow bridles should be attached to the main karabiners, if you have any doubts
askaqualiedtowinginstructororrefertotheoperatinginstructionssuppliedwithyourtowreleasesystem.
Recycling
Weallhavearesponsibilitytolookaftertheenvironmentandprotecttheplacesinwhichwey.Whentheharness
comes to the end of its useful life, remove all the metal parts and dispose of the rest in an appropriate recycling
facility.
Introduction

7
SNUG-manual-EN-1-6 July 2019
Features
Features
Reserve bridle
attachments
Lumbar adjustment
Storage pocket
Foam back protector
Shoulder adjustment
Main suspension points
Chest and leg buckles
Speed system pulley
and guide
Speed bar retainer
Integrated reserve
pocket
Magnetic keeper – should
beOPENinight

8
SNUG-manual-EN-1-6 July 2019
Reserve Parachute Installation
Werecommendthataqualiedprofessionalshouldalwaysperformtheinstallationandre-packingofthereserve
parachute.
The reserve pocket on the SNUG is suitable for reserve parachutes up 7,500cm3volume.
If it is not possible to connect the harness reserve handle to the loops on the parachute deployment bag inside the
pocket, please consult your supplier who may be able to supply an alternative deployment bag. Loops can be sewn at
anappropriateplaceonanydeploymentbag,butonlyaqualiedpersonshouldcarrythisout.
WARNING!
After installation of a reserve parachute in the harness, it is absolutely essential to do a simulated deployment under a
static swing, ensuring that the parachute release system operates correctly and the parachute comes out easily. The
cords which close the reserve pocket must be checked regularly. If the cord is worn, it must be replaced. Each time a
reserve parachute is installed, check that the cord is in good order by applying a load of 10kg.
Beforeeachight,checkthattheplasticrodsandhandlearelocatedcorrectly.
The magnetic keeper on the reserve handle helps keep the reserve handle in place for transportation. It should be
openedforight,tomakeiteasiertothrowthereserveifnecessary.
Reserve Parachute
Installation

9
SNUG-manual-EN-1-6 July 2019
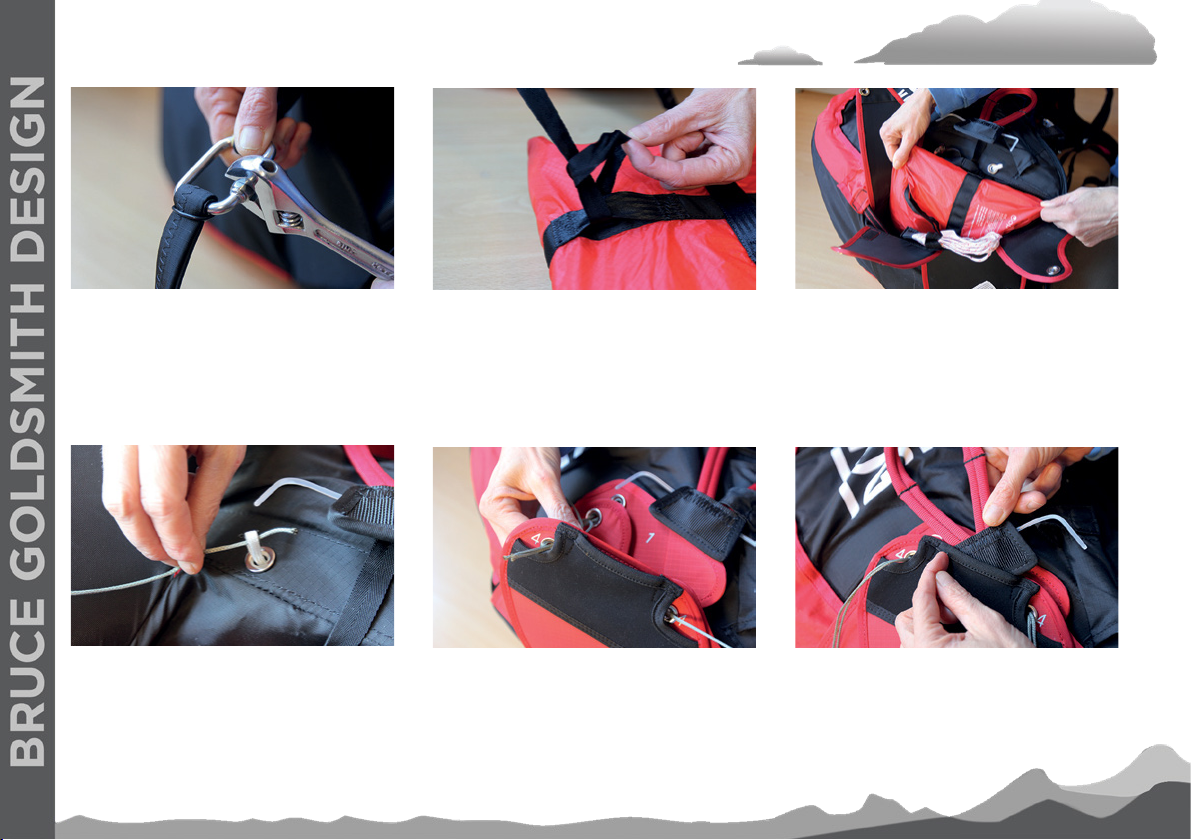
Connect the reserve handle to the
reserve with a larksfoot knot to the
middle loop on a side. Ensure that
the strap is long enough to allow the
plasticrodstobepulledoutrst.
Using the lines provided (located in the rear pocket), thread both eyelets in
sequence using the printed numbers for guidance.
Insert the reserve with the handle
attachment facing the seat board and
the lines straight underneath.
Attach the harness bridles to the
parachute’s bridle using a suitable
connector (not supplied).
Reserve Parachute
Installation
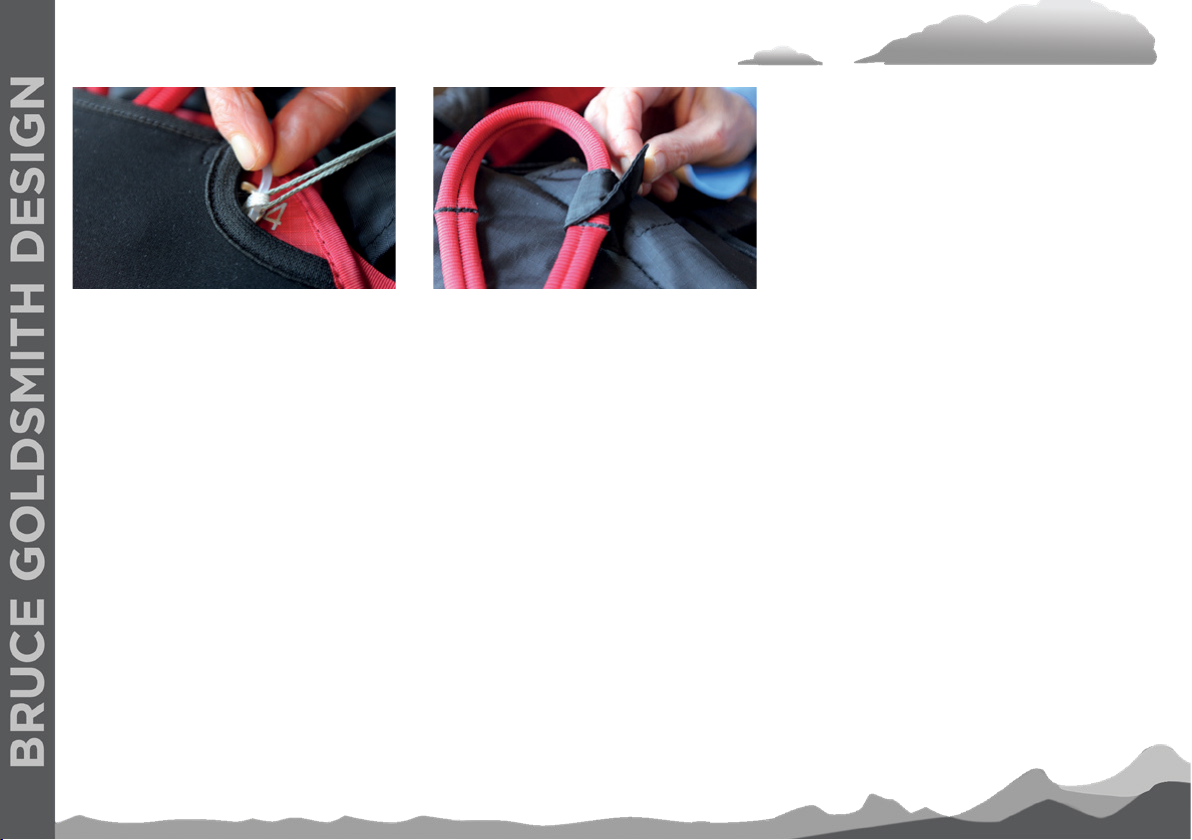
Put the handle inside the neoprene
cover.

10
SNUG-manual-EN-1-6 July 2019
For transportation only,* attach the
retaining strap with the magnetic
keeper.
Thread both plastic rods all the way
into the loops.
Reserve Parachute
Installation
*Theretainingstrapwiththemagnetickeeperisfortransportationoftheharnessonly.Leavingitinplacewhileying
means there is a risk that you could grab the keeper along with the handle and be unable to throw the handle.
Make sure you perform a practice throw from a static hangpoint. Not only does this ensure the correct functioning of
your deployment system, but it also allows you to become more familiar with the installation process.
Please note, the parachute can only be deployed with the right hand.

11
SNUG-manual-EN-1-6 July 2019
Throwing the reserve
Grab the handle and pull it away from the harness. Pull the reserve out of its pouch.
If you are using the reserve in distress in most cases you should throw the reserve away from your glider, harness, and the
ground.

12
SNUG-manual-EN-1-6 July 2019
Attaching the speedbar
4
The SNUG has an elasticated speedbar retainer, which automatically keeps the bar tidied away against the base
oftheharnesswhennotinuse,withnoddlyVelcrostraptoattachandreattach.Hiddenunderneaththeseatisa
pulley system on the elastic, that ensures the bar can be pushed easily to its full extension, and when the pressure
is released, it springs back into place against the harness base. There is a plastic adjuster (A, on the photo below) to
enable the pilot to set the bar’s stowed position a little bit away from the harness base if preferred, as some pilots
ndthismakesiteasiertocatchthespeedbarwiththefootwhenitisneeded.
Whenyourstreceiveyourharness,youneedtoattachthespeedbar,whichisdoneasfollows:
Thread the line through the pulley (1), then through the pastic tubing above the reserve handle (2). It then passes
throughthemetalloop(3)beforebeingtiedsecurelytothespeedbar,(4).
2
3
A
1 2
A4
3

13
SNUG-manual-EN-1-6 July 2019
Use
Initial harness set-up
BeforeyouywithyourSNUG,werecommendyoushouldhang it in a static swing and adjust it to achieve the best
tandangleofinclineforyou,andfamiliariseyourselfwiththevariousadjustmentsandthepositionofthereserve
handle. Stow your usual gear in the harness back to closely simulate how the harness will feel in the air.
Lumbar adjustment
The lumbar adjustment adjusts the incline of the harness. Please note that a more reclined position reduces the
stability of the harness and potentially increases the risk of twisting under the wing.
Shoulder strap adjustment
Adjusttheshoulderstrapstot,soyouarecomfortableinbothyingandstandingpositions.Thestrapsmayappear
loose while in the seated position but some play is required to avoid excessive strap pressure in the standing position.
Chest strap adjustment
With an auto balance system or ABS, the pilot can adjust the roll stability of the harness to their own preferences. If the
chest strap is tightened, the roll stability of the harness is increased; loosening the chest strap decreases the roll stability.
Speed system adjustment
Getanassistanttoholdtherisersupinayingpositionforyou.Thespeedsystemshouldbeadjustedtothecorrect
length so that when there is no pressure on the bar, the speedbar line does not have any effect on the risers. With
Use

14
SNUG-manual-EN-1-6 July 2019
your feet on the speedbar and legs fully extended, the riser pulleys should touch.
Ensure the accelerator line does not run through the reserve handle. The accelerator line should run inside the tube
just above the reserve handle.
Attachment to the Wing
Attach the wing’s risers to the karabiners at the main suspension points. The A-risers should face forwards. Attach
the brummel hooks of the speedbar to those on the paraglider’s risers.
Pre-ight checks
Werecommendperformingthefollowingpre-ightchecksbeforeeveryight.
• Check the karabiners, and make sure that the twist-lock system closes them automatically.
• Check the harness buckles. They should lock automatically.
• Check that the reserve handle and the plastic rods are in the correct position.
• Ensure that there are no twists in the lines and risers that connect the harness to the glider.
• Check chest, side and shoulder strap adjustments.
• Ensure that all buckles are locked.
Use

15
SNUG-manual-EN-1-6 July 2019
Fitting the harness
Beforeyingitisimportanttoadjusttheharnesssothatyoucaneasilyassumeasittingpositionwhenairborne.
1. Put the harness onto your shoulders.
2. Fasten the leg buckles, and then the chest strap buckle.
3. Push the leg straps down as far as possible towards the knees, and then tighten them (if the leg straps are
toohigh,itisdifculttogetintotheharnessafterthetake-offwithoutusingyourhands).
4. If necessary, adjust the shoulder straps (the shoulder strap adjustment depends on the size of the pilot; not
too tight as some free movement is required so that you can run easily).
5. Checkthatthelumbarstrapsareadjustedforthepreferredpositioninight.
6. Check that the chest strap is pre-adjusted correctly.
Ensure that the leg straps and the chest strap buckles are fastened correctly (closing the buckles incorrectly is a
common cause of accidents).
Landing
When you are setting up for your landing approach, we recommend repositioning yourself from the sitting position to
the upright position early enough to allow for sudden loss of height on approach. If you have a landing that is not on
your feet, and that impacts the harness’ back protection, we recommend a full revision should be performed on the
harnessbyatestcentre,orBGDGmbH.
Use

16
SNUG-manual-EN-1-6 July 2019
Maintenance / Inspection
Proper maintenance of the SNUG will maximize its longevity.
• Avoid excessive exposure to UV, heat and humidity
• Always ensure the harness is completely dry before packing it away
• Always store it in a cool, dry environment
• Never drag your harness over the ground
• Keep your harness clean of dirt, oils and any corrosive substances
• If necessary, the harness may be cleaned using mild soap and a soft brush
Replacement parts can be ordered from your BGD dealer.
Routine inspections of all of your equipment is vitally important for your safety. BGD recommends a service interval
of24monthsinadditiontotheusualpre-ightchecks.
For inspection, visually check the stitching, webbing and all structurally important areas. Pay particular attention to
the webbing around the hangpoint area under the karabiners, as this is where abrasion is most likely.
For the back protector, pay particular attention to all of the stitching, to the outer material, and the thickness. The
protectorshouldnotremainsquashedordeformedanditsthicknessshouldnotbelessthan140mm.
Maintenance / Inspection

17
SNUG-manual-EN-1-6 July 2019
Ifyoundanydamageorifyouareinanydoubt,makesuretheharnessischeckedbyaprofessionaloraskus.
Any damaged parts should be repaired or replaced by the manufacturer. Any repairs performed by anyone other
thanthemanufacturerwilldeemtheharnessuncertied.
We recommend the karabiners should be replaced every 5 years.
These karabiners should never be used for anything other than paragliding (climbing, towing, etc).
The zip fasteners should be lubricated from time to time, using a silicone spray.
If your harness gets wet, it is advisable to treat your automatic buckles and karabiners with silicone grease.
Maintenance / Inspection

18
SNUG-manual-EN-1-6 July 2019
Specications
S M L
Pilot’s height (cm) 150-170 160-185 175-200
Board width (cm) 32.5 34.9 37
Seat board depth (cm) 34.5 36.8 39
Suspension points height (cm) 40 45 48
Chest strap range (cm) 38-43 40-46 43-49
Harnessweight(kg) 3.2 3.3 3.5
Certication EN/LTF/CE EN/LTF/CE EN/LTF/CE
Specications

19
SNUG-manual-EN-1-6 July 2019
Guarantee
BGDGmbHtakesthegreatestcareindesignandproductionofitsproductsandproudlyofferstwoyearsor200
hours’ warranty, from the date of purchase, against manufacturing defects.
InordertoenjoythebenetsoftheBGDwarranty,youarerequiredtocompletethewarrantyformonthewebsitein
the‘Warranty’sectionwithin14daysofpurchase.Onlyafullycompletedwarrantyformwillbeacceptedtovalidate
this warranty.
Inordertosettleawarrantyclaim,BGDmustbenotiedimmediatelyinwritingafterthediscoveryofadefect,
and the affected product must be sent to BGD for inspection. BGD will then decide how a possible fault should be
rectied,eitherthroughrepair,replacementofpartsorreplacementoftheproduct.SolelyBGDoranagreedservice
centre should undertake repair or replacement of the damaged parts. If unapproved third parties undertake repair
work, there will be no entitlement to compensation under this warranty. The owner is not entitled to replacement
equipment during the warranty claim.
Some degradation of materials due to wear and tear is to be considered normal and will be excluded from claims.
Claims due to careless or incorrect use of the product including accidents, inadequate maintenance, unsuitable
storage, damage by solvents, fuel, chemicals, sand or seawater, overloading, exposure to extreme temperatures, or
prolonged sun exposure and colour fading are also excluded.
The claim for warranty service exists solely between the original purchaser of the equipment and BGD. The warranty
obligations only apply to private sport and leisure time activities, not for use for commercial purposes. If you are
unsure about any information contained in this manual, please contact your BGD dealer.
YoucanndfurtherinformationaboutBGD,theSNUG,oranyofourproductsonourwebsite,orfeelfreetocontact
anyofourworldwideBGDteam.BGDGmbHAmGewerbepark11,9413St.Gertraud,Austria.
Guarantee

20
SNUG-manual-EN-1-6 July 2019
manufacturer
EN test reference no.
LTF test reference no.
certification date
integrated parachute container
max. load
periodic inspection due after
date of manufacture
Bruce Goldsmith Design GMBH
PH 135.2015
GZ 135.2015
23.04.2015
yes
100 kg
2 years
EN 1651:199 & LTF 2. DV LuftGerPV §1, Nr. 7 c
conformity standards carried out by:
Air Turquoise SA
Rte du Pre-au-Comte 8
CH-1844 Villeneuve
Serial no.
Size :
ENSURE THAT YOU READ THE USER MANUAL BEFORE USING THIS HARNESS
Am Gewerbepark 11, 9413 St. Gertraud, Austria
30C
SNUG PARAGLIDING HARNESS
Certication labels
Certicationlabels
The SNUG harness and its back protector conform to the testing criteria of the EN 1651:199 & LTF 2. DV LuftGerPV §1,
Nr. 7 c
ConformitystandardswerecarriedoutbyAirTurquoiseSA,RteduPre-au-Comte8,CH-1844Villeneuve.
Other manuals for SNUG
1
Table of contents
Other Bruce Goldsmith Design Accessories manuals
Popular Accessories manuals by other brands

SENSIRION
SENSIRION SCD4 Series Handling instructions

bumprider
bumprider Ride-on Board +Sit instructions

Dometic
Dometic CFX3 25 Short Operating Manual

Zoom
Zoom U-24 Operation manual

PCB Piezotronics
PCB Piezotronics IMI SENSORS TO640B11 Installation and operating manual

FlexiForce
FlexiForce LiftMaster 773E manual