Brunetti XL REVO LTD User manual

By reading this manual you will deeply know the device you bought and will have the chance
to fully experience its potential. Our sets are handmade. This is why you could find some
sound and structural differences. This testifies the handmade making of the product.
OWNER❜S MANUAL
Personal S/N


POWER OUTPUT: 70W AB class or 15W AB class (Powerlimit®)
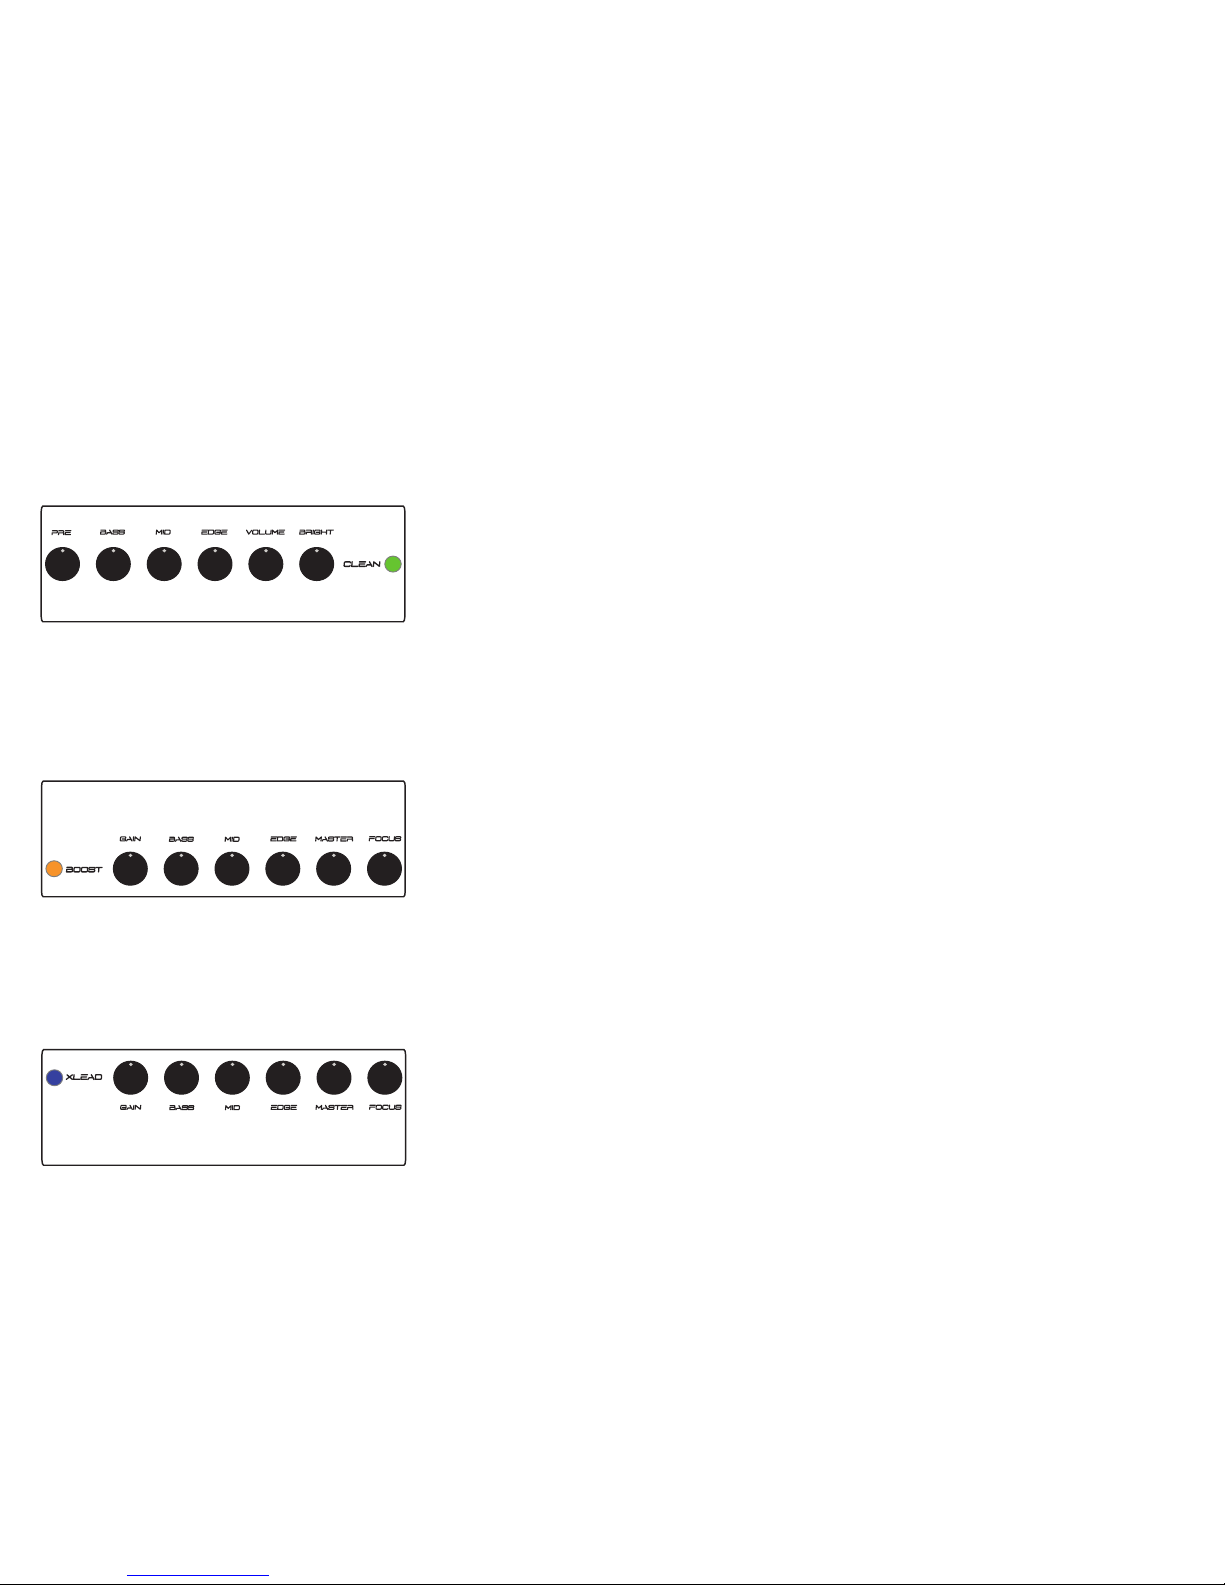
CHANNELS: 3 (Clean - Boost - XLead) totally separated
CHANNEL SWITCH: manual, footswitch (included), MIDI
EFFECTS LOOP: send/return for rack and stomps
PRE OUT: additional output for external amps or rack systems (2Vrms/10K)
POWERLIMIT®: 70W/15W manual switch wich operates on the power stage
TUBES: 5 x 12AX7 / 2 x 6550 (2 x KT88)
STRUCTURE: Chassis and iron/stinless steel laser cut panels
ELECTRONICS: WIMA “Red Series” MKP capacitors, sealed relays, low noise film resistors
OVERALL DIMENSIONS: 720 x 250 x 230 mm. Weight: ~20Kg
POWER CONSUMPTION: ∼200VA. HT Fuse: T500mA. Power Fuse: T1,6A
BOX CONTENT: power cable, channels switch, owner’s manual, waterproof cover
SPECIFICATIONS
Brunetti celebrates 15 years from the first XL, one of our flagship
products, by offering a limited edition in 50 pieces! XL R-EVO LTD is
an updated and customised version of the valued XL R-EVO amp.
The changes include the latest developments in technology
made by Brunetti to improve an excellent amp.
The final stage is equipped with two powerful 6550 tubes (or KT88), an echo
of sounds bound to amps that made the history of rock, with a total maximum
power of 70 W. You can find the innovative Powerlimit®function which reduces
the maximum power to 15 W modifying the final stage operating mode.
Other improvements concern the effects loop, for stomps
and rack systems, and the XLEAD channel revised to obtain
a different and more versatile timbre shape!
XL R-EVO LTD is hand made with great care as of the best
italian craft tradition. Every piece has been properly tested and
experimented for the professional use which is devoted to.
Before use, we recommend the reading of all suggestions and
notes included in this manuals to deeply know your amp. You can
disclose its personality and appreciate its flexibility. Please, pay
attention to instructions to avoid damage to people and things.
Switch MAIN…ON!
CONGRATULATIONS ON YOUR CHOICE!

CLEAN channel controls
POWERLIMIT®switch.
It operates on the final
stage power from full
(70W) to 1/5 (15W)
Power controls:
POWER (MAIN)
STD/BY (STANDBY)
Tubes protection fuse. It works
on high voltage. T 500 ma
WARNING!!
If the fuse burns there is something
wrong. Please, contact our support
LED buttons to select channels
and MIDI programming
XLEAD channel controls
Power Amp controlsInstrument input BOOST channel controls
XL R-EVO LTD is equipped with three totally separated channels: a transparent clean especially studied to support high gain levels, a versatile and
dynamic crunch (BOOST) which ranges from semi-clean to high distorted and compressed timbre levels, and a lead (XLEAD) very british style and
directly derived from the BOOST channel. It is very sensitive to touch but also aggressive and violent if you wish!
Each channel has its own separated equalizer and its controls allow you to work on the entire range of available frequencies. Each channel could
be selected by “soft” light buttons very useful to set the MIDI switching too. In this case the pedalboard must be switched off, you can use any MIDI
pedalboard connected to the rear panel MIDI IN input.
You can select the PowerLimit®function by the POWER AMP switch. This would operate directly on the final stage reducing the power to 1/5 of the
maximum power. This is a manual switch and it works on all channels. It interacts too with the VOLUME control and allows to double the potential of
timbre.
FRONT PANEL
PRE/GAIN: controls the preamp gain
BASS: controls low frequencies (100Hz)
MID: controls medium frequencies (1000Hz)
EDGE: controls high frequencies (10000Hz)
VOLUME/MASTER: controls the channel level
BRIGHT: controls brightness (5000Hz)
FOCUS: controls definition (3000Hz)
VOLUME: controls the output level of the power-amp stage
DEPTH: controls “depth” of sound

XLEAD
BOOST
CLEAN The CLEAN channel on XL R-EVO LTD has a well defined and balanced sound on medium frequencies,
with several uses. The controls allows you to obtain different timbre combinations.
It is possible to set out a low regulation of the PRE control to find a dry and defined sound.
While selecting higher values sound becomes fatter and crunchy according to the dynamics of
your way to play the instrument. BRIGHT function is progressive, this trick offers a great control
of brightness that aims to balance the sound according, for example, to the pickups used. The
VOLUME control operates on the channel level and on the signal level to send to effects loop. If
you set out a low VOLUME of the channel and a high VOLUME on the final stage you obtain a very
linear and dynamic sound, otherwise you obtain a more compressed sound with more sustain.
The BOOST channel of XL R-EVO LTD is very particular because of its encircling and fat sound with
a great harmonics reaction, which gives a unique compactness to timbre.
Equalization is completely independent from other channels and, here too, is very versatile. The
channel is the best for rhythmic phrasing, but it could go further to sound very rich in terms of
gain. The GAIN control is very progressive: you can pass from a light crunch to a great distortion
directly connected to the CLEAN channel.
The FOCUS function allows to readjust timbre operating on medium-high frequencies and improving
the sound return (lightening the sound) according to the volume you are playing at.
The XLEAD channel of XL R-EVO LTD is a real sound barrier.
It is modern, but you can find british style shades thanks to the refining of this limited edition. This
is the channel which underwent the most of changes.
The gain is not so higher than the BOOST channel, but the medium-high and high frequencies are
emphasized to stress a solo or rythmics that need more incisiveness.
The two distortion channels of XL R-EVO LTD could be used according to the sound you want to
obtain without been bound by BOOST channel for accompaniment and XLEAD for solos.

POWER AMP STAGE
On the final stage XL R-EVO LTD is equipped with two controls: VOLUME and DEPTH.
VOLUME is a potentiometer which operates on output general volume. The control is
progressive and easy to use, so you can change volume to adapt it to small places.
DEPTH controls the thickness of sound improving the low and medium-low frequencies. The
POWER AMP control is useful to reduce power on the final stage from 70W to 15W through
PowerLimit®function.
You can find also the start switch STD/BY (HT supply) and POWER (general supply) and the
HT fuse.
Before power-on, check the correct connection to a speaker; to start the device lift the
POWER switch and wait for 30 seconds. Then lift the STD/BY switch which gives power
to the tubes with high voltage (protected by HT FUSE).
XL R-EVO LTD is equipped with this brand new function which allows you to choose between two different power options on the final stage: 70W and
15W. This change influences the functioning class too but in the XL R-EVO LTD it is always AB (with differences in voltage supply of the tubes), both
at 70W and 15W. The amp is more sensitive at 15W than at 70W increasing compression when you are stronger in playing.
PowerLimit®is a brand new system of tubes-supplied power reduction on the final stage of the amp. It operates through a changing of the tubes’
internal configuration decreasing power up to 1/5 of the maximum value.
This system is equipped with some interesting clever devices and it does not limit power dispersing the excess through leakage resistances or similar,
but it forces tubes to give the best at low power and covering the frequency if necessary according to the hearing. So, it is a “shaping” method studied
by Marco Brunetti to reduce the amp general sound pressure but preserving the timbre qualities.
There are several advantages from the possibility to play in different conditions simply adapting the output volume of the amp without an intervention
on the equalization, to the full exploitation of the final power, distorting it if necessary and reaching each sound shade.
Available power options:
HIGH: 70W push-pull, AB class, tetrode
LOW: 15W push-pull, AB class, tetrode
POWERLIMIT®

Power input and general protection
fuse T1, 6A (+ spare part)
WARNING!!
If the fuse burns there is something
wrong. Please, contact our support
The fuse MUST BE type T (delayed)
Label that indicates serial
number and nominal voltage
Output impedance
selector
Select the right value
in conformity with the
speakers connected
Speakers connectors (parallel).
Use only suitable power cables!!
Switching connectors.
MIDI IN connector supplies phantom
power through pin 1 and 7 to pedalboards
connected through a 7 poles power cable.
Don’t connect the footswitch to MIDI IN
input!! The device could be damaged.
This section is
for serial-parallel
Effects Loop
PRE OUT connector.
Use only rack effects or
additional power amp
WARNING!!
Please refer to the manufacturer for all repairs and tubes replacement to insure the correct working
of the preamplifier. It does not exist service centres licensed by Brunetti Marco & C. The manufacturer
declines all responsibility for malfunctioning due to assistance not provided or authorized by Brunetti & C.
WARNING!!
The tubes 12AX7/ECC83 are long-lasting. Replace them only if necessary and with identical
or equal models and choose only high quality products (SINO China, TAD, Tung-Sol).
REAR PANEL

STOMP
EFX
OUT IN
WETDRY
0% 100%
Volume IN
Volume OUT
PRE OUT is a preamp output which could be used to send the preamplified signal to an external
power amp with its own cabinet, to a triamping system, to a tuner or a rack multieffects.
SEND is the preamp output to send signals to the input of an external effect unit. It has been
conceived to use both stomp effects and rack unit effects with the best sound results.
RETURN is an input which brings the signal to the final power amp of the head. The signal
processed returns in this connector from the output of the effects unit and it could be mixed with
the original sound of the amp thanks to the MIX% control. It is also possible to connect an external
preamp to the RETURN using just the final stage of the XL R-EVO LTD.
For all connections in the EFX LOOP section, use only very short shielded cables of high quality.
Whatever effect will modify the original timbre of the amplifier depending on the quality of the
system you use.
Connect only modulation effects to the loop, like chorus, flanger, delay, reverb, etc. to obtain the
best sound performance. Modulation pedals are normally equipped with a Level or Mix control to
be adjusted according to how much effect you want to add.
Do not use overdrive/distortion stomps in the effects loop.
EFFECTS LOOP USE
MIX% control could be set to obtain:
–No effect, on 0%;
–Parallel Loop, for example on 60%. This indicates 60% of
the effect (wet) and 40% of direct sound (Dry);
–Serial Loop, on 100%.
SEND and PRE OUT levels depend on MASTER/VOLUME
controls levels (position) on each of the three channels.
STOMP EFFECTS
Do not reach too high volumes
levels on a single channel to avoid
saturation with the signal passing
through SEND.
RACK EFFECTS
When you connect a rack unit leave out the direct signal (Dry) from
the effect and mix the preamp sound (Dry) with effect (Wet) using the
MIX% control according to your taste. The IN volume of the effect
must be adequate to the real volumes you reach with your preamp
checking that the signal sent by SEND does not saturate the effect.
To achieve a good balance between volume and the quantity of the
effect you have to adjust the volume OUT of the effect too.

MODULATION
Input Signal Output Signal
EFX
Output Signal
Input Signal
EFX
FILTER
DIRECT=0%
GUITAR IN PRE
SEND
MIX
DIRECT
IN
DIRECT
EFFECT
EFFECT=100%
MIX
OUT
POWER OUT
EFFECT
This connection is good for
modulation effects (chorus, phaser
etc.) and ambient effects (delay,
reverb etc.).
In order to achieve a great
sound, you MUST exclude DRY
from the effect unit (by the
internal mixer).
RETURN
GUITAR IN PRE
SEND
EFFECT
IN
MIX
POWER OUT
OUT
RETURN
EFFECT
DIRECT This connection is good for stomp
effects or processors that act on
the dynamics like compressors or
equalizers.
PARALLEL LOOP
In a parallel loop a share of the signal getting out of the preamp passes unaltered through the loop
circuit (DRY) and a share reaches directly the SEND. The latter is processed by the effects, sent
to the RETURN and then mixed with the DRY. The effect quality is less important here than in the
serial loop because the original DRY signal will be not “coloured” when it passes through the loop
or the effect and the WET signal will be pleasantly added to the DRY signal.
SERIAL LOOP
In the serial loop all the signal getting out of the preamp passes through the effects chain of the
loop. During the setting of the effect you have to consider that the sound is composed by a share
of the original sound, called DRY and a share of the processed sound, called WET. They both come
from the original sound and are mixed in the effect before being sent to the outputs.
FILTER EFFECTS
The filter effects main feature is the physical alteration of the signal wave, as a fuzz, overdrive or
distortion pedal does.
This family of effects finds its best place between guitar and preamp input.
MODULATION EFFECTS
The modulation effects main feature (see example) is the addition or the overlapping of other
curves or waves to the input signal.
This family of effects finds its best place in connection to the effects loop, i.e. between preamp
and power amp.
GENERAL INFO ON EFFECTS AND LOOP

MIDI IN
MIDI OUT
1 2 3 4 5
A/B
MIDI Footswitch
EFX
XL R-EVO LTD
Front panel
XL R-EVO LTD
Rear panel
MIDI THRU
You can operate the channels and the functions of your XL R-EVO LTD in manual, pedalboard or
MIDI mode.
The manual controls are three light push buttons on the front panel. They can switch channels,
the selection will be enlighted, and memorize MIDI setting of the amp. (See next section of this
manual).
The supplied pedalboard must be connected to the FOOTSW on the rear panel.
Do not connect the pedalboard to MIDI IN, this could damage the device.
The leds on the pedalboard allows you to see the channel selected and they correspond to the
three light push buttons on the front panel of the amp.
A great advantage is that you can use the switching systems in real time without any conflict
between them, but we advise that is always better to disconnect the unused switching system.
SWITCHING CHANNELS
XL R-EVO LTD can operate on channel switching with a standard MIDI pedalboard and it could
drive other MIDI devices.
The MIDI connection outline depends on systems and ease of connection. The basis is that the
program change of the MIDI pedalboard has to be sent to all devices to modify their setting. The
amp receives signals in OMNI mode, i.e. it identifies all the program changes on all the 16 MIDI
channels.
MIDI IN input is a 7 poles DIN which transmits MIDI signal and incorporates the 12VDC phantom
power supply, useful to power a compatible pedalboard. The input is retrocompatible with
connectors and 5 poles MIDI standard cables.
MIDI THRU input is a 5 poles DIN which can send the signals of the MIDI IN to a MIDI OUT useful
to manage other devices.
Please, follow this procedure to store the setting to be recalled by MIDI:
– Select the preset you want to use on the pedalboard
– Select the channel you prefer on the amp
– Select the preset you prefer on the multieffects unit.
Then, press the light button of the selected channel, and hold on a few seconds. The setting is
programmed and memorized when the three buttons flash.
MIDI PROGRAMMING

MIDI OUT
1 2 3 4 5
A/B
MIDI Footswitch
MIDI IN
MIDI THRU
Head
MIDI IN
Effect
MIDI OUT
1 2 3 4 5
A/B
MIDI Footswitch
MIDI IN
Head
MIDI THRU
MIDI IN
Effect
MIDI OUT
1 2 3 4 5
A/B
MIDI Footswitch
MIDI IN
Head
MIDI THRU
MIDI IN
Effect
Switcher MIDI IN
MIDI THRU
For MIDI cascade connection of several devices it is important to remind that devices receiving
MIDI signal have to be in OMNI mode (to receive signals on one of the 16 available channels)
or on a single MIDI channel. This setting must be equivalent to the pedalboard through which
the program changes are transmitted. When there is no correspondence the devices could not
identify the command.
For an easy setup we recommend to set all devices in OMNI mode.
MIDI CONNECTIONS

1x12”
16Ω
Speaker Impedance
Selector
HEAD
8
1x12”
16Ω
Speaker Impedance
Selector
HEAD
16
1x12”
16Ω
1x12”
8Ω
Speaker Impedance
Selector
HEAD
4
1x12”
8Ω
Speaker Impedance
Selector
HEAD
8
1x12”
16Ω
Non conventional connection
When you connect a speaker or a cabinet to a tube amplifier you have to check the correspondence
between impedance of the cabinet and the amp. If you have one speaker/cabinet the impedance
correspondence is direct (ex, speaker 16 ohm – selector 16 ohm), but if you are connecting more
speakers (or cabinets) you have to know the load the amp has to support in order to select the
right impedance value.
Hereafter you can find some useful examples to clear the connection described. Follow the
suggestions to obtain the maximum sound performance and the best functioning from the electrical
point of view.
The impedance selector on the rear panel of your amp allows you to select 16, 8 or 4 ohm.
The connection cables must be non-shelted and they must have an adequate section. It is better
not to use normal cables used to send guitar signals because they could overload and burn. The
two SPEAKER outputs are in parallel mode and make the connection to cabinets easier without
special cables.
A non conventional connection which enables you to obtain different sound performance without
damage of the amp is to connect a cabinet with higher impedance, ex. 16 ohm cabinet and 8 ohm
selector or 8 ohm cabinet and 4 ohm selector. The sound could be darker and rounded.
Do not connect less than 4 ohm load to avoid overload on the final stage and damage of the
amp.
SPEAKERS CONNECTIONS

Speaker Impedance
Selector
HEAD
8
Cassa 2x12”
MONO 8Ω
4x12”
MONO 16Ω
Speaker Impedance
Selector
HEAD
16 Speaker Impedance
Selector
HEAD
8
4x12”
MONO 16Ω
4x12”
MONO 16Ω
Speaker Impedance
Selector
HEAD
4
Cassa 2x12”
MONO 8Ω
Cassa 2x12”
MONO 8Ω
Speaker Impedance
Selector
HEAD
4
2x12”
MONO 8Ω
4x12”
MONO 16Ω
Non conventional connection
Spe ker Impedanc
Select r
HEAD
2x12”
MONO 4Ω
2x12”
MONO 4Ω
Non conventional connection

Tubes used to preamplify signal hardly wears out and are long-lasting. Problems are connected
mostly to microphonics and noise.
Microphonic is the skill of the tube to reproduce the signal and external vibrations. This is clearer
on high gain stages as distorted channels of modern guitar amplifiers. When the amp on and the
load correctly connected try a gentle pattering on the glass of tubes. You will hear a noise and a
“bump” through the speaker. It is normal.
Microphonic is obvious because you could hear annoying high frequencies (buzzing and triggers)
and sometimes a distortion of the sound. The first tube (V1) is tending to reproduce this noise
more than the others, and it is normal because it is the first on the preamp chain.
Furthermore tubes have an intrinsic quality of background noise due to functioning. During life of
tubes the noise could increase a lot causing crackling, buzzing etc. Once you detect the faulty tube
you have to replace it with a new one.
Preamp tubes do not require to be electrically selected (this is made by manufacturer) but they
must be high quality tubes.
INFO ON PREAMP TUBES
Final stage tubes are the last stage of amplification (before output transformer and speakers) and
they are subject to more wearing out than preamp tubes. They last an average of 800/1000
hours operating in class AB and depending on volumes you reach when playing. On an amp of
the same power operating in class A they could last 600/800 hours. This tubes are subject to
a greater stress.
WHEN TO REPLACE TUBES
It is possible to acknowledge a worn-out tube when you notice a general loss of power, and
volumes, sound is not so strong and you can detect a loss of low frequencies.
Troubles of this type of tubes are:
– A tube internal short circuit which makes the high voltage fuse to burn;
– The tube doesn’t light. This is easily detectable by looking at the internal filament of the tube;
– Tube becomes white-hot. The background sound of the amp increases too much (hum) and
looking at the internal filament will confirm the fault.
In all cases it is necessary to replace the faulty tube. If your tube is not a new one, at least one
year old, we recommend to replace all tubes. This is to improve the performance of your amp.
Otherwise you can replace just the faulty one.
WARNING!!
Place only balanced tubes (couple or quartet) with the same selection quality that you can find
on the label “Matching Reference” on the tube itself. All tubes placed on your amp must have
this quality; if you place tubes of different matching reference you have to adjust BIAS. This
could be made only by skilled technical staff!
INFO ON POWER AMP TUBES

FRONT PANEL
6550
KT88
12AX712AX712AX7 12AX7 12AX7
V1 V2 V3 V4 V5
CLEAN
BOOST
LEAD
BOOST
LEAD
BOOST
LEAD
LOOP DRIVER
REAR PANEL
6550
KT88
TUBES LAYOUT

Brunetti Marco & C. S.a.s
Via De’ Bonomini, 25/27
41100 MODENA ITALY
Telefono: +39 059 243404
Fax: +39 059 216464
www.brunetti.it
www.brunetti.it/forum
WARNING!!
Please refer to the manufacturer for all repairs and tubes replacement to insure
the correct working of the preamplifier. It does not exist service centres licensed by
Brunetti Marco & C. The manufacturer declines all responsibility for malfunctioning
due to assistance not provided or authorized by Brunetti & C.
Please, fill out the warranty form you find on
www.brunetti.it
to validate your warranty.
GENERAL INFO AND WARNINGS
WARNING!!
Before any kind of cleaning/manteinance operation, disconnect the appliance from the electric
supply.
IMPORTANT INFO
– Check that power supply electricity in use is the one indicated on the sticker on the rear panel
of the appliance;
– The appliance must be earthed in conformity to the national previsions in force;
– Do not throw water jets directly on the appliance;
– Do not use water steams to clean the appliance;
– Do not use solvents to clean the appliance, especially on serigraphy;
– The manufacturer declines all responsibility for any kind of damage to persons, things and/or
animals resulting from a wrong use of the appliance;
– The appliance conformity is proved by CE symbol on the rear side;
– The manufacturer reserves the right to make any useful and essential change to the products
without compromise the main safety and working features;
– Do not use the appliance barefoot;
– Do not touch the appliance with wet or moist hands or feet;
– Do not leave the appliance exposed to sun, rain, humidity ecc..
– Do not allow children or incompetents to use the appliance;
– Do not leave inflammable materials near the appliance;
– The appliance repair may be done during the warranty period only by the manufacturer in our
laboratory, or by authorized staff, in conformity to the national previsions in force;
– Control periodically all cables supplied with the appliance, if they result damaged, you have to
replace them immediately with another one with the same characteristics;
– In case of damage contact the shop where you bought the appliance.
Table of contents
Other Brunetti Amplifier manuals

Brunetti
Brunetti MILLE CR CUSTOM RELEASE User manual

Brunetti
Brunetti PIRATA 141 User manual

Brunetti
Brunetti MARANELLO BLACK TOP User manual

Brunetti
Brunetti wizard 6v6 User manual

Brunetti
Brunetti mercury EL34 User manual

Brunetti
Brunetti Customwork Series User manual

Brunetti
Brunetti SILVER BULLET User manual

Brunetti
Brunetti XL extra lead User manual

Brunetti
Brunetti METROPOLITAN 810 SOUND ROAD User manual

Brunetti
Brunetti MC2 MASTER COMBO User manual