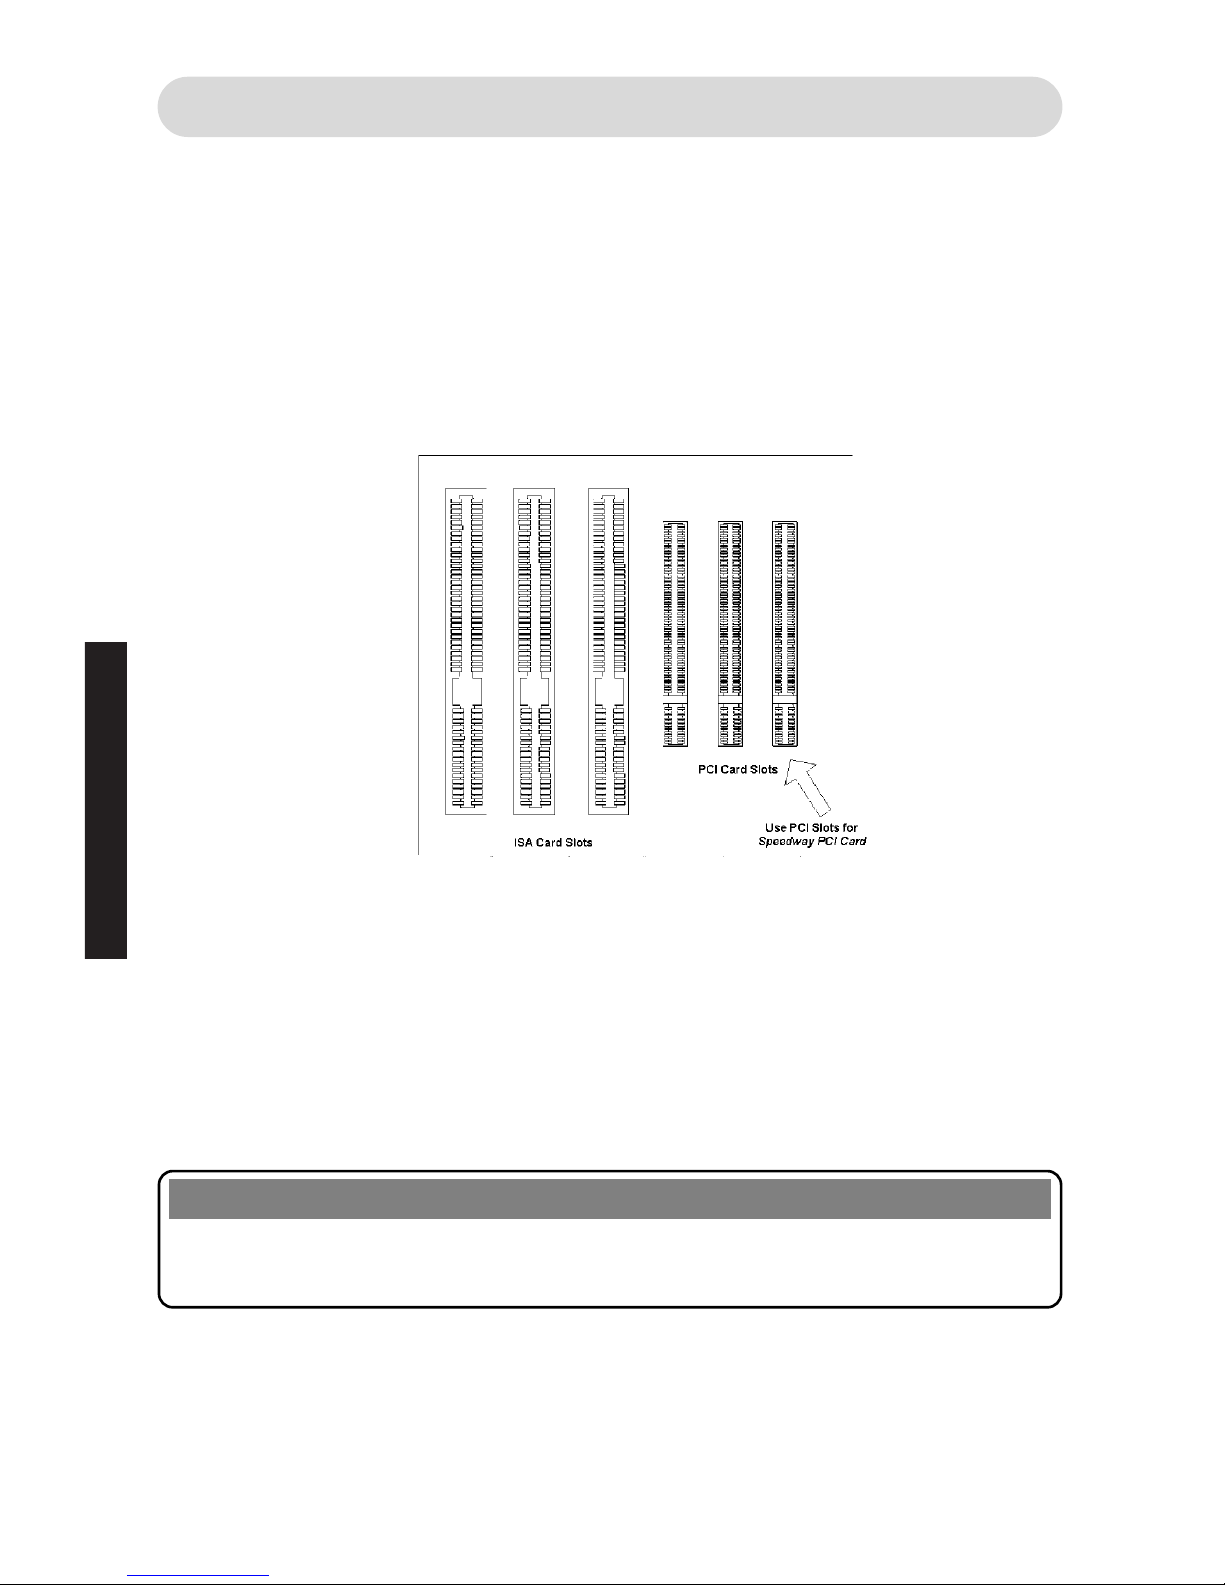
BT Speedway ISDN User manual

Internal ISDN PCI card for PCs
Speedway ISDN PCI card
Installation
Guide


1
Contents
1. Welcome to the Speedway! 2
2. Before you start 3
2.1 Check the Contents 3
2.2 PC System Requirements 3
2.3 About the Speedway! CD 4
3. Installation 5
3.1 Determine what version of Windows
you are using 5
3.2 Installing the Speedway
ISDN PCI Card 6
3.3 Device Driver Installation 7
3.4 Installing the Speedway! Applications
& the CAPI Port Driver 13
3.5 Setting up Internet access 15
3.6 Uninstalling the Speedway PCI Card
and Applications 18
4. Typical use examples 19
5. Troubleshooting and Support 21
6. Technical Information 25
6.1 CAPI Port Drivers 25
6.2 Internet Access 26
6.3 ISDN Information 27
6.4 Product Specifications 29
7. Software Licence Agreement 30
8. Index 32

2
WELCOME
1.Welcome to the
Speedway!
The Speedway ISDN PCI Card is an internal PC card which enables fast data
communications to and from your PC via ISDN or BT Highway service.
You will be able to browse the Internet and download files, images and
programs at speeds unavailable via modems connected to the analogue
network. You can also access other remote sites that have both access to the
ISDN and compatible terminal equipment.
Your Speedway ISDN PCI Card can combine both ISDN channels to provide a
data speed of up to 128Kbps.
Note
The actual data speed obtained is dependent upon the data speed offered by
your Internet service provider or that of the remote site you connect to.
You can install the supplied software under Windows 95, 98 and NT. For
further information, please refer to the relevant installation sections.
Also included is a suite of applications that form an integrated
communications package. These programs enable you to make the best use of
your Speedway ISDN PCI Card:
Speedway! data allows you to transfer data at high speed to and from other
PC users who have access to the ISDN and have a
compatible terminal adapter and software.
Speedway! fax allows transmission of faxes very quickly and directly from
a word processing program.
Speedway! phone is a virtual ISDN desktop telephone, providing ISDN
voice communication via your PC’s soundcard.
Speedway! answer gives you an ISDN answering machine on your PC if you
have a sound card installed.
Speedway! term allows you to quickly load information from an ISDN
Bulletin Board Service.
See ‘Typical use examples’ on page 18 for more information on the use of
these applications.

3
BEFORE YOU START
Please take a few minutes to read this guide and acquaint yourself with both
the installation process and the features of your card. Installation is simple but
you must take care to follow the instructions carefully in order to get the best
from your Speedway ISDN PCI Card.
Note
This guide assumes that you have a basic understanding of PCs and MS
Windows. If you are new to PCs, please make sure that you read and
understand any documentation that was delivered with your machine.
If you are new to MS Windows, make sure you try the various Windows
tutorials before attempting any installations.
2.1 Check the Contents
After opening and unpacking the box, you will find the following items:
• Speedway ISDN PCI Card
• ISDN cable (6m)
•Speedway! CD-ROM
• Installation Guide (this document)
2.2 PC System Requirements
Before attempting installation, please check that your PC meets the following
requirements:
• A Pentium processor with a recommended minimum 16Mb RAM
• A Microsoft Windows 95, 98 or NT (Workstation i386) operating system
• 10Mb hard disc space
• A CD-ROM drive
• A free PCI plug-in slot
If you are unsure of your PC’s specification or compatibility, please refer to
your PC manual or equipment supplier.
2. Before you Start...

4
BEFORE YOU START
Note
If your PC is already equipped with an ISDN adapter, you must first un-install
it and its drivers before you can successfully install the Speedway ISDN PCI
Card and its software. The un-installation process of ISDN adapters may vary
depending on the manufacturer. Please follow the manufacturer’s guidelines
for removal.
2.3 About the Speedway! CD
The CD includes an introduction which provides you with information about
its contents and assists you with the installation of your card in Windows 95,
98 or NT. The introduction should start automatically when you insert the CD
into your computer. If not, you can start the introduction manually by going
into Explorer (or using Start - Run menu) and then double-clicking on the
intro.hlp file in the root directory of the CD.
The CD contains the Speedway ISDN PCI card installation program for
Windows 95, 98 and NT. It also contains the installation program for the
Speedway! applications as well as additional software that may be useful.
Note
Some of the documents on the CD are .pdf (Portable Document Format) files.
You can read, search and print these documents by using the Adobe Acrobat
Reader. If your PC has not been loaded with Adobe Acrobat you will find an
installable copy on the CD.
Software updates are available via the Speedway website:
www.speedway.bt.com

5
INSTALLATION
3.Installation
Installation consists of five stages:
3.1 Determine what version of Windows you are using.
3.2 Physical installation of your card into to your PC and ISDN socket
connection.
3.3 Device driver installation.
3.4 Speedway! applications and CAPI port driver installation.
3.5 Internet access set-up
Important
It is important to follow the sequence of installation steps as specified. If you
fail to follow these instructions you may not be able to successfully install your
card. You will not be able to access the Internet until you have completed stages
3.1 to 3.5 above!
It is a good idea to view the Readme files on the CD before installing your card
for the latest product information and installation advice.
3.1 Determine what version of Windows you are using
If you are using Windows 98 or Windows NT, you will be aware of this from
the Windows start-up screen.
If you are using Windows 95 it is essential that you determine what version
you are using before you physically install your PCI card.
1. Double-click the My Computer icon on the Desktop, double-click the
Control Panel icon and then double-click the System icon.
2. Under the tab General will be a description of what version of Windows is
installed.
For example:
Microsoft Windows 95 4.00.950 B
Make a note of this for use in Section 3.3.

6
INSTALLATION
3.2 Installing the Speedway ISDN PCI Card
1. Switch off your PC and unplug the power connector cable.
2. Remove the cover from your PC.
3. Select an appropriate slot (Figure 1) and with a suitable screwdriver,
carefully remove the screw from the adjacent protective plate from the rear
of the PC. Do not allow this screw to drop into the computer.
Figure 1 indicates a typical PC board showing how your card connectors
may be arranged. Note that the PCI card should be installed in one of the
smaller sockets.
4. Gently insert the card into the slot with the back plate facing the rear of the
PC. Press down until the card is fully located into the slot. Do not disturb
the PC’s internal wiring during installation.
5. Replace the retaining screw in order to secure the card back-plate to the
rear of the PC.
6. Replace the cover of your PC, tighten any retaining screws and reconnect
the power connector cable.
Warning
If you are in any doubt about how to access the inside of your PC, you should
contact your PC supplier for advice.
ISDN Connection
1. Take the ISDN cable supplied and insert the plug on one end of the ISDN
cable into the socket on the rear plate of the Speedway ISDN PCI Card.
Figure 1

7
INSTALLATION
2. Insert the other end of the ISDN cable into your ISDN or BT Highway
socket.
3. Switch PC on.
The physical installation of your Speedway ISDN PCI Card is now
complete.
3.3 Device Driver Installation
Depending on which version of Windows you determined earlier:
If you have:
Windows 95 version A: Complete Section 3.3, Part A& Part E.
Windows 95 version B: Complete Section 3.3, Part B& Part E.
Windows 98: Complete Section 3.3, Part C& Part E.
Windows NT: Complete Section 3.3, Part D& Part E.
AFor Windows 95 Version 4.00.950 or 4.00.950a
1. Switch on your PC, if you have not already done so, and Windows will
automatically detect the card you have just installed.
2. The ‘New Hardware Found’ screen will be displayed, announcing that it has
recognised the BT Speedway PCI card as a ‘PCI Network Controller’. If this
screen is not displayed, close down Windows, switch off your PC and check
that the card is physically installed correctly.
3. Select ‘Driver from the disk provided by hardware manufacturer’, click OK.
4. Your PC will display a prompt asking you to insert the manufacturer’s
installation disk. Place the BT Speedway PCI Card CD in your PC’s CD
drive.
5. Click Browse, in the ‘Drives’ section and select your CD ROM drive letter.
Double-click on Cardware which will be shown in the ‘Folders’ section and
double-click on Windows.95. Click OK and click OK again on the following
screen.
6. After the files are copied to your PC, the ‘BT Speedway ISDN PCI Card’
screen will be shown (Figure 2).

8
INSTALLATION
7. Now follow the instructions in Part E.
BFor Windows 95 Version 4.00.950b
1. Switch on your PC, if you have not already done so, and Windows will
automatically detect the card you have just installed.
2. The ‘New Hardware Found’ screen will be displayed. If this screen is not
displayed, close down Windows, switch off your PC and check that the card
is physically installed correctly.
3. Immediately after the ‘New Hardware Found’ screen is displayed the
‘Update Device Driver’ wizard will be started and it’s initial display shown.
4. Insert the BT Speedway PCI Card CD in your PC’s CD drive.
5. Click Next and wait whilst Windows updates it’s driver database. This will
take a few seconds.
6. Windows will announce that it cannot locate the driver for the recognised
device. Click Other Locations, and you will be prompted to enter a ‘Path’
name.
7. Either type D:\CARDWARE\WINDOWS.95 (where Dshould be substituted
with the drive letter that represents your CD drive) and click OK OOrrclick
Browse, in the ‘Drives’ section and select your CD drive drive letter.
Double-click on Cardware which will be shown in the ‘Folders’ section and
double-click on Windows.95.
8. Click OK and click Finish again on the following screen.
Figure 2

9
INSTALLATION
Note
Sometimes Windows may have difficulty finding and loading files on the CD.
This is due to how Windows was originally installed. You must use the Browse
function in order to select the correct file path, including the correct drive letter
for the CDROM.
9. After the files are copied across, the ‘BT Speedway ISDN PCI Card’ screen
will be shown (Figure 2).
10.
Now follow the instructions in Part E.
CFor Windows 98
1. Switch on your PC, if you have not already done so, and Windows will
automatically detect the card you have just installed.
2. Immediately after the ‘New Hardware Found’ screen is displayed the ‘Add
New Hardware’ wizard will be started and it’s initial display shown.
3. Insert the BT Speedway PCI Card CD in your PC’s CD drive.
4. Click Next and in the new window select Search for the best driver for your
device and click Next.
5. In the next window, click on box marked Specify a Location. Either type
D:\CARDWARE\WINDOWS.98 (where Dshould be substituted with the drive
letter that represents your CD drive) and click Next OOrrclick Browse and in
the ‘Drives’ section select your CDROM drive letter. Double-click on
Cardware which will be shown in the ‘Folders’ section and double-click on
Windows.98. Click OK and click Next on the following screen.
Figure 2

10
INSTALLATION
6. You will be informed that ‘Windows is now ready to install the best driver
for this device’. Click Next.
7. Windows will inform you that ‘Windows has finished installing the software
that your new hardware device requires’.
Click Finish.
8. The ‘BT Speedway ISDN PCI Card’ screen will be shown (Figure 2).
9. Now follow the instructions in Part E.
DFor Windows NT
1. Make sure that you have administrator rights before starting installation.
2. Switch on your PC, if you have not already done so, and Windows will
automatically detect the card you have just installed.
3. Insert The Speedway PCI Card CD into the CD drive. If the CD does not
start automatically, then you can start the introduction manually by going
into NT Explorer (or using Start - Run menu) and then double-clicking on
the intro.hlp file in the root directory of the CD. This will show the ‘BT
Speedway ISDN PCI Welcome’ screen (Figure 3).
Figure 2

4. Click on the BT icon to bring up the ‘Windows System Selection’ view,
(Figure 4).
11
INSTALLATION
Figure 4
Figure 3

5. Click on the Windows NT icon. This will display the ‘Installation Selection’
view, (Figure 5).
7. Click on the BT Speedway ISDN PCI Card icon.
8. A new window provides installation instructions. Click on Install button.
‘BT Speedway ISDN PCI Card’ screen will be shown (Figure 2).
9. Now follow the instructions in Part E.
EWhen the BT Speedway ISDN PCI Card screen is displayed
(Figure 2)
1. Click on Continue.
2. The following window allows you to select the installation folder. Standard
default setting is C:\IDRIVER. Click on Continue.
3. In the next window select DSS1 (the default option) and click on Continue.
12
INSTALLATION
Figure 5
Figure 2

13
INSTALLATION
4. The setup information is displayed, click Continue.
The driver is then entered in the Windows Registry database and will be
activated as soon as your PC is re-started. When requested if you wish to
re-start Windows click Yes.
5. After re-starting a new program group ‘Speedway PCI’ will have been added
to your Windows Start Menu and a program group of the same name will
be seen on the Desktop.
You will find a ‘Readme’ and two applications in the Speedway PCI program
group.
You are now ready to install the Speedway! applications.
3.4 Installing the Speedway! Applications & the
CAPI Port Driver
Note
You can quit the installation procedure at any time by clicking the Cancel
button.
1. If you have removed the CD from the machine after the previous
installation section, re-insert the CD into your PC. The CD should
automatically load and you should see the ‘BT Speedway ISDN PCI
Welcome’ screen (Figure 4). If the CD does not automatically load use
Windows Explorer (or Start - Run menu) to open the intro.hlp file on
the CD.
2. Click on the BT icon to bring up the ‘Windows System Selection’ screen.
3. On this screen, click on the Windows operating system version you are
using. This will display the ‘Installation Selection’ view.
4. Click on the Speedway! Applications Suite icon.
5. On the next window, click on the Start Installation icon.
The installation program will now start and the ‘BT Speedway’ screen is
displayed. It is best to follow the on-screen instructions that are now
displayed, but you may find it easier to refer to the instructions below:
6. Click Next. Here you can specify the directory in which the applications
will be installed with the Browse button. The default is
C:\PROGRAM\FILES\SPEEDWAY!\.
7. Click Next. In the next window displayed, choose a program folder group
for your applications. The default is Speedway! Then click Next.

Now decide whether you require a default installation or an installation with
configuration:
Option 1 (Recommended)
If you just select Installation, the applications are installed with the default
settings in the specified directory/folder. All configuration parameters for
the applications can be later modified and customised to suit your specific
requirements. This option is recommended unless you fully understand the
settings. See the corresponding sections in the online help for relevant
information.
Option 2 (Advanced)
If you select Installation and Configuration, you can customise the settings
e.g. entries such as the fax station code number, the name of your
computer for Speedway! Data and information relating to operation with a
PBX.
8. Select either option and click Next. System files will now be copied to
your PC.
9. Leave the Install CAPI port driver check box enabled and click Next.
10 . A list of virtual modems that will be installed is displayed. The default
setting selects all options. The user can choose to un-check those that are
not required.
Note
Unless you have a thorough knowledge of modem protocols it is recommended
that the default (install all modems) is used.
11. Click OK.
12
.
.
It is recommended that the ‘Readme’ checkbox is left enabled in order the
latest release information can be obtained.
Click on Next. This will be displayed the ‘Readme’ file in Notebook.
When you exit Notebook the final installation screen will be displayed.
The programs are now installed and the program group Speedway! is
created on your Windows Start Menu.
13
.You are advised to restart your PC at this stage. Click Finish.
Note
Please refer to the on-line help for instructions on how to use the Speedway!
applications effectively.
Installation of the Speedway! applications is now completed.
14
INSTALLATION

3.5 Setting up Internet access
Note
Please make sure that you Internet Service Provider (ISP) can provide ISDN
access. This may require that you call them before attempting to establish a
connection with your Speedway PCI Card.
Internet access at 64Kbps with Windows 95/98
1. After restarting your PC, double-click My Computer on the desktop.
2. Double-click Dial Up Networking.
3. Double-click Make New Connection.
4. Type in your choice of name for your new connection icon.
5. From the ‘Select modem list’ select the ISDN Internet (PPP over ISDN)
virtual modem.
6. Click Next.
7. Enter your Internet service provider’s phone number.
8. Click Next again and Finish.
Your new Connection icon will now be displayed in the ‘Dial-Up Networking’
window.
You are now ready to connect to your ISP at 64Kbps.
Note
If connection is made directly from your Internet browser application, it will be
necessary to re-configure your browser to use your newly created Dial-Up
connection.
Internet access at 128Kbps with Windows 95/98
The Dial Up Networking on your PC must support ‘Multi-Linking’.
1. If you are using Windows 98, move directly to step 7.
2. To ensure that you have the correct version of Dial Up Networking in
Windows 95 follow the next steps.
3. If you have already created a connection icon, as described above, Right
Click on the icon. Otherwise create a 64Kbps access connection as
described above.
4. Select Properties from the menu.
5. If you can see a tab labelled Multilink then your PC can connect at 128Kbps
and you should move to step 7. Otherwise continue to step 6.
15
INTERNET

16
INTERNET
6. It is necessary to install a new version of MS Dial Up Network (msdun13).
This can be found on the CD in the Tools folder (or on the Speedway web
site). Open the msdun13 folder and Double Click on the msdun13 file and
follow the instructions given to complete the installation. Note the
installation may request files from your Windows 95 installation CD.
You are now ready to create a new dial up network connection.
You are now ready to connect to your ISP at up to 128Kbps.
Note
To avoid disappointment, make sure that your Internet service provider can
provide a 128Kbps connection!
Internet access at 64Kbps with Windows NT
1. After restarting your PC, double click My Computer on the desktop.
2. Double-click Dial Up Networking.
3. Click New.
4. Type in your choice of name for your new connection. Click Next.
5. Select I am calling Internet.
Click Next.
6. Enter your Internet service provider’s phone number.
Click Finish.
7. Click More and select menu item Edit entry and modem properties.
8. In ‘Dial using’ box select ISDN Internet (PPP over ISDN).
9. Click OK and then click Close.
To dial your Internet Service Provider:
1. Double-click My Computer on the desktop.
2. Double-click Dial Up Networking.
3. Select ‘Phone book entry to dial’ for your Internet Service Provider. Click
Dial.
4. Enter your user name and password. Click OK.
7. Follow the instructions in Setting up Internet access at 64Kbps above.
8. Right mouse click over the new icon you have just created and select
Properities.
9. Click on Multilink tab
10 . Click on ‘Use additional devices’. Click Add.
11. From the list select ‘ISDN RAS (PPP over ISDN)’, click OK.
12 . Click OK.

17
INTERNET
You are now ready to connect to your ISP at 64Kbps.
Internet access at 128Kbps with Windows NT
These instructions assume the you have already created a connection to the
Internet over a single 64Kbps channel, as in the previous section. Follow the
instructions below to change your link to enable simultaneous connection of
both channels.
After the PC has rebooted -
1. Open Control Panel.
2. Open Dial-Up Networking.
3. Select service that you require to multilink from the Phone book entry list.
4. Click on More and select Edit entry and modem properties.
5. In the Basic tab select Multiple lines in Dial using list.
6. Click on Configure.
7. Select both devices (check box) ISDN Internet (PPP over ISDN) and ISDN
RAS (PPP over ISDN).
8. Make sure that your ISP telephone number is the same in both devices.
9. Click on OK and then click OK again.
You are now ready to connect to your ISP at up to 128Kbps.
3.6 Uninstalling the Speedway PCI Card
and Applications.
Before you uninstall the Speedway! software, you must first physically remove
the PCI card from your computer. This ensures that Windows does not try to
automatically re-install the device driver software via the ‘plug and play’
system.
1. Open Control Panel.
2. Open Network.
3. Click on Services tab.
4. Select Remote Access Service.
5. Click on Properties.
6. Click on Add.
7. Select ISDN RAS(PPP over ISDN).
8. Click on Continue.
9. Click on Close.
10 . Restart PC as requested.

18
UNINSTALLING
1. Turn your PC off and remove the power cable.
2. Removal of your PCI card is the reverse process of that outlined in
Section 3.2.
3. Remember to replace the rear panel blanking plate that you removed
previously.
The software uninstall process for all versions of Windows is very similar.
1. Open the Control Panel. This can be done from either clicking on My
Computer on the Desktop or Clicking on Start - Settings - Control Panel
from the Windows button (normally on the bottom left corner of
the screen).
2. Double-click on Add/Remove Programs. There may be up to three entries
seen in the list; ISDN CAPI Port, Speedway PCI and Speedway! (all will be
seen if complete Speedway! installation process has been followed).
3. Click on specific entry in list to be removed and then click on
Add/Remove button.
4. Confirm uninstall by clicking Yes.
5. You will then be requested to restart your PC. If you want to remove other
entries in the list click on the Do not Restart option and select another
entry. When all entries are uninstalled restart your PC.
Table of contents