Bull 13001 Manual

INSTALLATION & OPERATING INSTRUCTIONS
MODEL #13001 PREMIUM OUTDOOR REFRIGERATOR MANUAL

TABLE OF CONTENTS PAGE #
SAFETY INSTRUCTIONS……………………...…………………………………………………….………………………..………………………...2
INSTALLATION INSTRUCTIONS……………………….….…….………………...…….....….………………………………....…...………….…..3
CABINET LOCATION GUIDELINES.........................................................................................................................................................3
INSTALLING THE GLASS SHELF............................................................................................................................................................3
CHANGING THE DOOR’S SWING...........................................................................................................................................................4
OPERATION INSTRUCTIONS............................................................................................................................................................................6
CONTROL PANEL.....................................................................................................................................................................................6
ELECTRICAL..............................................................................................................................................................................................6
STORING FOODS......................................................................................................................................................................................6
REGULAR MAINTENANCE…………………………………………………………………………………………..……………..……….....…....….7
AUTOMATIC DEFROSTING OF THE REFRIGERATOR…….…..….…..………….………...…....……..…………………...………..........7
CLEANING THE CONDENSER COIL……………………….......................………..….….…..………...……........…..…...…….…….….....7
CLEANING THE FAN BLADES AND MOTOR...................………..….….…..………...……........…..…....……….….…..…….….…...…..7
CLEANING THE INTERIOR OF THE UNIT...............................................................................................................................................7
TROUBLESHOOTING.........................................................................................................................................................................................8
PARTS LIST………………………………………………….………….……….……….…….………….……….…………………….........................9
EXPLODED ILLUSTRATION………………………………………………………………………….……….…….…………….….......….………...10
LIMITED WARRANTY…………………………………….………….…….……….….……………..….………………….……..………....…...…....11
- READ THE FOLLOWING INSTRUCTIONS CAREFULLY AND BE SURE YOUR REFRIGERATOR IS PROPERLY INSTALLED, ASSEMBLED
AND CARED FOR. FAILURE TO FOLLOW THESE INSTRUCTIONS MAY RESULT IN SERIOUS BODILY INJURY AND/OR PROPERTY
DAMAGE. IF YOU HAVE QUESTIONS CONCERNING ASSEMBLY OR OPERATION, CONSULT YOUR DEALER OR APPLIANCE SERVICE
REPRESENTATIVE.
- NOTE TO INSTALLER:
LEAVE THESE INSTRUCTIONS WITH THE CONSUMER AFTER INSTALLATION.
- NOTE TO THE CONSUMER:
RETAIN THESE INSTRUCTIONS FOR FUTURE REFERENCE.
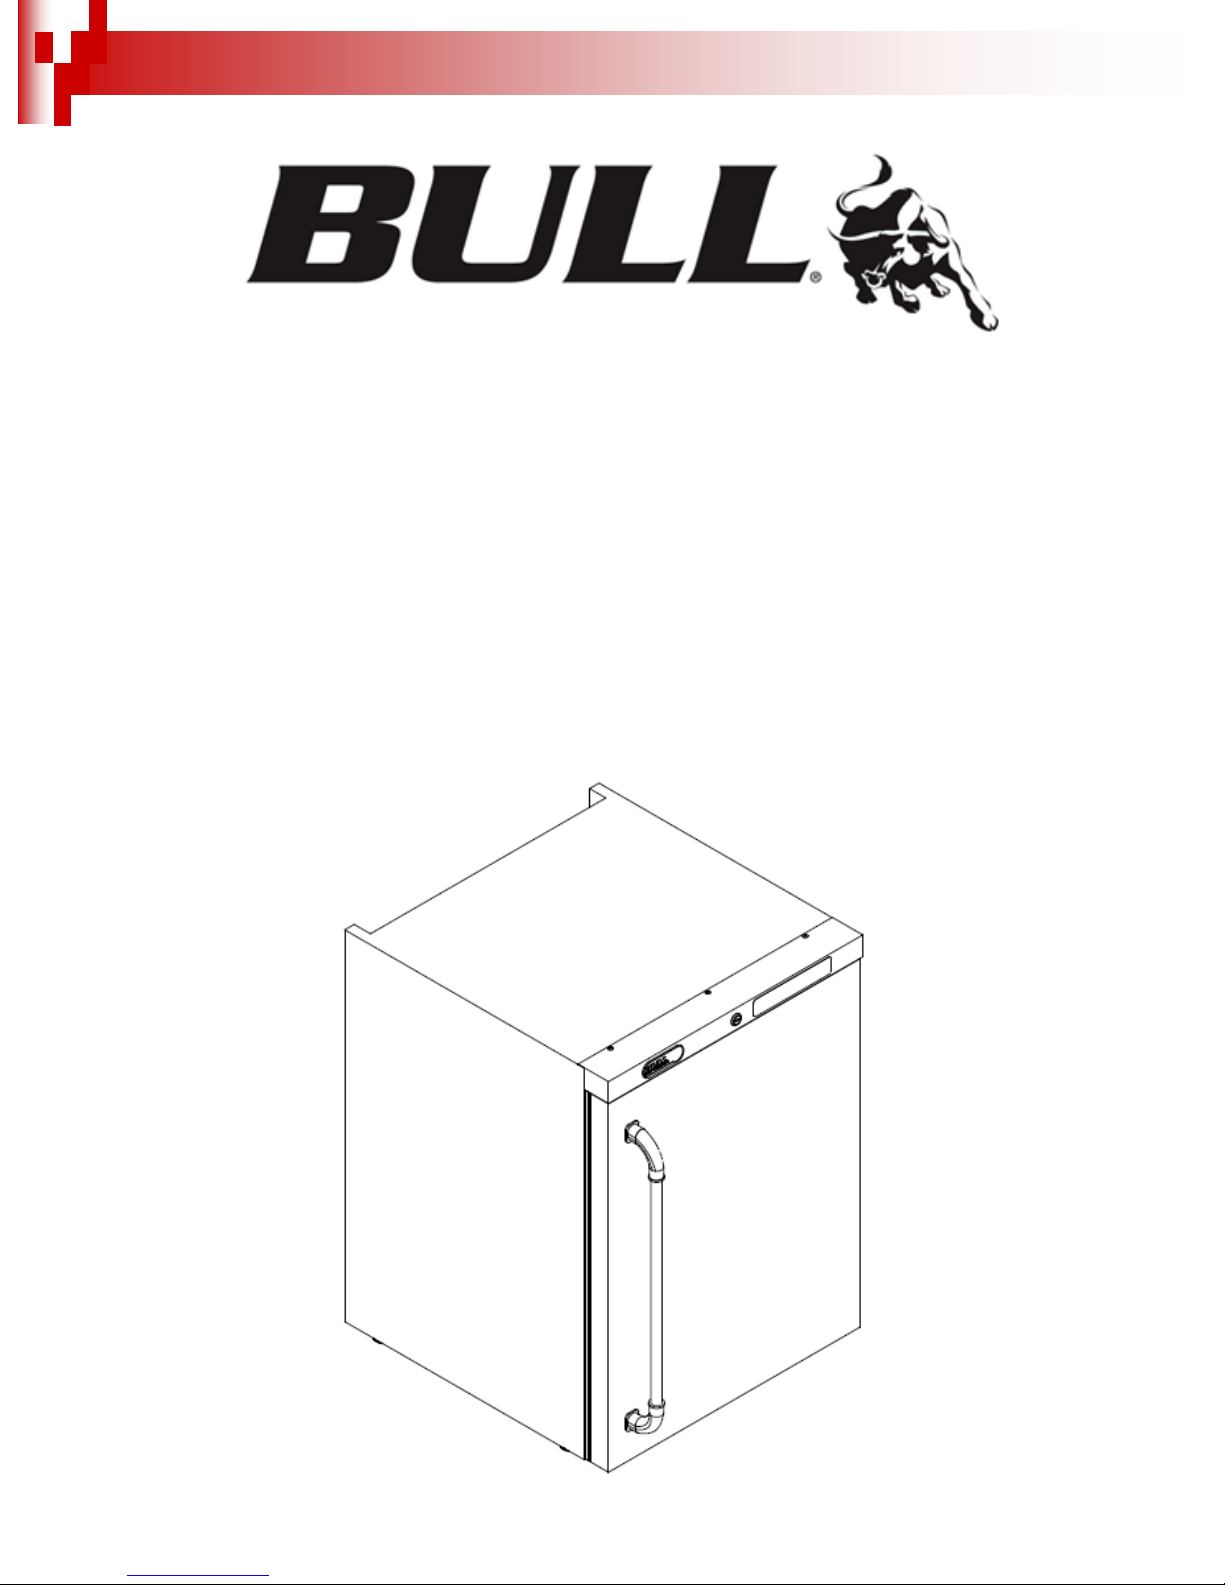
- THIS REFRIGERATOR IS INTENDED FOR STORING BEVERAGES AND FRESH FOODS AT TEMPERATURES HIGHER THAN 0°C/32°F.
*FOR WARRANTY PURPOSES, PLEASE RECORD YOUR SERIAL NUMBER, DATE OF PURCHASE & A COPY OF YOUR RECEIPT OR
INVOICE IN THE BACK OF YOUR MANUAL ON PAGE 11.
1

SAFETY INSTRUCTIONS
ATTENTION:
To minimize shock and fire hazards, be sure not to overload outlet. Please designate one outlet for your unit.
Do not use extension cords.
Do not put your hands under the unit when the unit is required to be moved.
When the unit is not in use for a long period of time, please unplug the unit from the outlet.
After unplugging the unit, wait at least 10 minutes before re-plugging it. Failure to do so could cause damage to the compressor.
Do not defrost the appliance with other electric appliances (for example a hair dryer) and never attempt to scrape/remove ice/frost with sharp
objects.
UNPLUG CORD:
To minimize shock and fire hazards, please do not plug or unplug the cord with wet hands.
During maintenance and cleaning, please unplug the unit.
PROPER GROUNDING REQUIRED:
To minimize shock and fire hazards, make sure that the unit is properly grounded.
PROHIBITION:
Do not attempt to remove or repair any component unless instructed by factory.
Make sure that the unit is not resting on or against the electrical cord and plug.
To minimize personal injury, do not hang on the door.
Do not store any flammable and explosive gas or liquids inside the unit.
Do not attempt to alter or tamper with the electrical cord.
2
READ CAREFULLY BEFORE OPERATION OF YOUR REFRIGERATOR

INSTALLATION INSTRUCTIONS
If the unit has recently been transported, please let unit stand still for a minimum of 24 hours before plugging it in.
Make sure that the unit drops down to desired temperature before loading the unit with product.
Make sure that there is proper ventilation around the unit in the area where it will operate.
Make sure all accessories are installed (for example shelves, shelf clips, etc.) before plugging the unit in.
CABINET LOCATION GUIDELINES
Install the unit on strong and leveled surfaces.
- Unit may make unpleasant noises if surface is uneven.
- Unit may malfunction if surface is uneven.
Install the unit in a dry, well-ventilated area.
- Unit should be away from direct sunlight; extreme cold ambient temperatures may also cause the unit not to perform properly.
Avoid installation in a high humidity and/or dusty area.
- Humidity could cause unit to rust and decrease efficiency of the unit.
- Dust collected on condenser coil will cause unit to malfunction. Clean the condenser at least once a month with a brush or clean cloth.
Avoid placing the unit near heat emitting devices (for example cooking appliances, radiators, water heaters, or similar devices) and moisture-
generating equipment.
- High ambient temperatures will cause the compressor to overwork, leading to higher energy bills and gradual breakdown of the unit.
The unit must have more than 20 cm of clearance from the cabinet to any walls.
- Since this product has many ventilation holes underneath, please make sure there is a gap of at least 3 cm between the bottom of the product
and the ground. Also make sure there is nothing stuck underneath.
INSTALLING THE GLASS SHELF
Open the door. The glass shelf is packed at the refrigerator bottom.
Take the glass shelf out of the refrigerator and packaging.
Put the glass shelf onto the four protective pads (see diagram below).
3
READ CAREFULLY BEFORE INSTALLATION OF YOUR REFRIGERATOR

INSTALLATION INSTRUCTIONS (cont.)
CHANGING THE DOOR’S SWING
The direction that the door opens could be changed by placing the upper and lower hinges in different corners.
1. Remove the hardware on the top of the control panel.
2. Remove the hardware from the front of the control panel.
4

INSTALLATION INSTRUCTIONS (cont.)
3. Remove the hardware from the top door hinge.
4. Remove the hardware from the bottom door hinge.
5. Place the hinges and door to your preference. Note: There is a standard and reverse hinge for the top of the door. Door can be inverted.
6. Reinstall the control panel and hardware.
5

OPERATION INSTRUCTIONS
CONTROL PANEL
Temperature control: Press “set”. Choose up or down to adjust the temperature. Holding the directional button for at least 2 seconds quickly
changes the temperature displayed. The temperature will be set and show on the display if not pressing the direction for 6 seconds.
Indicator light: When the compressor is on and when the temperature is set, the light will stay on.
Interior light: When the refrigerator door is open, the interior light will stay on. When the refrigerator door is closed, the light will shut off.
°C/°F conversion: When you press the °C/°F button, you can choose whether the temperature is displayed in Celsius or Fahrenheit. When
LED2 is on, the temperature is displayed in °F. When LED2 is off, the temperature is displayed in °C.
Restoring to default settings: Press the up button twice, and then put your fingers on the down button for 6 seconds. When the display light
blinks, it means all setting have been reset. It will return to normal status in 6 seconds.
ELECTRICAL
Please ensure that the required voltage of the compressor is being supplied at all times. Low or high voltage can detrimentally affect the
refrigeration unit. All units should be plugged into a grounded and properly-sized electrical outlet with appropriate overcurrent protection. Please
refer to the electrical requirements on the nameplate. Please make sure that your unit has its own dedicated outlet. Do not use an extension cord.
STORING FOODS
Foods to be stored in the refrigerator should be properly packed so as to prevent mixing various moisture degrees and odors.
Make sure that foods do not touch each other. Assure adequate air circulation around packages.
Never store flammable, volatile or explosive substances.
Beverages with high alcohol percentage shall be stored in tightly sealed bottles in a vertical position.
Food should not touch the rear wall of the refrigerator.
Try not to open the door too often.
Make sure to remove perishable articles of food out of the appliance before you leave for a long time.
6

REGULAR MAINTENANCE
AUTOMATIC DEFROSTING OF THE REFRIGERATOR
There is no need to defrost the refrigerator; ice depositing on the inner back wall is defrosted automatically.
Ice build-up on the inner back wall during the compressor operation will (when the compressor has cycled off) defrost automatically. Defrosted
water collects inside the drain by passing through the drain outlet in the inner back wall into a drain pan situated above the compressor. From there
the water will evaporate over time.
CLEANING THE CONDENSER COIL
For efficient operation, it is important that the condenser surface be kept free of dust, dirt and lint.
We recommend cleaning the condenser coil and fins at least once per month.
Clean with a commercial condenser coil cleaner, available from any kitchen equipment retailer. Brush the condenser fins from top to bottom, not
side to side.
After cleaning, straighten any bent condenser fins with a fin comb.
CLEANING THE FAN BLADES AND MOTOR
If necessary, clean the fan blades and motor with a soft cloth.
If necessary to wash the fan blades, cover the fan motor to prevent moisture damage.
CLEANING THE INTERIOR OF THE UNIT
When cleaning the cabinet interior, use a solvent of warm water and mild soap.
Do not use steel wool, caustic soap, abrasive cleaners, bleach or anything that may damage the stainless steel surface.
Wash door gaskets on a regular basis, preferably weekly. Simply remove the door gasket from the frame of the door, soak in warm water and
soap for 30 minutes. Dry with soft cloth and replace.
Check door gaskets for proper seal after they are replaced.
Periodically remove the shelves and pilasters from the unit and clean them with mild soap and warm water. To remove the pilasters, first remove
the shelves and shelf brackets. Then, simply lift the pilaster up and out.
NOTE: Disconnect power cord if the refrigerator will not be used for long periods of time.
7
DISCONNECT POWER CORD BEFORE CLEANING ANY PARTS OF THE UNIT

TROUBLESHOOTING
8
SYMPTOM POSSIBLE CAUSE CORRECTIVE ACTION
Compressor not running. Fuse blown or circuit breaker tripped. Replace fuse or reset circuit breaker.
Power cord unplugged. Plug in power cord.
Thermostat set too high. Set thermostat to lower temperature.
Condensing unit runs for long
periods of time. Excessive amount of warm product
placed in refrigerator. Allow adequate time for product to cool
down.
Prolonged door opening or door ajar. Ensure door is closed when not in use.
Avoid opening door for long periods of
time.
Door gasket(s) not sealing properly. Ensure gaskets are snapped in
completely. Remove gasket and wash with
mild soap and warm water.
Dirty condenser coil. Clean the condenser coil.
Evaporator coil iced over. Unplug unit and allow coil to defrost. Make
sure thermostat is not set too cold. Ensure
that door gasket(s) are sealing properly.
Refrigerator temperature is
too warm. Thermostat set too warm. Set thermostat to lower temperature.
Blocking air flow. Re-arrange product to allow for proper air
flow. Make sure there is at least four
inches of clearance from evaporator.
Excessive amount of warm product
placed in refrigerator. Allow adequate time for product to cool
down.
Fuse blown or circuit breaker tripped. Replace fuse or reset circuit breaker.
Dirty condenser coil. Clean the condenser coil.
Prolonged door opening or door ajar. Ensure door is closed when not in use.
Avoid opening door for long periods of
time.
Evaporator coil iced over. (See above)
Refrigerator is noisy. Loose part(s). Locate and tighten loose part(s).
Tubing vibration. Ensure tubing is free from contact with
other tubing or components.

PARTS LIST
MODEL #13001 PREMIUM OUTDOOR REFRIGERATOR
HOW TO ORDER REPLACEMENT PARTS
Please refer to the parts list on this page.
To make sure you obtain the correct replacement parts for your premium refrigerator, the following information is required to assure getting the
correct part.
1. Reference number of replacement part needed.
2. Description of replacement part needed.
3. Quantity of parts needed.
IMPORTANT: Use only factory authorized parts. The use of any part that is not factory authorized can be dangerous. This will also void your
warranty.
IMPORTANT: Keep this installation and operating instruction manual for referral, and for replacement parts ordering.
9
REF # PARTS # QTY WARRANTY PERIOD
113501 3 1 yr
213502 1 1 yr
313503 12 1 yr
413504 4 1 yr
513505 4 1 yr
613507 4 1 yr
713508 1 1 yr
813509 1 1 yr
913510 1 1 yr
10 13533 1 1 yr
11 13511 1 1 yr
12 13512 4 1 yr
13 13515 1 1 yr
14 13525 1 1 yr
15 13526 1 1 yr
16 13530 1 1 yr
17 13531 1 1 yr
18 13532 1 1 yr
FAN MOTORS W/ COVER
ADJUSTING FEET
DOOR GASKET
DOOR KEY
GLASS SHELF SUPPORT
PROTECTIVE COVER
DOOR HANDLE W/SCREWS
COMPLETE FRONT PANEL DISPLAY
INTERIOR LIGHTCIRCUIT BOARD W/COVER AND SCREWS
DOOR W/GASKET
UPPER HINGE - REVERSE
BOTTOM HINGE
GLASS SHELF PROTECTIVE PAD
WIRE SHELF RAIL
DESCRIPTION
WIRE SHELF
GLASS SHELF
SHELF SUPPORT CLIP
UPPER HINGE - STANDARD

EXPLODED ILLUSTRATION
10

LIMITED WARRANTY
Bull Outdoor Products, Inc. warrants to the original purchaser at the original site of delivery with proof of purchase of each Outdoor Gas Grill that
when subject to normal residential use, it is free from defects in workmanship and materials for the periods specified below. This warranty excludes
grills used in rental or commercial applications. It does not apply to rust, corrosion, oxidation or discoloration, which may occur due to moisture or
overheating, unless the affected component becomes inoperable. It does not cover labor or labor related charges. There will be a shipping and
handling charge for the delivery of the warranty part(s).
Our obligation under this warranty is limited to repair or replacement, at our option, of the product during the warranty period. The extent of any
liability of Bull Outdoor Products, Inc., under this warranty is limited to repair or replacement. This warranty does not cover normal wear of parts,
damage resulting from any of the following: negligent use or misuse of the product, use on improper fuel/gas supply, use contrary to operating
instructions, or alteration by any person other than our factory service center. The warranty period is not extended by such repair or replacement.
Warranty claim procedure: If you require service or parts for your Bull grill, please contact our Warranty Service Center for factory direct
assistance. Our hours of operation are 8AM to 4 PM PST. Our phone number is (800) 521-2855 and our FAX number is (909) 770-8627. Please
direct all correspondence to: Bull Outdoor Products, Inc., 2483 W. Walnut Ave., Rialto, CA 92376. ATTN: Warranty Service Center
Product repair as provided under this warranty is your exclusive remedy. Bull Outdoor Products, Inc. shall not be liable for any incidental or
consequential damages for breach of any express or implied warranty on its products. Except to the extent prohibited by applicable law, any
implied warranty or merchantability or fitness for a particular purpose on this product to the duration of the above warranty. Some states do not
allow the exclusion or limitation of incidental or consequential damages, or allow limitations on how long an implied warranty lasts, so the above
limitations or exclusions may not apply to you. This warranty gives you specific legal rights, and you may have other rights, which vary from state to
state.
Serial Number
Date of Purchase
*Attach a copy of your receipt or invoice here*
11
Table of contents
Other Bull Refrigerator manuals