Bulldog Security TR36 User manual

TR36
User Guide
1
TR36/201805-15/GEN
These instructions are for a NEGATIVE EARTH VEHICLE (11 - 36V) and covers tting and
operating the Bulldog TR36 tracker with an iButton IMMOBILISER. The tracker and
immobiliser must be tted by a competent auto electrician. BEFORE installing, please
register your Bulldog TR36 and ensure correct operation on the smartphone app
Your Bulldog TR36 needs registering before you can enjoy the full tracking experience at:
www.bulldogtracking.co.uk/register
During the registration you will need the tracker IMEI and Sim Serial Number printed on the white card
that accompanied your tracker. After successful registration, you will receive an email giving full details
of the tracking service and how to track your Bulldog TR36 via your smartphone and online.
In this guide: text in red refers to a command / option in our tracking app and in blue refers to a
reference image in this guide, Fig 3 to 6.
1. REGISTRATION
These installation instructions are for the installation of a Bulldog TR36 tracker with iButton and
Immobiliser Kit. The installation shown in Fig. 1 provides the facility to only allow the engine to be
started by the holder of a unique iButton which has been pre-congured to work with your Bulldog
TR36 on a KEYSTART IGNITION. For a PUSH BUTTON start see Fig. 2.
IMPORTANT: Unused wires on the Bulldog TR36 - you must ensure that the end of any ununsed wires
are not touching any other wires, terminals or chassis. It is recommended that insulation tape is
wrapped around the end of each wire.
Once wiring is complete, mount the Bulldog TR36 in a hidden location under the dashboard and
securely attach the Bulldog TR36 and Immobiliser wiring harness to avoid them becoming dislodged.
Do not mount in the engine bay or other area where it can get wet; next to radio equipment; between
metal cavities in the vehicle or other parts of the vehicle where interference may be caused such as
radio speakers.
Read the TR36 User Guide and test all functionality, in a safe environment to ensure the
immobiliser functions correctly
2. INSTALLATION
Fig. 1

3. INDICATORS
The Bulldog TR36 has two indicators to show the status.
Blue: GPS Status
Flash: (on for 1 second and ofor 2 seconds) The tracker is not picking up a GPS signal
Flash: (on for 0.1 and ofor 2.9 seconds) The tracker is picking up a GPS signal
Flash: (every 0.1 seconds) The tracker is initialising or battery is low
OThe tracker is not connected to power
Green Status
Flash: (on for 1 second and ofor 2 seconds) The tracker is not registering on GSM
Flash: (on for 0.1 and ofor 2.9 seconds) The tracker GPRS is not connected or is being connected
Flash: (every 0.1 seconds) The tracker is registering on GSM
OThe tracker is not connected to power
2
TR36/201805-15/GEN
Fig. 2

Your conrmation email contained a link to download and set up the smartphone app to ensure it
works correctly with your phone and tracker.
This manual references icons / buttons within the smartphone app as described in Fig. 2.
Fig. 3
Please test all push notications to ensure they operate as expected. If not, ensure that the app is
permitted to send push notications within your iOS or Android settings.
If you do not want notication of all events, as a minimum we recommend the following notications
are set: Low Battery, Enter Sleep, Exit Sleep, Installed and Drop O.
When an alert is triggered, a Push Notication is displayed on your phone and you can view all alerts
in the app by tapping Alarm. This will display: date, time tracker name alert type and address at time
of the alert.
4. APP SET UP
AlarmMenu Refresh
Time
OnOConrm Back
The Bulldog Tracking app provides full details of your tracker , location, battery life and signal
strengths (iOS screen):
1 - Compass heading
2.- Toggle between map view and satellite view
3 - Toggle trac information overlay
4 - Last reported address of tracker
5 - GSM Mobile phone signal strength
6 - Speed at last GPS reporting interval
7 - Battery % remaining
8 - Online / oine status
5. VIEW LOCATION AND ALERTS
1
2
3
4
5 86 7
3
TR36/201805-15/GEN
Fig. 4

The Geofence Alert noties you if the tracker either enters into or exits out of a geographic area that is set
via the app:
Fig. 5
A geo-fence is a pre-dened area on a map and by using geo-fences you can be alerted if your tracker
travels into or out of that area. You can select whether you want an alert when the tracker crosses the
boundary whilst travelling INTO the geo-fence or travelling OUT of the geo-fence.
Once a geo-fence is set up ‘Enable’, you will receive the required alert every time the geo-fence boundary
is crossed. To stop receiving the alerts you must ‘Disable’ the geo-fence.
The Bulldog TR36 supports up to 2 geo-fences via the smartphone app.
Enable
Tap Menu, Management, Command, Set a geo-fence.
Tap Geo Fence Number and select the number to assign to the geofence.
Zoom in on the map to display the centre of the required geofence.
Tap the map to activate the centre of the required geofence.
7. GEO-FENCE ALERTS
Edit
Geofence diameter
slider
Exit Switch
Enter Switch
Geo Fence
Number
The Speed Alert noties you if the tracker exceeds a preset speed
Enable
Tap Menu, Management, Command, Set the Speeding alarm.
In Max Speed (kmh): enter a speed over which you want to receive a push notication (e.g. 70 km/h). Tap
Conrm.
When your tracker exceeds the set speed limit a push notication will be shown on your smartphone .
Disable
Tap Menu, Management, Command, Set the Speeding alarm.
In Max Speed (kmh): enter 0Tap Conrm.
Speed alerts are now disabled.
The Status screen will display after each command is set. After a few seconds if the command is
successful Status: Send successfully will be displayed. If an error is displayed e.g. Tracker is o-line, try
again later.
6. SPEED ALERTS
TR36/201805-15/GEN
NO 1

When an alert is triggered e.g. Speed, Vibration, Geo-Fence etc, a Push Notication is displayed on
your phone and you can view all alerts in the app by tapping Alarm. This will display: date, time tracker
name alert type and address at time of the alert.
IMPORTANT
Alerts can only be set when the tracker is NOT in sleep mode.
If the tracker is in sleep mode Tracker is o-line will be displayed.
You can check if the tracker is oine by viewing the tracker on the Map (Tap Menu, Map). If the tracker is not
displayed tap Tracker Select and tap the switch to On next to your tracker name.
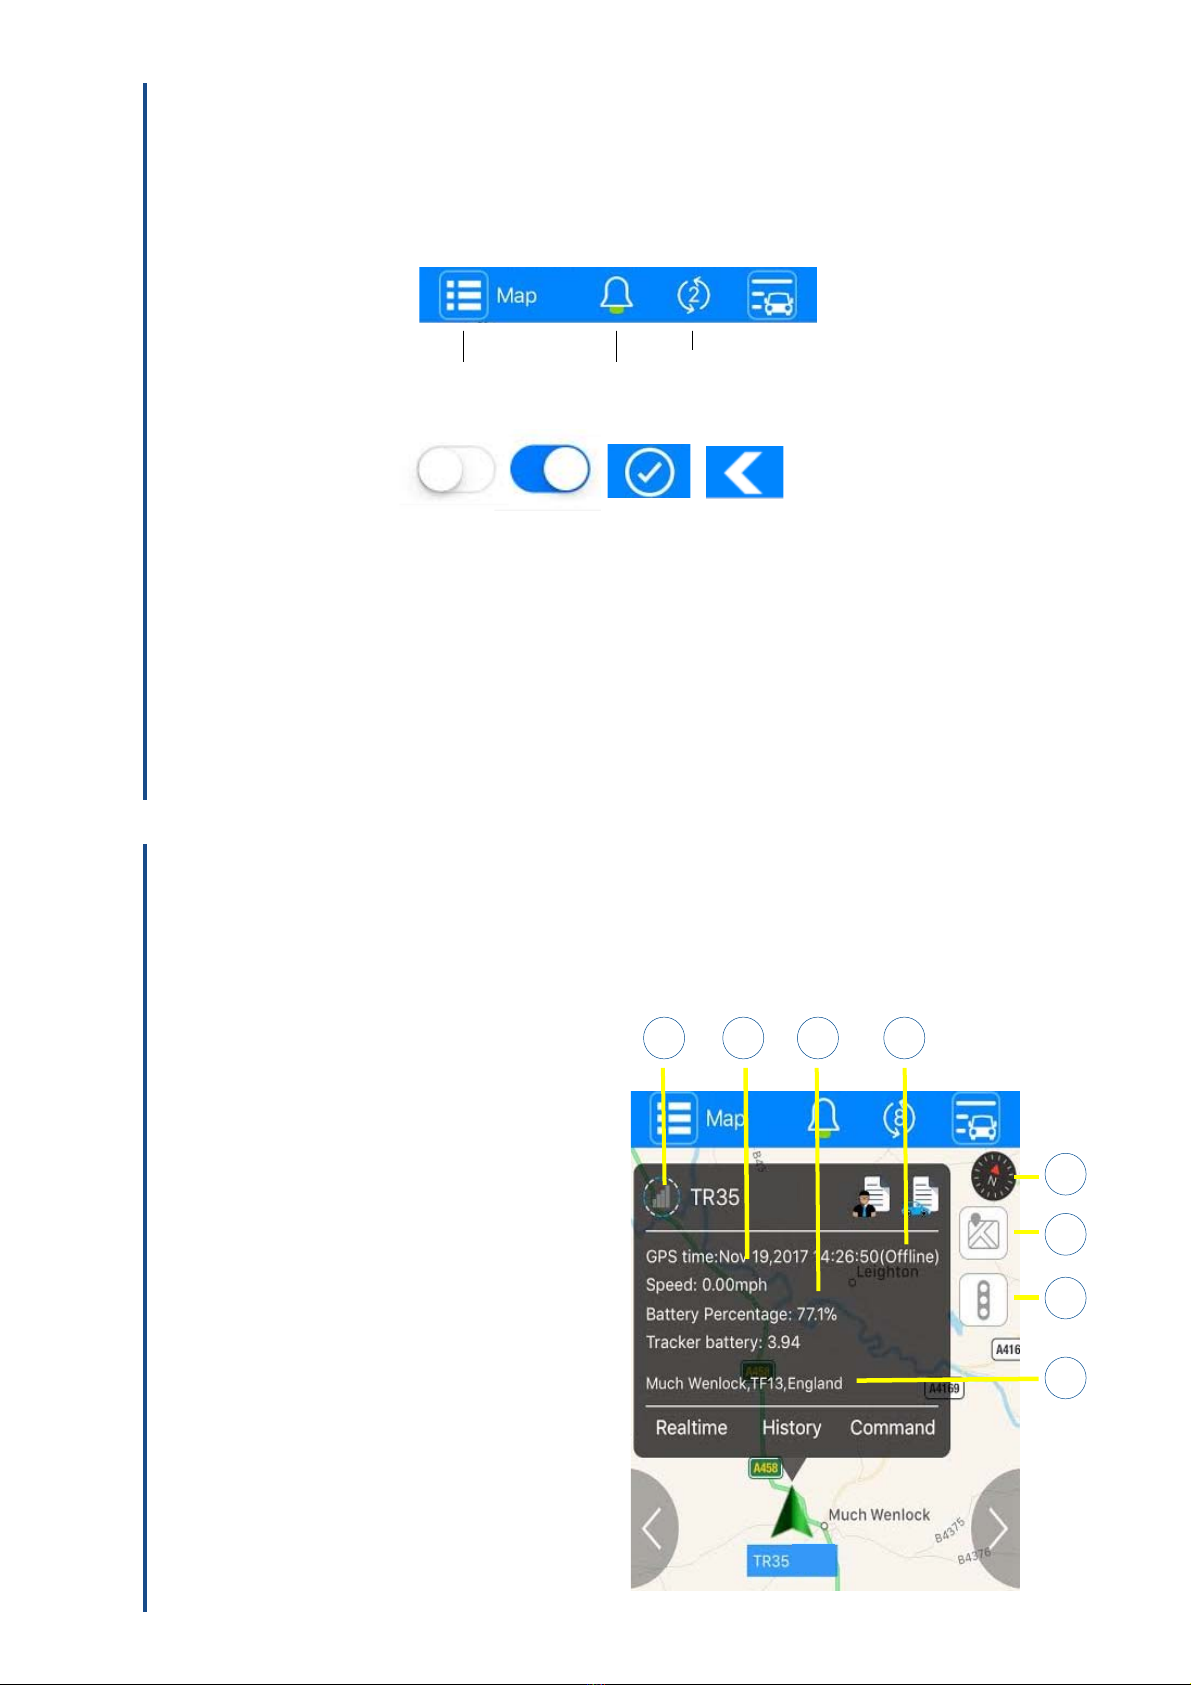
Tap your tracker icon to display the status window. This will show status and location data for your
tracker.
8. NOTIFICATIONS
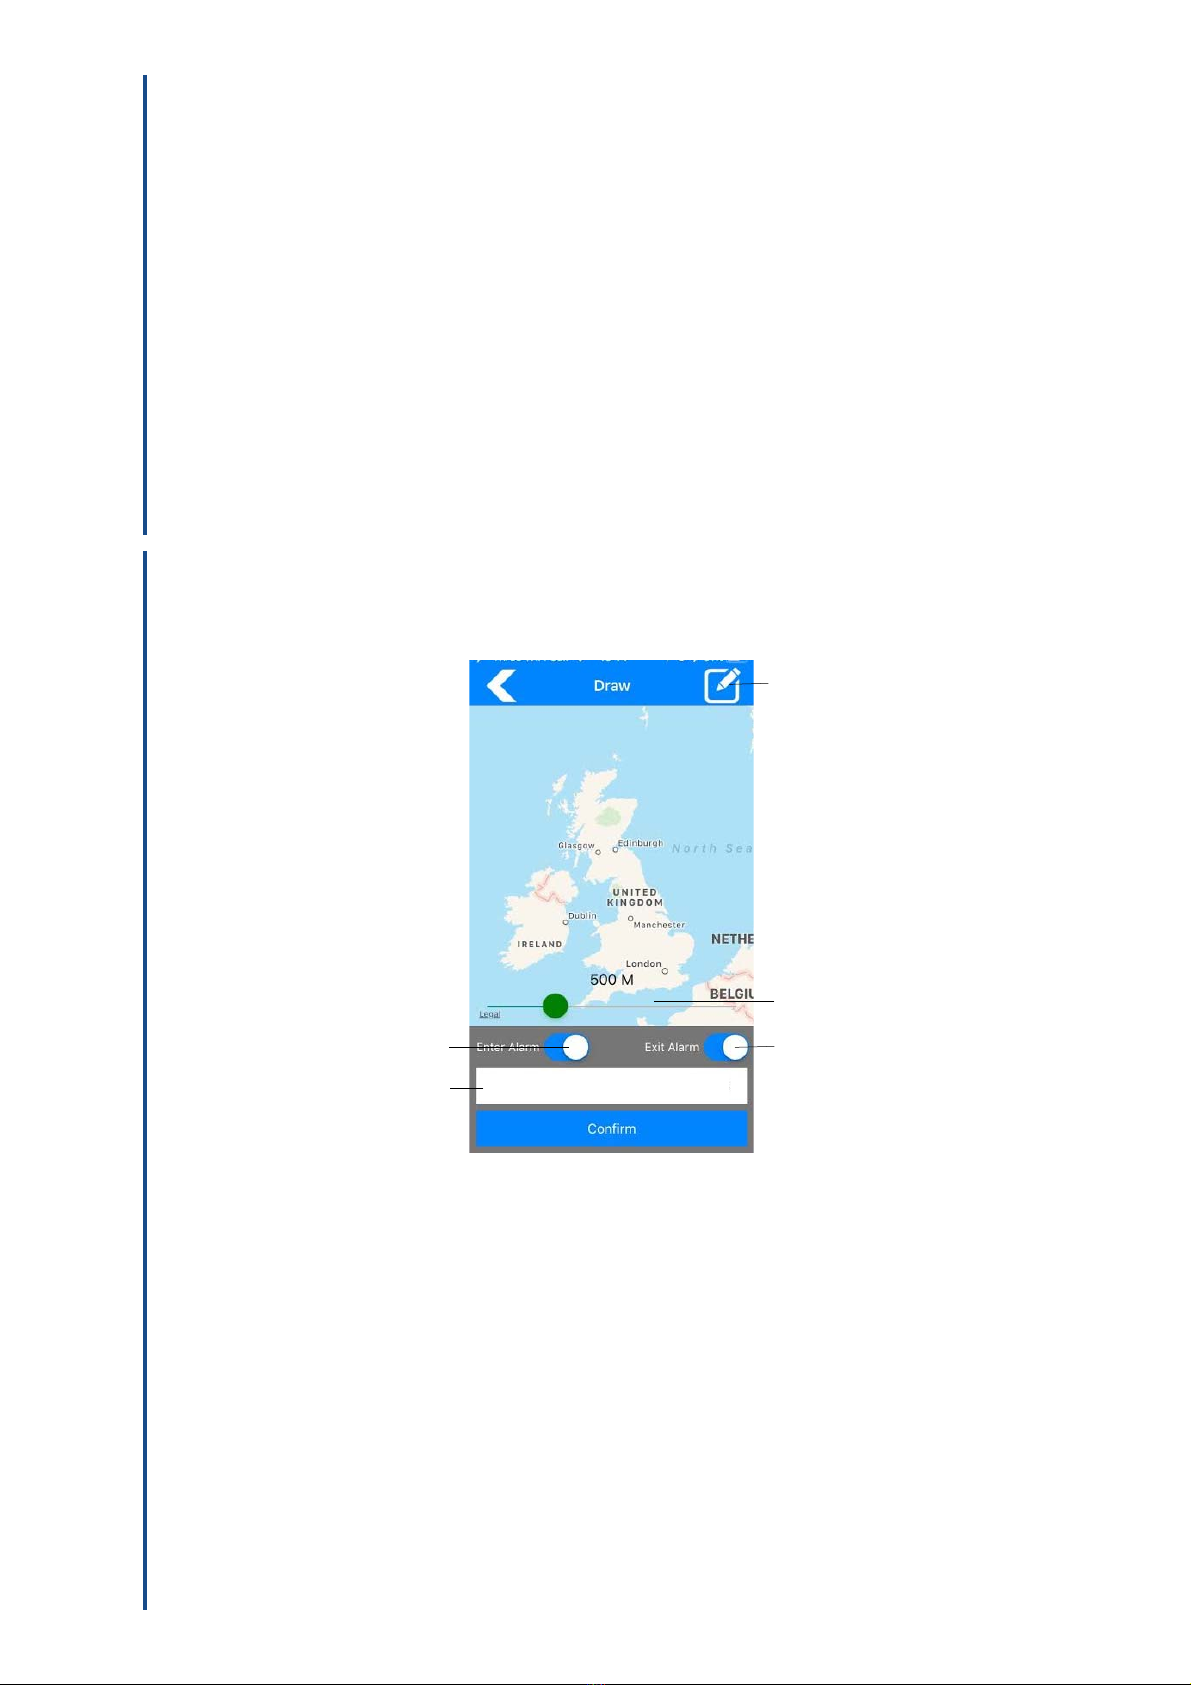
A red circle is displayed showing the area of the geo-fence.
Use the Geofence diameter slider to increase or decrease the diameter of the geo-fence circle.
Select the switches for Enter Alarm and Exit Alarm to select if you are alerted when you enter into the geo-
fence area or exit the geo-fence area.
Tap Conrm
The Status screen will display after each command is set. After a few seconds if the command is successful
Status: Send successfully will be displayed. If an error is displayed e.g. Tracker is o-line, try again later.
Disable
Tap Menu, Management, Command, Delete a geo-fence.
Tap Set a geo-fence and select the number of the geo-fence to delete
Tap Conrm
The Status screen will display after each command is set. After a few seconds if the command is successful
Status: Send successfully will be displayed. If an error is displayed e.g. Tracker is o-line, try again later.
GEO-FENCE ALERTS
5
TR36/201805-15/GEN
Important
The Bulldog tracking app, allows for the management and control of multiple vehicles using one log in.
Care should be taken when sending commands to ensure that the correct vehicle is sent the command.
Failure to follow these instructions, where you operate multiple vehicles from one app log in, could result in
vehicle trackers not operating as expected. To send a command to a tracker:
Tap Menu, Map. tap the Tracker Select icon and tap the name of the tracker you want to send a
command. (If there are multiple vehicles in the same location, zoom into the map) Tap the icon of the
tracker to bring up the status screen as shown in Fig 6. (iOS screen shown)
Tap Command in the status window and the command screen will be displayed allowing you to select the
required command and this command will be sent only to the selected tracker.
10. MULTI-VEHICLE MANAGEMENT
Fig. 6
Status Window
Command function

For support please visit
bulldogtracking.co.uk/support
Bulldog Security Products Ltd, Units 1-4 Stretton Road. Much Wenlock. Shropshire. TF13 6DH 6
The Bulldog TR36 functionality is pre-congured to work with our tracking service and no attempt should be
made to alter any settings in the tracker that are not explicitly detailed within these instructions.
Any attempt to change any other settings is in breach of the terms of our tracking service as are detail at
www.bulldogtracking.co.uk and could result in your Bulldog TR36 tracker becoming permanently inoperable
or not operating in the manner that it is designed to work.
USE OF ANY ACCESSORIES NOT APPROVED AND SUPPLIED BY BULLDOG WILL VOID ANY PRODUCT WARRANTY.
BULLDOG SHALL IN NO EVENT BE LIABLE FOR ANY SPECIAL, INDIRECT, INCIDENTAL, CONSEQUENTIAL OR PUNITIVE DAMAGES OR
FOR LOSS, DAMAGE, OR EXPENSE, INCLUDING LOSS OF USE, PROFITS, REVENUE, OR GOODWILL, DIRECTLY OR INDIRECTLY ARISING
FROM PURCHASER’S USE OR INABILITY TO USE THE PRODUCT, OR FOR LOSS OR DESTRUCTION OF OTHER PROPERTY OR FROM ANY
OTHER CAUSE, EVEN IF BULLDOG HAS BEEN ADVISED OF THE POSSIBILITY OF SUCH DAMAGE. BULLDOG SHALL HAVE NO LIABILITY
FOR ANY DEATH, PERSONAL AND/OR BODILY INJURY AND/OR DAMAGE TO PROPERTY OR OTHER LOSS WHETHER DIRECT,
INDIRECT, INCIDENTAL CONSEQUENTIAL OR OTHERWISE, BASED ON A CLAIM THAT THE PRODUCT FAILED TO FUNCTION.
THE TRACKING SERVICE ASSOCIATED WITH THE BULLDOG TRACKER IS PROVIDED SUBJECT TO OUR TERMS AND CONDITIONS AT
WWW.BULLDOGTRACKING.CO.UK THE BULLDOGONE TRACKER CONTAINS NO USER SERVICEABLE PARTS AND ANY ATTEMPT TO
REMOVE THE COVER OR DISMANTLE WILL VOID ANY PRODUCT WARRANTY.
THESE INSTRUCTIONS MAY BE MODIFIED OR CHANGED WITHOUT NOTICE.
TR36/201805-15/GEN
Table of contents
Other Bulldog Security GPS manuals