Burco 77010 User manual

Manuals and Documents
Brought to you by
Wechillit.com Ltd
WCI Group House
18 Pride Hill
Shrewsbury SY1 1DQ
Tel: 01743 289418
Fax: 01743 289416
Web: www.wechillit.com

Guarantee registration
Appliance model
Serial no.
Date of purchase
Customer name
Address
Please help us to further improve our products by ticking the
one main reason for purchase
Price Styling/Appearance
Features Previous Burco ownership
Dealer recommendation Service back-up
Other (please state)
Where did you buy your Burco appliance ?
Dealer/Retailer
If you do not want Burco to keep you informed of future products and offers,
please tick here
CUT HERE & DETACH
Getting the best from your
toaster......
• Remove any plastic film from the product before use
• The conveyor belt toaster must be placed on a level, firm place.
• If you are having difficulty using your toaster please refer to the
trouble shooting guide at the back on the instruction book.
Model 77010
SKU 444448554
Dimensions
H 390mm,
W 365mm,
D 575mm
Conveyor belt toaster
Please read and keep these
instructions
CP77010MUK Rev 2 10/08
www.burco.co.uk
0871 222 2620
0844 815 3744
Trouble shooting
If you have any difficulty with your appliance, please
consult list below before contacting the Burco customer
helpline:
ISSUE:Toaster is connected to the mains but has no power
going into the unit.
CHECK:Is the green power indicator on? If not try using
another power supply. Check power supply is
switched on and the right hand dial is not switched
to off.
ISSUE: The conveyor belt is moving but the toaster is not
toasting?
CHECK:Has left hand dial been set to ‘econ’ ie half power
mode.
ISSUE: Unit is switched on but conveyor belt is not moving
or moving very slowly.
CHECK:Has the right hand dial been set to OFF?
CHECK:Has debris become lodged inside the unit stopping
the conveyor belt moving round. If debris is
stopping your toaster working Turn OFF at the
power mains and allow to cool before removing
debris.
ISSUE: Has left hand dial set to very dark/slow?
CHECK:Use right hand dial to select a lighter shade of toast
and increase conveyor belt speed.
ISSUE: Conveyor belt toaster keeps burning toast.
CHECK:Use right hand dial to select a lighter shade of toast
and increase conveyor belt speed.
ISSUE: Toaster will not eject from rear.
CHECK: Is rear hatch open?
If the guide above does not help you solve the problem you
have with your toaster please contact our helpline on
0871 222 2620
Burco products are intended for commercial use only as
detailed in these instructions.
Burco has a policy of continuous improvement in
product quality and design. The Company, therefore,
reserves the right to change the specification of its models
at any time.
Burco Commercial Catering Equipment
Glen Dimplex Professional Appliances
Stoney Lane, Prescot, Merseyside, L35 2XW
Tel 0871 222 5118 Fax 0871 222 9636
Email [email protected]
77010 rev2:77010 rev3 15/10/08 10:49 Page 1
Important safety
instructions
The use of any electrical appliance
requires following common sense
safety rules.
Primarily there is danger of
personal injury and secondly danger of
damage to the appliance and
property. These are indicated in the
instructions text by the following two
conventions:
WARNING: Danger of personal
injury
IMPORTANT: Damage to the
appliance
In addition we offer the following
essential safety advice.
Location
• Always ensure that your conveyor
belt toaster is sat level on a firm,
flat surface.
• Ensure your toaster is sat far
enough back from the front of the
work surface not to hang over the
edge and cause an obstruction.
• Do not use your conveyor belt
toaster outside.
IMPORTANT: Do not locate the toaster
in areas subject to excess
temperatures or grease from
cooking appliances such as fryers,
as exposure to these elements
may cause damage to the unit. Do
not place toaster in an area which
restricts air flow around the front
or rear of the unit. Do not place
the toaster in direct discharge
path or air-conditioning vent or
makeup air vent.
Personal safety
• WARNING: Extreme caution
must be used when moving the
toaster as it is very heavy.
• WARNING: The exterior
surfaces of the toaster will get
very hot whilst in operation.
Use caution when touching
these surfaces
•Always turn the toaster off, allow
to cool down and unplug before
adjusting, moving or cleaning the
unit.
Mains cord
•The mains lead should reach from
the socket to the toaster without
straining the connections.
• Do not let the cord hang over the
edge of the table or the counter
and keep it away from any hot
surfaces.
• Do not place the toaster where the
mains lead could fall into a sink.
Other safety
considerations
• To protect against fire, electric
shock and personal injury do not
immerse cord, plug or toaster in
water or any other liquid.
• The use of attachments or tools
not recommended or sold by
Burco Appliances may cause fire,
electric shock or injury.
• If the mains lead is damaged, it
should be replaced. by a qualified
technician.
• Unplug from the mains outlet
when not in use and before
cleaning.
• This appliance is not intended for
use by persons (including children)
with reduced physical, sensory or
mental capabilities, or lack of
experience and knowledge, unless
they have been given supervision
or instruction concerning use of
the appliance by a person
responsible for their safety.
Marketing Department
Burco Appliances Ltd
Talbot Road
Mexborough
South Yorkshire
S64 8AJ
Affix
postage stamp
here
CUT HERE & DETACH
NOTE: You will not need to use
lubrication on your toaster.
This appliance is not to be cleaned
using a water jet.
Replacement
parts
IMPORTANT: This product has no
user serviceable parts.
Genuine replacement Burco parts
must only be fitted by a qualified
service engineer. If generic non-Burco
parts are fitted you may stop your
toaster operating safely and in the
most efficient manner.
Helpline
If you have trouble with your
toaster please consult our Trouble
shooting guide on the back of this
instruction book. If after consulting
this and you are still having trouble
please do not hesitate to call us.
Please have your product to hand and
have the following information ready
to enable us to deal with your query
quickly:
• Name of the product.
• Model number as shown on rating
plate, located on the back of the
unit.
• Serial number as located on rating
plate, located on the back of the
unit.
Guarantee
This conveyor belt toaster is
guaranteed for a period of 12 months
from the date of purchase against
defective materials or faulty
workmanship.
This guarantee is given subject to
the unit being used in accordance with
the instructions of the supply voltage
marked on it and to the usual fair wear
and tear conditions.
The guarantee does not cover
consequential damage arising out of
any failure acceptable under
guarantee, nor does it cover damage
resulting from misuse, accident or
unauthorised alterations to the unit.
Proof of purchase will be required.
In any communication with the
manufacturer, it is essential to quote
the model and serial number marked
on the rating plate.
This guarantee, in no way
diminishes the buyer’s statutory rights.
Please fill in and return the tear
off section to register the guarantee
with Burco.
72
For electrical products sold within the
European Community. At the end of the
electrical products useful life it should
not be disposed of with household
waste.
Please recycle where facilities exist.
Check with your Local Authority or
retailer for recycling advice in your
country.
77010 rev2:77010 rev3 15/10/08 10:49 Page 4
Electrical
requirements
Check that the voltage on the
rating plate of your appliance
corresponds with your electricity
supply which must be A.C. (Alternating
Current).
If the socket outlets are not
suitable for the plug supplied with this
appliance, the plug should be removed
and the appropriate one fitted.
WARNING: The plug removed
from the mains lead, if severed,
must be destroyed as a plug with
bared flexible cord is hazardous if
engaged into a live socket outlet.
WARNING: This appliance must
be earthed.
Should the fuse in the 13A plug
require changing, a 13A BS 1362 fuse
must be fitted.
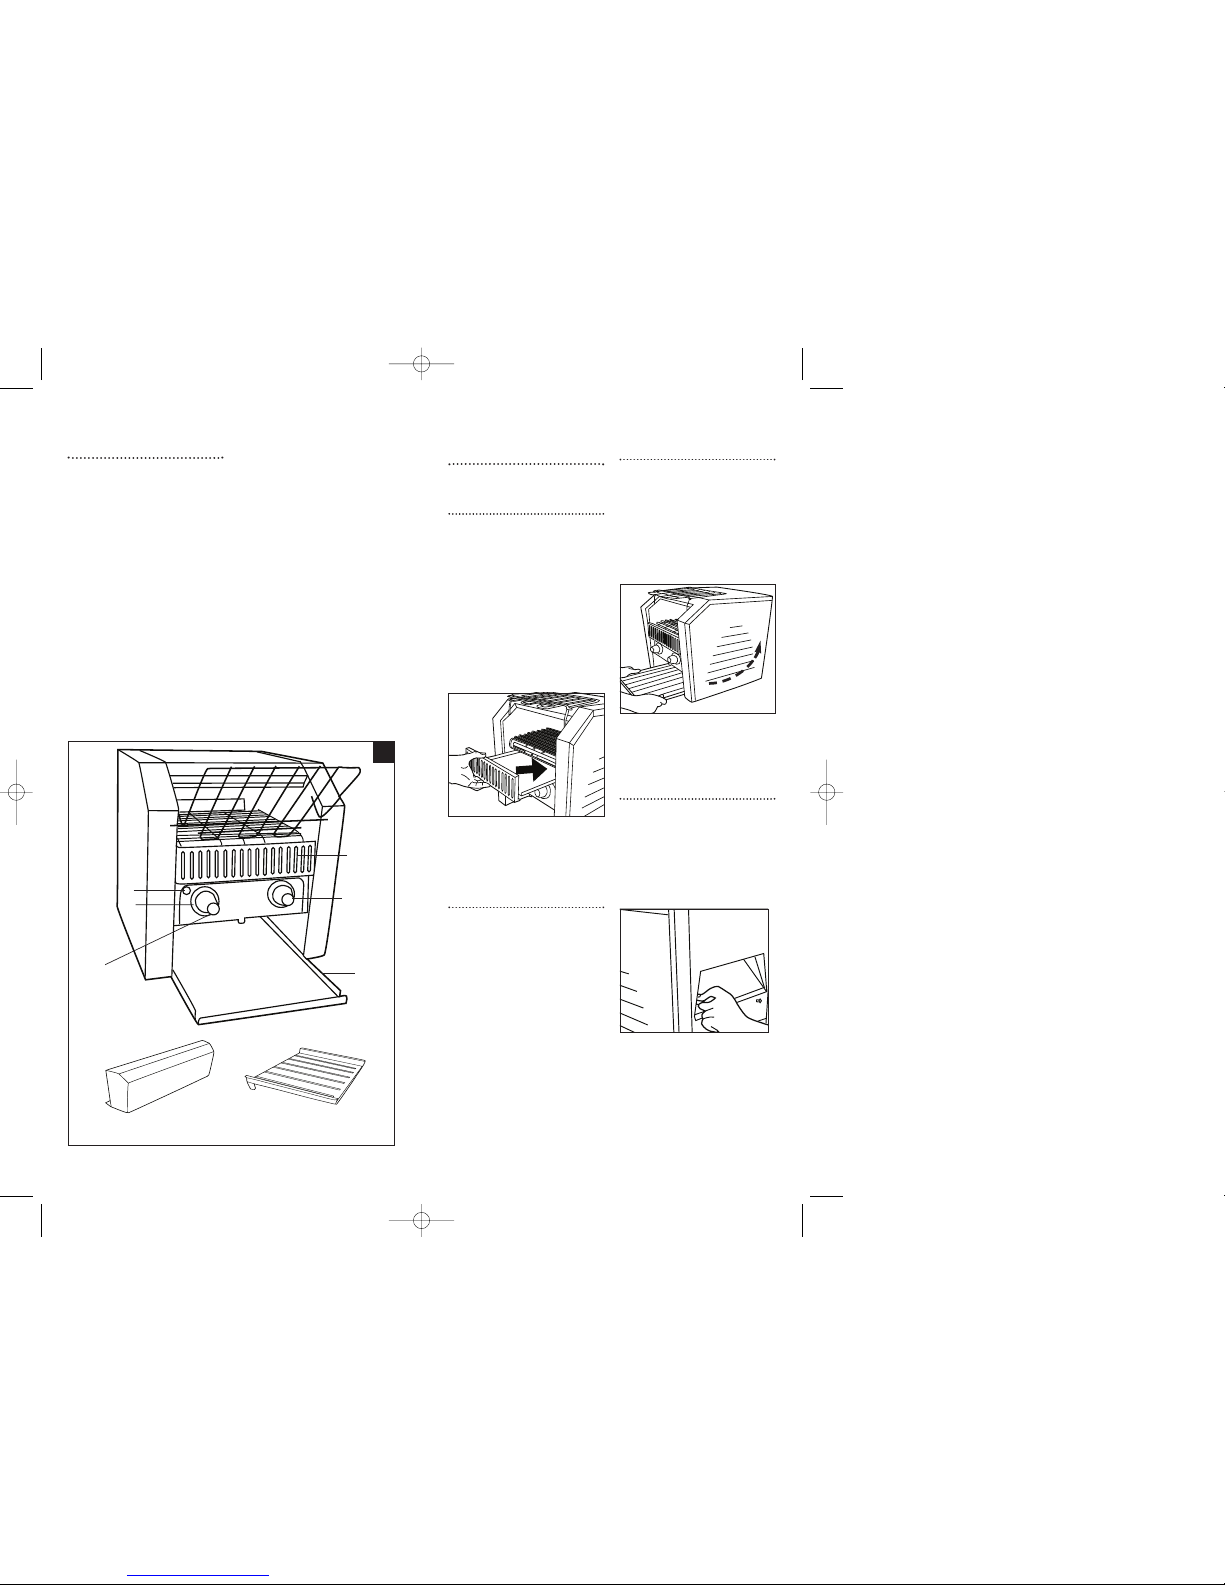
Features
⁄Bread feed chute
¤Crumb tray
‹Element selection dial (for single
or double sided toasting)
›Front toast eject chute.
fiShade selection / speed control
flPower on indicator
‡Control panel cover
·Control panel cover security nut.
Back
‚Rear toast eject chute
3 4
Assembling your
toaster
Crumb tray
WARNING: Ensure your toaster is
disconnected at the main power
supply and has cooled down
before attaching or removing
the crumb tray.
1To attach the crumb tray insert on
top of the rail on of the toasting
tray.
2Push all the way in until the tray
reaches the back and the front of
the tray sits flush with the front of
the unit.
IMPORTANT: To avoid debris entering
the unit and causing damage
always operate the toaster with
crumb tray installed.
Eject chute
Your toaster can be set up to use
either the front or rear toast eject
chute, however they can not be used
together. When using the rear eject
chute the rear hatch must be pushed
inward to open and clicked into place
before use.
For front eject the rear hatch must
be in the vertical/closed position.
Front toast eject
chute
WARNING: Ensure your toaster is
disconnected at the main power
supply and it has cooled down
before attaching or removing
the front toast eject chute.
•Attach the chute by pushing the
curved end with hooked lip to the
back of the unit.
• Adjust until the hooked lip is fixed
over the screws on the inside of
the toaster at the rear end.
Rear toast eject
chute
WARNING: Ensure your toaster is
disconnected at the main power
supply and has cooled down
before attaching or removing
the rear toast eject chute.
• Push rear hatch inward to open
and click into place.
• Attach the eject chute by hooking
the two cut outs on the side of the
chute over the two screws on the
back of the toaster.
A
‹
fi
¤
fl
⁄
›
‚
‡
·
77010 rev2:77010 rev3 15/10/08 10:49 Page 7

6
• Once located over the screws push
the eject chute down firmly to
ensure it is locked in place.
Bread feed chute
WARNING: Ensure your toaster
is disconnected at the mains power
supply and has cooled down before
adjusting the bread feed chute.
Bread feed chute is designed to
enable toast to be automatically feed
into the toaster. Using the bread feed
chute will ensure the most efficient
and even toasting possible is achieved.
• The bread feed chute will already
be attached to your toaster.
• To use, ensure that the chute is
protruding from the front of the
toaster.
• Whilst not in use or for storage the
toast feed chute can be rotated
back and stored on the top of
your toaster.
Toasting
Products for toasting when placed
on the conveyor belt pass through the
cooking area which has elements both
above and below. Items of different
thickness, sizes, moisture and sugar
content will toast at different speeds.
However, the main derminant of the
final result is the conveyor speed which
can be adjusted using the selection
dial.
IMPORTANT: The toasting of
coated or buttered products such as
cheese sandwiches or garlic bread is
not recommended. Any residue from
these items if deposited inside the
toaster could ignite or inhibit the
performance of your toaster.
Use
IMPORTANT: On first use ensure all
packaging and holding tapes are
removed from the unit.
• Plug the unit into a properly
grounded electricity supply.
• Suggested the unit is allowed to
heat up fully on the initial
operation as it is likely to give off
a new smell initially.
Warm up / single or
double sided toast
• Select single or double sided
toasting.
• The dial on the right of the
control panel (element selection
dial) allows you to select whether
you require:
Single sided toasting (top
element only active)
Double sided toasting (both
elements active)
• The green power indicator will
illuminate and will remain
illuminated whilst there is power
to the unit.
IMPORTANT: It is recommended that
20 minutes is allowed for your
toaster to warm up before use for
economy mode.
Make toasting and
shade selection
• The dial on the left of the control
panel (shade selection /speed
control) allows you to select the
5
shade of toasting required (this is
achieved by adjusting the speed
of the conveyor belt.)
•To change the shade of toasting
you require select from the
following:
Very light
toasting
Medium
toasting
Very dark
toasting.
Tip: It is suggested that to achieve
desired level of toasting the
toaster should be set to “Medium
toasting’ on first use. Insert a
piece of toast to test level, when
this is dispensed adjust controls
accordingly to achieve desired
result. The control cover panel can
then be attached to prevent
changing of settings (see below)
• During use the shade selection and
element selection dials can be
adjusted as required.
Additional
features
Control panel cover
WARNING: Ensure your toaster has
cooled down before attaching
or removing control panel cover.
• Ensure the fixture beneath of the
control panel cover is extended.
• Place control panel cover over the
control panel.
• Push against unit and turn fixture
anti-clockwise until the cover is
secure.
Economy mode
This feature allows the toaster to be
put into standby mode, which
reduces the power economy mode
by 50%.
• To activate select the ‘Econ’ on
the using the
element selection
dial on the right
of the control
panel.
• To revert back
to full operation
select single or double sided
toasting as above. Allow a
minimum of 2-3 minutes before
toasting: the unit will be back up
to full temperature within 10
minutes.
Cleaning
WARNING: Always disconnect the
plug from the mains and allow
to cool before cleaning.
• Remove crumb tray and chutes to
clean. These items are both
dishwasher safe, or they can be
cleaned using a cloth and small
amount of non-abrasive cleaner.
• Wipe the outside of your toaster
with damp cloth. It is
recommended that this is done
daily. Stubborn stains may be
removed using a good stainless
steel cleaner or non-abrasive
cleaner.
• Hard to reach areas should be
cleaned using a small bristle brush
and mild cleaner.
IMPORTANT:Do not use abrasive
cleaners on the toaster as this
could scratch the finish of your
toaster.
O
f
f
E
c
o
n
77010 rev2:77010 rev3 15/10/08 10:49 Page 9
Table of contents
Other Burco Toaster manuals


