Burmester 111 Musiccenter User manual

Owner’s Manual

iPad is a registered trademark of Apple Inc., registered in the U.S.A. and other countries.
HIGHRESAUDIO is a registered trademark.
Using third-party services (Internet radio, music streaming services) with the 111 Musiccenter is
subject to any terms of use of those suppliers, as well as technical requirements on the part of the
user such as Internet access and service availability over which Burmester Audiosysteme GmbH has
no control.
Software-Version 2.52
Dear Music Enthusiast,
Congratulations on your selection and thank you for your trust.
You have chosen a product that combines absolute fidelity and uncompromising quality with
technical innovation and maximum flexibility.
Please read through these operating instructions at least once before initially installing the product so
you can fully benefit from all the functions of this truly high-fidelity device. Should any of your
questions remain unanswered, please contact your audio dealer or us directly.
Talk to us about any special requests you may have – even if they seem out of the ordinary. We love
accepting technically feasible challenges.
We wish you many hours of musical enjoyment.
Your Burmester Team

Musiccenter 111
3
I ........................................................
The Key to Symbols and Text Notations ...............................................5
A W C ...................................................
A O M...................................
I S I .........................................
Meaning of warning symbols and words ..............................................7
Opening the device ................................................................7
Replacing defective fuses ...........................................................7
Power supply ......................................................................7
Placing the Musiccenter.............................................................8
Operation during thunderstorms.....................................................8
Backup ...........................................................................8
H M ...........................
Packaging .........................................................................8
What’s in the box?..................................................................9
Placing the Musiccenter.............................................................9
I M...........................................
Installing the storage battery........................................................10
Connecting analog sources.........................................................11
Connecting digital sources .........................................................11
Connecting a power amplifier ......................................................12
Connecting tape recorder, headphones and a digital output............................12
Connecting a network cable and USB devices ........................................13
Connecting components for remote control ..........................................14
Connecting the WiFi antennas ......................................................15
Connecting the power cord ........................................................16
C E D ......................................
H M ..................................
F R C ....................................
H M H N ...............
Establishing a connection with a network cable .......................................21
Connecting to the network via WiFi..................................................22
T C

4
H M N..................
C O M ................................
Using the buttons on the front panel or the remote control .............................24
Using the BurmesterMC iPad® App ..................................................24
Using a Web browser ..............................................................25
H C M..........................
H CD...................................................
H C N ......................
H C USB S D .....................
H () CD I M .........................
H C S S ..........
H C H D (P).....................
H C I ..............................
H M - D S ..............
H S N V ............................
H S U..................................
W...........................................................
M, R C........................................
D ( E U).........................
A............................................................
G ...........................................................
T S .............................................

INTRODUCTION
Musiccenter 111
5
I
The 111 Musiccenter was designed and manufactured with the highest possible audio
performance in mind. This performance is greatly influenced by the correct installation
and operation of this fine audiophile instrument. Therefore, we urge you to read this
manual very carefully and keep it handy for future reference.
This manual is intended to give you all the information you need to operate the 111
(Software Version 2.52) safely and to its full potential.
To use all the functions of the 111 Musiccenter you will either need an Apple iPad®with
the free BurmesterMC App installed or you can use any computer (PC, Tablet, Mac)
with a web browser. (Computer and iPad®are not included). How to use the App or a
Web Browser to control the Musiccenter will be explained in separate manuals.
The Key to Symbols and Text Notations
3Requirement
This indicates a condition that needs to be fulfilled before the next action can
be taken.
►Action
This indicates a single action.
1.
2.
3.
Action sequence
This indicates a sequence of actions that must be taken in the described
succession.
ªResult
Indicates the result of an action.
A W C
Please keep in mind that the Musiccenter, like any other electrical device, must be
handled with care and caution at all times. Especially digital components operate with
very high and potentially lethal voltages. Careless or negligent operation may not only
damage the device and other components in the system but may cause bodily harm
and even death.

A BRIEF OVERVIEW OF THE MUSICCENTER
6
A O M
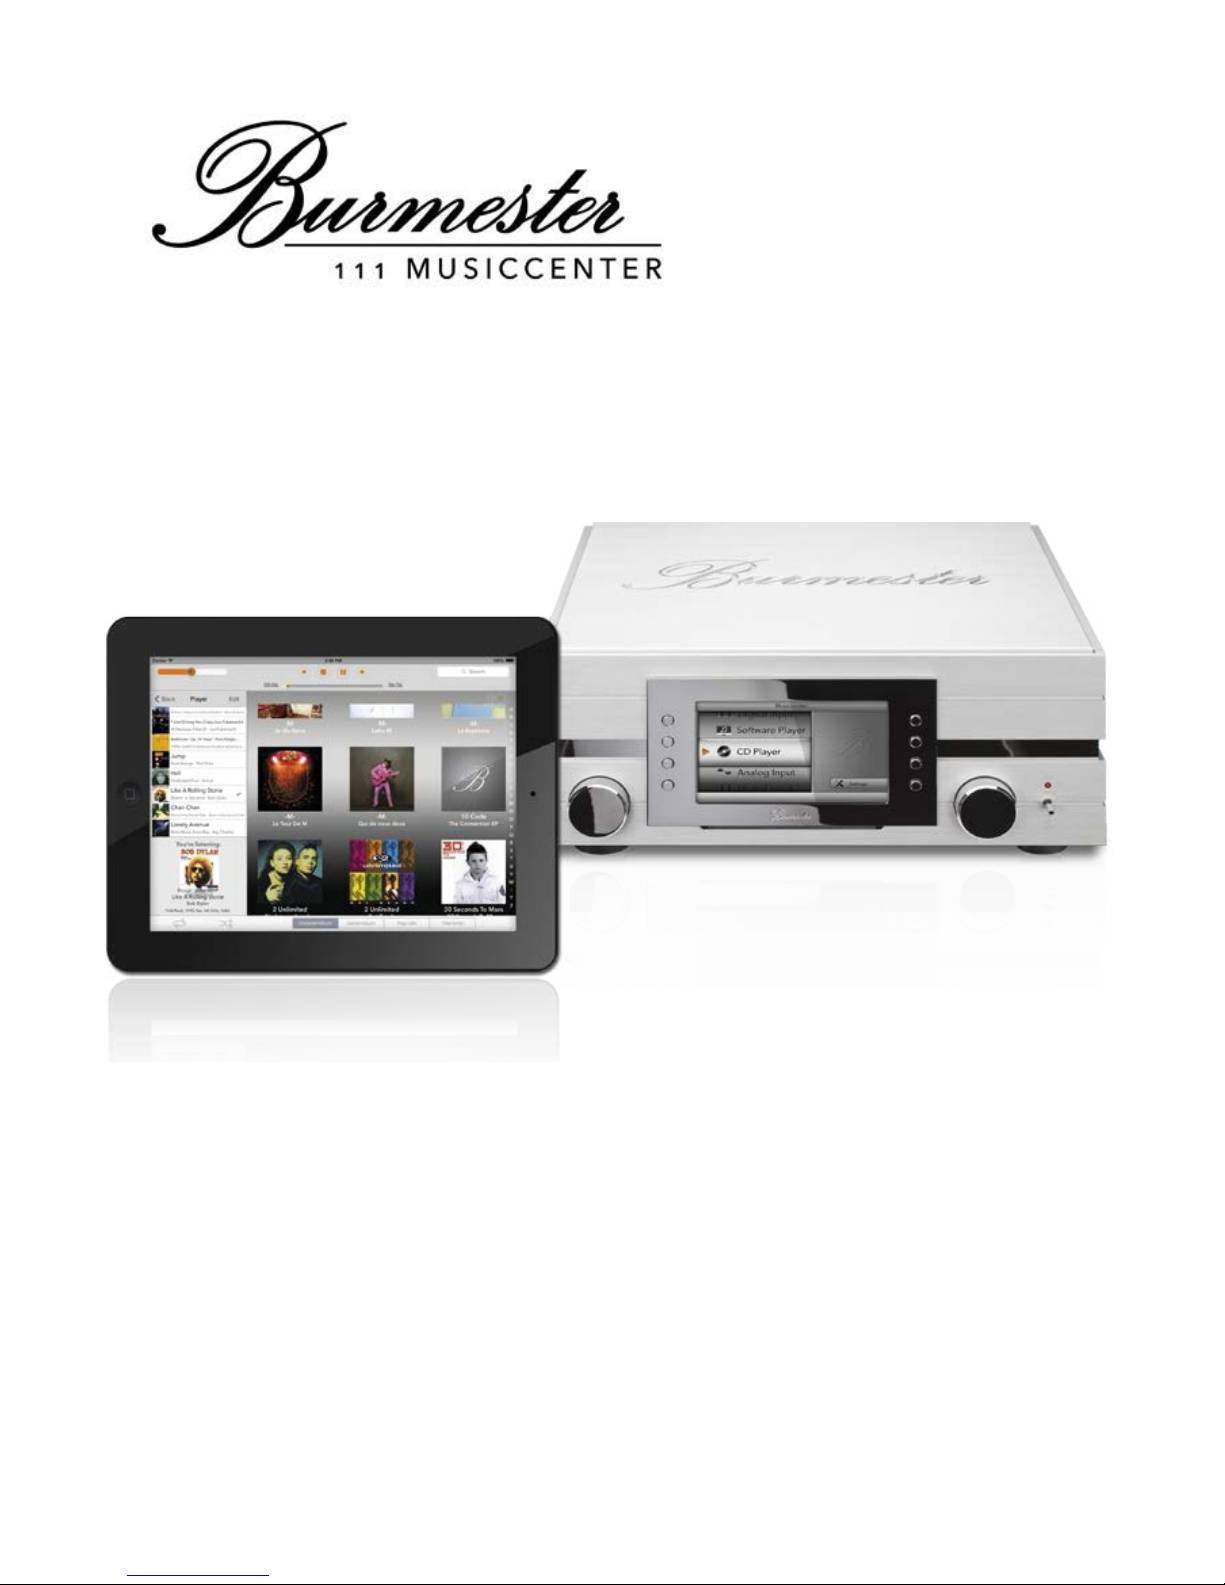
The Burmester Musiccenter 111 combines several premium audio components into
one unit, providing multiple options for highest-quality music reproduction:
Preamplifier
Connect your analog and digital signal sources to the reference-class preamplifier and
assign names of your choosing to the connected devices.
CD drive
Play CDs directly or rip them into internal memory.
Internal hard drive
Copy songs to the internal hard drive and optimize the sound quality during ripping.
If the Musiccenter is connected to the Internet, CD covers as well information about the
album and artist are automatically downloaded and saved.
Play back stored music. The search function gives you convenient options to select
songs by name, by artist, by album or by genre.
Home network
Connect the Musiccenter to your home network. Thanks to the DLNA/UPnP standard,
musical content saved on the Musiccenter is available on other devices connected to
the network. At the same time the Musiccenter can access content on those other
devices. This includes music on another Musiccenter or on another UPnP/ DLNA
servers on the network.
Music downloads, music streaming services and Internet radio1
Using your Internet connection, download high-resolution music from providers like
HIGHRESAUDIO, stream high-resolution music from service providers like TIDAL and
access a wide variety of Internet radio stations.
Control via the iPad®-App
Conveniently control your Musiccenter using an Apple iPad® tablet (optional) with the
free BurmesterMC App:
• Choose among connected signal sources.
• Start ripping a CD into internal memory.
• Scroll through the covers of saved albums or display information about albums and
artists.
• Create and play playlists.
Note: Information on how to install the Burmester MC App and use it with the Apple iPad®
can be found in the separate manual „Owner’s Manual for using the iPad®-App“.
Control via a web browser
Even without an iPad® you can access the Musiccenter using any standard web
browser. Besides selecting albums, tracks and playlists for playback the web browser
interface offers a variety of additional functions:
• Import audio files in the formats flac, m4a, aif, wav, mp3, aac and ogg.
• Edit album and track information
• Export audio files to a USB stick
• Query information about your device
• Change system settings
Note: Information on how to operate the Musiccenter via a web browser can be found in the
separate manual „User Guide for Operation via a Web Browser“.
1 Using an Internet connection and music downloads or streaming services will incur usage-
dependent costs.

IMPORTANT SAFETY INFORMATION
Musiccenter 111
7
I S I
Meaning of warning symbols and words
This document uses the following warning symbols and words:
The general danger symbol, in conjunction with the warning words
CAUTION, WARNING, and DANGER, serves to warn against the risk
of severe injuries. Follow all subsequent instructions to prevent
serious or fatal injuries.
The lightning symbol, in conjunction with the warning word
DANGER, serves to warn against a lethal electrical voltage.
ATTENTION The warning word NOTICE indicates a danger that can lead to
damage to or destruction of the device.
CAUTION The warning word CAUTION indicates a danger that poses a low or
medium risk of injury.
DANGER The warning word DANGER indicates a danger which can directly
lead to death or severe injury.
Opening the device
Do not open the device. The device does not contain any parts that can be maintained
by the user. Fuses inside the device may only be replaced by authorized staff, such as
your specialist dealer.
Replacing defective fuses
A defective fuse may render the device inoperative, meaning the device does not turn
on even though a power supply is present. When the power plug is connected and the
mains switch is on, a lethal voltage is present after opening the fuse holder inside the
fuse compartment. The fuses (F1, F2) are located inside the device and may only be
replaced by a qualified professional.
Power supply
Use the supplied 3-wire power cord for power supply. The protective earth contact
must not be rendered ineffective. Furthermore, the device may only be connected to
an outlet with a functioning protective conductor connection.
The device has a power supply unit that automatically adjusts to the power supply. As a
result, the device can be operated with all common power supplies.
Lay the power cord in a way that prevents it from being damaged. Do not use a
damaged power cord. Instead, switch the device off and contact your specialist dealer.
Disconnecting from the power supply
To disconnect the Musiccenter from the power supply completely, use the easy-to-
access mains switch on the rear panel.

HOW TO UNPACK AND INSTALL THE MUSICCENTER?
8
Placing the Musiccenter
When selecting an installation location, please note the following:
• Avoid direct sunlight, excessive heat, cold, moisture, and dust.
• Ensure sufficient ventilation. Do not place the device in a closed rack.
• Do not cover the slots and openings on the device. They serve as a means of
ventilation.
• Do not expose the device to dripping water or spray water and do not place any
containers holding liquids on your device. Do not place any open ignition sources,
such as burning candles, on the device.
Operation during thunderstorms
During thunder and lightning storms, disconnect the device from the power supply by
unplugging the power cord from the unit or from the power socket. Switching off the
mains switch on the rear panel of the device is not sufficient. For good measure, also
disconnect all other components from the power supply.
Backup
Burmester recommends backing up audio data saved in the Musiccenter to an external
USB drive via the web interface. Backups should be performed every six months or
after ripping a certain number of CDs. Please refer to the enclosed separate document
“Instructions for Operation via a Web Browser” for more information on performing a
backup.
H M
CAUTION
Device is very heavy
The Musiccenter is very heavy. If it slips and falls you could be hurt.
►If necessary please get the help of a second person to assist with unpacking and
installing the device.
►Please be particularly mindful of sharp corners.
►Put the box on the floor and carefully lift out all accessories and the Musiccenter.
►If the initial operating temperature is too high or too low it might lead to
malfunctions. Therefore, please let the device rest for a while after unpacking before
connecting and operating it.
Packaging
The packaging has been designed for re-use – unless it was damaged during the initial
shipment. We urge you not to discard it but saving it for any future shipment.

HOW TO UNPACK AND INSTALL THE MUSICCENTER?
Musiccenter 111
9
What’s in the box?
►The following items are supplied. Please make sure everything is in the box:
— 111 Musiccenter
— RCA-XLR Adapter (4 singles or 2 pairs)
— Remote control 067
— Power cord
— Network cable
— Storage battery
— Socket wrench
— Operating Manuals (OM): Quick-start OM, OM for the Musiccenter, OM for
operation via the iPad®-App, OM for operation via a Web browser, TIDAL OM
— WiFi antennas (2)
— Warranty documents
►Please contact your audio dealer if something is missing or anything has been
damaged during transport.
Placing the Musiccenter
ATTENTION
Heat or humidity
High heat or excessive humidity might damage the device.
►Protect the device from direct sunlight.
►Avoid placing the Musiccenter near heat sources such as radiators, stoves or on
top of other components that might get hot, such as power amplifiers.
►Avoid humidity and dust.
►Make sure there is sufficient ventilation.
1. Place the Musiccenter on a sturdy and level surface. CAREFUL! Keep in mind the
heavy weight of the Musiccenter.
2. Protect the device from heat and humidity.
3. Connect the device as described in the following chapter.

INSTALLING THE MUSICCENTER
10
I M
In this chapter you will find descriptions of all possible connections. An overview of all
the connecting terminals on the back panel of the device can be found in an appendix
at the end of this manual.
CAUTION
Connecting live components
Connecting powered-up devices may damage them.
►Please switch off the Musiccenter as well as all other components in your system
before making any connections.
►Switch the components back on only after all of them have been completely and
properly connected.
Installing the storage battery
The Musiccenter is equipped with a rechargeable battery to ensure the safe power
down of the system in case of a loss of AC power. The battery is part of the accessories
and must be installed before operating the device.
You may skip this part of your audio dealer has already installed the battery for you.
ATTENTION
Operation without the storage battery
The Musiccenter is fully functional even without the storage battery. However, it
cannot power down safely in case of a power failure. This may result in data loss or
even damage to the operating system.
►Install the storage battery or ask your audio dealer to do it for you.
Note: Even with the battery installed the display will go dark at once in case of a power loss.
However, in the background the system is powered down safely.
To install the storage battery:
1. Unscrew the four screws and remove the compartment cover.
2. Connect the cable of the battery with the connecting cable in the UPS BATTERY
compartment.
3. Push the battery into the compartment until it snaps into place.
4. Replace the compartment cover and secure it with the four screws (hand-tight only).

INSTALLING THE MUSICCENTER
Musiccenter 111
11
Connecting analog sources
►Use the terminals INPUT 1/2/3 to connect analog signal sources with balanced
interconnect cables.
►Unbalanced cables can be used at the same terminals in connection with the
supplied XLR-RCA adapters.
Connecting digital sources
►Connect coaxial digital signal sources, for example a CD player, with the RCA
terminals INPUT 4/6/8.
►Connect optical digital signal sources, for example a digital tuner, with the TOSLINK
terminals INPUT 5/7/9.

INSTALLING THE MUSICCENTER
12
Connecting a power amplifier
►For best sound quality connect the BALANCED output terminals with the inputs of
your power amp using balanced interconnect cables.
►Use output terminals UNBAL and an unbalanced interconnect if your amp offers
unbalanced RCA inputs only.
Connecting tape recorder, headphones and a digital output
1 TAPE
Terminals to connect an analog recording device.
2 PHONES
Output for connecting headphones.
3 Optical DIGITAL OUT
TOSLINK terminal to connect, for example, a preamplifier using an optical digital
cable.
4 Coaxial DIGITAL OUT
RCA terminal to connect, for example, a preamplifier using a coaxial cable.
21 3 4

INSTALLING THE MUSICCENTER
Musiccenter 111
13
Tape recorder (TAPE)
This terminal supplies a fixed-level analog signal.
►This terminal should be used preferably for an analog recording device.
CAUTION! Do not connect audio components that might be damaged by a fixed-level high output
signal – for example a power amplifier.
Headphones (PHONES)
This terminal supplies a variable analog signal.
►Use this to connect your headphones.
DIGITAL OUT
These terminals supply the output signal in digital form.
►Use either coaxial or optical cables for connections.
Connecting a network cable and USB devices
ETHERNET
►Use this terminal to connect the Musiccenter via an Ethernet cable with the router of
your home network.
Information on operating on a network can be found in the chapter “How to connect
the Musiccenter to my Home Network?” on page21 and in the separate „Owner’s
Manual for using the iPad®“.
USB 1 − 4
The USB slots give you the option to connect various USB devices, for example:
• an external hard drive for performing a backup
(see also „User Guide for Operation via a Web Browser“)
• a USB stick for downloading an update
(see also “Performing a Software Update with a USB Stick” on page38)
• a USB stick as source to playback music
(see also “How to play Content from a USB Storage Device?” on page29)
►Plug the USB device into a slot.
ªIt should be recognized automatically and be operational after a brief
configuration delay. You will find more details at the relevant positions in the
manual.

INSTALLING THE MUSICCENTER
14
Connecting components for remote control
BURLINK
BURLINK (BURmester LINK) is an interface developed by Burmester to control
Burmester audio components with a set of remote commands.
►Connect the Musiccenter to a control system using a RS-232 cable.
REMOTE
Connecting the DC-OUT socket with the DC-IN socket of another Burmester device will
cause this second device to be turned on and off parallel with the Musiccenter. In the
same way the Musiccenter is turned on or off in tandem if its DC-IN socket is connected
to the DC-OUT socket of another Burmester component.
►Connect the Musiccenter and a second Burmester device using a Remote cable.
A correct in Remote cable is supplied with Burmester power amplifiers or may be
purchased at your Burmester audio dealer.
IR IN
IR IN allows the connection of an additional infrared receiver. This infrared receiver may
be placed in a different room and thus allows controlling the Musiccenter remotely
without being in sight of it.
Connecting an external infrared receiver deactivates the internal receiver.
►Plug the interconnect cable of the infrared receiver into the IR IN socket.
Note: Additional infrared receivers may be purchased directly from Burmester with a length
of interconnect cable according to your specifications.

INSTALLING THE MUSICCENTER
Musiccenter 111
15
Connecting the WiFi antennas
WiFi antennas are used to establish a connection between the Musiccenter and an
iPad® for example. You can screw the two antennas directly into the connections at the
rear of the Musiccenter or into an optional antenna box.
By using the optional antenna box with a connecting cable you are able to elevate the
antennas and thus increase their reach.
To connect the antennas directly to the device:
1. Straighten the joints of the antenna bases and screw them into the threads of the
connectors on the back panel. Make sure not to skew the antennas to avoid
damaging the threads.
2. The antenna bases can be turned and are hinged for up and down folding. After
installing the antennas turn them into the desired position and fold them up.
Connecting the antennas using the optional antenna box:
1. Screw the two connector plugs onto the treads of the connectors on the back panel.
Make sure not to skew the plugs to avoid damaging the threads.
2. Straighten the joints of the antenna bases and screw them onto the connectors on
the antenna box. Make sure not to skew the antennas to avoid damaging the
threads.
3. Place the antenna box in an elevated position above the Musiccenter.

INSTALLING THE MUSICCENTER
16
Connecting the power cord
DANGER
Dysfunctional power cables or AC outlets
Power cords without ground connection or ungrounded AC outlets may cause a life-
threatening electric shock.
►Use only the supplied 3-wire power cord for AC connection. Under no
circumstances should the ground wire be disconnected.
►Connect the device only to a properly grounded AC outlet.
To connect the power cord:
3The MAINS switch is in the OFF position.
1. Plug the supplied power cord into the device and connect it to the AC outlet.
2. Switch the MAINS switch to ON.
ªThe POWER LED on the front panel will light up green for about 2 seconds
(see also “Control Elements and Displays” on page17, number 8) During this
time the Musiccenter checks and adjusts to the available AC voltage. The
POWER LED goes out after this process has been concluded successfully.
Note: The MAINS switch cuts the device off from the power supply. Please switch the MAINS
switch only to the OFF position when the device is in standby mode (the Power LED on
the front panel lights up orange) or when it has been switched off with the POWER
switch on the front panel (POWER LED is dark).

CONTROL ELEMENTS AND DISPLAYS
Musiccenter 111
17
C E D
1 2 3 54 8
6 7
1 Rotary dial for selecting menu functions
• Rotate to flip through menu items
• Push to select a menu item
2 Left row of buttons for selecting functions
The display shows the individual function of each button.
3 CD slot
4 Infrared receiver
The infrared receiver gets signals from the remote control.
Do not cover it up or put items in front of it.
5 Right row of buttons for selecting functions
The display shows the individual function of each button.
6 Volume control
• Turn to change the volume
• Push to mute the analog outputs
7 ON/OFF switch (POWER)
• OFF: The device is switched off. It can not be switched on by remote control. The LED is dark.
• STBY: The device is in standby mode and can be switched on by remote control. The LED
lights up orange.
• ON: Briefly pushing the toggle switch up turns the device on. The switch springs back to its
center position. The LED lights up red. Pushing the switch upwards again will return the
device to standby mode.
• SERVER MODE: When the LED lights up green the Musiccenter is in server mode. Detailed
information can be found in the chapter“How to use the Musiccenter as stand-alone Data
Server?” on page35.
8LED
• LED is dark: The device is switched off.
• LED lights up orange: The device is in standby mode and can be switched on by remote
control.
• LED lights up red: The device is working.
• LED lights up green: The device is in server mode. Detailed information can be found in the
chapter “How to use the Musiccenter as stand-alone Data Server?” on page35.

HOW TO SWITCH THE MUSICCENTER ON?
18
H M
1. Set the POWER toggle switch on the front
panel in center position.
ªThe LED lights up orange and the device is
in standby mode.
2. Toggle the POWER switch briefly upward or
press the POWER button on the remote.
ªThe LED lights up red and the system
powers up. This may take about a minute.
After the system is powered up for the first time
the Setup Wizard starts and guides you through
the basic settings.
3. Press the Start button.
You can now choose to operate the Musiccenter
with or without a network connection.
4. To operate the device without network
connection:
Press the button Stand Alone.
To operate the device with a network cable:
Press the Standard button.
To connect the device via WiFi:
Press the Wi-Fi Setup button.
5. Press the Next button.
Note: If you have chosen Wi-Fi Setup as connecting method please follow with the next step.
All other types of connection do not require further action on your part.
6. Connect your computer via WiFi with your
Musiccenter (see also “How to connect
Computer and Musiccenter?” on page25).

HOW TO SWITCH THE MUSICCENTER ON?
Musiccenter 111
19
7. Open a Web browser on your computer and
type in the address box the IP address of the
Musiccenter: 192.168.111.1 or its name:
http://MusicCenter111.local.
ªThe Network menu of your Web interface
opens up. It shows a list of all available
WiFi networks.
8. Click on the name of the desired WiFi network.
9. A password-protected network is shown with a
key symbol. In this case type in the WiFi
password of your router and click on accept.
Next you’ll see the screen Network Mode. The
dot to the right of Wi-Fi should show in color:
Color Significance
red The device tries to connect to the WiFi
network.
orange The device is connected to the network
but has no connection to the Internet.
green The device is connected to the network
and the Internet via WiFi.
Note: If the color stays red for more than a minute the device could not connect to the
network. Please repeat all the steps for establishing a connection.
Note: You can change these settings again later on. Information about operating within a
network can be found in the chapter “How to connect the Musiccenter to my Home
Network?” on page21 and in the Operating Manual for the iPad®.
To switch the device into standby mode:
►Toggle the POWER switch on the front panel briefly upward or press the POWER
button on the remote.
ªAfter the system has powered down the device switches into standby mode.
To switch the device completely off:
►Push the POWER switch down into OFF position.
ªAfter powering down the system the device switches off.
You can no longer turn it on with the remote control.
Note: Using the MAINS switch on the back panel takes the device completely off the power
supply. Please turn the MAINS switch to OFF only when the Musiccenter is in standby
mode (STBY, LED lights up orange) or after it has been switched off with the POWER
switch on the front panel (OFF, LED is dark).

FUNCTIONS OF THE REMOTE CONTROL
20
F R C
The remote control allows the quick and convenient selection of a number of
frequently used functions, such as switching the device on and off, changing the
volume or controlling CD playback. For all other more complex functions you will need
either an iPad® (optional) or a Web browser.
1 On/off switch
To switch the Musiccenter on or move into standby mode.
2 Volume
To change the volume.
3 Playback controls
Stop playback.
Start playback or pause current playback.
CD Player: Return to the beginning of the current track. Press
again to jump to the previous track.
Internet radio: Navigate between pre-set stations.
CD Player: Skip to the next track.
Internet radio: Navigate between pre-set stations.
4 MODE
Activating the background lighting of the display screen in
increments.
5 AUDIO
Switching between 96 kHz and 192 kHz sampling frequency.
6 DIM
Dimming the display screen in increments until it is off.
1
2
3
5
6
4
Other manuals for 111 Musiccenter
2
Table of contents
Other Burmester Stereo System manuals