Busch-Welcome 83121 User manual

0073
-1-7477 │ │ 22.02.2012
Busch
-Welcome®
Pos: 2 /DinA4 - Anleitungen Onli ne/Inhalt/KNX/D oorEntry/83101 - 83121/Ti telblatt - 83121/1/2/3 - BJ E @ 18\mod_1304409104345_15.doc x@ 104 954 @ @ 1
83121
Video outdoor station, 1/2/3gang
=== Ende der Liste für Textmarke Co ver ===

Busch
-Welcome®
| 0073-1-7477
— 2 —
Pos: 4 /Busch-Jaeger ( Neustruktur)/Modul-Struktur /Online-Dokumentation/Inhal tsverzeichnis ( -->Für alle Dokument e <--)/Inhaltsverzeic hnis @ 19\mod_132064904438 6_15.docx @ 109653 @ @ 1
1Safety....................................................................................................................................................................... 3
2Intended use ............................................................................................................................................................ 3
3Environment............................................................................................................................................................. 3
3.1 Busch-Jaeger devices............................................................................................................................. 3
4User Manual............................................................................................................................................................. 3
5Operation ................................................................................................................................................................. 4
5.1 Standard operation ................................................................................................................................. 4
5.2 Cleaning.................................................................................................................................................. 5
6Technical data.......................................................................................................................................................... 6
7Mounting / Installation .............................................................................................................................................. 7
7.1 Requirements for the electrician ............................................................................................................. 7
7.2 General installation instructions .............................................................................................................. 7
7.3 Mounting ................................................................................................................................................. 8
7.4 Camera setting...................................................................................................................................... 13
7.4.1 Setting the camera................................................................................................................................ 13
7.4.2Detection angle of the camera .............................................................................................................. 13
7.5 Connection............................................................................................................................................ 15
8Dismantling ............................................................................................................................................................ 16
8.1 Replacing the name plates.................................................................................................................... 16
9Addressing............................................................................................................................................................. 18
9.1 Addressing the stations......................................................................................................................... 18
9.1.1 Potentiometer ....................................................................................................................................... 18
9.1.2 Setting the address of the outdoor station:............................................................................................ 18
9.1.3 Assigning the doorbell push-button of an outdoor station to an apartment ........................................... 18
9.1.4 Setting the address of the indoor station............................................................................................... 18
9.1.5 Setting of the "standard outdoor station"............................................................................................... 19
9.2 Video for addressing the device............................................................................................................ 21
=== Ende der Liste für Textmarke TOC ===

Busch
-Welcome®
Safety
| 0073-1-7477
— 3 —
Pos: 6 /Busch-Jaeger ( Neustruktur)/Modul-Struktur /Online-Dokumentation/Über schriften (--> Für alle Dokumen te< --)/1. Ebene/S - T/Sicher heit @ 18\mod_13026127917 90_15.docx @ 103357 @ 1 @ 1
1 Safety
Pos: 7 /Busch-Jaeger ( Neustruktur)/Modul-Struktur /Online-Dokumentation/Sic herheit (--> Für alle Dokumente < --)/Warnhinweise/Sic herheit - 230 V @ 18\mod_130260681 6750_15.docx @ 103308 @ @ 1
Warning
Electric voltage!
Risk of death and fire due to electrical voltage of 230 V.
– Work on the 230V supply system may only be performed by authorised electricians!
– Disconnect the mains power supply prior to installation and/or disassembly!
Pos: 8 /Busch-Jaeger ( Neustruktur)/Modul-Struktur /Online-Dokumentation/Über schriften (--> Für alle Dokumen te< --)/1. Ebene/A - F/Bestim mungsgemäßer Gebrauch @ 18\mod_130 2763321316_15.doc x @ 103483@ 1 @ 1
2 Intended use
Pos: 9 /DinA4 - Anleitungen Onli ne/Inhalt/KNX/D oorEntry/83101 - 83121/ Bestimmungsgemaesser Gebrauc h - 83101-83121 @ 18\mod_1304405398359_1 5.docx @ 104750 @ @ 1
The outdoor station is an integral part of the BuschWelcome®door communication system and operates
exclusively with components from this system. The device must only be used with suitable Busch-Jaeger flush-
mounted and surface-mounted installation sockets.
Pos: 10 /Busch-Jaeger ( Neustruktur)/Modul-Struktur /Online-Dokumentation/ Überschriften (--> Für alle Dokume nte <--)/1. Ebene/U - Z/ Umwel t @ 18\mod_130261 4158967_15.docx @ 103383 @ 1 @ 1
3 Environment
Pos: 11 /Busch-Jaeger ( Neustruktur)/Modul-Struktur /Online-Dokumentation/ Umwelt (--> Für alle Dokumente <--) /Hi nwe is e/ Hin wei s - Umwelt - Hinweis Elektr ogeräte @ 18\mod_1302763 973434_15.doc x@ 103500 @ @ 1
Consider the protection of the environment!
Used electric and electronic devices must not be disposed of with domestic waste.
– The device contains valuable raw materials which can be recycled. Therefore, dispose of the
device at the appropriate collecting depot.
Pos: 12 /DinA4 - Anleitungen Onli ne/Ueberschriften/2. /Busch-Jaeger Geraete @ 18\mod_130276 4122619_15.doc x@ 10352 4 @ 2@ 1
3.1 Busch-Jaeger devices
Pos: 13 /Busch-Jaeger ( Neustruktur)/Modul-Struktur /Online-Dokumentation/ Umwelt (--> Für alle Dokumente <--) /Hi nwe is e/ Hin wei s - Umwelt - Busch-J aeger Elektrogeräte @ 18\mod_13026 18869741_15.doc x@ 103473 @ @ 1
All packaging and devices from Busch-Jaeger bear the markings and test seals for proper disposal. Always
dispose of the packaging material and electric devices and their components via the authorized collecting depots
and disposal companies.
Busch-Jaeger products meet the legal requirements, in particular the laws governing electronic and electrical
devices and the REACH ordinance.
(EU-Directive 2002/96/EG WEEE and 2002/95/EG RoHS)
(EU-REACH ordinance and law for the implementation of the ordinance (EG) No.1907/2006)
Pos: 14 /DinA4 - Anleitungen Online/ Ueberschriften/1. /Anwenderhandbuc h @ 19\mod_1309347227593_15. docx @ 107473 @ 1 @ 1
4 User Manual
Pos: 15 /DinA4 - Anleitungen Online/ Inhalt/KNX/DoorEntr y/Systemhandbuch/ Anwenderhandbuch - BJE @ 19\mod_1309347 542342_15.docx @ 107482 @ @ 1
Detailed information for planning Busch-Welcome®systems is contained in the user manual. Download at
www.Busch-Jaeger.de.
Pos: 16 /Busch-Jaeger ( Neustruktur)/Modul-Struktur /Online-Dokumentation/Steuer module - Onli ne-Dokumentation (--> Für alle Doku mente <--)/++++++++++++Seitenumbruch++++++++++++ @ 9\mod_1268898668093_0. docx @ 52149 @ @ 1

Busch
-Welcome®
Operation
| 0073-1-7477
— 4 —
Pos: 17 /DinA4 - Anleitungen Online/ Ueberschriften/1. /Bedienung @ 18\mod_130261 3924165_15.docx @ 103365 @ 1 @ 1
5 Operation
Pos: 18 /DinA4 - Anleitungen Online/ Ueberschriften/2. /Normaler Betrieb @ 18\mod_1 302768820965_15.doc x @ 103540 @ 2 @ 1
5.1 S tandard operation
Pos: 19 /DinA4 - Anleitungen Online/ Inhalt/KNX/DoorEn try/83101 - 83121/Bedienung - 83101-83 121 @ 18\mod_1304405398124_1 5.docx @ 104742 @ @ 1
mhmmmm
Fig. 1:
No.
Function
1
The left potentiometer at an outdoor station indicates the address of this station.
- See also chapter Addressing, on page 18.
2
The next two potentiometers indicate the address of the topmost doorbell push-button of this station. The
doorbell push-buttons below that are automatically numbered (consecutive).
- See also chapter Addressing, on page 18.
3
•Connection for the system controller
•When using several outdoor stations: connection for the external bus
4
The sliding switch activates or deactivates the return sound when the doorbell push-button is pressed.
The return sound is switched on
The return sound is switched off
Pos: 20 /Busch-Jaeger ( Neustruktur)/Modul-Struktur /Online-Dokumentation/Steuer module - Onli ne-Dokumentation (--> Für alle Dokument e <--)/++++++++++++Seitenumbruch++++++++++++@ 9\mod_1268898668093_ 0.docx @ 52149 @ @ 1

Busch
-Welcome®
Operation
| 0073-1-7477
— 5 —
Pos: 21 /DinA4 - Anleitungen Online/ Ueberschriften/2. /Reinigung @ 19\mod_13107 33980533_15.docx @ 107853 @ 2 @ 1
5.2 Cleaning
Pos: 22 /DinA4 - Anleitungen Online/ Inhalt/KNX/DoorEn try/83101 - 83121/Reinigun g -83121 @ 19\mod_1322 139087148_15. docx @ 110 625 @ @ 1
Caution
Risk of damaging the surface of the device.
The surface of the device can be damaged by cleaning fluids or abrasive agents!
– Clean the surfaces using a soft cloth and commercially available glass cleaner.
– Never use abrasive cleaning agents.
Fig 2: Cleaning
Pos: 23 /Busch-Jaeger ( Neustruktur)/Modul-Struktur /Online-Dokumentation/Steuer module - Onli ne-Dokumentation (--> Für alle Dokument e <--)/++++++++++++Seitenumbruch++++++++++++@ 9\mod_1268898668093_ 0.docx @ 52149 @ @ 1

Busch
-Welcome®
Technical data
| 0073-1-7477
— 6 —
Pos: 24 /DinA4 - Anleitungen Online/ Ueberschriften/1. /Technische Daten @ 18\mod_1302 615863001_15.docx @ 103416 @ 1 @ 1
6 Technical data
Pos: 25 /DinA4 - Anleitungen Online/ Inhalt/KNX/DoorEn try/83101 - 83121/Technisc he Daten - 83121 @ 18\mod_130440910404 8_15.docx @ 104945 @ @ 1
Des ignation
Value
Operating temperature
-25
℃
to +55
℃
Protection
IP 44
Single-wire clamps
2 x 0.6 mm² – 2 x 1 mm²
Fine
-wire clamps 2 x 0.6 mm² – 2 x 0.75 mm²
Bus voltage
28 V- ±2 V
Pos: 26 /Busch-Jaeger (Neustruk tur)/Modul-Struktur/ Online-Dokumentation/Steuer module - Onlin e-Dokumentation (--> Für alle Doku mente <--)/++++++++++++Seitenumbruch++++++++++++ @ 9\mod_1268898668093_ 0.docx @ 52149 @ @ 1

Busch
-Welcome®
Mounting / Installation
| 0073-1-7477
— 7 —
Pos: 27 /Busch-Jaeger ( Neustruktur)/Modul-Struktur /Online-Dokumentation/ Überschriften (--> Für alle Dokument e <--)/1. Ebene/M - O/Montag e / Installation @ 18\mod_13026139 66111_15.docx @ 103373 @ 1 @ 1
7 Mounting / Installation
Pos: 28 /Busch-Jaeger ( Neustruktur)/Modul-Struktur /Online-Dokumentation/Si cherheit (--> Für alle Dokument e <--)/Warnhinweise/Si cherheit - Niederspannun gs-und 230 V-Lei tungen @ 18\mod_130261782 1491_15.docx @ 103465 @ @ 1
Warning
Electric voltage!
Risk of death and fire due to electrical voltage of 230 V.
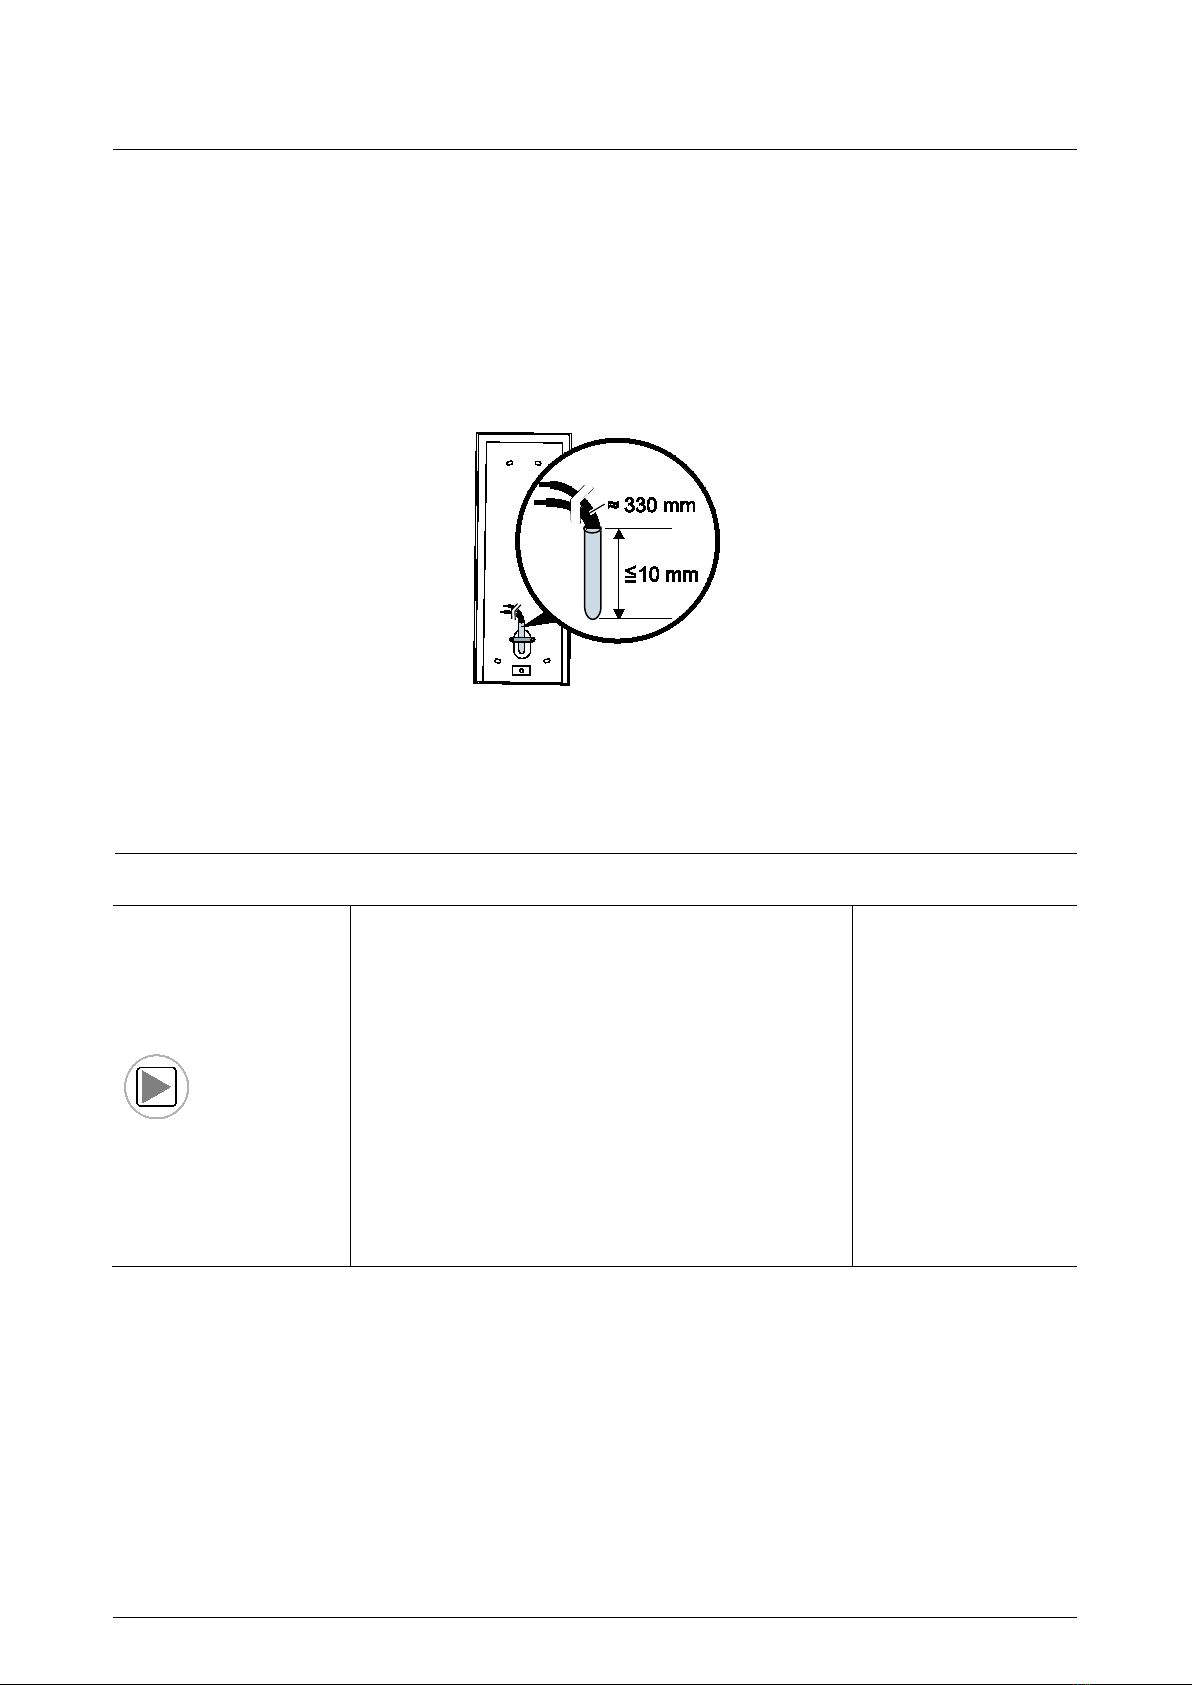
– Low-voltage and 230 V cables must not be installed together in a flush-mounted socket!
In case of a short-circuit there is the danger of a 230 V load on the low-voltage line.
Pos: 29 /Busch-Jaeger ( Neustruktur)/Modul-Struktur /Online-Dokumentation/Sic herheit (--> Für alle Dokument e <--)/Warnhinweise/Sic herheit - Fachkenntnisse @ 18\m od_1302774384017_15.d ocx @ 103564 @ 2 @ 1
7.1 Requirements for the electrician
Warning
Electric voltage!
Install the device only if you have the necessary electrical engineering knowledge and experience.
•Incorrect installation endangers your life and that of the user of the electrical system.
•Incorrect installation can cause serious damage to property, e.g. due to fire.
The minimum necessary expert knowledge and requirements for the installation are as follows:
•Apply the "five safety rules" (DIN VDE 0105, EN 50110):
1. Disconnect from power;
2. Secure against being re-connected;
3. Ensure there is no voltage;
4. Connect to earth;
5. Cover or barricade adjacent live parts.
•Use suitable personal protective clothing.
•Use only suitable tools and measuring devices.
•Check the type supply network (TN system, IT system, TT system) to secure the following
power supply conditions (classic connection to ground, protective earthing, necessary
additional measures, etc.).
Pos: 30 /DinA4 - Anleitungen Online/ Inhalt/KNX/DoorEntr y/Montage/Montagehi nweise - Allgemein @ 19\mod_131056 3670478_15.doc x@ 107743 @ 2 @ 1
7.2 General installation instructions
•Terminate all branches of the wiring system via a connected bus device (e.g., indoor station, outdoor station,
system device).
•Do not install the system controller directly next to the bell transformer and other power supplies (to avoid
interference).
•Do not install the wires of the system bus together with 230 V wires.
•Do not use common cables for the connecting wires of the door openers and wires of the system bus.
•Avoid bridges between different cable types.
•Use only two wires for the system bus in a four-core or multi-core cable.
•When looping, never install the incoming and outgoing bus inside the same cable.
•Never install the internal and external bus inside the same cable.
Pos: 31 /Busch-Jaeger ( Neustruktur)/Modul-Struktur /Online-Dokumentation/Steuer module - Onli ne-Dokumentation (--> Für alle Dokument e <--)/++++++++++++Seitenumbruch++++++++++++@ 9\mod_1268898668093_ 0.docx @ 52149 @ @ 1

Busch
-Welcome®
Mounting / Installation
| 0073-1-7477
— 8 —
Pos: 32 /Busch-Jaeger ( Neustruktur)/Modul-Struktur/On line-Dokumentation/Übersc hriften (--> Für alle Dokumente < --)/2. Ebene/M - O/Montage @ 18\mod_13 02615960458_15.doc x@ 10342 4 @ 2 @ 1
7.3 Mounting
Pos: 33.1 /DinA4 - Anleitung en Online/Inhalt/K NX/DoorEntry/83101 - 83121/ Montage - Module/Montage - Montagedo se -- 83101- 83121/1/2/3 @ 19\mod_1322 131554466_15.docx @ 110531 @ @ 1
•It can be installed in BuschWelcome®flush-mounted installation boxes or surface-mounted installation boxes.
•Ensure that the size is correct when selecting the installation box.
•For the installation in a hollow wall the flush-mounted installation box can be fitted with a special claw set
(Article number 83511, order number 8300-0-0308).
Fig. 3:
1. Prepare the installation box.
2. Strip the wires.
– The insulated section of the cable end must not be longer than 10 mm.
Pos: 33.2.1 /DinA4 - Anlei tungen Online/Inhalt/ KNX/DoorEntry/ Video-Module/Einleitu ngen/Einleitung - Hohlwandb efestigungsset @ 20\mod_1324552 373415_15.doc x@ 112517 @ @ 1
Video for hollow wall fixing set
Pos: 33.2.2 /DinA4 - Anlei tungen Online/Inhalt/ KNX/DoorEntry/ Video-Module/Videos/Spr achneutral/Video Hohlwand-Bef estigungsset @ 2 1\mod_1329748760913_0. docx @ 198455 @ @ 1
Pos: 33.3.1 /DinA4 - Anlei tungen Online/Inhalt/ KNX/DoorEntry /Video-Module/Einleitu ngen/Einleitung - Montage des Gerae tes @ 20\mod_1324552679883 _15.docx @ 112541 @ @ 1

Busch
-Welcome®
Mounting / Install
ation
| 0073-1-7477
— 9 —
Video for mounting the device
Pos: 33.3.2 /DinA4 - Anlei tungen Online/Inhalt/ KNX/DoorEntry/ Video-Module/Videos/Spr achneutral/Video Mon tage - Aussenstation - Montage-Ansc hluss-Aufsetzen @ 21\mod_132974889376 9_0.docx @ 198484 @ @ 1
Pos: 33.4 /DinA4 - Anleitung en Online/Inhalt/K NX/DoorEntry/83101 - 83121/ Montage - Module/Montage - Abschlu ssleiste entfernen -- 83121/ 1/2/3 @ 19\mod_132213340952 6_15.docx @ 110546 @ @ 1
Fig. 4:
3. Remove the end strip.
– Use the enclosed mounting tool for this purpose.
– When selecting the installation site ensure that the minimum distance to the right side is adhered to for
the removal of the end strip.
– If the minimum distance toward the bottom cannot be adhered to, the device must be removed from the
installation box when replacing the name plates.
Pos: 33.5 /Busch-J aeger (Neustruktur)/Modul-Strukt ur/Online-Dokumentation/Ste uermodule - Onli ne-Dokumentation ( -->Für alle Dokume nte <--)/++++++++++++Seitenumbruch++++++++++++ @ 9\mod_1268898668093_0. docx @ 52149 @ @ 1

Busch
-Welcome®
Mounting / Installation
| 0073-1-7477
— 10 —
Pos: 33.6.1 /DinA4 - Anlei tungen Online/Inhalt/ KNX/DoorEntry/ Video-Module/Einleitu ngen/Einleitung - Demontage de s Namensschildes un d der Abschlussleiste @ 20\mod_13245518 30762_15.docx @ 112493 @ @ 1
Video for the disassembly of the end strip and the
name plate
Pos: 33.6.2 /DinA4 - Anlei tungen Online/Inhalt/ KNX/DoorEntry/ Video-Module/Videos/Spr achneutral/Video - Ausse nstation - Demontage Absc hlussleiste-Namensschild @ 21\mod_132974 6978119_0.doc x@ 198399 @ @ 1
Pos: 33.7 /DinA4 - Anleitung en Online/Inhalt/K NX/DoorEntry/83101 - 83121/ Montage - Module/Montage - Ankle mmen -- 83101- 83121/1/2/3 @ 19\mod_132213656 2582_15.docx @ 110570 @ @ 1
Fig. 5:
4. Hang the device into the installation socket.
5. Fasten the safety loop.
6. Connect the wires the the enclosed clamp.
7. Plug the clamp onto the contact pins.
Pos: 33.8 /DinA4 - Anleitung en Online/Inhalt/K NX/DoorEntry/83101 - 83121/ Montage - Module/Montage - Beschr iftung einsetzen -- 83121/1/ 2/3 @ 19\mod_1322136638579_15. docx @ 110578 @ @ 1

Busch
-Welcome®
Mounting / Installation
| 0073-1-7477
— 11 —
Fig. 6:
8. Fold the device shut until it snaps in audibly.
9. Remove the label holder.
10. Insert the name plate and remount the label holder.
– If the text cannot be fixed directly at the mounting position, it can be done already prior to the installation.
Pos: 33.9 /DinA4 - Anleitung en Online/Inhalt/K NX/DoorEntry/83101 - 83121/ Montage - Module/Montage - Beschr iftungstraeger-Abschlussl eiste einsetzen -- 83121/1/2/ 3 @ 18\mod_1304409103782_ 15.docx @ 104937 @ @ 1
Fig. 7:
11. Screw on the front of the device.
12. Mount the end strip.
– To do this, press the end strip into the holder from the front. The end strip will then snap into its end
position by itself.
The installation of the outdoor station is now complete.
Pos: 33.10 /Busch-J aeger (Neustruktur)/Modul-Struk tur/Online-Dokumentation/St euermodule - Onli ne-Dokumentation(--> Für alle Doku mente <--)/++++++++++++Seitenumbruch++++++++++++ @ 9\mod_1268898668093_0.doc x@ 52149 @ @ 1

Busch
-Welcome®
Mounting / Installation
| 0073-1-7477
— 12 —
Pos: 33.11.1 /DinA4 - Anlei tungen Online/Inhalt/KNX/Door Entry/Video-Module/Ein leitungen/Einlei tung - Montage des Namensschi ldes und der Abschlusslei ste @ 20\mod_132455248019 6_15.docx @ 112525 @ @ 1
Video for mounting the name plate and the end strip
Pos: 33.11.2 /DinA4 - Anlei tungen Online/Inhalt/KNX/Door Entry/Video-Module/Vi deos/Sprachneutr al/Video Montage - Aussenst ation - Namensschild-Absc hlussleiste @ 21\mod_132974 9122997_0.doc x@ 198527 @ @ 1
Pos: 33.12.1 /DinA4 - Anlei tungen Online/Inhalt/KNX/Door Entry/Video-Module/Ein leitungen/Einlei tung - Montage des Namensschi ldes und der Abschlussleis te vor Geraetemontag e @ 20\mod_1324552561899_15. docx @ 112533 @ @ 1
Alternative procedure:
Video for mounting the name plate and the end strip before the device is mounted.
Pos: 33.12.2 /DinA4 - Anlei tungen Online/Inhalt/KNX/Door Entry/Video-Module/Vide os/Sprachneutr al/Video Montage - Aussenst ation - Namensschild-Absc hlussleiste - Vorberei tung @ 21\mod_1329749298149_0. docx @ 198556 @ @ 1
Pos: 34 /Busch-Jaeger ( Neustruktur)/Modul-Struktur /Online-Dokumentation/Steuer module - Onli ne-Dokumentation (--> Für alle Dokument e <--)/++++++++++++Seitenumbruch++++++++++++@ 9\mod_1268898668093_ 0.docx @ 52149 @ @ 1

Busch
-Welcome®
Mounting / Installation
| 0073-1-7477
— 13 —
Pos: 35 /DinA4 - Anleitungen Online/ Ueberschriften/2. /Kameraeinstellu ng @ 19\mod_1313483510801_15. docx @ 108723 @ 2 @ 1
7.4 Camera setting
Pos: 36 /DinA4 - Anleitungen Online/ Inhalt/KNX/DoorEn try/83101 - 83121/Kameraeins tellung - 83121 @ 19\mod_131348 3556191_15.docx @ 108731 @ 33 @ 1
7.4.1 S etting the camera
Fig. 8:
1. Open the lid of the camera on the rear of the device.
2. Set the camera.
- The adjusting range is ±15°.
The camera is now set.
7.4.2 Detection angle of the camera
Fig. 9: Horizontal detection angle

Busch
-Welcome®
Mounting / Installation
| 0073-1-7477
— 14 —
Fig. 10: Vertical detection angle
Pos: 37 /Busch-Jaeger ( Neustruktur)/Modul-Struktur /Online-Dokumentation/Steuer module - Onli ne-Dokumentation (--> Für alle Dokument e <--)/++++++++++++Seitenumbruch++++++++++++@ 9\mod_1268898668093_ 0.docx @ 52149 @ @ 1

Busch
-Welcome®
Mounting / Installation
| 0073-1-7477
— 15 —
Pos: 38 /DinA4 - Anleitungen Online/ Ueberschriften/2. /Anschluss @ 18\mod_13026 17573351_15.doc x@ 103449 @ 2 @ 1
7.5 Connection
Pos: 39 /DinA4 - Anleitungen Online/ Inhalt/KNX/DoorEn try/83101 - 83121/Anschluss - 8310 1-83121@ 18\mod _1304405397859_15.doc x @ 104734 @ @ 1
Fig. 11:
No.
Function
1
•Connection for the system controller
•When using several outdoor stations: connection for the external bus
Pos: 40 /Busch-Jaeger ( Neustruktur)/Modul-Struktur /Online-Dokumentation/Steuer module - Onli ne-Dokumentation (--> F üralle Dok umente <--)/++++++++++++Seitenumbruch++++++++++++ @ 9\mod_1268898668093_ 0.docx @ 52149 @ @ 1

Busch
-Welcome®
Dismantling
| 0073-1-7477
— 16 —
Pos: 41 /DinA4 - Anleitungen Onli ne/Ueberschriften/1. /Demontage @ 19\mod_132213757861 2_15.docx @ 110602 @ 1 @ 1
8 Dismantling
Pos: 42 /DinA4 - Anleitungen Online/ Ueberschriften/2. /Auswechseln der Na mensschilder @ 19\mod_132213771 3092_15.docx @ 110617 @ 2 @ 1
8.1 Replacing the name plates
Pos: 43 /DinA4 - Anleitungen Online/ Inhalt/KNX/DoorEn try/83101 - 83121/Auswec hseln der Namensschilder 8312 1 @ 19\mod_1322137662625 _15.docx @ 110610 @ @ 1
Fig. 12:
1. Remove the end strip.
– Use the enclosed mounting tool for this purpose.
- If the minimum distance toward the bottom cannot be adhered to, the device must be removed from the
installation box when replacing the name plates.
2. Remove the label holder.
Fig. 13:
3. Insert the name plate and remount the label holder.

Busch
-Welcome®
Dismantling
| 0073-1-7477
— 17 —
Fig. 14:
4. Mount the end strip.
– To do this, press the end strip into the holder from the front. The end strip will then snap into its end
position by itself.
The name plate has now been replaced.
Pos: 44 /Busch-Jaeger ( Neustruktur)/Modul-Struktur /Online-Dokumentation/Steuer module - Onli ne-Dokumentation (--> Für alle Dokument e <--)/++++++++++++Seitenumbruch++++++++++++@ 9\mod_1268898668093_ 0.docx @ 52149 @ @ 1

Busch
-Welcome®
Addressing
| 0073-1-7477
— 18 —
Pos: 45 /DinA4 - Anleitungen Online/ Ueberschriften/1. /Adressierung @ 18\mod_1302 616059553_15.doc x@ 103 432 @ 1@ 1
9 Addressing
Pos: 46 /DinA4 - Anleitungen Onli ne/Inhalt/KNX/DoorEn try/Adressierung/Adressi erung-Projektierung @ 20\mod_1324 287710173_15.docx @ 112353 @ 23333 3 @ 1
9.1 Addressing the stations
9.1.1 Potentiometer
Before installing as system, it must must be addressed.
For this "Addressing", three potentiometers have been fitted
to the rear of the device. The digits 0 to 9 can be set on each
potentiometer.
Fig. 15: Potentiometer for setting the stations
Outdoor station:
The left potentiometer (1) at
an outdoor station indicates the
address of this station.
The next two potentiometers (2) indicate the address of the
topmost
doorbell push-button of this station. The doorbell
push
-switches below that are automatically numbered
(consecutive).
Indoor
station:
The left potentiometer (3) of the indoor station indicates the
address of the preferred outdoor station. The next two
potentiometers (4) indicate the address of this indoor station.
Fig. 16: The function of the potentiometers
9.1.2 S etting the addres s of the outdoor s tation:
The allocation to one of the four inputs of the system is made on the outdoor stations and the associated switch
actuators for door and light via the setting of the address.
For this the potentiometer house/outdoors is set on an address between 1 and 4. The potentiometer is located on
the rear of the outdoor station or the front of the MDRC switch actuator.
9.1.3 As signing the doorbell push-button of an outdoor station to an apartment
The doorbell push-buttons of an outdoor station are assigned to the apartments consecutively from top to bottom
and left to right with the addresses 01, 02, etc.
This assignment applies equally to several outdoor stations in a system. This means that in Figure 18 on page20,
in each outdoor station push-button A is assigned to apartment 01, etc.
This factory setting is fixed via two potentiometers on the rear of the outdoor station. The middle potentiometer
must be on "0" and the right one on "1".
9.1.4 S etting the addres s of the indoor s tation
The apartment is assigned on the indoor station via the setting of the address. Up to 99 apartments can be
addressed within one system. In each of these up to four indoor stations with the same rights can be located with
the same address.
When pressing the assigned doorbell push-button, all four indoor stations are called. The address of an indoor
station (e.g. "15") is set with the aid of the potentiometers on the indoor station, the middle one indicating the tens
digit (here "1") and the right one the singles digit (here "5"). The potentiometer is located on the back or outside of
the indoor stations.

Busch
-Welcome®
Addressing
| 0073-1-7477
— 19 —
9.1.5 S etting of the " s tandard outdoor s tation"
For several outdoor stations in a system the "standard outdoor station" must be set on the indoor stations.
For this the potentiometer STATION is set on the address of the standard outdoor station - between 1 and 4.
The potentiometer is located on the rear of the indoor stations.
Fig. 17: Factory assignment of doorbell push-buttons
No.
Des ignation
1
Apartment 01
2
Apartment 01
3
Outdoor station
4
Apartment 09
5
Apartment 10

Busch
-Welcome®
Addressing
| 0073-1-7477
— 20 —
Fig. 18: Several outdoor stations with identical assignment
No.
Designation
1
Main entrance outdoor station
2
Side entrance outdoor station
3
Apartment 01
4
Apartment 02
5
Apartment 03
Table of contents
Other Busch-Welcome Intercom System manuals
Popular Intercom System manuals by other brands

SCS Sentinel
SCS Sentinel VisiDoor 7+ Installation and user manual

Aiphone
Aiphone RY-3DL Installation & operation manual

Vimar
Vimar ELVOX Petrarca 6A40 instruction sheet

PS Engineering
PS Engineering Avidyne PMA8000B Pilot's guide and operation manual

CAME BPT
CAME BPT PEC IP user manual

Conrad
Conrad 551319 operating instructions