Bush K - 285 User manual

owner’s manual
1/32
owner’s
manual
The world of inflaTable boaTs

producTion of inflaTable boaT
2/32
owner’s manual
3/32
producTion of inflaTable boaT
This manual has been completed to help you to operate your craft with safe-
ty and pleasure.
It contains details of the craft; the equipment supplied or tted its systems,
and information on their operation. Please, read the manual carefully, and
familiarize yourself with the craft before using it.
This owner’s manual is not a course on boating safety or seamanship. If this
is your rst craft, or you are changing to a type of craft you are familiar with,
for your own comfort and safety, please ensure that you obtain handling and
operating experience before “assuming command” of the craft. Your dealer
or national sailing federation or yacht club will be pleased to advise you of
local sea schools, or competent instructors.
Ensure that the anticipated wind and sea conditions will correspond to the
design category of your craft, and that your screw are able to handle the
craft in these conditions.
Even when your boat is categorized for them, the sea and wind conditions
corresponding to the design category C range from severe storm condi-
tions for category, to strong conditions for the top of category C, open to the
hazards of a freak wave of gust. These are therefore dangerous conditions,
where only a competent, t and trained screw using a well maintained craft
can satisfactorily operate.
This owner’s manual is not a detailed maintenance or trouble-shooting
guide. In the case of difculty, refer to the boat builder or his representative.
If a maintenance manual is provided, use it for the craft maintenance.
Always use trained and competent people for maintenance, xing or modi-
cations. Modications that may affect the safety characteristics of the craft
shall be assessed, executed and documented by competent people. The
boat builder cannot be held responsible for modication that he has not
approved.
In some countries, a driving license or authorization are required, or specic
regulation are in force.
Always maintain your craft properly and make allowance for the deterioration
that will occur in the time and as a result of heavy use or misuse of the craft.
Any craft, no matter how strong it may be, can be severely damaged if not
used properly. This is not compatible with safe boating. Always adjust the
speed and direction of the craft to sea conditions.
The craft should have onboard the appropriate safety equipment (lifejackets,
harness, etc) according to the type of craft, weather conditions, etc. This equip-
ment is mandatory in some countries. The screw should be familiar with the use
of all safety equipment and emergency manoeuvring (man overboard recover,
towing etc) sailing schools and clubs regularly organize drill sessions.
All person should wear a suitable buoyancy aid (life jacket/ personal otation
device) when on the deck. Note that, in some countries, it is a legal requirement
to wear a buoyancy aid that complies with their national regulations and times.
PLEASE, KEEP THIS MANUAL IN A SECURE PLACE, AND HAND IT
OVER TO THE NEW OWNER WHEN YOU SELL THE CRAFT.
conTenTs
1. Declaration of conformity 4-6
2. General 7-9
3. Assembly and disassembly 10-17
4. Safety and operation recommendations 18-25
5. Maintenance 26-27
6. Environment 28
7. Warranty 29-30
8. Specications 31
9. Warranty Card 32

producTion of inflaTable boaT
4/32
owner’s manual specificaTions, descripTion and feaTures
5/32
General
2. General
2.1 safeTy alerTs
This manual uses the following safety alerts to draw your attention to special
safety instructions that should be followed.
DANGER - Denotes that an extreme intrinsic hazard exists which
would result in high probability of death or irreparable injury if proper
precautions are not taken.
WARNING - Denotes that a hazard exist which can result in injury or
death if proper precautionsare not taken.
CAUTION - Denotes a reminder of safety practices or direct atten-
tion to unsafe practices which could result in personal injury or dam-
age to the craft or component or to the environment.
2.2 naTional leGislaTion
Before you prepare for the water with your BUSH inatable, check the local
legislation on any restrictions on the specic water you want to use. You
might check for speed-restriction and restrictions on the use of outboard
engines, restrictions on the airborne sounds, etc.
2.3 General safeTy informaTion
Safe Boating Suggestions.
In order to safely enjoy the waterways, familiarize yourself with local and
other governmental boating regulations and restrictions, and consider the
following suggestions:
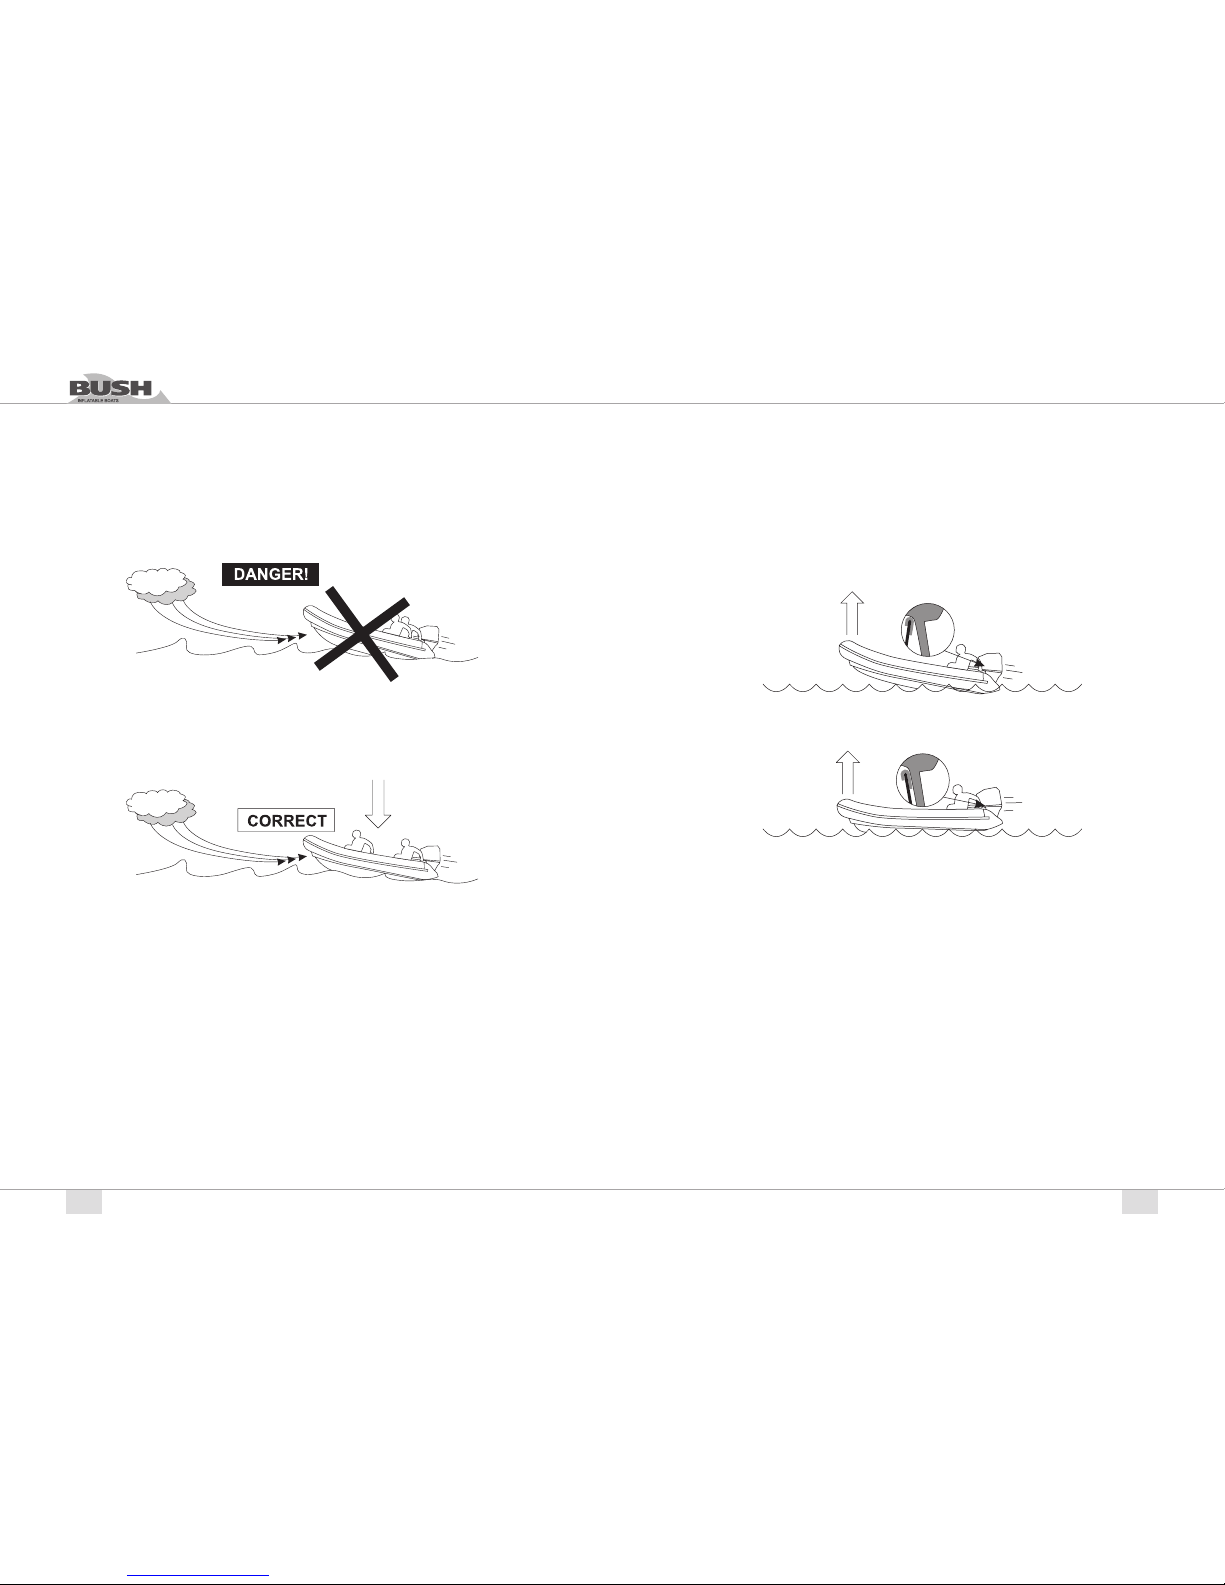
WARNING: If this boat is used around the mother ship at open sea,
take the necessary precautions! Don’t lose contact with the mother
ship!
ALWAYS WEAR A LIFEJACKET!
Use otation devices. Have an approved personal otation device of suitable
size for each person aboard (it is the law) and have it readily accessible.
Do not overload your boat. Most boats are rated and certied for maximum
load (weight) capacities (refer to your boat capacity plate). If in doubt, con-
tact your dealer or the boats manufacturer.
Perform safety checks and required maintenance. Follow a regular schedule
and ensure that all repairs are properly made. Know and obey all nautical
rules and laws of the waterways.
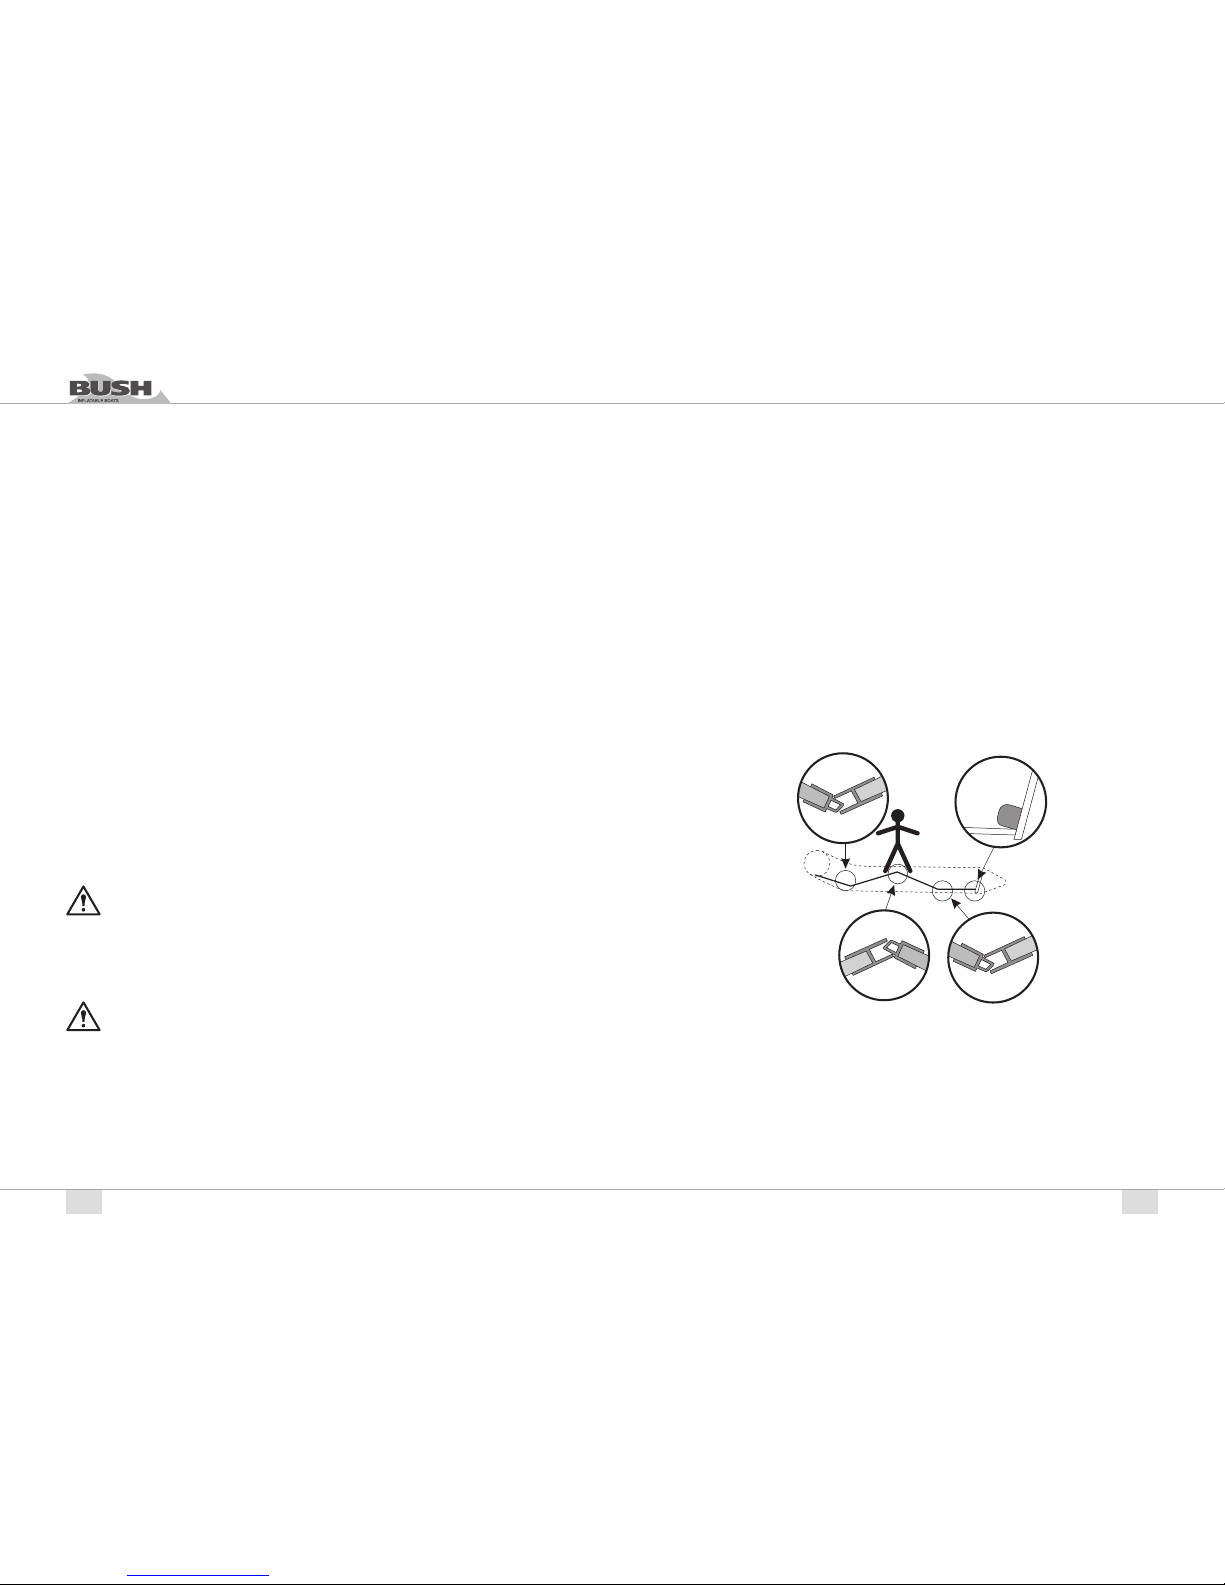
Make sure everyone in the boat is properly seated. Do not allow anyone to
sit or ride on any part of the boat that was not intended for such use.
This includes the back of seats, gunwales, transom, bow, decks, raised sh-
ing seats, any rotating shing seat; or anywhere that an unexpected accel-
eration, sudden stopping, unexpected loss of boat control, or sudden boat
movement could cause a person to be thrown overboard or into the boat.
Never be under the inuence of alcohol or drugs while boating (it is the law).
Alcohol or drug use impairs your judgment and greatly reduces your ability
to react quickly. Prepare other boat operators. Instruct at least one other per-
son on board in the basics of starting and operating the outboard, and boat
handling, in case the driver becomes disabled or falls overboard.
Passenger boarding. Stop the engine whenever passengers are boarding,
unloading, or are near the back (stern) of the boat. Just shifting the outboard
into neutral is not sufcient.
Be alert. The operator of the boat is responsible by law to maintain a proper
lookout by sight and hearing. The operator must have an unobstructed view
particularly the front. No passengers load, or shing seats should block the
operators view when operating the boat above idle speed.
Never drive your boat directly behind a water skier in case the skier falls. .
Watch fallen skiers. When using your boat for water skiing or similar activi-
ties, always keep fallen or down skier on the operator’s side of the boat while
returning to assist the skier. The operator should always have the down skier
sight and never back up to the skier or anyone in the water.

producTion of inflaTable boaT
6/32
owner’s manual assembly and disassembly
7/32
General
WARNING: Do not exceed the maximum recommended number
of persons. Regardless of the number of persons aboard, the total
weight of persons and equipment must never exceed the maximum
recommended load. Always use the seats/seating spaces provided.
Payload.
WARNING: When loading the craft never exceed the maximum
recommended load. Always load the craft carefully and distrib-
ute loads appropriately to maintain design trim (approximate level).
Avoid placing heavy weight high up.
Outboard engine.
DANGER: The maximum motor power of this boat is given in the
specication in this manual. Overpowering a boat can result in se-
rious injury, death or boat damage. The installation and operation
instructions of the outboard motor can be found in this manual.
DANGER: You might lose control of the boat when using the motor
at full speed. Accidents may occur. BUSH can not be held respon-
sible for these actions.
3. assembly and disassembly
3.1 The valves
The BUSH valves are especially designed for safe and comfortable use. The
valves are designed at to increase the comfort in the boat and to prevent
damage the boat.
Operation of the valve:
Take off outside cap• (b). The valve is closed when the middle screw (a)
is in upside position.
To open the valve put your nger • (a) in the middle of the valve and push
the middle screw down, turn your nger ¼ until the screw locks.
To close the valve push the screw and turn your nger ¼ until the screw •
comes up
Pump connection:
Put end piece (the nozzle tting) of the pump on the valve.•
Turn right (clockwise) and start pumping.•
Keep pumping until no air can be put into the boat.•
When ready, be sure to take off the pump.•
Be sure to put on the protection cap again (for protection from dirt and•
damage).

producTion of inflaTable boaT
8/32
owner’s manual assembly and disassembly
9/32
3.2 inflaTion of Tube and keel
Remove any sharp objects from at surface where boat will be assembled.
To inate the boat, roll the boat out on the oor. If the boat is unpacked,
check if all parts are present. Check that the valves are closed. This can be
done by putting your nger in the valve, push the little colored knob in, and
turn to the right one stroke. If the knob jumps up a little it is possible get air
into the boat. (To let air out of the boat you have to turn the knob). Get your
delivered pump. Push the nozzle, end piece on the valve and turn right. The
pump will tighten on the valve. Put enough air in the boat to give the boat
some form. All chambers should be inated equally avoid damage to the
bulkheads that separate the chambers.
3.3. order of inflaTion of Tubes
CLOSE THE DIAPHRAGM OF KEEL’S VALVE BEFORE INFLATING
Inate the boat in the following order:
side chambers1.
front chambers (if applicable)2.
oor chamber (if applicable)3.
keel chamber (if applicable). 4.
ALWAYS INFLATE THE KEEL CHAMBER LAST.
CAUTION: Over-ination can cause structural damage to your boat.
Never surpass these values!
The maximum ination pressure for the body is 0.25 bar = 3.6 psi.
The maximum ination pressure for the keel is 0.35 bar = 5 psi.
The maximum ination pressure for the oor is 0.7 bar = 10 psi.
CAUTION: DO NOT use mechanical compressors to inate your
boat. Overination may result in ruptured seams and/or bulkheads.
The pump that is delivered gives exactly the right pressure to your
boat.
3.4 floor
BUSH boats which are equipped with an inatable or a non-inatable oor
must be operated with these oors properly installed before use. Using the
boat without the provided oors unsafe, uncomfortable and may result in
damage to the boat.
3.5 floorboard insTallaTion
Place the front section (bow board 1) of the oorboard as far in the front •
of the boat as possible. Make sure the hole in the bottom is straight
above the valve of the keel section.
Place part two into the boat. Put the two parts of the oorboard “in line”.•
Insert the back section under transom holders.•
Push down the two parts to the bottom of the boat.•
The oorboards will be in a level position.•

producTion of inflaTable boaT
10/32
owner’s manual assembly and disassembly
11/32
Installation of the aluminum stringer
After installation of the oorboards, put the stringers in the sides of the oor.
To make the installation of the stringers easier we recommended putting
an oar under the bottom of the boat. This lifts up the oorboards to have
easier access to put the stringers on the sides of the oor.
3.6 hiGh pressure inflaTable floorboard dwf
BUSH has two types of inatable oorboards:
Type A: This is a at inatable oor without any deadrise.
Type AK: Models 3D-V. This is arcuated inatable oorboard with a deadrise.
The types of inatable oors is NOT interchangeable.
Inate the boat to the half of full pressure.•
Unfold and stretch out the oor onto the bottom of the boat sticking it •
well under the half-inated tubes and against the transom. The valve
must be face up.
Inate the boat.•
Close the valves by putting the caps on and turning them to the right.•
Push the sides of the oorboard under the tubes as far as possible•
Then fully inate the inatable oorboard.•
If you fully inate the air deck, it will push itself underneath the tube and •
it will stay there tight in its place.
Oar
3.7 seaTs
If your boat is equipped with seats and a “seat rails” system on the tubes,
you can install the seat bench as in the following drawing. You must install
the seat after fully inating the boat.
The seat rails (c) are connected to the inner sides of inatable tubes (d) of
your boat. The seat holders (b) are connected to the lower side of the seats.
Insert the seat rails c into the holes a of your seat holders on the both sides
of the boats equally and move the seat to the proper position.
CAUTION: NEVER use the seats for lifting your boat or as handles.
The seat holders are breakable.
3.8 rowinG equipmenT
BUSH boats come as standard with oars, rowlocks, and a rowing seat. En-
sure seat is properly installed. To install the oars in the oarlocks, put the oars
over the rowlocks pins. To prevent loss of the oars, be sure to put the cap on
the rowlock. If the oars are not in use, put the oars in the clips on the sides
of the boat.
CAUTION: DO NOT use the oars as levers: they are breakable!
WARNING: Local water conditions must be taken into account be-
fore operating boat with oars or a small outboard. Boat power may
not be strong enough to overcome currents in tidal inlets, open seas,
small channels or shallows of shoal water regions.

producTion of inflaTable boaT
12/32
owner’s manual assembly and disassembly
13/32
3.9 enGine insTallaTion
Outboard power.
DANGER: Overpowering a boat can result in serious injury, death or
boat damage. Using an outboard that exceeds the maximum horse-
power limit of a boat can:
result in severe handling and/or stability problems1.
place too much weight at the transom altering the designed o-2.
tation characteristics of the boat
cause the boat to break apart particularly around the transom3.
area.
The maximum motor power to be used for your boat see in specifica-
tion of this manual.
Mounting the engine:
Make sure you are standing safely and are stable.•
Unlock the motor for tilting and mount motor on the transom.•
The motor must be in the middle of the transom for proper operation.•
Screw the brackets securely on the stern.•
Lock the motor-securing line attachment.•
Position of the outboard engine
The outboard motor must be so installed that in the normal running position,
it stands vertically in the water. This means that the “cavitations plate” on the
low side or the outboard engine is horizontal in the water if the boat is lying in
its normal position. The anti-cavitations plate on the engine should be about
20 - 40 mm under the bottom of the transom.
Starting the engine
Pull the boat into the water•
Secure the motor in the downwards position•
Stand securely and start the engine.•
Avoid very high speeds when running the boat backwards, water can •
come in the boat over the transom. Before putting the boat into the water
check that the water plug in the transom is in place and closed.
3.10 TransporTaTion
3.10.1 Lifting the boat out of the water
Make sure there are no sharp edges under the boat on the place where you
want to lift the boat out of the water Use the handgrips for lifting instead of
the ropes and seats.
3.11 deflaTion
General information:
NOTE: Boat should be clean and dry before rolling up for storage.
Remove any sand and debris that may cling the fabric.•
When deating the boat, do not deate one chamber at once.•
Deate all chambers evenly, this prevents damage to the bulkheads in •
the boat.
To deflate the boat:
Put the boat on the oor
Put your nger in the valve and turn ¼.•
Release some air from all chambers.•
Make sure the inside of the valve stays open (to enable the air to get out •
during folding).
Push evenly on the whole boat to let as much air out as possible. If you•
deate and store your BUSH, you can leave the inatable oorboard as
it is installed, just leave out the air and fold the boat.

producTion of inflaTable boaT
14/32
owner’s manual safeTy and operaTion recommendaTions
15/32
3.12 foldinG The boaT
Put the boat on the oor.1.
Take out the oorboards.2.
Fold the boat to the middle of the boat, so that the whole boat is as 3.
wide as the transom.
3. 4.
Bring the cones at the back of the side chambers to the middle of the4.
transom
Roll the transom forward. This helps to get the air out. Be sure all valves5.
are in the open position.
Folded this way the boat ts in the delivered pack (sack) for transporta-6.
tion. If you prefer the oars to be in the same pack sack as the boat take
care that the oars will not damage the pack / sack. Put in the round parts
of the oars rst.
4. safeTy and operaTion
recommendaTions
4.1 imporTanT safeTy informaTion
Read this:
Lanyard Stop Switch.
The purpose of a lanyard stop switch is to stop the engine when the operator
moves far enough away from the operator’s position to activate the switch.
This would occur if the operator accidentally falls overboard or moves within
the boat a sufcient distance from the operator’s position. While activation of
the lanyard stop switch will stop the engine immediately, a boat will continue
to coast for some distance depending upon the velocity and degree of any
turn at shut down.
WARNING: Avoid serious injury or death from deceleration forces
resulting from accidental or unintended stop switch activation.
Accidental or unintended activation of the switch during normal
operation is also a possibility. This could cause any, or all, of the
following potentially hazardous situations:
O• ccupants could be thrown forward due to unexpected loss of
forward motion.
A• particular concern for passengers in the front of the boat who
could be ejected over the bow and possibly struck by the gear
case or propeller.
Loss of power and directional control in heavy seas, strong cur-•
rent or high winds.
Loss of control when docking. The boat operator should never•
leave the operator’s station without rst disconnecting the stop
switch lanyard from the operator.

producTion of inflaTable boaT
16/32
owner’s manual safeTy and operaTion recommendaTions
17/32
4.2 pre-operaTinG check lisT
Check the ination pressure of the air chambers.•
Remove any obstruction from the self bailer oor drain.•
Close the self bailer oor drain.•
Check outboard for tightness on transom.•
Know the fuel capacity and cruising range.•
Check that the lanyard stop switch for the outboard works correctly.•
Be sure the boat is not overloaded. Do not exceed the maximum num-•
ber of passengers or load capacity. Look at the boat capacity plate.
ALWAYS WEAR A LIFEJACKET!
Be sure there is an approved personal otation device of suitable size •
for each person aboard and readily accessible.
Check that the paddles are in the boat in case of engine trouble.•
Operator knows safe navigation, boating, and operating procedures.•
A ring type life buoy or buoyant cushion designed to be thrown to a•
person in the water.
Arrange passengers and load in the boat so the weight is distributed•
evenly and everyone is seated in a proper seat or on the oor.•
Instruct at least one passenger in the basics of boat handling and the•
starting and operation of the outboard, in case the driver becomes dis-
abled or falls overboard.
4.3 sTabiliTy and buoyancy
4.3.1 Position of persons and luggage
For safe operation it is advised to have people seat in the middle of the
boat as much as possible. The position of the people will directly inuence
the stability of this craft. When operating the boat with outboard every one
should be seated on the oor, neither on the side tubes nor the rowing seats,
in order to prevent falling overboard.
4.3.2 Rowing
BUSH boats are designed to give you a comfortable rowing position. Use
the delivered bench to make maximum use of the rowing possibilities.
WARNING: NEVER use the oars as levers they are breakable!
4.3.3 Under engine power
The bottom of your BUSH is designed to have a “V” shape (except the
model type S and A). This improves the sailing characteristics, especially
when operating an outboard engine. It is possible to get your BUSH boat
onto the plane.
CAUTION: While you are sailing at high speed or in “aquaplaning”:
avoid abrupt corners and high waves, this might endanger the pas-
sengers. Make sure everybody holds on to the safety ropes or han-
dles. For comfort and safety, reduce speed in waves. Small children
must be sitting in the boat.
WARNING: ALWAYS WEAR A LIFEJACKET!
Wave And Wake Jumping: Operating recreational boats over waves and
wake is a natural part of boating. However, when this activity is done with
sufcient speed to force the boat hull partially or completely out of the water,
certain hazards arise, particularly when the boat re-enters the water.
There is another less common known hazardous result from allowing your
boat to launch off a wave or wake. If the bow of your boat pitches down far
enough while airborne, upon water contact it may penetrate under the water
surface and submarine for an instant. This will bring the boat to a nearly in-
stantaneous stop and can send the occupants ying forward. The boat may
also steer sharply to one side.
When accelerating with the boat, the bow can make an upward movement.
This might limit the sight of the coxswain temporarily. When the speed of the
boat increases, the boat will come back to a level position again. If the wind
blows towards you when running, a bow pointed upwards can cause the
wind lift the front of the boat up.

producTion of inflaTable boaT
18/32
owner’s manual safeTy and operaTion recommendaTions
19/32
4.3.4 Single Operation
When operating under power without passengers, sit not on ination tubes
or seat, weight should be as far forward and in the middle as practical. Avoid
heavy weights near the transom. Rapid acceleration should be avoided to
prevent the possibility of backward ipovers.
Wind and wave conditions can be highly dangerous for your inatable. You
can easily be ipped over if the load in the boat is not distributed in the bow
of the boat and wind and tide are against. Especially the models with inat-
able oor should be driven carefully in headwind and waves.
Distribution of load and weight take the bow down to a safe situation. The
anti-cavitations plate on the engine should be about 30-50 mm under the
bottom of the transom.
If your outboard is too high on the transom, you will experience a lot of cavi-
tations (air bubbles and slippage around the propeller). If your outboard is
too low on the transom it will create drag and it will throw up water into the
boat. In both cases you end up with loss of speed, so try to nd the ideal
position before you nally bolt your engine to the transom (consult your en-
gine supplier).
At all speeds it is advisable to keep the boat level. Prevent the bow from
pointing up, and prevent the bow from pointing down towards the water. Use
the weight of the people on board to achieve the level position. Adjust your
engine angle (see below)
REMEMBER:
• An outboard tilted too far from the transom will drive the boat with a bow
up attitude which is both very dangerous and inefcient.
An outboard tilted too close to the transom will drive the bow section too
deep into the water which ends up in loss of speed and/or cavitation.
Occasional checks should be made to the motor attachment screws. 1.
Loose screws will cause erratic boat operation and possible loss of en-
gine overboard.
Make a thorough review of the motor’s manual before operation.2.
On board loads should be monitored to avoid chafng or puncturing the 3.
boat’s skin.

producTion of inflaTable boaT
20/32
owner’s manual safeTy and operaTion recommendaTions
21/32
4.3.5 Turning the boat
When taking a sharp turn, reduce the speed of your boat. The boat will tilt
considerably inside towards the turning centre.
4.3.6 Towing the boat
If the boat is to be towed by another boat, the boat must be empty. Remove
outboard, fuel tank and equipment
WARNING:
- Never tow your craft with people aboard.
- Frequently inspect the towing painter.
- Periodically check the towing conditions
and especially that the craft is not taking in water.
IMPORTANT: The bow lifting handle should not be used for towing, anchor-
ing, or mooring. Use the port and starboard points of the boat for towing.
Towing this way makes the boat steady and secure behind the towing boat,
and helps to avoid damage to your BUSH. Attach the towing ropes as in the
following scheme:
The RIB may be towed for bow ring.
4.4 hazards
4.4.1 Water hazards
Wrecks, reefs, rocky shores, sand bars, and shallows should be avoided 1.
or approached with caution.
When boating in unfamiliar waters, obtain information on local water 2.
hazards before launching.
BEWARE OF OFFSHORE WINDS AND CURRENTS.3.
4.4.2 Air chamber failure
Your BUSH is designed with more than one air chamber. Therefore, in the
event of one of the air chambers leaking owning to a puncture, the boat will
save at least 50 % of the buoyancy. Shift the weight to the opposite side.
Secure the leaking chamber as necessary (by tying–up or holding– up) and
immediately proceed to the nearest shore or mother ship, whichever is near-
est. However, be careful about shallows or reefs, because they can scratch
or further damage your boat.
4.4.3 Beaching
It is recommended that the boat not be powered onto the beach, dragged
across rocks, sand, gravel or pavement as damage to the boat skin may
result.
4.4.4 Davits
If the boat is suspended on davits, remove the drain plug so that no water
can accumulate inside the boat.
Drain plug
The Rib is equipped with a hull/ cavity drain plug. Both must be installed
when launching the boat. The hull cavity plug should be removed periodi-
cally to eliminate water from condensating in the inner hull. The deck drain
plug should be removed only when the boat is under power in forward mo-
tion or when the boat is stored out of the water on davits boat storage racks
exposed to rain and water.

producTion of inflaTable boaT
22/32
owner’s manual safeTy and operaTion recommendaTions
23/32
4.4.5 Sunlight
Avoid exposure to the sun for prolonged periods. The changing air pres-
sure inside the tubes might cause damage to your boat. Extreme sunshine
(ultra-violet rays) over a long period of time may accelerate ageing of the
materials. Cover the boat to block direct sunlight exposure if the boat is to
be removed from water for an extended period.
4.4.6 Smoking
Refrain from smoking especially while refueling your boat.
When refueling, always stick to the following recommendations:
If possible, remove portable tanks from the craft to refuel.-
Refuel the tanks in the open air, far from heat sources, sparks or ames.-
Do not ll the tanks to the brim. The fuel increases IN volume with a rise -
in temperature and there is a possibility of the tank overowing or even
breaking.
4.4.7 High altitude use
Normal full ination pressure is 250 mbar. If boat is inated at sea level (low
altitude) and transported to a high altitude (i.e., for use in a mountain lake) the
air pressure must be reduced at the higher altitude to prevent over ination.
4.4.8 Swimming
DANGER! Stop the propeller of your outboard engine when people
are swimming close to your boat. The propeller can be extremely
dangerous to anyone or anything in the water.
Stop the outboard motor immediately if you spot swimmers in
the vicinity of your boat.
5. mainTenance
5.0 General mainTenance
5.1 cleaninG aGenTs
Household cleaners should be used sparingly and not discharged into water-
ways. Never mix cleaners and be sure to use plenty of ventilation in enclosed
area. DO NOT use strong detergents, solvents or products which contain phos-
phates, chlorine, solvents, no biodegradable or petroleum based products.
Citrus based cleaners are excellent for marine cleaning purposes and are
safe for you and the environment. Cleaning your Lodestar can best be one
with just clean water and normal soap.
IMPORTANT: Waxes or cleaners containing alcohol or hydrocarbons
should not to used on the boat fabric. These products will prematurely dry
out or damage the boat fabric.
5.2 repairs
WARNING! Avoid serious injury or death from a re, explosion or
poisoning. The glues and solvents used for repairing inatable are
toxic and highly ammable. As a safety precaution, always work out-
doors or in an area that is well ventilated, and away from any open
ames, sparks, or appliances equipped with pilot lights. Breathing
the vapors or exposure to the skin may be hazardous to your health.
Avoid breathing the vapors and contact with skin and eyes by wear-
ing a carbon lter respirator and protective gear over all exposed
areas of the body.
5.2.1 Small repairs
If you have any damage to your BUSH, we strongly recommend to your
refer to your BUSH dealer. If the damage is a small puncture you can use
the material you nd in the repair kit. For the best results when gluing, the
relative humidity should be less than 60%, ambient air temperature should
be between 18 °C to 25 °C and not in direct sunlight.

producTion of inflaTable boaT
24/32
owner’s manual mainTenance
25/32
In general, work as follows:
Cut out a patch large enough to overlap the damaged area by 30 mm•
from all sides.
Centre the overlapping patch over the damaged area and trace with a•
pencil the outline of the patch.
Clean the surroundings of the puncture and the patch with solvent.•
Apply two thin layers of adhesive using a short bristle brush, in a circular •
pattern on both the backside of the patch and the patch area on the
boat. Allow the rst layer to dry completely (approximately 15 minutes)
before applying the second layer. The second layer should dry until
tacky, then apply the patch to the prepared area and press down rmly.
Using a smooth object (the back of a tablespoon works well), force out
any air bubbles that may have been trapped under the patch, working
from the centre of the patch to the outside.
Wait 24 hours before you inate the boat again.•
5.2.2 Large repairs
Larger areas or, if the parts overlaps a seam, should be patched by a pro-
fessional repair technician at an inatable repair station. Contact your local
BUSH dealer for the nearest inatable repair station.
5.2 (winTer) sToraGe
IMPORTANT: To prevent hull or tube discoloration from marine growth
or polluted waters, do not store boat in the water for extended periods of
time.
1. After use, the boat and all components should be washed with a mild
soap and rinsed with fresh water. Dry all parts before storage in the car-
rying bag. This will help prevent mould or mildew.
2. Wood components should be inspected for damage or deterioration of
the nish. Surface scratches or abrasions should be renished with a
marine grade varnish.
3. To keep the boat looking new, store the boat in a cool dry area and avoid
excess exposure to direct sun light.
6. environmenT
6.1 discharGe of polluTanTs
and disposal of wasTe
Prevent pollutants REACHING the water around your boat. Using the water
for water sports also means taking care of a clean water sports environ-
ment. Waste means all forms of garbage, plastics, recyclables, food, wood,
detergents, sewerage and even sh parts in certain water – in short, nearly
everything. We recommend you bring back everything you take out with you
for proper disposal ashore. Many areas prohibit the discharge of sewerage
overboard or even an operable overboard waste discharge.
6.2 advisable speeds
When running, take care at high speed this maybe dangerous:
yourself or anyone or anything in the water in front of you.•
cause considerable waves behind the boat which damages the water-•
front.
cause unnecessary noise to fellow water sporters.•
6.3 excessive noise
Noise means engine noise or even yelling. Many bodies of water have ad-
opted noise limits. Don’t use thru-transom exhaust unless you’re well off-
shore. Music and loud conversation can carry a considerable distance on
water, especially at night.
6.4 exhausT emissions
Increased exhaust (hydrocarbon) emissions pollute our water and air. Keep
your engine tuned and boat hull clean for peak performance. Consult your
dealer and engine manual for information.

producTion of inflaTable boaT
26/32
owner’s manual warranTy
27/32
warranTy
7. warranTy
LIMITED WARRANTY
I. We warrant each new production BUSH inatable boat and accessories
attached thereto (hereafter referred to as “Product”) to be free from de-
fects in material and workmanship, but only when the consumer sale is
made in a country to which distribution is authorized by us.
II. The warranty shall become effective only upon receipt of a completed
Warranty Card or digital registration conrmation, which shall identify the
product so registered by serial number.
This warranty shall remain in effect as described below.
A. Hull coated fabric is covered by a 5 year warranty against cracking, po-
rosity and rot.
B. Hull seams are covered against delaminating by a limited 5 year war-
ranty.
NOTE: Seams are determined to have delaminated when the outer coating
separates from the fabric base or the seam loses its structural strength. If
delamination is occurring on only one seam and not on the entire boat, the
seam is to be repaired under warranty.
C. All other boat parts, including but not limited to components such as
berglass hull, oars, oar locks, lifting handles, foot pumps, oars, boat
bag, transom holder, transom, “D” rings, stringers, “H” ttings, oor
boards, rubbing strake and all other components are covered by a lim-
ited 2 years warranty.
III. Since this warranty applies only to defects in material and workmanship,
it does not apply to normal wear and tear, or to damage caused by:
A. Neglect, lack of maintenance, accident, abnormal operation or improper
installation or services;
B. Use of an accessory or part not manufactured or sold by us;
C. Participating in or preparing for racing or other competitive activity;
D. Alteration or removal of parts.
IV. This warranty does not cover incidental or consequential costs or ex-
penses such as: haul–out, launch, towing transport and storage charg-
es; telephone or rental charges of any type, inconvenience, or loss of
time or income; or other consequential damages. or loss of time or in-
come; or other consequential damages.
V. Customer must provide reasonable access to the product for warranty
service by delivering the product for inspection to a BUSH dealer au-
thorized to service the purchaser’s product. If a purchaser cannot de-
liver product to such authorized dealer, the may give notice in writing
to the company. We shall then arrange for the inspection and repair,
provided such service is covered under this warranty. Purchaser shall
pay for all related transportation charges and/or any other expenses
associated with that service. Any product or parts shipped by purchas-
er for inspection or repair must be shipped with transportation charges
prepaid. The Warranty Registration Card is the only valid registration
identication and must be presented at the time warranty service is
required. Warranty claims will not be accepted without presentation of
the Warranty Card.
VI. Our obligation under this Warranty shall be limited to repairing a defec-
tive part, or at our option, refunding the purchase price or replacing such
part or parts as shall be necessary to remedy any malfunction resulting
from defects in material or workmanship as covered by this Warranty.
We reserve the right to improve the design of any product without as-
suming any obligation to modify any product previously manufactured.
VII. This warranty gives you specic legal rights, and you may also have
other legal rights which vary from country to country.

producTion of inflaTable boaT
28/32
owner’s manual warranTy
29/32
specificaTion
Model Lenght
overal,
m
Beam
overal,
m
Lenght
inside,
m
Beam
inside,
m
Tube
diametr,
m
No of
chamber Floor
type
Total
weight,
kg
Max.
load,
kg
Max.
No of
persons
Max. engine
size. kW/hp Design
category
VENTA
V - 270 2.70 1.06 2.00 0.44 0.31 2 + 1 Inat. 21 210 2 - D
V - 300 3.00 1.40 2.30 0.58 0.41 2 + 1 Inat. 26 420 3+1 - D
RAFT
R - 345 3.45 1.42 2.68 0.58 0.42 2 + 1 Inat. 33 620 6 1.6/2.2 D
MURENA
M - 285 2.85 1.46 2.10 0.62 0.42 2 Slatted 34 550 4 + 1 1.6/2.2 D
SKATE
S - 315 3.15 1.48 2.02 0.68 0.40 3 + keel Rigid 53 475 4 11/15 C
S - 350 3.50 1.66 2.37 0.78 0.44 3 + keel Rigid 68 600 6 15/20 C
S - 380 3.80 1.90 2.53 0.88 0.51 3 + keel Rigid 79 870 6 + 1 18.4/25 C
S - 410 4.10 1.90 2.78 0.88 0.51 3 + keel Rigid 86 950 7 22/30 C
KAIMAN R
K - 285 R 2.85 1.32 2.00 0.60 0.36 3 + keel Rigid 50 400 4 3.3/4.5 D
K - 300 R 3.00 1.47 2.10 0.75 0.36 3 + keel Rigid 54 424 4+1 11/15 C
K - 330 R 3.30 1.53 2.35 0.73 0.40 3 + keel Rigid 58 580 5 15/20 C
K - 360 R 3.60 1.70 2.50 0.78 0.46 3 + keel Rigid 69 750 5+1 18.4/25 C
KAIMAN S
K - 245 S 2.45 1.32 1.72 0.60 0.36 3 Slatted 29 350 3 2.9/4 -
K - 265 S 2.65 1.32 1.90 0.60 0.36 3 Slatted 30 380 4 3.3/4.5 D
K - 285 S 2.85 1.32 2.00 0.60 0.36 3 Slatted 33 400 4 3.3/4.5 D
KAIMAN AK
K - 285 AK 2.85 1.32 2.00 0.60 0.36 3+1 DWF 33 400 4 2.2/3 D
K - 300 AK 3.00 1.47 2.10 0.75 0.36 3 + 1 DWF 41 424 4 + 1 7.3/9.9 C
K - 330 AK 3.30 1.53 2.35 0.73 0.40 3 + 1 DWF 48 580 5 11/15 C
K - 360 AK 3.60 1.70 2.50 0.78 0.46 3 + 1 DWF 55 750 5 + 1 15/20 C
FAVORIT
F - 370 3.70 1.85 2.42 0.85 0.50 3 + keel Rigid 77 840 6 18.4/25 C
F - 400 4.00 1.85 2.70 0.85 0.50 3 + keel Rigid 81 870 7 22/30 C
F - 420 4.20 2.05 2.90 1.05 0.50 5 + keel Rigid 90 904 10 25.7/35 C
F - 470 4.70 2.05 3.40 1.05 0.50 5 + keel Rigid 110 1021 12 29.4/40 C
CRAB
K - 285 R 2.85 1.32 2.00 0.60 0.36 3 + keel Rigid 50 400 4 3.3/4.5 D
K - 300 R 3.00 1.47 2.10 0.75 0.36 3 + keel Rigid 54 424 4+1 11/15 C
K - 330 R 3.30 1.53 2.35 0.73 0.40 3 + keel Rigid 58 580 5 15/20 C
K - 360 R 3.60 1.70 2.50 0.78 0.46 3 + keel Rigid 69 750 5+1 18.4/25 C
K - 400 R 4.05 1.90 2.88 0.90 0.50 3 + keel Rigid 79 1000 7 22/30 C
CLASSIC RIB
C - 300 RIB 3.00 1.46 2.23 0.66 0.40 3 Fibergl. 62 450 5 9/12 C
8. specificaTion 9. warranTy card
Model
Serial No. LV-BSH
PURCHASER’S DATA
Names
Address
Z.I.P. Code Town
Country Phone
DATE OF PURCHASE DEALER’S STAMP
“BUSH” Ltd., Riga, Latvia
www.bushboats.com
www.bush.lv
This manual suits for next models
32
Table of contents
Popular Boat manuals by other brands

Hobie
Hobie Mirage Drive Parts guide

Boston Whaler
Boston Whaler Rage owner's manual

Boston Whaler
Boston Whaler Boston Whaler 15 Guardian Series Operation & maintenance manual

Hobie
Hobie Getaway Illustrated Part Guide

Yamaha
Yamaha WaveRunner EX 2023 Owner's/operator's manual

Aqua glider
Aqua glider ZS30 user guide