Butler EPO-1D-Premia User manual

USER MANUAL
Single Deck Electric Pizza Oven:
EPO-1D-Premia

User Manual
2
Thanks for your using of our company product, in order to ensure the product performance
give full play to the role, please have a read of this manual to avoid unnecessary loss and
damage, and get a further study of our product characteristic、installation and operation. Also
please keep the manual for further reference.
Index
I. Control board operation instruction
II. Functions
III. Machine illustration diagram
IV. Parts list
V. Installation instruction
VI. Operation instruction
VII. Warning
VIII. Maintenance
IX. Trouble shooting
X. Specification
XI. Wiring diagrams
Ⅰ.Control board operating instruction
1. Operating instruction of the EPO-1D-Premia control board.
1.1 The left switch is for controlling the internal lighting.
1.2 The right switch is for controlling all the heating elements, turn it on, then the
thermostats can be used. The indicator lights turn off when the heating elements reach
the set temperature. (If the power switch is “On”, the timer would be out of
function. If you need to use the timing function, please first turn off the power
switch, by now, the timer is also act as “power switch”.)
1.3 These two thermostats are separately control the top and bottom heating elements and
their indicator lights.

User Manual
3
Ⅱ. Functions
1. Functions
1.1 Heating up quickly. This oven is equipped with 350℃thermostat, greatly save the
cooking time.
1.2 Equipped with baking stone, which makes the food are heated more evenly.
1.3 Two thermostats separately control the top and bottom heating elements, you can
freely adjust the temperature of each heating element.
2. Application
2.1 Applicable for baking all the fresh and freeze bread and flour products.
2.2 Applicable for baking fresh and freeze meat.
Ⅲ.Machine illustration diagram
Appearance:
Case:
Front Panel:
Chamber:

User Manual
4
Chamber:
Ⅳ. Parts list
No.
Part No.
Description
QTY
1
EP1T-001
Door
1
2
EP1T-002
Double row switch
1
3
EP1T-003
Indicator light
2
4
EP1T-004
Thermostat
2
5
EP1T-005
Front frame
1
5.1
EP1T-005-001
Bottom rail
1
5.2
EP1T-005-002
Left clevis
1
5.3
EP1T-005-003
Top clevis
1
5.4
EP1T-005-004
Right clevis
1
5.5
EP1T-005-005
Left vertical board
1
5.6
EP1T-005-006
Top rail
1
5.7
EP1T-005-007
Machine control board
1
6
EP1T-006
Chamber
1
6.1
EP1T-006-001
Baking stone
1
6.2
EP1T-006-002
Heating element
2
6.3
EP1T-006-003
Left layer board
1
6.4
EP1T-006-004
Up strip for the heating element
1
6.5
EP1T-006-005
Right layer board 1
2
6.6
EP1T-006-006
Right layer board 2
1
6.7
EP1T-006-007
Main panel of the chamber
1
6.8
EP1T-006-008
Cover board of the chamber
1
6.9
EP1T-006-009
Fixed plate for the pyrocotton
1
6.10
EP1T-006-010
Lamp shade
1
7
EP1T-007
Bottom fixed plate for the pyrocotton
1
8
EP1T-008
Top fixed plate for the pyrocotton
1
9
EP1T-009
Durothermic lamp
1

User Manual
5
Ⅴ. Installation instruction
1. All the electrical power unit and circuit connection must be installed by qualified
electrician with safety standard.
2. Connection must be based on requirements.
3. Make sure the rubber feet have been installed securely.
4. Product should be place in a well ventilated place on solid platform, and we suggest to
least at least 10cm space between the product and the wall or barriers. Also place the
product away from combustible materials, and there should be a fire extinguisher
equipped around.
5. Remove the packaging film off the surface.
6. The power wire should be connected according to safety standards. Make sure the voltage
and frequency conform to the parameters. And please install a double pole switch before
connection. When the voltage working, the voltage error should be under ±10%.
(Product must be connected to ground.)
7. Connect the cable to the power supply fixed by using a screwdriver according to the
connection diagram, then loosen the screw inside the power point, and plug in the cable,
make sure the sheet copper compress the power line tightly. If the connection is incorrect,
it may cause joint heating and burning off the power cord.
Ⅵ. Operation instruction
1. Turn on the power supply.
1.1 The temperature of the oven can be adjusted between 0~350℃.
1.2 Turn the timer clockwise to the desired time, then the indicator light on and the
heating element starts working, when it reaches the set temperature, the indicator light
off. If the temperature is below the set temperature, the heating element will be
automatically reheated and the indicator light on.
1.3 The internal lighting can help monitoring the baking process.
1.4 Cooking time depends on the amount of the food, the more the food had, the longer
the time required.
1.5 Please turn off the power if not using.
Ⅶ. Warning
1. If you want to clean、repair or move the machine, please pull out the plug first.
2. Please don’t touch the switch or plug with wet hand.
3. The machine can’t be flushed directly, and please be careful don’t let any water flow into
10
EP1T-010
Binding post
1
11
EP1T-011
Side board
2
12
EP1T-012
Rubber feet
4
13
EP1T-013
Shell
1
14
EP1T-014
Layer board for the chamber
1
15
EP1T-015
PG13.5 cable gland
1
16
EP1T-016
Cable
1
17
EP1T-017
Timer
1

User Manual
6
the switch when cleaning.
4. Keep the children from touching or using the machine.
5. The ground wire must be connected, all the connection must be reinstated after
maintenance.
Ⅷ. Maintenance
1. Please pull out the plug first before maintenance, and clean it after cooling down the
chamber.
2. For daily cleaning, you can use a dry cloth to wipe off the grease on the chamber, don’t
flush the chamber with water directly. For cleaning the baking stone, please take out the
baking stone, use a fur brush to clean its surface, and rinse it with water then dry it.
(Don’t use any cleanser to clean the baking stone, because the baking stone can
strongly absorb the water, so that the cleanser would be absorbed at the same time,
which may affect the flavor of the food.)
3. We suggest to maintain the machine by qualified electrician once in a month.
Ⅸ. Trouble shooting
Ⅹ. Specification
Model
Temperature
range
Dimension(mm)
Internal
dimension(mm)
Voltage(V)
Power(KW)
EPO-1D-Premia
0~350 ℃
560X570X280
415X400X120X1PCS
220V
2KW
Stoppage
Solution
Not heating up
1. Please check whether the connection is loose.
2. Rotate the thermostat to your needed temperature.
3. Please check whether the power switch is match up with the parameters
4. Contact the service center for repair suggestion.
Short circuit
Contact the service center for repair suggestion
Internal light
Not work
1. Pull out the plug, and cool down the chamber.
2. Replace a new bulb.
Scorching smell
appear
Contact the service center to check whether the connection is short out.
Baking unevenly
Readjust the thermostats for each heating elements to see how they work,
If they work well, please contact the service center to check if the Heating
element need to change.
User Manual
7
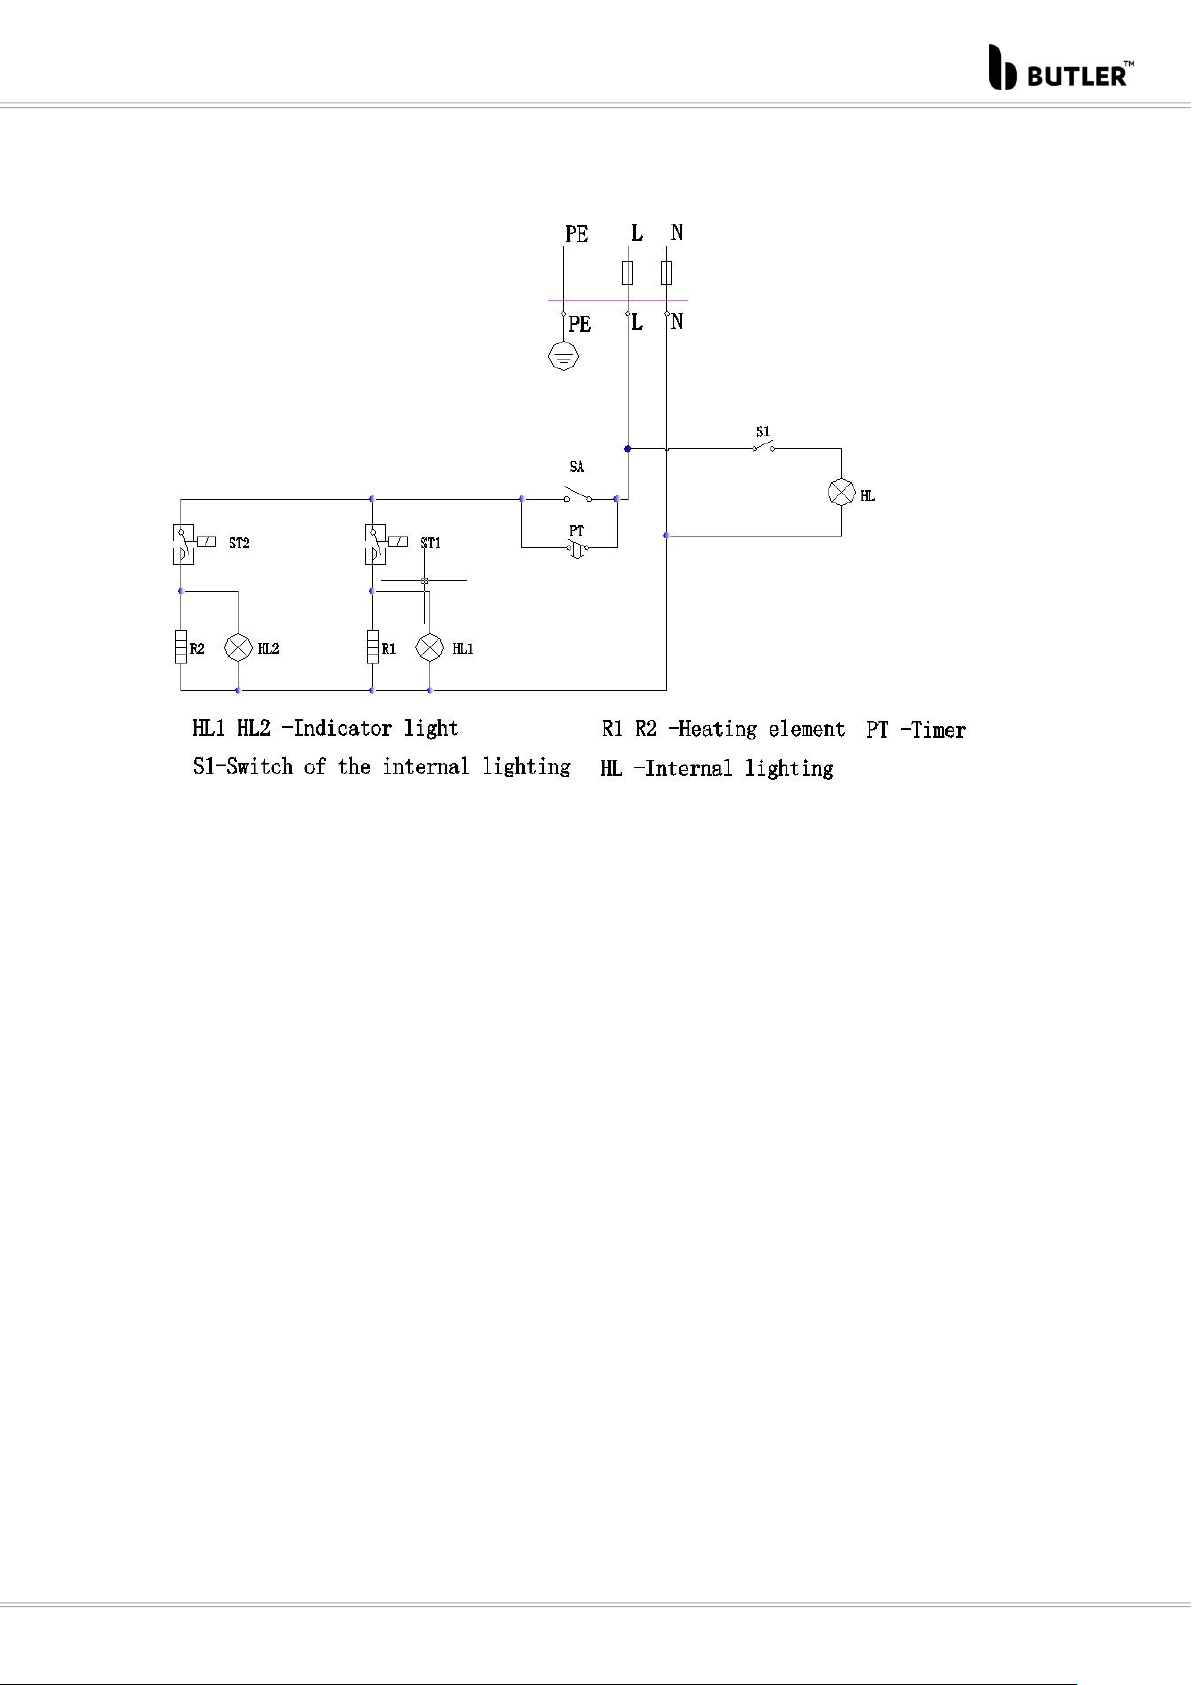
Ⅺ. Wiring diagrams

User Manual
8
Marketed globally by:
TRUFROST COOLING PRIVATE LIMITED
1215, 12th Floor, Tower B, Emaar Digital Greens, Golf Course Extn. Road,
Sector 61, Gurugram –122102 (India)
www.trufrost.com
Table of contents
Other Butler Oven manuals


