BW Broadcast rds2 User manual

RDS2 RDS Encoder
No part of this manual may be re-produced in any form without prior written permission from BW Broadcast.
The information and specifications contained in this document is subject to change at any time without notice.
Copyright 2009 BW Broadcast
www.bwbroadcast.com
Technical manual

I - Introduction ...........................................................................................................................3
1.0 Introduction to RDS.........................................................................................................3
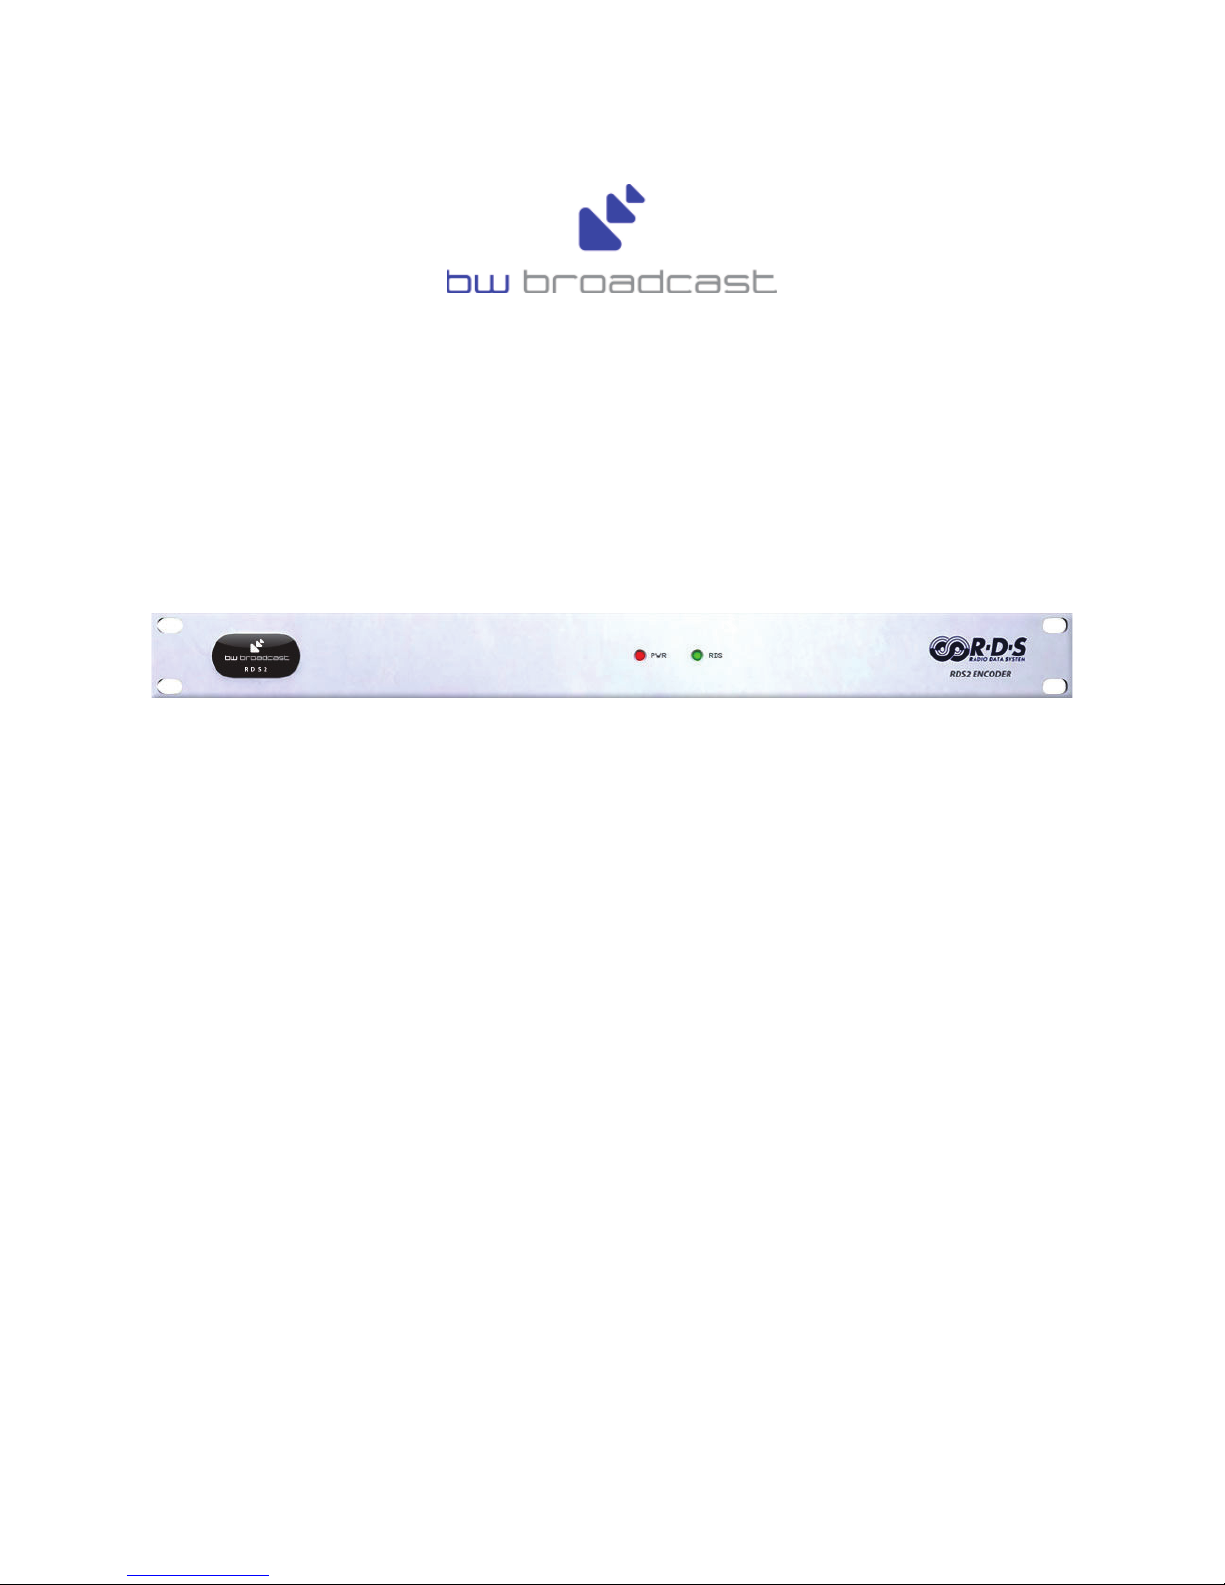
1.1 BW RDS2 Equipment......................................................................................................4
1.2 RDS2 Connections and Indicators ...................................................................................4
II - Installation and Setup...........................................................................................................5
2.0 Installing the BW RDS2 Configuration Software............................................................5
2.1 Connecting the BW RDS2 to a PC...................................................................................5
III - Programming the BW RDS2 ..............................................................................................7
3.1 BW RDS2 Software.........................................................................................................7
3.2 Configuration Screen Operations...................................................................................10
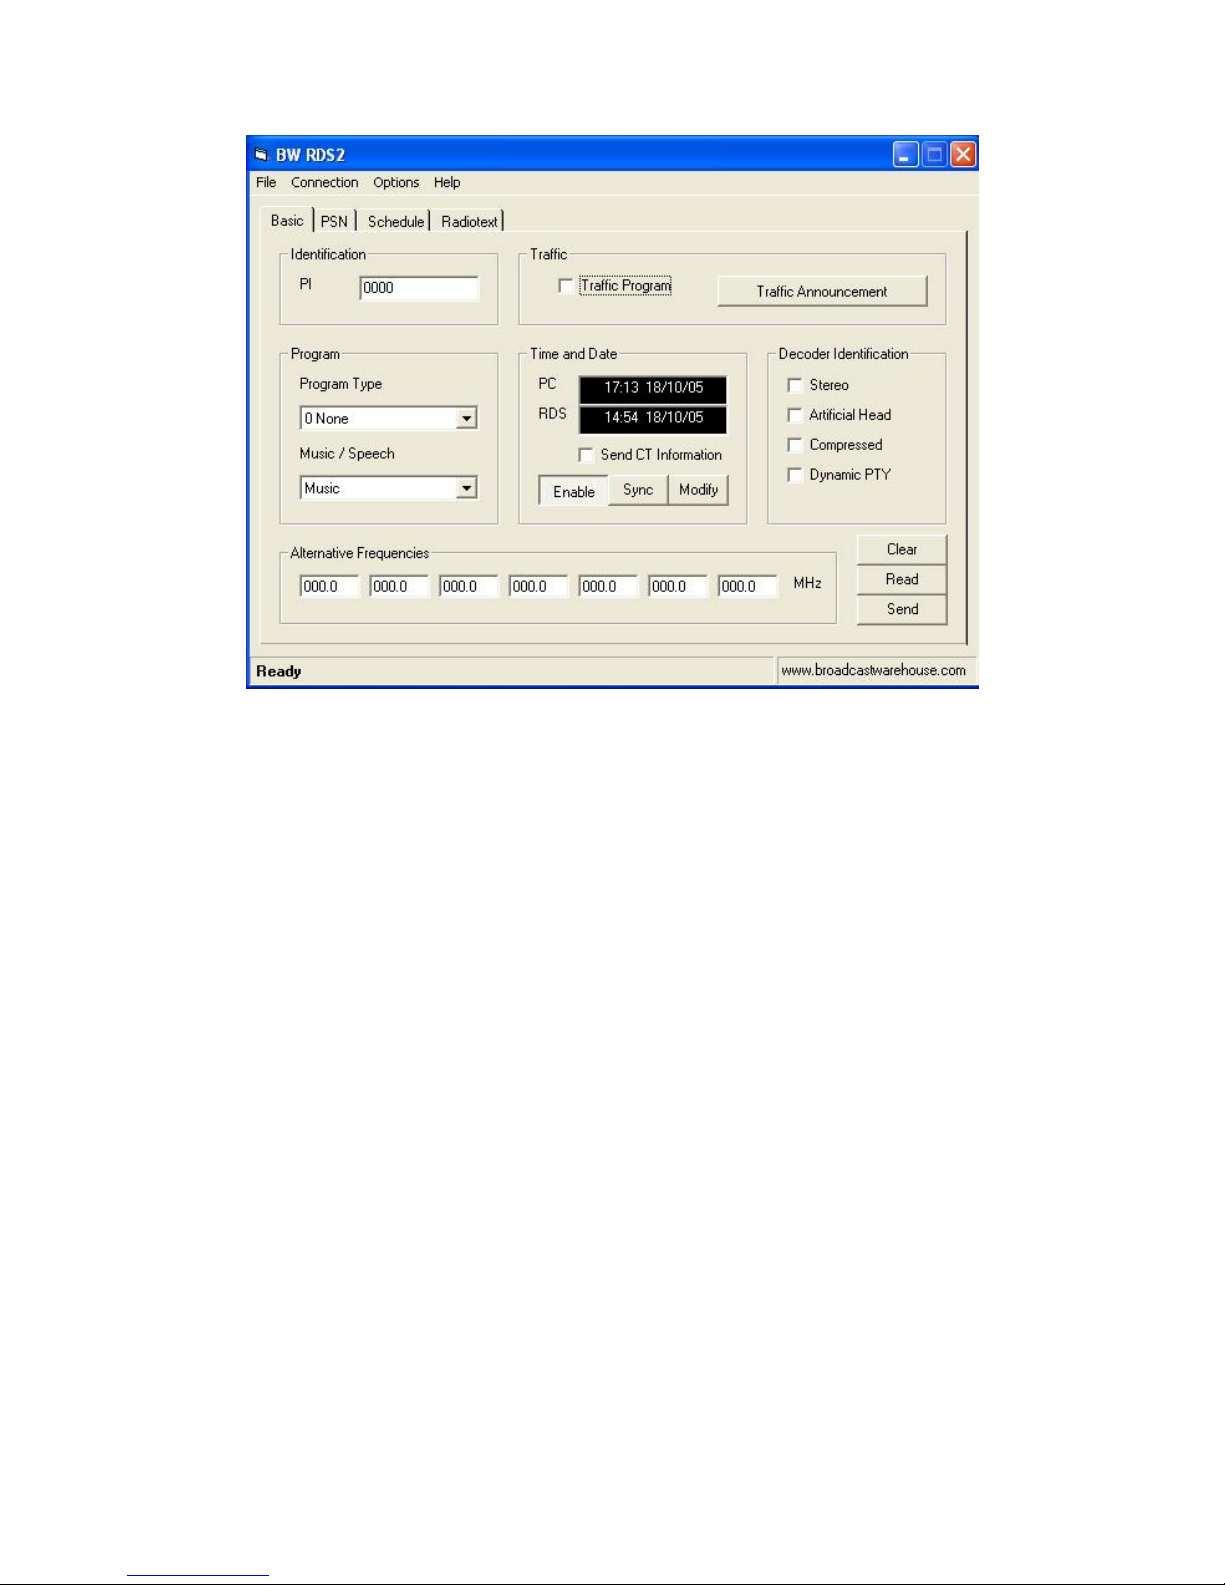
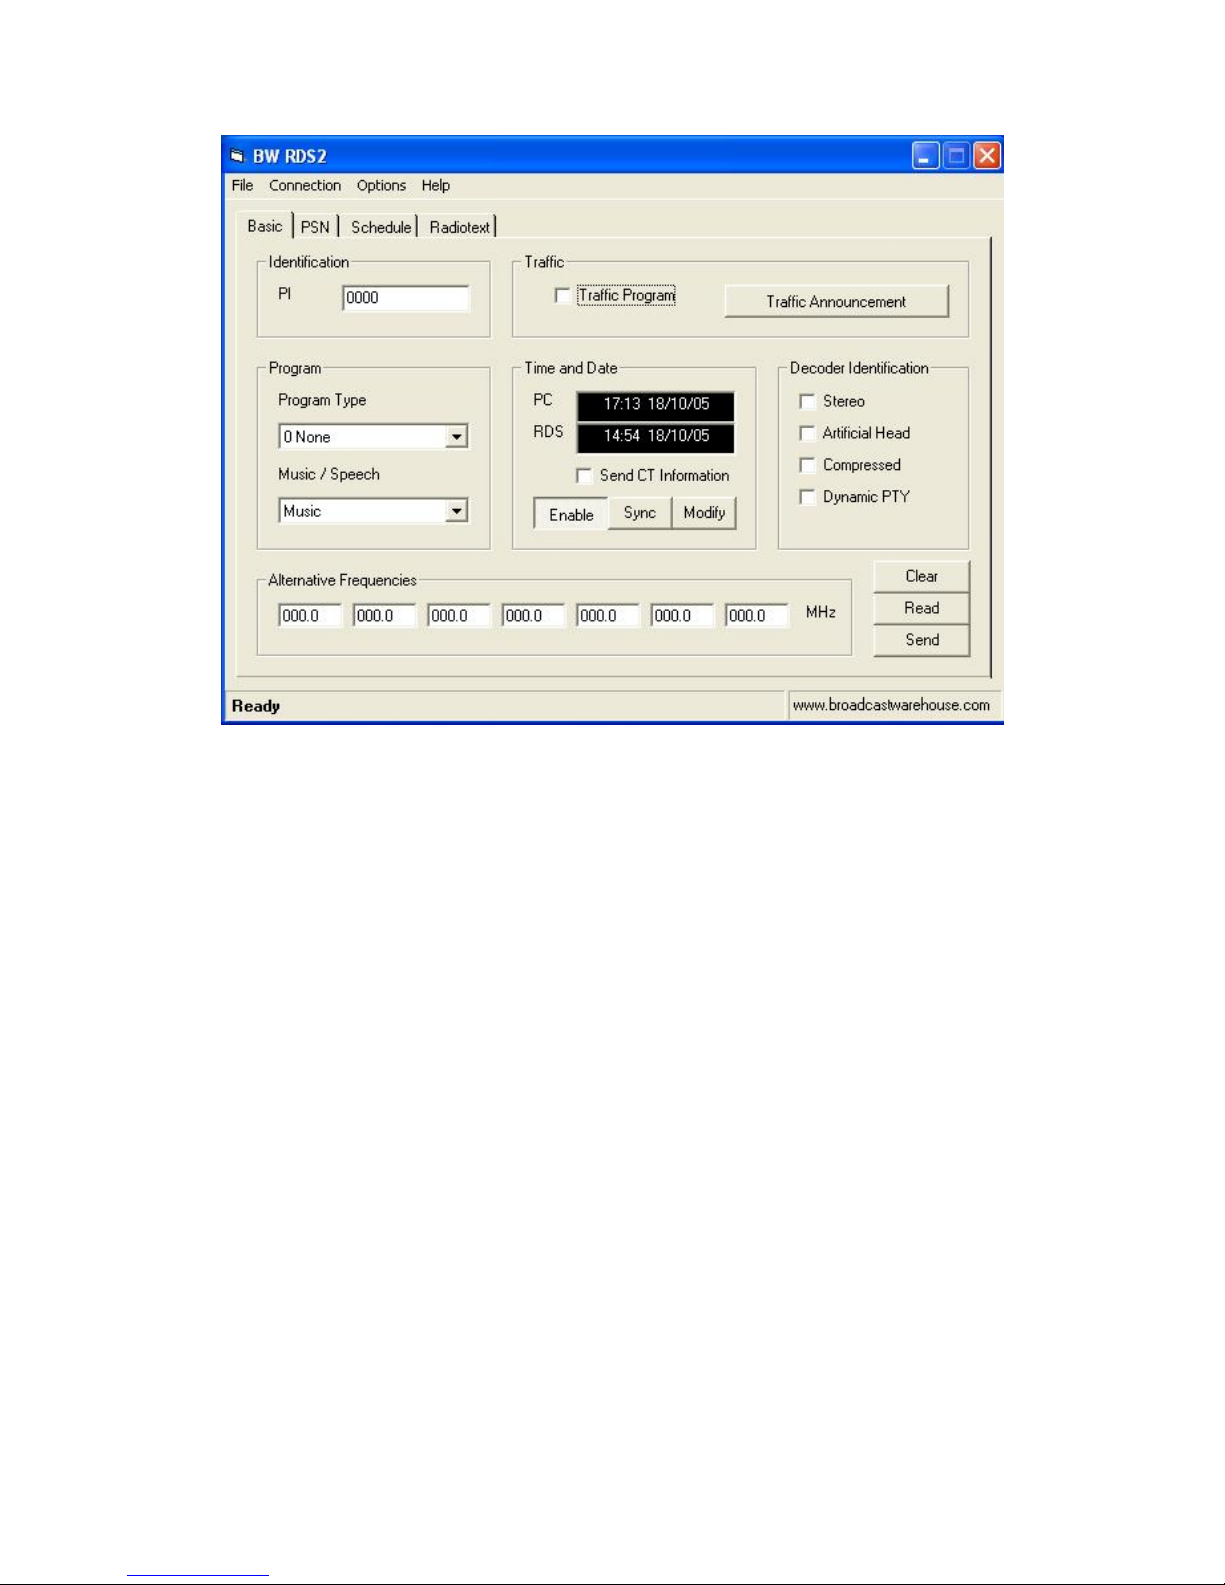
3.3 ‘Basic’ Configuration Screen.........................................................................................11
3.4 ‘PSN’ Configuration Screen...........................................................................................17
This cycle will continue for as long as Page1 is ‘ACTIVE’....................................................19
Caution.....................................................................................................................................19
The two main issues with Dynamic PSN’s are,........................................................................19
Direct Entry..............................................................................................................................20
Note:.........................................................................................................................................21
Insert Text.................................................................................................................................21
Figure 2.5 BW RDS2 Software PSN Entry sub window........................................................21
Insert Scrolling Text.................................................................................................................21
3.5 ‘Schedule’ Configuration Screen...................................................................................23
3.6 ‘Radiotext’ Configuration Screen ..................................................................................25
Figure 3.D BW RDS2 Software Radiotext Configuration window.........................................26
The RDS2 will be programmed with this information next time the SEND button is pressed.
..................................................................................................................................................26
IV - Installing the RDS2 in your Broadcast System ............................................................27
4.1 Pilot Synchronisation .....................................................................................................27
4.2 Equipment Configuration...............................................................................................27
4.3 RDS Level control..........................................................................................................28
This is approximately the correct level for the RDS output.....................................................28
Once you have set the RDS level reconnect your audio and you are all set for RDS
broadcasting. ............................................................................................................................28
V - Hardware Configuration ................................................................................................29
5.1 Dip Switches .................................................................................................................29
5.2 Control Port Configuration............................................................................................29
6.0 Glossary..............................................................................................................................29
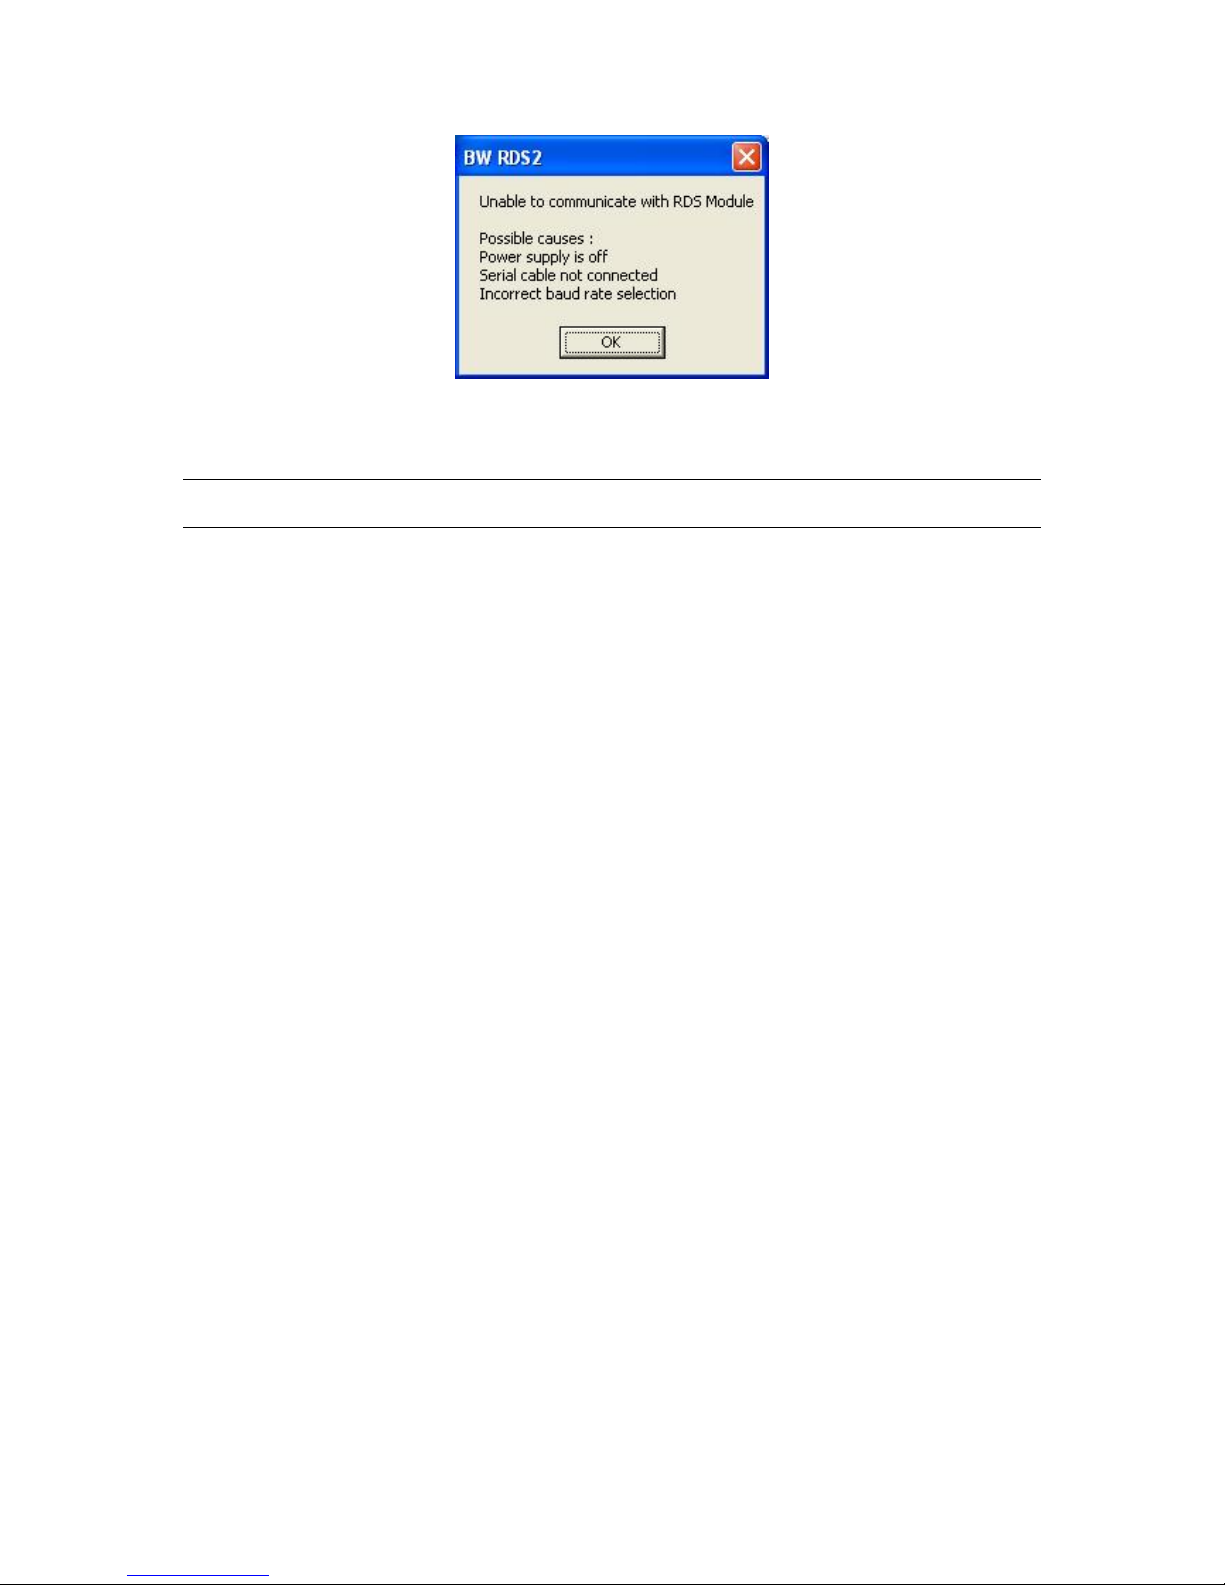
7.0 Troubleshooting .................................................................................................................29
X.0 Glossary............................................................................................................................29
Troubleshooting: ....................................................................................................................33
Configuring your PC’s serial port........................................................................................33
Table 2.1 Default Serial Port Configuration ............................................................................33
PSN Text not appearing correctly ........................................................................................33
BW RDS2 - QuickStart Guide:.............................................................................................34
2.1. RDS2 Contents................................................................................................................34
The default setting for communication is connection on COM1 at 9600 baud rate. ...............35
3.1 BASIC PAGE Configuration. ........................................................................................35
Important:................................................................................................................................36
3.2.1 Configuring a Static PSN..............................................................................................37
To make sure this page remains ‘active’ you will need to disable all time slots in the PSN
scheduler...................................................................................................................................38
1

3.4 RADIOTEXT Configuration ..........................................................................................38
4.0 Connecting the RDS2 to your Transmitter....................................................................39
Happy Broadcasting!................................................................................................................39
2

I - Introduction
1.0 Introduction to RDS
The Radio Data System (RDS) is a non-audible 57 kHz sub carrier that is broadcast in
commercial FM systems allowing text, program, data, control and other information to be sent
to RDS enabled FM receivers. RDS data is sent in pre-defined groups with each group able to
contain particular RDS information packets.
The most popular and most visible use of RDS is transmitting the broadcaster’s Program
Station Name (PSN) to be visible on the display of RDS enabled receivers. RDS can also be
used for many more purposes like traffic management channels (TMC) or automated
frequency switching to provide a continuous clear signal at different geographical locations in
a single broadcaster’s network (AF).
The BW RDS2 is a low cost stand-alone RDS encoder that allows small or large broadcasters
to implement any of the following RDS functions:
PI Program Identification DI Decoder Identification
PSN Program Station Name PIN Program Item Number
TP Traffic Program TDC Traffic Data Channel
TA Traffic Announcement IH In-House Application
PTY Program Type EON Enhanced Other Networks
AF Alternative Frequencies PTYN Program Type Name
RT Radio Text ECC Extended Country Code
CT Clock Time LI Linkage Identifier
MS Music/Speech TMC Traffic Management Channel
3

1.1 BW RDS2 Equipment
The following items are shipped with the BW RDS2 unit,
1. RDS2 1U rack RDS Encoder.
2. Mains IEC lead
3. DB9 Serial lead (9 Pin IBM PC compatible).
4. BW Software CD.
5. Instruction manual
All equipment should be unpacked and checked before any attempt is made to setup the
equipment. Please contact Broadcast Warehouse immediately if any equipment appears to be
damaged or missing.
1.2 RDS2 Connections and Indicators
B
A
F GH
J
I
D E
C
Figure 1.1 Front and Back view of BW RDS2 unit.
Front
A. Power indicator
B. RDS Signal indicator
Back
C. 25Way D-Type connector marked ‘Control’. – Pinout details in Appendix A
D. Block of 8 DIP switches marked Settings. – Switch settings explained in Appendix B.
E. 9Way D-Type connector marked RS232. – for connection to a PC
F. RDS/MPX OUT BNC connector – Output RDS signal mixed with any input MPX
signal
G. MPX IN. BNC connector – MPX input for use in Loop-Through mode
H. 19KHz REF IN. BNC connector – Reference 19kHz Pilot tone if no MPX signal is
present
I. RDS output level control (CW reduces level, CCW increases level)
J. Mains IEC Socket
4

II - Installation and Setup
Caution:
To make sure no invalid information is broadcast, the RDS2 should be fully
configured before being commissioned in a broadcast system.
2.0 Installing the BW RDS2 Configuration Software
The software application provided by BW for use with the RDS2 encoder unit allows
easy configuration of the most used features of the RDS2 encoder (PI, PTY, MS, AF,
TA, TP, DI, CT, PSN, RT). Alternative software is available for programming the more
complicated RDS features. Please contact BW for more information.
The software for the BW RDS2 is supplied on the CD-ROM shipped with the unit and
is designed to run under Microsoft Windows (9x/NT/2000/XP). This is also available
for download from the BW website,
http://www.broadcastwarehouse.com/downloads/BW%20RDS2.zip
If you are downloading the software from the BW site you will need to unzip the
downloaded file before installing it.
To install the software simply navigate to the ‘BW RDS2’ folder and double click on
the "setup" icon. Follow the steps indicated to complete the installation.
2.1 Connecting the BW RDS2 to a PC
Once the software has been installed, connect the supplied serial lead between the 9Way
D-Type connector marked ‘RS232’ on the back BW RDS unit and an available serial
port on your PC or laptop.
Note:Currently the RDS2 does not support USB connections. If you require a
USB connection you will find USB to DB9 serial converters from online
computer stores.
For initial connection testing, all dip switches on the back of the unit (Fig 1.1: Point
‘D’) should be set UP except the last unit switch which should be set DOWN. This will
set the communication baud rate to 9600.
Start the BW RDS2 software (Start -> All Programs -> BW RDS2 -> BW RDS2).
You should see the main software window (see figure 2.3).
5

Figure 2.1 BW RDS2 Software Startup - Basic Configuration window
To configure the software to communicate to the BW RDS2 unit open the ‘Options’
drop down menu (Alt-O), then select the correct Serial Communications Port number
(Com1, 2, 3, 4) and set the default baud rate to 9600.
Once the communications settings are correct, click on the READ button in the bottom
right hand side of the screen. If the connection is setup correctly you will see the status
message at the bottom of the window change from Ready to Working and progress
chevrons displayed.
Once this is complete the screen will be filled with information that has been read from
the RDS2 unit and the status message will change back to Ready. Your unit is now
correctly connected and ready for programming.
If the communications settings are not correct you will see the message “Unable to
communicate with RDS Module” (see Figure 2.4). The software application has not
been able to connect to the RDS2 unit through the serial port. Check the selected Com
port in the ‘Options’ drop down menu is correct and try again. If you continue to have
problems close down all applications, check the serial cable and port settings and re-
start the BW RDS2 software.
6

Figure 2.4 BW RDS2 Software Failed Communications sub window.
III - Programming the BW RDS2
3.1 BW RDS2 Software
The software supplied with the BW RDS2 has been designed to provide the user with a
simple way of configuring the most commonly used functions on the RDS2 - (PI, PTY, MS,
AF, TA, TP, DI, CT, PSN, RT). Most of these can be configured in the ‘Basic’ configuration
screen which is the first screen visible after loading the software. Two extra configuration
screens are dedicated to storing text and scheduling information for PSN settings (PSN,
Schedule) and one configuration screen is dedicated to Radiotext (RT).
When the software is run it opens a window as shown in Figure 3.1.
7

Figure 3.1 BW RDS2 Software Basic Configuration Window.
The main program window has four pull down menus always present for configuring program
based settings.
8

File Menu
This menu allows operations for saving and loading configuration files (.BWR).
Configuration files store or load all information except clock time and date. The BW
RDS2 Software Application has its own custom file format for storing the data from
the various fields and checkboxes on the screens. These files have the .BWR file
extension and are generally stored in the “BW RDS2” folder in the main “Program
Files” folder.
New Create a new configuration file. This will reset all settings on
screen to allow a new configuration to be created
Open Open an existing .BWR file and load it to the screen
Save Save screen settings to the current .BWR file.
Save As Save screen settings to a new or alternative .BWR file.
Exit Exit the application in a controlled fashion.
Connection Menu
This pull down menu enables an operator or user to read in or write out all the
controllable settings to the RDS2 Encoder Unit in one operation.
Read All Retrieve all settings from the RDS2 Encoder unit.
Send All Send all settings in screen menus to the Encoder unit.
After successfully connecting to an RDS2 unit using the BW RDS2 software it is best
to load the current configuration in the RDS2 unit by selecting the ‘Read All’
operation from the ‘Communications > Read All’. This will be your starting point for
modifying the RDS2 configuration.
Options Menu
The Options pull down menu (Alt-O) is used to select the serial port and baud rate
used to communicate to the BW RDS2 Encoder unit.
You can select communications ports 1-4 and Baud rates of 2400, 4800, 9600 or
19200.
The selected baud rate must match the baud rate setting on the RDS unit. See Section
XXX
Help
The Help pull down menu (Alt-H) provides version and contact information
BW Website Starts up the browser pointing at the BW website.
BW Email Starts up the email client to the info account at BW.
About Gives basic information about the version of RDS2.
The next level down from the main menu bar has a tabbed selection field with four
configuration screens to select:
9

1. Basic Basic Configuration Screen.
2. PSN PSN Configuration Screen.
3. Schedule PSN Schedule Configuration Screen.
4. Radio Text Radio Text Configuration Screen.
These will be explained in more detail in the following sections.
3.2 Configuration Screen Operations
RDS Settings
Each tabbed configuration screen has a range of settings which are either check boxes,
drop down selection boxes or text entry boxes. When the software starts up the values
shown in each screen will be the program default values. These values do not reflect
any values currently set in the BW RDS2 unit until communication has been
established with the unit.
Control Buttons
Each tabbed screen will also have a CLEAR button and two communication buttons;
READ and SEND. These control buttons will only affect values in the selected
configuration screen.
•Clear Clear (or set to default) the current values in all settings
•Read Update displayed settings with information from the RDS encoder unit.
•Send Send displayed settings to the RDS encoder unit.
The SEND button programs all information shown on the screen into the RDS unit.
Until this button is pressed any changes made to the data fields and check boxes are on
the screen only.
It is good setup practise to READ back from the RDS unit immediately after the
SEND process is complete in order to verify the information that was sent to the unit.
Note:
The SEND button only updates fields on the currently displayed
configuration screen. If you wish to update all current RDS encoder settings
in the program use the “Send All” option from the Connection drop down
menu (Alt-C).
This is most useful after a full range of settings have been loaded from a
configuration file.
An operator should remember that the information displayed in the software
application is internal to the software application and only represents the data in the
RDS2 Encoder unit immediately after a “Read” or “Send” option has been used to
communicate with the unit.
10

If you want to update each item separately during the basic configuration remember to
click on the send button after each change. Alternatively make a number of changes
and then send the data or use the “Send All" option in the "Connection" pull down
menu (Alt-C) when you have finished.
3.3 ‘Basic’ Configuration Screen
On starting the RDS2 software a window will open with the ‘Basic’ configuration screen.
This screen allows the configuration of the most commonly used BW RDS2 functions.
The Basic configuration screen is subdivided into seven areas,
1. Identification (PI)
2. Traffic (TP, TA)
3. Program (PTY, MS)
4. Time and Date (CT)
5. Decoder Identification (DI)
6. Alternative Frequencies (AF)
7. Control buttons CLEAR, READ, SEND
3.3.1 Identification - Program Identification (PI)
What is PI?
The RDS PI number is a four digit hexadecimal code that uniquely identifies a
broadcast network. The PI code is usually issued to a broadcast network by the
licensing authority responsible for the country or region.
The PI code is an essential part of implementing alternative frequency (AF) switching
since an RDS enabled receiver looking for the same radio program being broadcast on
an alternative frequency will check the PI code on the alternative frequency to make
sure it is the same broadcast network.
Important: The PI code should not be left blank or randomly filled with data.
If the BW RDS2 is to be connected to a station that is part of a regional or national
chain broadcasting the same programming content then the PI should be the same for
all transmitters in the chain.
Setting up your PI code
On the Basic configuration screen enter your assigned Program Identification number
into the PI box.
11

The RDS2 will be programmed with this information next time the SEND button is
pressed.
3.3.2 Traffic Announcements (TP, TA)
RDS traffic flags allow users with RDS enabled receivers to identify stations that
broadcast traffic information. Users can configure their RDS enabled receiver to
automatically tune to stations that provide traffic announcements for the duration of
the announcement only.
What is TP?
Many car based RDS enabled receivers have an option where the listener can scan for
stations that broadcast traffic announcements. A station will indicate they have
frequent local or regional traffic information by broadcasting the RDS Traffic Program
(TP) flag.
Setting Up TP
In the “Traffic” Section on the Basic configuration page, check the “Traffic Program”
box to mark the broadcast as carrying “Traffic Announcements”. The RDS2 will be
programmed with this information next time the SEND button is pressed.
What is TA?
For stations already broadcasting the TP flag, shortly before a traffic announcement is
about to take place, the Traffic Announcement (TA) flag should also be broadcast.
RDS enabled receivers with this feature selected will detect the TA flag and tune the
receiver to the station broadcasting the traffic information. When the traffic
announcement has finished the TA flag should cease to be broadcast. When the TA
flag is no longer broadcast the RDS enabled receiver will return to the previous
listening material.
Broadcasting the TA flag
Shortly before a Traffic announcement is made the “Traffic Announcement” button
should be clicked on, this automatically sets the TA flag in the RDS output, and the
button appears depressed on the screen.
Unlike most settings, the Traffic Announcement button is a ‘Real-Time’ button that
results in immediate communication with the RDS unit. Pressing this button will
cause the TA flag to be set in the output without having to press the SEND button.
12

When the traffic announcement is finished the “Traffic Announcement” button should
be clicked again so that it is released, and the consumers RDS enabled receiver can
revert back to it’s previous in-car entertainment mode.
Note
The BW RDS2 also has the ability to trigger the TA flag using
hardware triggers located on the CONTROL port on the back of the
unit. See Appendix XXX for more information.
3.3.3 Program Settings
What is Program Type (PTY)?
The PTY setting allows a broadcaster to indicate the format or genre of the material
they are broadcasting. Most broadcasters will set this once to indicate their format
(i.e. for a Rock Music station) however PTY information can be changed dynamically
on a varied content broadcast.
The Program Type (PTY) information can be used by RDS enabled receivers to allow
the listener to scan for stations based on their entertainment preference.
PTY NO. PTY CATEGORIES PTY NO. PTY CATEGORIES
0 None/Undefined 16 Weather
1 News 17 Finance
2 Affairs (current) 18 Children (programs)
3 Information 19 Social (affairs)
4 Sport 20 Religion
5 Education 21 Phone-In
6 Drama 22 Travel
7 Culture 23 Leisure
8 Science 24 Jazz (music)
9 Varied 25 Country (music)
10 Pop Music 26 National (music)
11 Rock Music 27 Oldies (music)
12 Easy Music (M.O.R) 28 Folk (music)
13 Light Classics 29 Documentary
14 Serious Classics 30 (Alarm) Test
15 Other Music 31 Alarm
Table 3.1 Program Type (PTY) Numbers and Categories
13

Setting up PTY
On the ‘Basic’ configuration screen click on the downwards facing arrow in the
“Program Type” box in the “Program” Section and select the appropriate
programming content type. It is important to use the correct Program Type as some of
the types are reserved for special features such as emergency announcements.
Note
If you will be changing the program type throughout your broadcast,
ensure the ‘Dynamic PTY’ box is checked in the ‘Decoder
Identification’ section of the configuration screen.
The RDS2 will be programmed with this information next time the SEND button is
pressed.
What is the Music/Speech setting?
An RDS enabled receiver has two user definable presets that can be set up to give
optimum performance when the station caries mainly music or speech. This will be
selected based on the MS flag.
Setting up the MS flag
Select the appropriate option in the Music/Speech box.
The RDS2 will be programmed with this information next time the SEND button is
pressed.
3.3.4 Time and Date - The RDS2 Internal Clock
The BW RDS2 unit contains an internal clock that is primarily used for triggering the
PSN Scheduler (See Scheduler Configuration Page) but can also be used for
broadcasting time and date (CT) information.
Clock time and date information is often used by RDS enabled receivers to
synchronise their own internal clocks. Because of this, CT information should only be
broadcast if the accuracy of the time can be verified.
14

Setting the Internal clock
The “Time and Date” section on the Basic configuration screen has two time and date
display boxes - PC & RDS. The top display box (PC) displays the current time and
date on the PC on which the software application is running. The second display box
(RDS) shows the time and date when CT information was last read from the BW
RDS2 unit. The RDS time shown in this window only changes when the READ
button is pressed or the ‘Connection > Read All’ operation is used.
Below these fields are three buttons,
1. Enable: This enables the RDS encoder to broadcast clock time information
(CT). This button is a ‘Real-Time’ button and does not require the SEND button
to be pressed to have an effect.
2. Sync: Pressing this button will instantaneously synchronise the two displayed
clocks by copying the time and date information from the PC field into the RDS
field. It does not copy the information into the BW RDS2 unit until the data is
sent by either the SEND button or the “Connection > Send All” operation.
3. Modify: This button allows you to manually modify the RDS field date and time
information (see Figure 2.4). RDS time is always set as UTC (GMT) time plus or
minus an offset to reflect the time zone that the unit is being operated in.
Figure 2.4 BW RDS2 Time & Date modification sub window.
The RDS2 will be programmed with this information next time the SEND button is
pressed.
15

Avoiding Changes to Time and Date
Immediately below the two Time and Date fields is a checkbox “Send (CT)
Information”. This checkbox controls whether the time and date information
indicated on the screen is sent to the RDS encoder when the SEND button is pressed
or the ‘Communications > Send All’ operation is activated.
This option has been included to allow users to change settings on the basic
configuration page and update them by pressing the SEND button without having to
ensure the displayed clock time is accurate before each SEND operation.
If you are changing other information on the screen but don’t want to modify the time
in the RDS when you click on the ‘SEND’ button, make sure that the ‘Send CT
Information’ checkbox is unchecked.
3.3.5 Decoder Identification (DI) and Dynamic PTY
What is DI?
Decoder Identification allows a broadcaster to provide information about the technical
format of the material being broadcast. The primary use of the DI signal is to indicate
whether the material is broadcast in stereo or mono.
An addendum to the RDS DI signal is ‘Dynamic PTY’. This flag was added to allow
stations with varying formats (see PTY section XXX) to identify themselves. RDS
enabled receivers are able to continuously monitor PTY information from stations that
have the Dynamic PTY flag set and can then make station changes based on updated
PTY information. Stations with a fixed PTY will not be continuously monitored.
Configuring your DI settings
For most non specialised small or local broadcast stations with constant programming
type the transmission will be either in Stereo or Mono and the Program Type (PTY)
information will remain constant. Therefore only the ‘Stereo’ check box would need to
be selected.
The Stereo checkbox should be unchecked when mono transmission are sent out as an
RDS receiver can switch the audio presets in the receiver to give better quality. This is
useful for stations making traffic announcements as it will often improve the audio
quality in a vehicle.
16

For broadcast stations with constant programming type (see Program Type above) the
Decoder Identification section has the Dynamic PTY field cleared. However if the
broadcast program content changes during the day, and the Program Type (PTY) field
is changed accordingly then the Dynamic PTY check box should be checked.
The RDS2 will be programmed with this information next time the SEND button is
pressed.
3.3.6 Alternative Frequencies - Broadcast Group Frequency Identification
(AF)
What is AF?
If a broadcaster is part of a regional group of stations, RDS Alternative Frequency data
can be used to provide information about the frequencies used by other stations
broadcasting the same program.
If the signal level drops below a certain threshold on a particular frequency, the RDS
enabled receiver can scan through the AF list and automatically tune in to the strongest
alternative signal broadcasting the same program
Important:
All RDS encoders on these transmitters must have the same Program
Identifier (PI) for this to work.
Although the RDS specification allows for up to 25 alternative transmitter frequencies,
each transmitter should only have a frequency list that is based on the other
transmitters that can be received in its locality. This is to prevent wasted time scanning
for stations that cannot be received clearly.
Setting up your AF list
First ensure your PI is set correctly and is the same for the stations you will include in
your AF list.
On the Basic configuration screen, simply fill in the text fields from left to right with
the closest geographically located station on the left to the furthest station on the right.
The RDS2 will be programmed with this information next time the SEND button is
pressed.
3.4 ‘PSN’ Configuration Screen
17

The RDS Program Service Name (PSN) signal was developed to allow broadcasters to
identify themselves on an RDS enabled receiver by sending up to eight (8) characters of text
at a time to be displayed on the receiver.
As well as station ID information, the RDS PSN signal is now commonly used for
broadcasting information about radio station contacts, competitions, song and artist
information and more.
3.4.1 Understanding PSN Pages in the RDS2
The BW RDS2 ‘PSN’ configuration screen allows you to configure up to 10 pages of
information. Each PSN page has 50 available lines - grouped across 5 columns - with
each line having 8 characters.
The ACTIVE Page
Although the BW RDS2 can store 10 pages of PSN information it will only broadcast
data from one page at a time. This is known as the ACTIVE page. There is no
indication of which page is currently ACTIVE. Setting which page is ACTIVE can be
done manually by selecting the page to be activated and pressing the ‘MAKE
ACTIVE’ button or automatically by the PSN Scheduler (See Section XXX).
Enabled Lines
Within a PSN page, if any text has been entered on a line, that line will be ‘Enabled’.
‘Enabled’ lines are visible by their grey colour. If a line is grey but does not appear to
have any text visible it may have a ‘space’ entered.
18

The Line Timer
Each PSN Page will also have a line timer value at the bottom that can be set between
1 and 99 seconds.
Broadcasting PSN Information
While a page is ‘ACTIVE’ the BW RDS2 will broadcast in a sequence each individual
‘Enabled’ line for the amount of time indicated by the Line Timer. If a page has only
one Enabled line the PSN information will be ‘Static’. If more than one line is
Enabled the PSN information will be ‘Dynamic’. If the PSN page is still ACTIVE
after the last Enabled line has been broadcast, the sequence will begin again from the
first Enabled line.
Example: In the screen above, if Page 1 is ACTIVE, the PSN information that will be
broadcast is:
Text1 broadcast for 1 second
Text2 broadcast for 1 second
Text3 broadcast for 1 second
Text1 broadcast for 1 second
Text2 broadcast for 1 second
…
This cycle will continue for as long as Page1 is ‘ACTIVE’.
Dynamic PSN
The ability of the RDS2 to broadcast a sequence of PSN lines each for a set amount of
time makes it possible to overcome the previous restrictions of only having 8
characters in which to display any message. Constantly changing the PSN allows
messages to be broadcast using a sequence of words in small groups or even allows
scrolling messages to be broadcast by broadcasting a sequence of lines that change by
only one character at a time.
Caution
Although Dynamic PSN is a popular function of capable RDS
encoders, both the RDS and RBDS specifications deprecate the use of
dynamic PSN’s for safety and technical reasons.
The two main issues with Dynamic PSN’s are,
•Safety : Dynamic PSN can distract a vehicle driver which
increases the likelihood of road traffic accidents.
•Technical : An RDS receiver automatically copies the last PSN
received into it’s internal memory, so that the next time the frequency
is tuned the PSN in memory is displayed until a new PSN is received.
This often gives rise to garbage messages appearing on the receiver
display causing confusion to the listener. Also various RDS chip
manufactures have designed their RDS chips in different ways and
19
Table of contents
Other BW Broadcast Media Converter manuals